Beta Release — 26-02-2026
📌 Overview
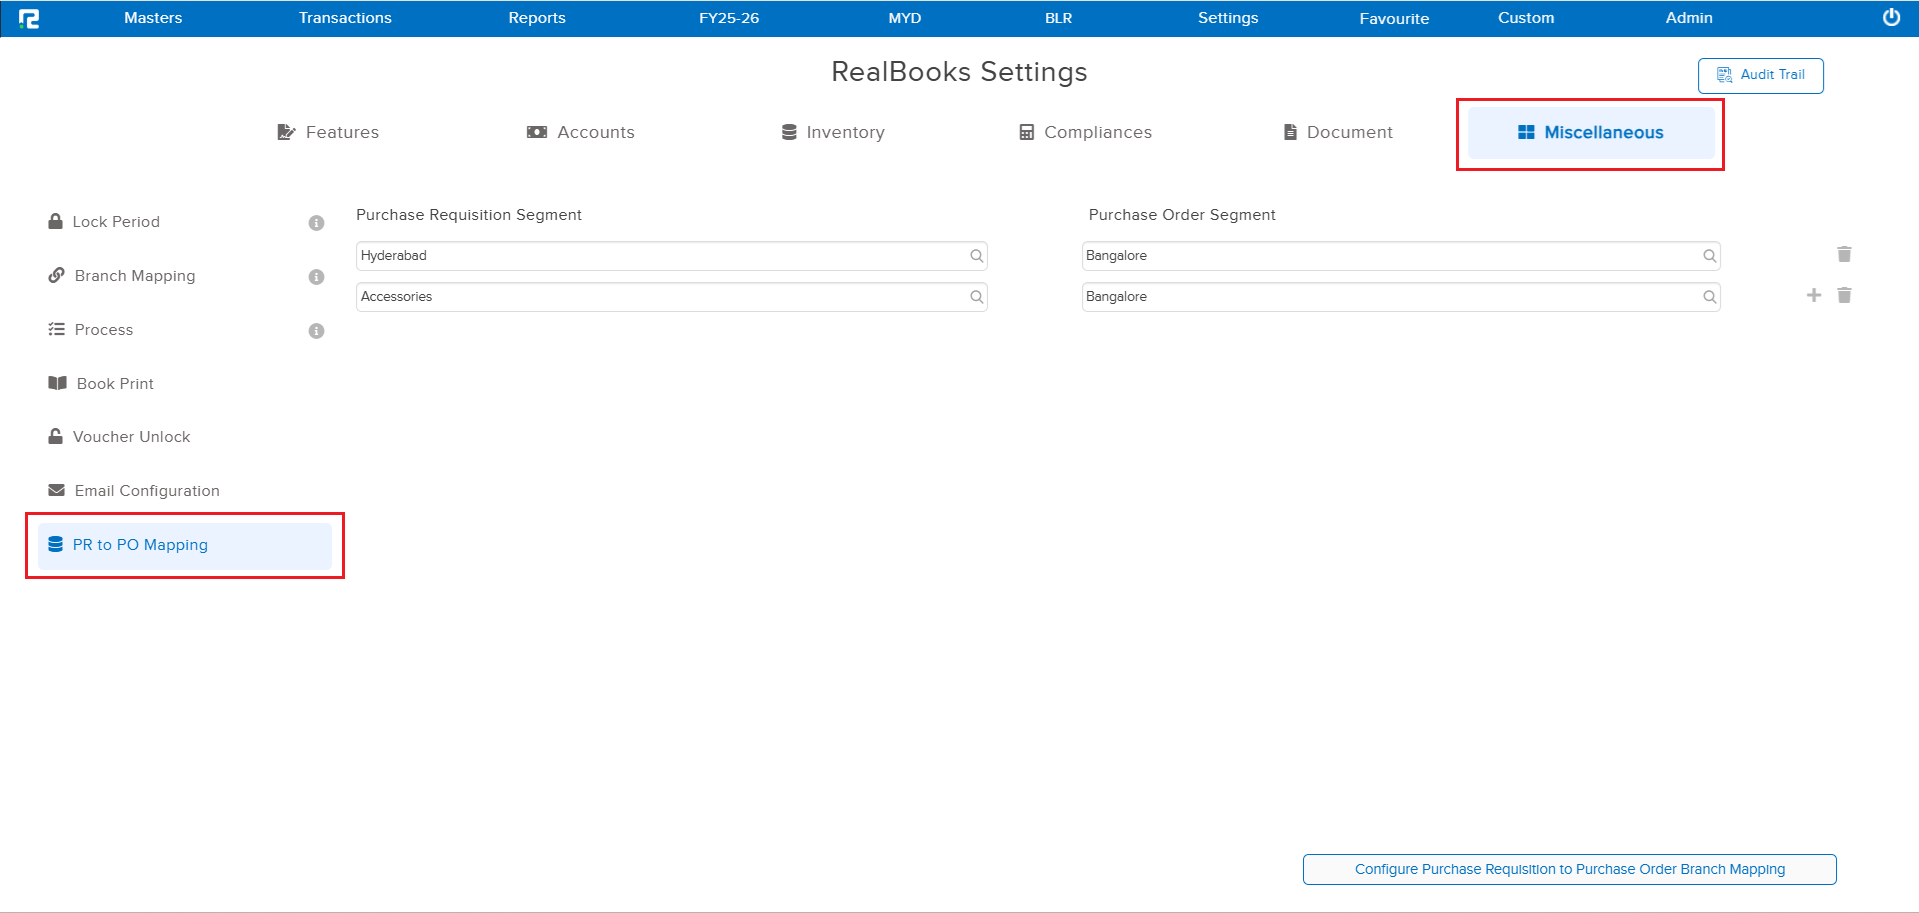
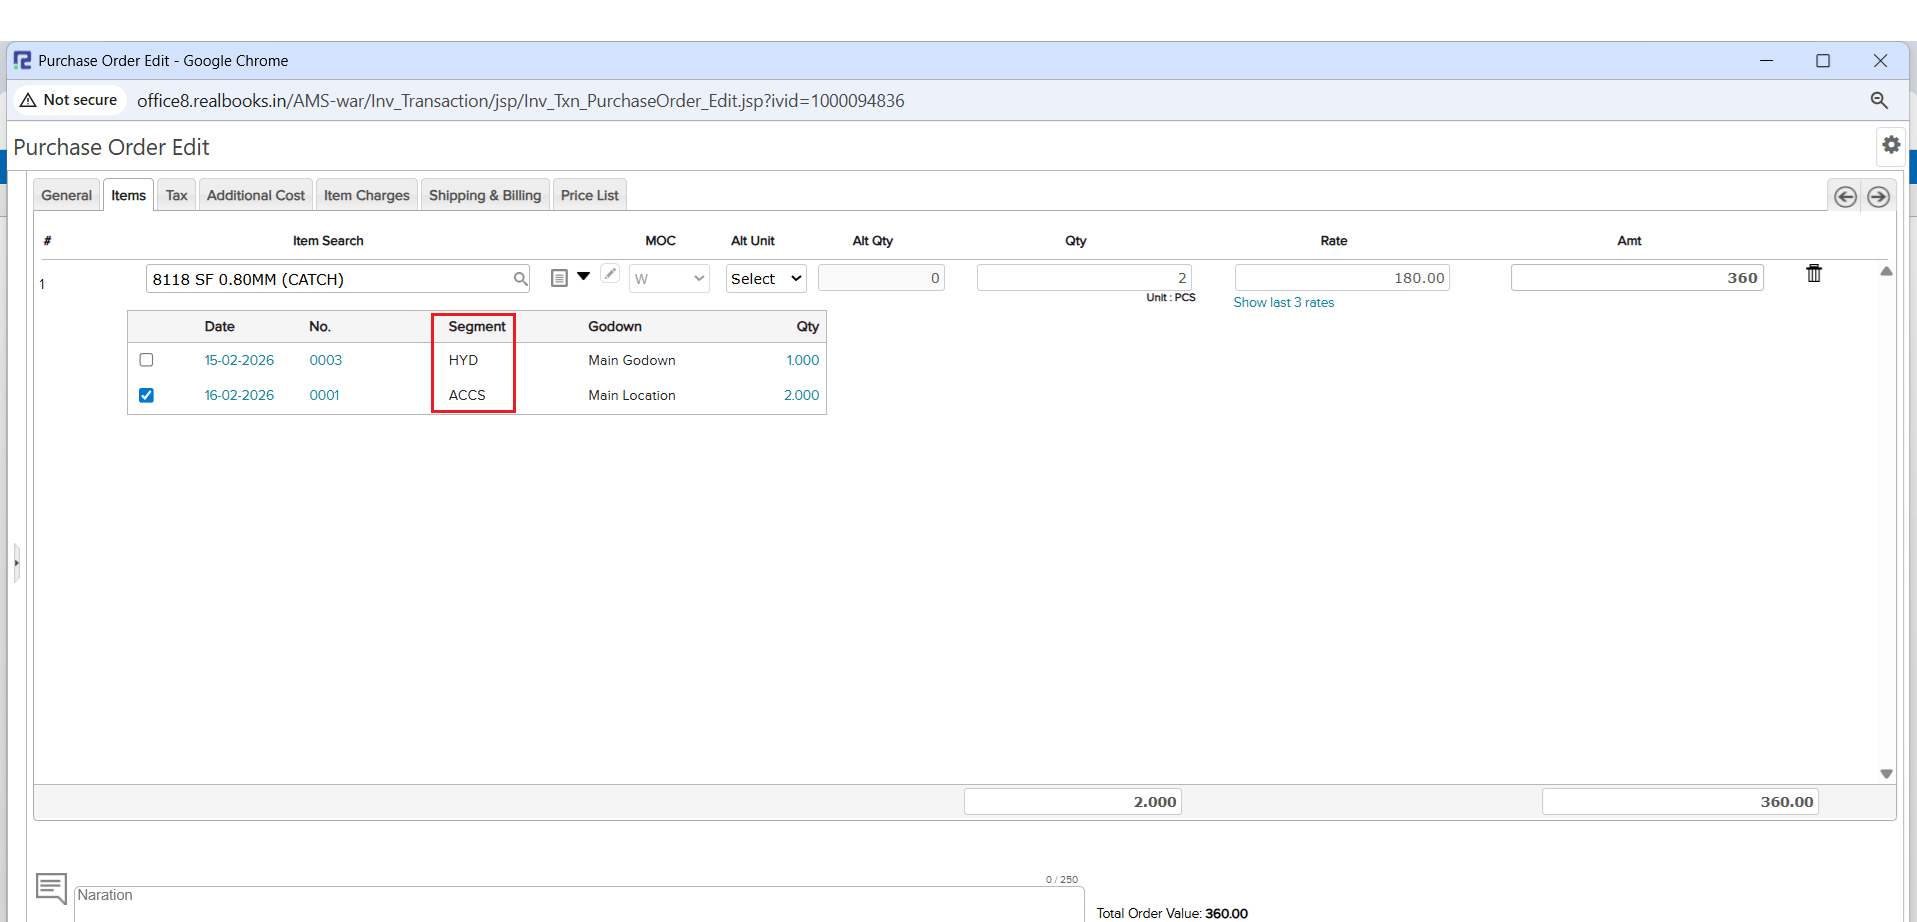
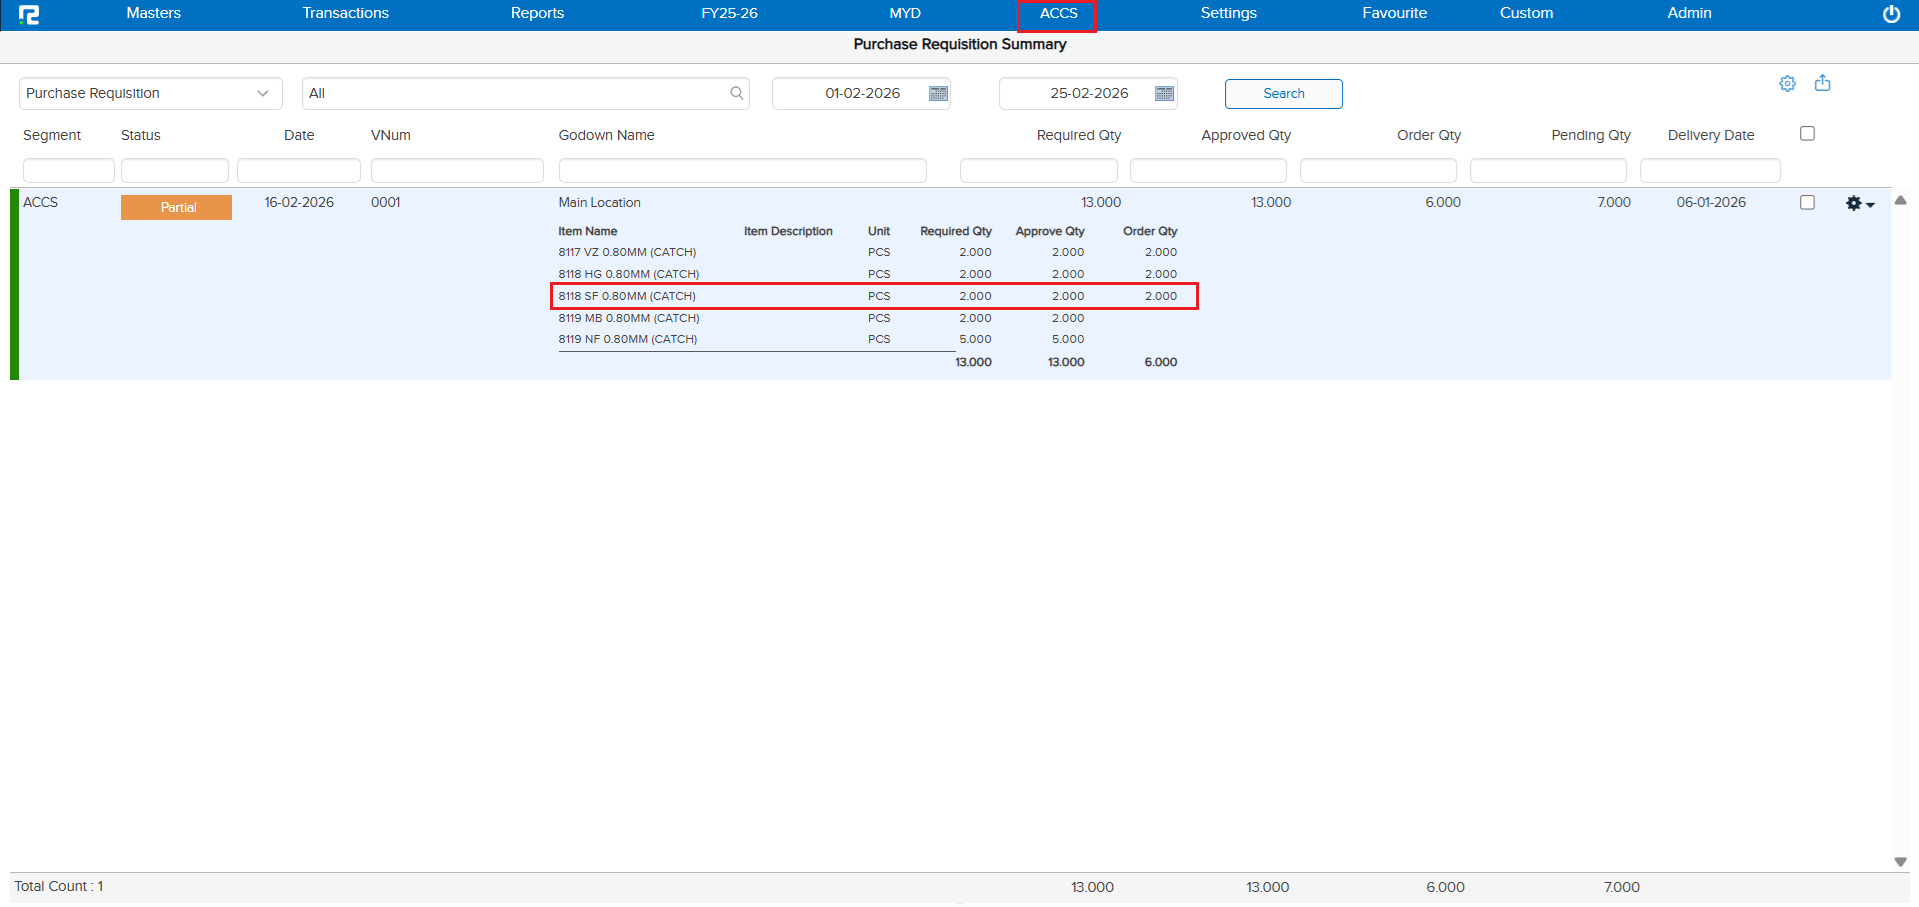
If your organization handles purchasing centrally — say, your Bangalore office creates Purchase Orders for requisitions coming from Hyderabad and Accessories segments — this feature is made for you! You can now map multiple segments to a centralized Purchase Order segment, so all Purchase Requisitions flow into one place.
🌟 What This Means for You
No more creating separate Purchase Orders in each segment. Your central procurement team can now see and tag Purchase Requisitions from across the organization, all from a single segment. This saves time, reduces duplication, and streamlines your procurement process.
🛠 Quick Setup
Simply map which segments should feed into your centralized PO segment, then click save. It’s that easy!
🎬 Example
Let’s say Hyderabad and Accessories segments raise Purchase Requisitions, and Bangalore handles all purchasing:
1. Map Hyderabad → Bangalore and Accessories → Bangalore.
2. When creating a PO in Bangalore, you’ll see PRs from both segments ready to be tagged.
📷 See It in Action
📌 Overview
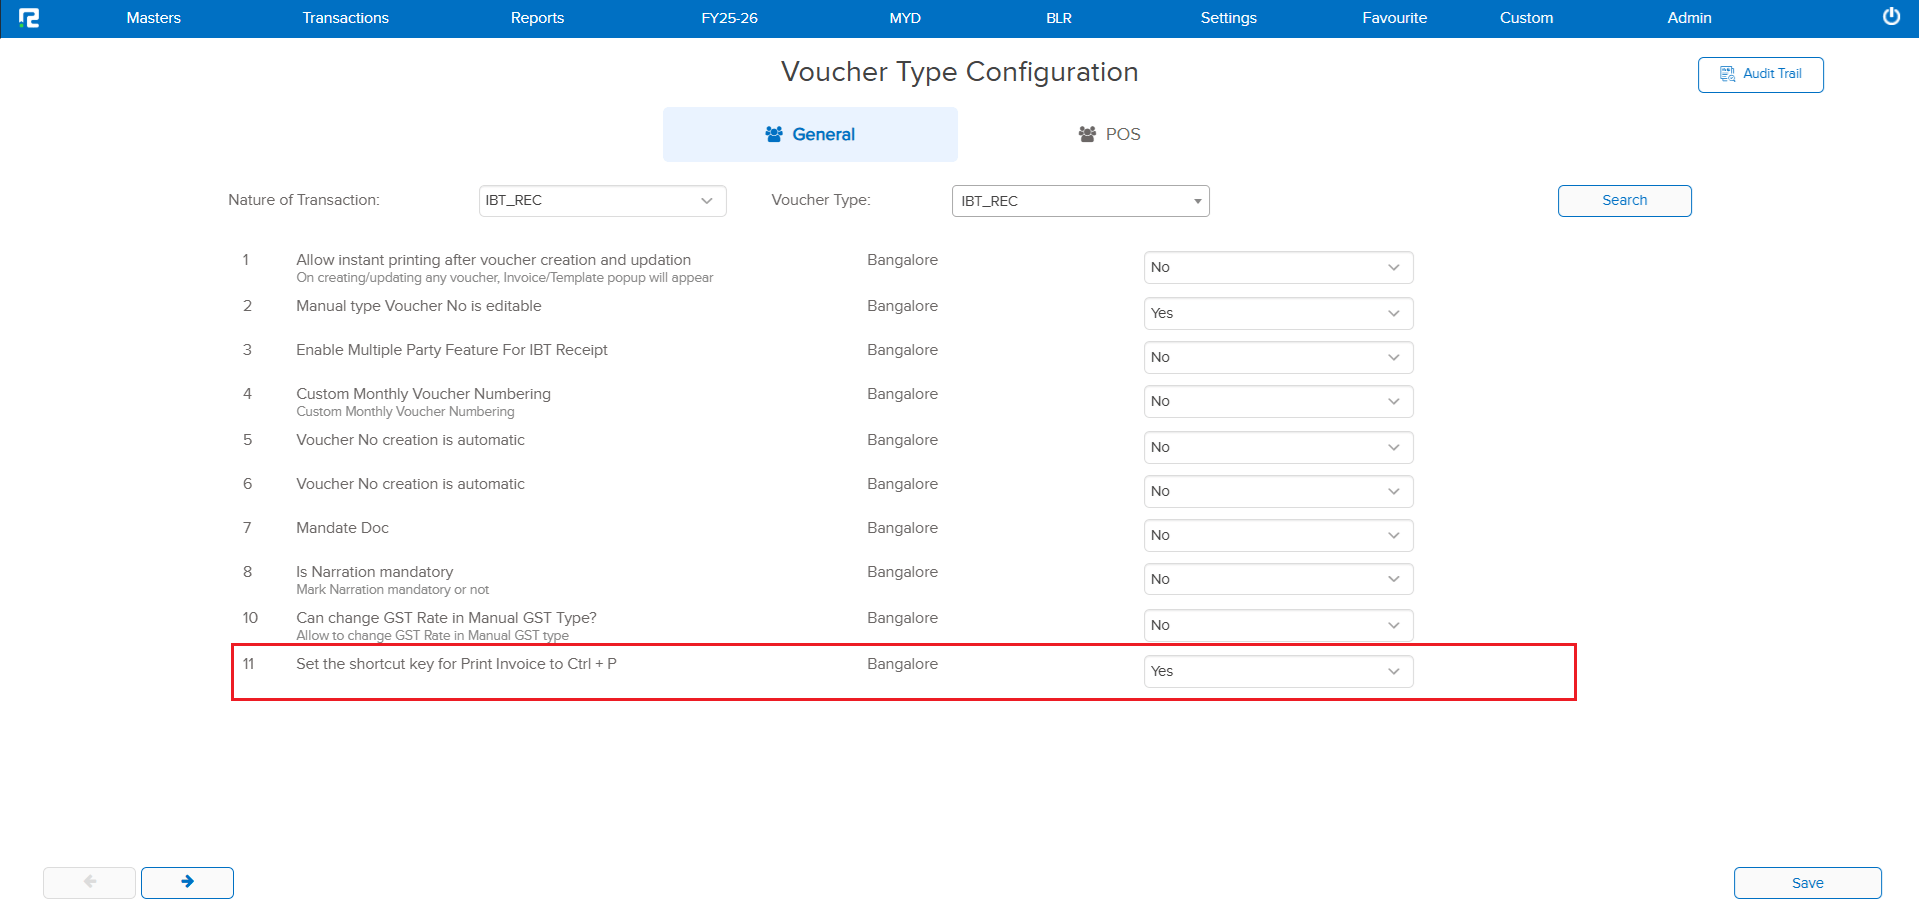
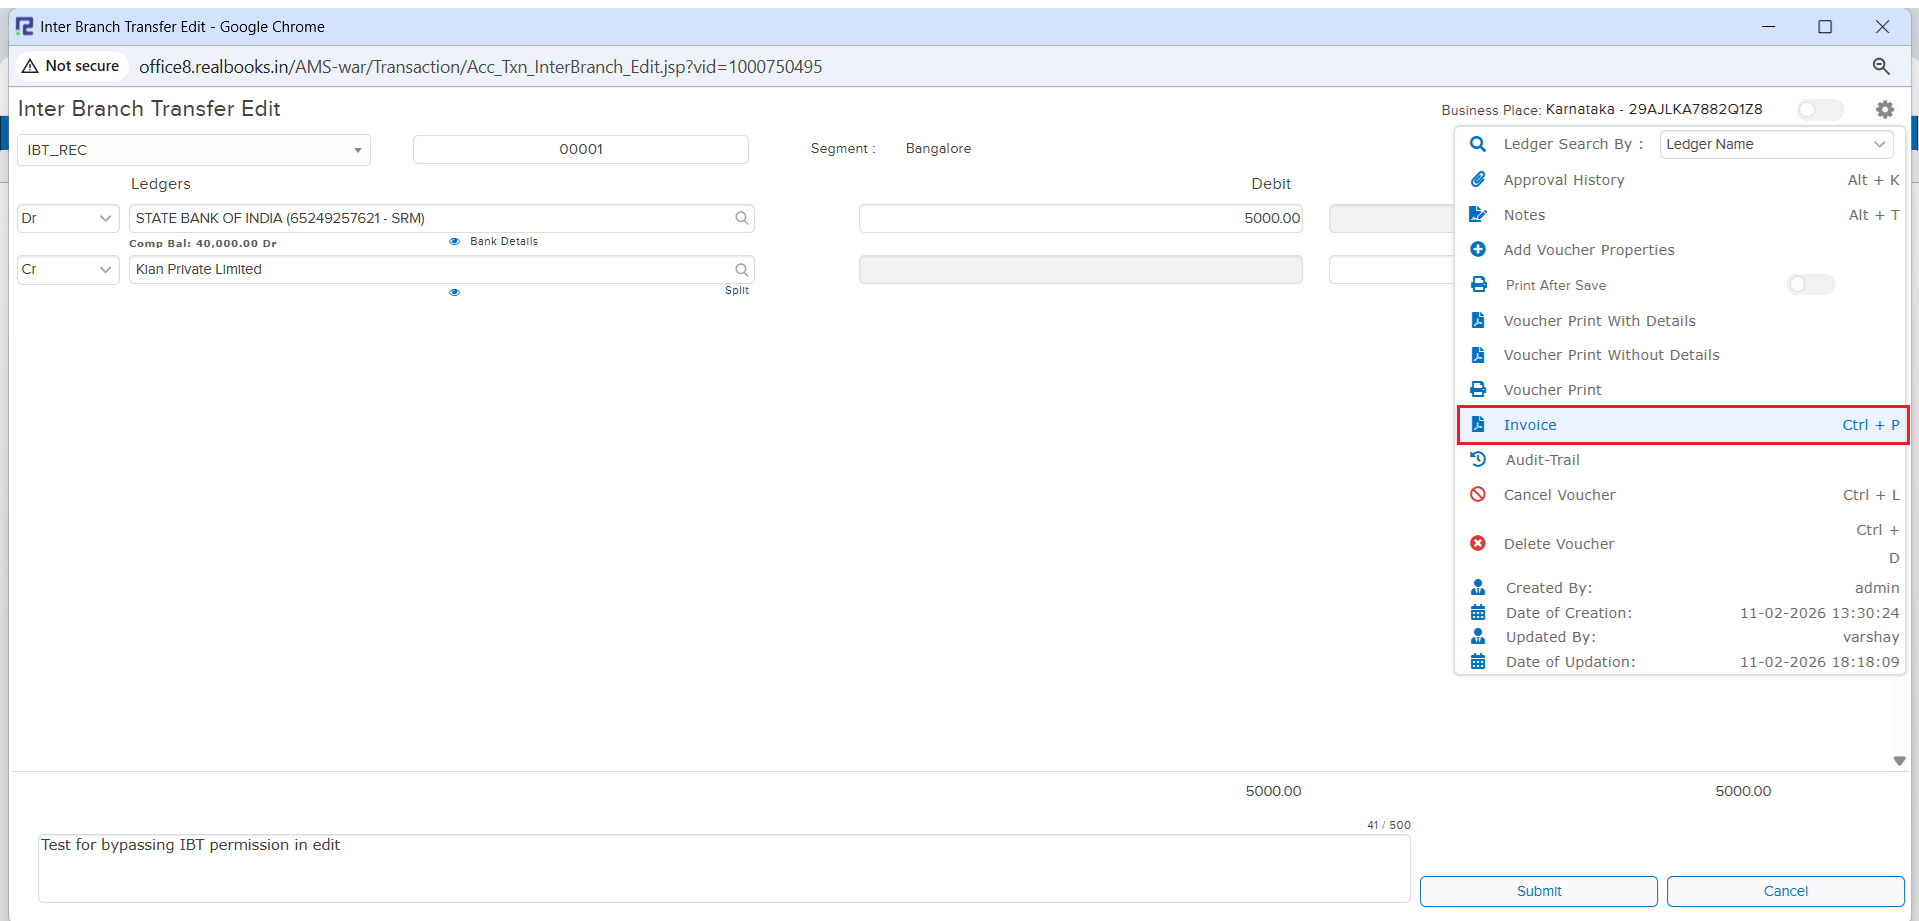
We know Ctrl + P is the universal shortcut for printing — and now you can use it in RealBooks too! Previously, you had to press Ctrl + Y to print voucher templates from the IBT_REC edit screen. With this update, you can enable the familiar Ctrl + P shortcut through a simple configuration.
🌟 What This Means for You
No more remembering a different shortcut! Enable Ctrl + P and print your IBT_REC voucher templates instantly using the shortcut you already know and love.
🛠 How to Enable It
It’s just a one-time setup:
1. Select IBT_REC as the Nature of Transaction.
2. Set the parameter of “Set the shortcut key for Print Invoice to Ctrl + P” to Yes.
3. That’s it! Now open any IBT_REC voucher in edit mode and press Ctrl + P to print.
📷 See It in Action
📌 Overview
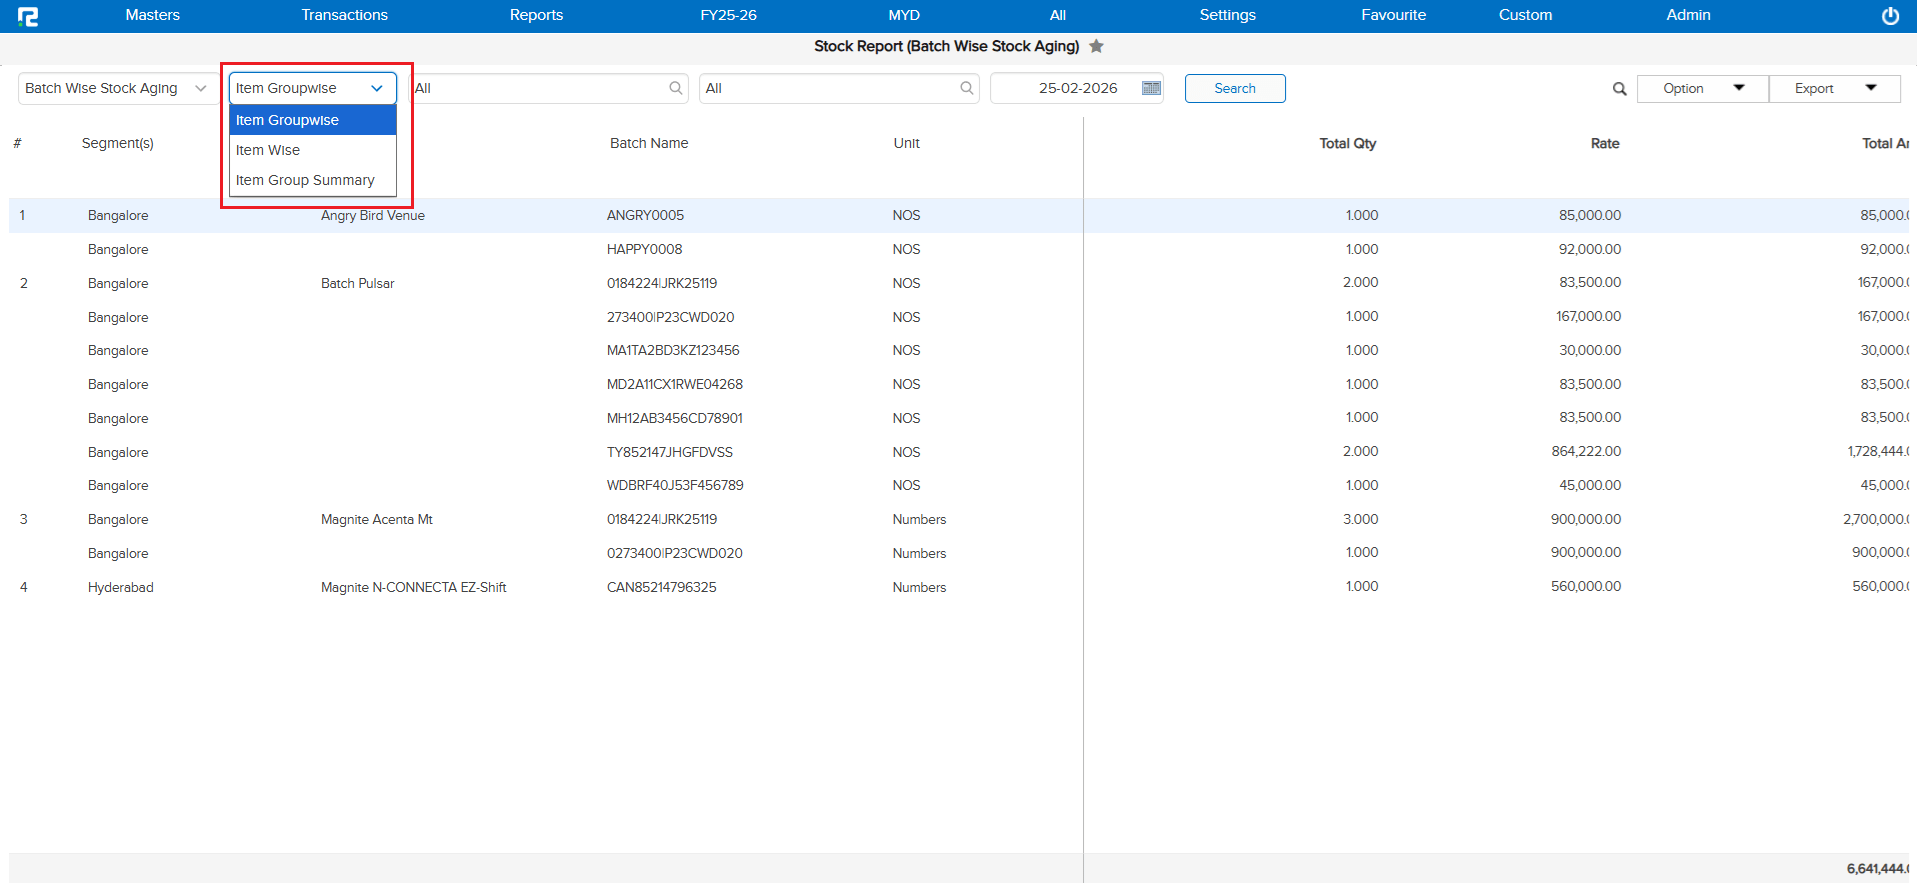
Love working with Pivot Tables in Excel? Now you can export your Batch Wise Stock Aging report directly in pivot-ready format! This works across all three report variations: Item Groupwise, Item Wise, and Item Group Summary.
🌟 What This Means for You
No more manually reformatting data in Excel. The pivot export gives you a ready-to-analyze structure, saving you time and effort when reviewing your inventory aging.
🎬 How to Use It
1. Select your preferred variation.
2. Click Export.
3. Choose Excel Pivot — done!
📷 See It in Action

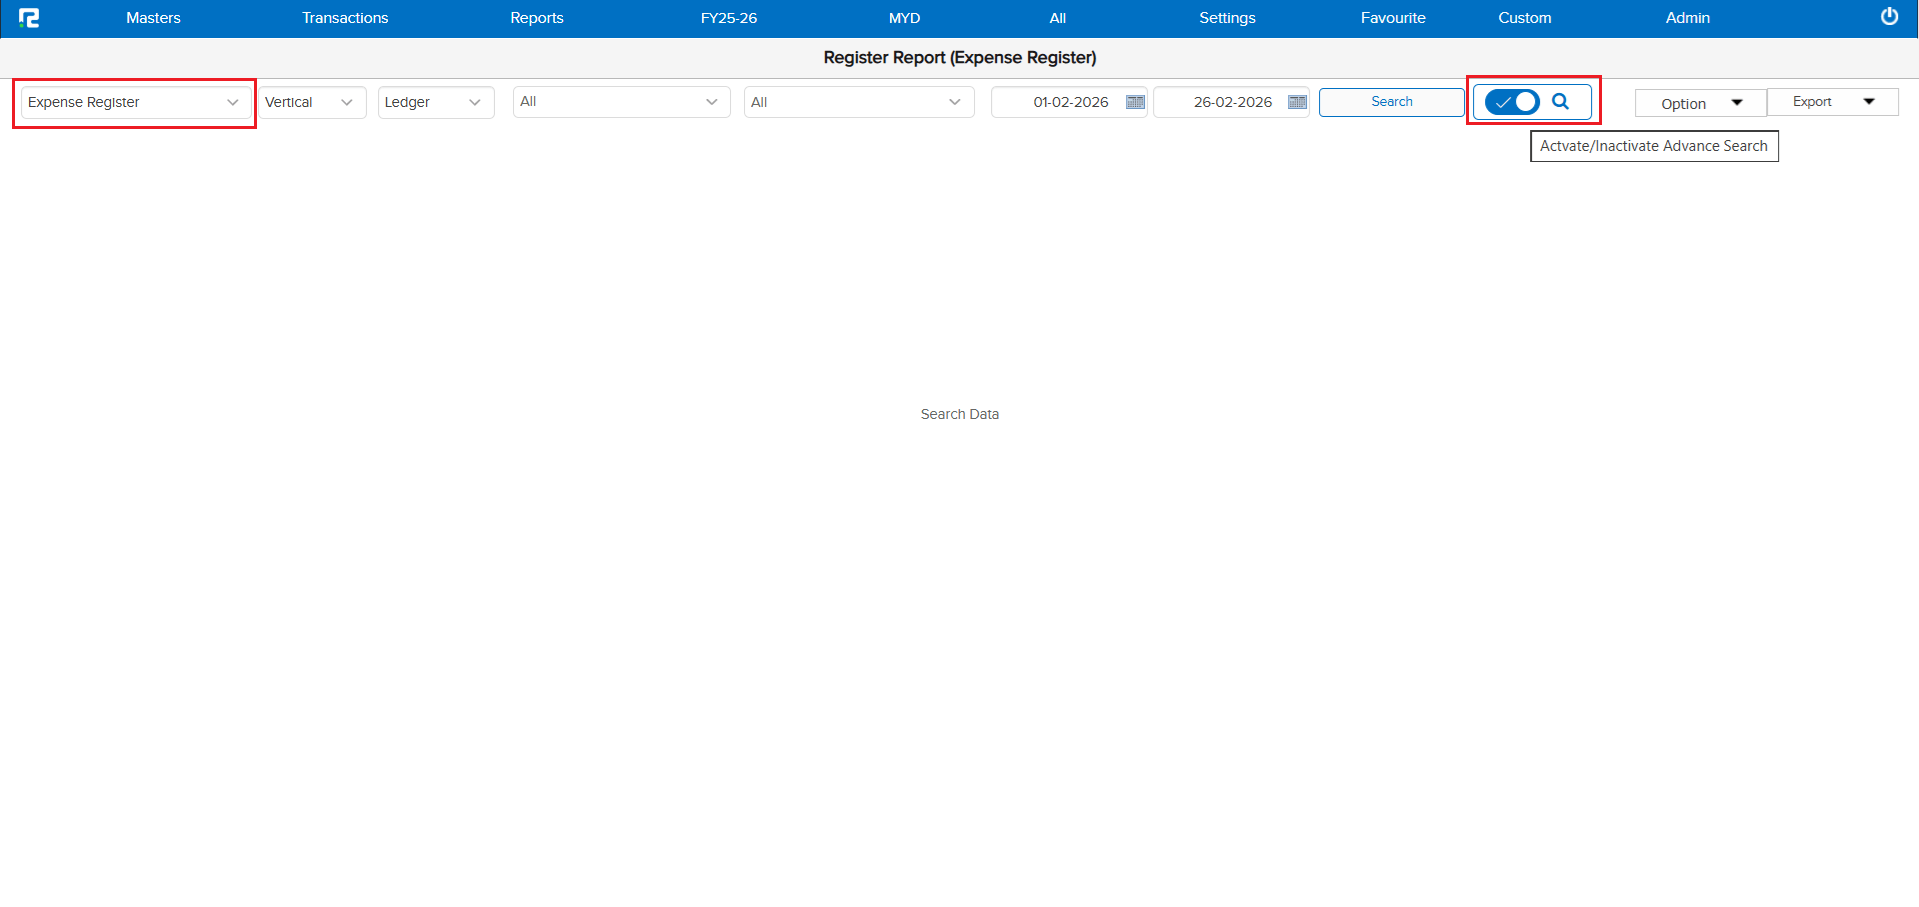
📌 Overview
Tired of waiting for the Expense Register to load when you have thousands of entries? We’ve added a smart new option! You can now download your filtered data directly to Excel without the page needing to display all that data first.
🌟 What This Means for You
Faster exports, no more browser freezes, and you get exactly the data you need in Excel. Use the toggle to switch between viewing on screen or downloading directly — the choice is yours!
🎬 How to Use It
1. Turn on the Advance Search toggle.
2. Set your filters.
3. Click Export to download directly, or Search to view on screen.
📷 See It in Action
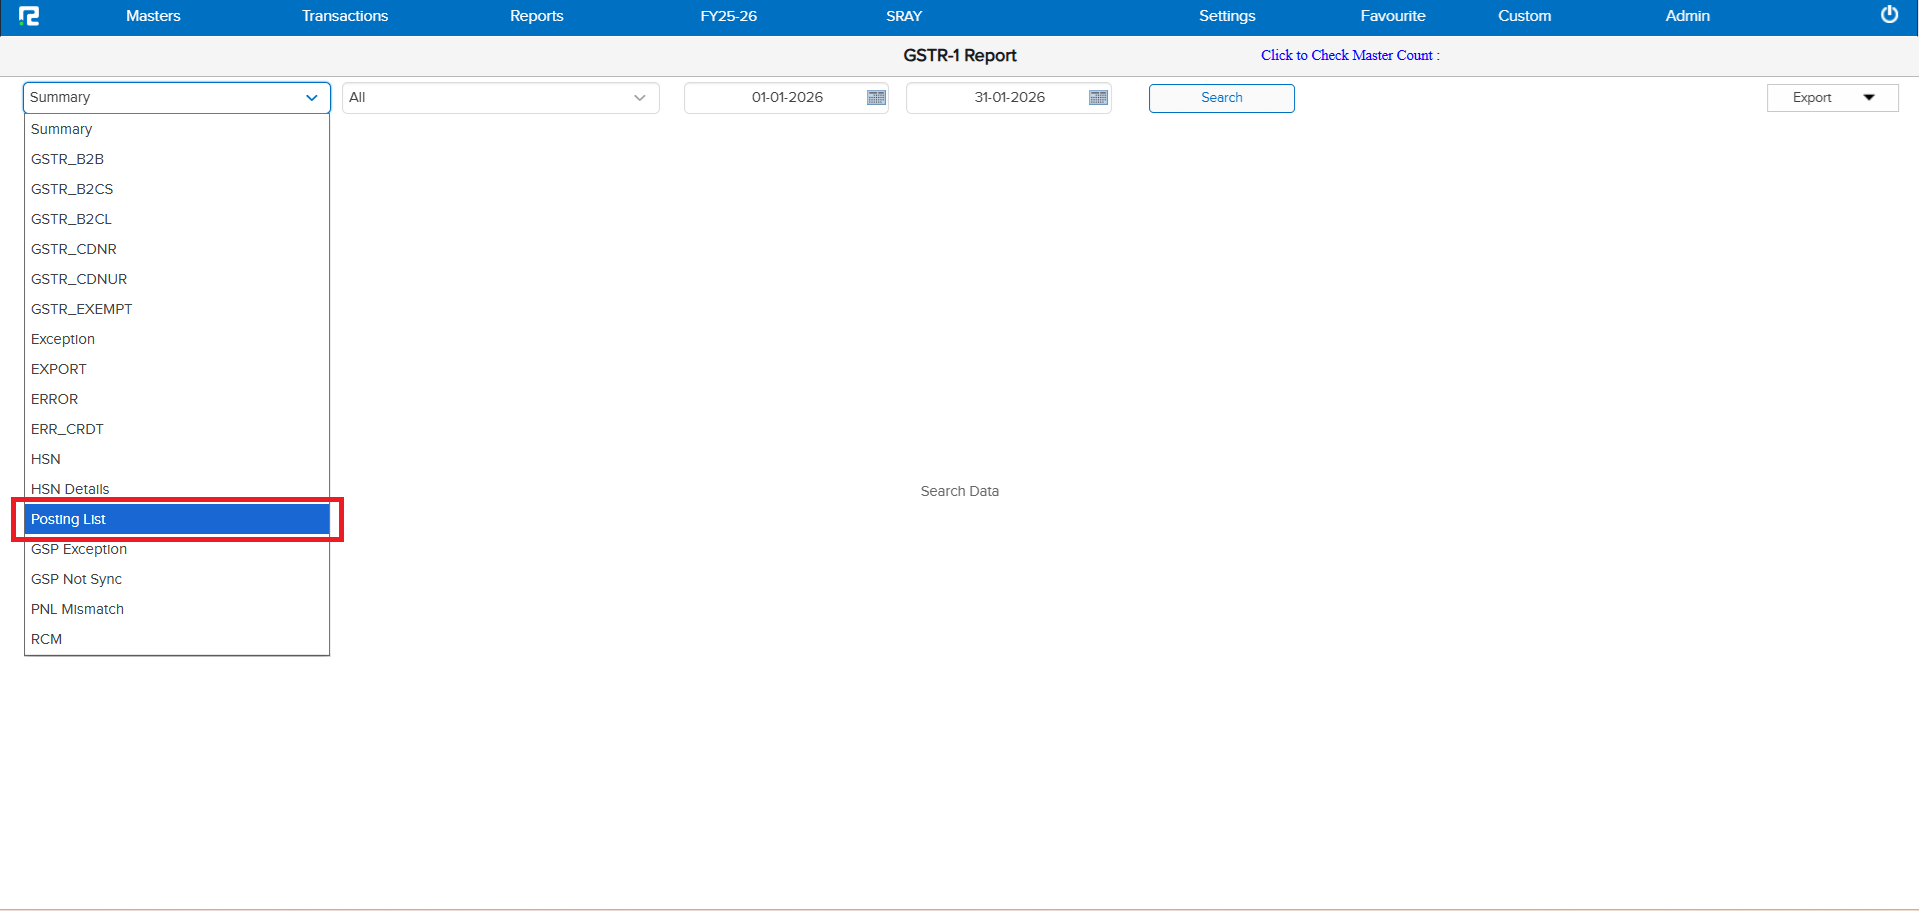
📌 Overview
Great news for businesses that file GSTR-1 on a quarterly basis! Until now, RealBooks only supported monthly filing. We’ve added a brand new Quarterly option that lets you select and post GSTR-1 data by quarter — Quarter 1 through Quarter 4.
🌟 What This Means for You
If your business files quarterly, you no longer need to manually combine monthly data. Simply select your quarter, and RealBooks handles the rest. Faster filing, fewer errors, and full compliance support.
🎬 How to Use It
1. Go to the GSTR-1 Report.
2. Select Posting List.
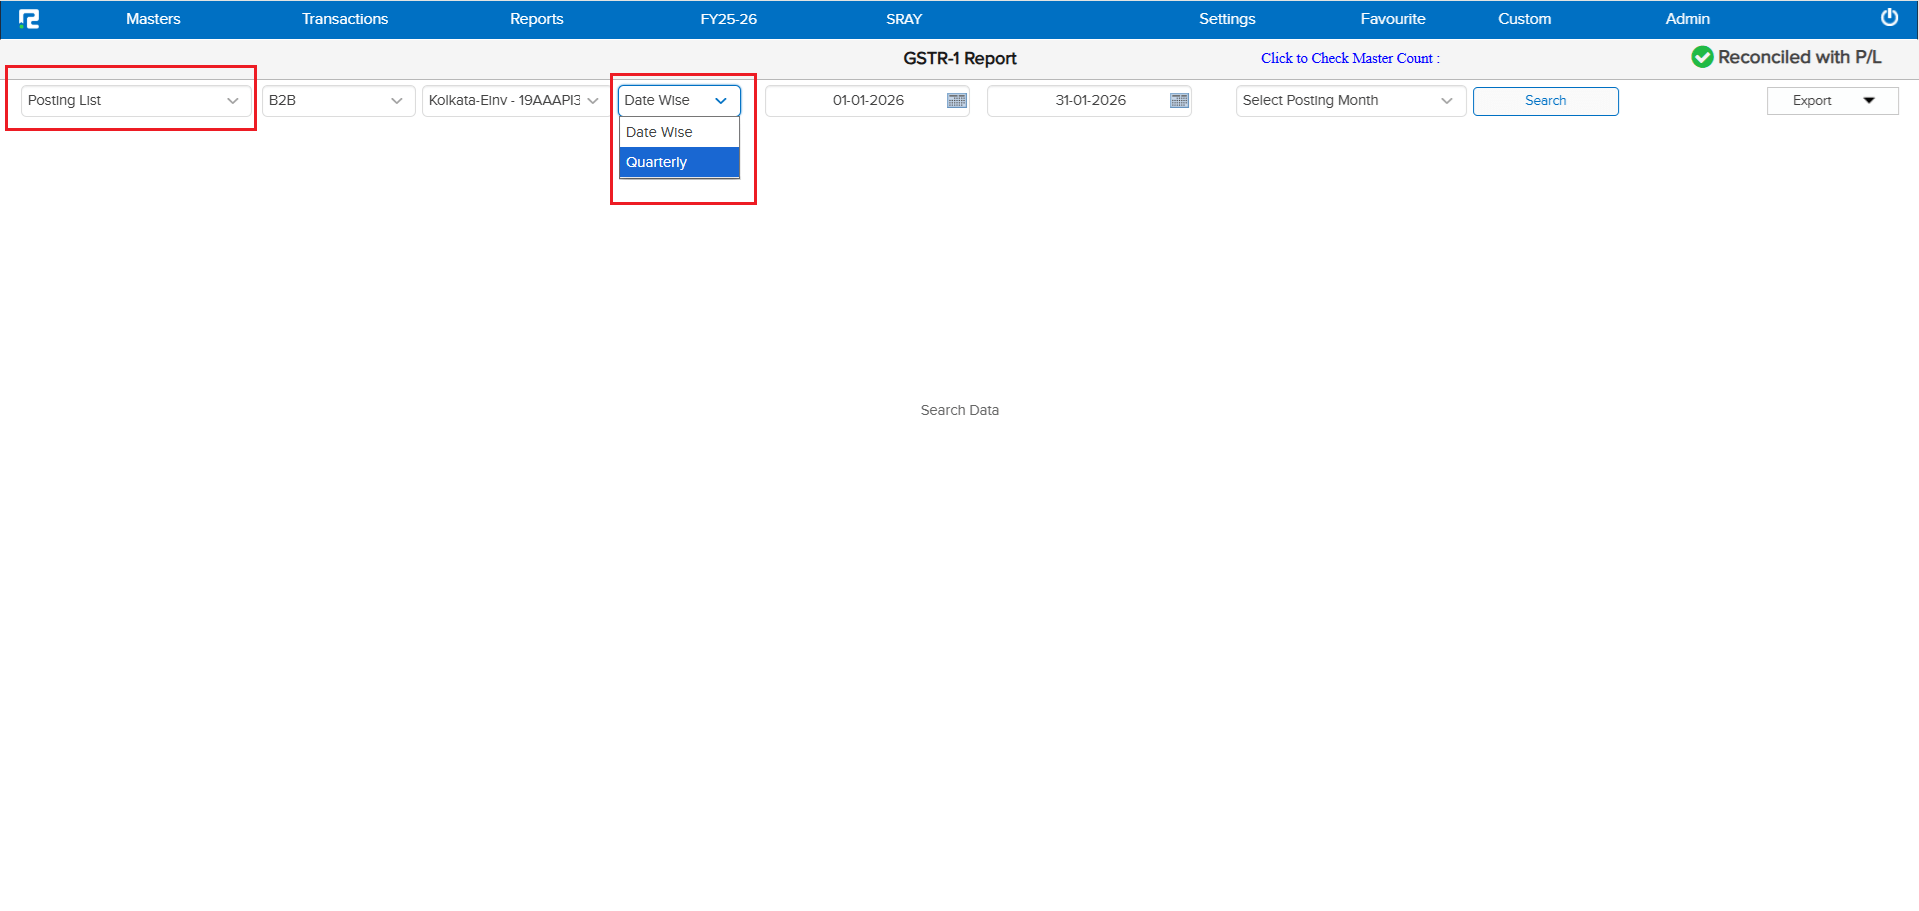
3. Choose Quarterly from the dropdown.
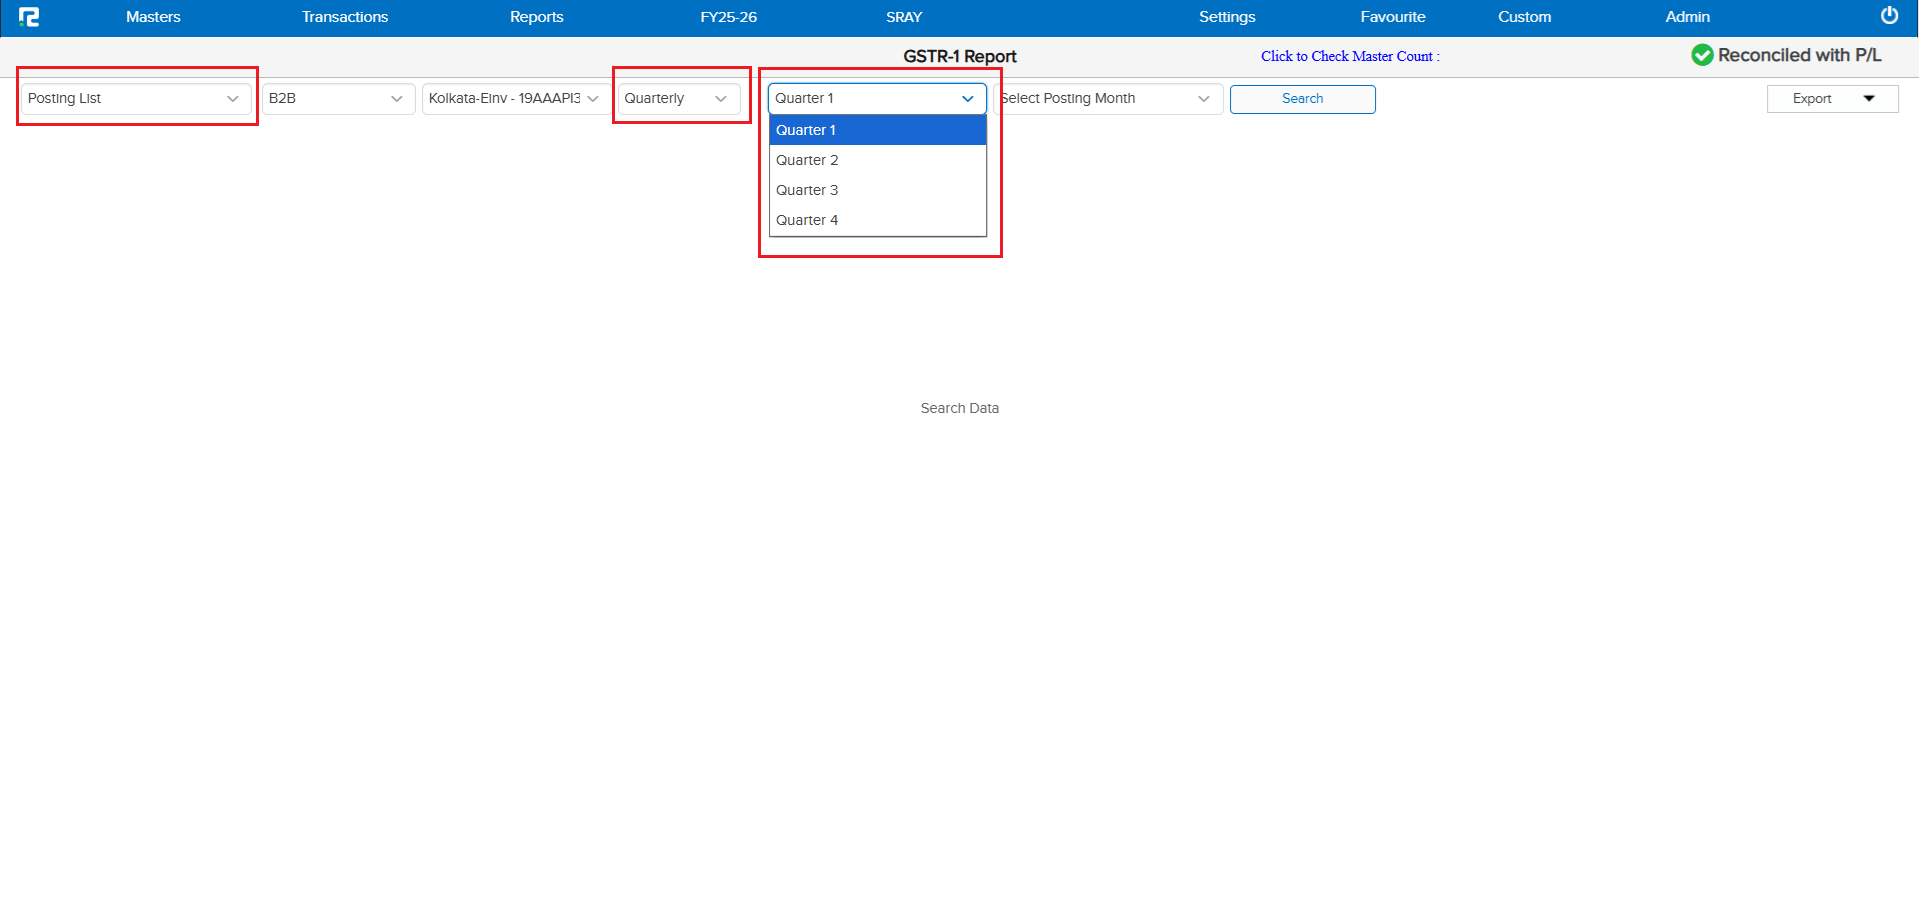
4. Pick your quarter (Q1, Q2, Q3, or Q4).
5. Click Search and you’re all set!
📷 See It in Action
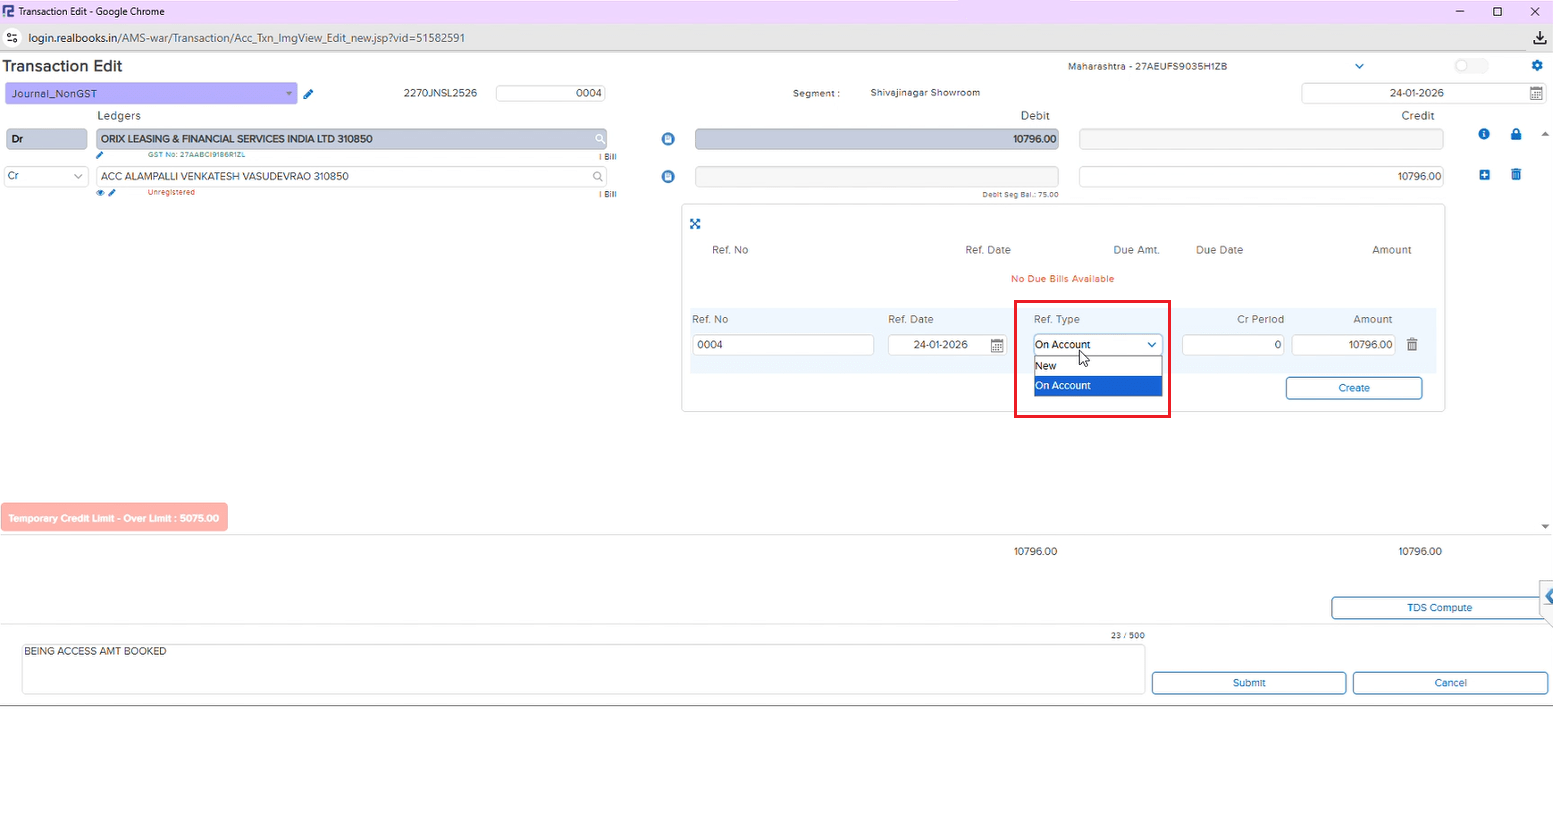
📌 What Was Happening
If you were working with a Journal entry that had two parties with the same bill number and one party’s bill was tagged — the other party’s reference type got stuck. You couldn’t switch it from “New” to “On Account”, which meant extra workarounds.
🌟 What This Means for You
This is now fixed! You can freely change reference types for any party, regardless of what’s happening with the other entries. Your workflow stays smooth and uninterrupted.
📷 See It in Action
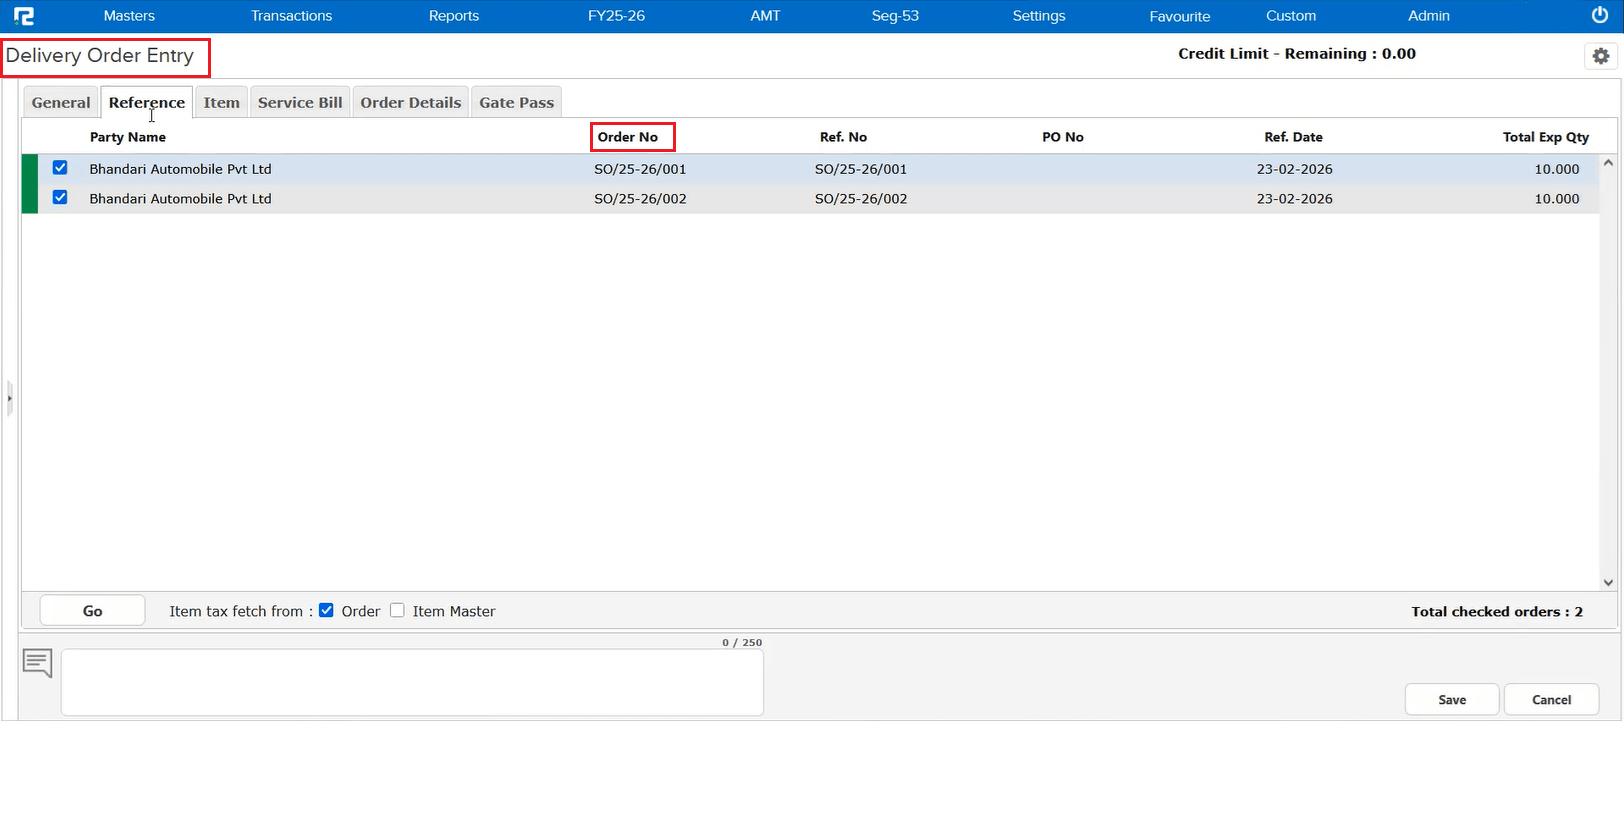
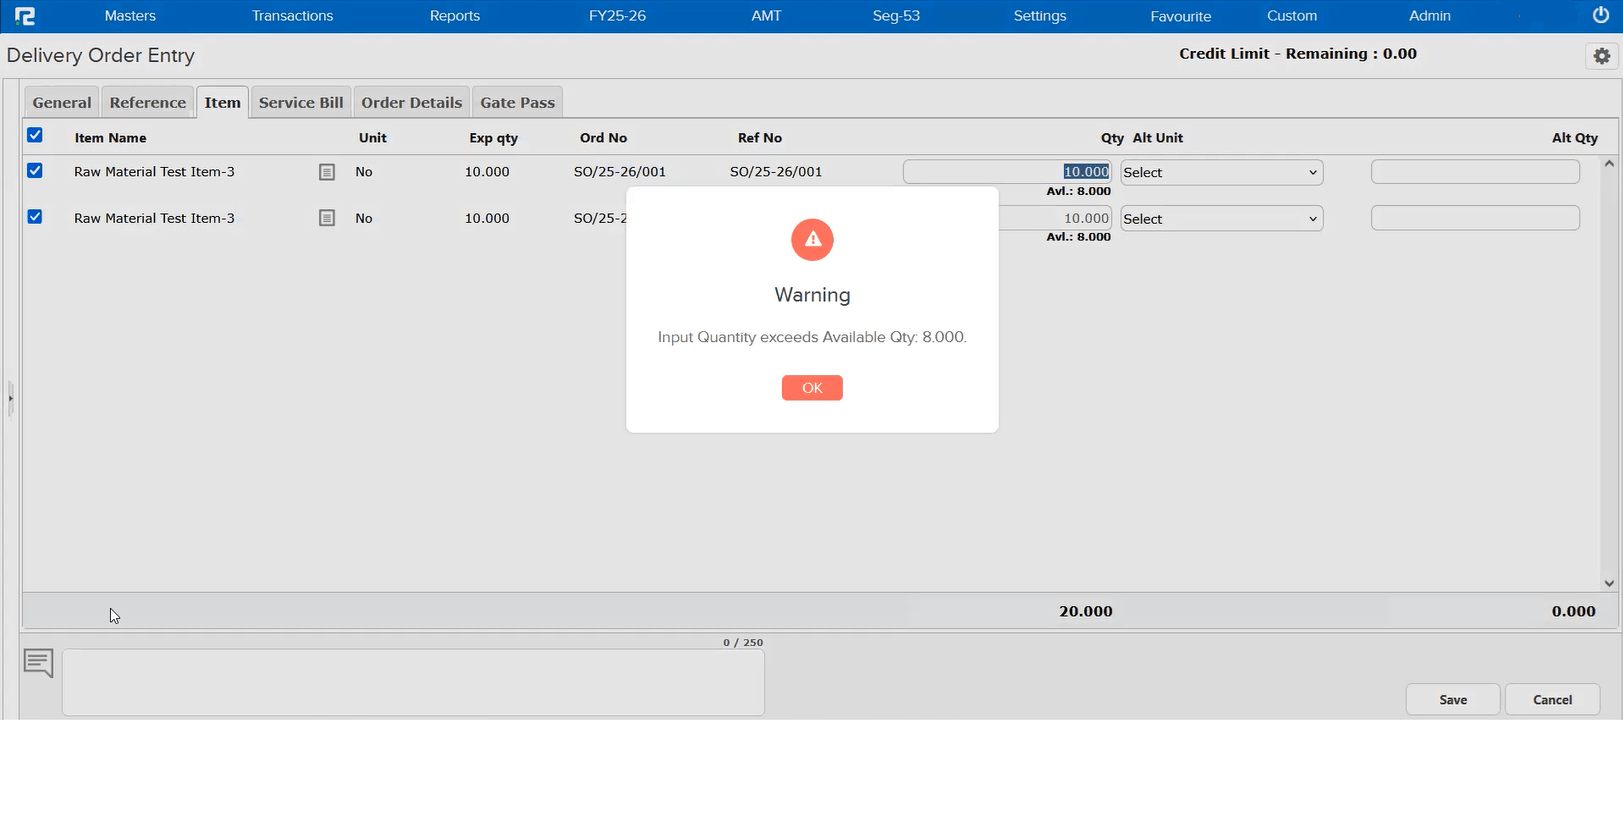
📌 What Was Happening
When creating a Delivery Order with multiple Sales Orders for the same item, the system wasn’t checking the combined quantity properly. For example, if you had 8 items available and two Sales Orders for 10 each, the system let you enter 10 + 10 = 20 — well beyond what’s in stock.
🌟 How This Helps You
You’ll now see a clear warning — “Input Quantity exceeds Available Qty” — before any overselling happens. This protects your inventory accuracy and prevents fulfillment issues down the line.
📷 See It in Action
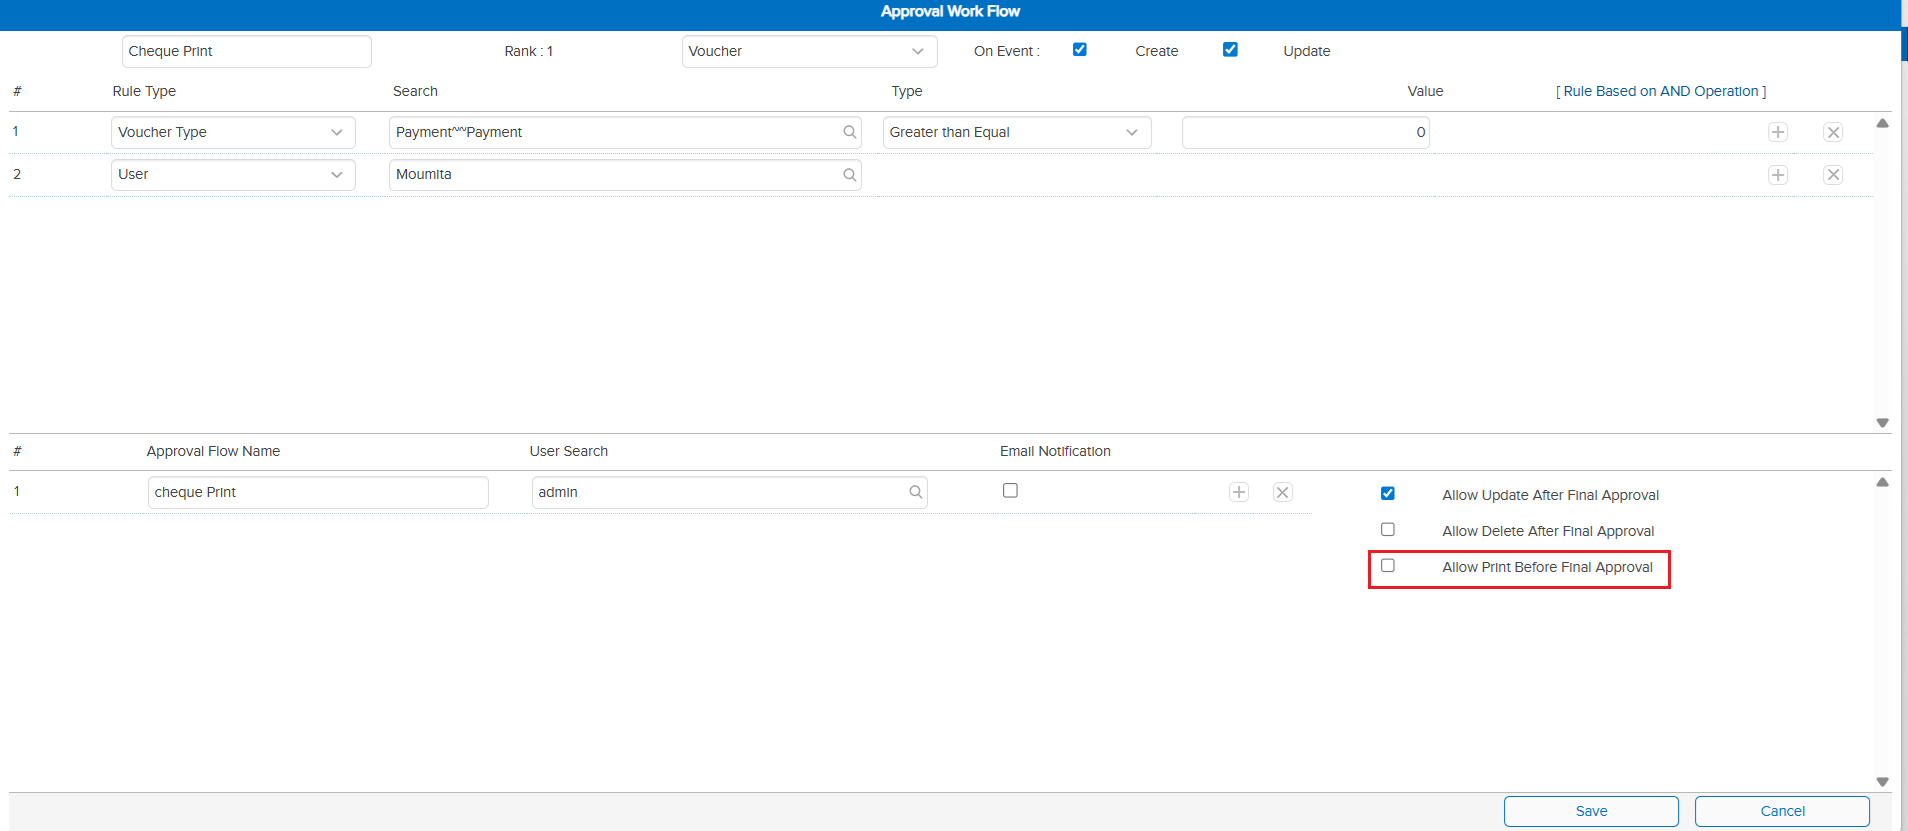
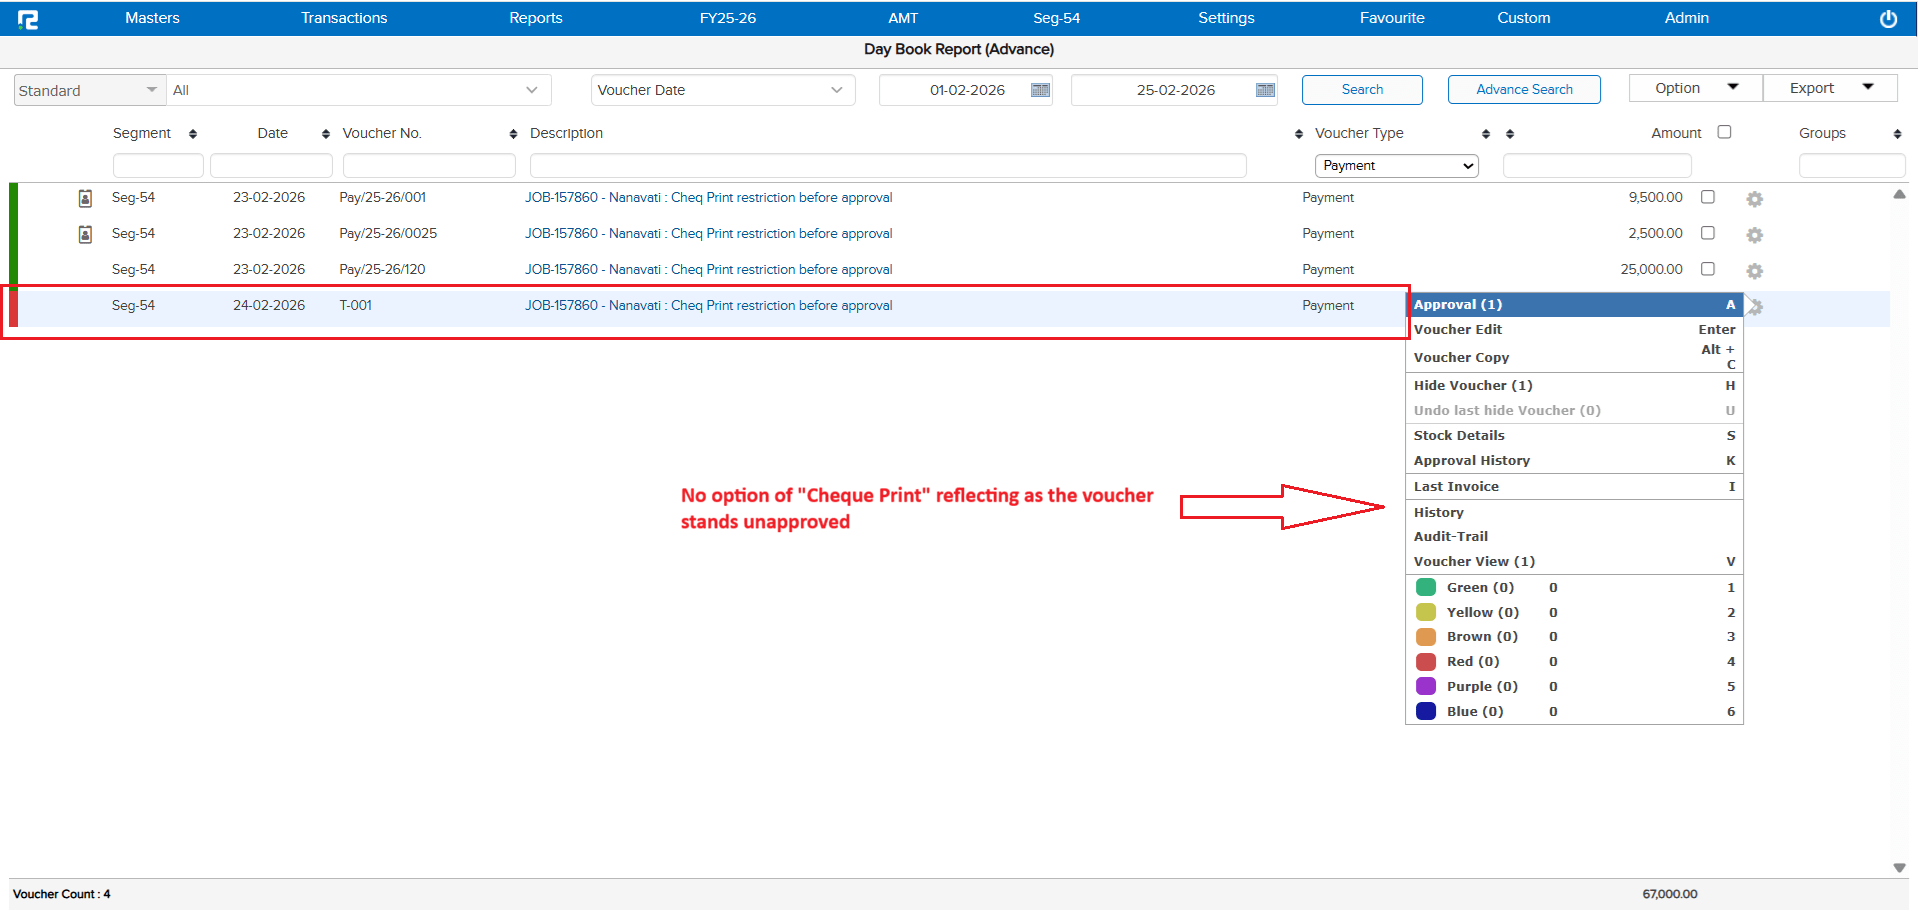
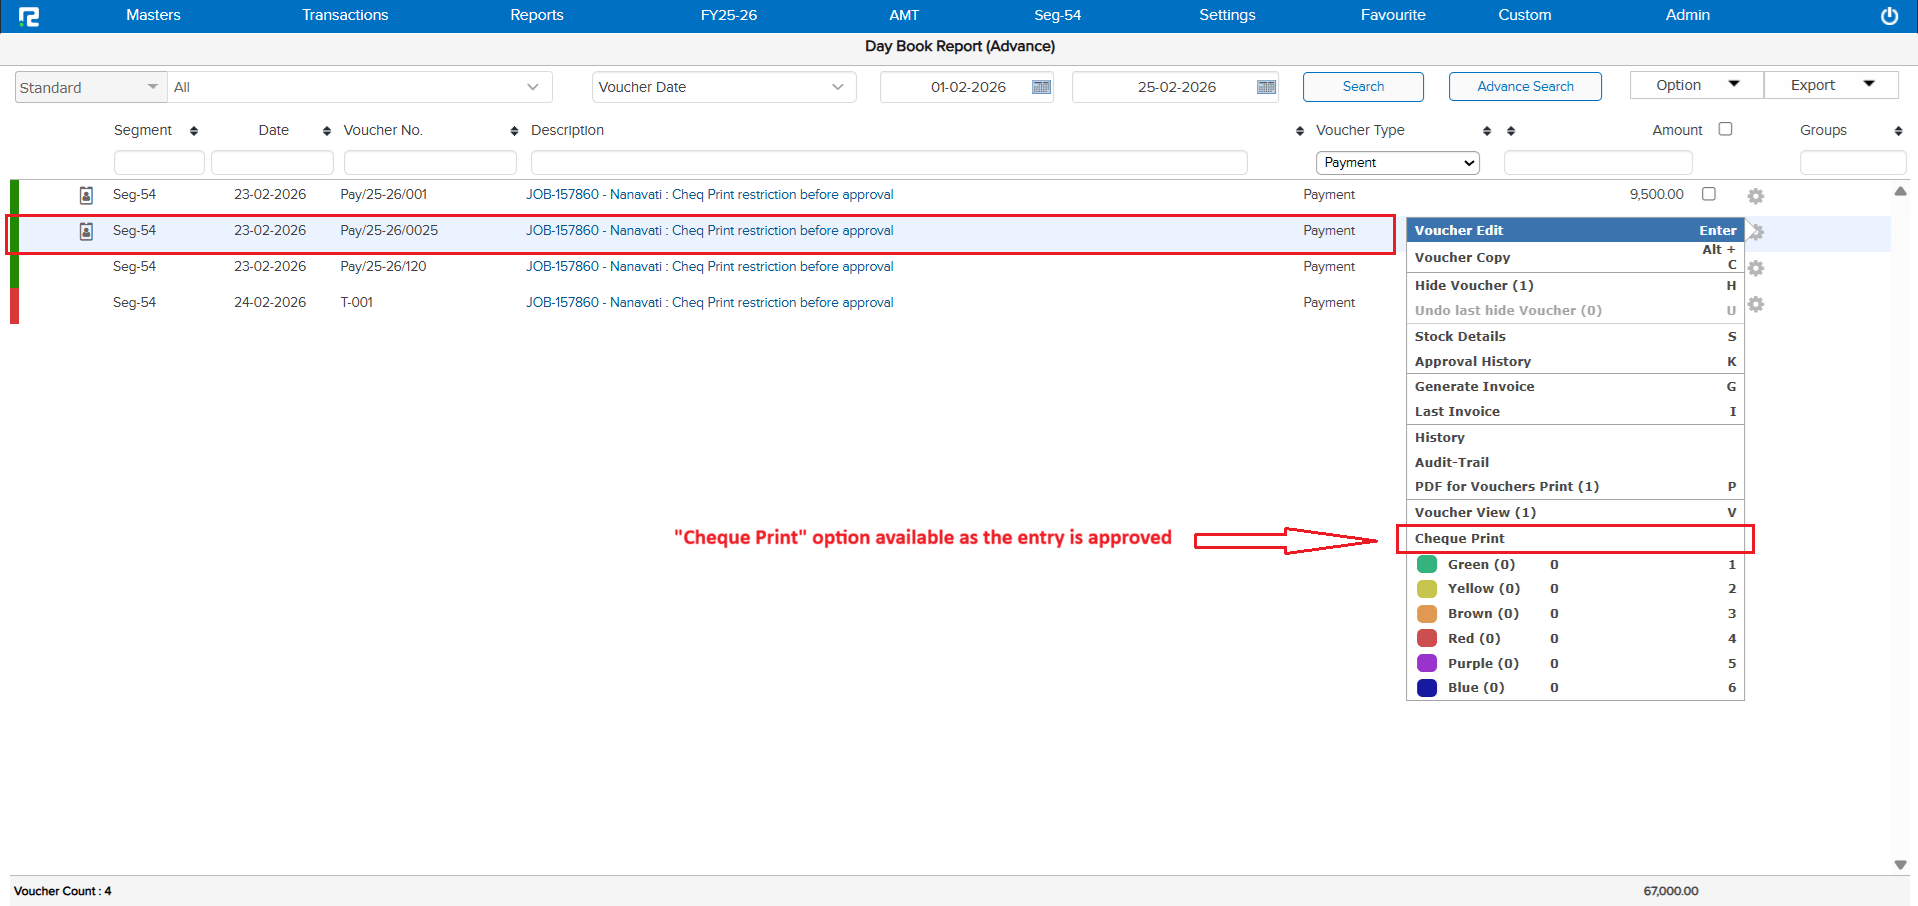
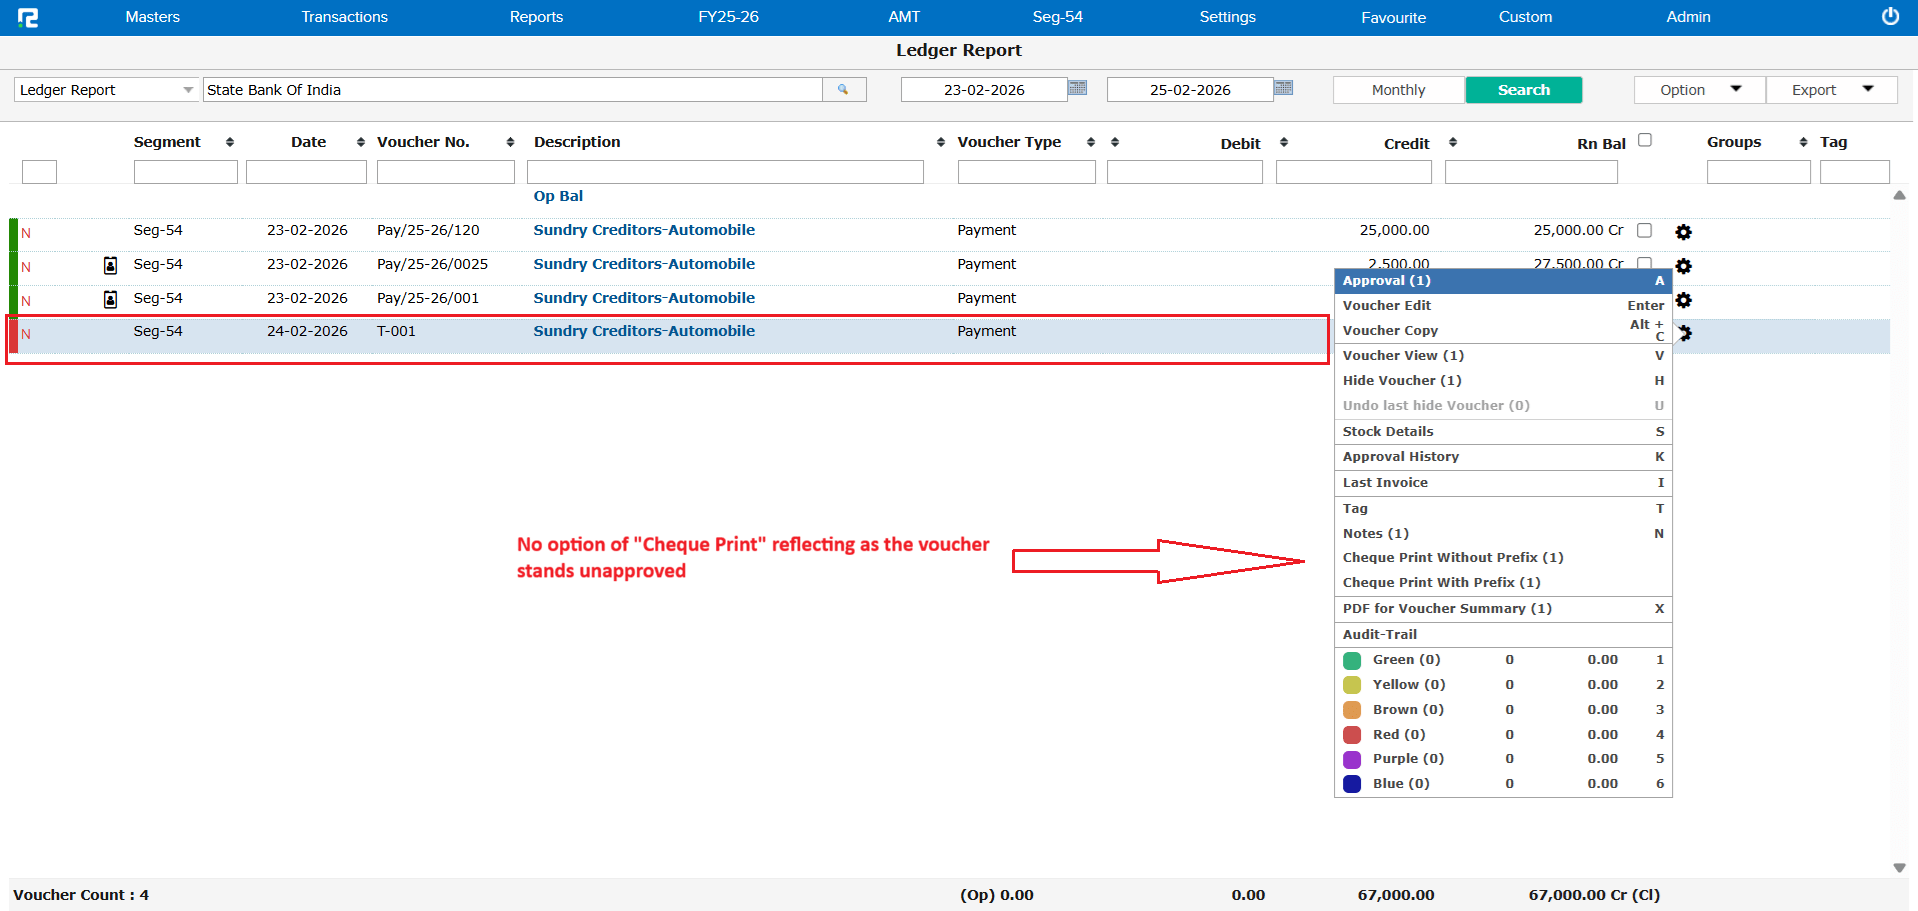
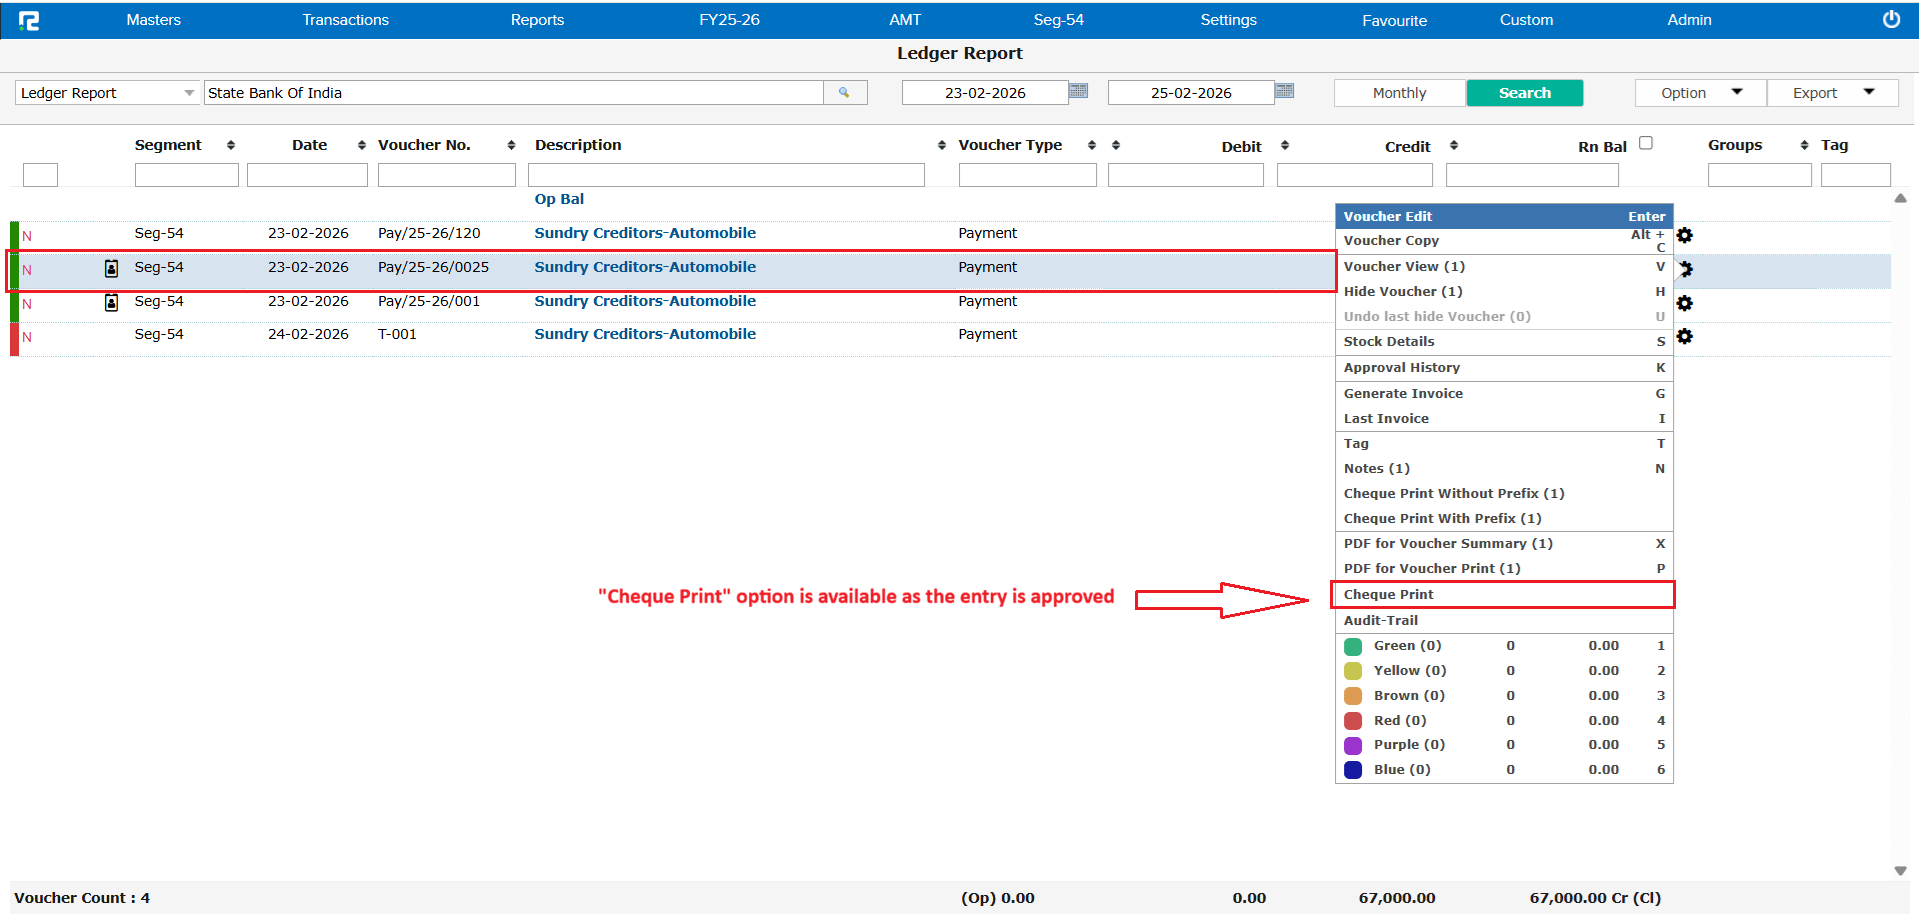
📌 What Was Happening
Even though you had set “Allow Print Before Final Approval” to No in your Approval Workflow, the Cheque Print option was still showing up in DayBook and Ledger Reports for unapproved vouchers. Template printing was correctly blocked, but cheque printing slipped through.
🌟 How This Helps You
Your approval controls are now fully enforced. Cheque Print is hidden until the voucher is approved, giving you complete confidence that no unapproved payments are being printed.
📷 See It in Action
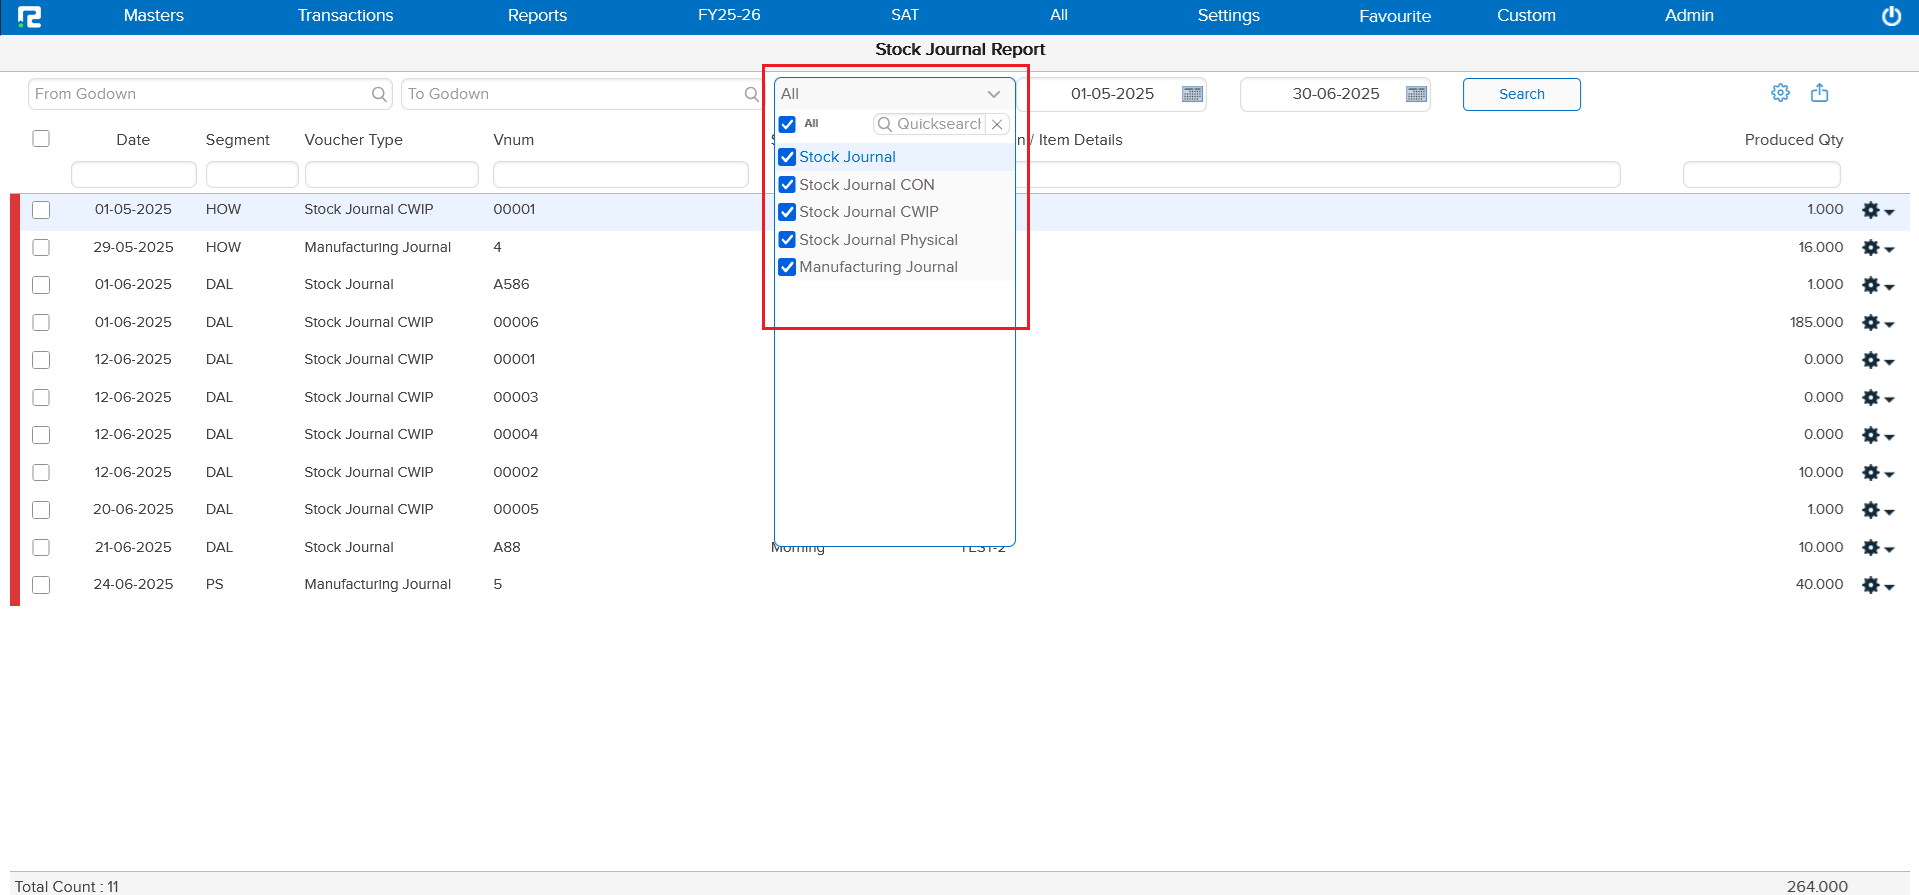
📌 What Was Happening
If your company uses Direct Stock Accounting, you may have noticed that Stock Journal CWIP, CON, and Physical entries wouldn’t open in edit mode from the Stock Journal Report. You had to go through the Ledger Report instead — an unnecessary extra step.
🌟 How This Helps You
All Stock Journal variations now open directly from the Stock Journal Report, just as you’d expect. No more workarounds needed!
🛠 Where to Find It
📷 See It in Action
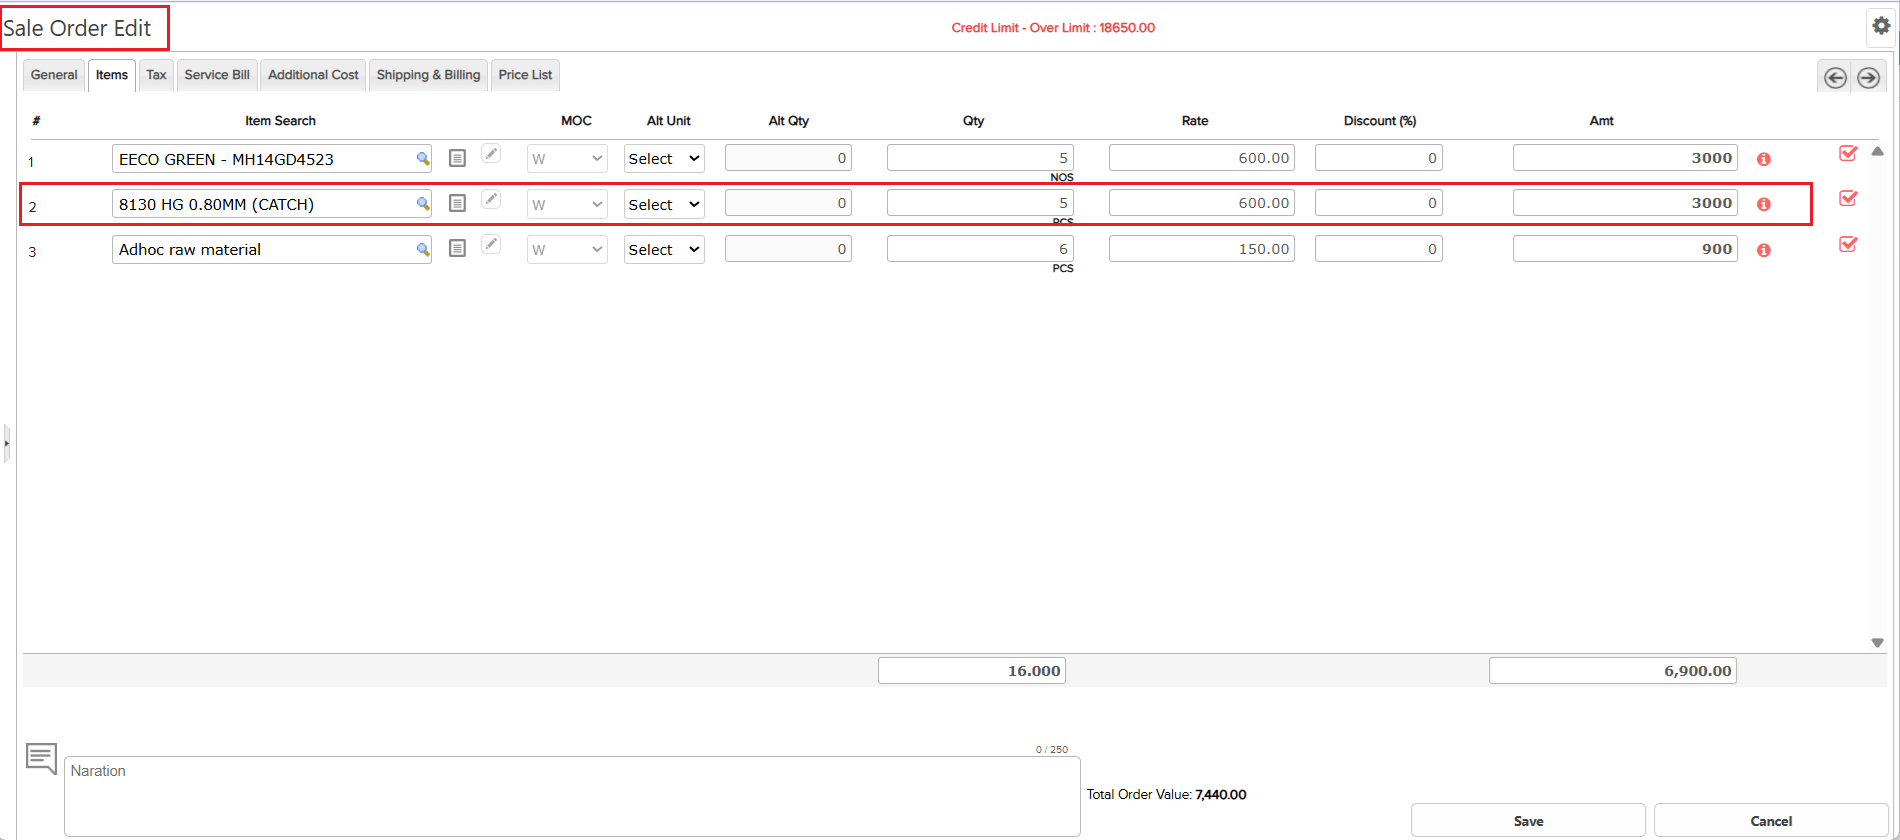
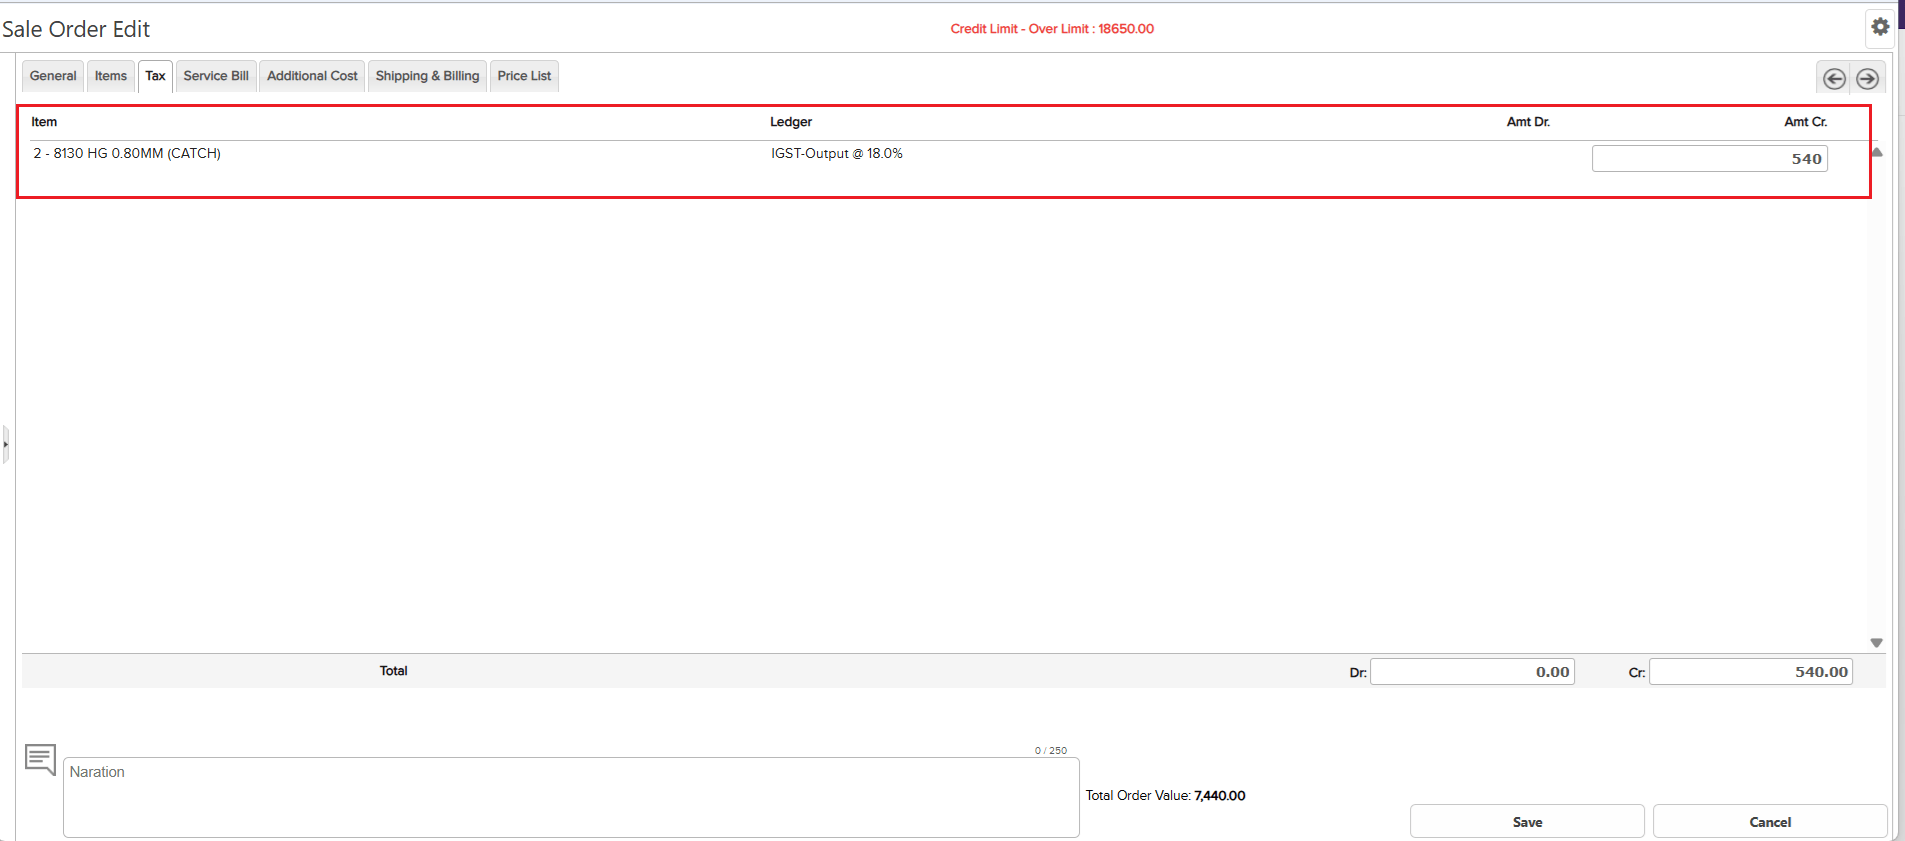
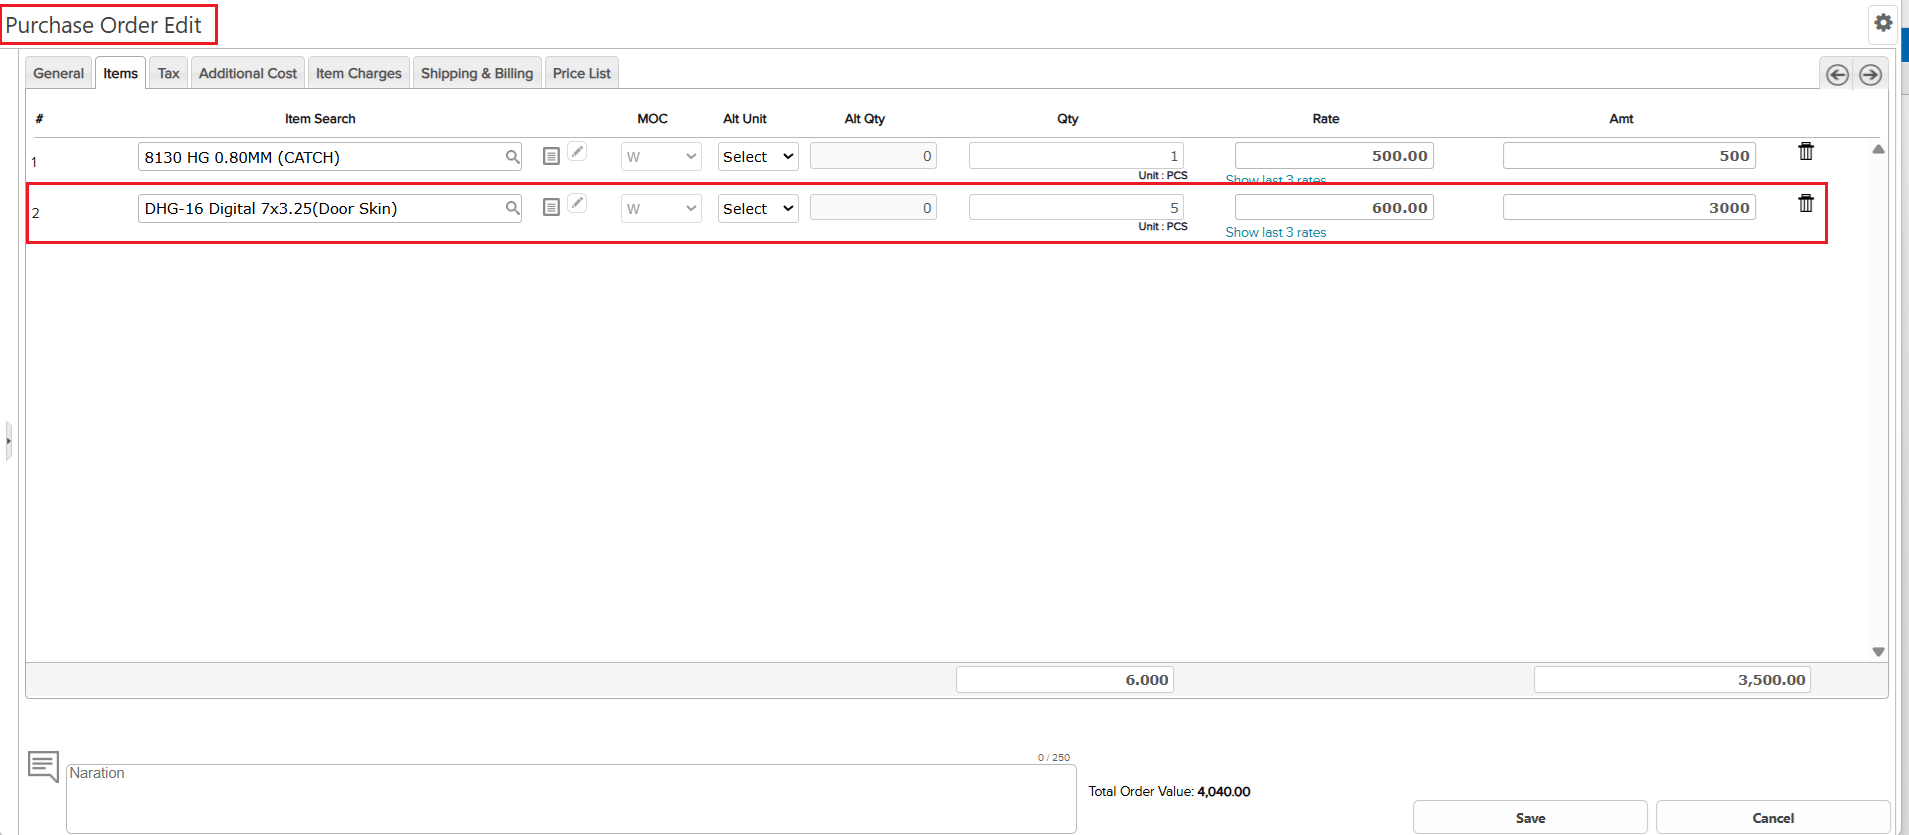
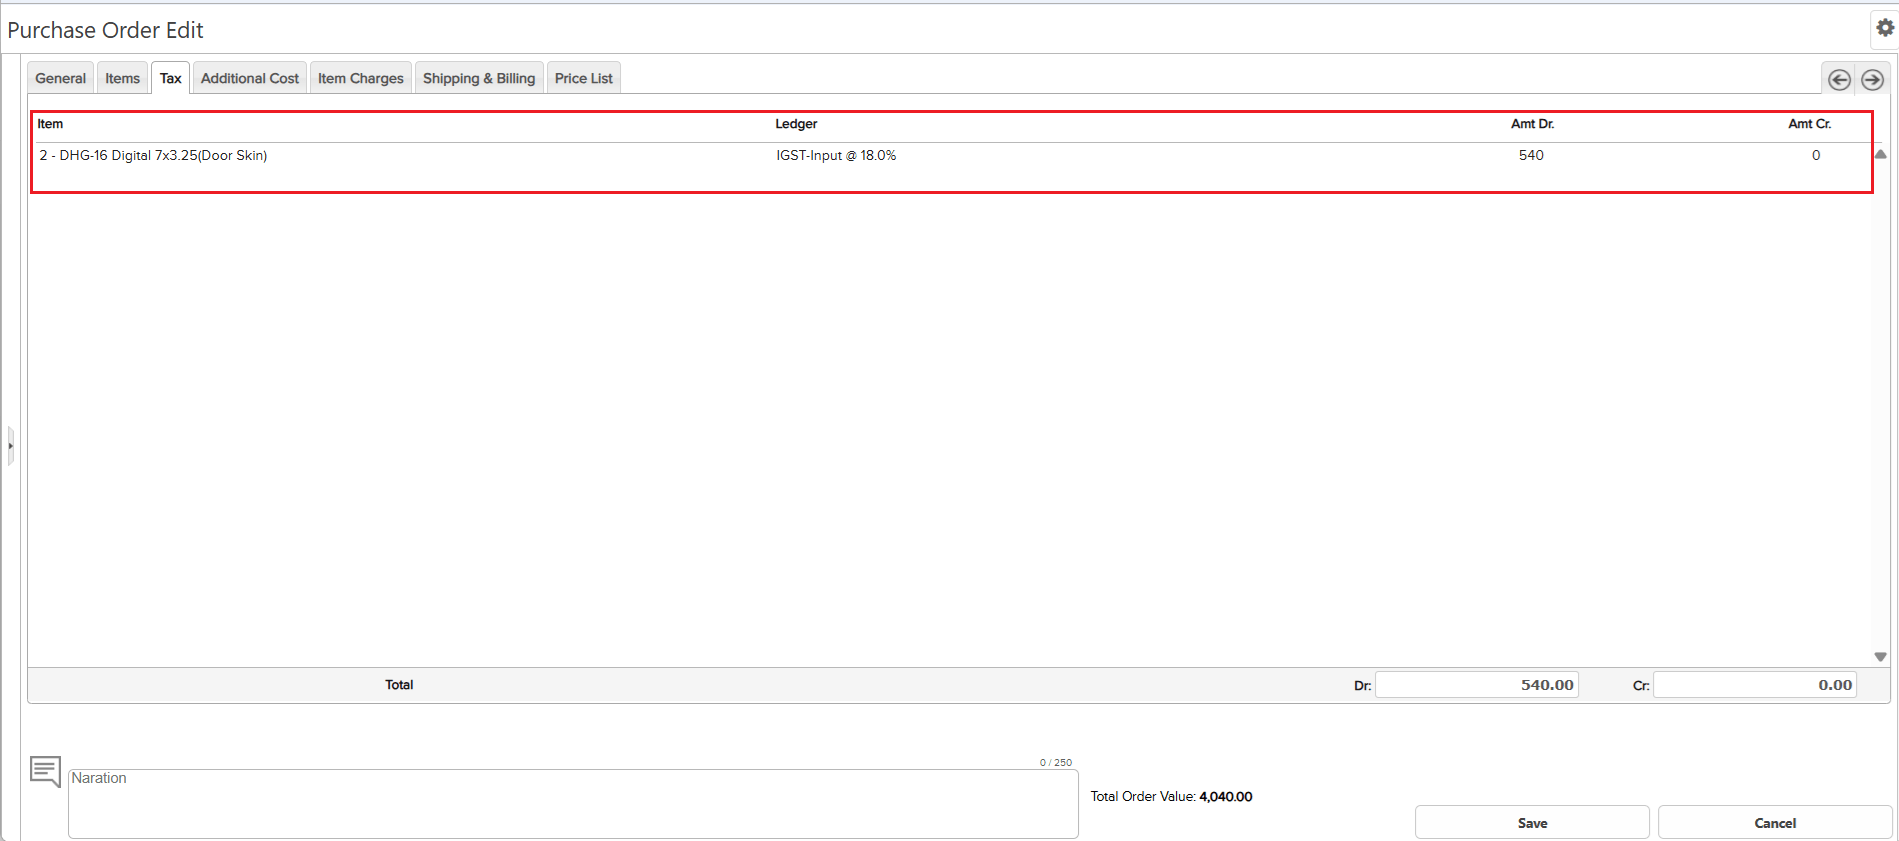
📌 What Was Happening
When you had multiple items in a Sale Order or Purchase Order and only some had tax, the Tax tab was showing the wrong serial numbers. For example, if Item #2 had tax but Item #1 didn’t, the Tax tab confusingly showed it as serial no. 1.
🌟 How This Helps You
The Tax tab now correctly matches the item serial numbers from the Items tab. If tax applies to Item #2, you’ll clearly see “2” in the Tax tab. No more guesswork!
📷 See It in Action
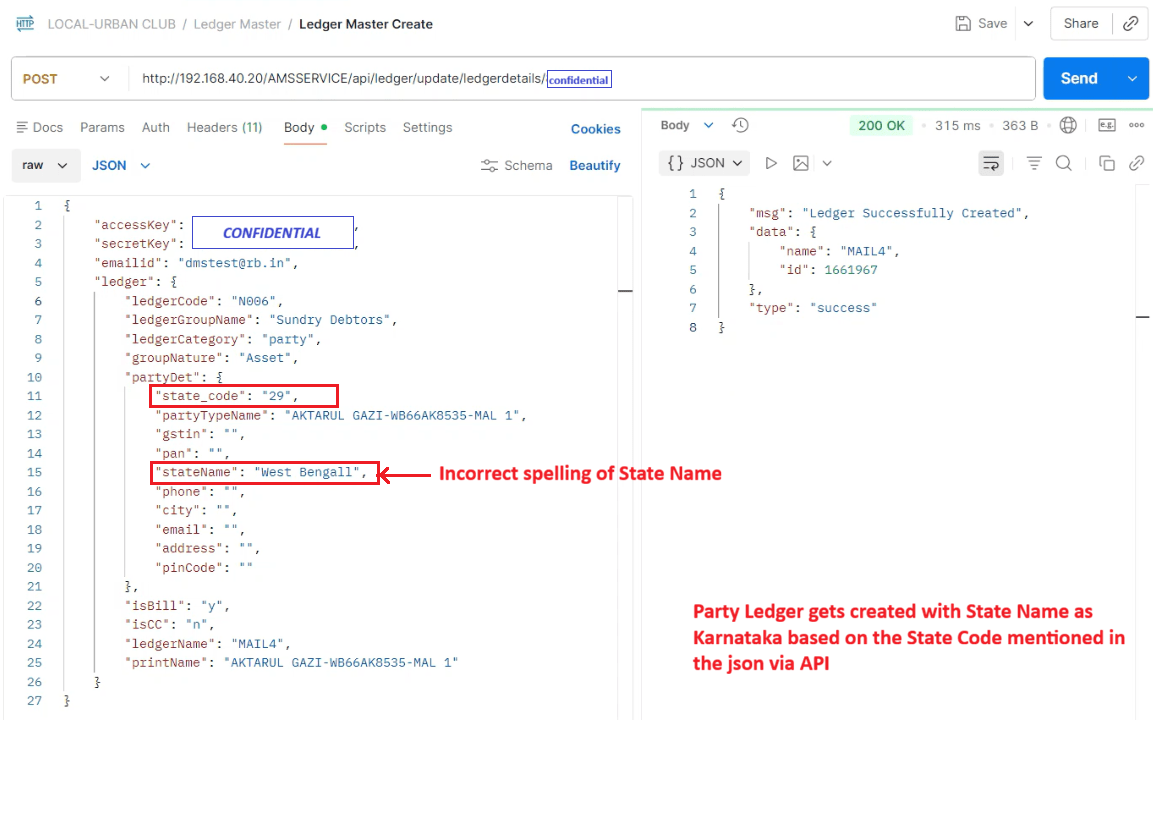
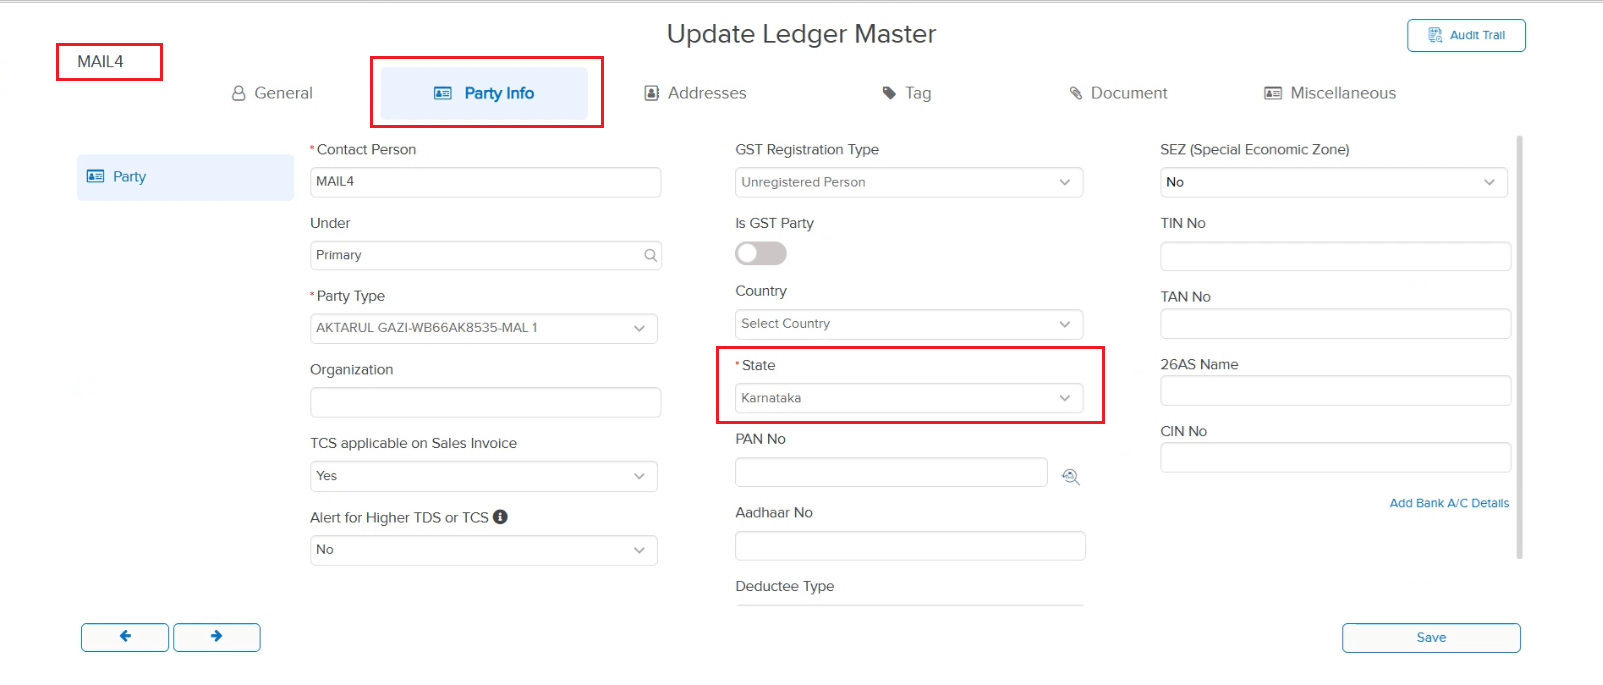
📌 What Was Happening
If a party ledger was created through the API and the state name didn’t quite match the state code (for example, code “29” is Karnataka, but the name was sent as “West Bengall” with a typo), the ledger was created — but the crucial Party Info tab was completely missing. This meant you couldn’t see or edit party details.
🌟 How This Helps You
The system is now smarter about handling state data. It trusts the State Code as the source of truth, so even if the state name has a typo, everything works correctly. The Party Info tab will always appear with the right state information.
📷 See It in Action