Filter By:
New Release – 19th March, 2026
Beta Release — 19-03-2026
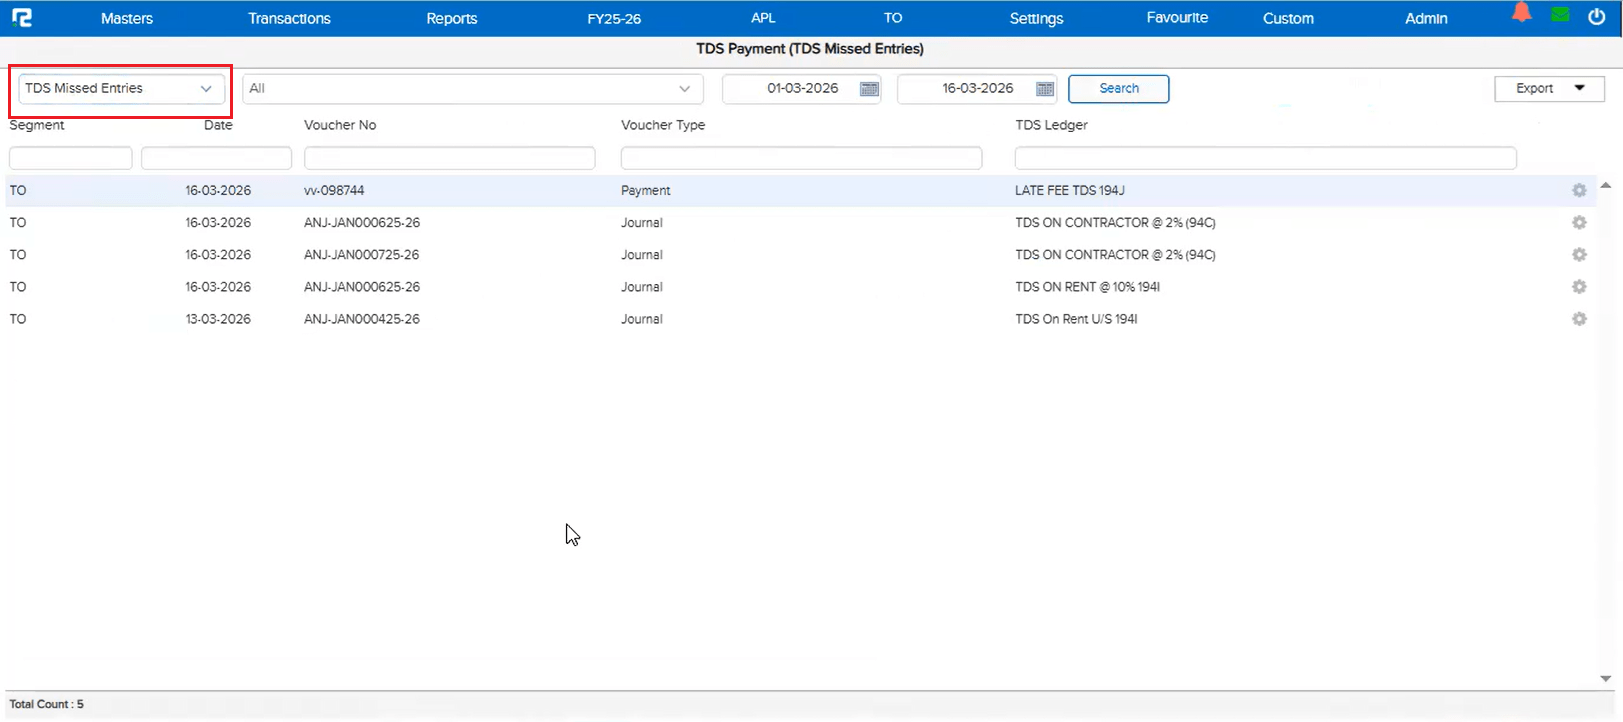
📌 Overview
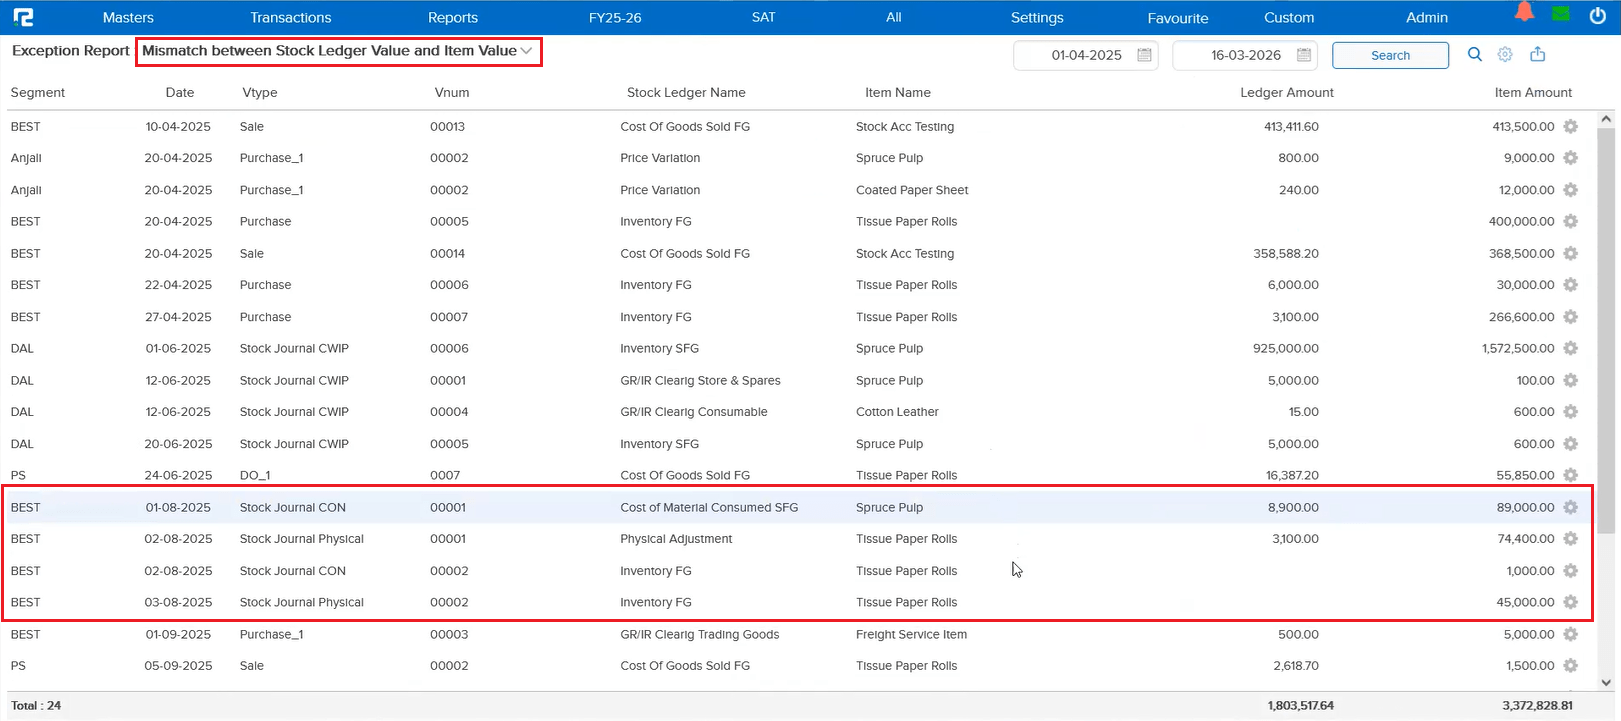
Some entries containing TDS ledgers were not reflecting in the TDS reports, making it difficult for users to fully rely on the TDS data for compliance. To address this, a brand new TDS Missed Entries exception report has been developed. This report displays all entries that contain TDS ledgers but have not been considered in the standard TDS reports — giving you complete visibility into any gaps.
🌟 What This Means for You
You can now confidently verify your TDS data before filing. The TDS Missed Entries report acts as a safety net, ensuring no TDS-related entries slip through the cracks. If any entries are listed here, you know exactly what needs attention — giving you full confidence in your TDS compliance.
🎬 How to Access It
Simply navigate to the report, and it will list all entries that have TDS ledgers but are missing from your TDS reports. Review the entries and take corrective action as needed.
📷 See It in Action
📌 Overview
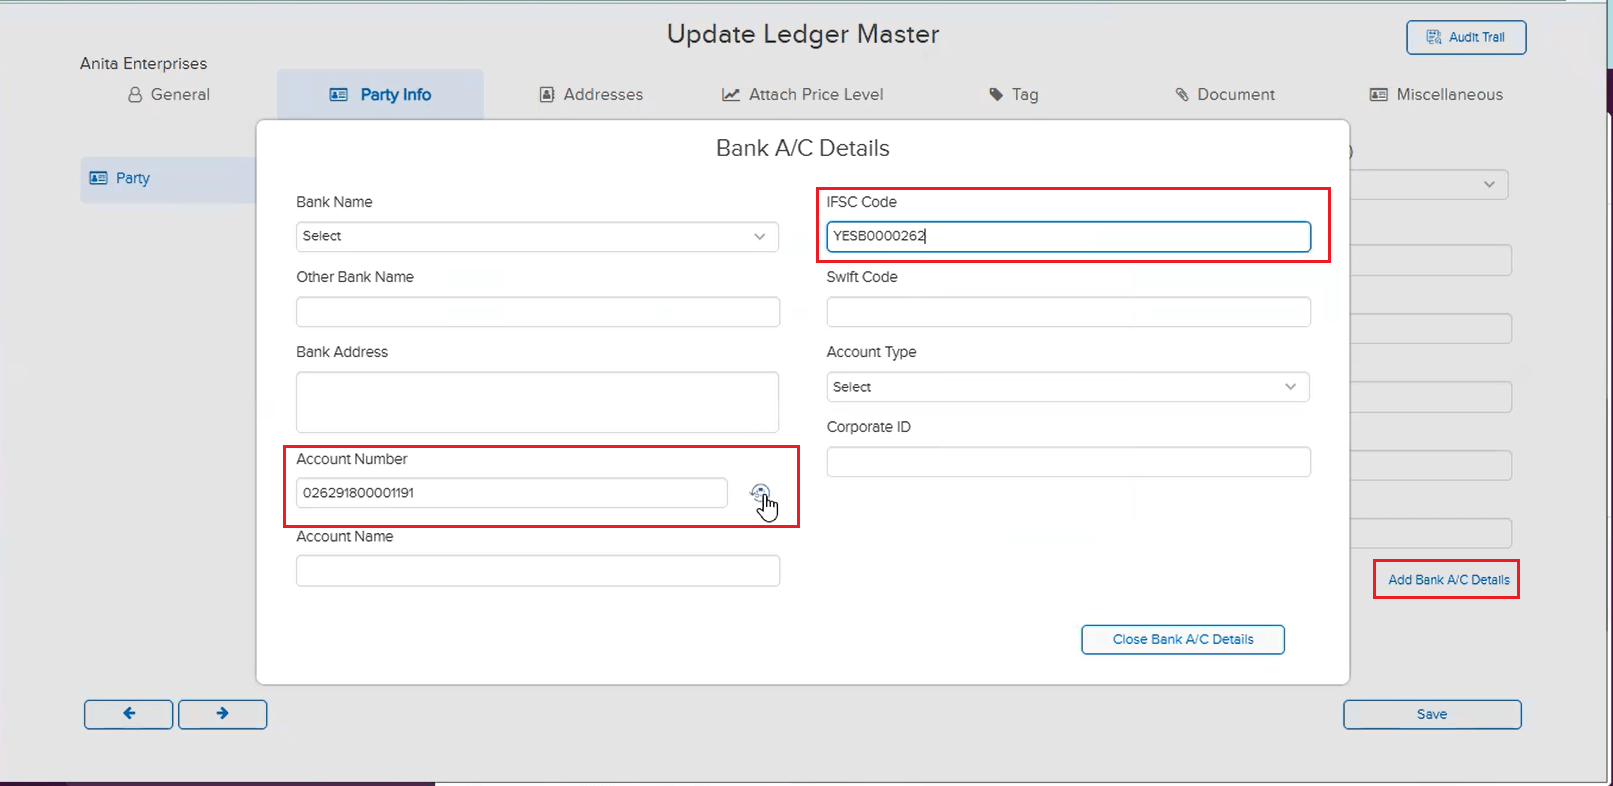
RealBooks now integrates with Cashfree — a trusted third-party vendor — to validate whether a bank account number is valid or invalid. This validation happens at the time of ledger creation and ledger editing, and works for both Bank ledgers and Party ledgers. The verification is based on the account number and the updated IFSC code entered in the ledger master.
🌟 What This Means for You
Before making any bank payment via FTP, you can now be confident that the recipient’s bank details are verified and valid. If the bank details are not verified, bank payments via FTP will not be processed — even if the entry has been approved in RealBooks. This adds a critical layer of security to your payment workflow, preventing payments to incorrect or invalid bank accounts.
🎬 How It Works
1. While creating or editing a Bank or Party ledger, enter the account number and IFSC code.
2. The system will validate the bank details via Cashfree’s bank validation service.
3. If the account is valid, the ledger can be saved and FTP payments will proceed normally.
4. If the account is invalid or unverified, the system will flag it — and bank payments via FTP will be blocked until the details are corrected and verified.
📷 See It in Action

📌 Overview
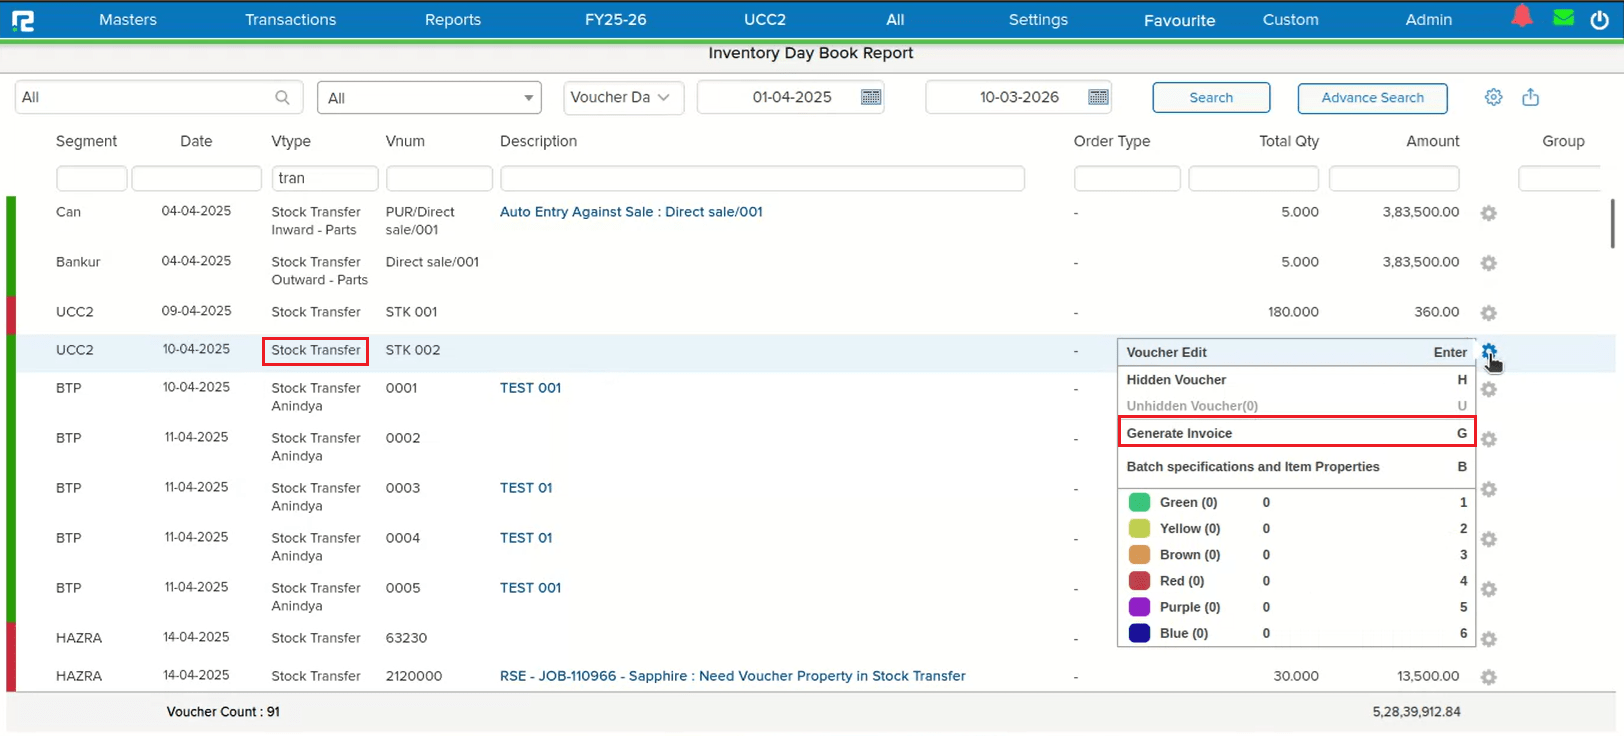
A new Generate Invoice option has been added for Stock Transfer entries in the Voucher Listing Report. You can now generate invoices directly from the report without needing to open each entry individually. Additionally, a convenient keyboard shortcut G is available — simply select a Stock Transfer entry and press G to instantly trigger the invoice generation pop-up.
🌟 What This Means for You
No more navigating away from the Voucher Listing Report to generate invoices for stock transfers. Whether you prefer clicking the option or using the keyboard shortcut, invoice generation is now just one step away — saving you time and keeping your workflow seamless.
🎬 How to Use It
1. Go to Reports → Inventory → Stock → Voucher Listing.
2. Locate and select the Stock Transfer entry you want to generate an invoice for.
3. Use the Generate Invoice option, or simply press the G key on your keyboard.
4. The invoice generation pop-up will appear — select the appropriate template and proceed.
📷 See It in Action
📌 Overview
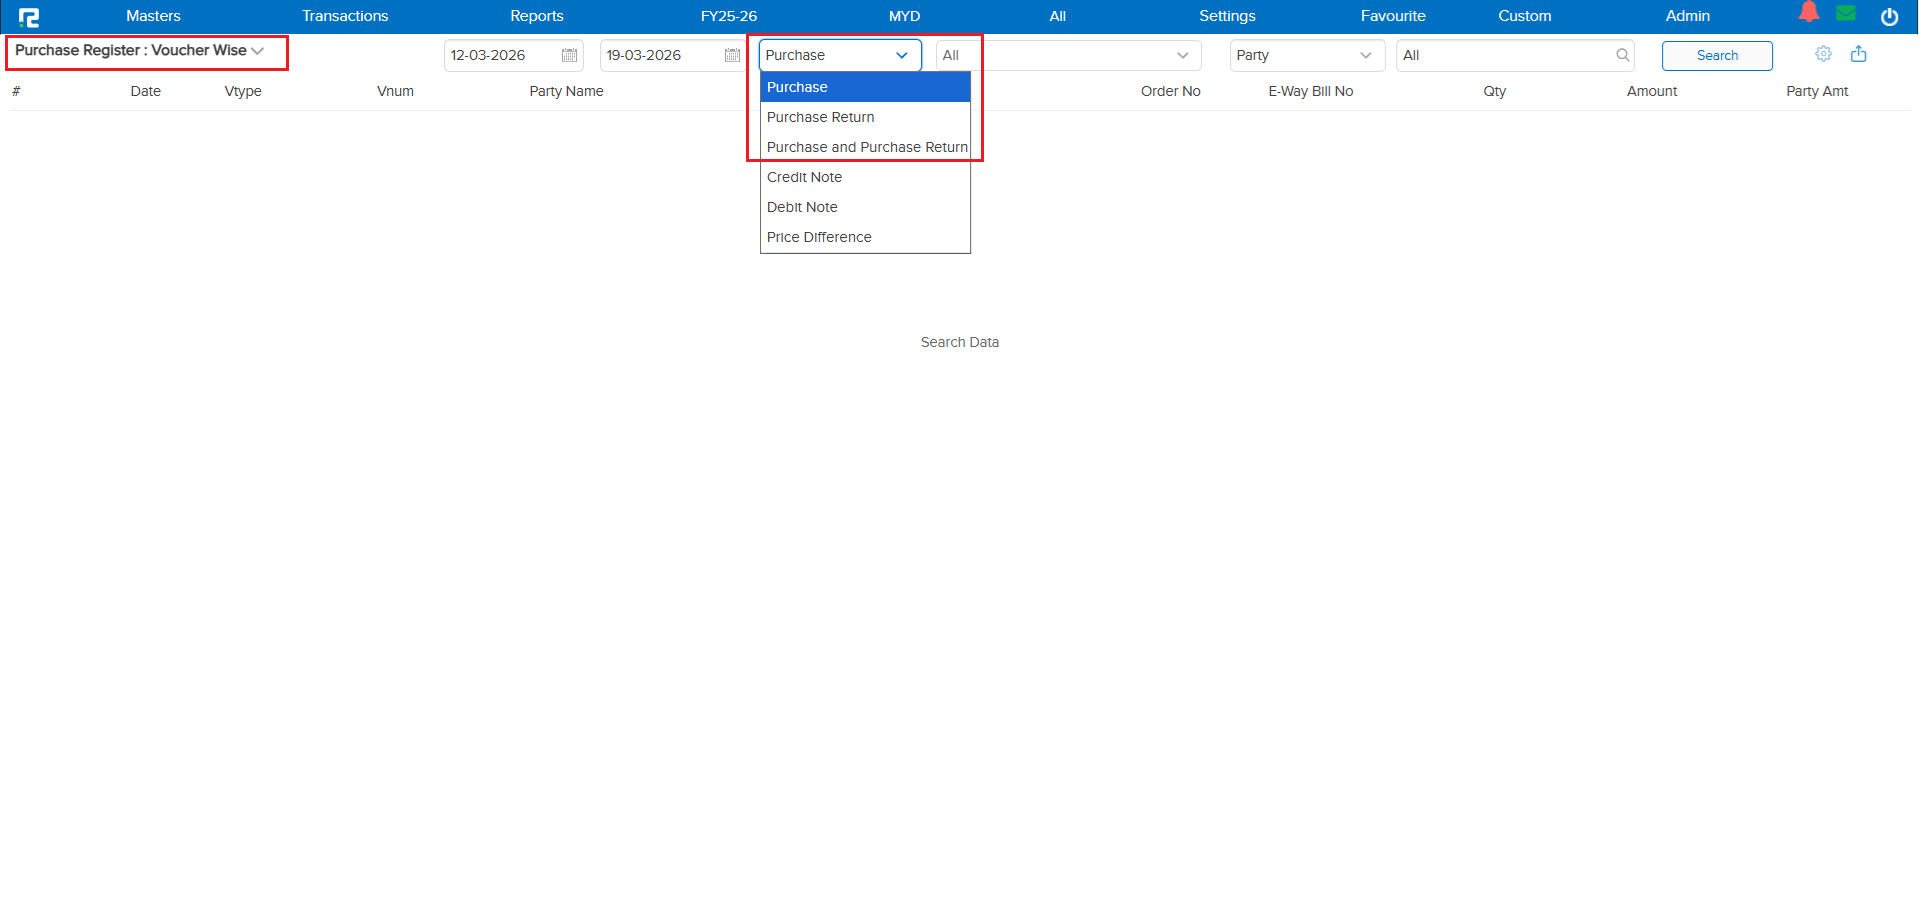
Previously, the Ref No. column in the Purchase Register (Voucher Wise) Excel export contained both the Bill Number and Bill Date combined in a single column, separated by a comma. This made it difficult to sort, filter, or work with bill dates independently in Excel.
With this enhancement, the Ref No. column now contains only the Bill Number, and a brand new Ref Date column has been added right next to it containing the Bill Date.
🌟 What This Means for You
Your Excel exports are now cleaner and easier to work with. You can independently sort, filter, and analyze by Bill Number or Bill Date without needing to manually split the data. This applies to both Excel and Custom Excel export types.
🎬 Where It Applies
This change applies to the following sub-types:
• Purchase
• Purchase Return
• Purchase & Purchase Return
And both export types:
• Excel
• Custom Excel
📷 See It in Action

📌 Overview
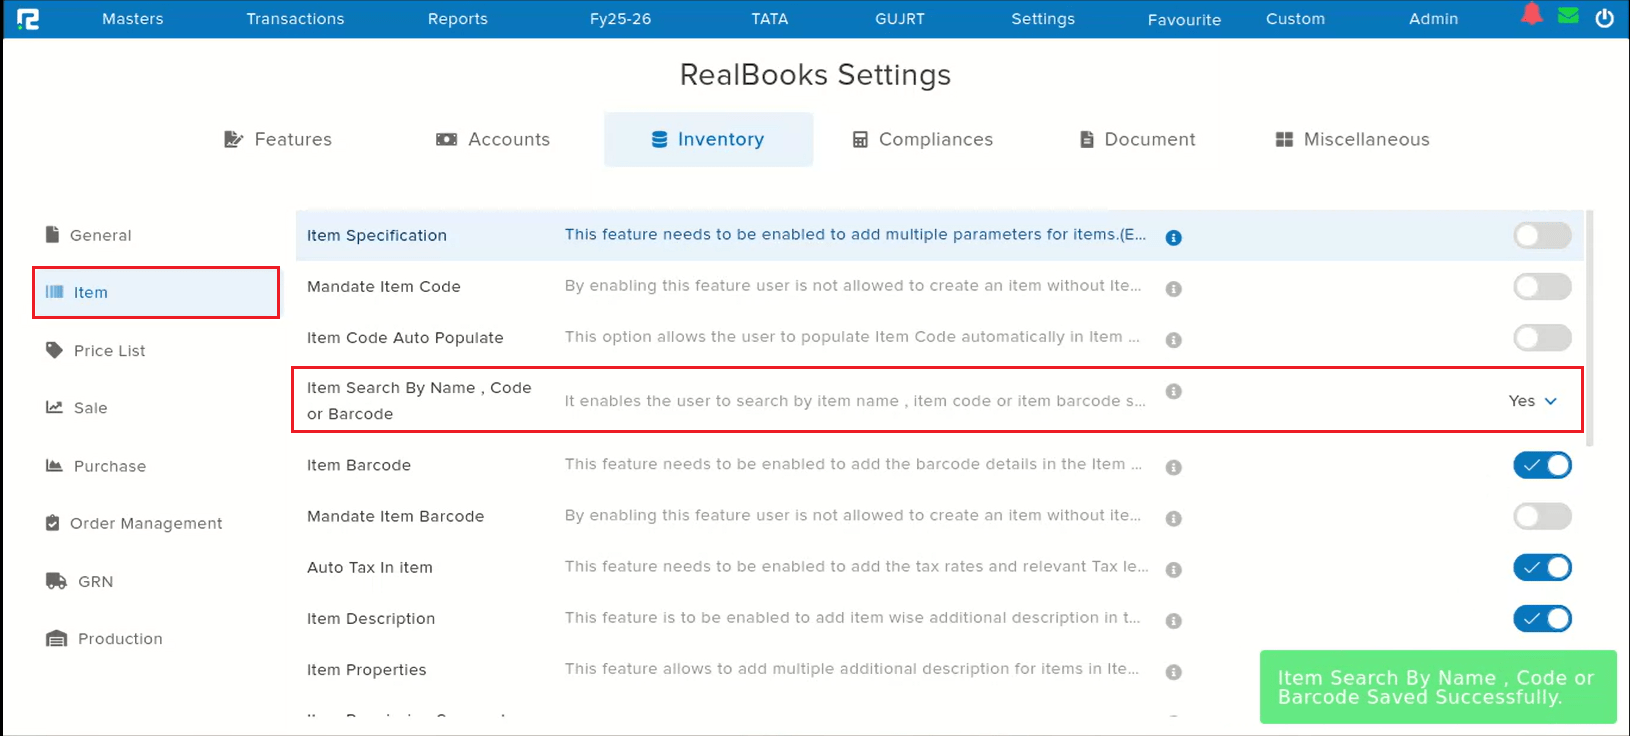
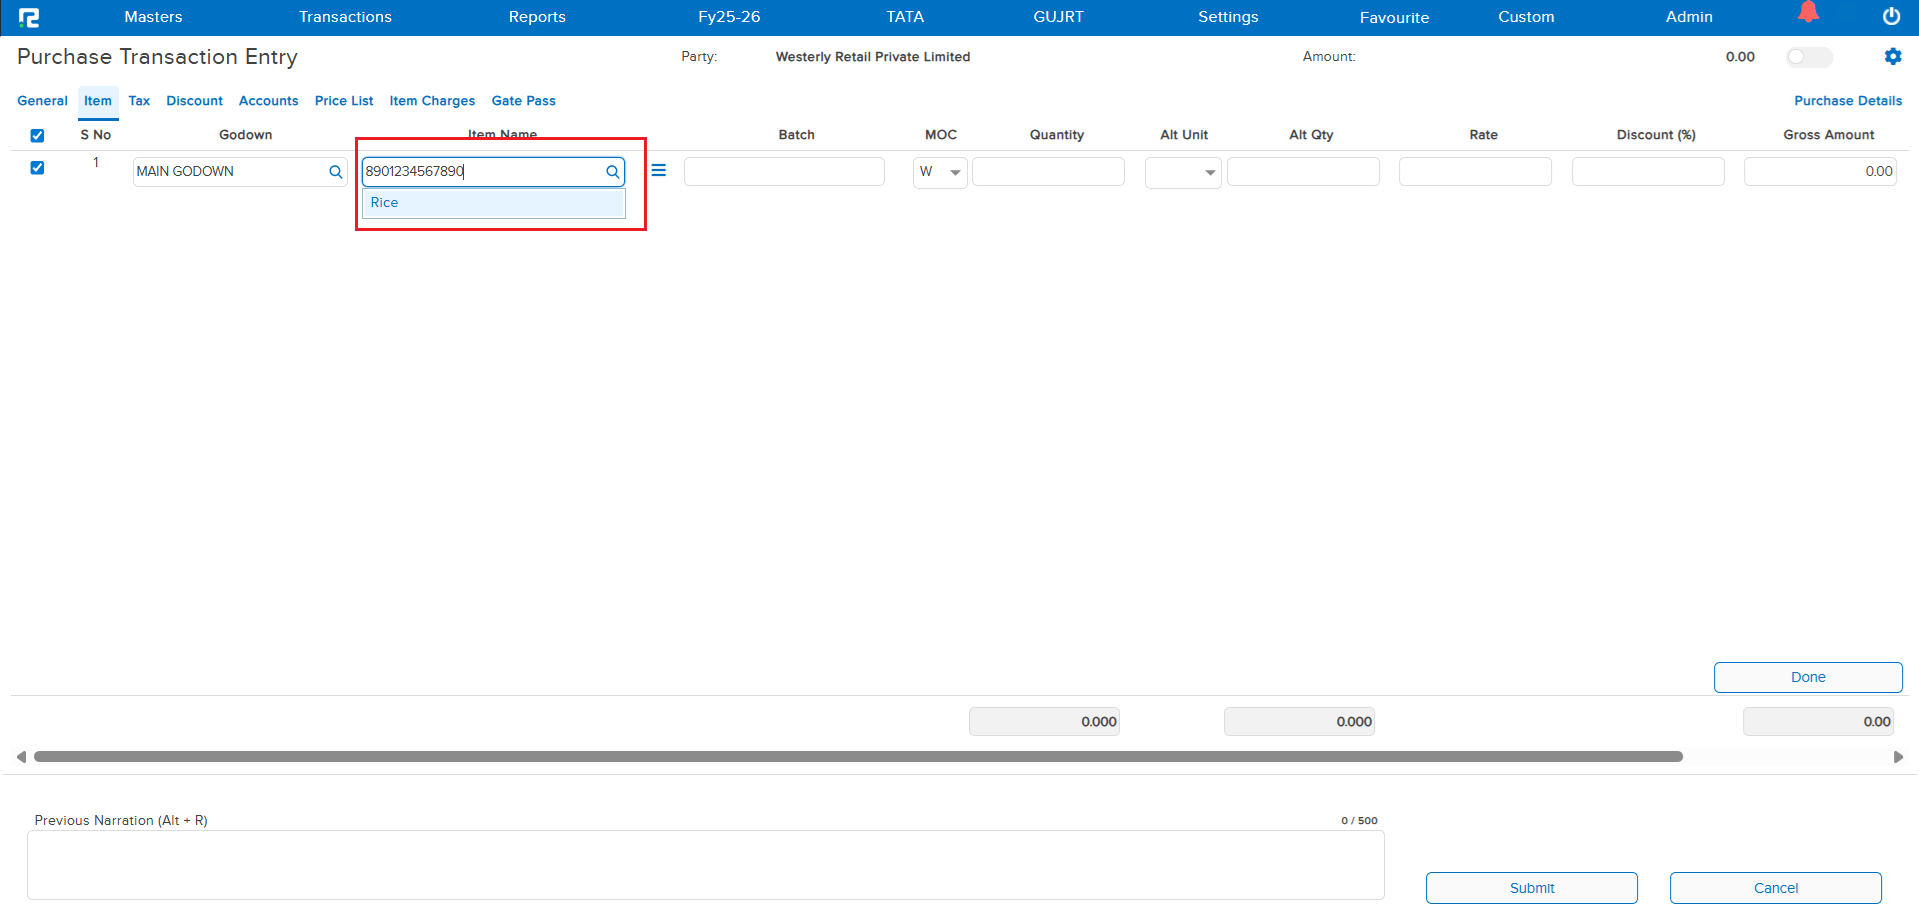
When the Simultaneous Item Search parameter is enabled from the Settings page, the search previously only worked with Item Name and Item Code. With this enhancement, the search now also includes BarCode — so you can find items by scanning or typing a barcode directly in the search field.
🌟 What This Means for You
If your workflow relies on barcodes, you no longer need to switch between search modes. Simply type or scan the barcode in the simultaneous search field, and the system will find the matching item instantly — just like it does for Item Name and Item Code. One search field, three ways to find your item!
🎬 How to Use It
1. Ensure the Simultaneous Item Search parameter is enabled in your Settings page.
2. In any item search field, type or scan the BarCode.
3. The system will search across Item Name, Item Code, and BarCode simultaneously and display the matching results.
📷 See It in Action

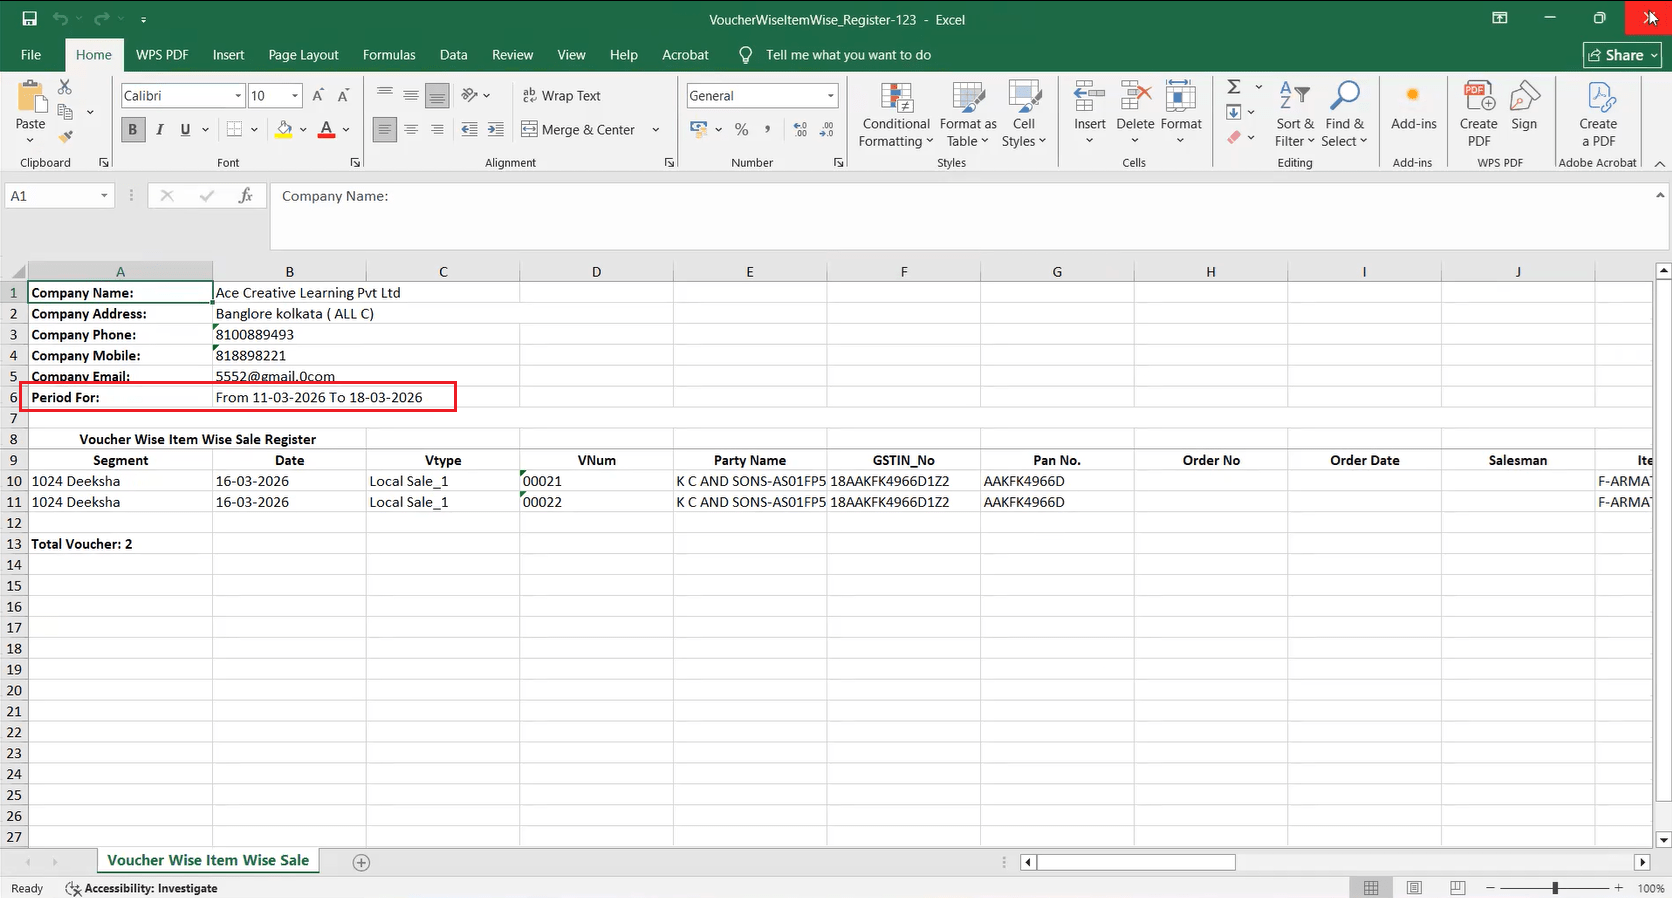
📌 Overview
When exporting Purchase Register or Sale Register data in the Voucher Wise Item Wise Excel format, the date range selected in the report was previously not included in the exported file. This made it difficult to identify which period the exported data belonged to. The selected date is now available in the Excel export.
🌟 What This Means for You
Your exported Excel files now clearly show the date range, making it easier to identify, organize, and share period-specific data without confusion. No more guessing which date range a particular export covers!
🎬 Where It Applies
Purchase Register (Voucher Wise Item Wise):
• Purchase
• Purchase Return
• Purchase & Purchase Return
Sale Register (Voucher Wise Item Wise):
• Sale
• Sale Return
• Sale & Sale Return
📷 See It in Action

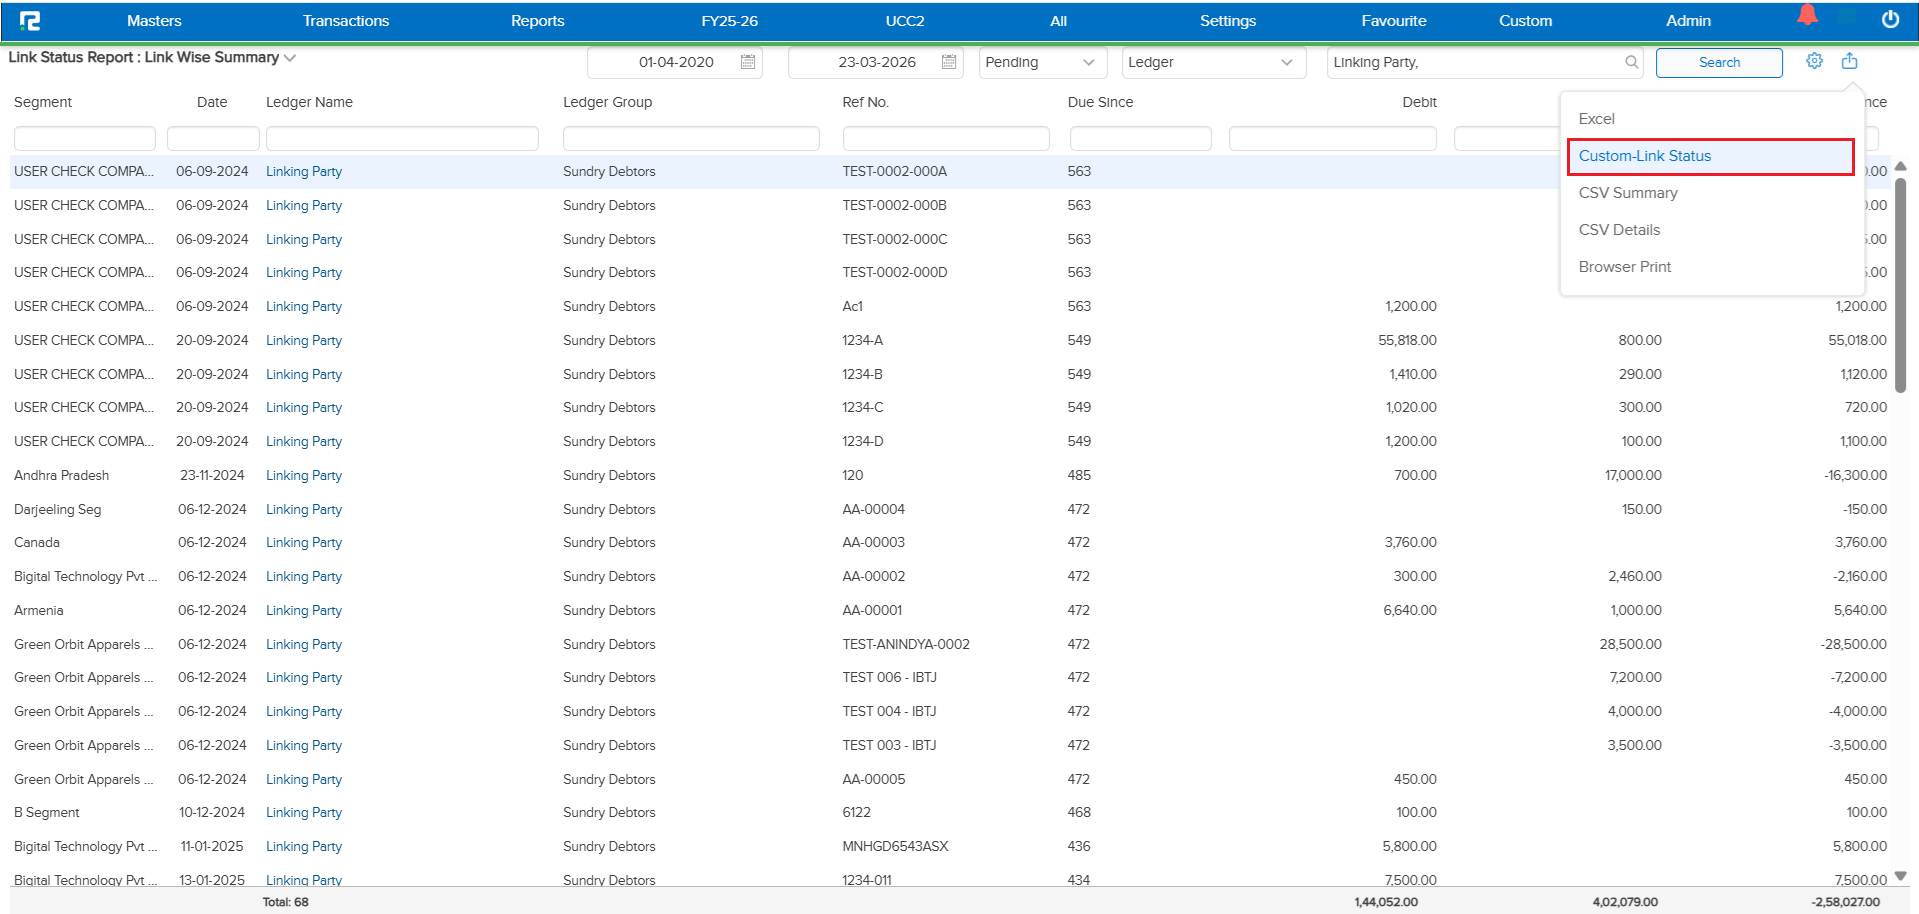
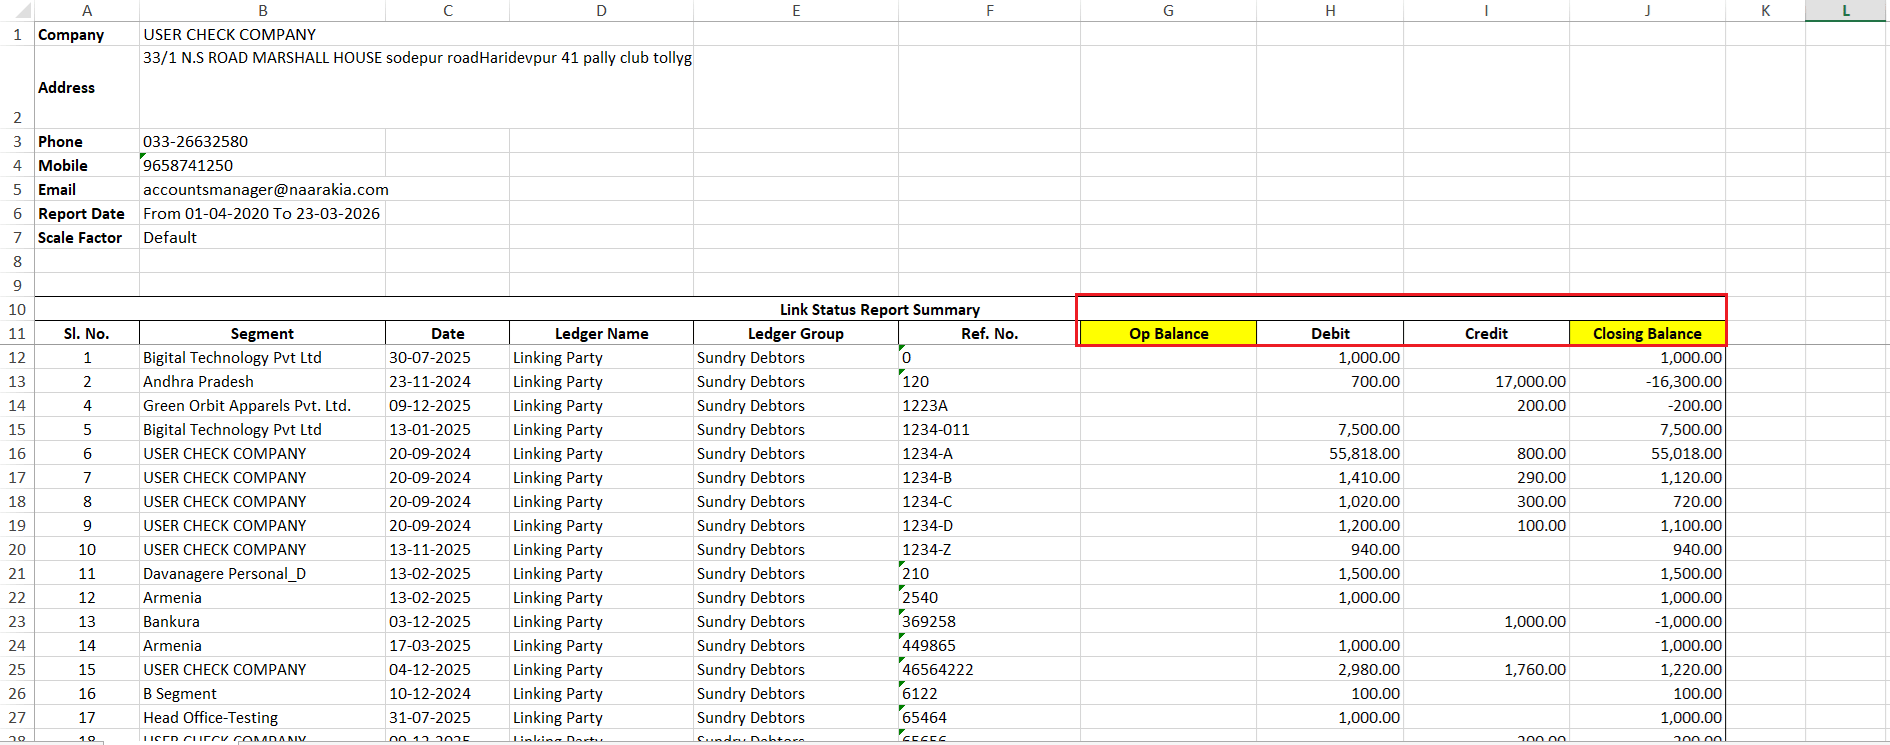
📌 Overview
Previously, to get accurate data in the Link Wise Summary report, users had to run the report from the start of the company so that all entries for a reference number were considered. If a specific month was selected, older transactions for that reference were not included — leading to incomplete data.
With this enhancement, the report now shows the opening balance for each reference as on the selected date range, so you no longer need to run the report from the very beginning.
🌟 What This Means for You
You can now run the Link Wise Summary report for any specific month or date range and still get the complete picture. The opening balance ensures you see the correct closing balance without having to process data from the start of the company every time.
🎬 How It Works
The following logic is now applied:
• If any transaction has happened for a reference in the selected date range, the report will show the opening balance of that reference — even if the first transaction date falls outside the current period.
• If no transaction has happened for a reference in the selected date range, the report will still include the reference with its opening balance.
• The reference data appears in both the Summary and Detail sheets, with transactions for the selected period and the opening balance as on the start of the date range.
• The Difference & Subtotal calculations now factor in the opening balance to display the correct closing balance.
📷 See It in Action
📌 What Was Happening
When editing a Purchase Order or Sale Order, if you changed the item and then selected the same GST ledger that was already used for the original item, pressing Tab or Enter triggered an incorrect error message: “You have to select an item”. This blocked the user from proceeding, even though the item was already selected and valid.
🌟 How This Helps You
You can now freely change items in edit mode and reselect the same GST ledger without any errors. The system correctly recognizes the selected item, so your order editing workflow remains smooth and uninterrupted.
📷 See It in Action

📌 What Was Happening
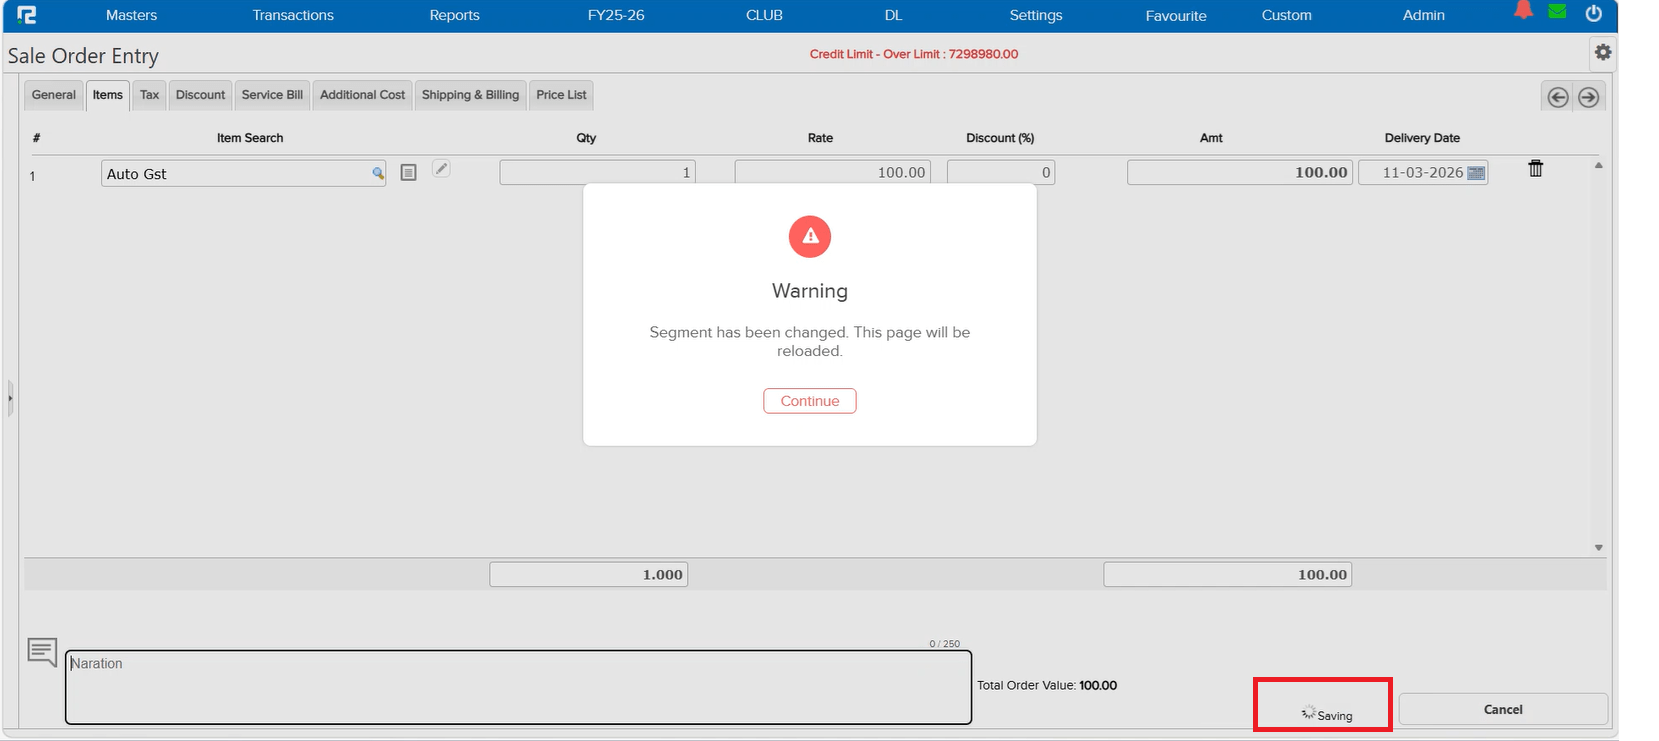
A critical data integrity issue was reported: a user created an entry in the Haridwar segment, but it got saved in the Kolkata segment instead. The Business Place in the entry was also reflecting as Uttarakhand inside the Kolkata segment, even though no changes were made to the entry itself.
After investigation, the root cause was identified — the user had switched the segment in another tab. While the current tab showed a “segment switched” warning on screen, the user was still able to save the entry using the Ctrl + S shortcut, bypassing the warning. This caused a mismatch where one database table recorded Haridwar as the segment while the remaining tables saved Kolkata.
🌟 How This Helps You
The Ctrl + S shortcut now correctly respects the segment-switch warning. If the segment has been changed in another tab, the system will block the save action and prompt you to refresh — preventing any cross-segment data mismatches. Your entries will always be saved in the correct segment.
📷 See It in Action
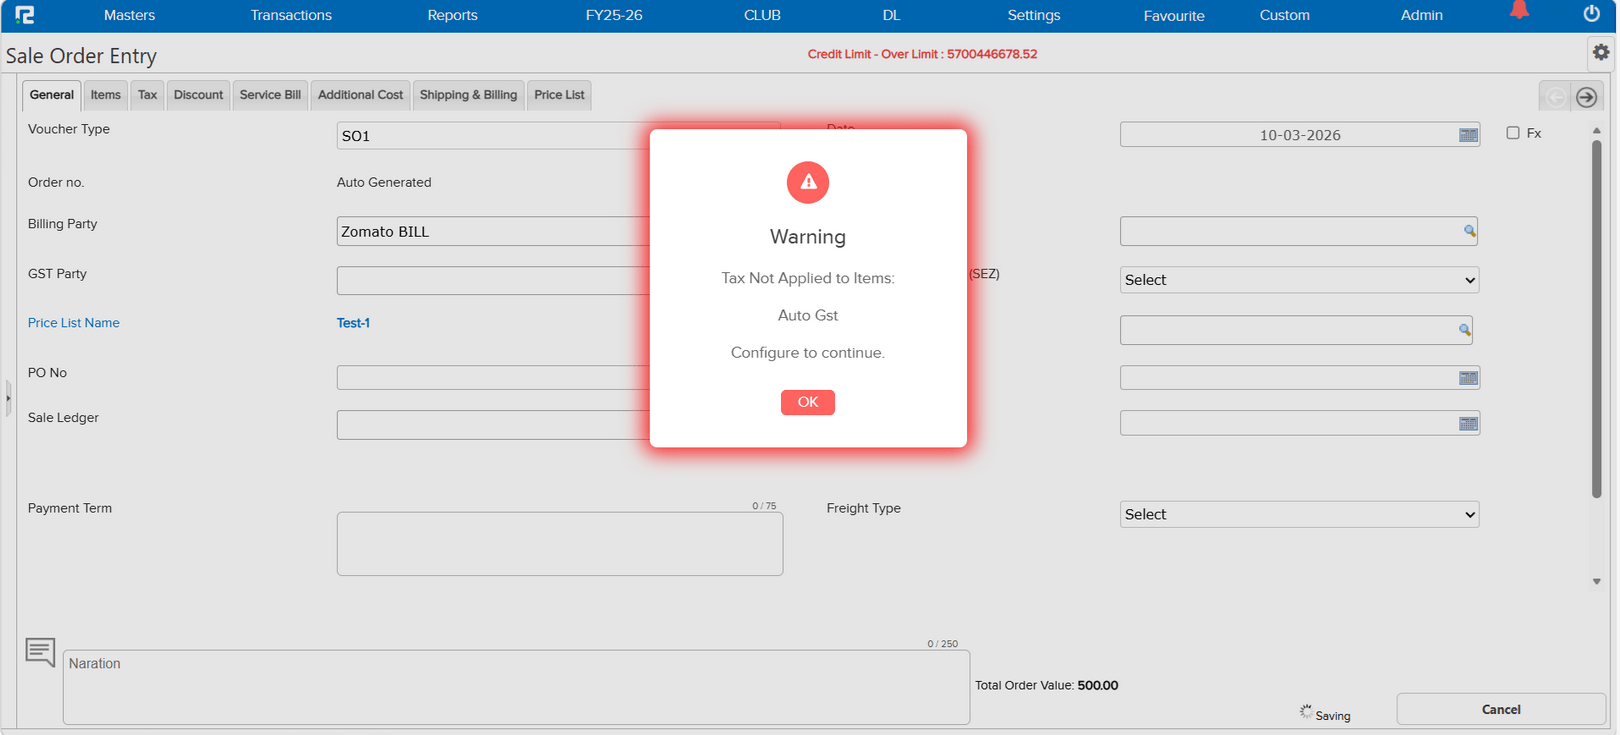
📌 What Was Happening
In certain cases, a Purchase Order was being saved without GST tax calculated on the items — even though all necessary configurations were in place (GST-registered Company/Segment, GST-registered Party, Input Tax configured in Item Master, and GST enabled in the Voucher Type). This caused a ripple effect: the auto-posted Sale Order (via Interbranch auto-posting) and its related Sales entry were also impacted with missing tax details.
🌟 How This Helps You
A new validation has been added to safeguard your data. The system will now prevent saving a Purchase Order without GST tax details when all the following conditions are met:
• The Company/Segment is marked as GST Registered
• The Party is GST Registered
• The Item Master has Input Tax configured
• GST is enabled in the Voucher Type
This ensures your Purchase Orders always carry the correct tax information, and any downstream auto-posted Sale Orders and entries remain accurate.
📷 See It in Action
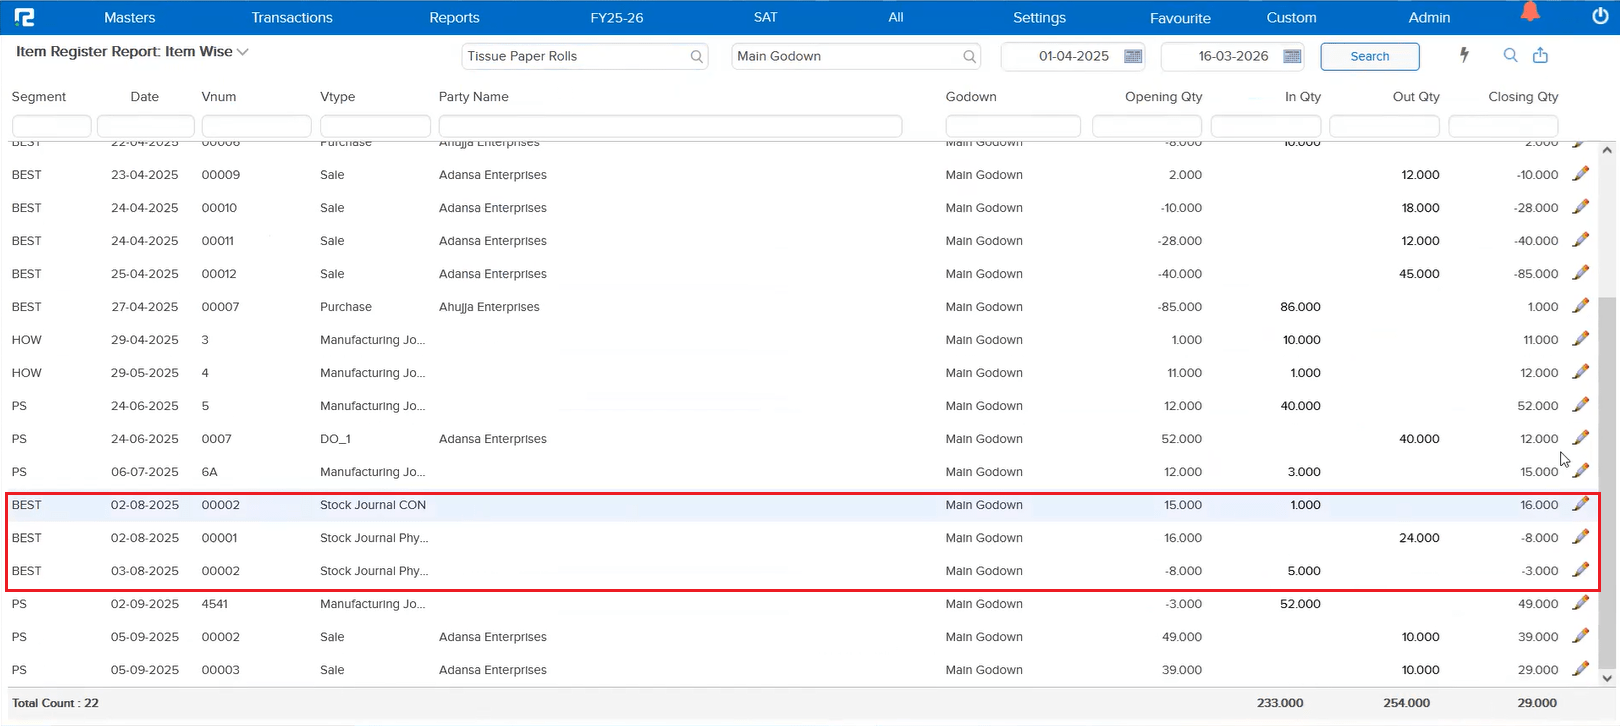
📌 What Was Happening
Similar to the issue previously fixed in the Stock Journal Report (JOB-158260), the same problem existed in other reports as well. Stock Journal CWIP, Stock Journal CON, and Stock Journal Physical entries wouldn’t open in edit mode when accessed from the Item Register, Exception Report, and the drill-down of the Stock Movement Report.
🌟 How This Helps You
All Stock Journal variations — CWIP, CON, and Physical — now open correctly in edit mode from these reports as well. No workarounds needed, regardless of which report you’re navigating from.
🛠 Where to Find It
Also applies to the drill-down view of the Stock Movement Report.
📷 See It in Action
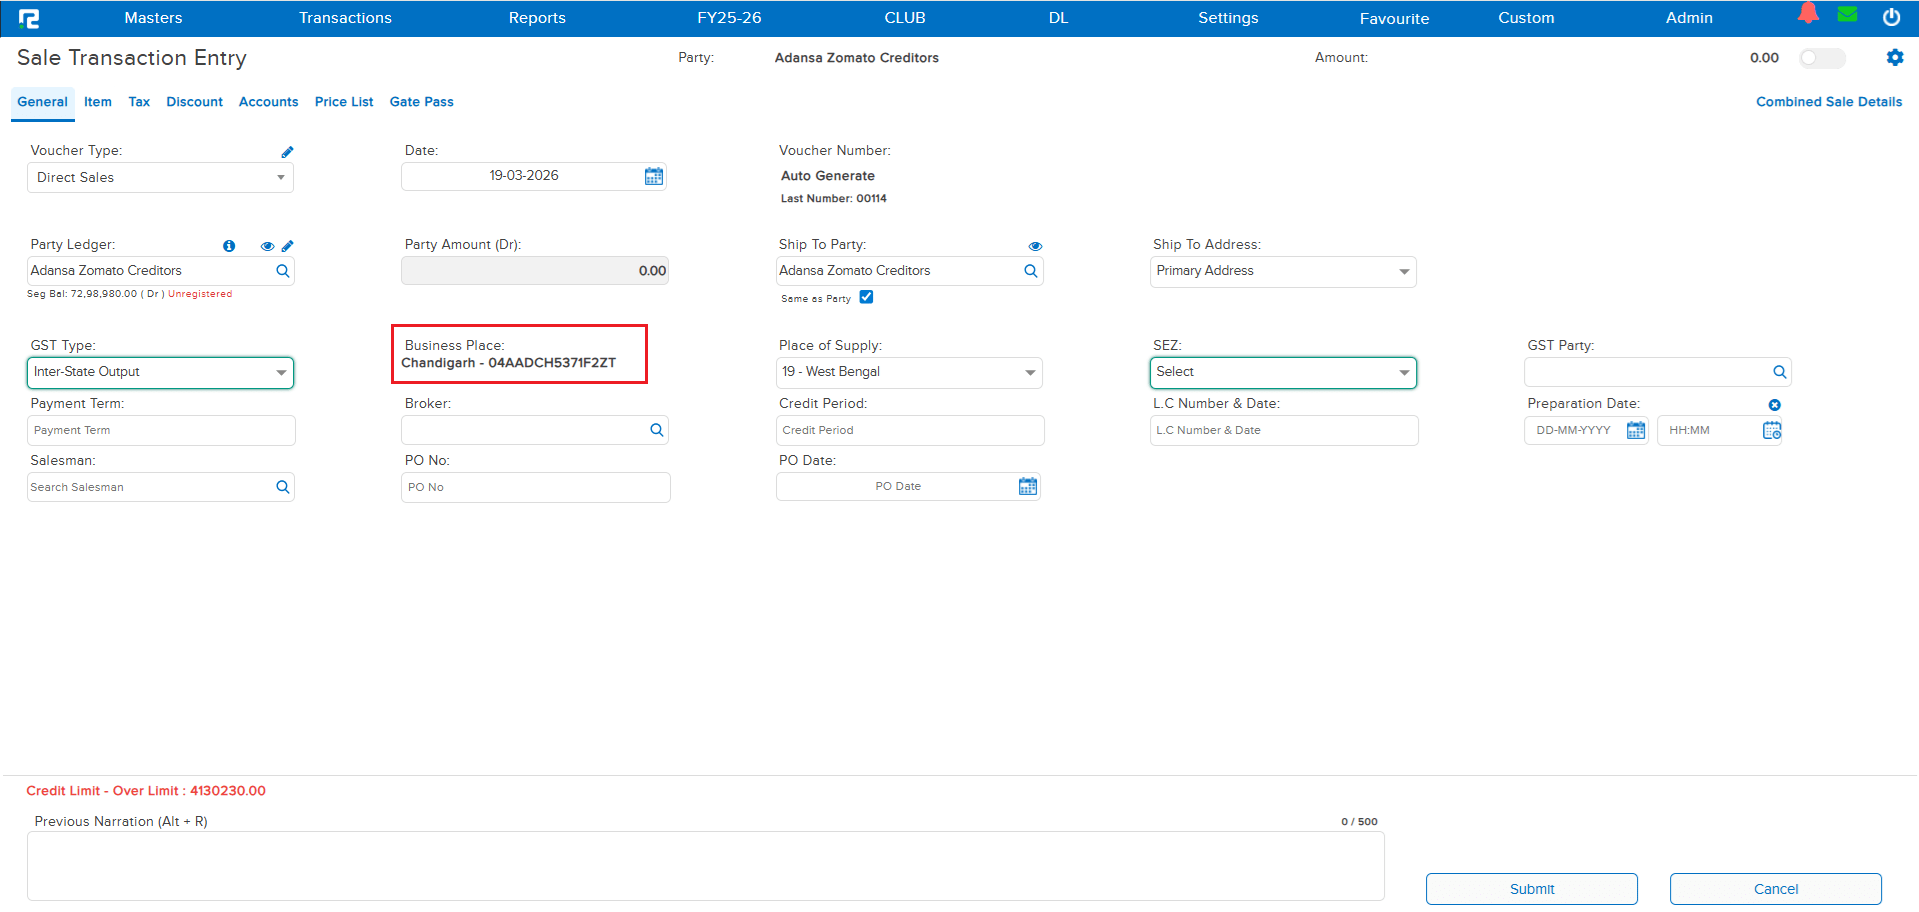
📌 What Was Happening
Previously, the Business Place was sometimes getting skipped in Sale Orders even when the configuration was done correctly. This was suspected to occur due to frequent switching of segments across different browser tabs. A validation was already added for Sale Orders to block saving if the Company is GST registered, the GSTIN is assigned to the segment, and the appropriate Business Place is missing.
However, the same issue was also occurring in Sales transactions, where the Business Place could be saved as blank under similar conditions.
🌟 How This Helps You
The Business Place validation has now been extended to Sales transactions as well. If your Company is GST registered and the GSTIN is assigned to the segment, the system will block the save if the Business Place is missing — ensuring your GST compliance data is always complete and accurate across both Sale Orders and Sales entries.
📷 See It in Action
New Release – 6th March, 2026
Beta Release — 06-03-2026
📌 Overview
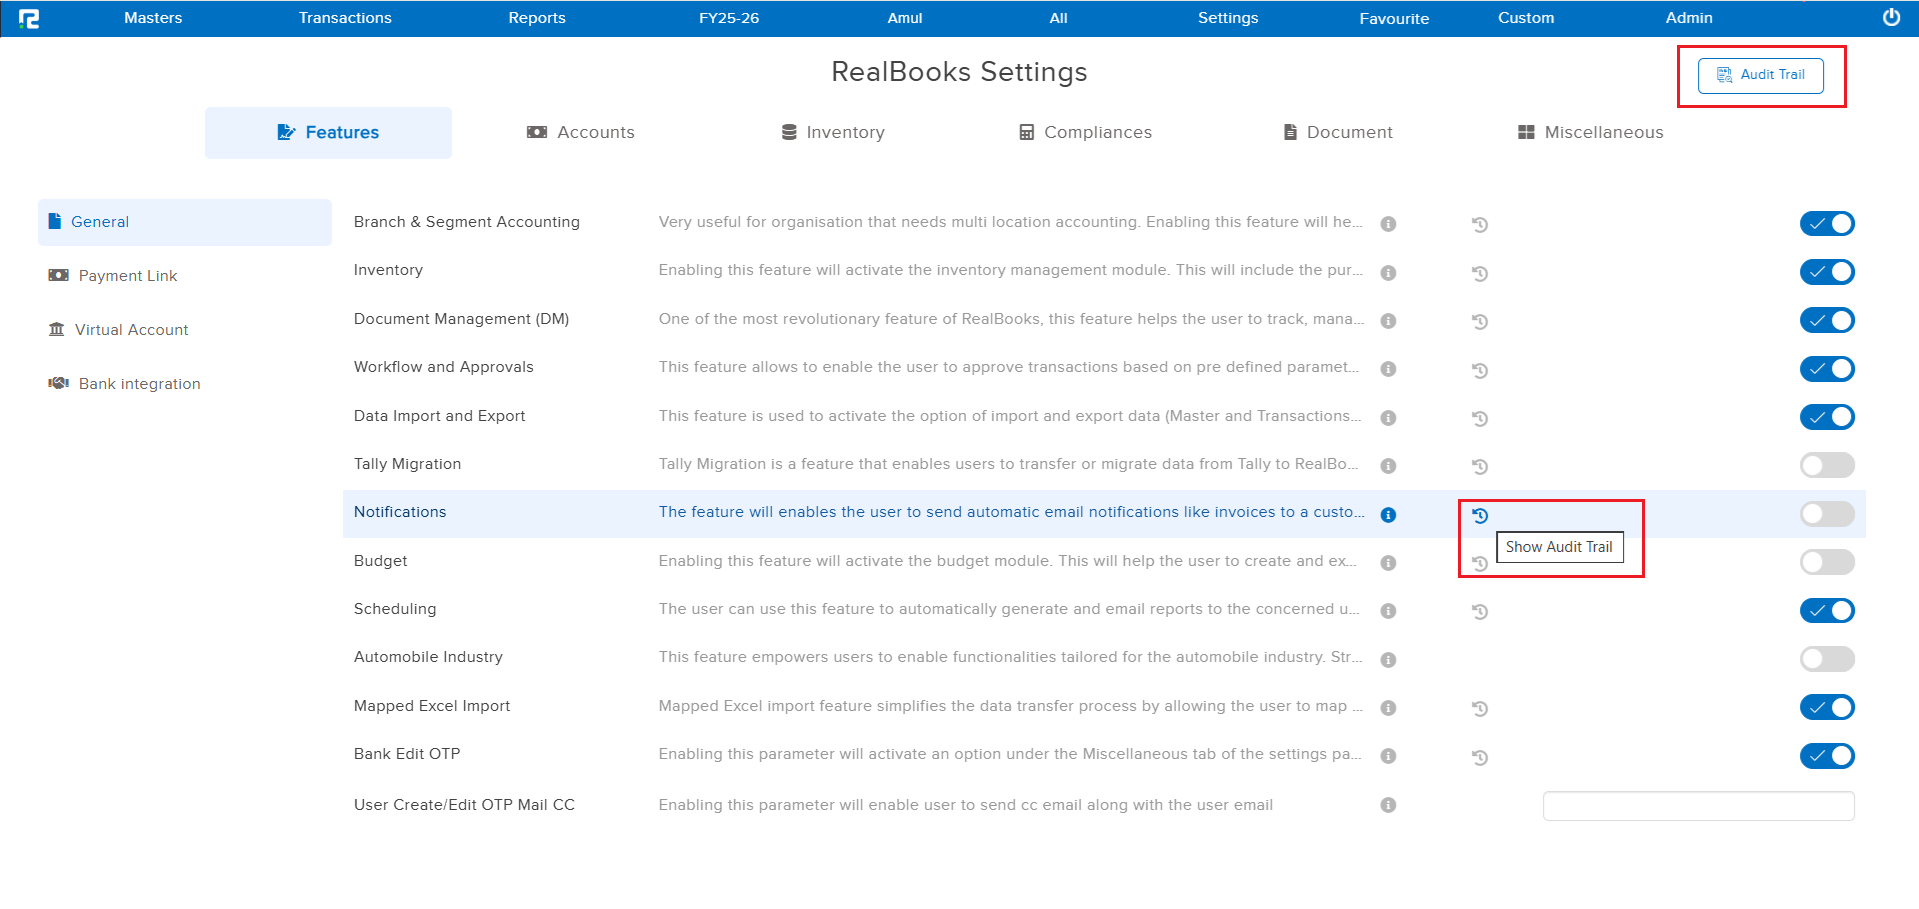
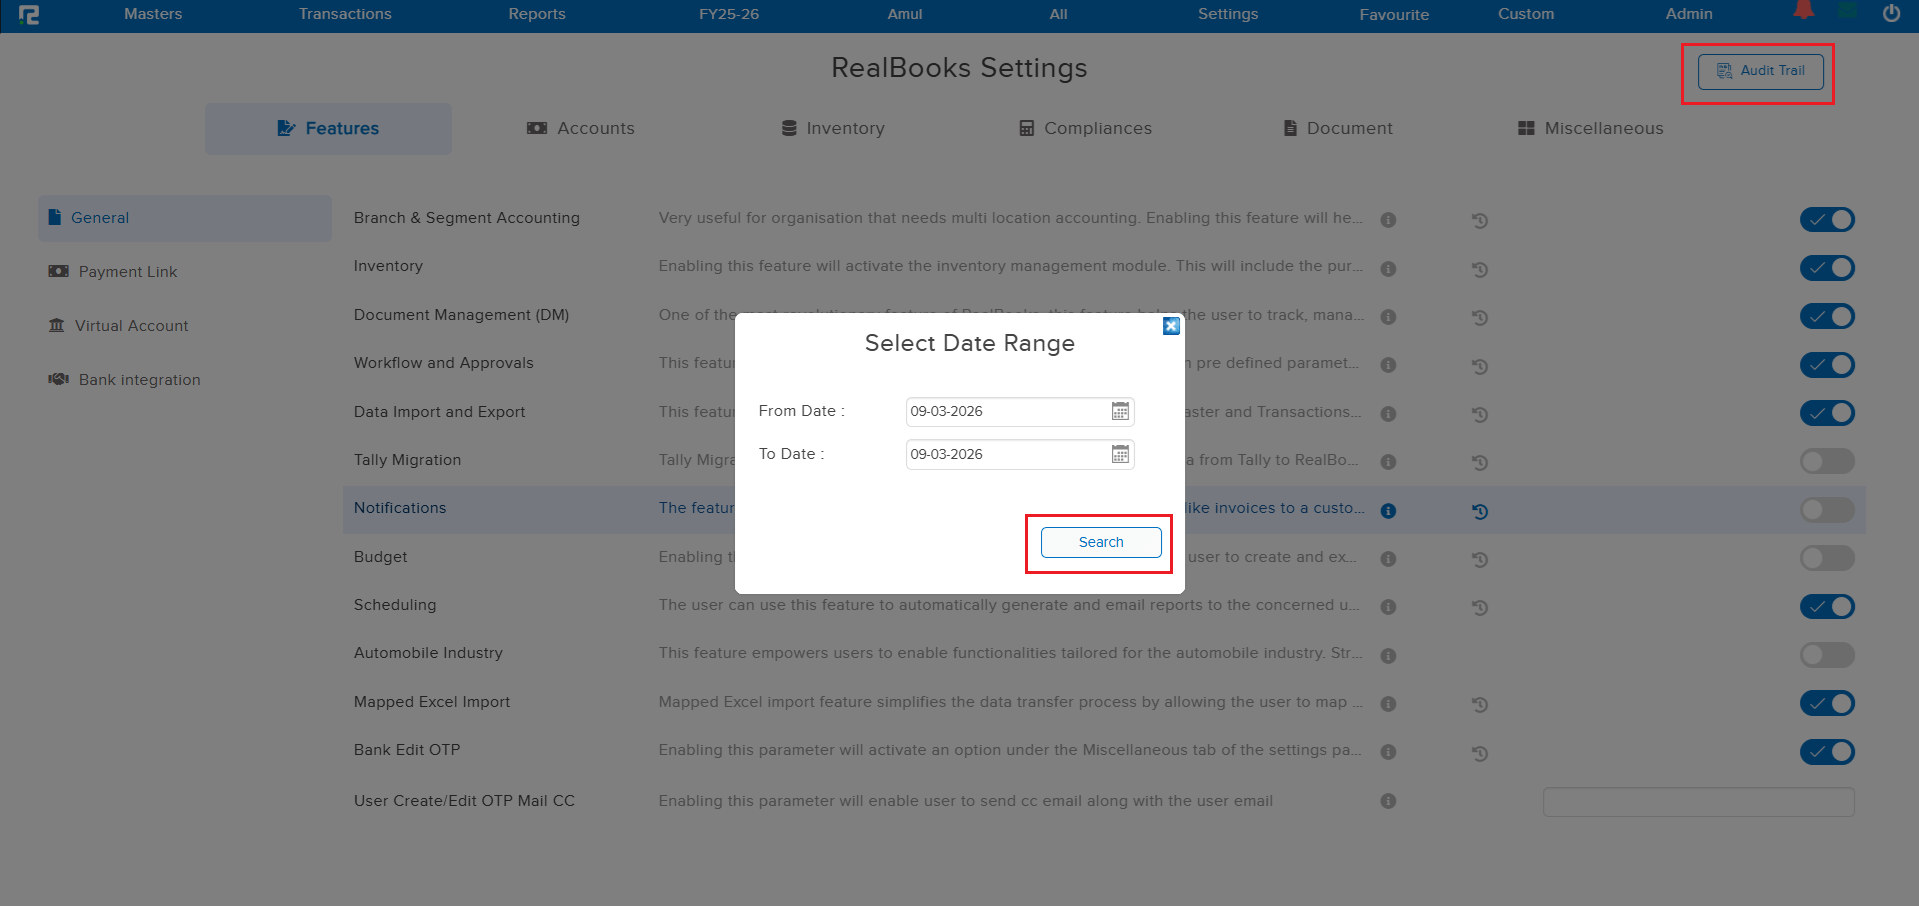
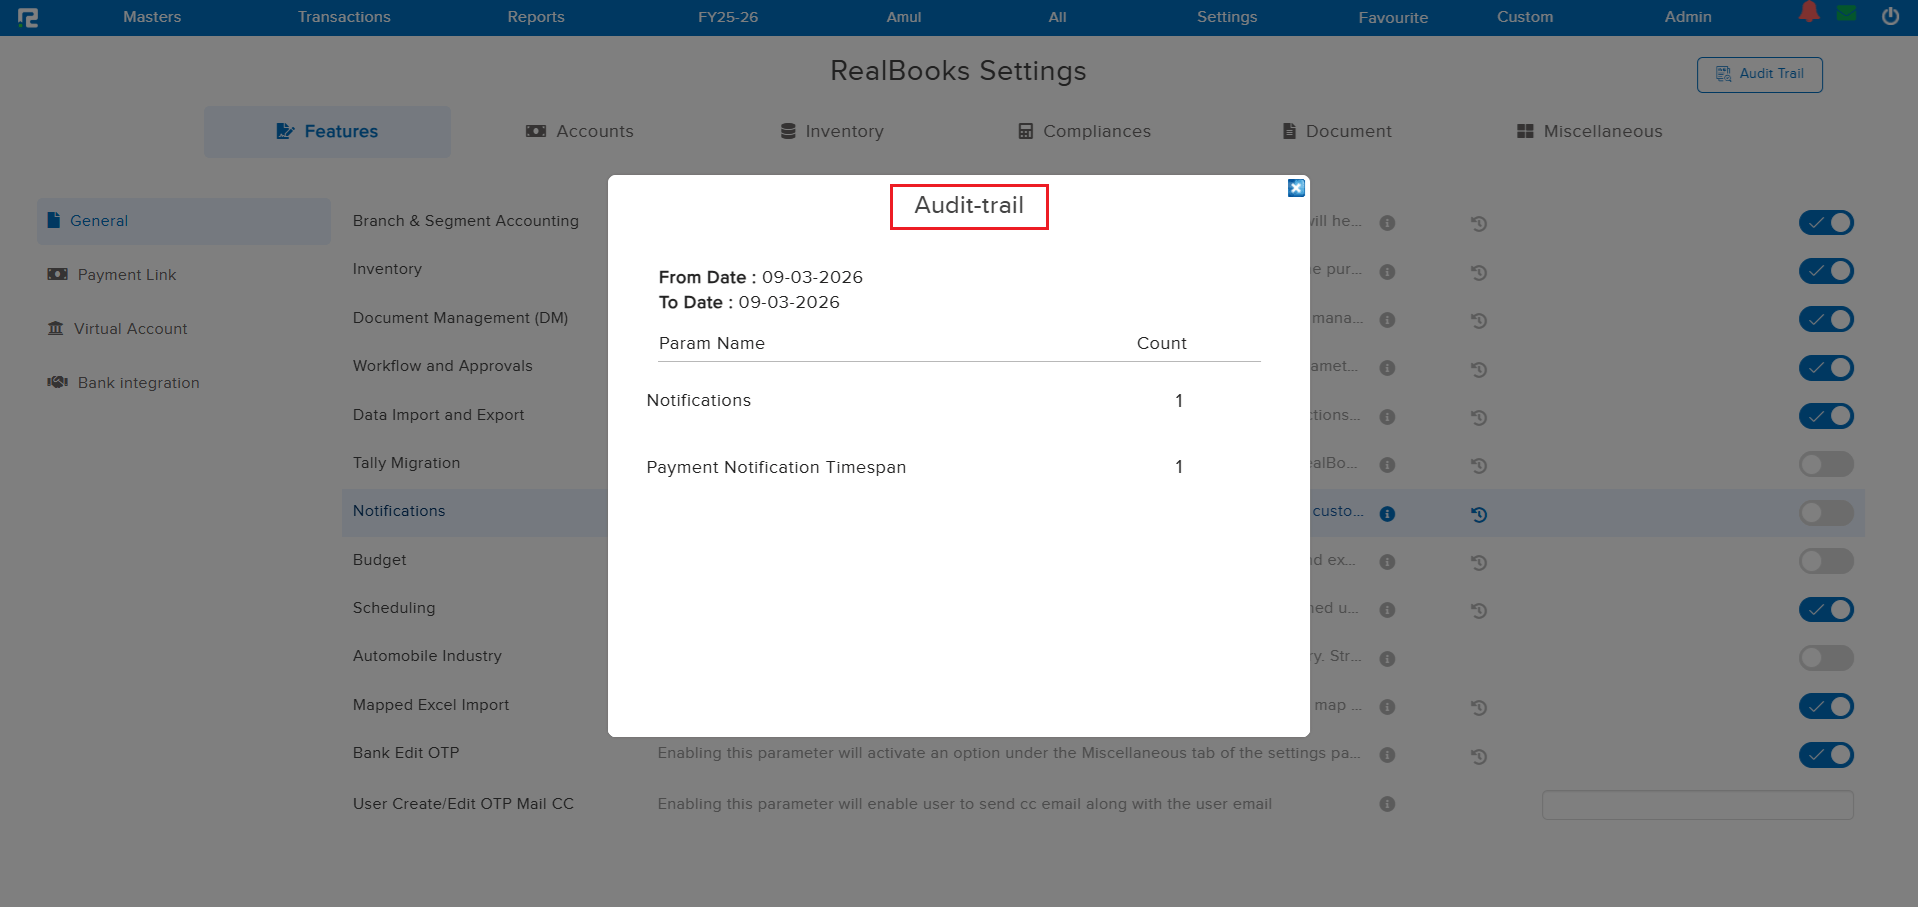
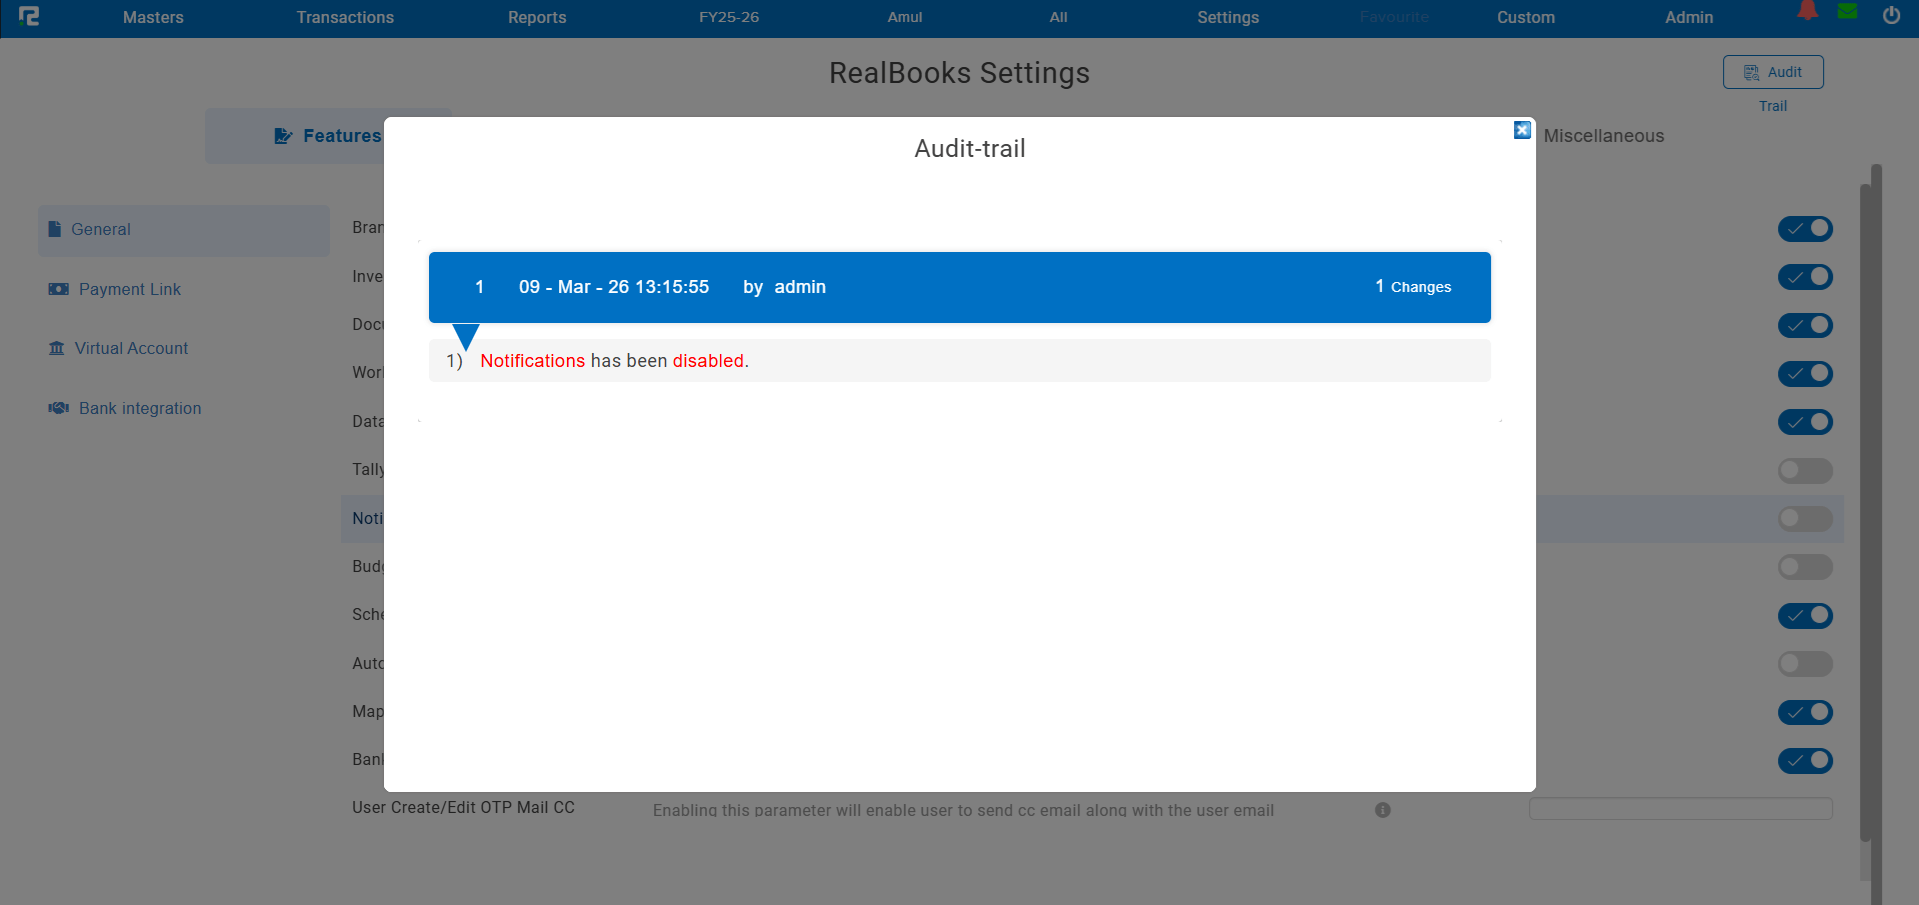
A comprehensive Audit Trail has been introduced on the Settings Configuration page. You can now track every parameter change with full visibility into who made the change, when it was made, and what was enabled or disabled. Two levels of audit trail are available: an Overall Audit Trail showing all configuration changes, and a Parameter-Wise Audit Trail for tracking the history of individual settings.
🌟 What This Means for You
No more guessing who toggled a setting or when a configuration was changed. The audit trail gives administrators complete transparency and accountability over all settings changes, making it easier to troubleshoot issues and maintain compliance.
🎬 How to Use It
1. Go to Settings → Configuration.
2. Use the Overall Audit Trail to view all recent configuration changes across parameters.
3. Click on any individual parameter to view its Parameter-Wise Audit Trail — showing the complete history of that specific setting.
📷 See It in Action
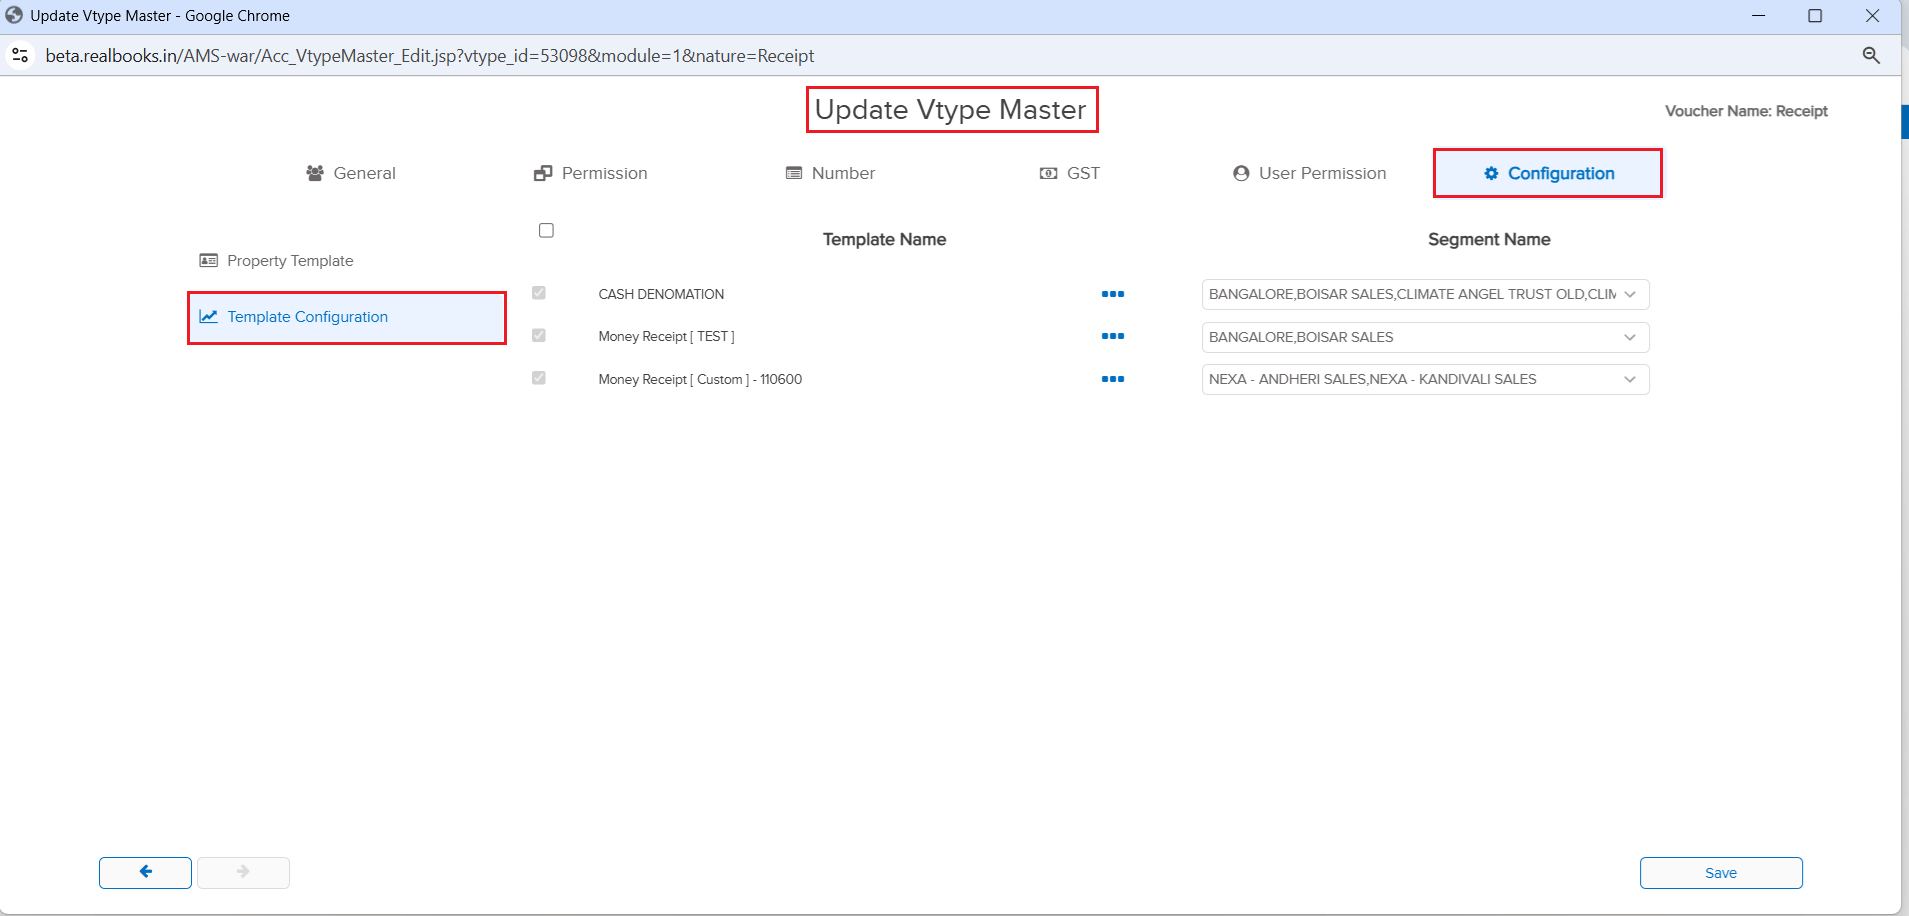
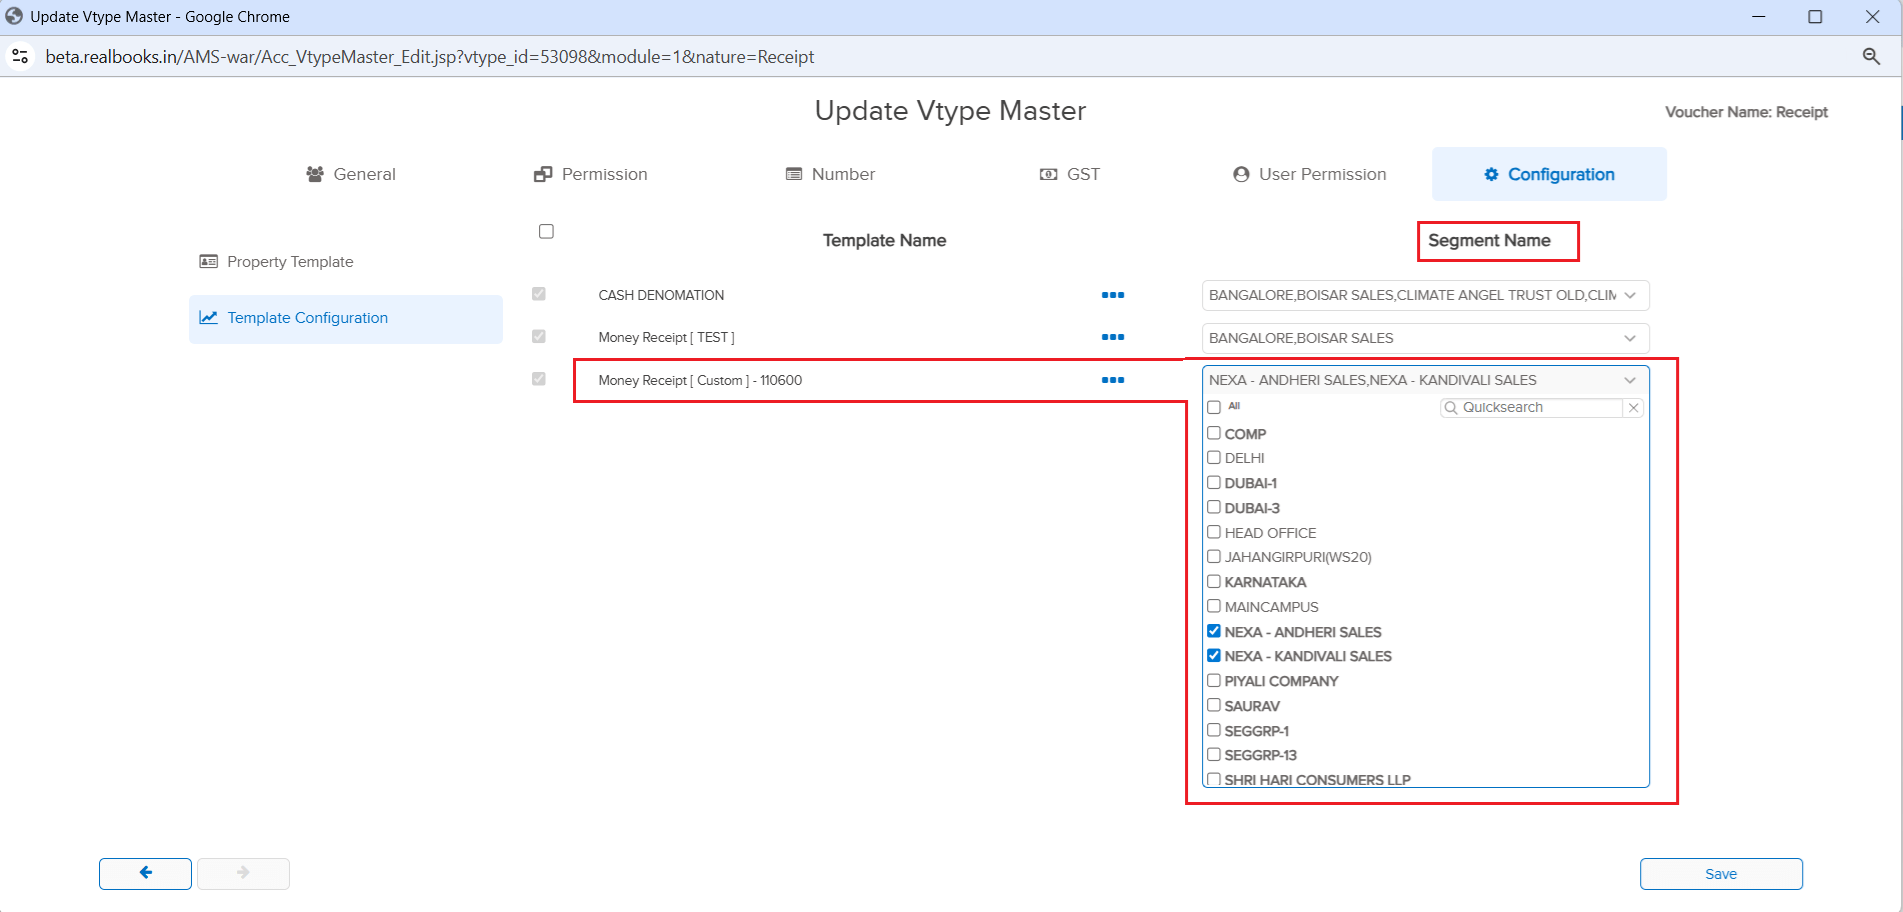
📌 Overview
If your company has custom templates deployed, you can now assign them to voucher types directly from the Voucher Type Master — no need to contact the RealBooks team! Previously, when a new segment was created after a custom template was deployed, you had to reach out to get the template assigned to the new segment. Now, you can do it yourself. Additionally, you can see how many templates are assigned to a specific voucher type and which segments each template is assigned to.
🌟 What This Means for You
Complete self-service control over template assignments! When you create a new segment, simply go to the Voucher Type Master and assign the required templates yourself. You also get full visibility into the template-to-segment mapping, making it easy to manage and audit your template configurations across the organization.
🎬 How to Use It
1. Go to Masters → Accounts → Voucher and open a voucher type in Edit mode.
2. You’ll see the available custom templates listed for selection.
3. Assign templates to the desired segments.
4. View the summary to see how many templates are assigned and their segment mappings.
📷 See It in Action
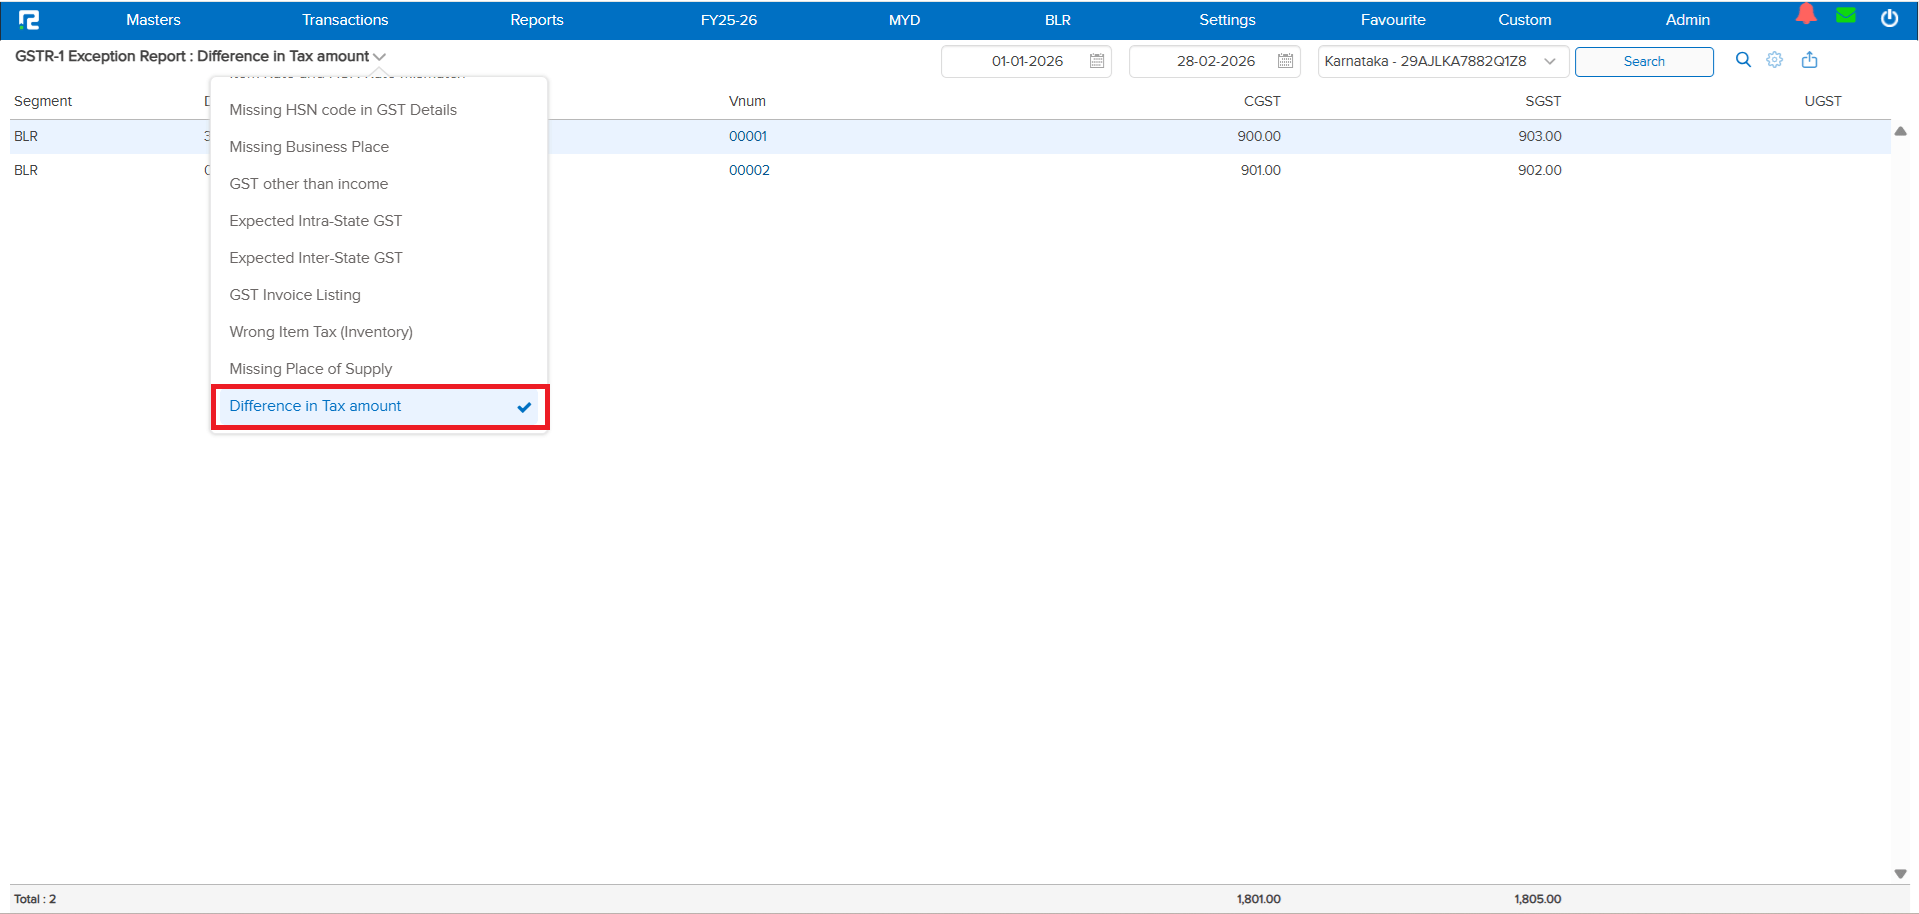
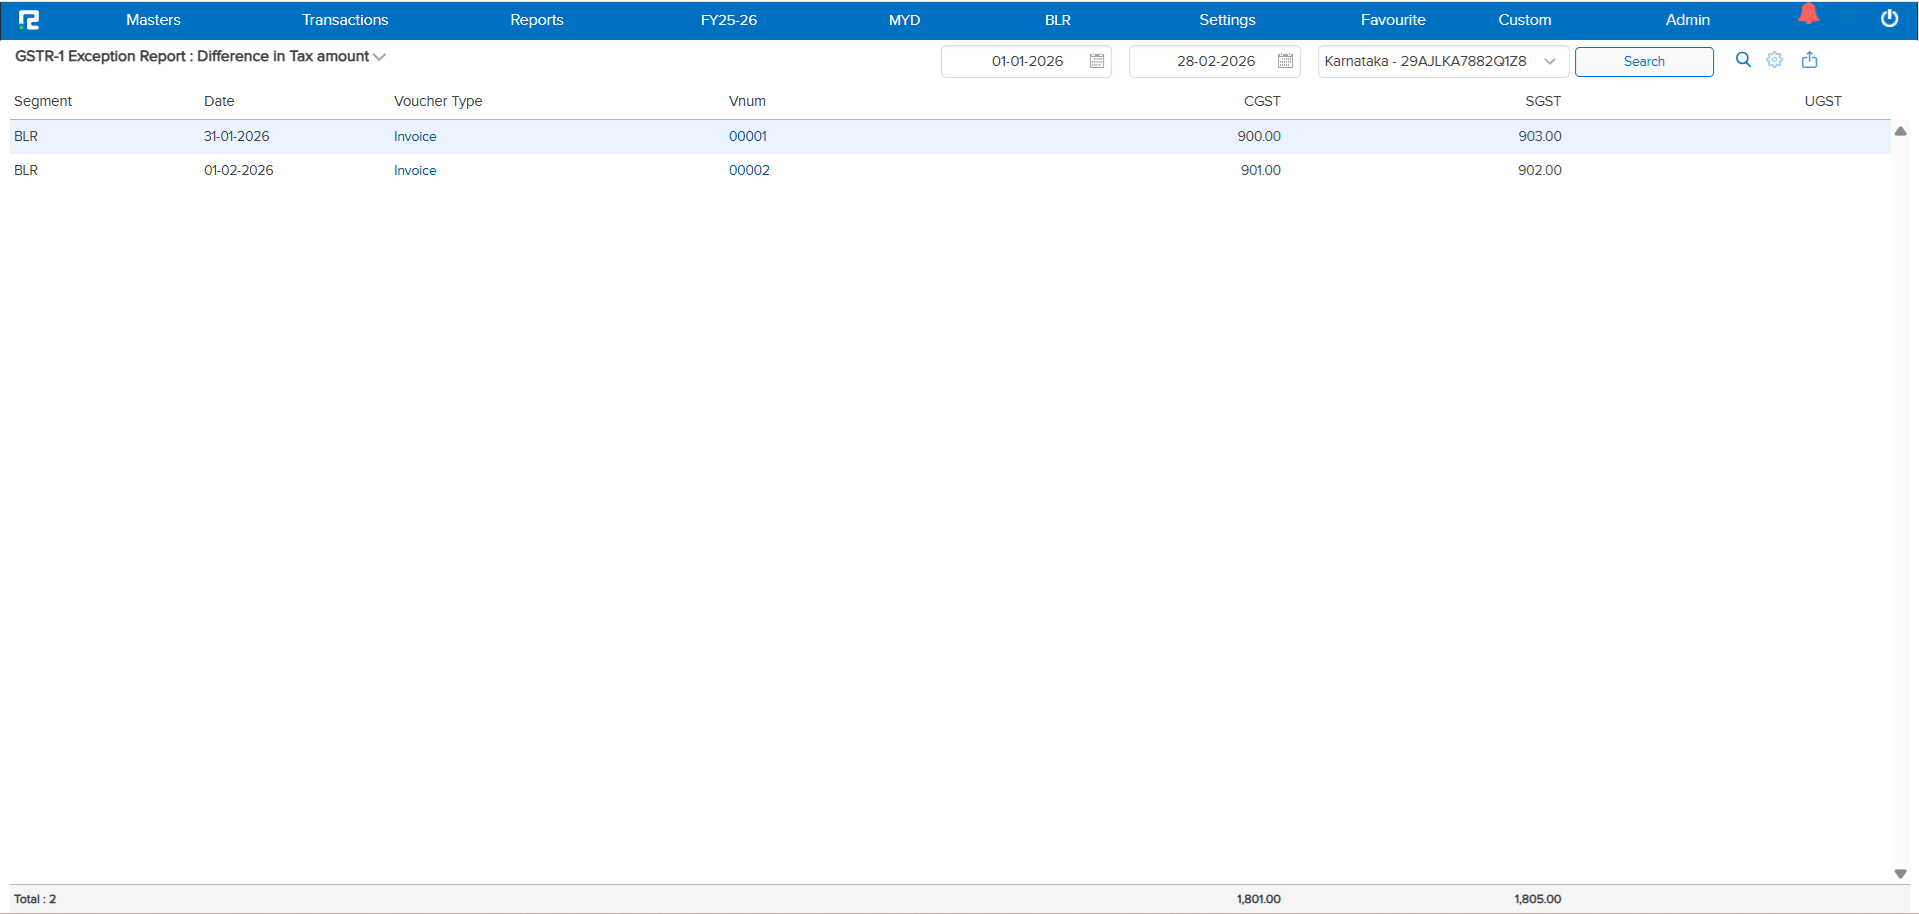
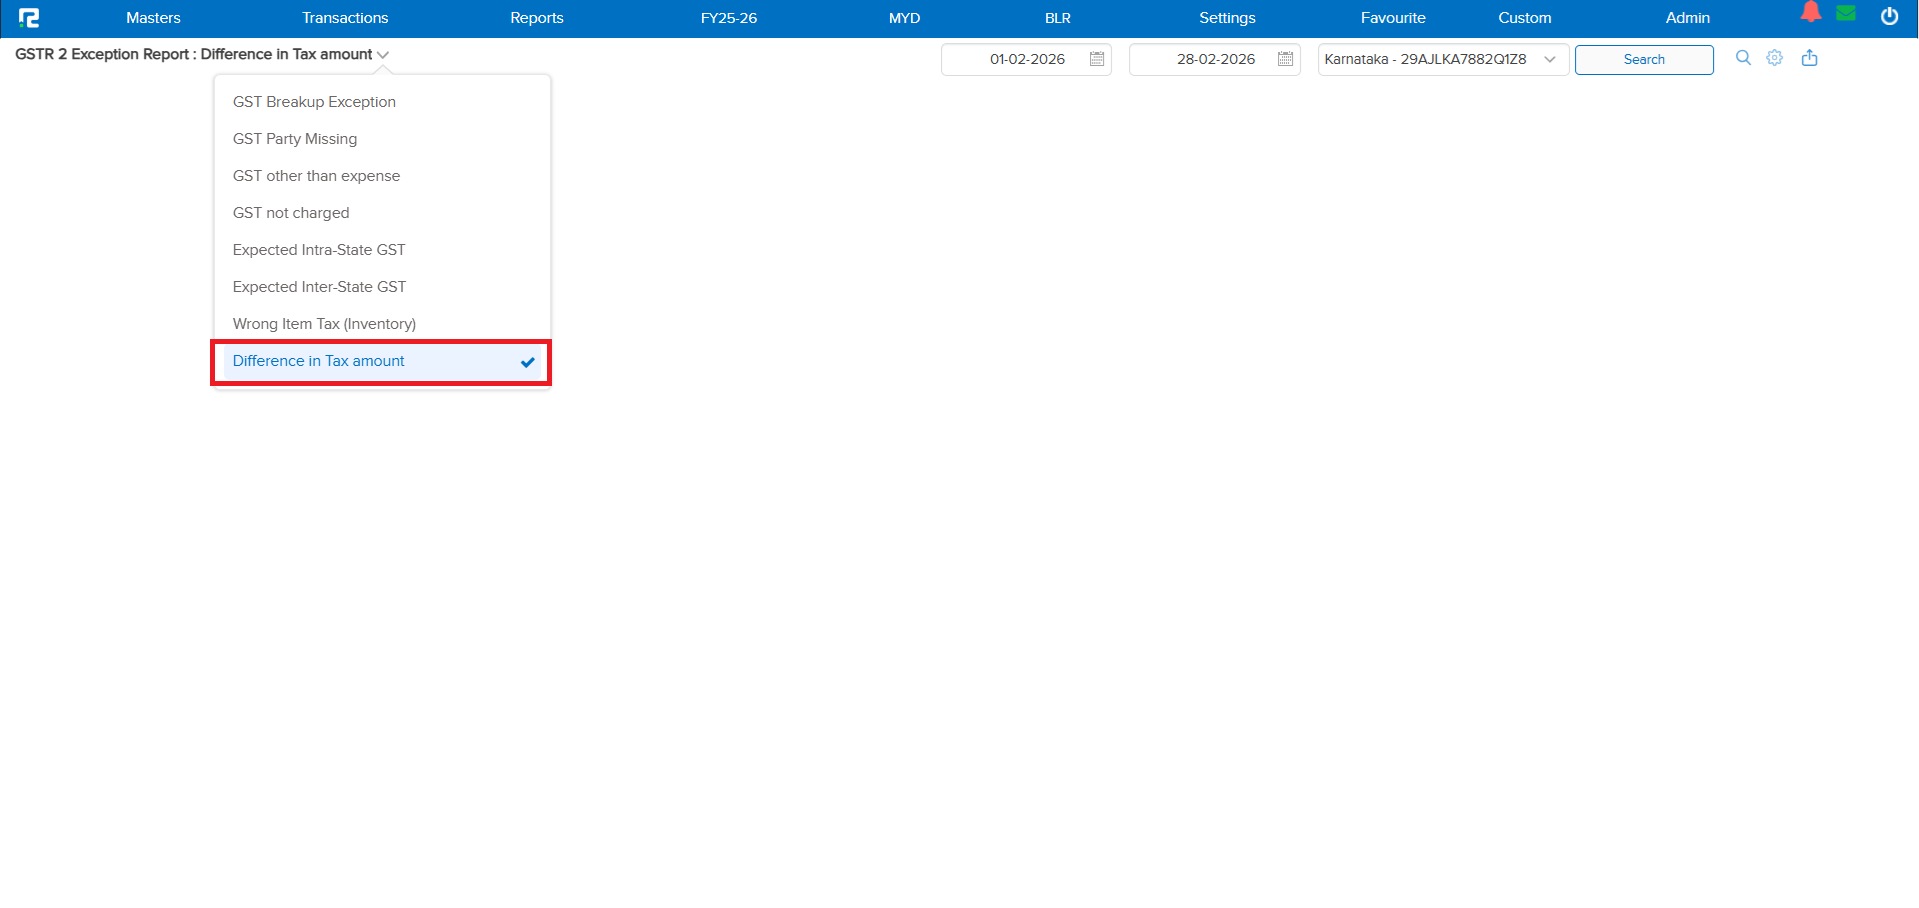
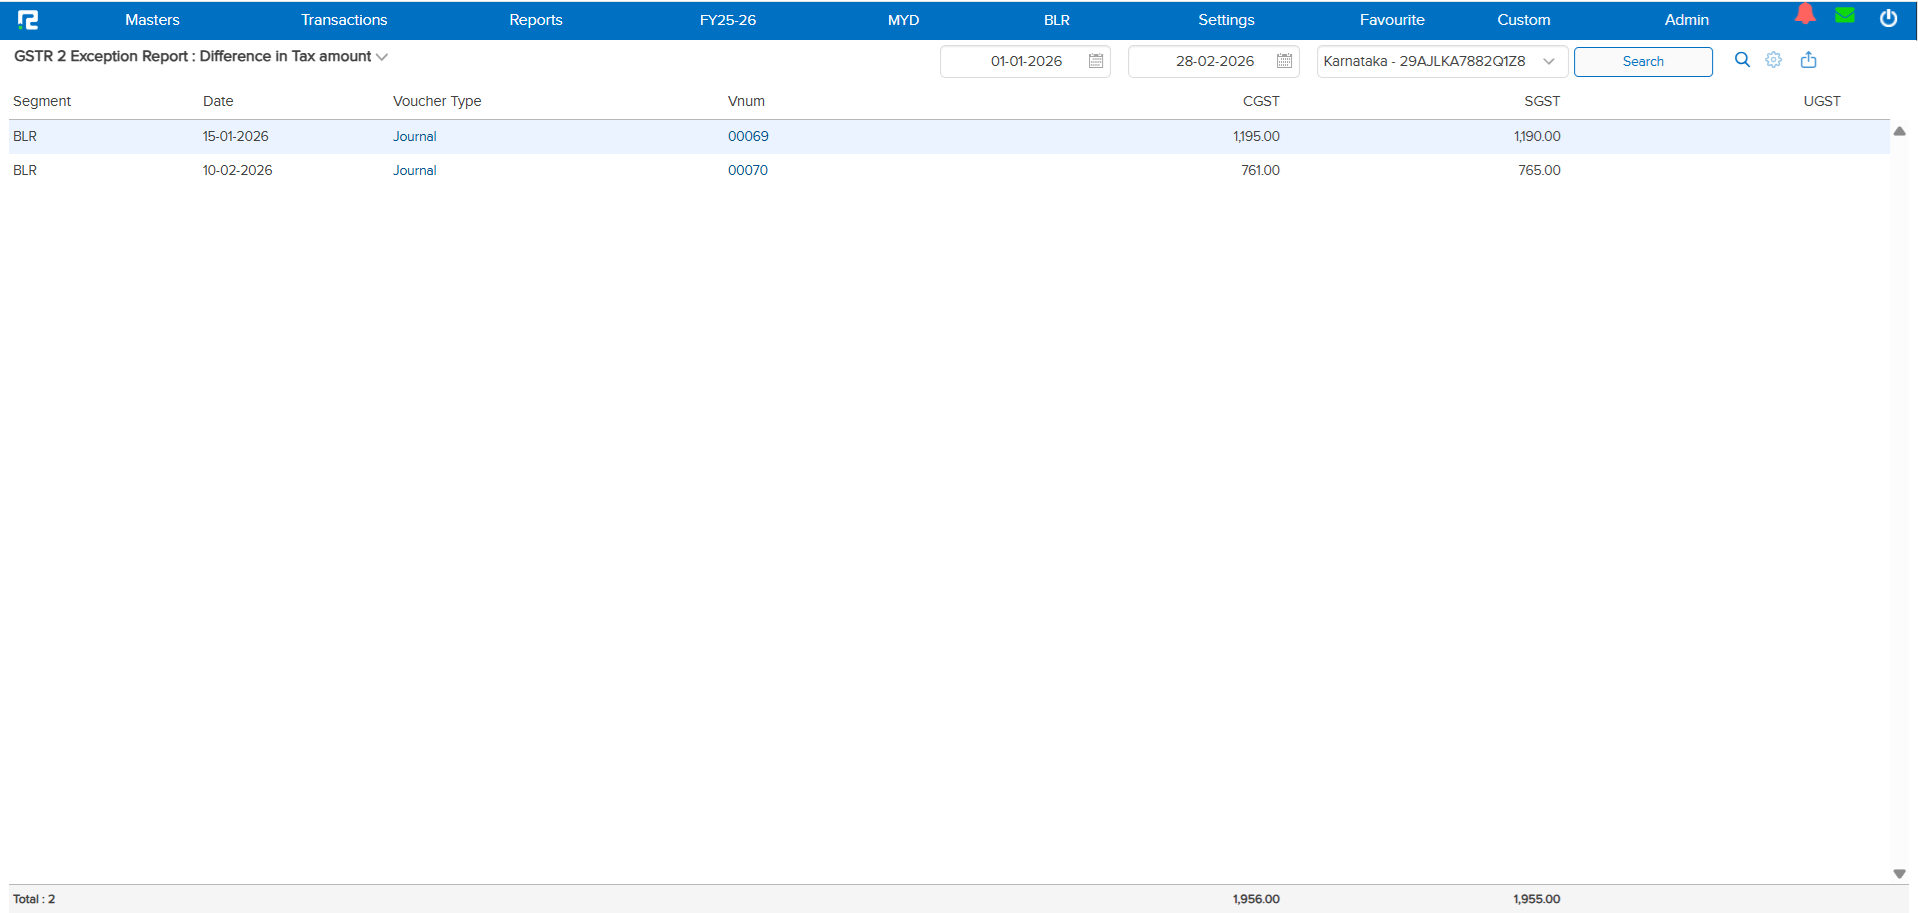
📌 Overview
A brand new variation — Difference in Tax Amount — has been added to both the GSTR-1 Exception and GSTR-2 Exception reports. This report highlights transactions where the total CGST value and total SGST value do not match, helping you catch tax calculation discrepancies before filing.
🌟 What This Means for You
Tax mismatches between CGST and SGST can lead to filing errors and compliance issues. With this new variation, you can quickly identify and correct these discrepancies right from the exception report — no manual cross-checking needed!
🎬 How to Use It
The new variation is available in both GSTR-1 and GSTR-2 exception reports:
1. Open either exception report.
2. Select the new Difference in Tax Amount variation.
3. Run the report to see all transactions where CGST and SGST values don’t match.
📷 See It in Action
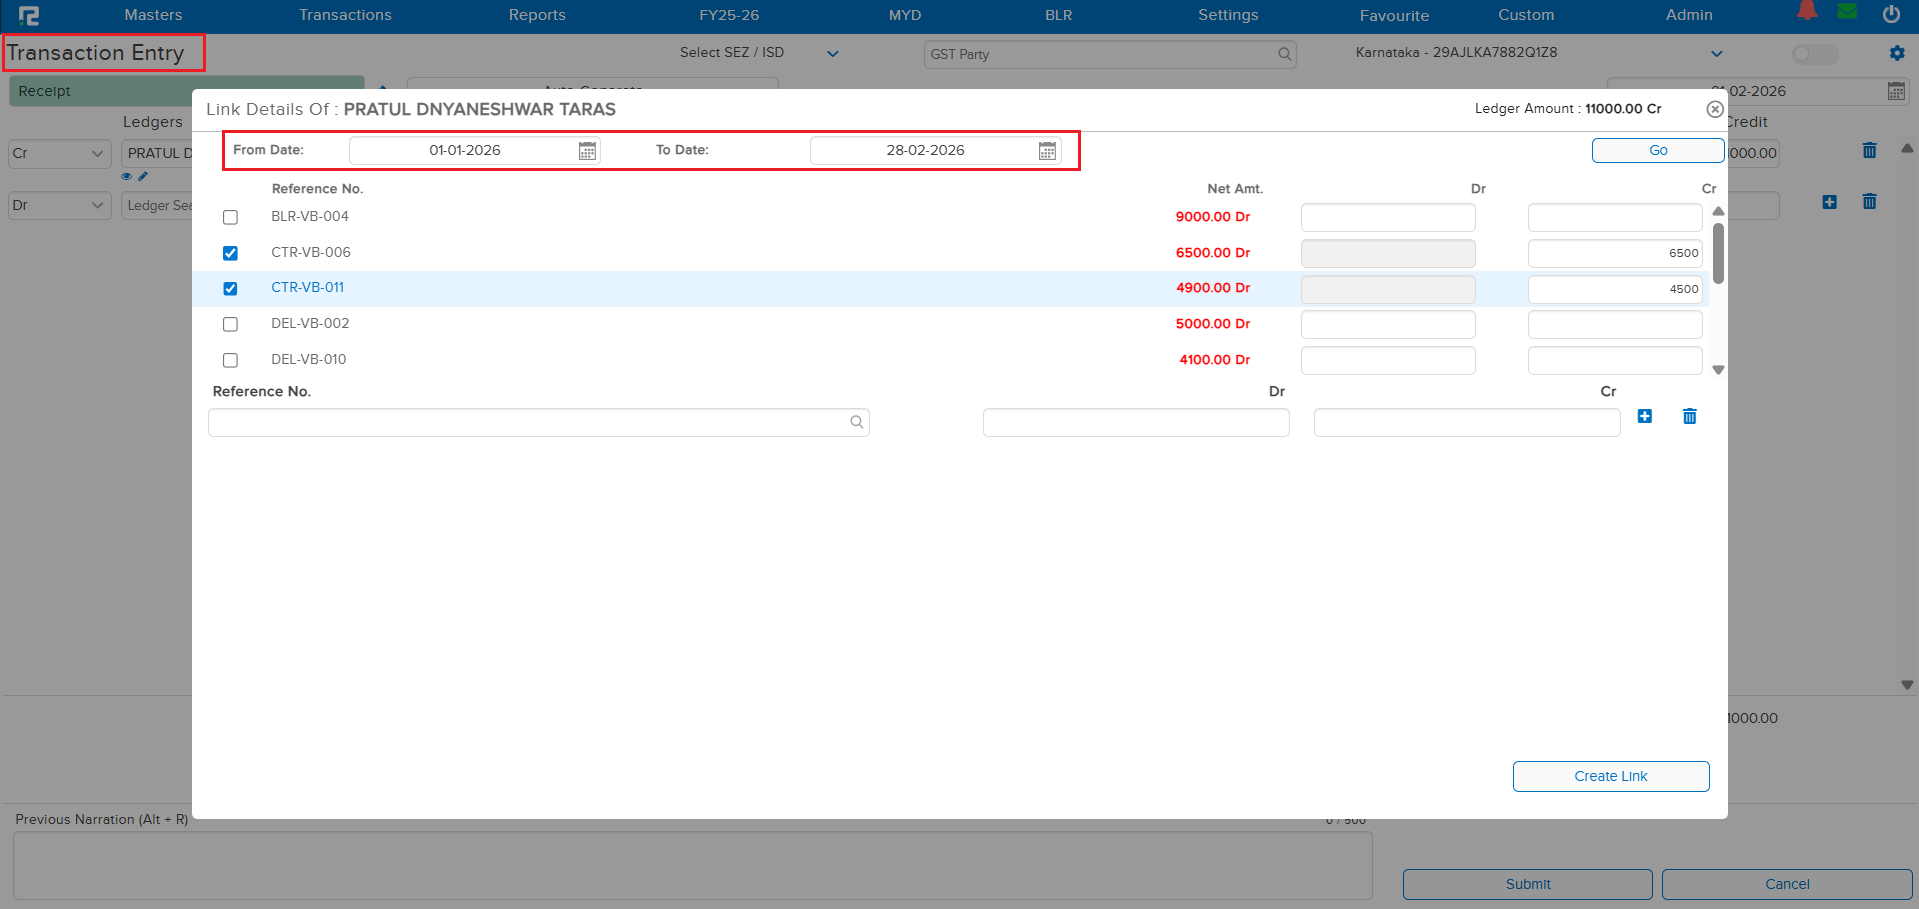
📌 Overview
The Link Search option in transactions now includes a date range filter. Whether you’re creating a new transaction or editing an existing one, you can now search for linked entries by specifying a “From” and “To” date — making it much easier to find the exact transaction you need.
🌟 What This Means for You
No more scrolling through long lists of linked transactions! Simply set a date range and the system filters results instantly. This is especially helpful when you have a high volume of transactions and need to quickly locate a specific one during entry or editing.
🎬 How to Use It
1. Open any transaction in entry or edit mode.
2. Click the Link Search option.
3. Use the new From Date and To Date fields to filter results by date range.
4. Select the linked transaction you need.
📷 See It in Action

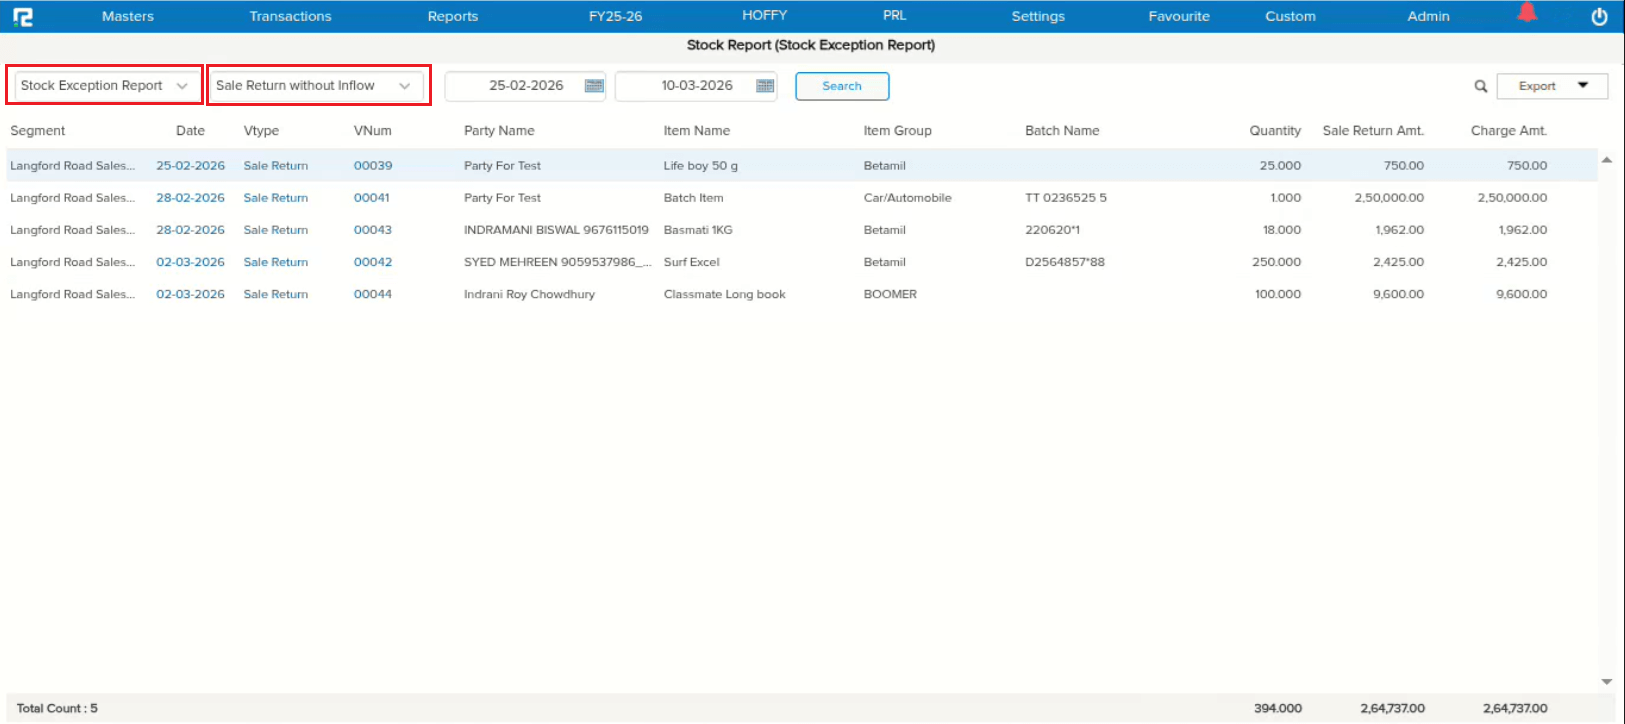
📌 Overview
A new parametric feature has been introduced to handle COGS (Cost of Goods Sold) updates in case of Sale Returns. This applies to both batch and non-batch items. If an item was never purchased or had no inflow via Stock Journal, the system now automatically updates the COGS based on the Sales Return Rate. A dedicated Stock Exception Report lists all entries where COGS has been updated using the Sales Return Rate.
🌟 What This Means for You
Previously, if a returned item had no purchase or inflow history, the COGS couldn’t be determined. Now, the system intelligently uses the Sales Return Rate to update COGS automatically via the Overnight Scheduler, ensuring your cost records stay accurate without manual intervention.
🎬 How It Works
1. This is a parametric feature — enabled on demand only.
2. Applies to both batch and non-batch items.
3. If the item has no purchase or Stock Journal inflow, COGS is updated based on the Sales Return Rate.
4. COGS updates are processed via the Overnight Scheduler.
5. An exception report is available to review all affected entries.
🛠 Where to Find the Exception Report
📷 See It in Action
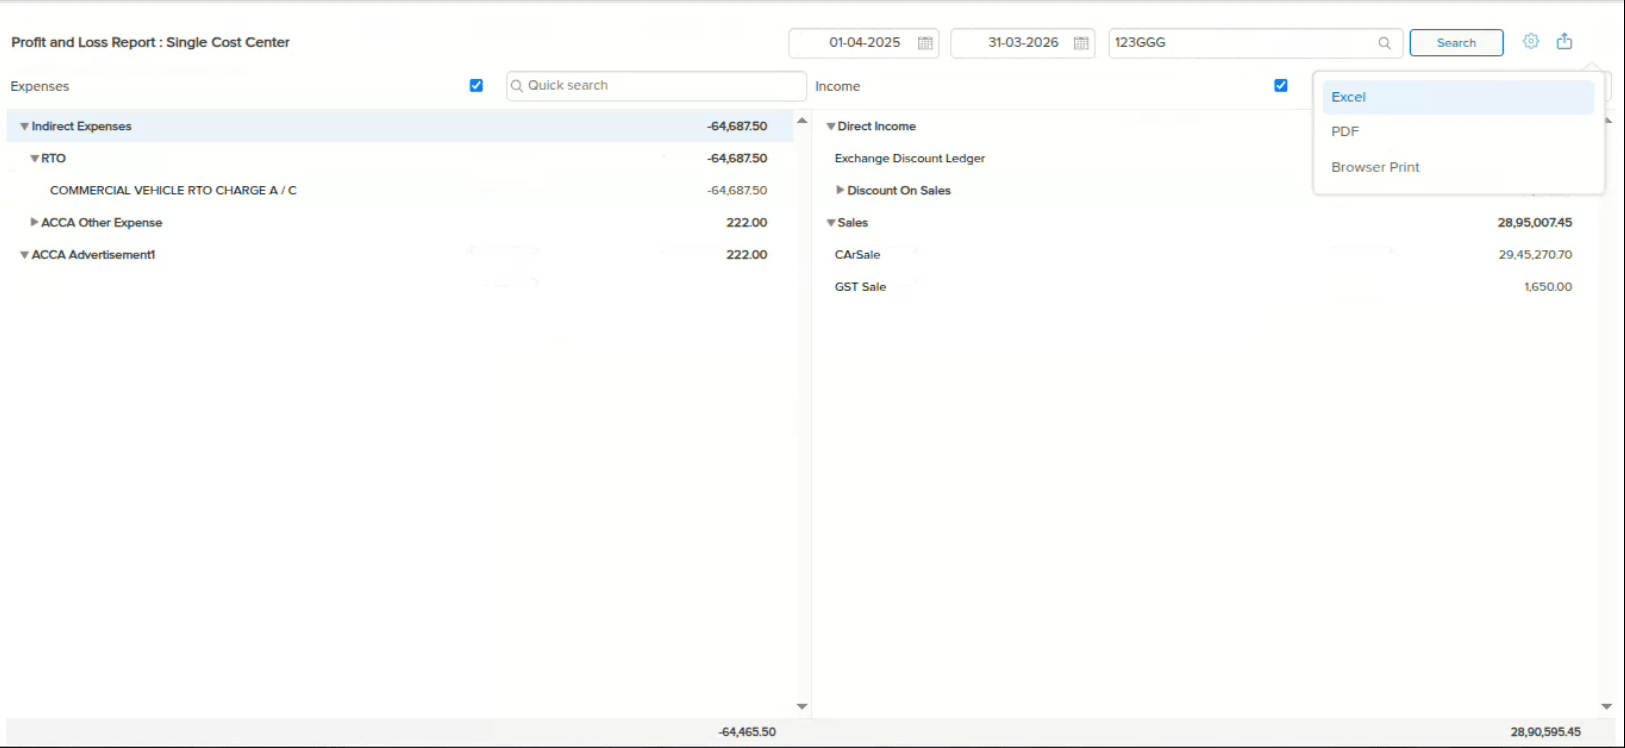
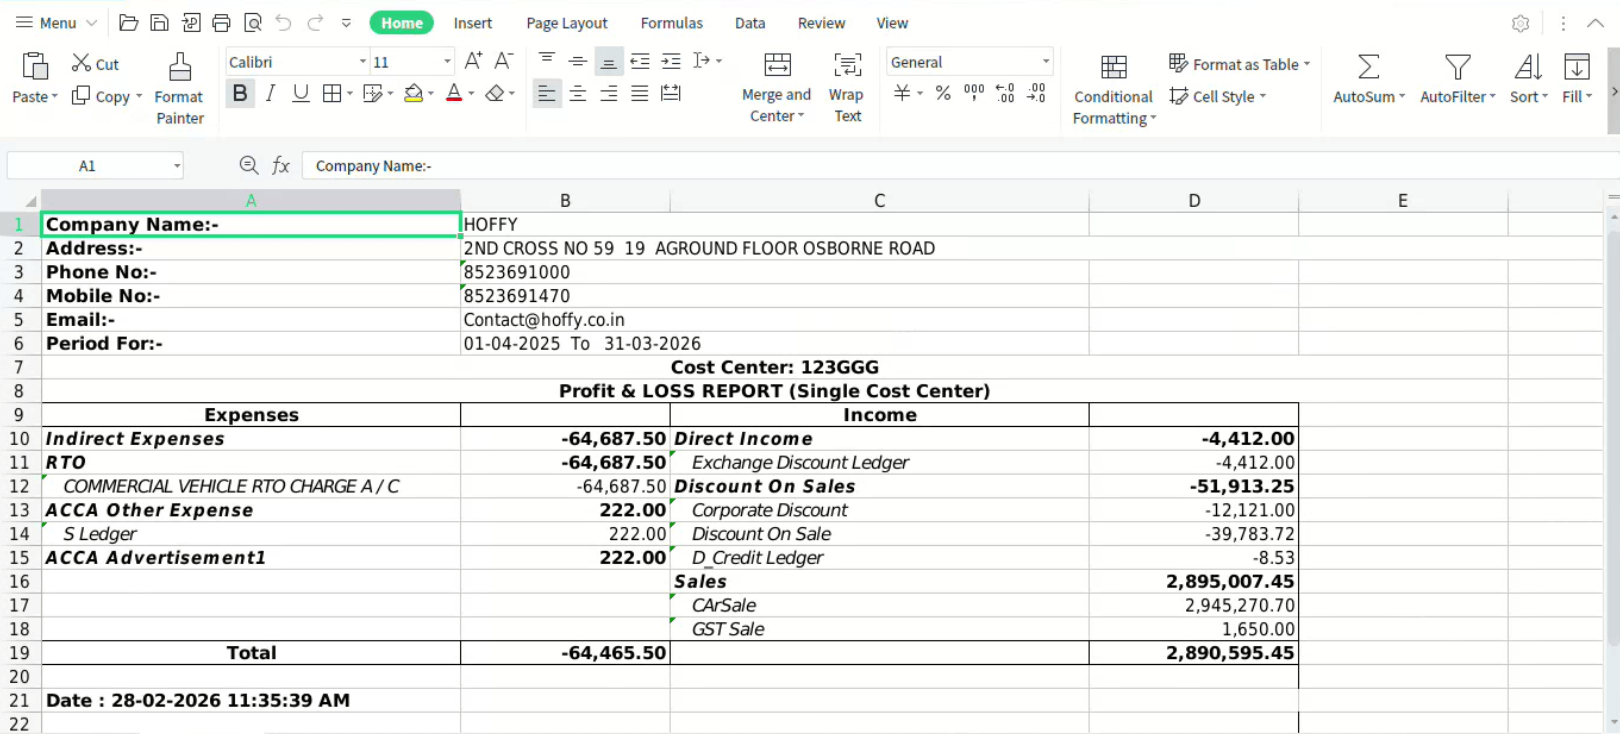
📌 What Was Happening
When you drilled down from the Cost Centre Summary report, the resulting Profit & Loss – Single Cost Centre report was not getting exported. Clicking the export option had no effect, leaving you unable to download the detailed cost centre data you needed.
🌟 How This Helps You
The export functionality now works seamlessly on the drill-down page. You can drill down into any cost centre and export the Profit & Loss – Single Cost Centre report without any issues.
🛠 Where to Find It
📷 See It in Action

📌 What Was Happening
If you were working with two tabs open and both had the same segment selected (e.g. “All”), the system was still forcing you to refresh. Here’s the scenario: You’re on Tab 1 with segment “All”, you switch to Tab 2 and change the segment to “Bangalore”, work there for a while, then switch the segment back to “All”. When you returned to Tab 1 — even though both tabs now had the same segment “All” selected — the system forcefully asked you to refresh Tab 1.
🌟 How This Helps You
The system now correctly checks whether the segment has actually changed before prompting a refresh. If both tabs are on the same segment, you can switch between them freely without losing your work or being interrupted by unnecessary refresh prompts.
📷 See It in Action
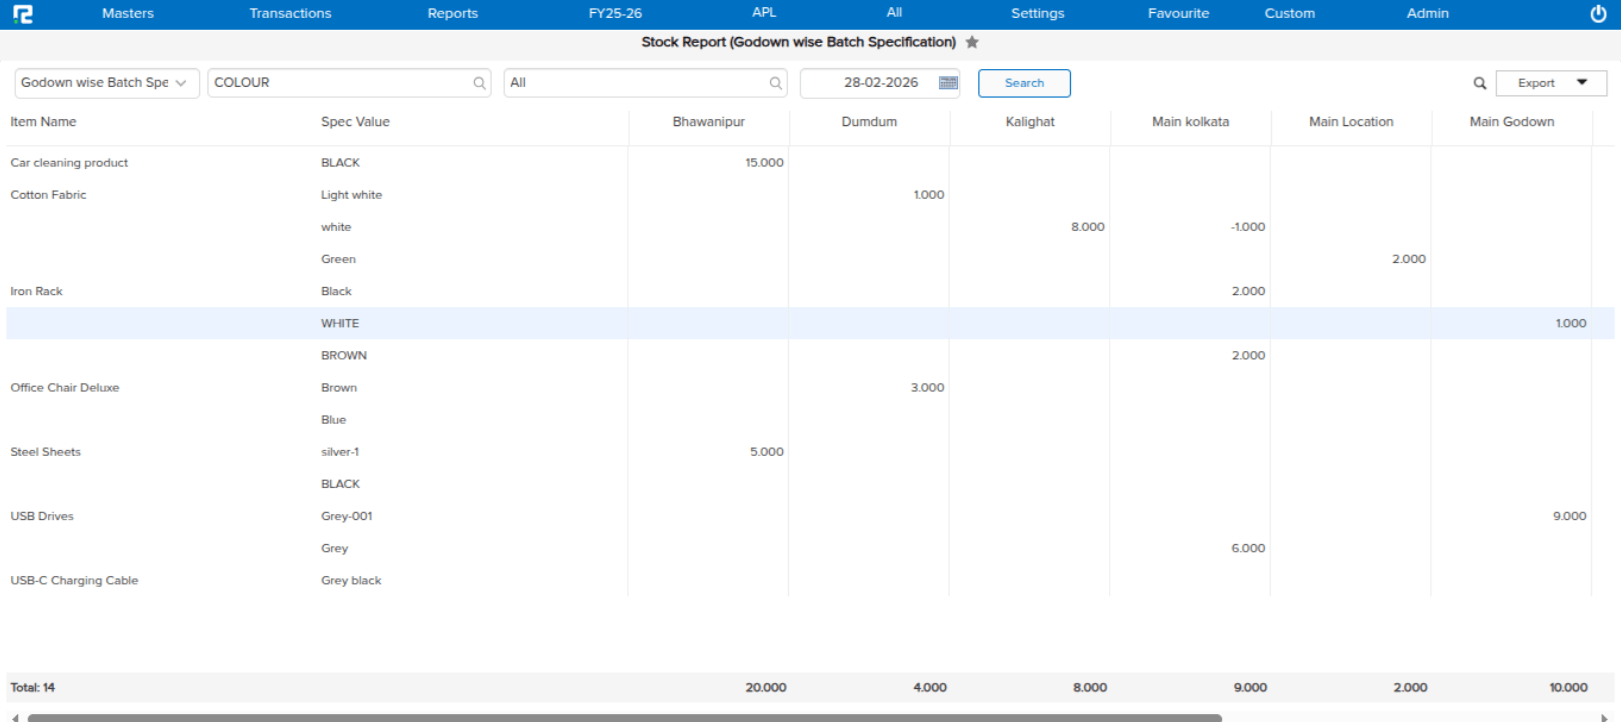
📌 What Was Happening
If you purchased three batches of the same item with different specifications and then transferred the stock of the last batch from Godown A to Godown B, the quantity for that batch appeared blank in the UI for Godown B. This issue occurred specifically when multiple godowns were displayed on the screen at the same time.
🌟 How This Helps You
The report now correctly displays the transferred batch quantity in the destination godown, regardless of how many godowns are visible on screen. Your inventory data is accurate and reliable across all godown views.
🛠 Where to Find It
📷 See It in Action
📌 What Was Happening
When running the Sale Register report (Voucher Wise Item Wise — Sale & Sale Return) for the first time, the Gross Item Rate displayed correctly. However, if you filtered by an Item Name and then removed that filter, the Gross Item Amount changed automatically — showing incorrect values without any data actually changing.
🌟 How This Helps You
The Gross Item Amount now remains consistent regardless of whether you apply or remove item filters. You can freely filter and clear searches without worrying about the report data shifting unexpectedly.
🛠 Where to Find It
📷 See It in Action
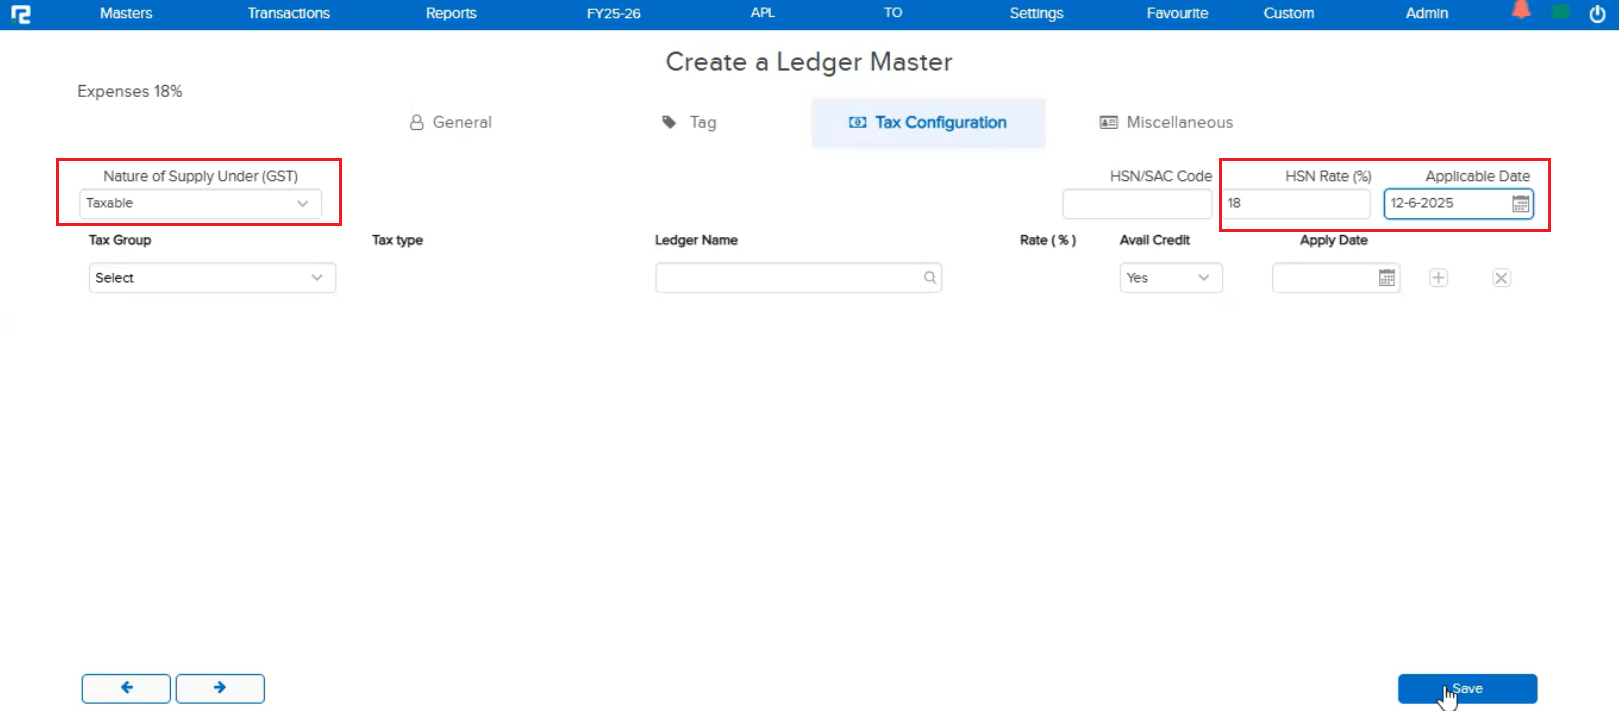
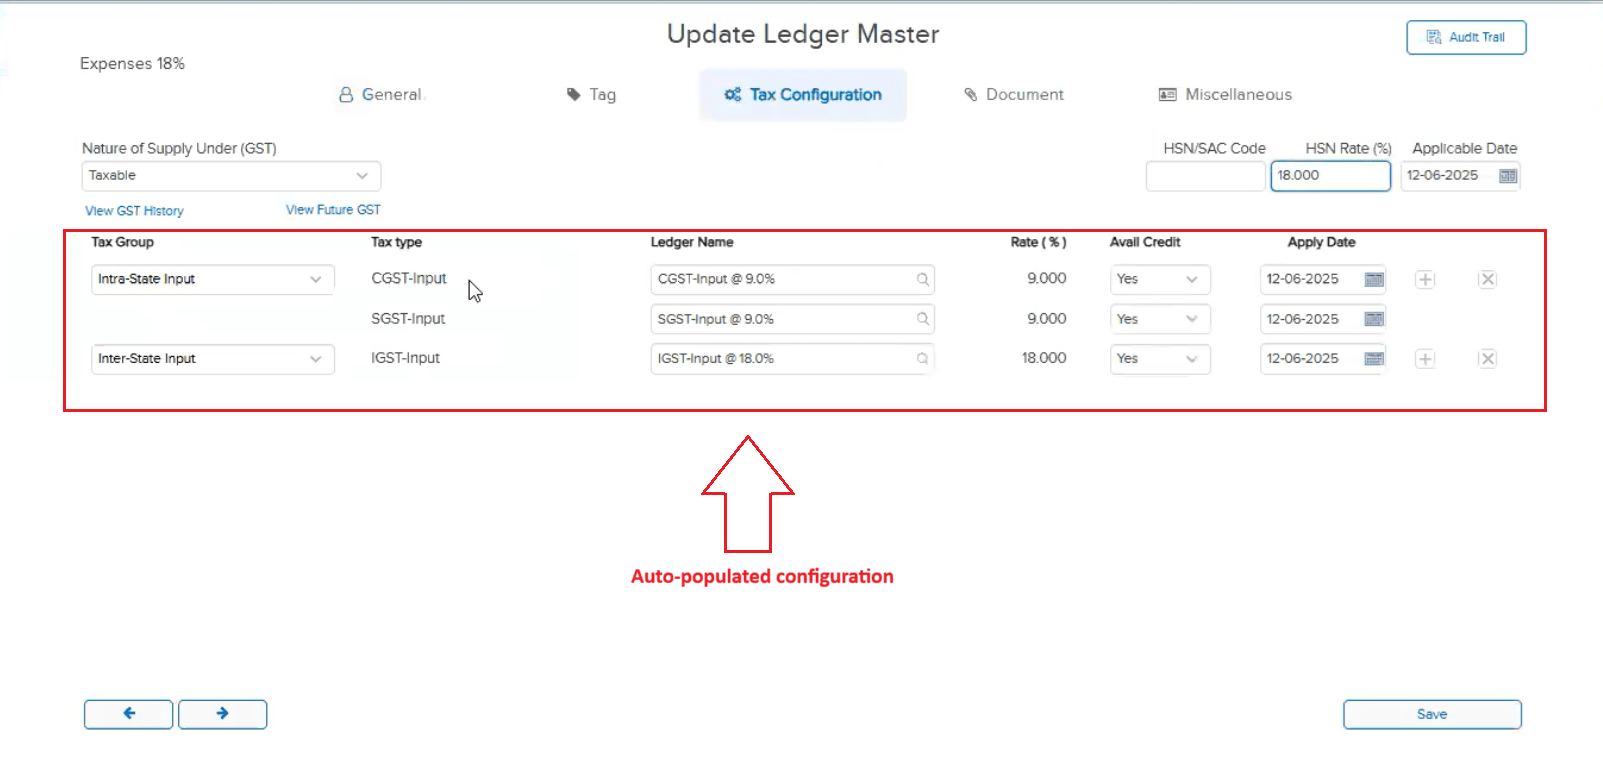
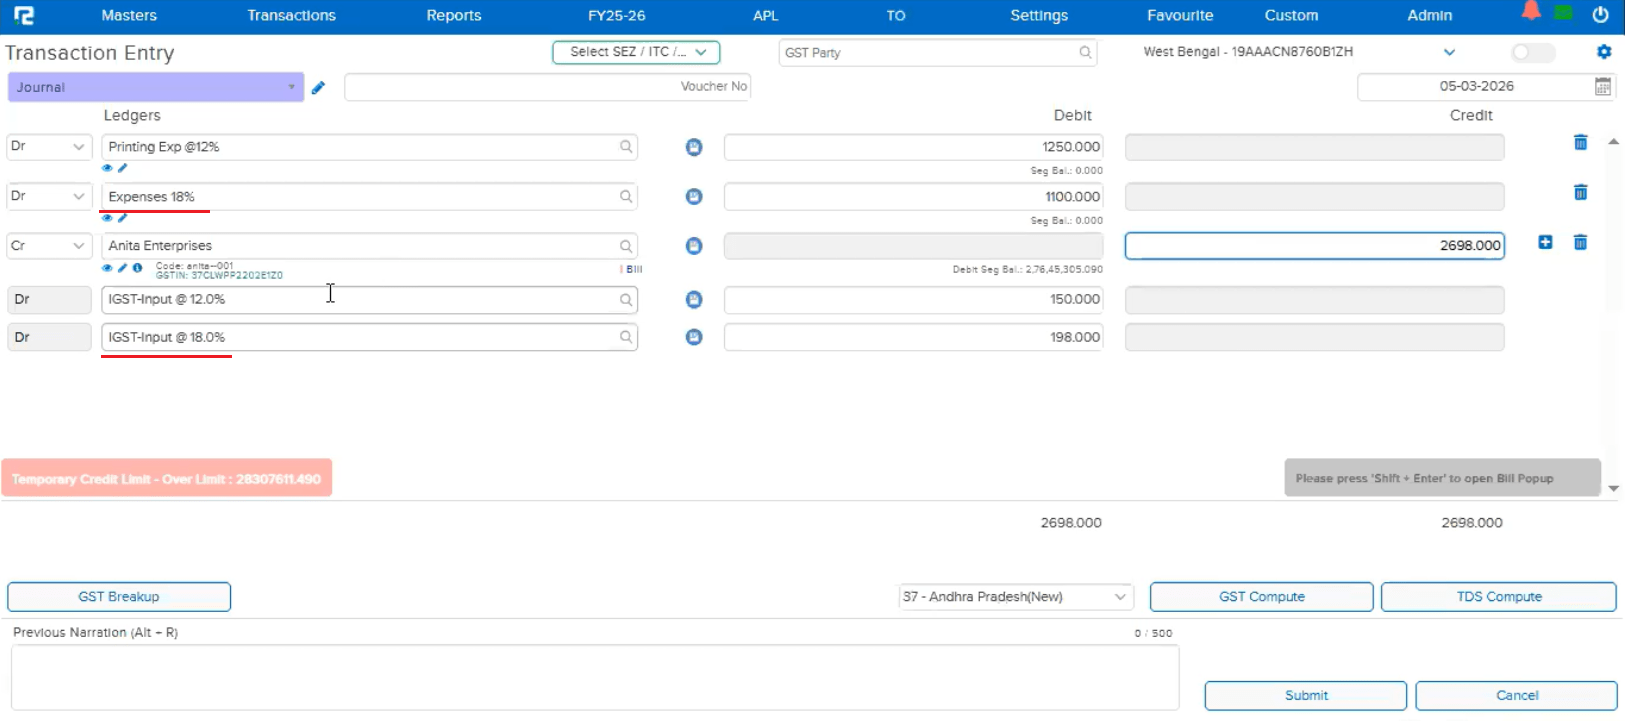
📌 What Was Happening
When a transaction used two expense ledgers — one with tax configured via HSN Rate/Code and the other with tax configured manually — the GST was not computing correctly. The issue was that the applicable date for HSN-based tax configuration was not being saved internally (even though it appeared correctly on the UI). As a result, when Auto GST was enabled, the ledger with HSN-based tax was incorrectly picking up the tax configuration from the other manually-configured expense ledger.
🌟 How This Helps You
The applicable date for HSN Rate/Code based tax configurations now saves correctly. Each expense ledger computes its own GST independently, so you get accurate tax calculations even when mixing HSN-based and manually-configured tax ledgers in the same transaction.
📷 See It in Action
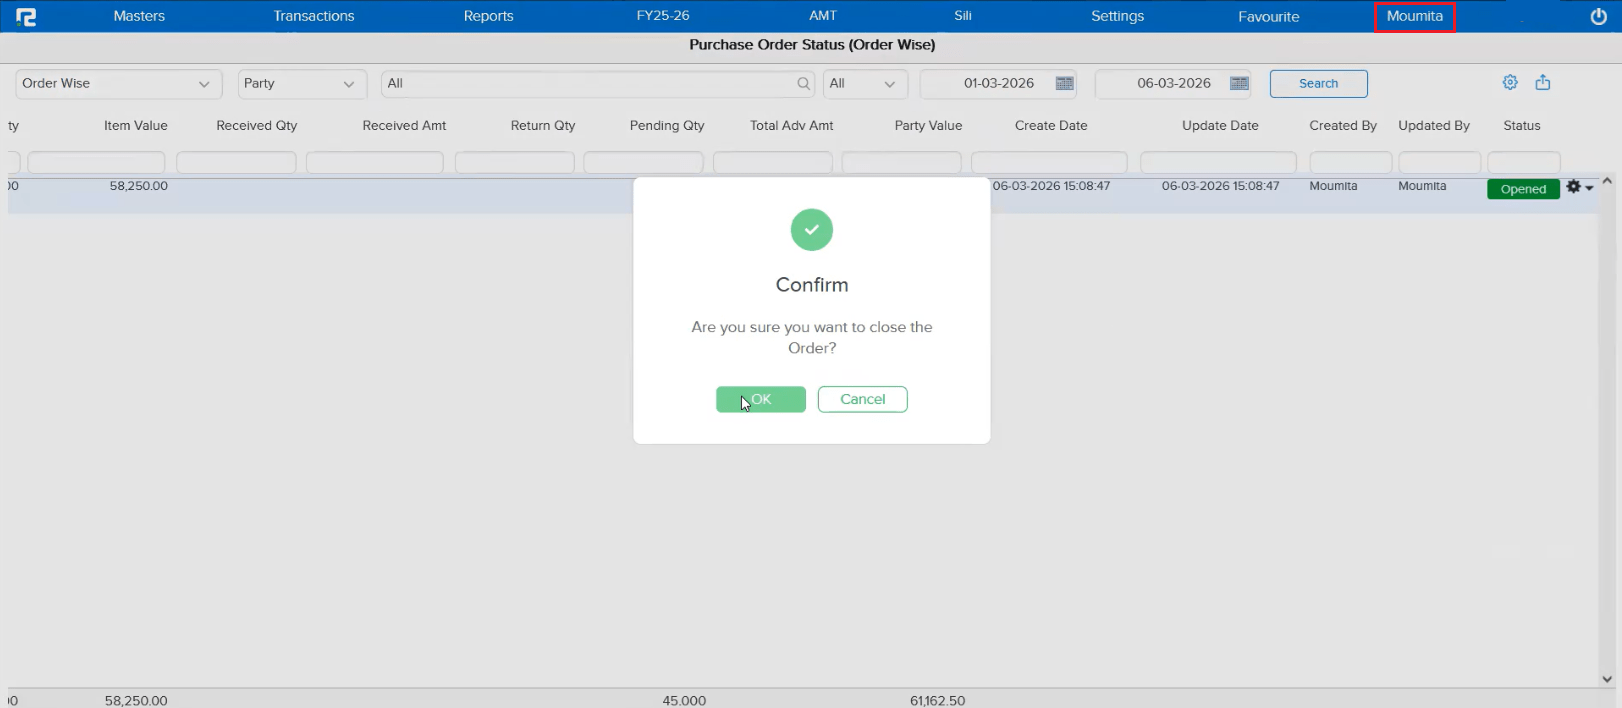
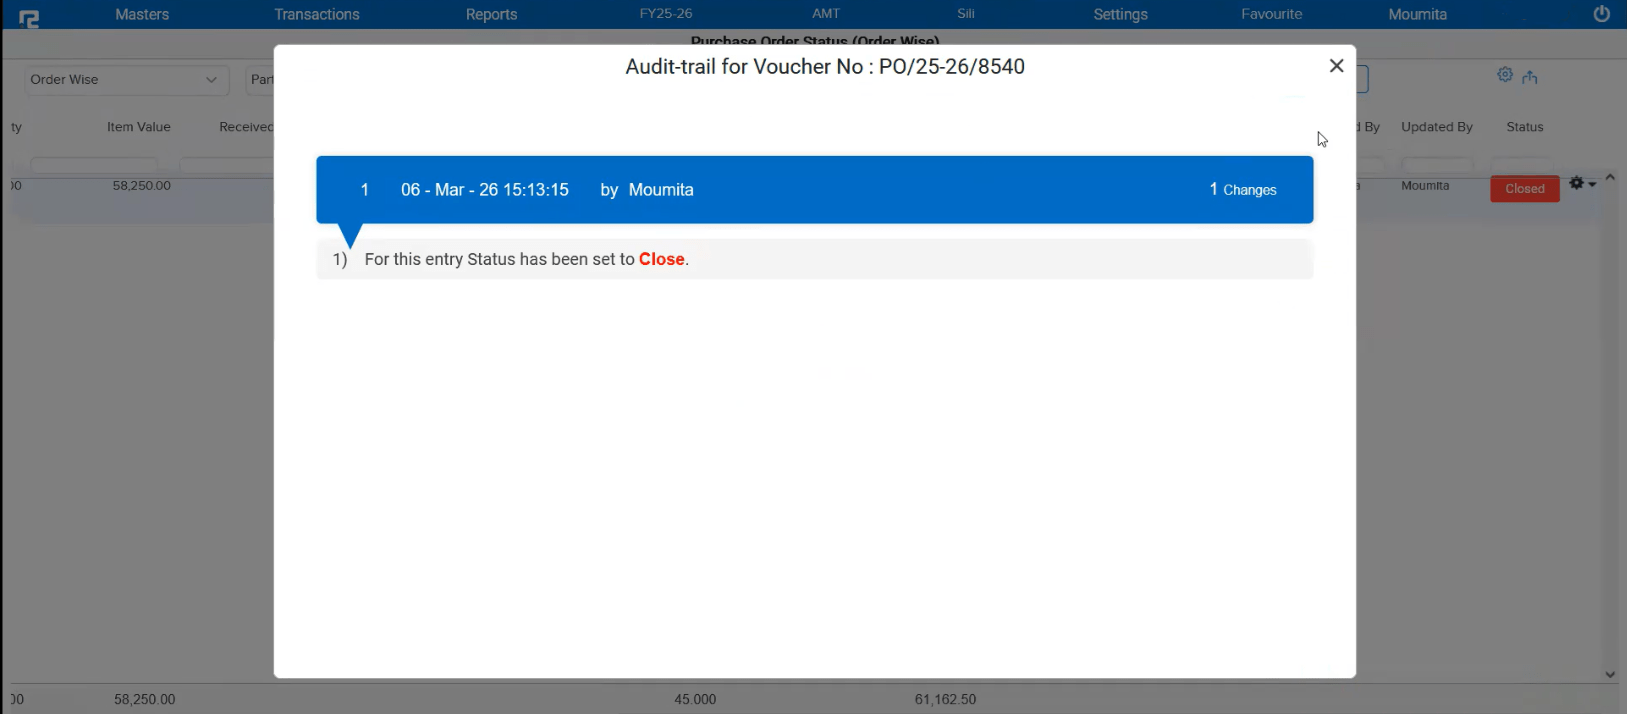
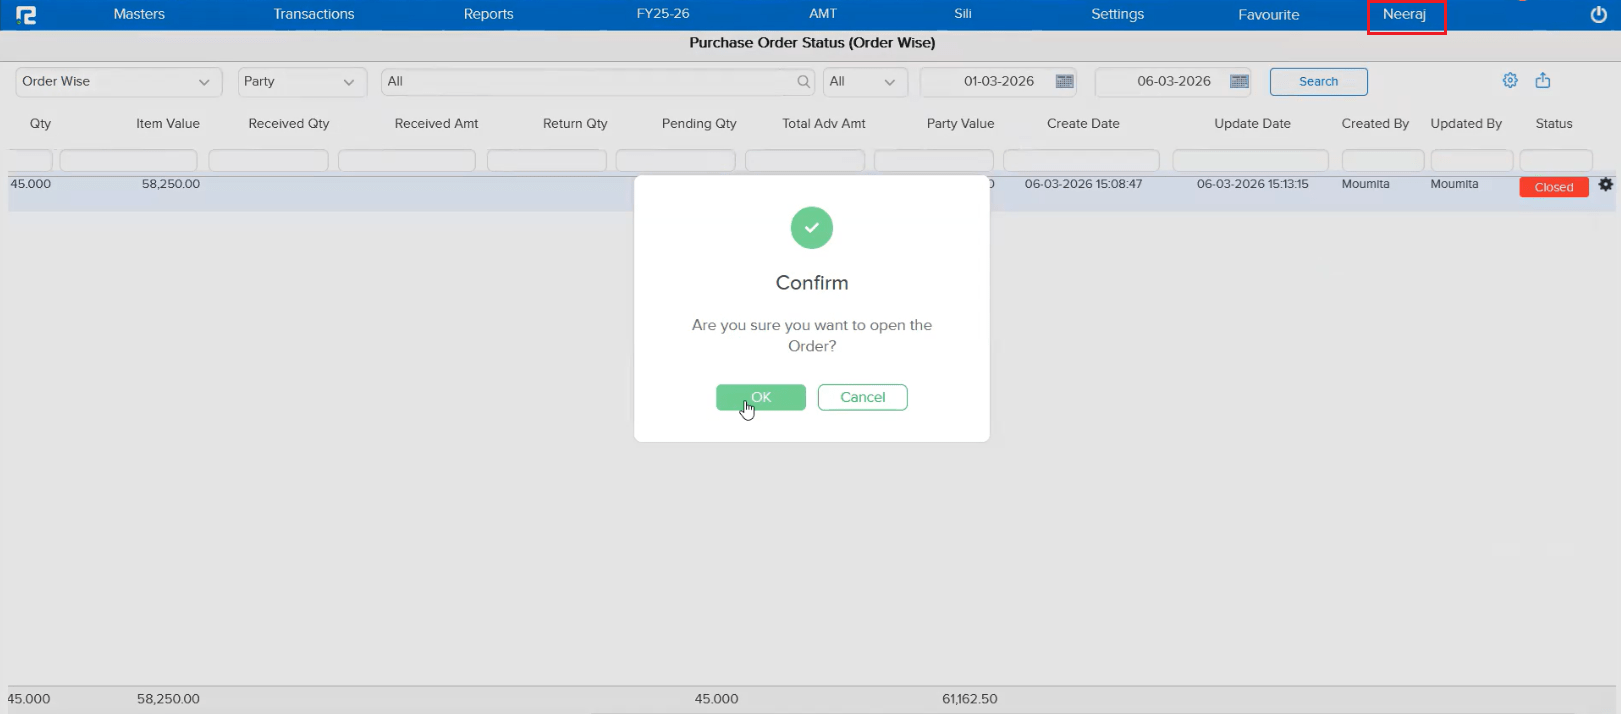
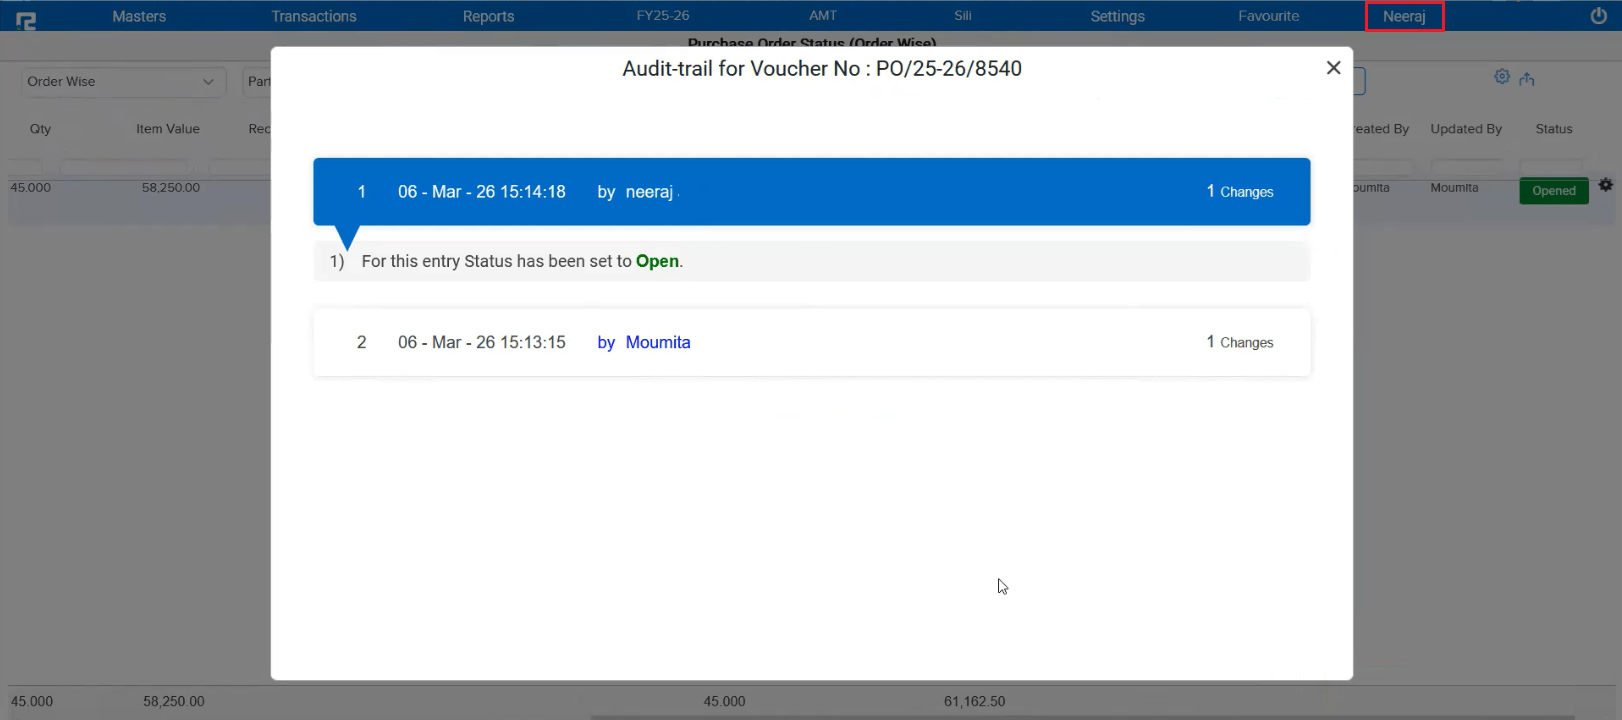
📌 What Was Happening
When User A edited a Purchase Order or Sale Order and later User B closed that order from the listing screen (since there is no open/close option in edit mode), the audit trail was incorrectly showing User A as the person who performed the close action. The system was defaulting to the last editor instead of tracking the actual user who closed the order.
🌟 How This Helps You
The audit trail now correctly reflects the actual user who performed the close or open action from the listing screen. This ensures complete accountability and accurate tracking of who did what on each order.
📷 See It in Action