Beta Release — 06-03-2026
📌 Overview
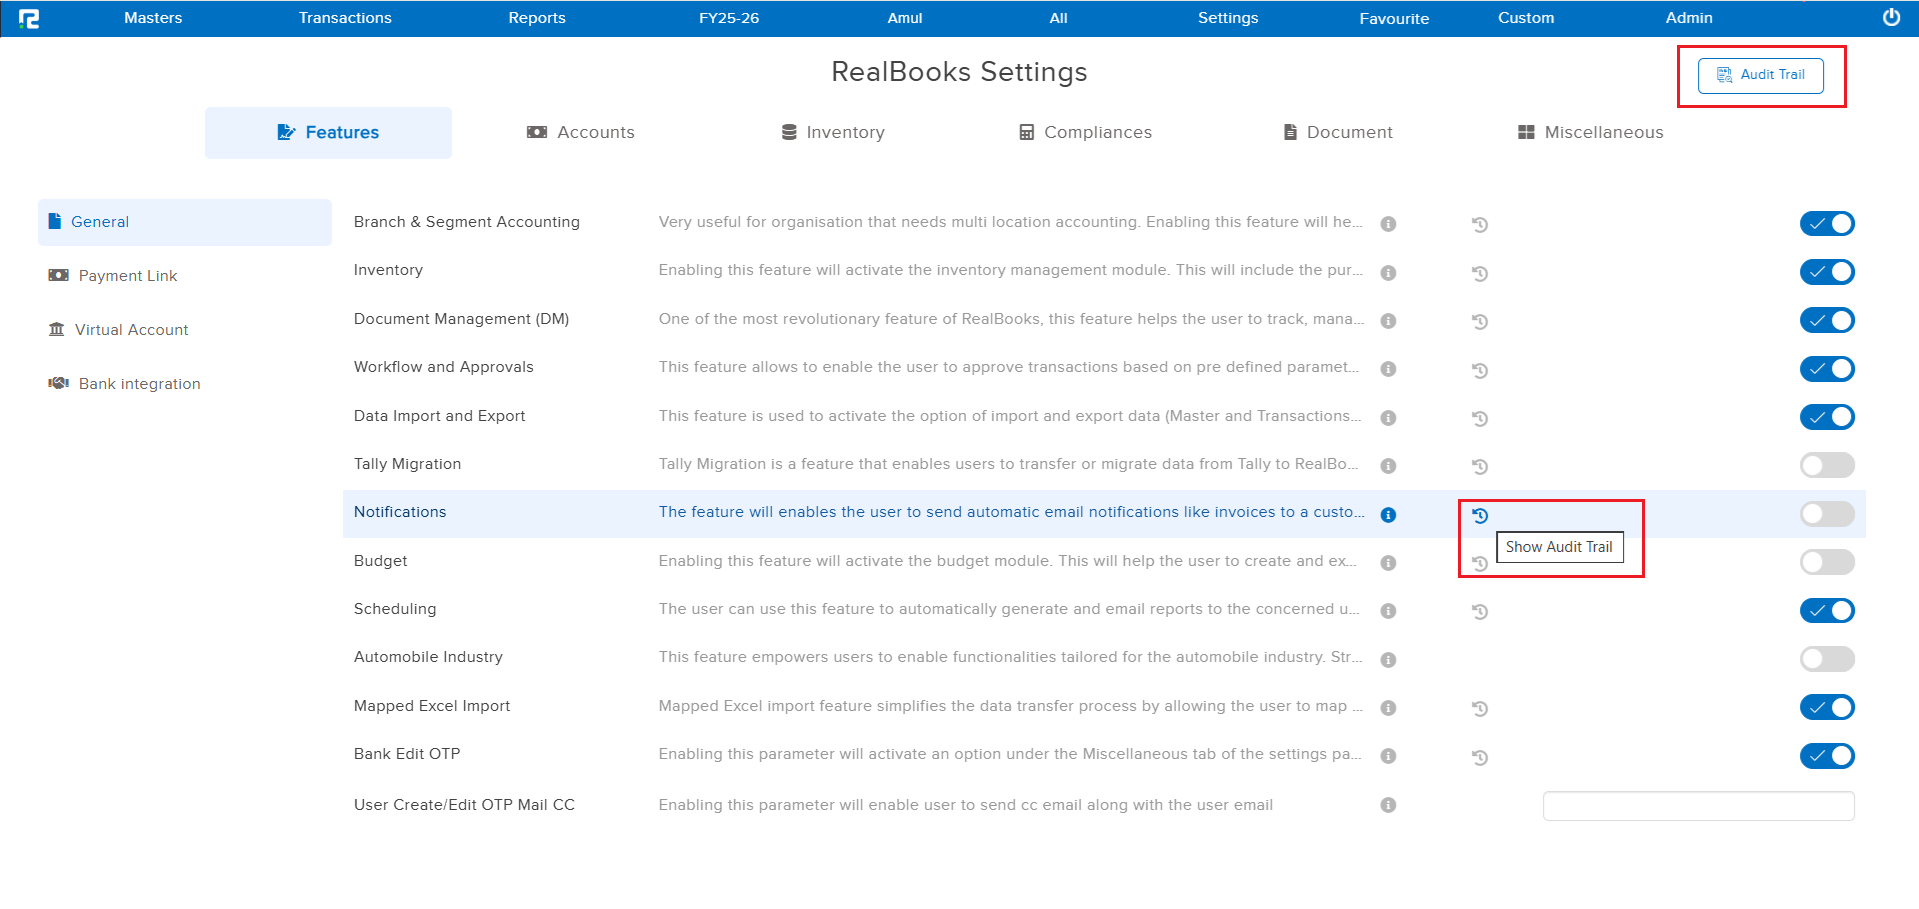
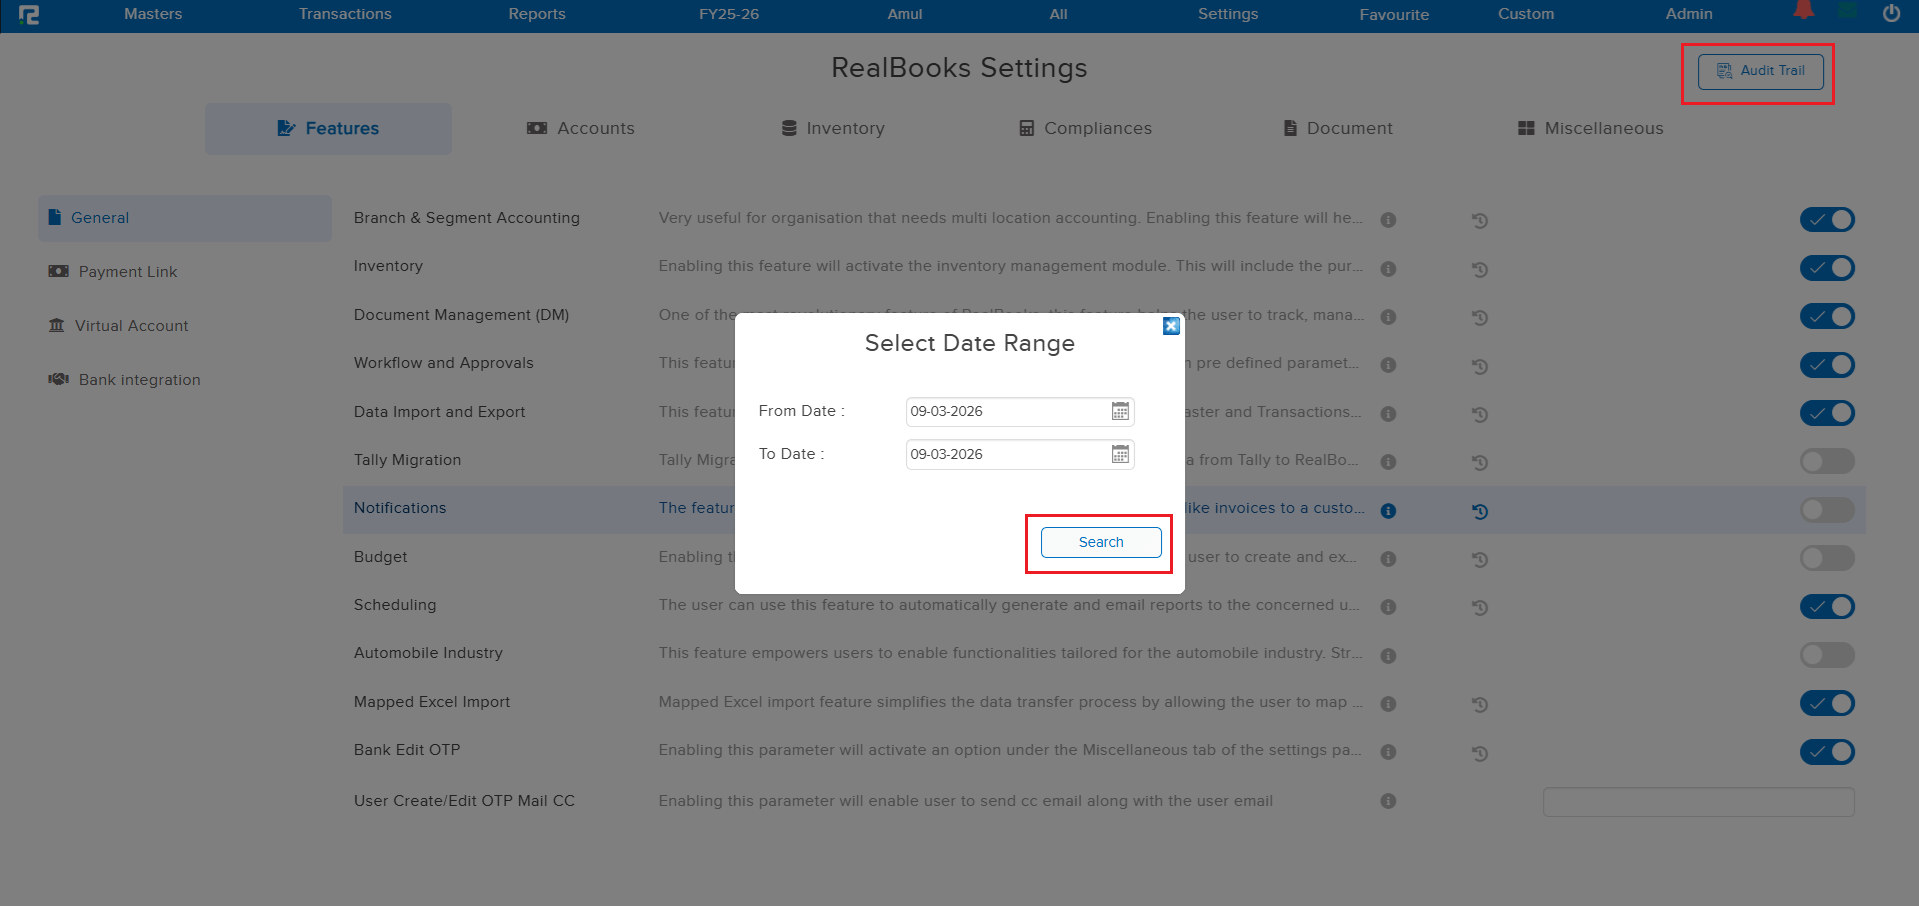
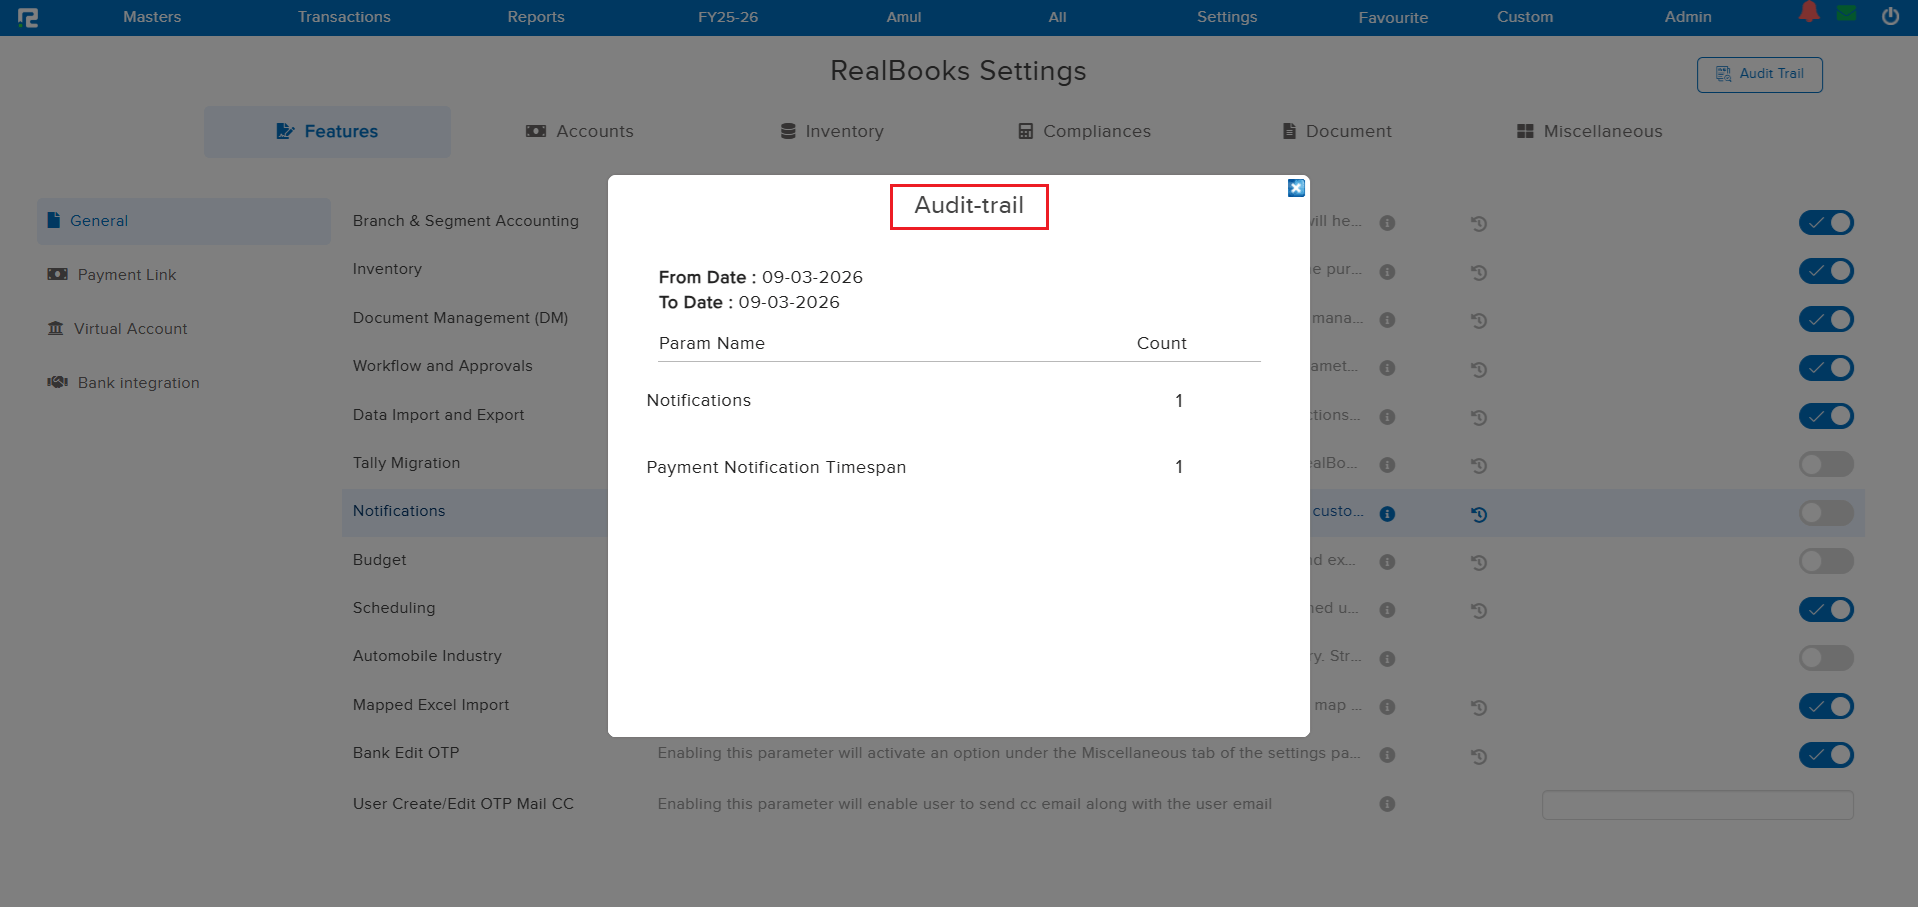
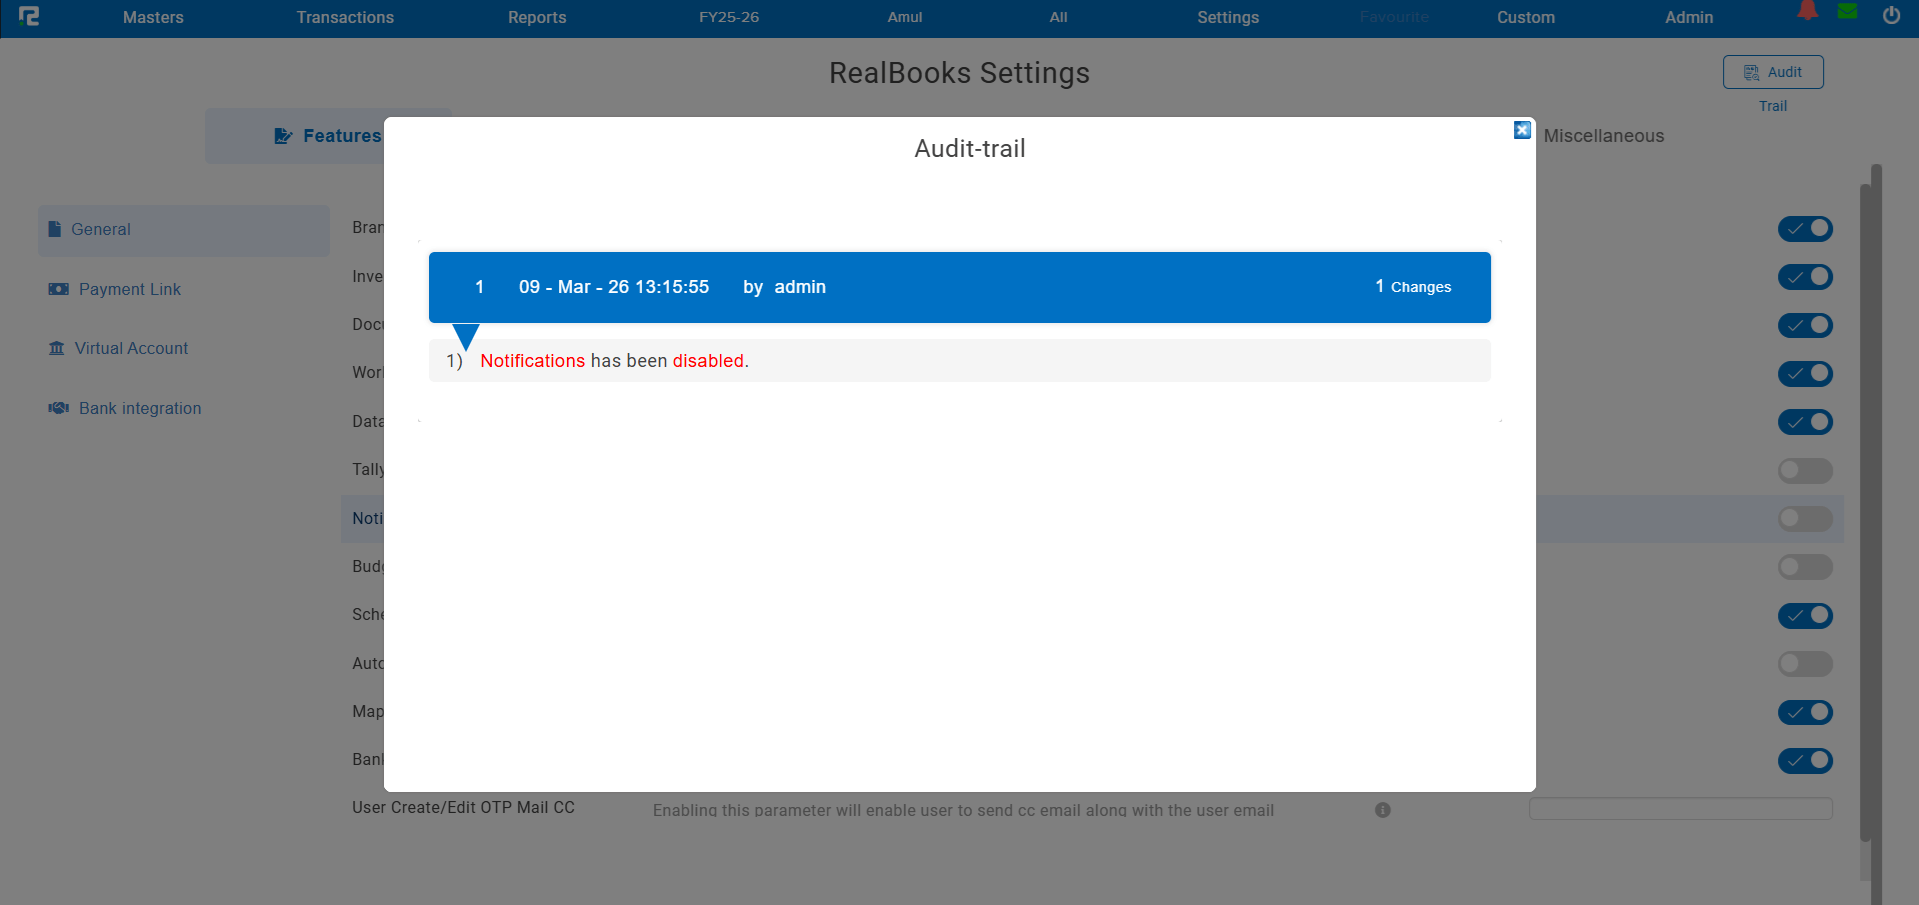
A comprehensive Audit Trail has been introduced on the Settings Configuration page. You can now track every parameter change with full visibility into who made the change, when it was made, and what was enabled or disabled. Two levels of audit trail are available: an Overall Audit Trail showing all configuration changes, and a Parameter-Wise Audit Trail for tracking the history of individual settings.
🌟 What This Means for You
No more guessing who toggled a setting or when a configuration was changed. The audit trail gives administrators complete transparency and accountability over all settings changes, making it easier to troubleshoot issues and maintain compliance.
🎬 How to Use It
1. Go to Settings → Configuration.
2. Use the Overall Audit Trail to view all recent configuration changes across parameters.
3. Click on any individual parameter to view its Parameter-Wise Audit Trail — showing the complete history of that specific setting.
📷 See It in Action
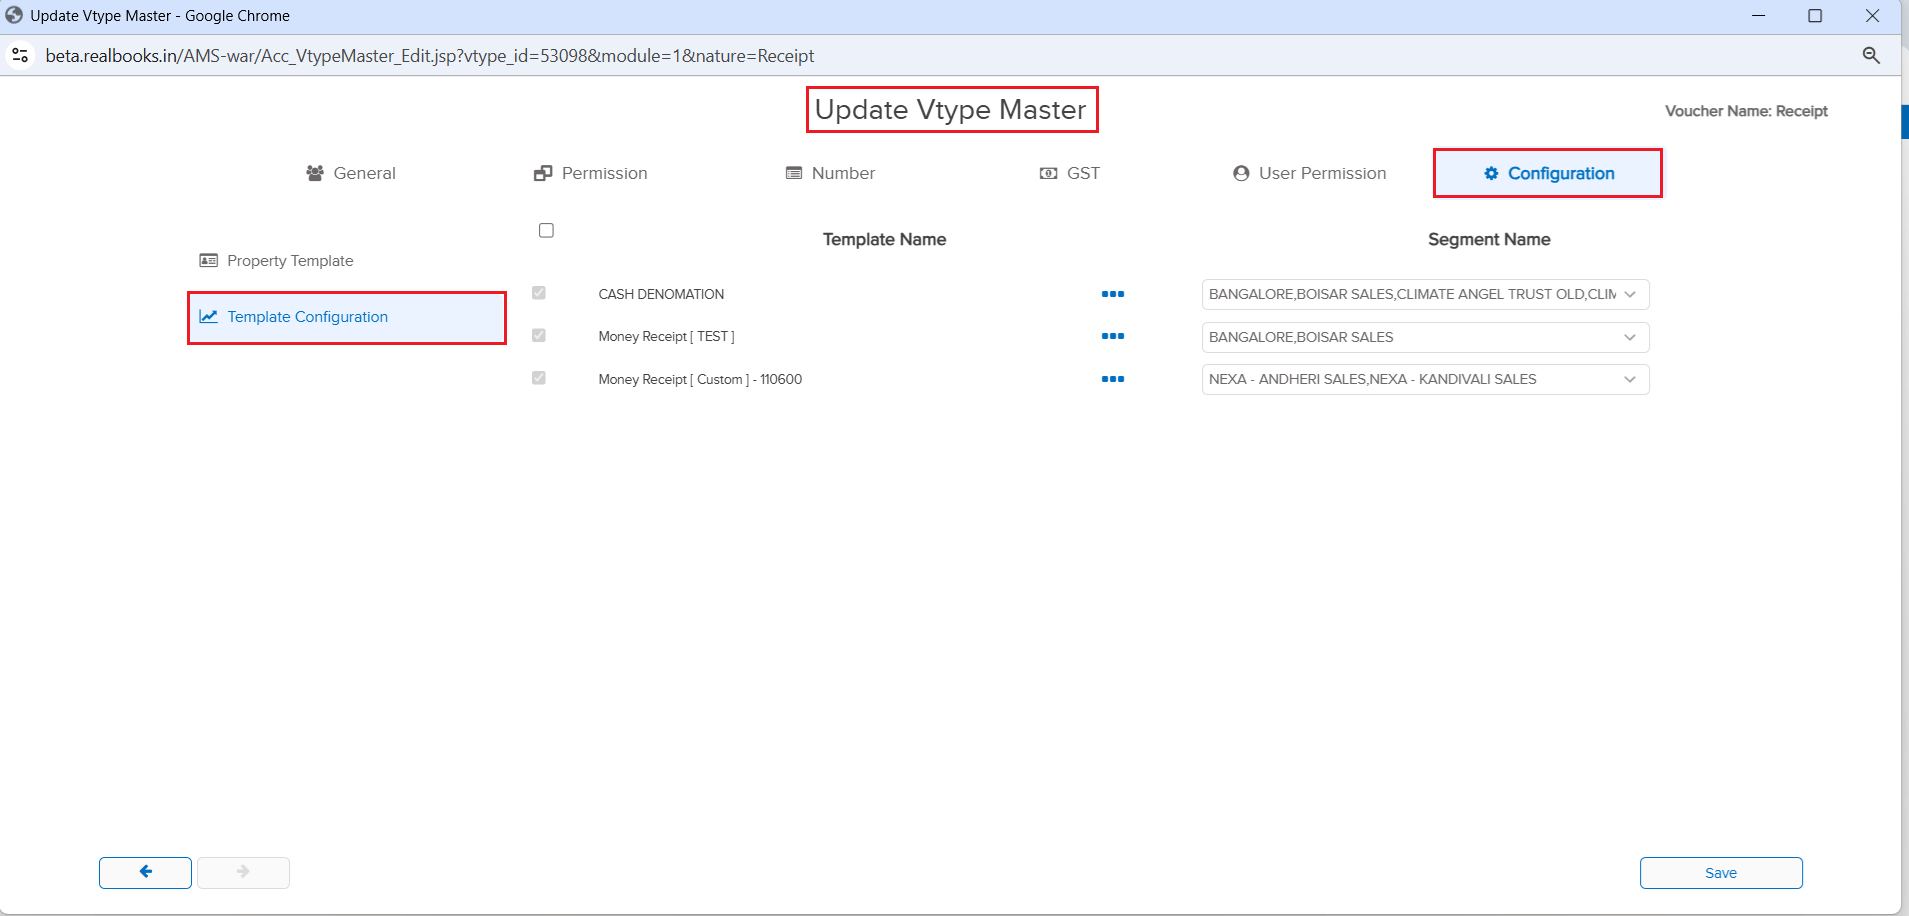
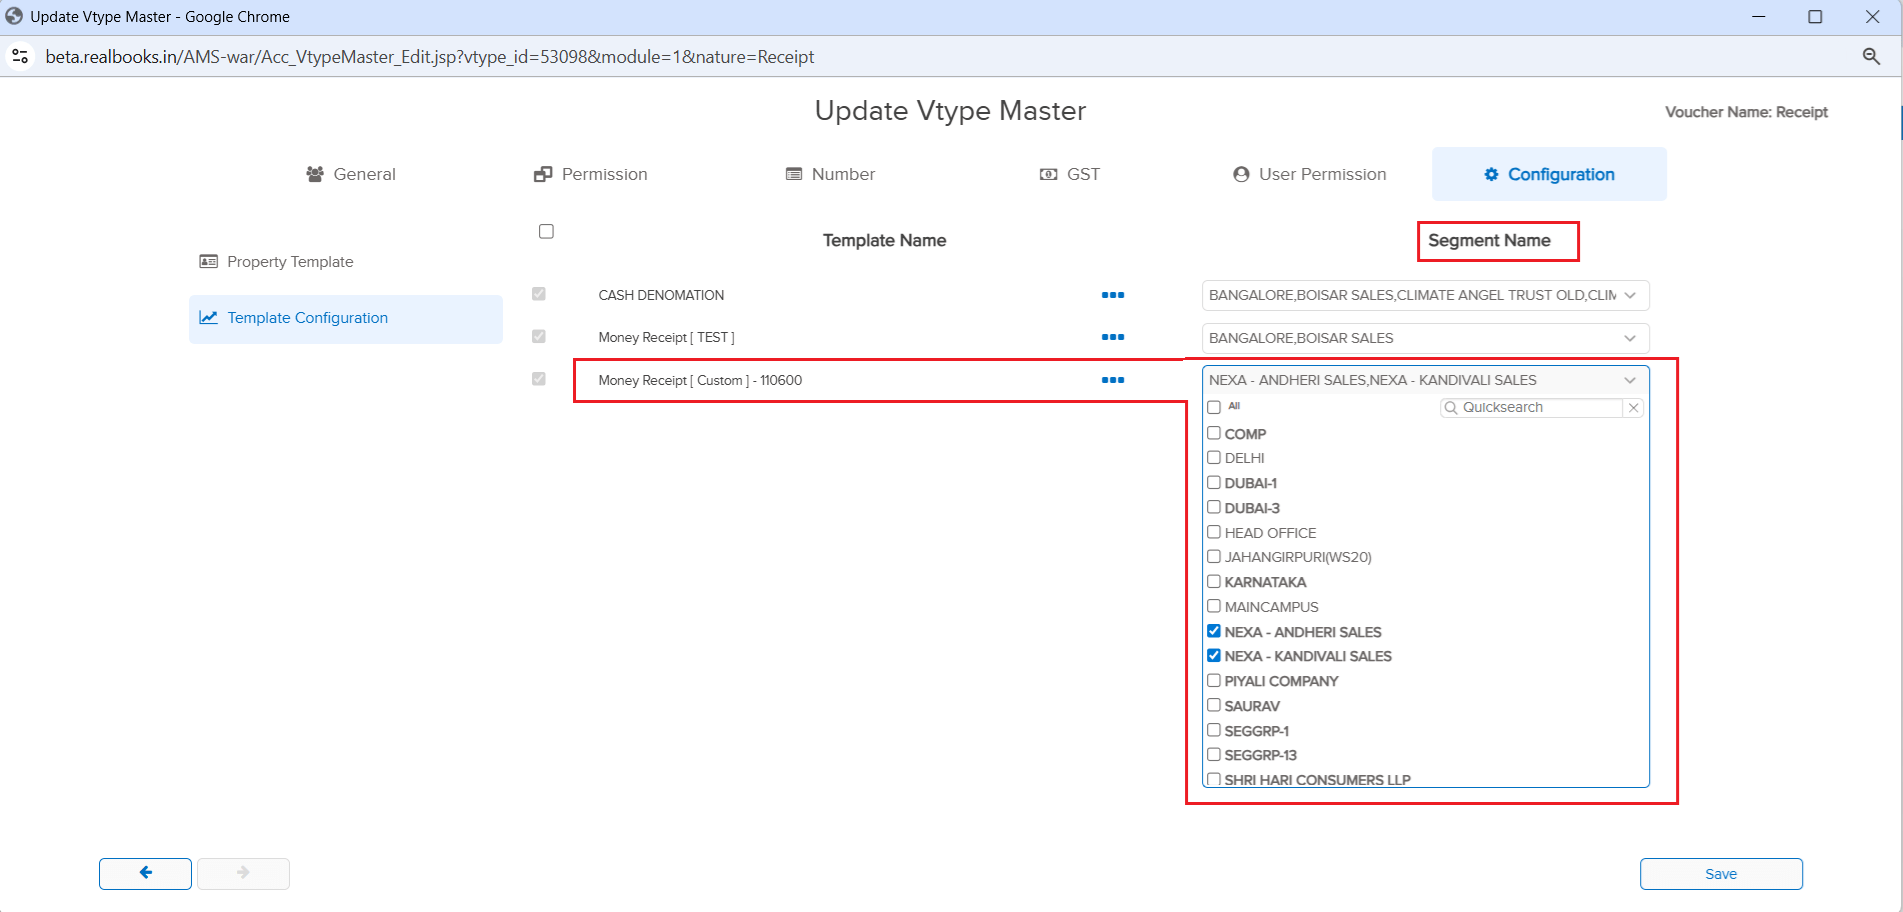
📌 Overview
If your company has custom templates deployed, you can now assign them to voucher types directly from the Voucher Type Master — no need to contact the RealBooks team! Previously, when a new segment was created after a custom template was deployed, you had to reach out to get the template assigned to the new segment. Now, you can do it yourself. Additionally, you can see how many templates are assigned to a specific voucher type and which segments each template is assigned to.
🌟 What This Means for You
Complete self-service control over template assignments! When you create a new segment, simply go to the Voucher Type Master and assign the required templates yourself. You also get full visibility into the template-to-segment mapping, making it easy to manage and audit your template configurations across the organization.
🎬 How to Use It
1. Go to Masters → Accounts → Voucher and open a voucher type in Edit mode.
2. You’ll see the available custom templates listed for selection.
3. Assign templates to the desired segments.
4. View the summary to see how many templates are assigned and their segment mappings.
📷 See It in Action
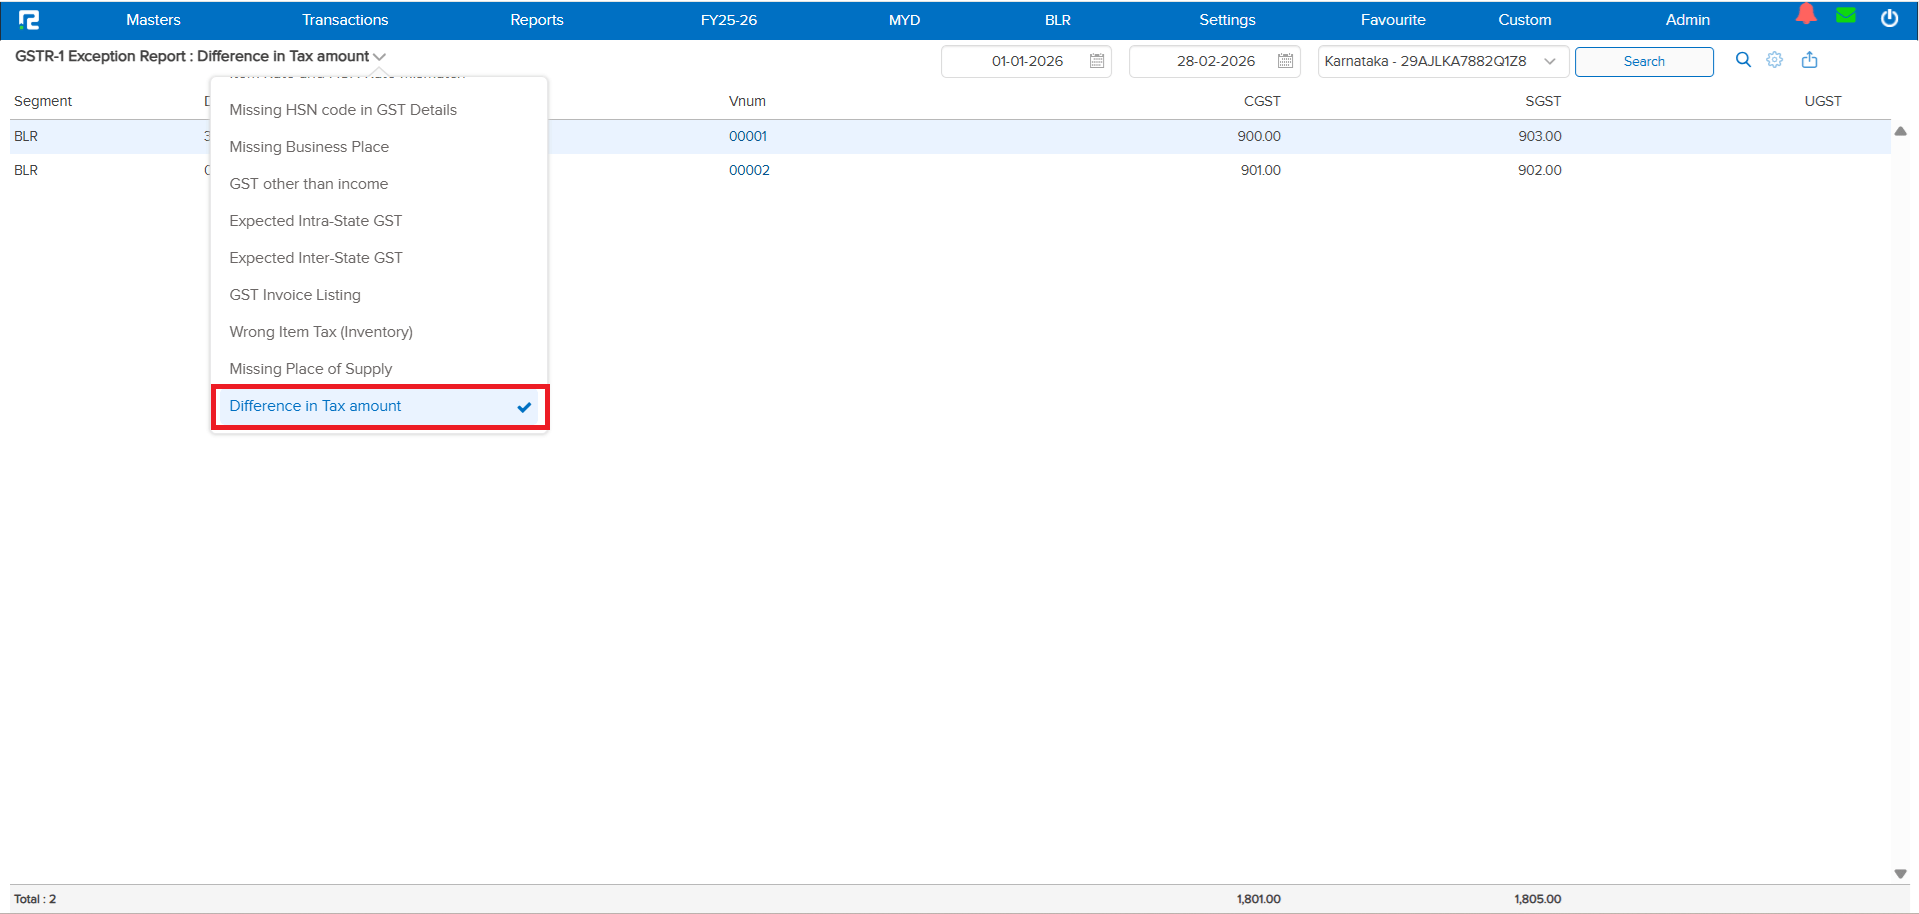
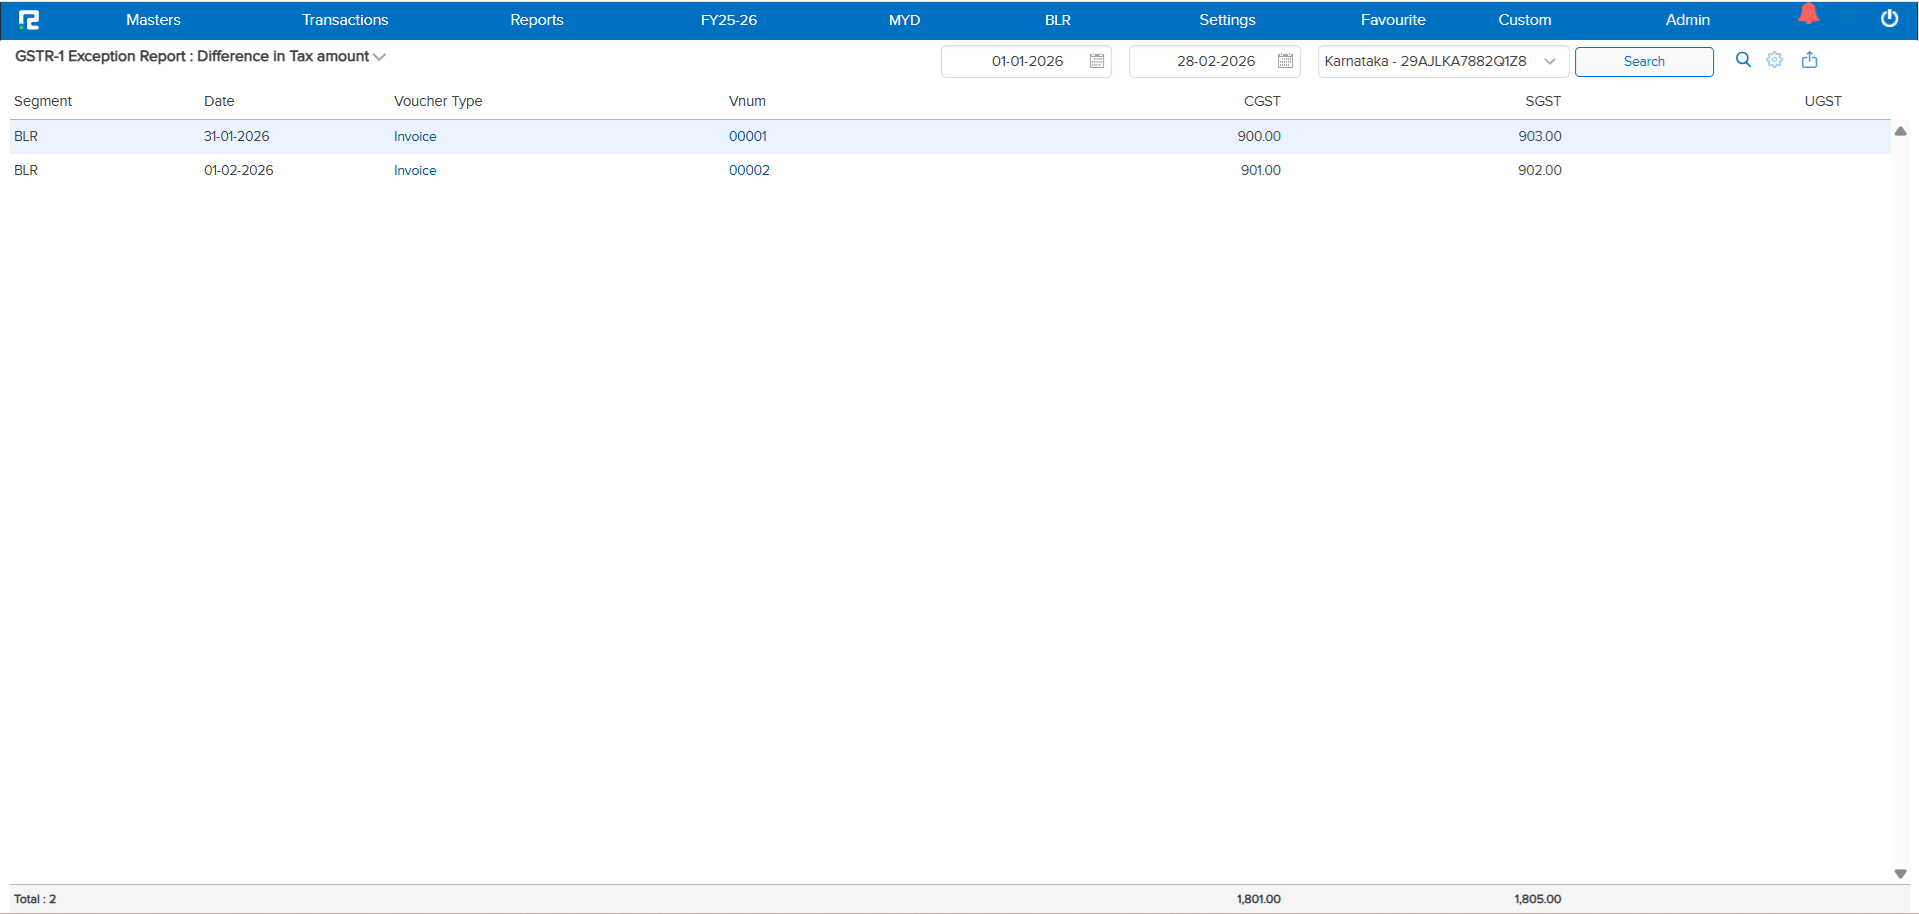
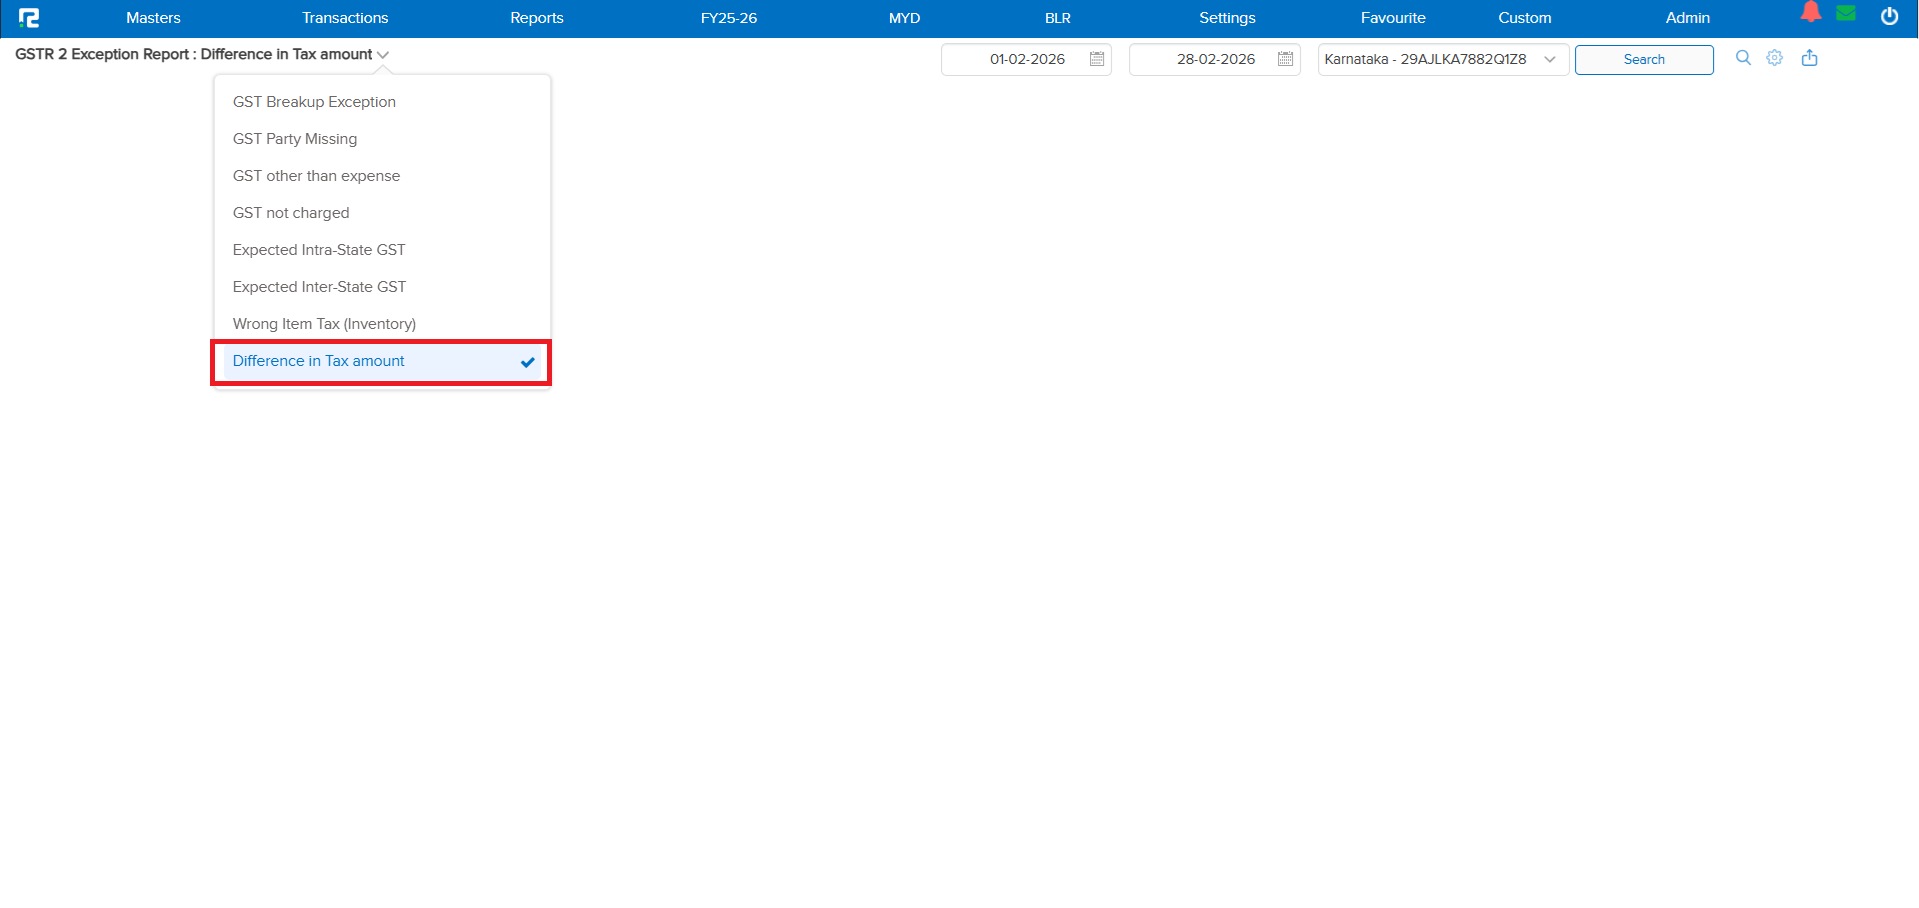
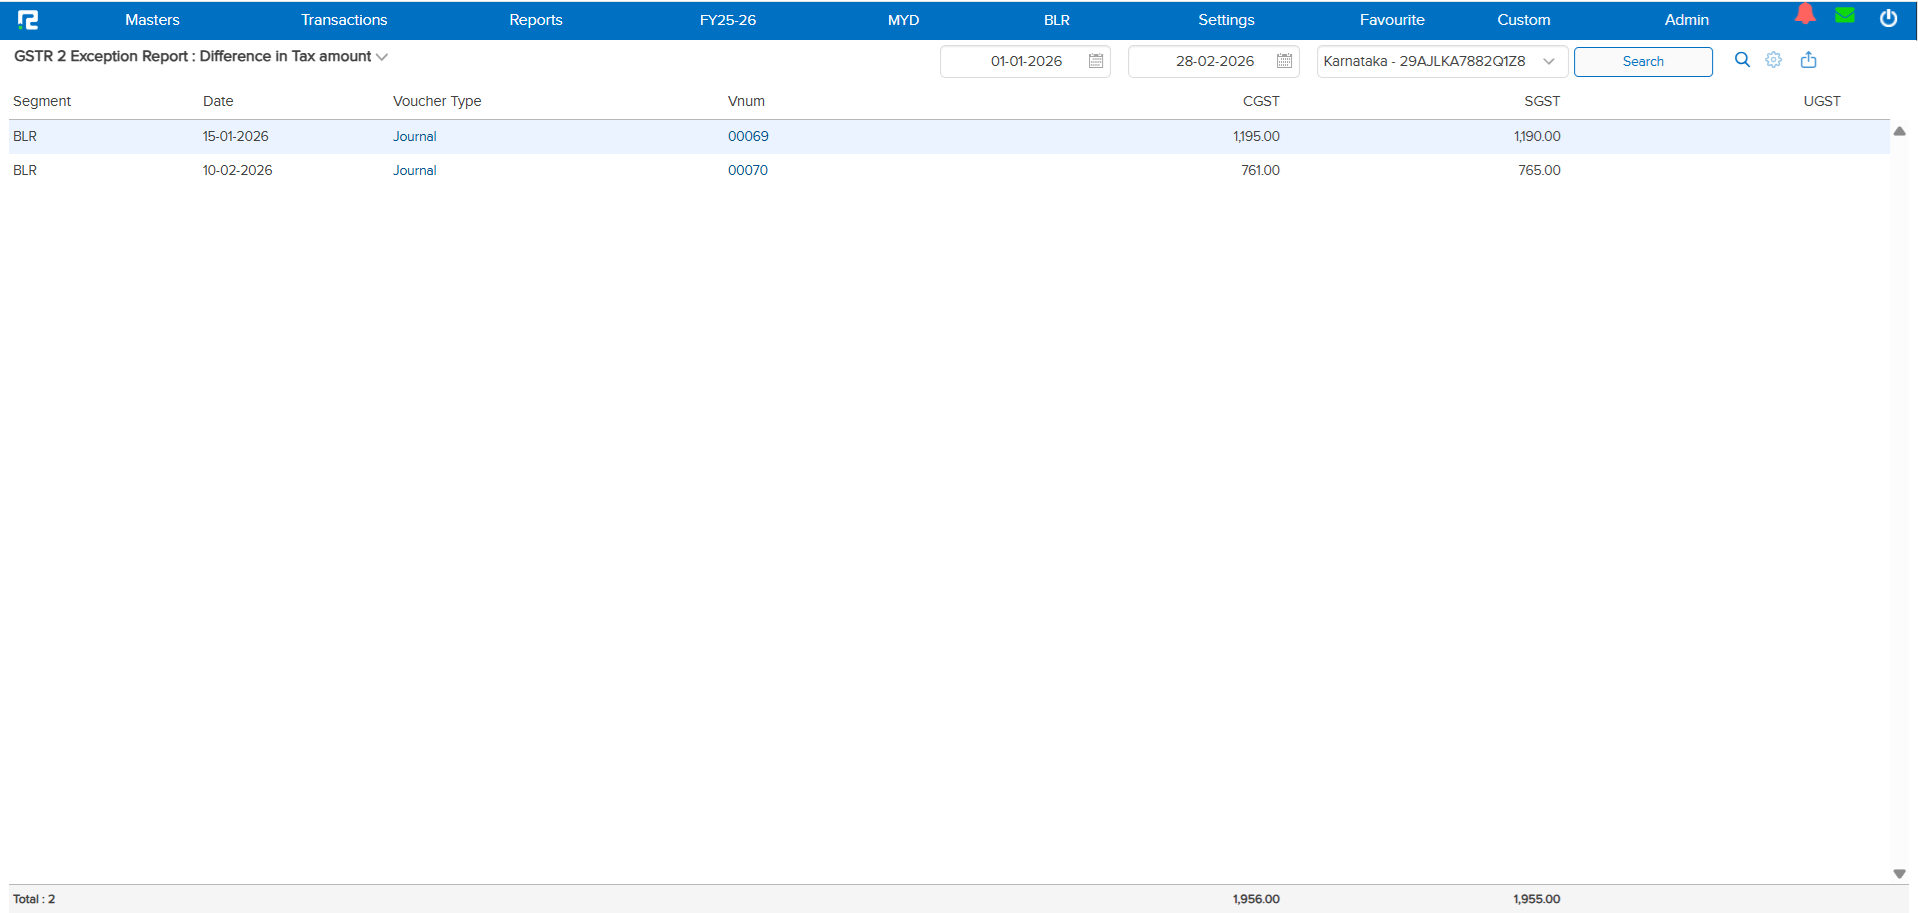
📌 Overview
A brand new variation — Difference in Tax Amount — has been added to both the GSTR-1 Exception and GSTR-2 Exception reports. This report highlights transactions where the total CGST value and total SGST value do not match, helping you catch tax calculation discrepancies before filing.
🌟 What This Means for You
Tax mismatches between CGST and SGST can lead to filing errors and compliance issues. With this new variation, you can quickly identify and correct these discrepancies right from the exception report — no manual cross-checking needed!
🎬 How to Use It
The new variation is available in both GSTR-1 and GSTR-2 exception reports:
1. Open either exception report.
2. Select the new Difference in Tax Amount variation.
3. Run the report to see all transactions where CGST and SGST values don’t match.
📷 See It in Action
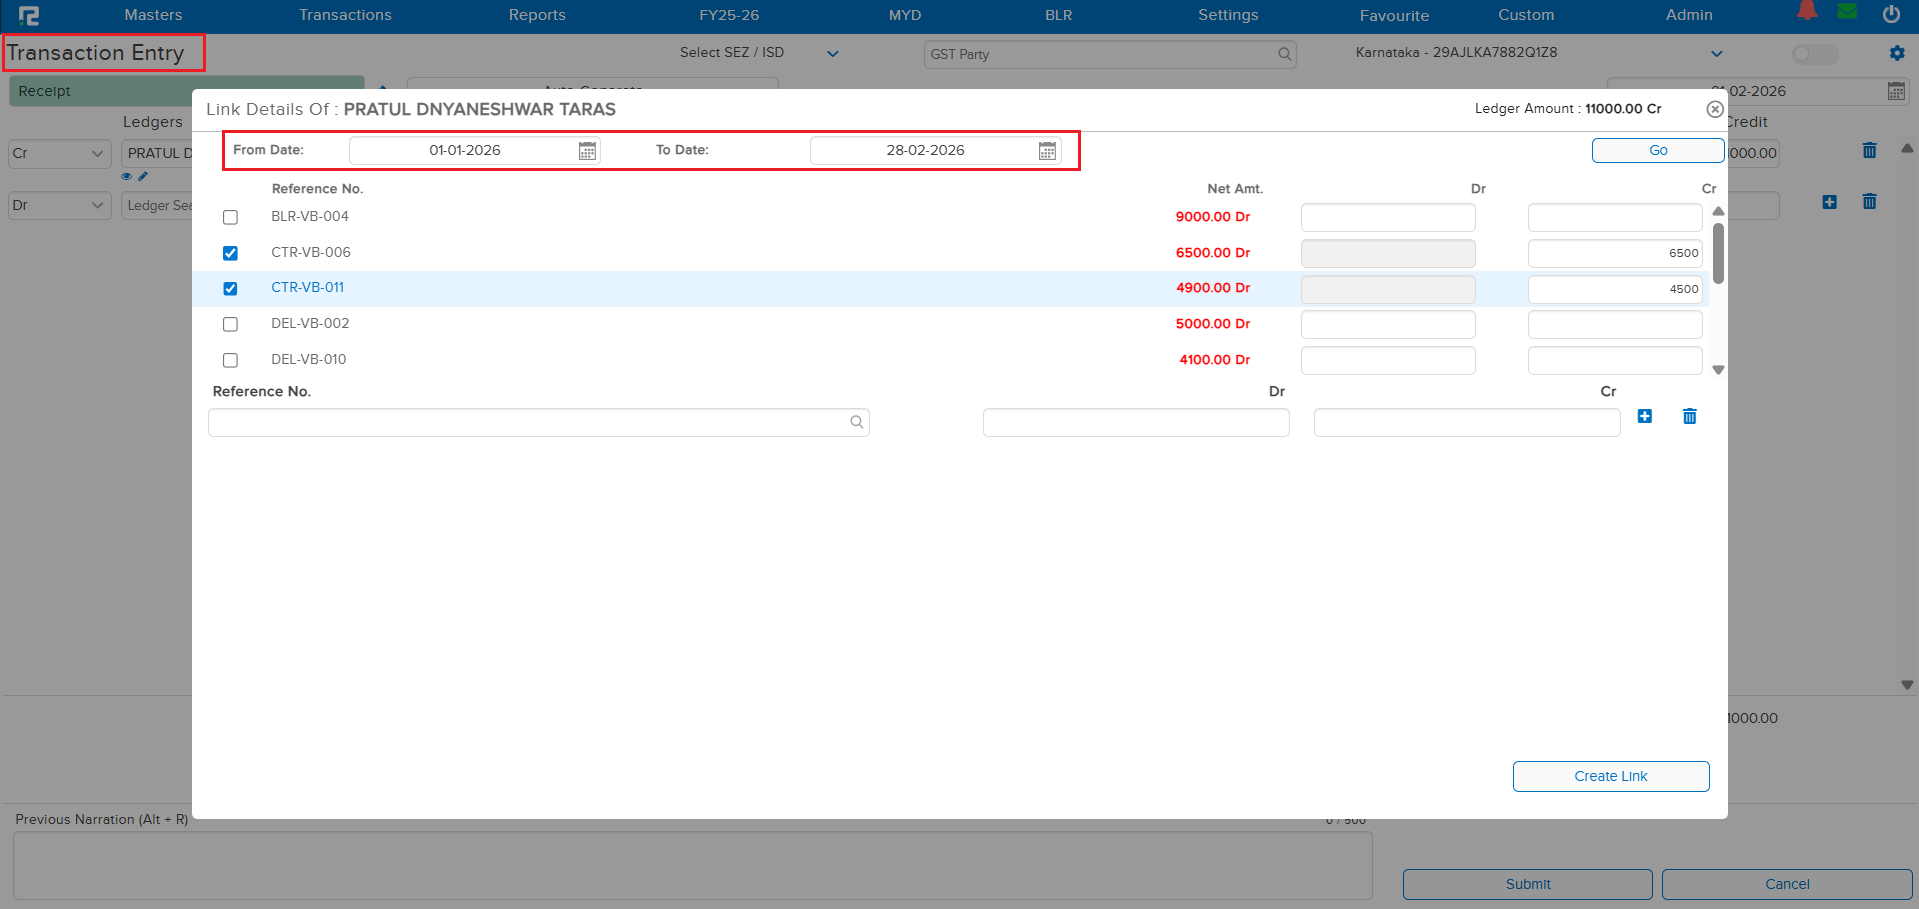
📌 Overview
The Link Search option in transactions now includes a date range filter. Whether you’re creating a new transaction or editing an existing one, you can now search for linked entries by specifying a “From” and “To” date — making it much easier to find the exact transaction you need.
🌟 What This Means for You
No more scrolling through long lists of linked transactions! Simply set a date range and the system filters results instantly. This is especially helpful when you have a high volume of transactions and need to quickly locate a specific one during entry or editing.
🎬 How to Use It
1. Open any transaction in entry or edit mode.
2. Click the Link Search option.
3. Use the new From Date and To Date fields to filter results by date range.
4. Select the linked transaction you need.
📷 See It in Action

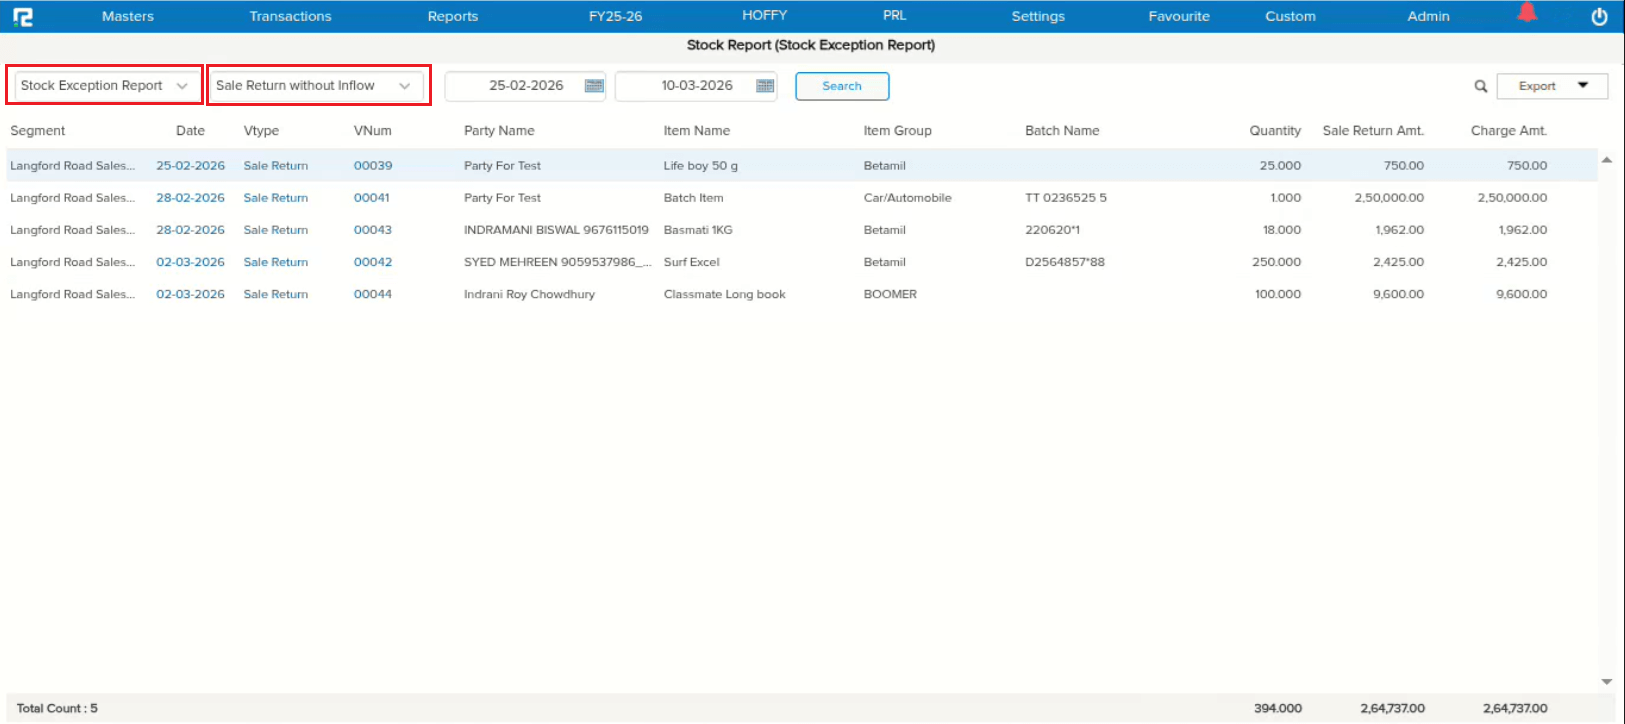
📌 Overview
A new parametric feature has been introduced to handle COGS (Cost of Goods Sold) updates in case of Sale Returns. This applies to both batch and non-batch items. If an item was never purchased or had no inflow via Stock Journal, the system now automatically updates the COGS based on the Sales Return Rate. A dedicated Stock Exception Report lists all entries where COGS has been updated using the Sales Return Rate.
🌟 What This Means for You
Previously, if a returned item had no purchase or inflow history, the COGS couldn’t be determined. Now, the system intelligently uses the Sales Return Rate to update COGS automatically via the Overnight Scheduler, ensuring your cost records stay accurate without manual intervention.
🎬 How It Works
1. This is a parametric feature — enabled on demand only.
2. Applies to both batch and non-batch items.
3. If the item has no purchase or Stock Journal inflow, COGS is updated based on the Sales Return Rate.
4. COGS updates are processed via the Overnight Scheduler.
5. An exception report is available to review all affected entries.
🛠 Where to Find the Exception Report
📷 See It in Action
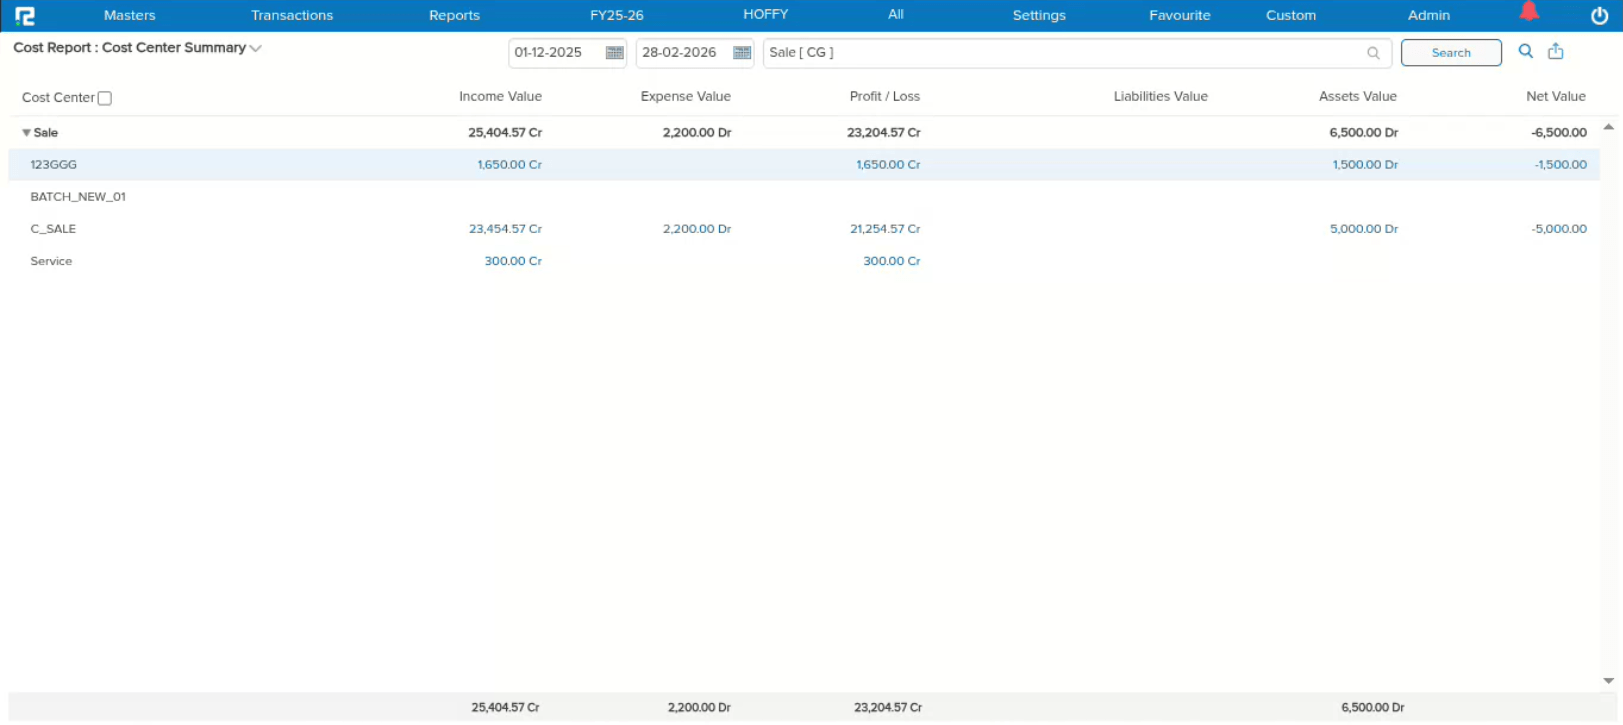
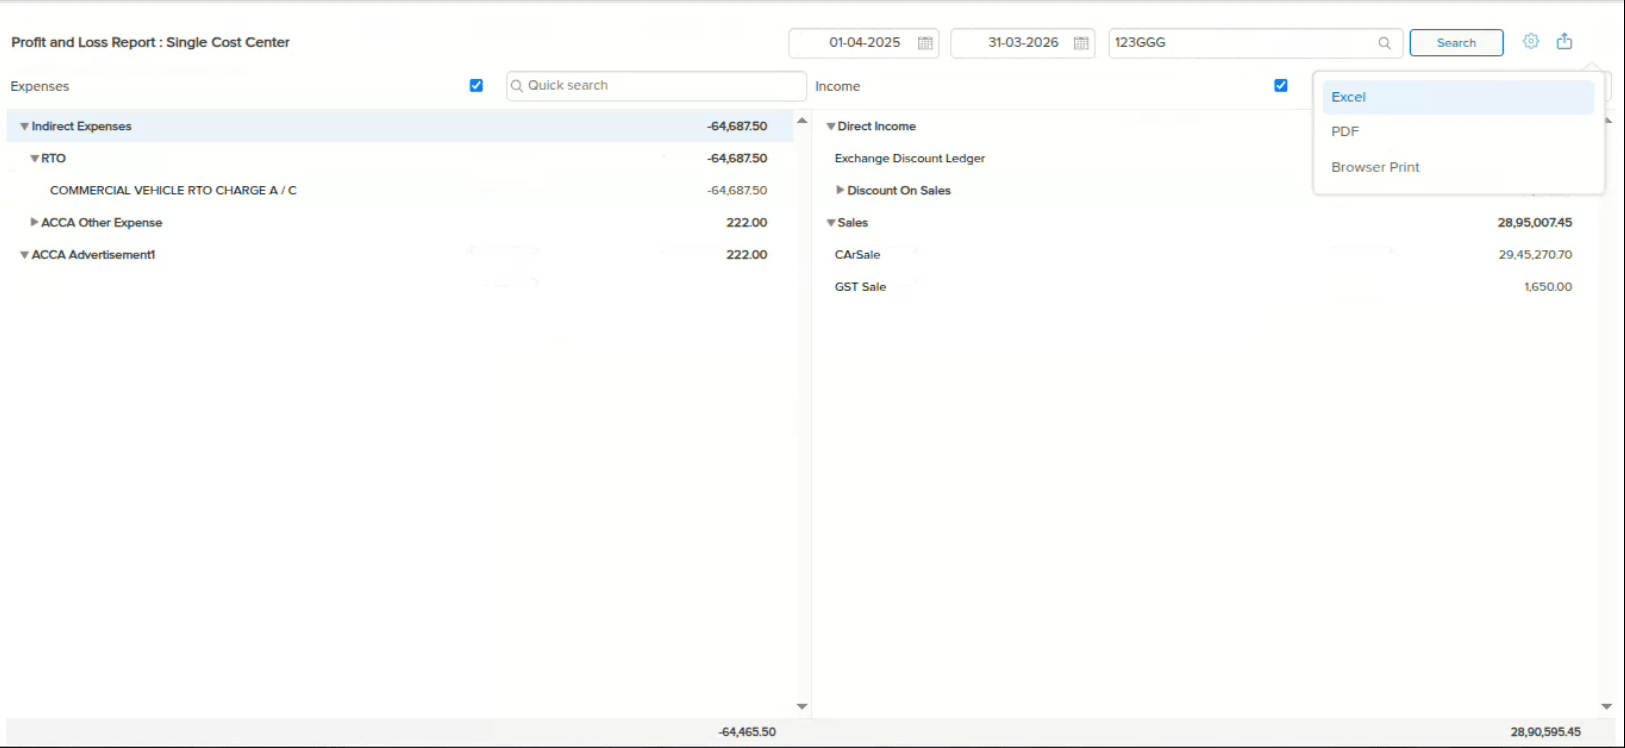
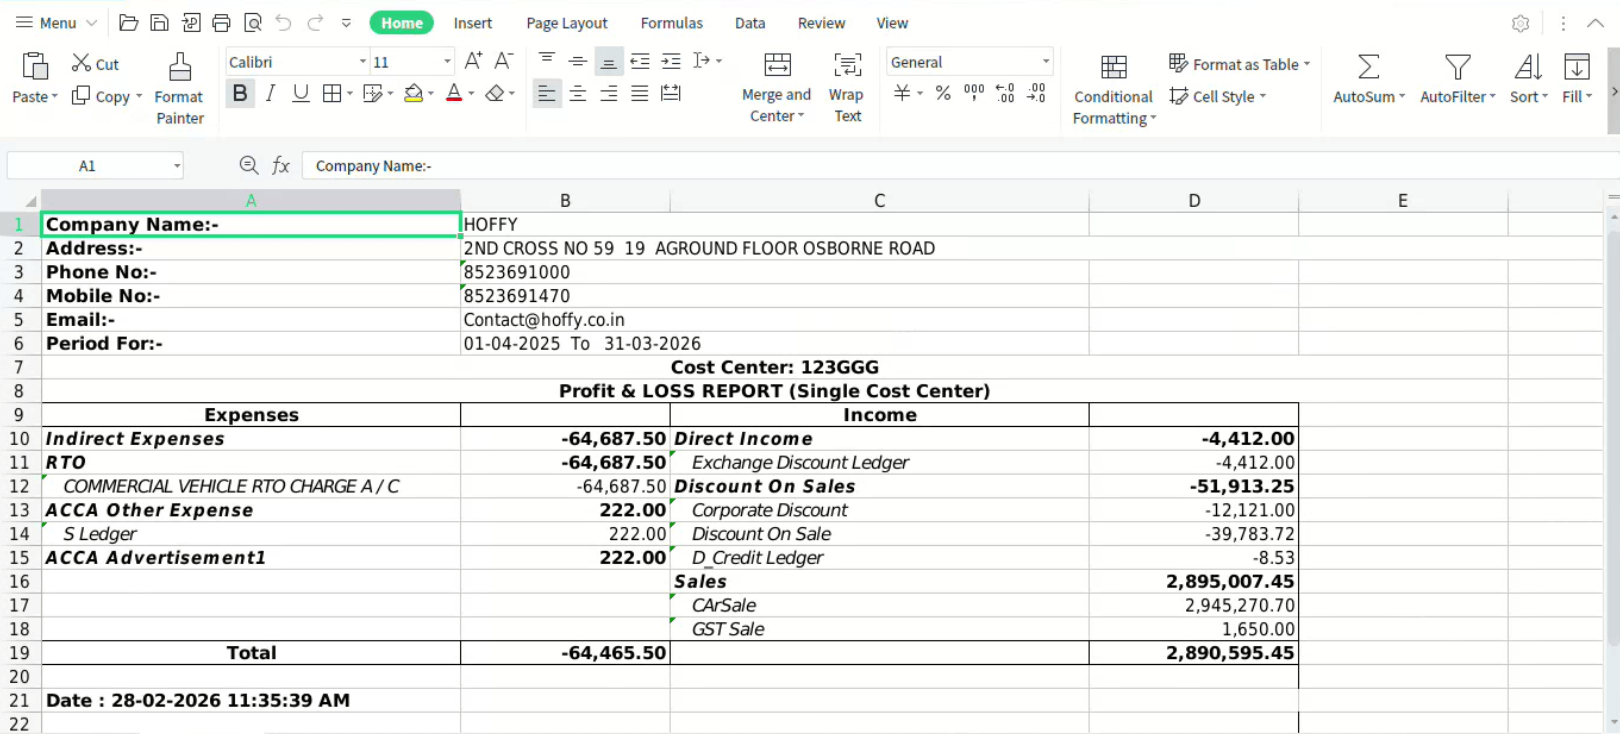
📌 What Was Happening
When you drilled down from the Cost Centre Summary report, the resulting Profit & Loss – Single Cost Centre report was not getting exported. Clicking the export option had no effect, leaving you unable to download the detailed cost centre data you needed.
🌟 How This Helps You
The export functionality now works seamlessly on the drill-down page. You can drill down into any cost centre and export the Profit & Loss – Single Cost Centre report without any issues.
🛠 Where to Find It
📷 See It in Action
📌 What Was Happening
If you were working with two tabs open and both had the same segment selected (e.g. “All”), the system was still forcing you to refresh. Here’s the scenario: You’re on Tab 1 with segment “All”, you switch to Tab 2 and change the segment to “Bangalore”, work there for a while, then switch the segment back to “All”. When you returned to Tab 1 — even though both tabs now had the same segment “All” selected — the system forcefully asked you to refresh Tab 1.
🌟 How This Helps You
The system now correctly checks whether the segment has actually changed before prompting a refresh. If both tabs are on the same segment, you can switch between them freely without losing your work or being interrupted by unnecessary refresh prompts.
📷 See It in Action
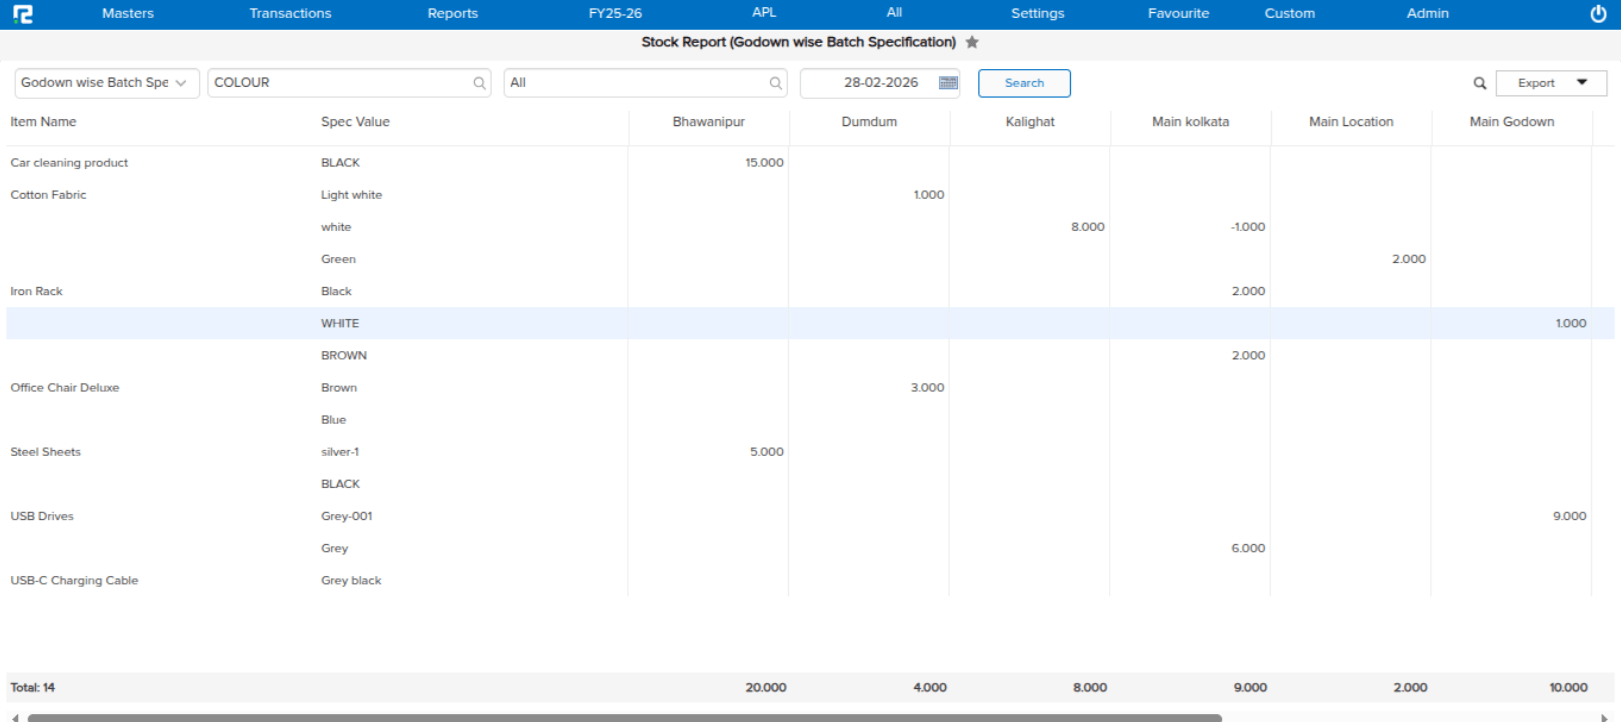
📌 What Was Happening
If you purchased three batches of the same item with different specifications and then transferred the stock of the last batch from Godown A to Godown B, the quantity for that batch appeared blank in the UI for Godown B. This issue occurred specifically when multiple godowns were displayed on the screen at the same time.
🌟 How This Helps You
The report now correctly displays the transferred batch quantity in the destination godown, regardless of how many godowns are visible on screen. Your inventory data is accurate and reliable across all godown views.
🛠 Where to Find It
📷 See It in Action
📌 What Was Happening
When running the Sale Register report (Voucher Wise Item Wise — Sale & Sale Return) for the first time, the Gross Item Rate displayed correctly. However, if you filtered by an Item Name and then removed that filter, the Gross Item Amount changed automatically — showing incorrect values without any data actually changing.
🌟 How This Helps You
The Gross Item Amount now remains consistent regardless of whether you apply or remove item filters. You can freely filter and clear searches without worrying about the report data shifting unexpectedly.
🛠 Where to Find It
📷 See It in Action
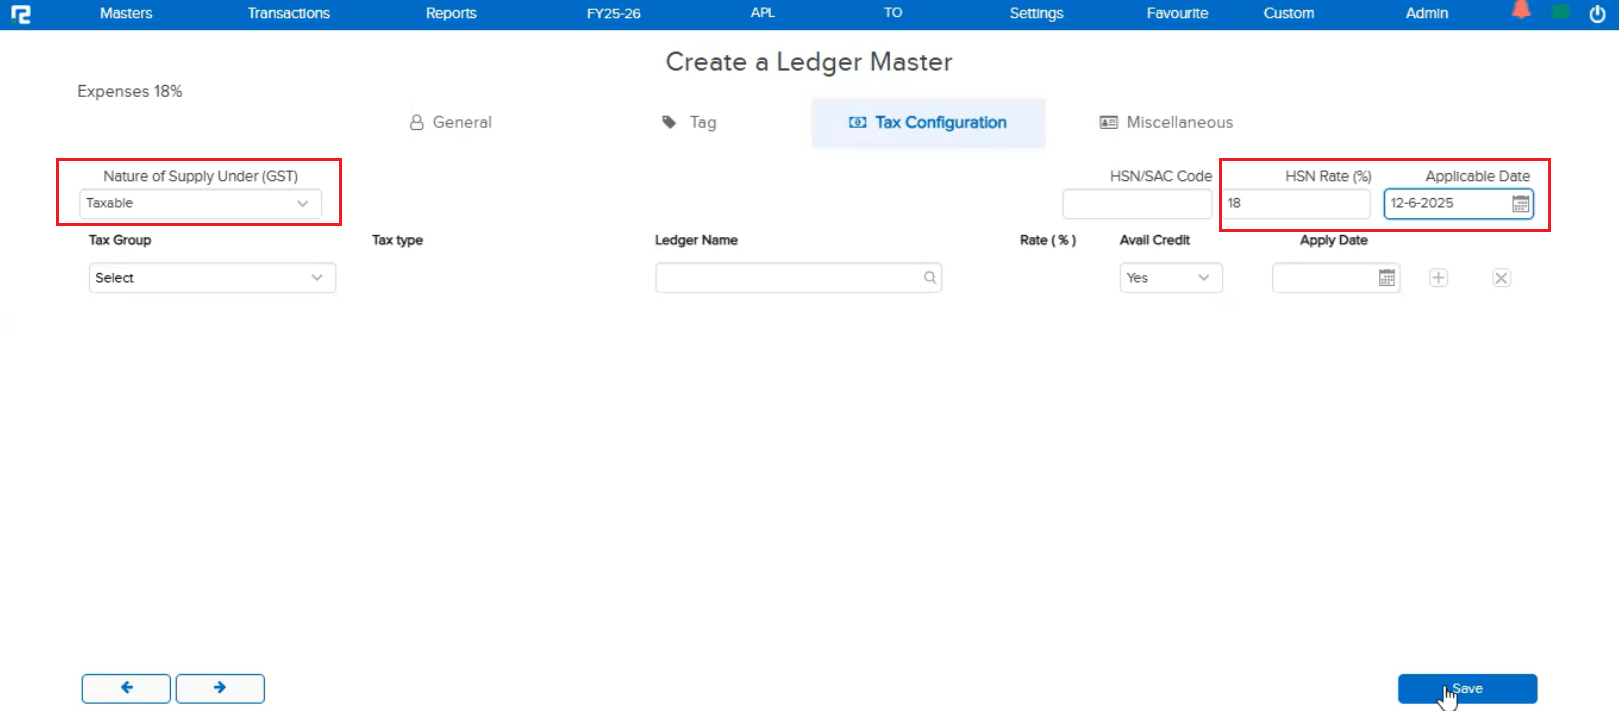
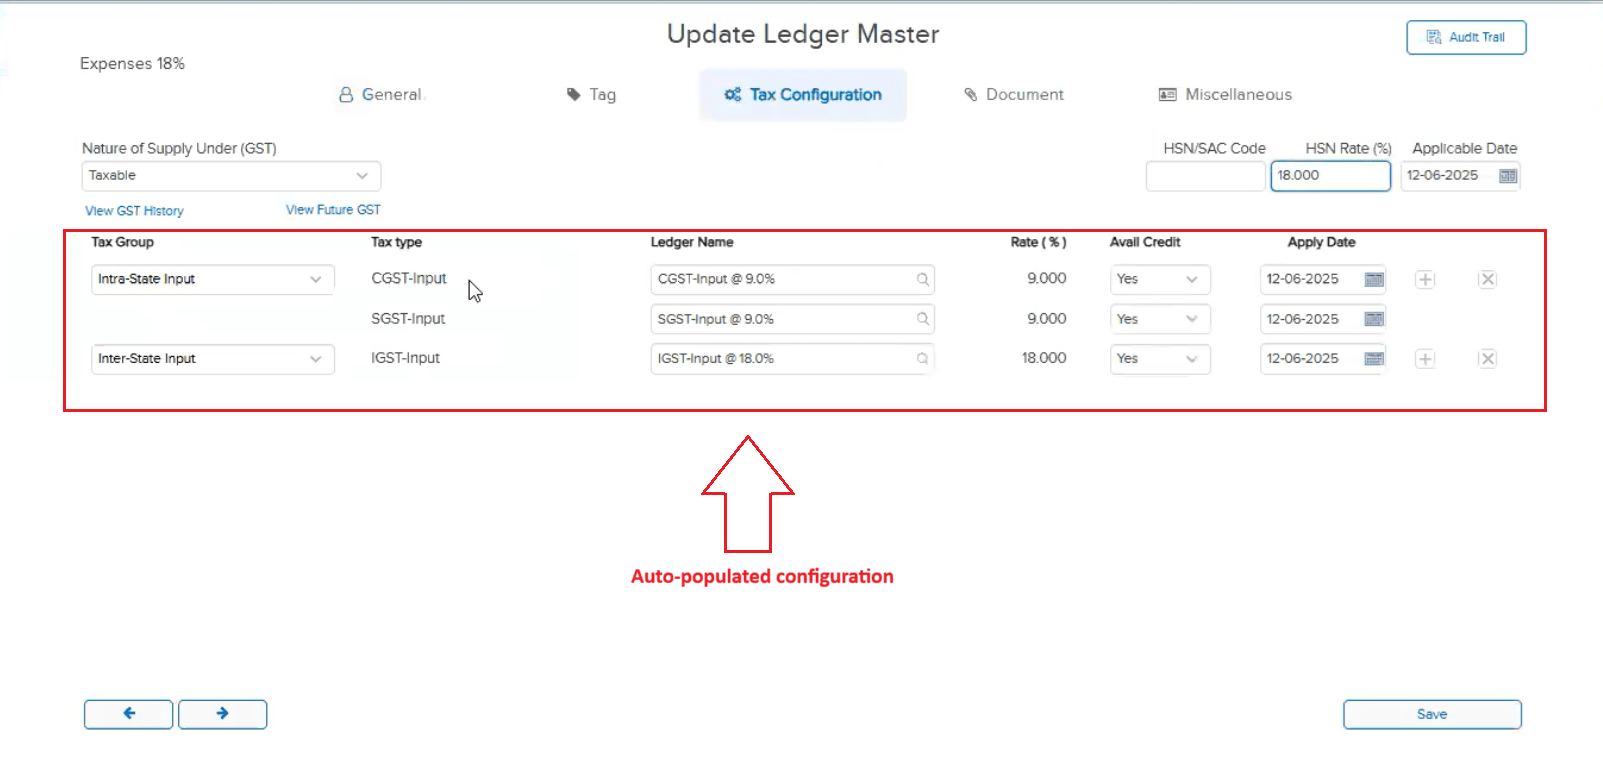
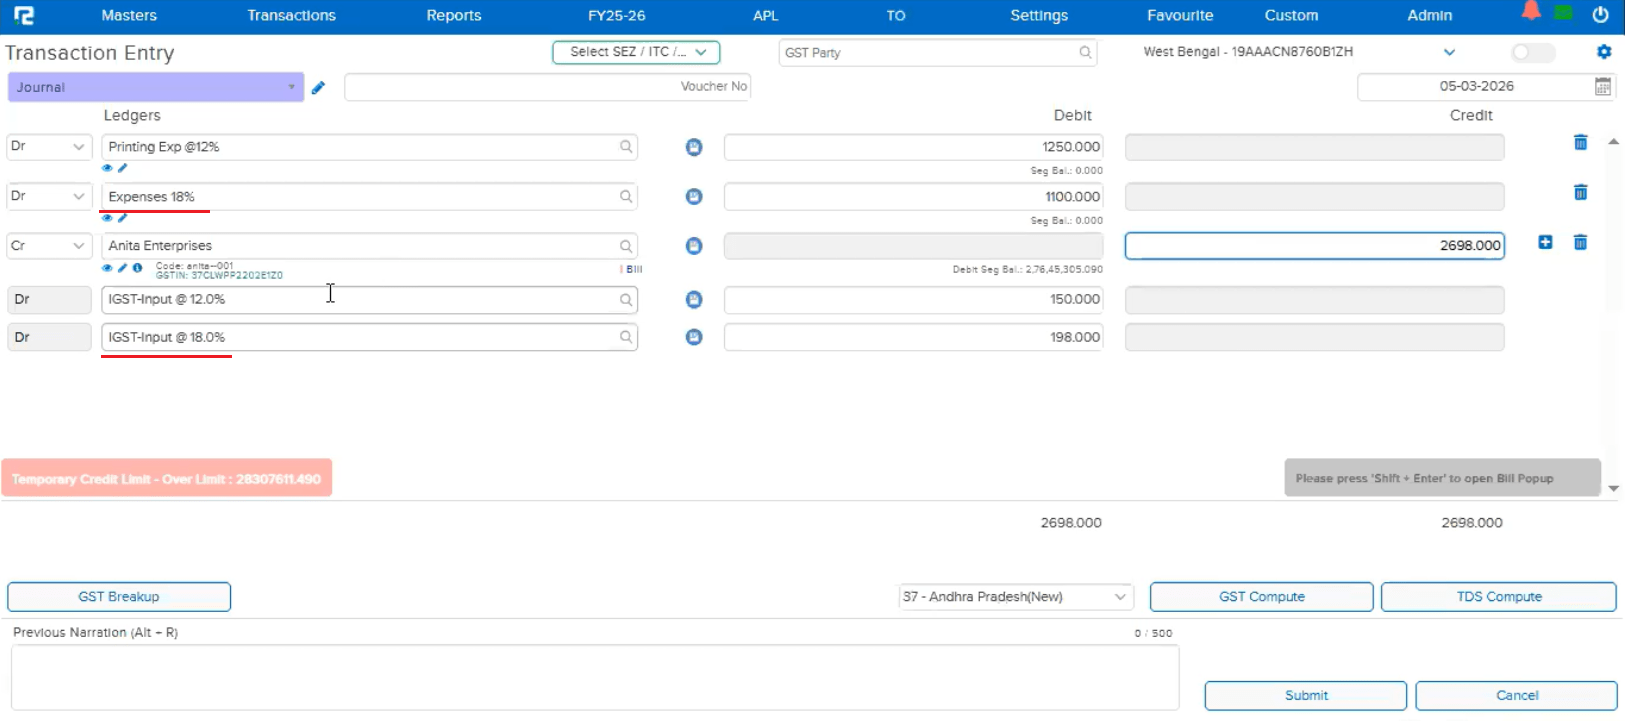
📌 What Was Happening
When a transaction used two expense ledgers — one with tax configured via HSN Rate/Code and the other with tax configured manually — the GST was not computing correctly. The issue was that the applicable date for HSN-based tax configuration was not being saved internally (even though it appeared correctly on the UI). As a result, when Auto GST was enabled, the ledger with HSN-based tax was incorrectly picking up the tax configuration from the other manually-configured expense ledger.
🌟 How This Helps You
The applicable date for HSN Rate/Code based tax configurations now saves correctly. Each expense ledger computes its own GST independently, so you get accurate tax calculations even when mixing HSN-based and manually-configured tax ledgers in the same transaction.
📷 See It in Action
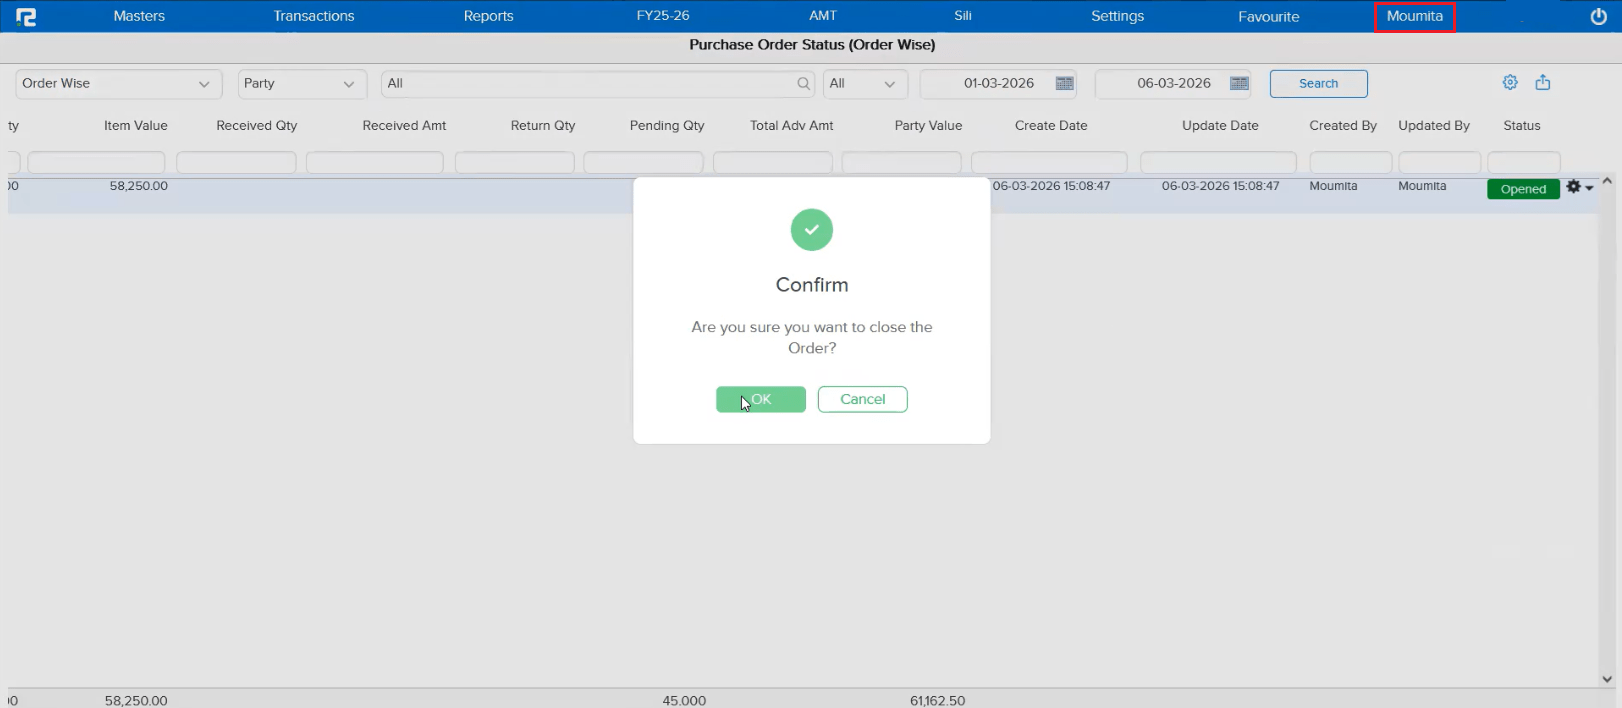
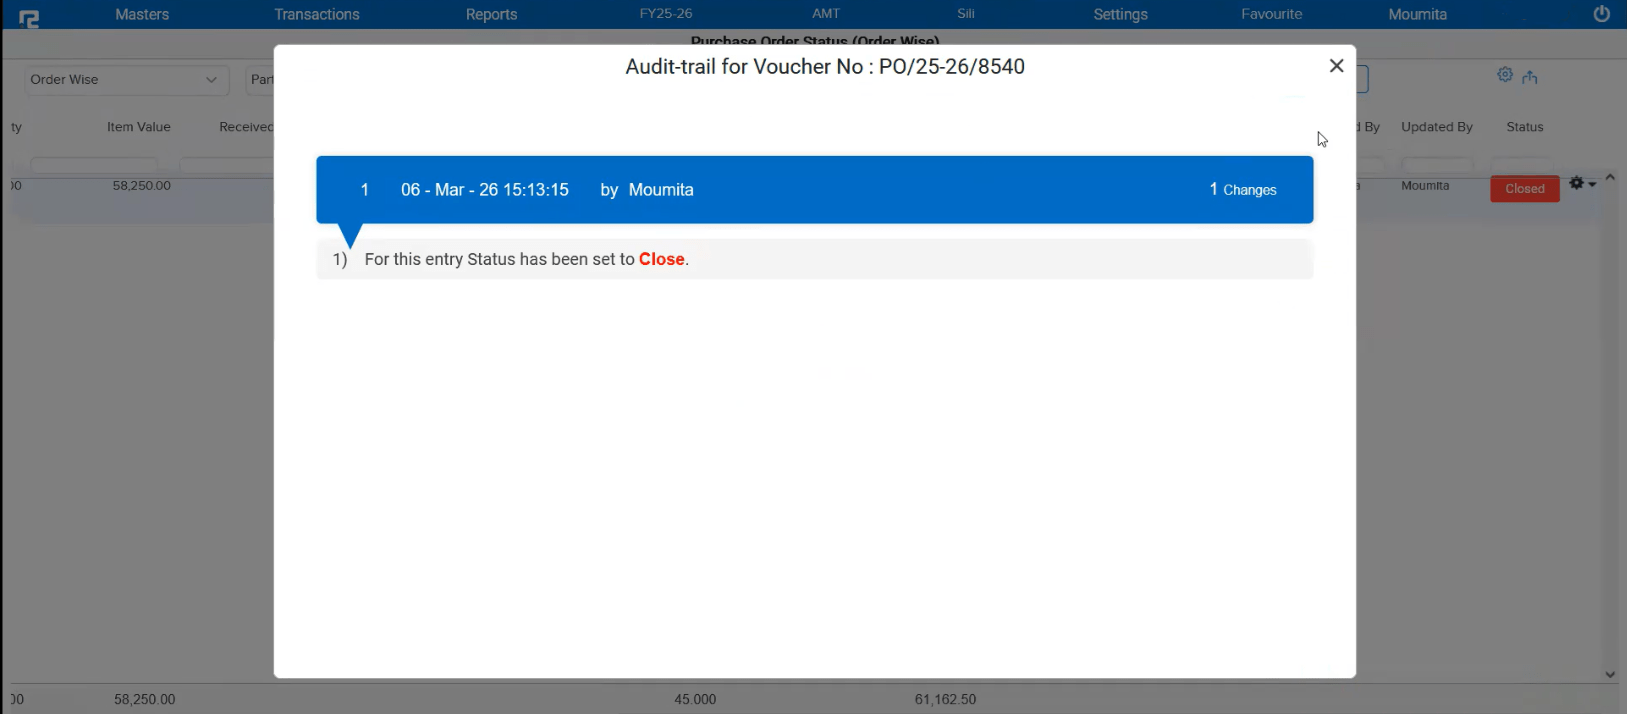
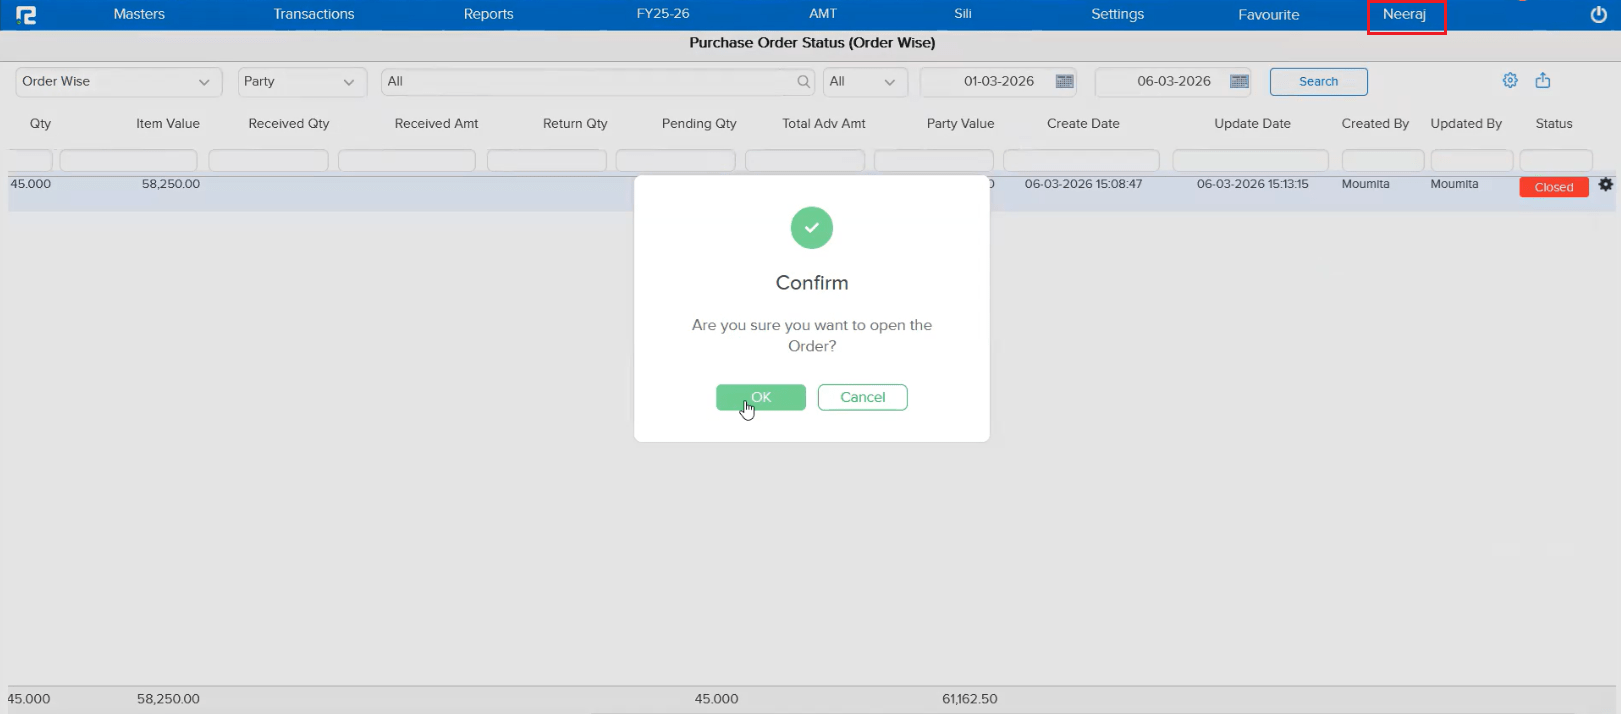
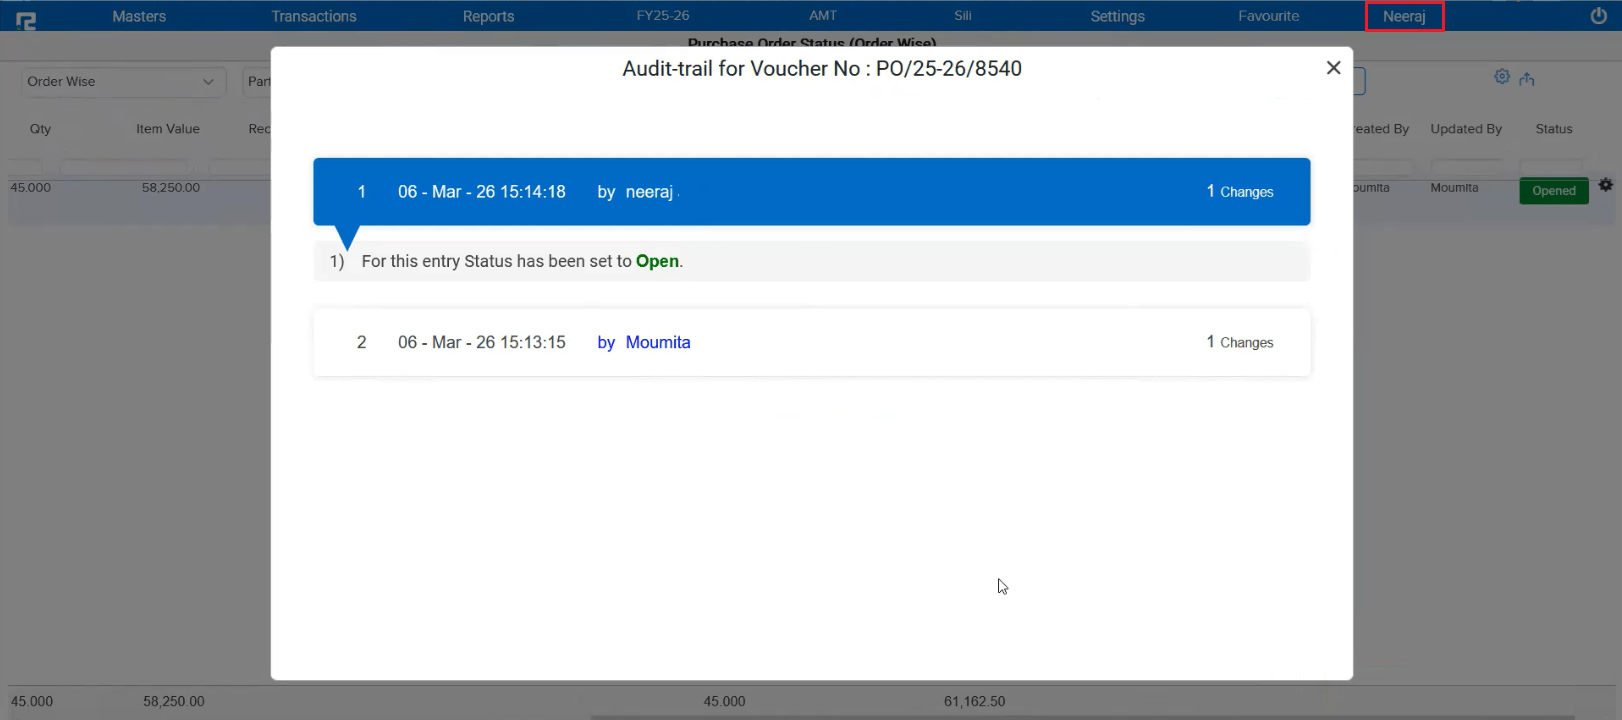
📌 What Was Happening
When User A edited a Purchase Order or Sale Order and later User B closed that order from the listing screen (since there is no open/close option in edit mode), the audit trail was incorrectly showing User A as the person who performed the close action. The system was defaulting to the last editor instead of tracking the actual user who closed the order.
🌟 How This Helps You
The audit trail now correctly reflects the actual user who performed the close or open action from the listing screen. This ensures complete accountability and accurate tracking of who did what on each order.
📷 See It in Action