Main Release — 26-08-2026
📌 What’s New
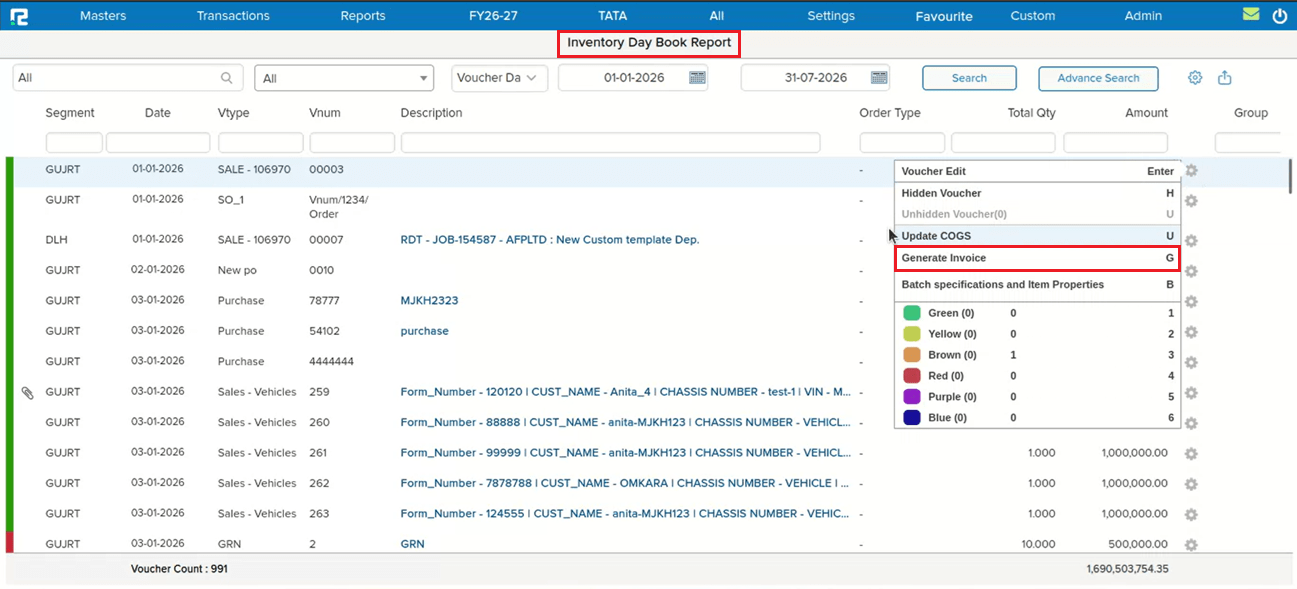
Currently, the system has a Bill Wise Report to view bill details. However, there was no way to check bill details based on Voucher Type — making it difficult to view the tagged value against a specific bill and track untagged bills for a particular voucher type.
🌟 What This Means for You
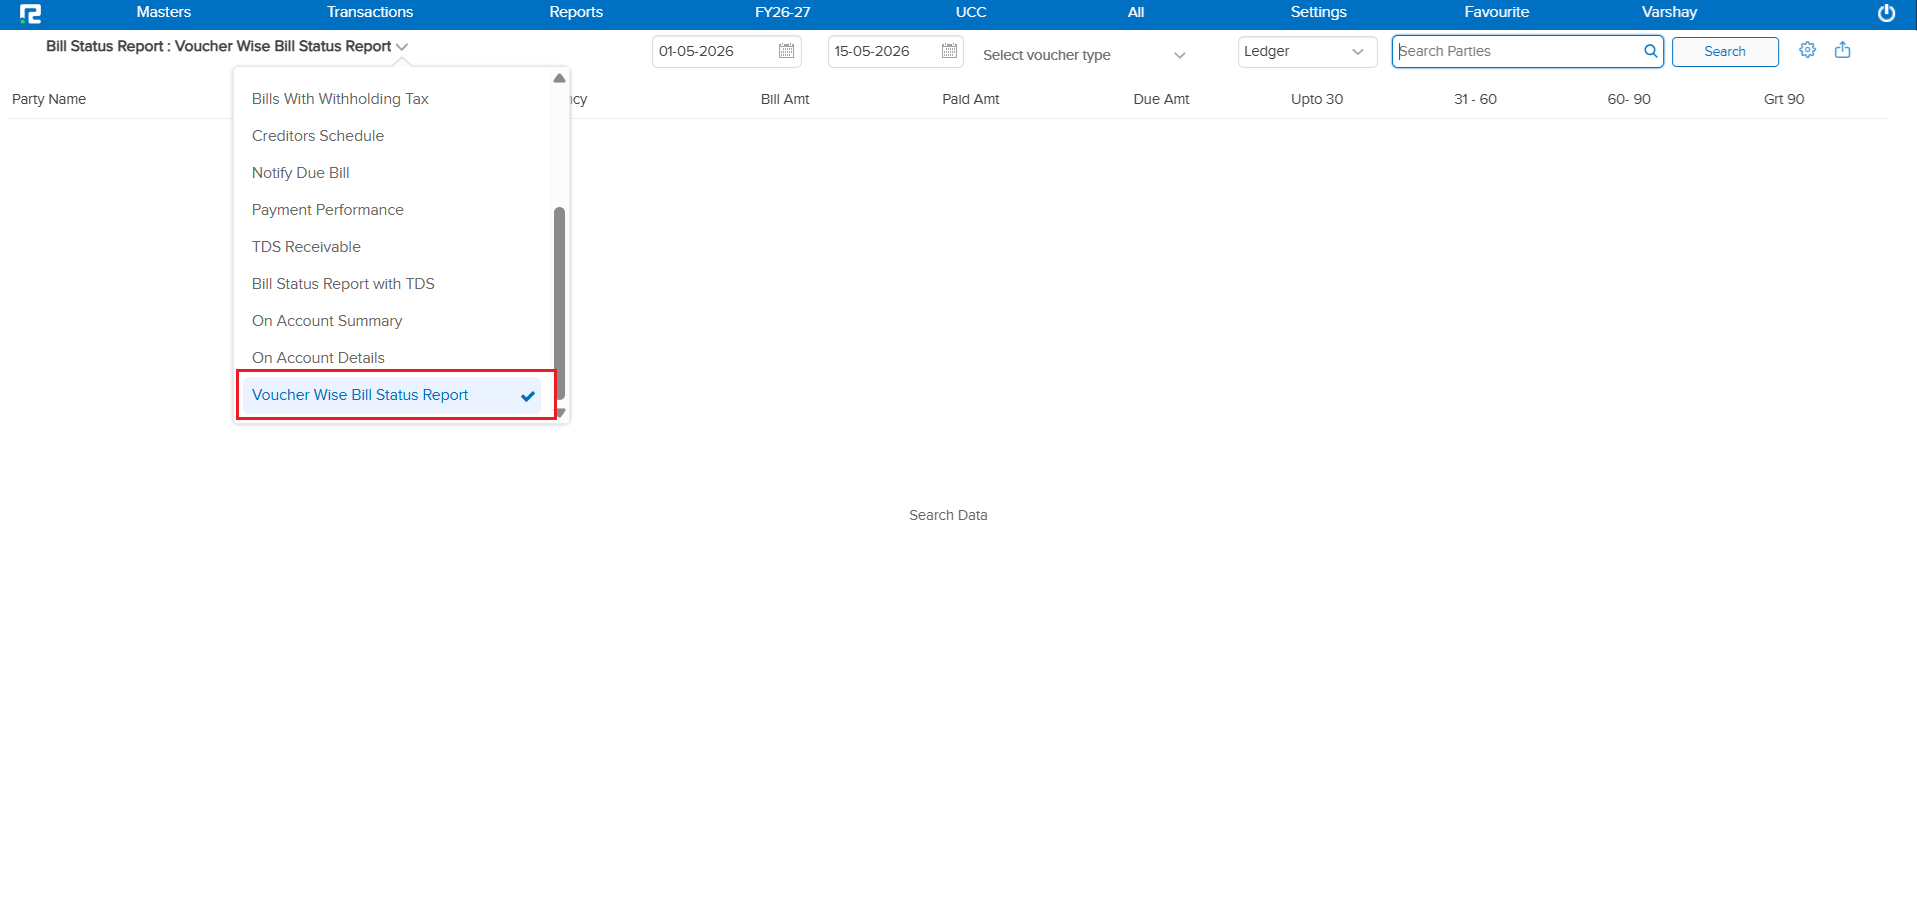
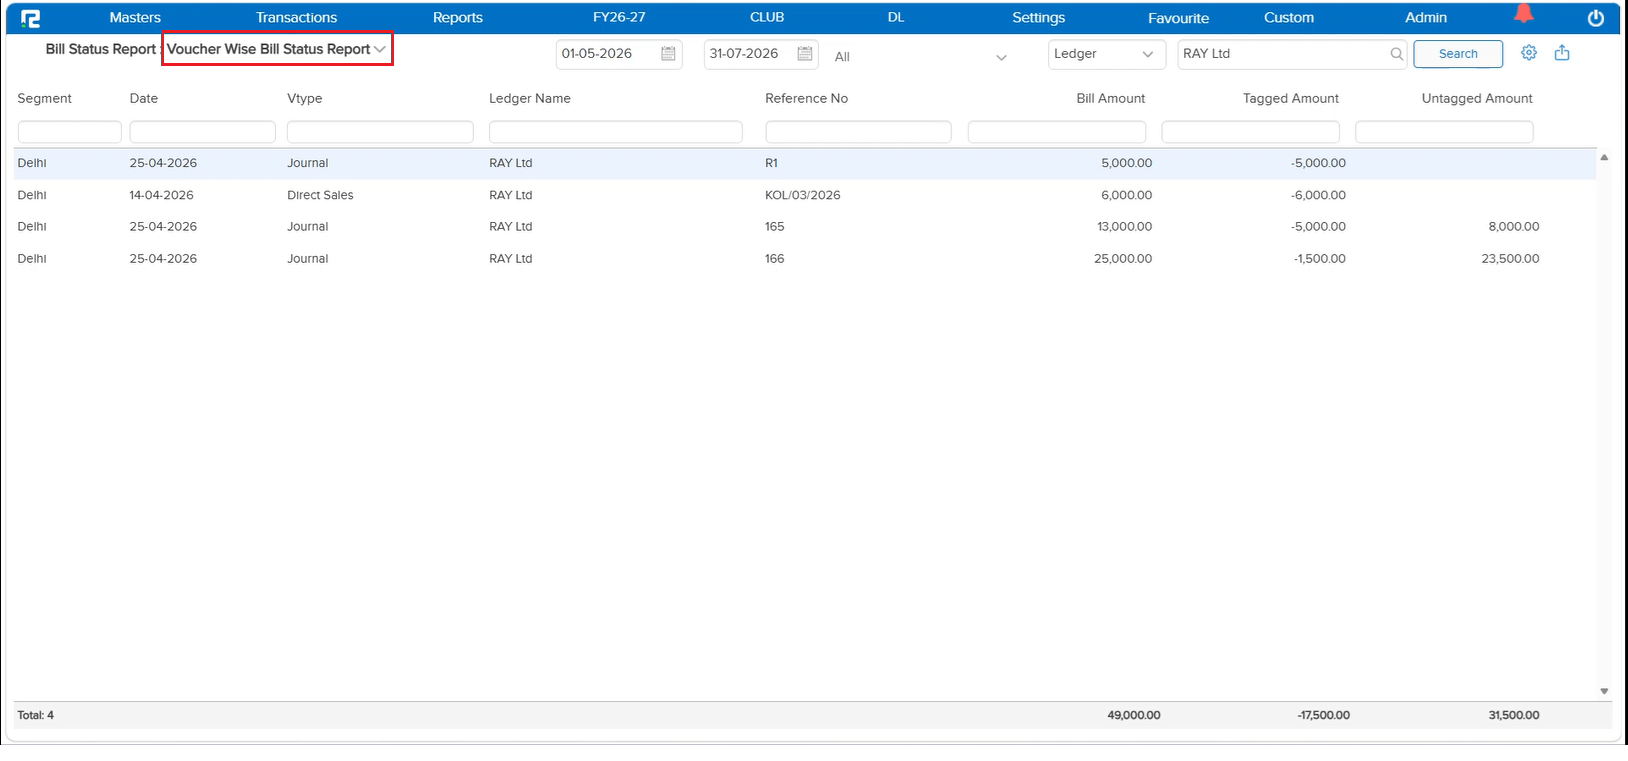
A new Voucher Wise Bill Status Report has been introduced. This report allows you to check bill details based on Voucher Type, helping you view the tagged value against a specific bill and easily track untagged bills.
Report Columns:
• Segment – Segment or business unit to which the transaction belongs
• Date – Date when the voucher was created
• Voucher Type – Type of voucher used (Sales, Receipt, Payment, etc.)
• Ledger Name – Name of the customer or party
• Reference No – Bill number or reference number
• Bill Amount – Total bill value
• Tagged Amount – Amount already adjusted or linked
• Untagged Amount – Amount still pending or not linked
🎬 Where to Find It
📷 See It in Action
📌 What’s New
Currently, there was no dedicated screen to reconcile the physical stock (actual count) against the book stock (system records). Users had to manually compare quantities and values outside the system, making the stock reconciliation process tedious and error-prone.
🌟 What This Means for You
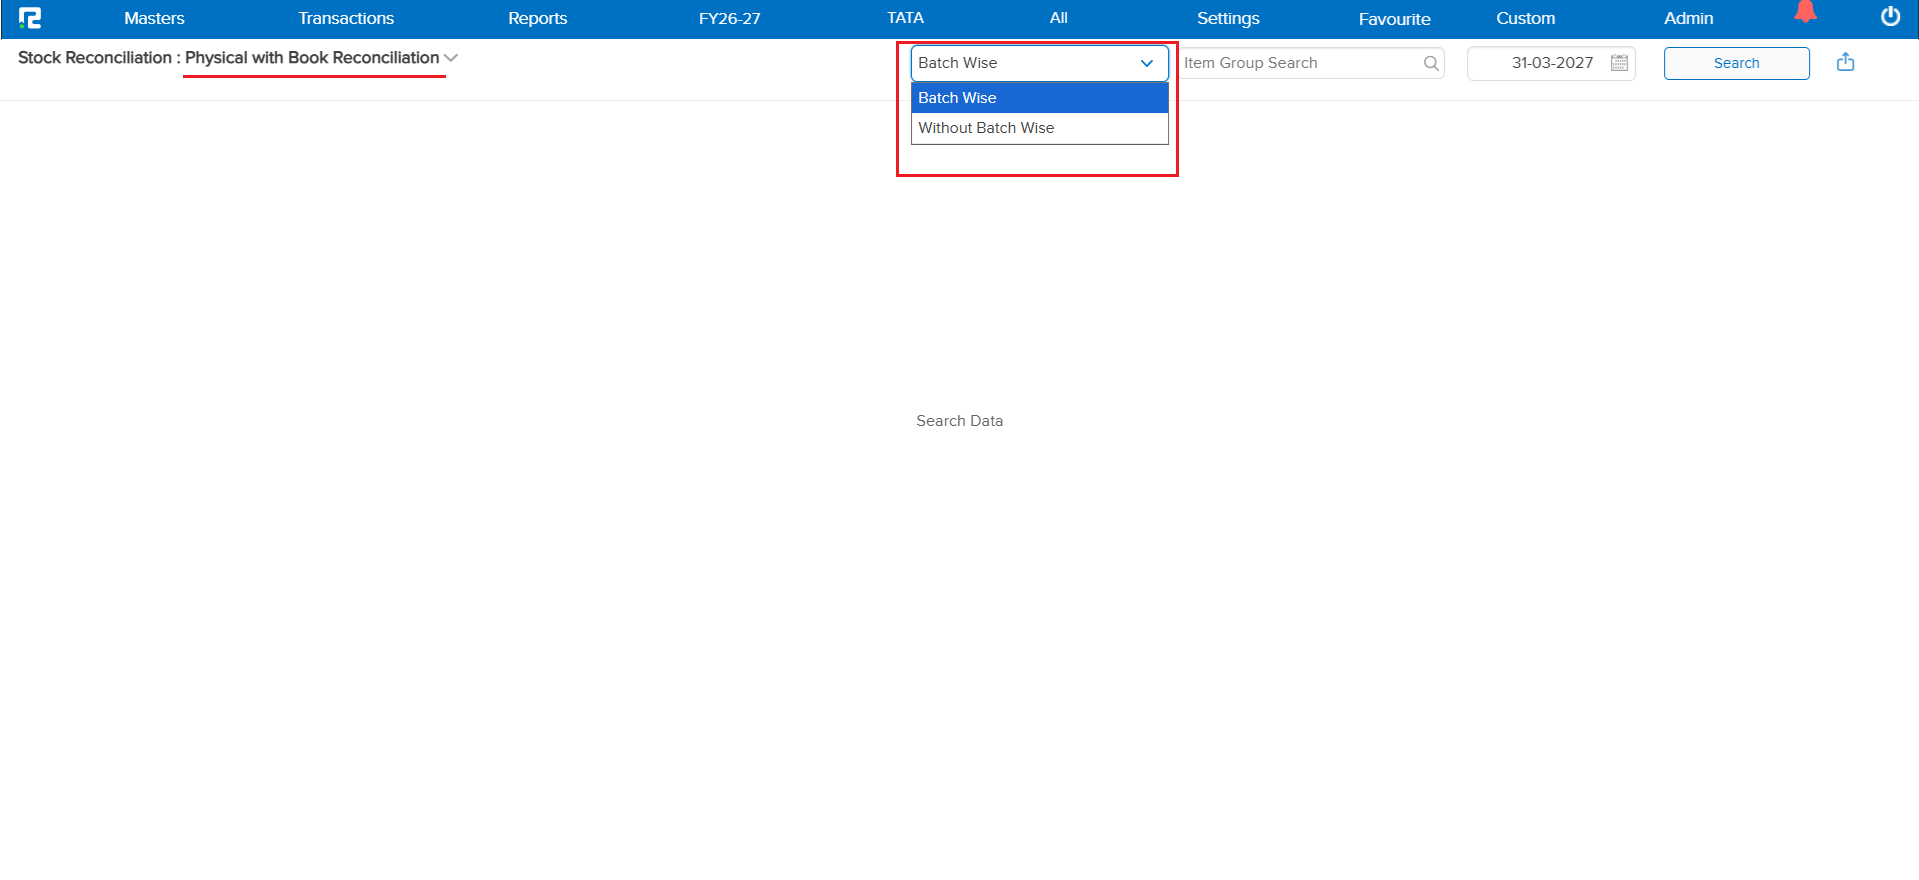
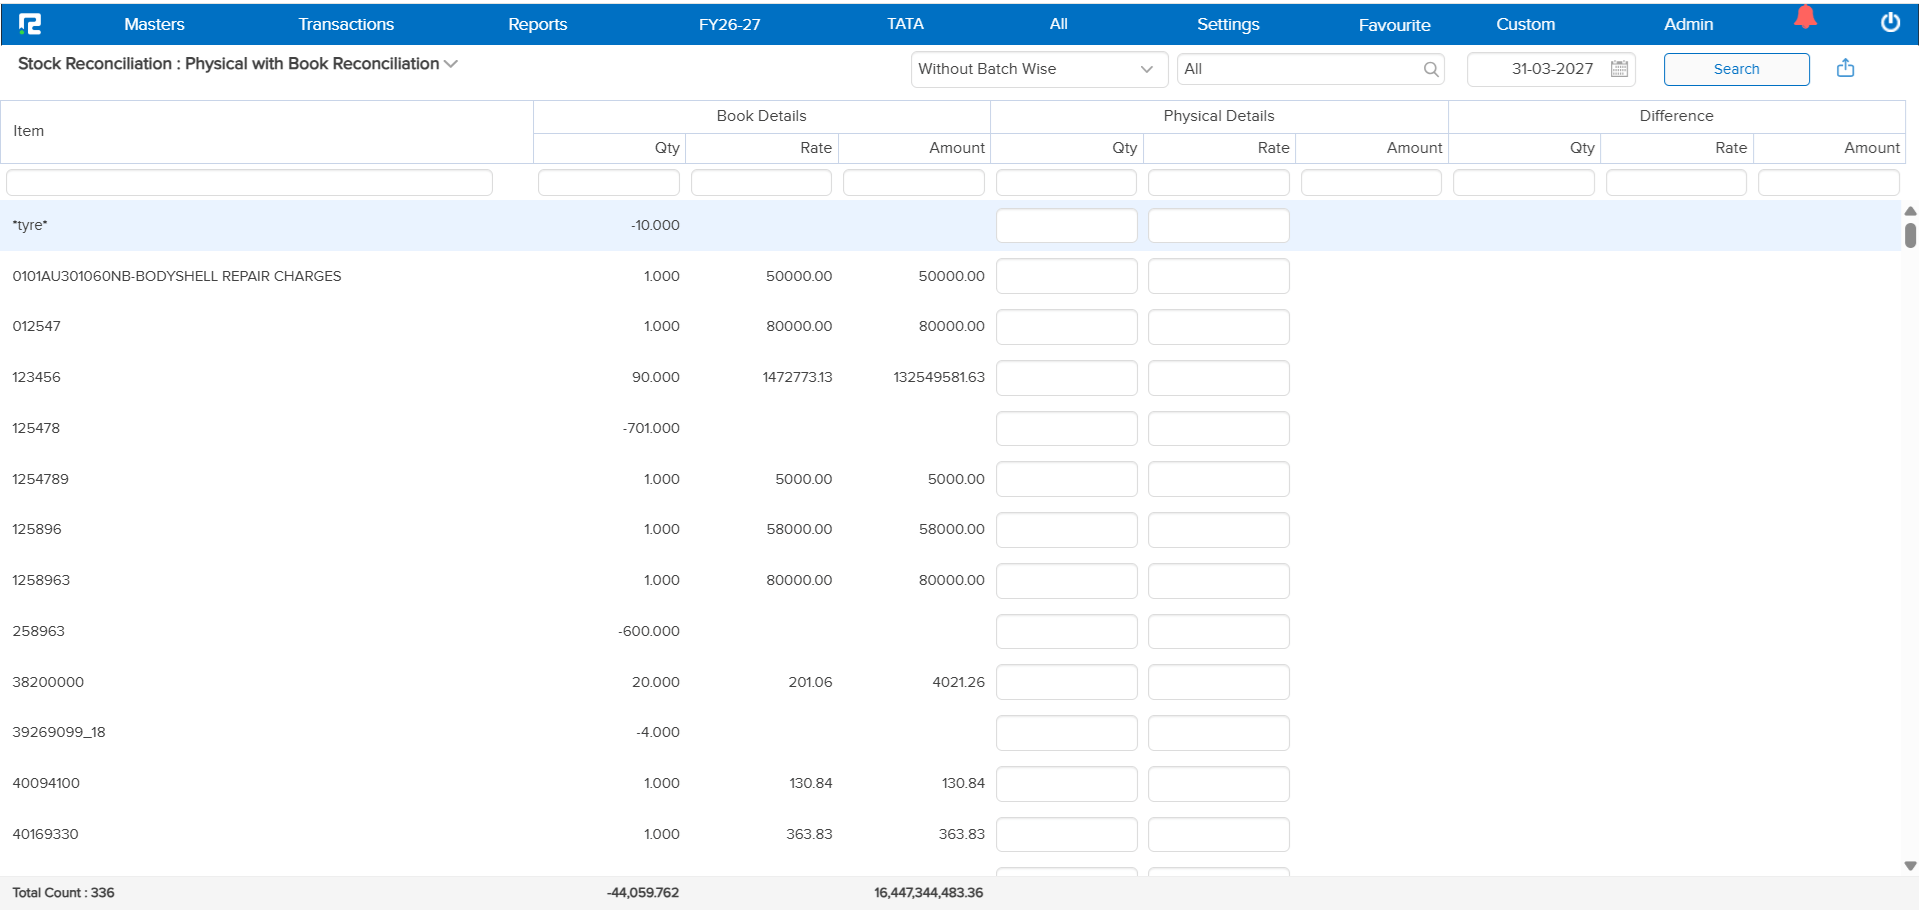
A new Stock Reconciliation Report screen has been introduced. The system automatically displays the Book Stock (as per system records), and users can enter or update the Physical Stock after performing the physical count. The system then calculates and displays the difference in Quantity, Rate, and Amount automatically.
Key Highlights:
• Batch Wise – Report is batch-wise where batch is applicable
• Segment Restriction – Where segment is applicable, adding physical stock will not be allowed from “All Segment”
• Difference Calculation – Book Details − Physical Details = Difference
This helps you easily identify shortages, excess stock, or valuation differences between system records and actual physical stock.
🎬 Where to Find It
📷 See It in Action
📌 What’s New
There was no dedicated screen to reconcile TDS Receivable as per Books with the 26AS statement. The 26AS statement is available in Excel format based on TAN number, but users had to manually compare TDS amounts outside the system — making the reconciliation process tedious and error-prone.
🌟 What This Means for You
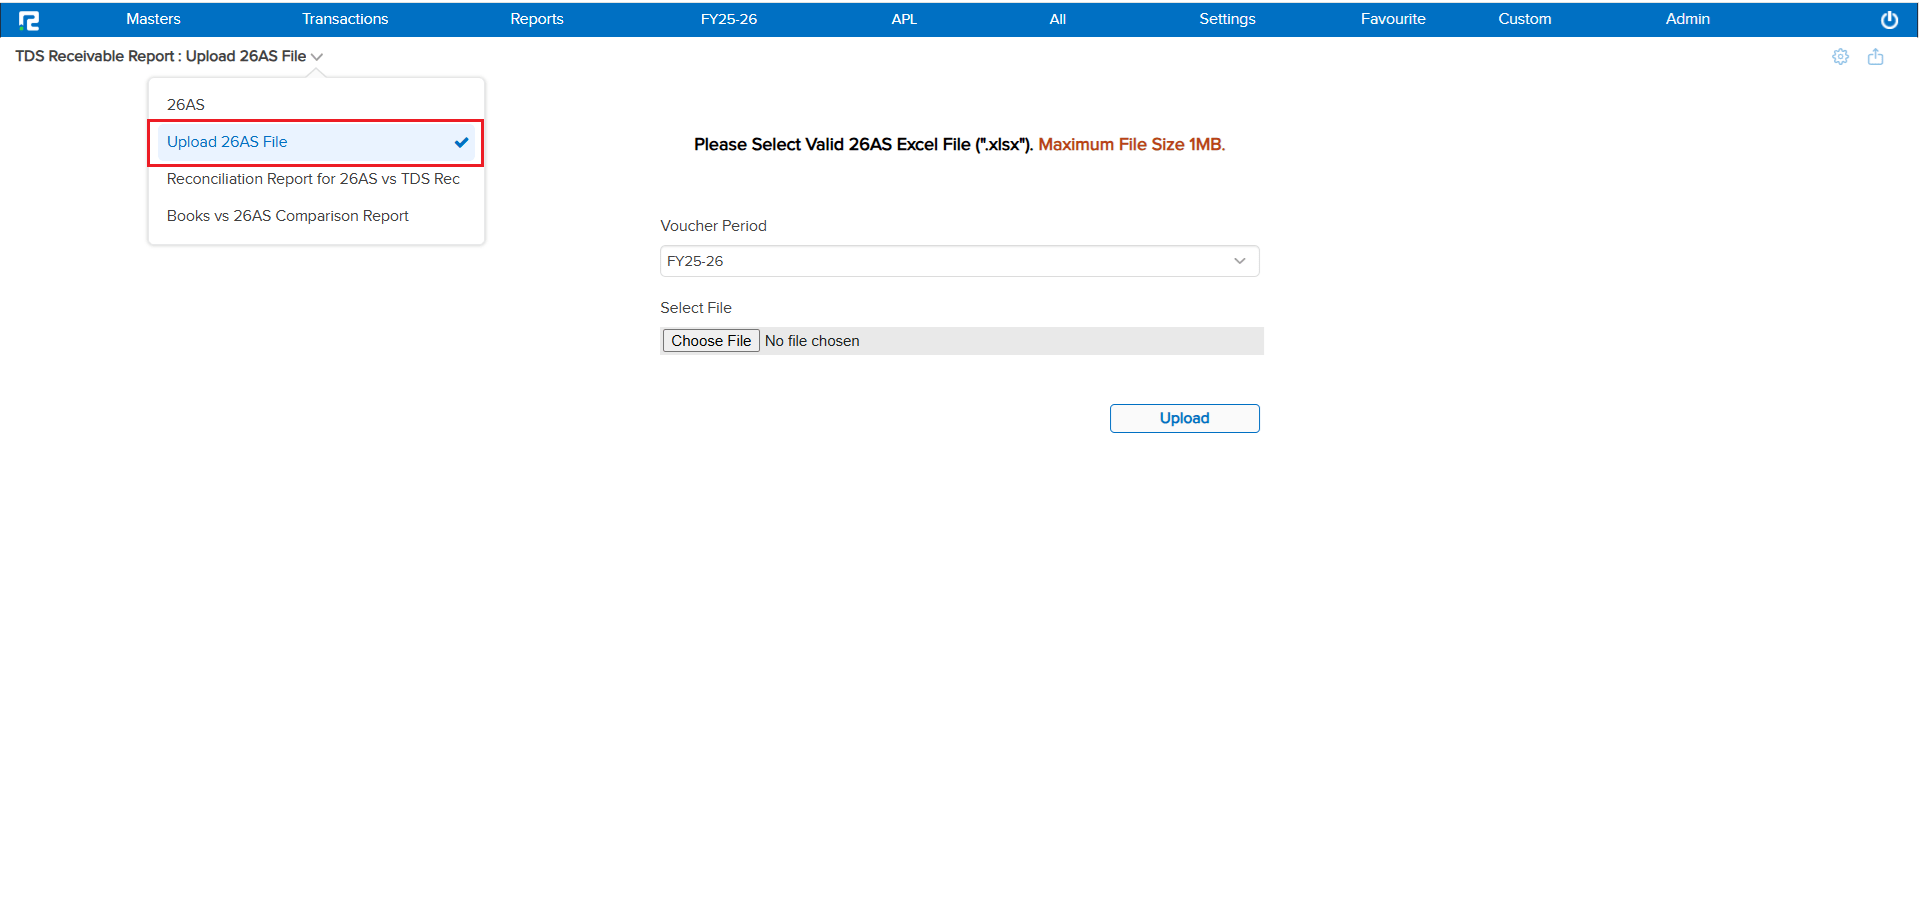
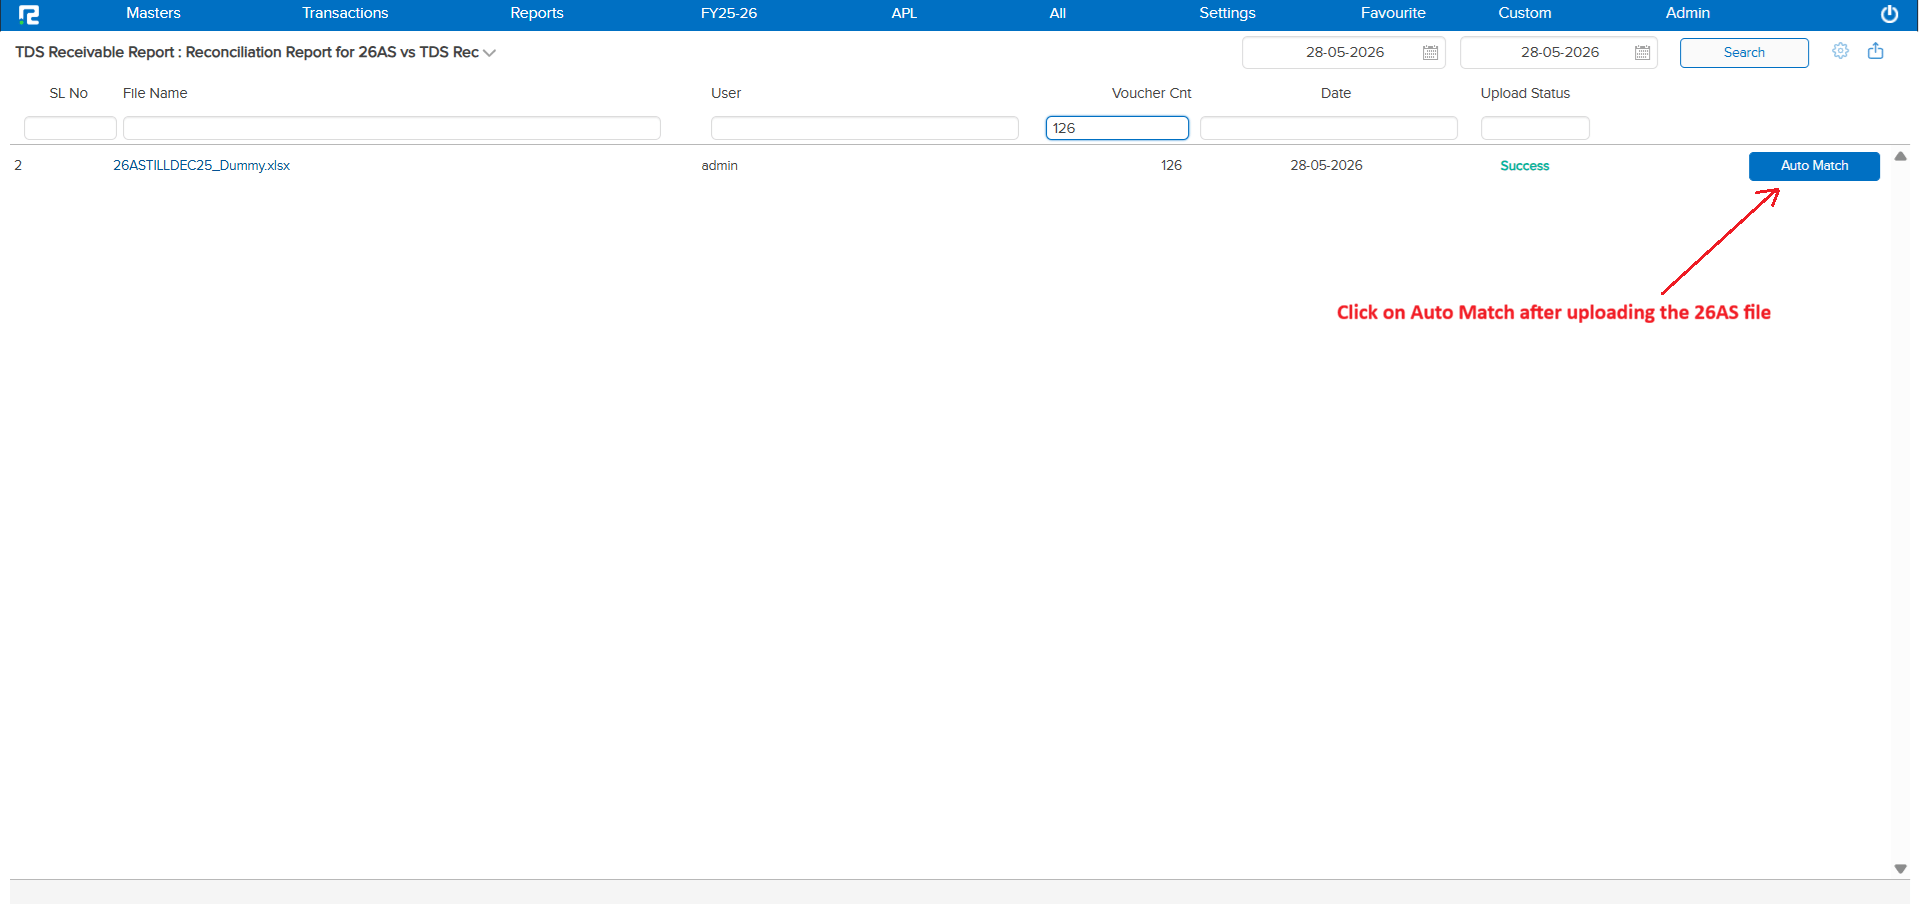
A new 26AS vs TDS Receivable Reconciliation Report has been introduced. The system fetches entries from the uploaded 26AS Excel file and compares them with the ledger balances in the books, party-wise.
Reconciliation Logic:
• Reconciliation is done party-wise — bill-wise matching is not required
• Only the total TDS amount per party is compared between Books and 26AS
• The report displays the difference between the amount in Books and the amount in 26AS
Important: If the 26AS Excel file is re-imported for the same financial year, the system will replace the previously imported file for that financial year with the newly uploaded one.
🎬 Where to Find It
📷 See It in Action
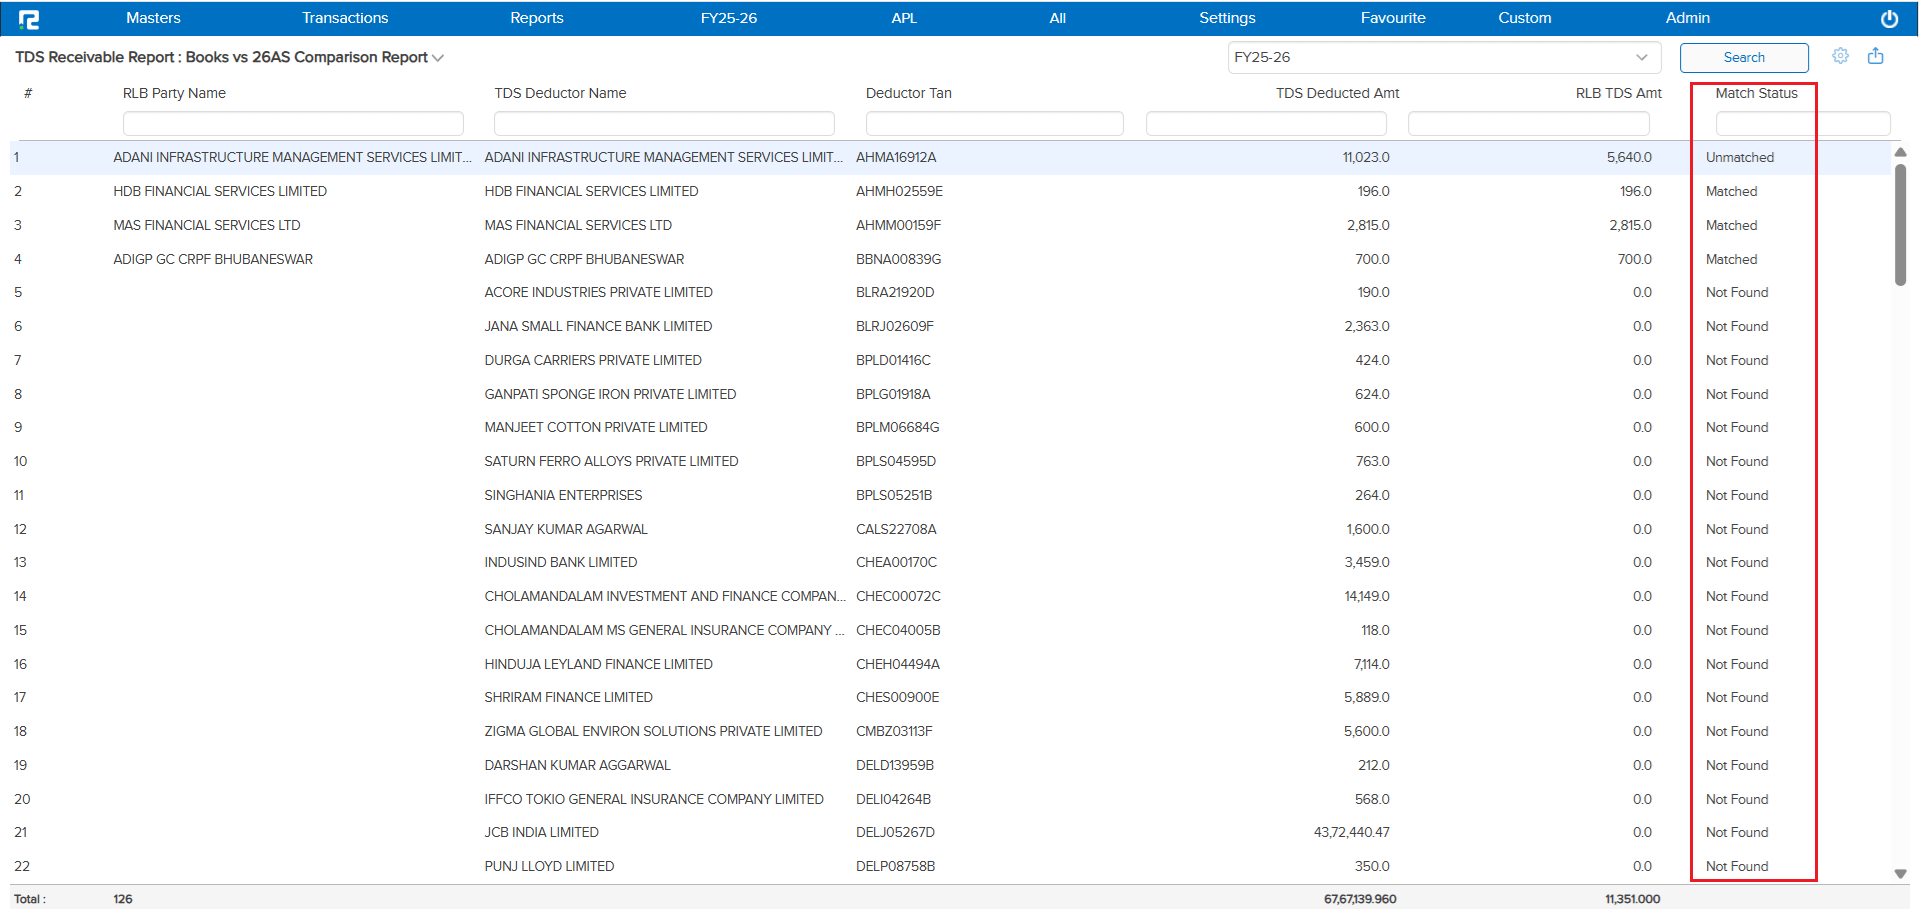
📌 What Was Needed
There was no dedicated report under Bill Status to track outstanding bills falling within a critical near-term window. Users had no quick way to identify:
• Bills due within the next 7 days — payments that need to be actioned immediately
• Bills overdue within the last 7 days — payments that have already crossed their due date
Without this view, tracking and acting on these bills required manual effort across multiple screens, and there was no built-in path to push selected bills directly into bank export processing.
🌟 What This Means for You
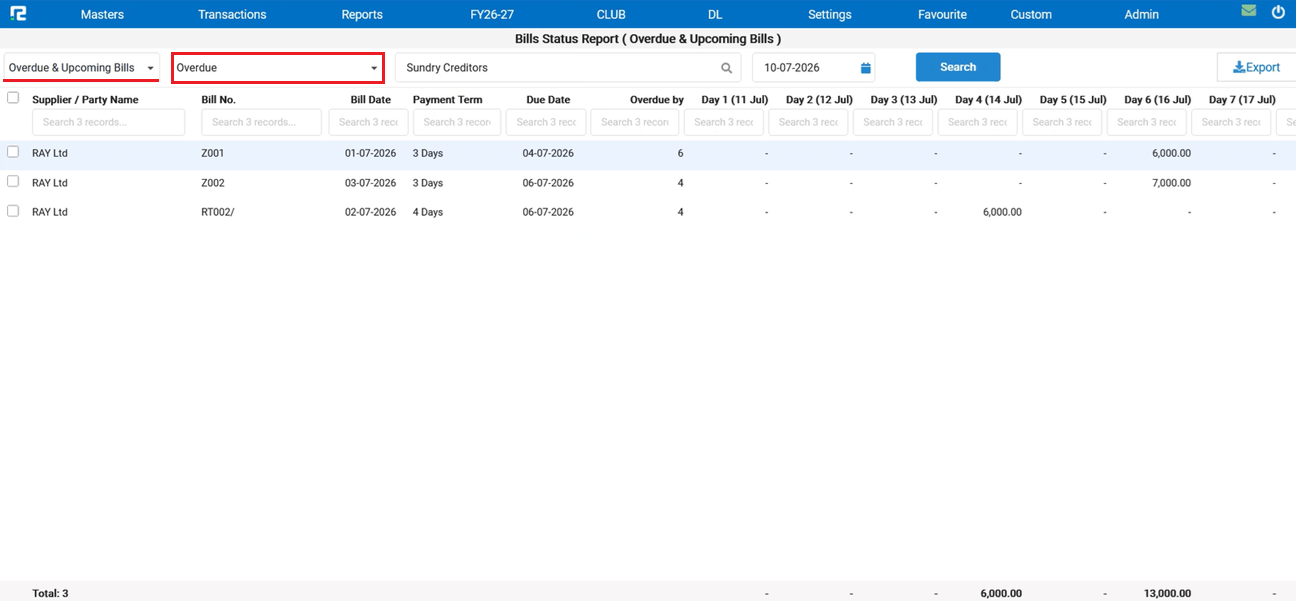
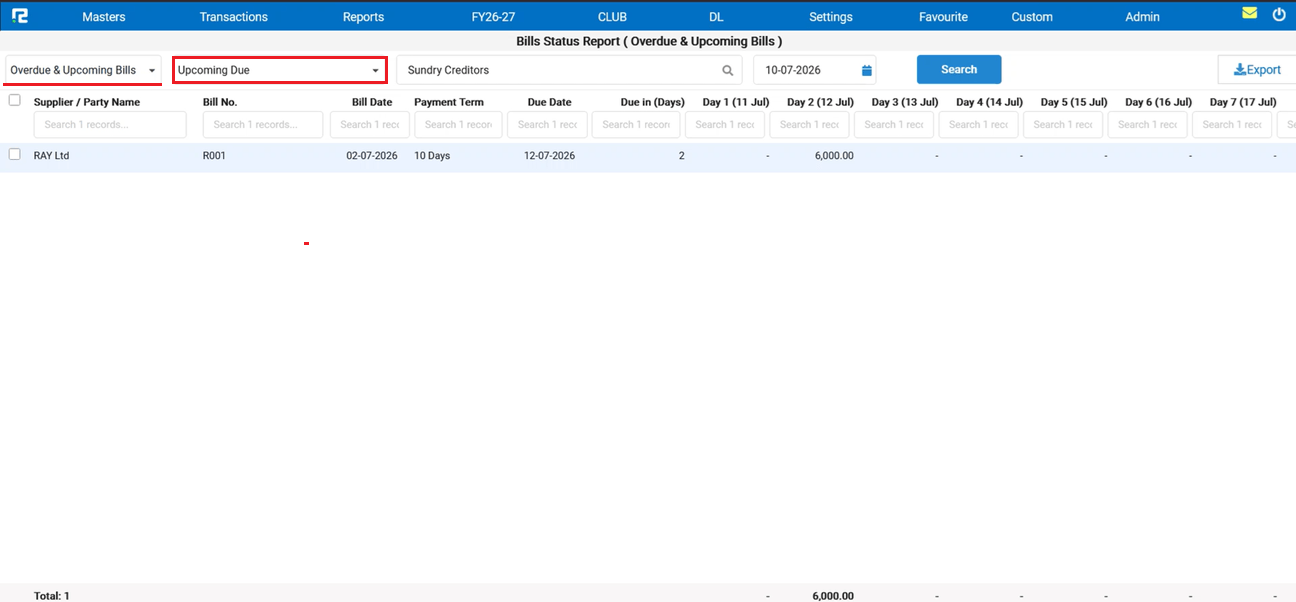
A new Pending Bills Due Within Next 7 Days report has been added under Bill Status:
• Tracks bills due within the next 7 days and bills overdue within the last 7 days in a single view
• Report is generated bill-wise for a granular, line-by-line breakdown of outstanding amounts
🎬 Where to Find It
📷 See It in Action
📌 What Was Happening
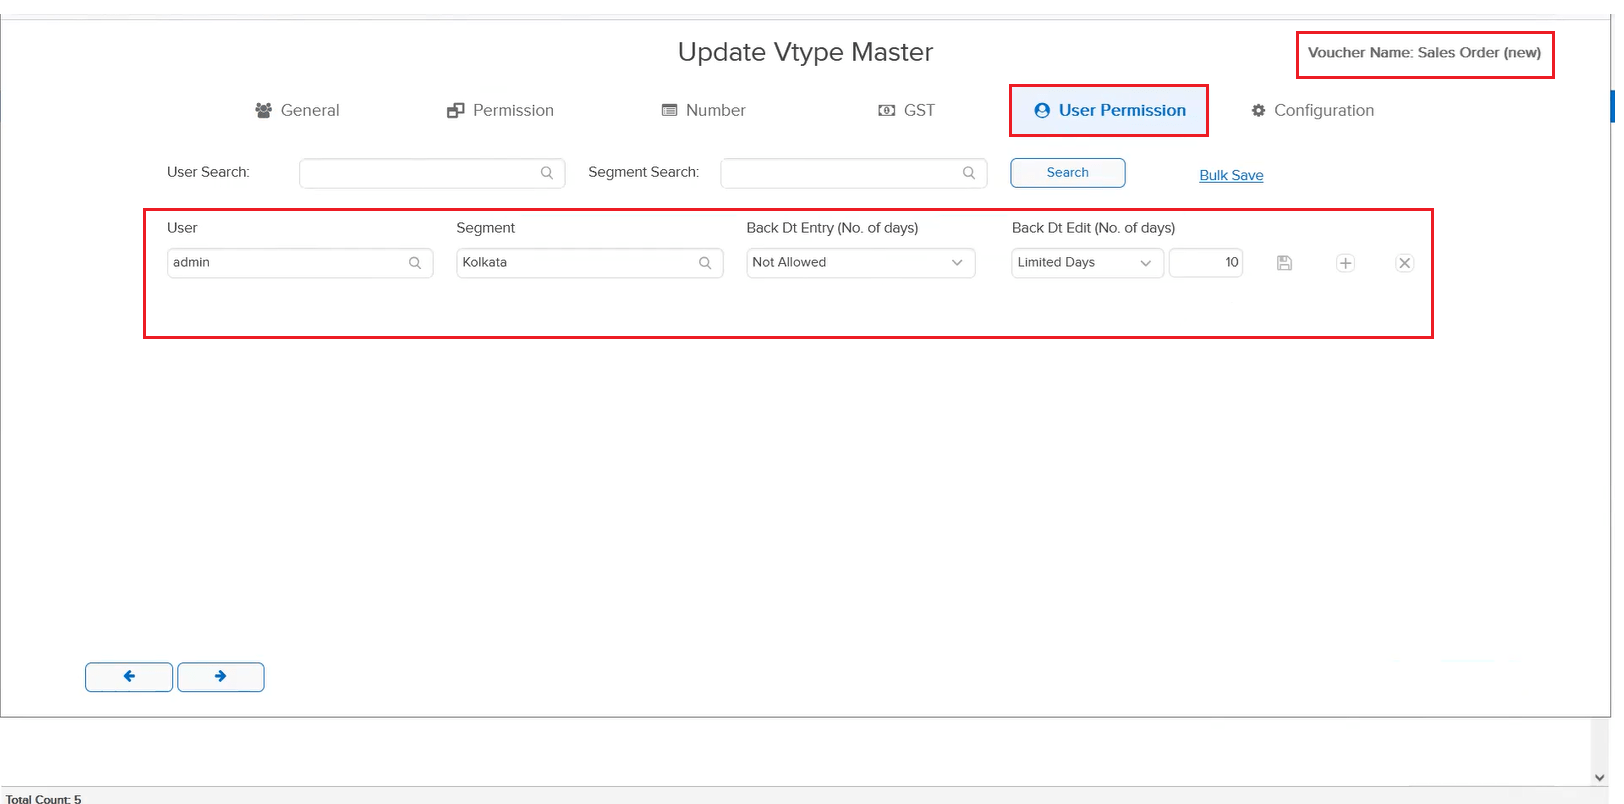
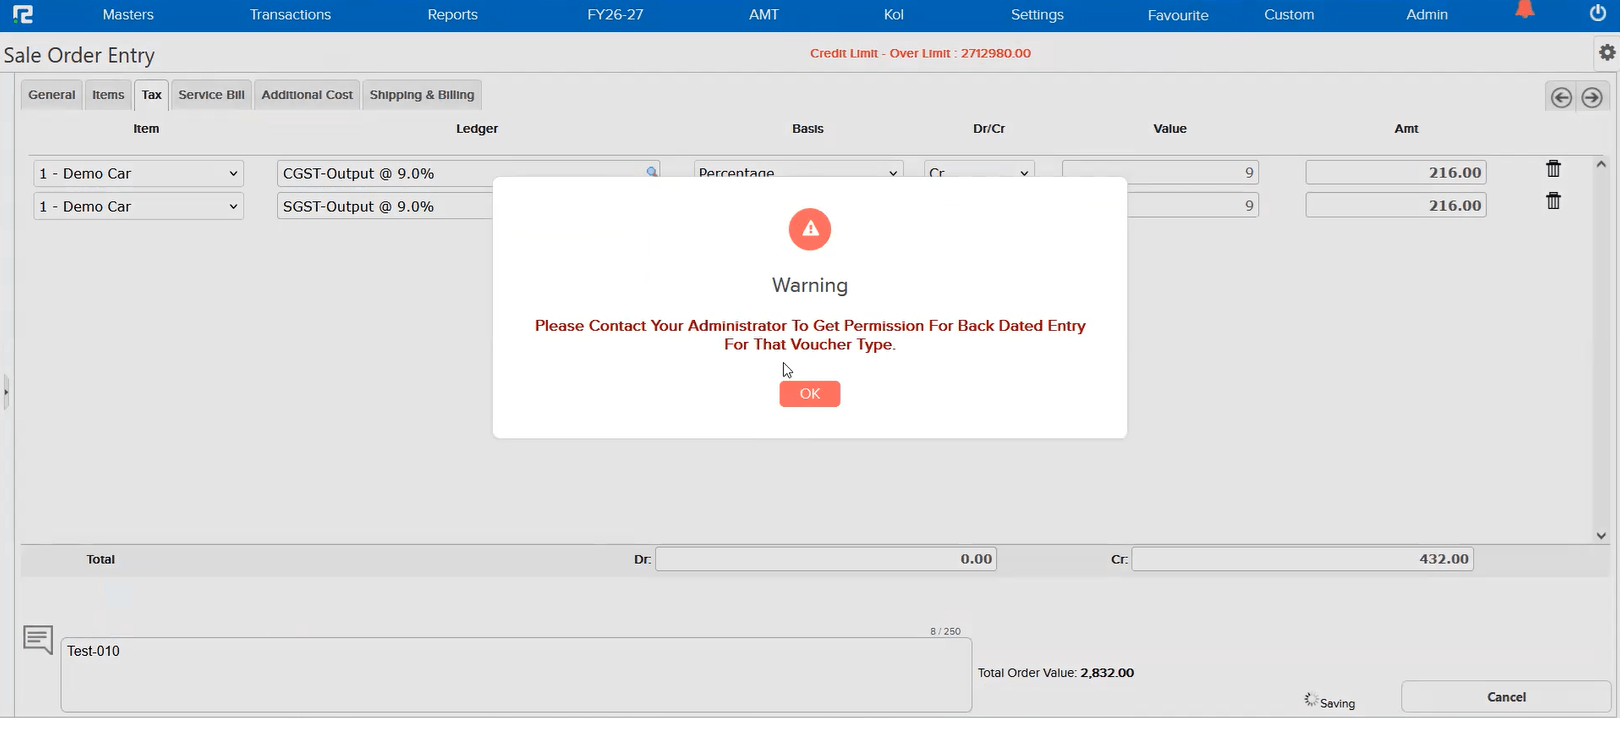
Users were not allowed to create or edit back-dated entries for Sale Order and Purchase Order voucher types, even though the Back Date Entry / Edit (No. of Days) permission was configured in the Voucher Type master. The root cause was that the back date entry and edit functionality was never developed for Sale Order and Purchase Order voucher types — however, the option was available on the UI, giving the impression it should work.
🌟 What This Means for You
The Back Date Entry and Edit functionality has now been implemented for Sale Order and Purchase Order voucher types. Both back-dated entry creation and editing of existing back-dated entries are now supported, and the permissions set in the Voucher Type master are respected correctly.
🎬 Where to Find It
📷 See It in Action
📌 What Was Happening
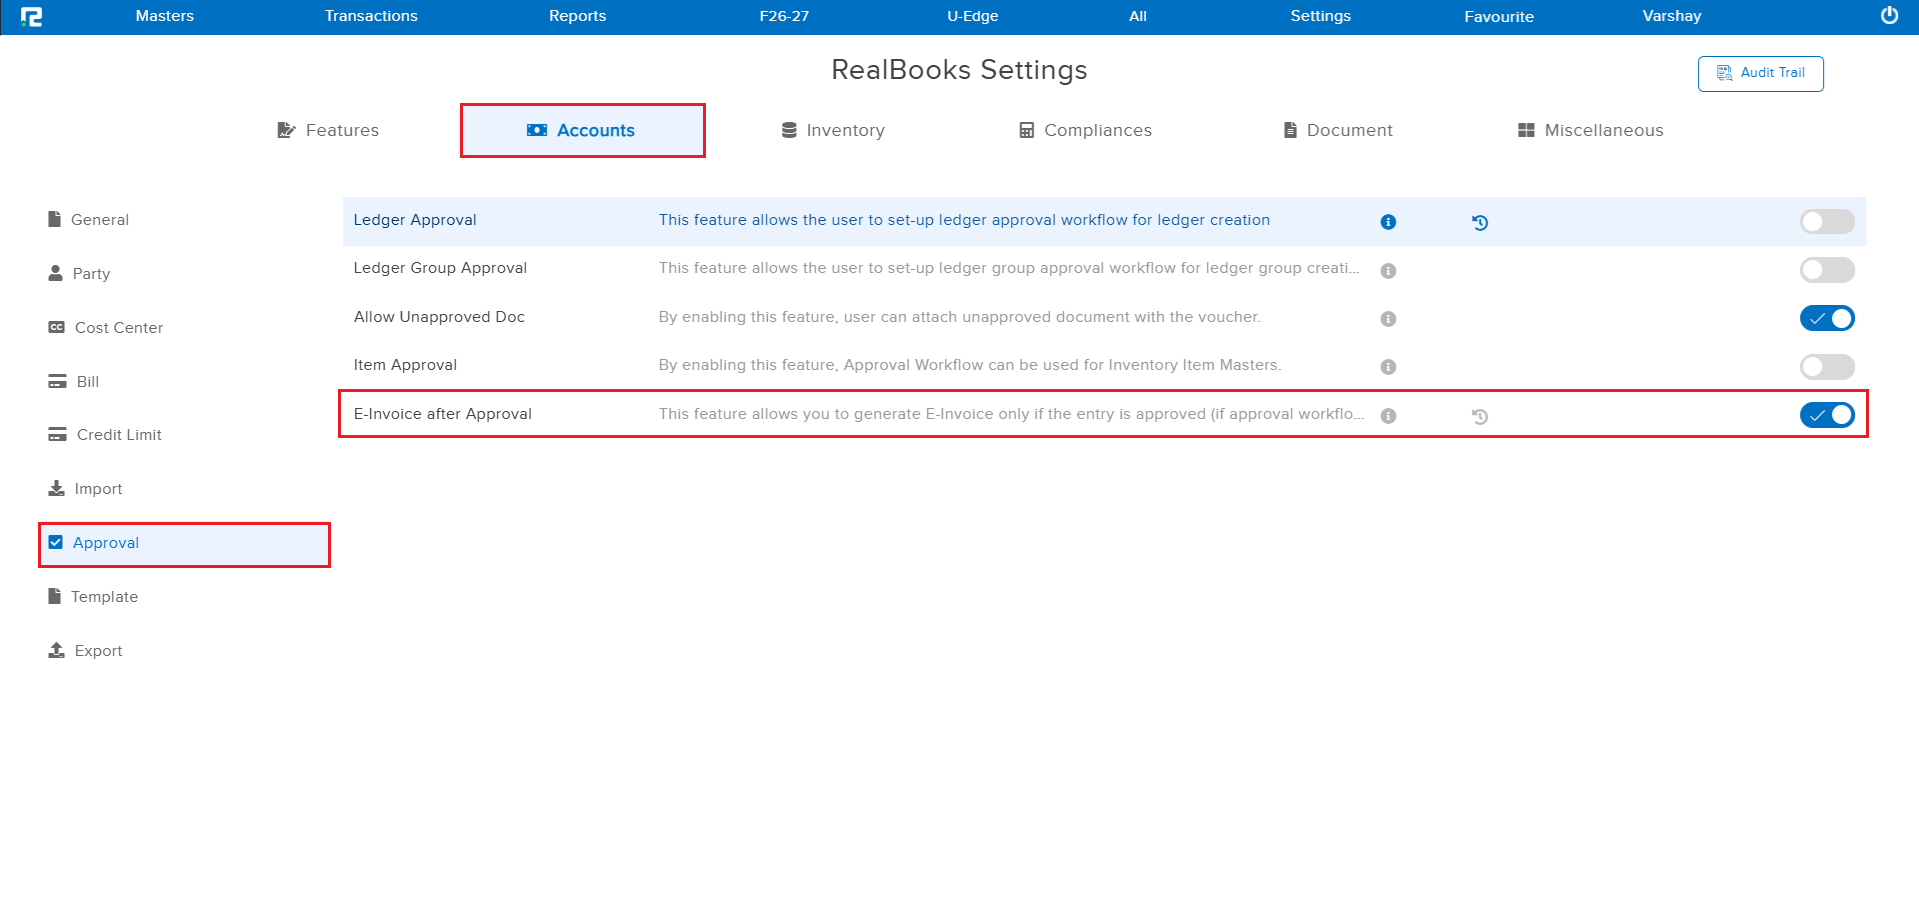
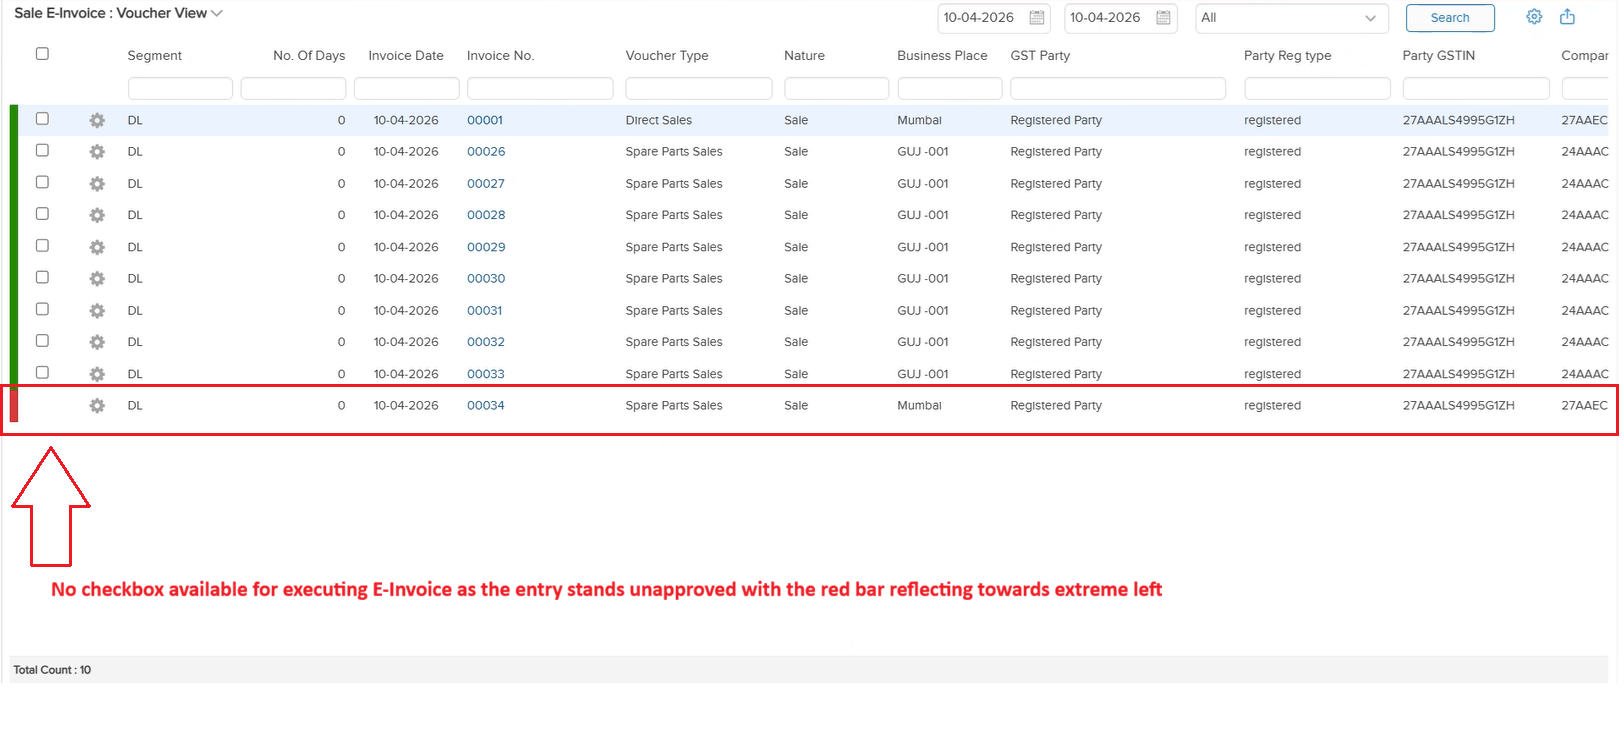
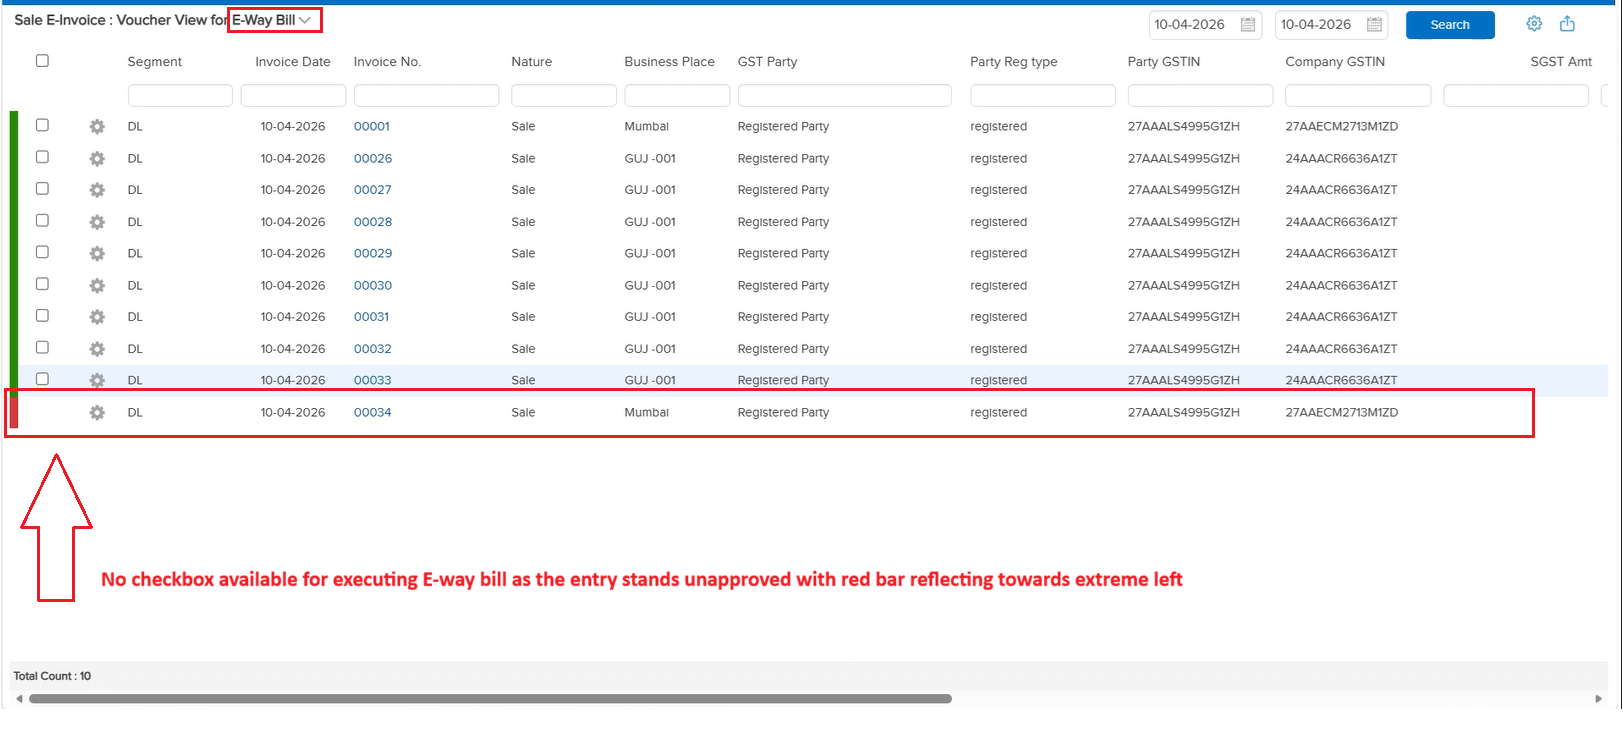
When an entry was pending for approval in the Approval Workflow, users could still generate E-Invoice and E-Way Bill for that entry. There was no mechanism to restrict E-Invoice or E-Way Bill generation based on the approval status — which could lead to compliance documents being generated for unapproved transactions.
🌟 What This Means for You
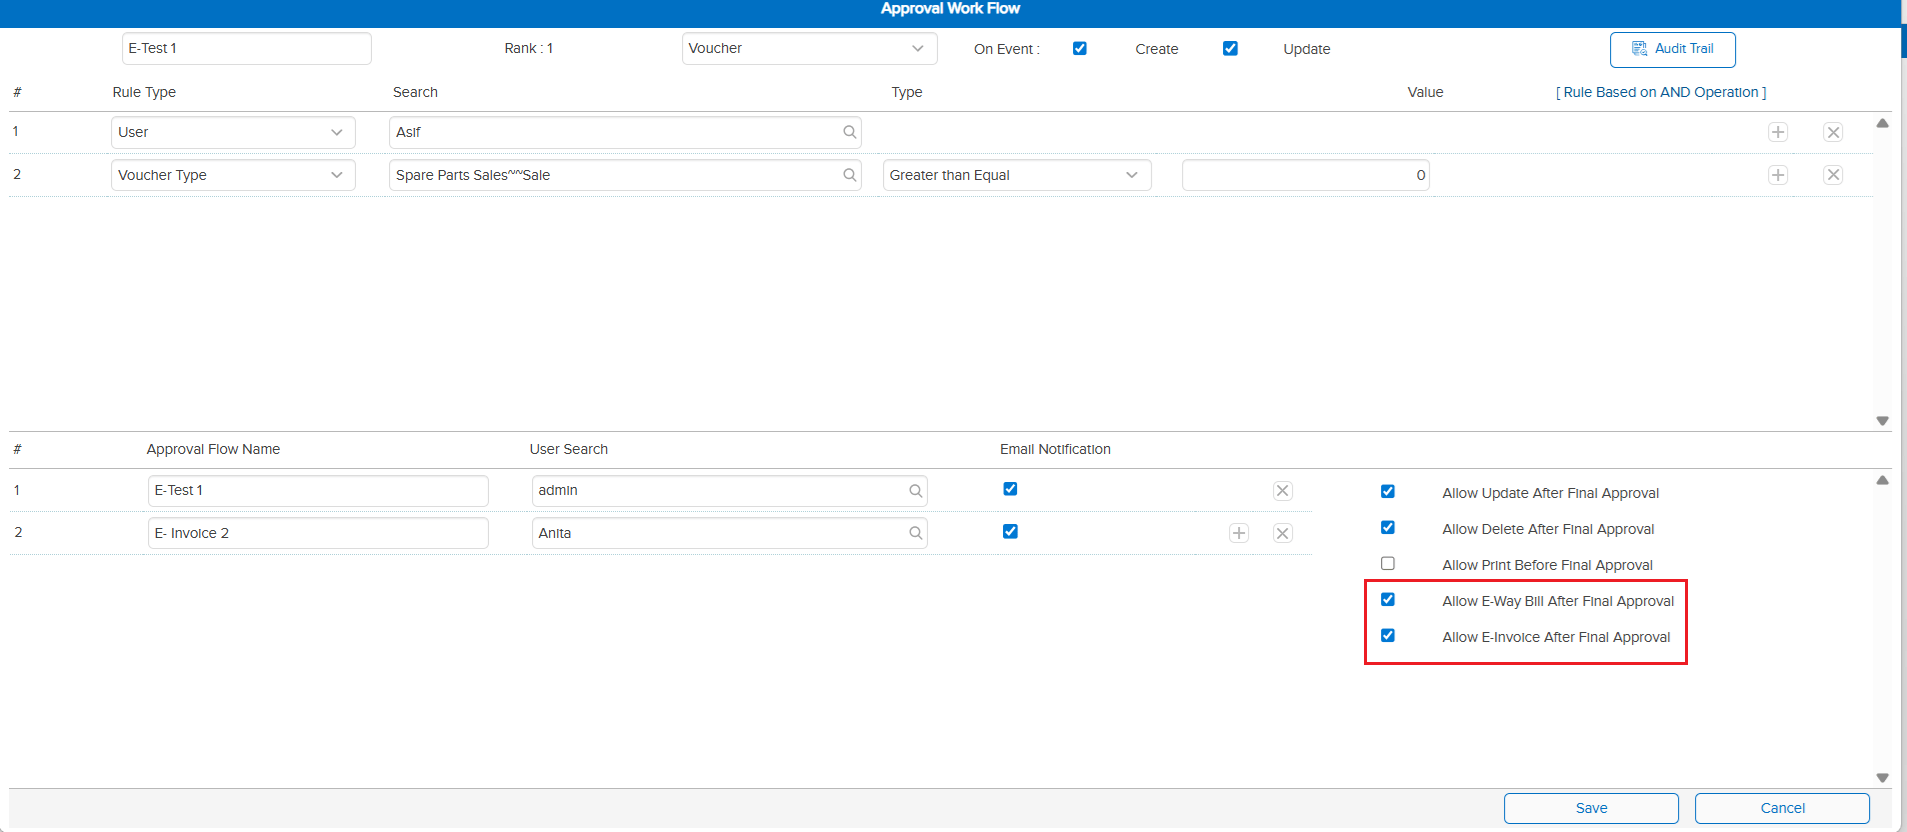
Two new checkbox options have been introduced in the Approval Template (positioned under the “Print Before Approval” option):
• Allow E-Invoice Generation after Approval
• Allow E-Way Bill Generation after Approval
When these checkboxes are selected, E-Invoice and E-Way Bill generation will be allowed only after the entry is fully approved. If the checkboxes are not selected, the generation will be allowed by default as before.
🎬 Where to Find It
📷 See It in Action
📌 What Was Happening
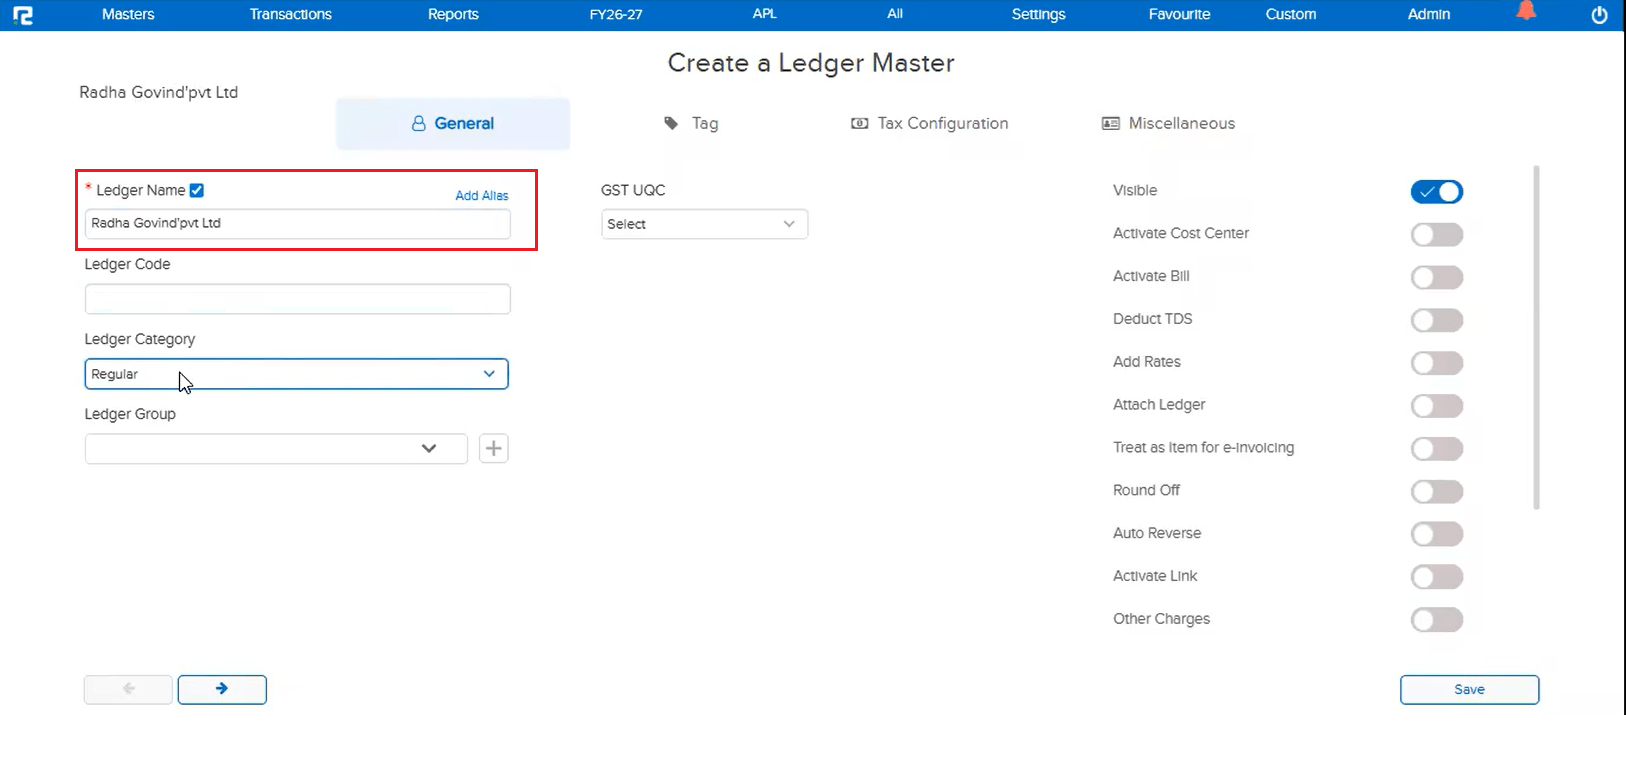
The single apostrophe (’) symbol was previously restricted in the Ledger Master due to an internal technical glitch. This meant users could not use the apostrophe character while creating or naming ledgers — which was inconvenient for ledger names that naturally include an apostrophe (e.g., “Ram’s Enterprise”).
🌟 What This Means for You
The underlying technical issue has been resolved, and the single apostrophe (’) is now allowed again in the Ledger Master. You can freely use the apostrophe character when creating or editing ledger names without any restrictions.
🎬 Where to Find It
📷 See It in Action
📌 What Was Happening
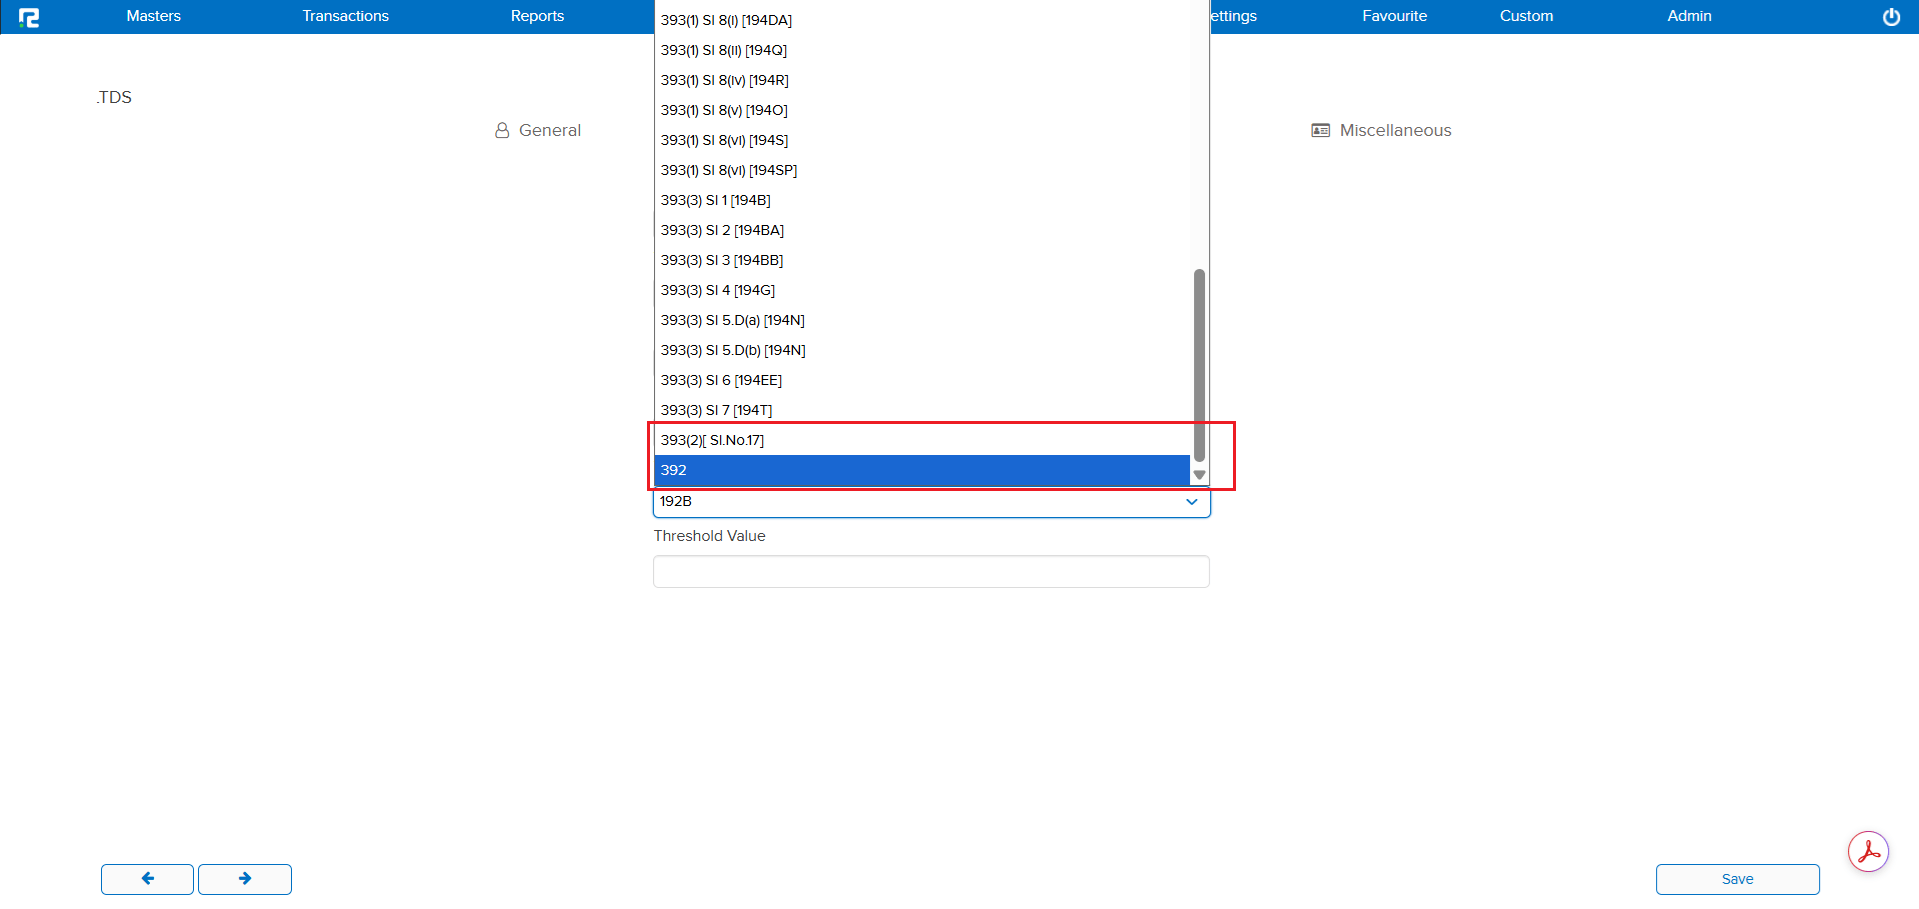
Two new TDS sections required for compliance were not available in the Ledger Master. Users who needed to map ledgers to Section 393(2) [Sl.No.17] or Section 392 had no option to do so within the system.
🌟 What This Means for You
The following new TDS sections have been added to the Ledger Master:
• Section 393(2) [Sl.No.17]
• Section 392
You can now map ledgers to these sections directly, ensuring accurate TDS deduction and compliance reporting.
🎬 Where to Find It
📷 See It in Action
📌 What Was Happening
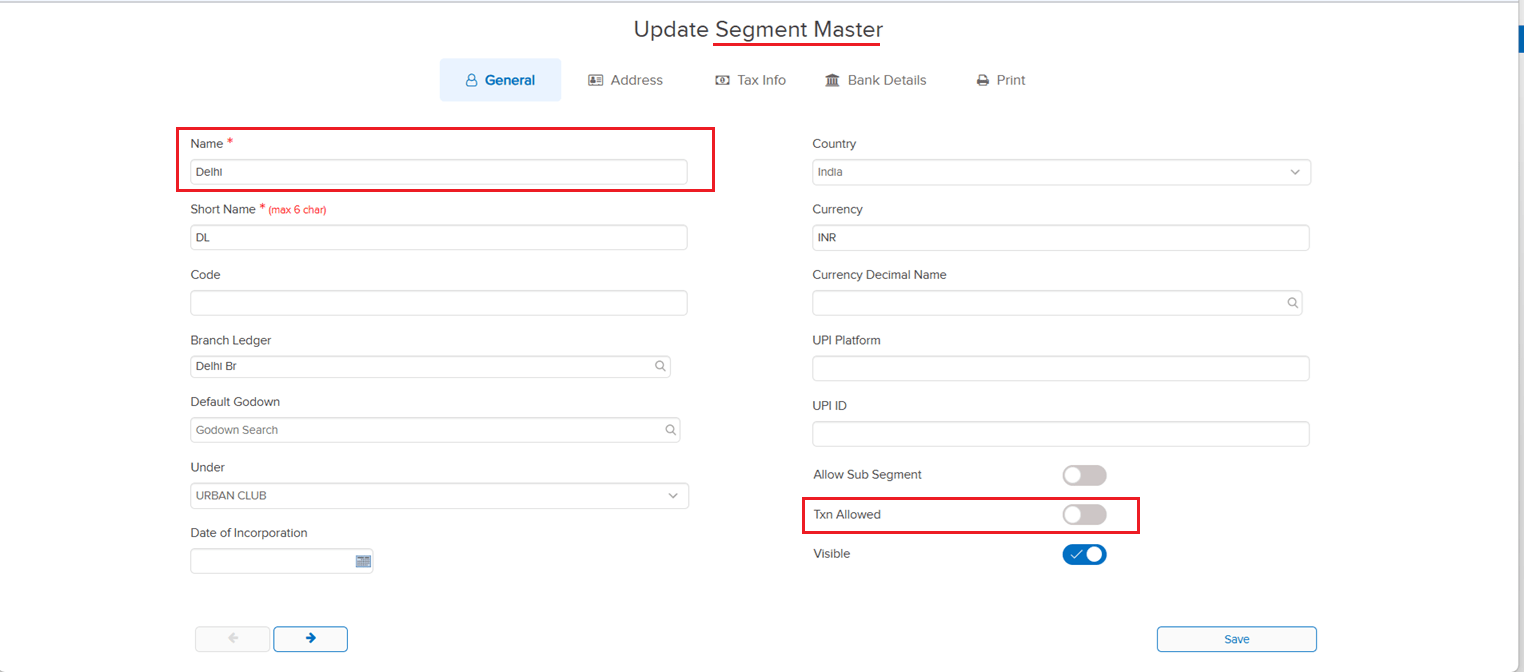
In the Voucher Type Numbering screen, the Company and Group segment names were being displayed in the UI even when the “TXN Allowed” parameter was disabled in the Segment Master. Showing segments that are not permitted for transactions caused confusion during manual voucher type numbering setup.
🌟 What This Means for You
The Voucher Type Numbering screen now respects the “TXN Allowed” parameter from the Segment Master. When this param is disabled for a segment, the corresponding Company and Group segment names will no longer appear during manual Voucher Type numbering in the UI — keeping the screen clean and showing only relevant, transaction-permitted segments.
🎬 Where to Find It
📷 See It in Action
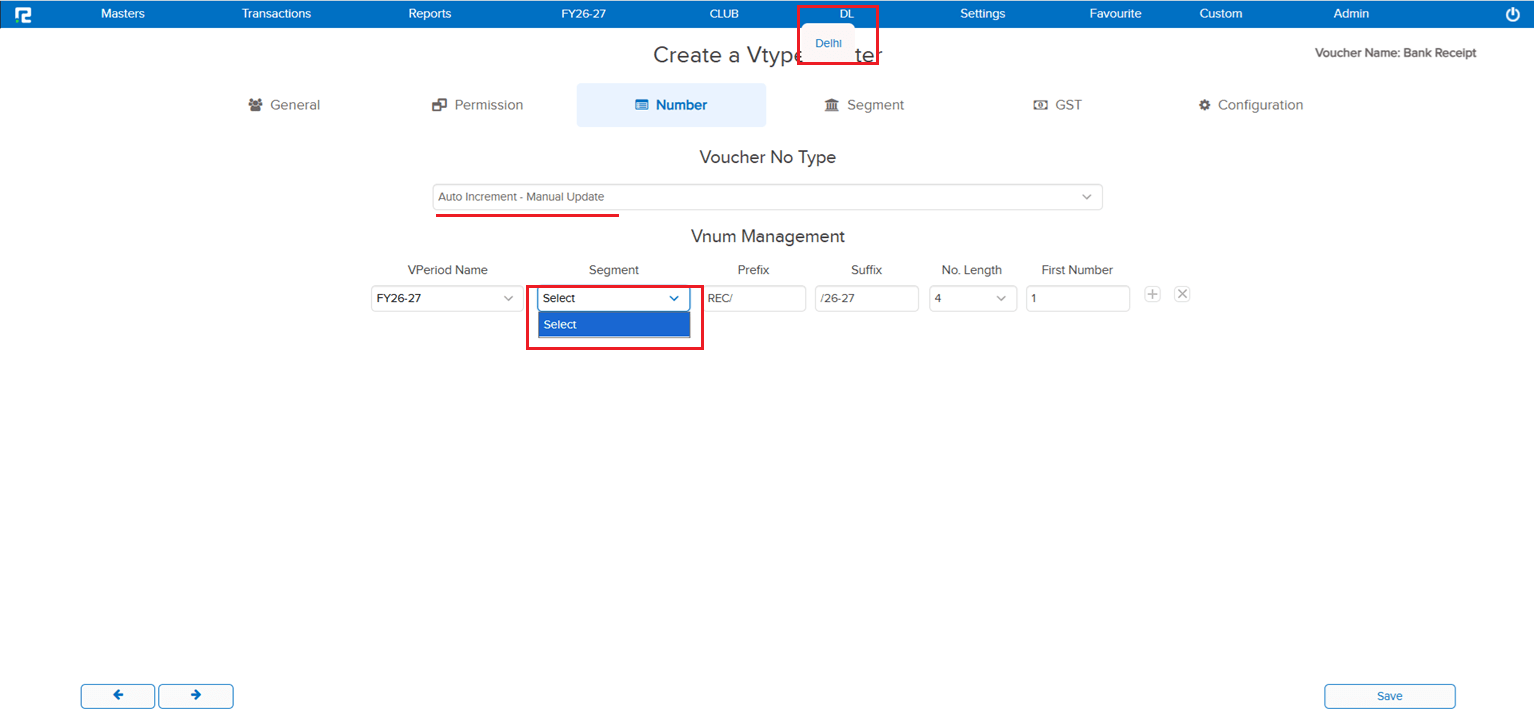
📌 What Was Happening
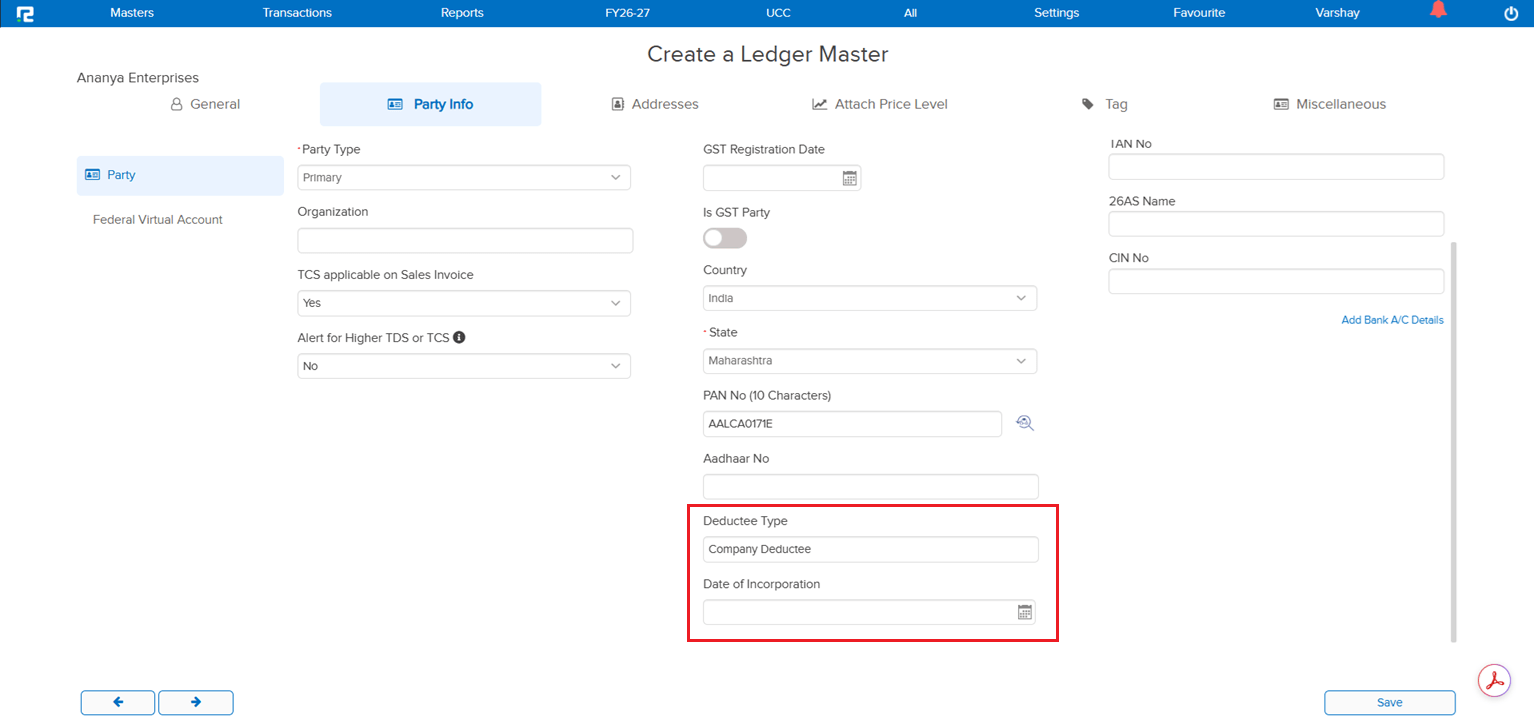
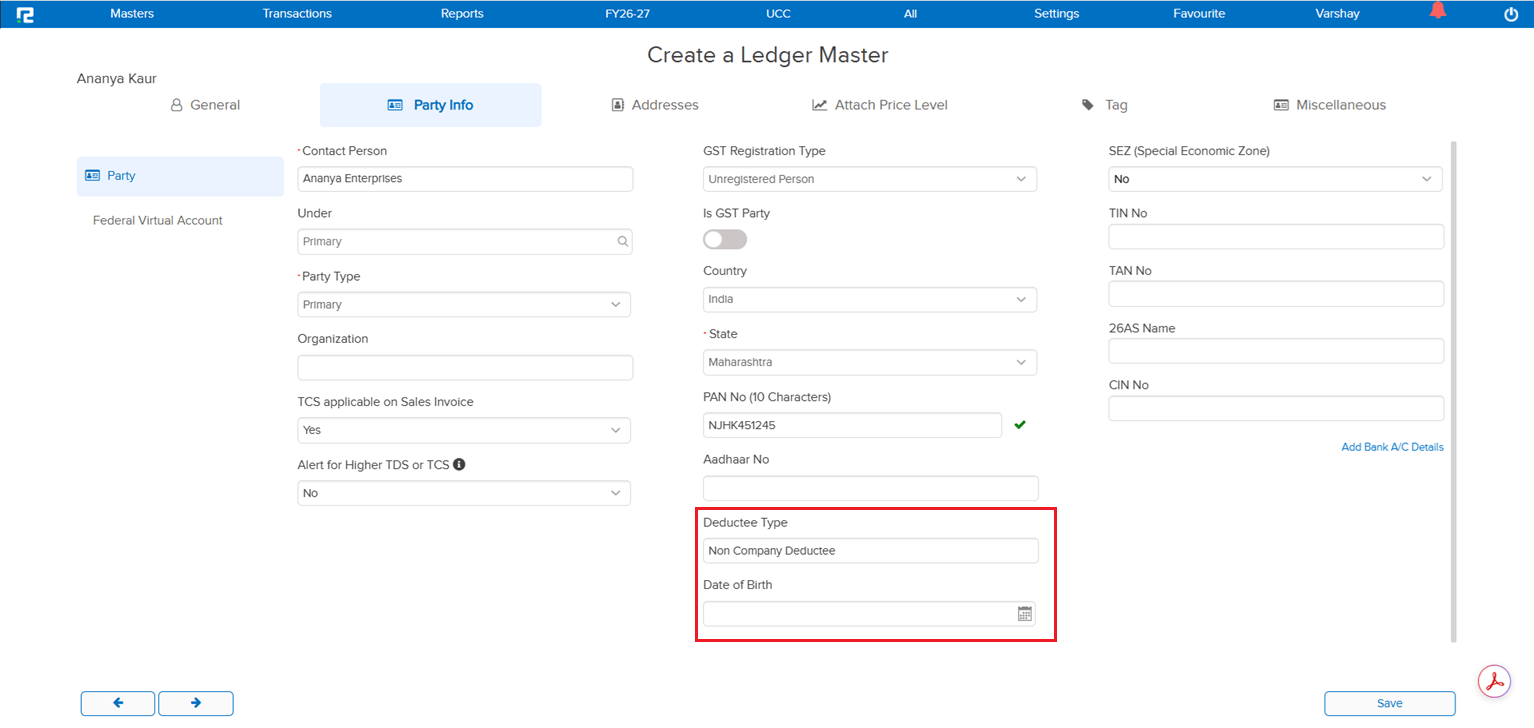
In the Ledger Master → Party Information section, after PAN verification there was no provision to capture Date of Birth or Date of Incorporation. These details are statutorily relevant and depend on the Deductee Type derived from the PAN — without dedicated fields, users had no clean way to record them against the party ledger.
🌟 What This Means for You
Two new fields have been added to the Party Information section of the Ledger Master, displayed conditionally based on the Deductee Type returned from PAN verification:
• Deductee Type = Company: only the Date of Incorporation field is displayed in the popup
• Deductee Type = Non-Company: only the Date of Birth field is displayed in the popup
This keeps the screen clean by showing only the field that is relevant for the verified PAN, while ensuring the correct statutory detail is captured against every party ledger.
🎬 Where to Find It
📷 See It in Action
📌 What Was Happening
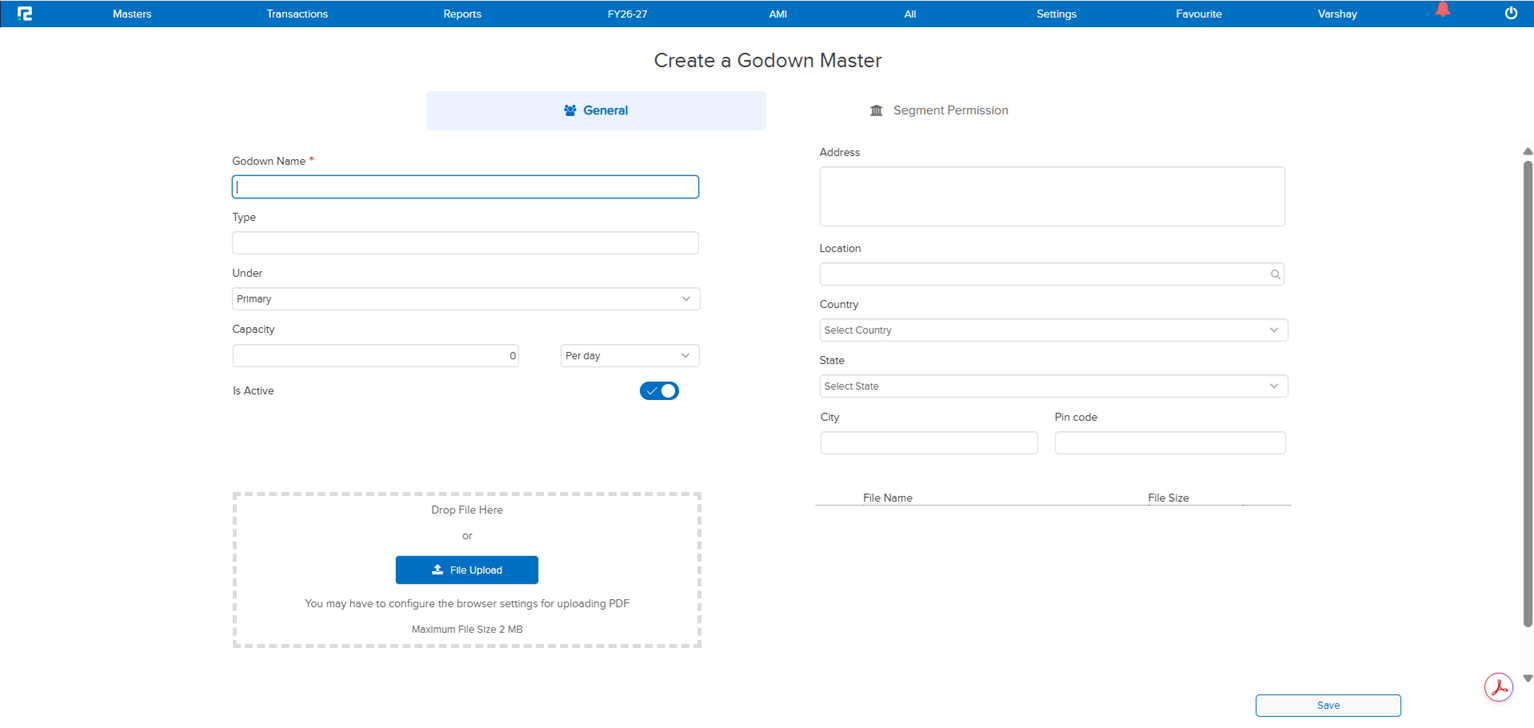
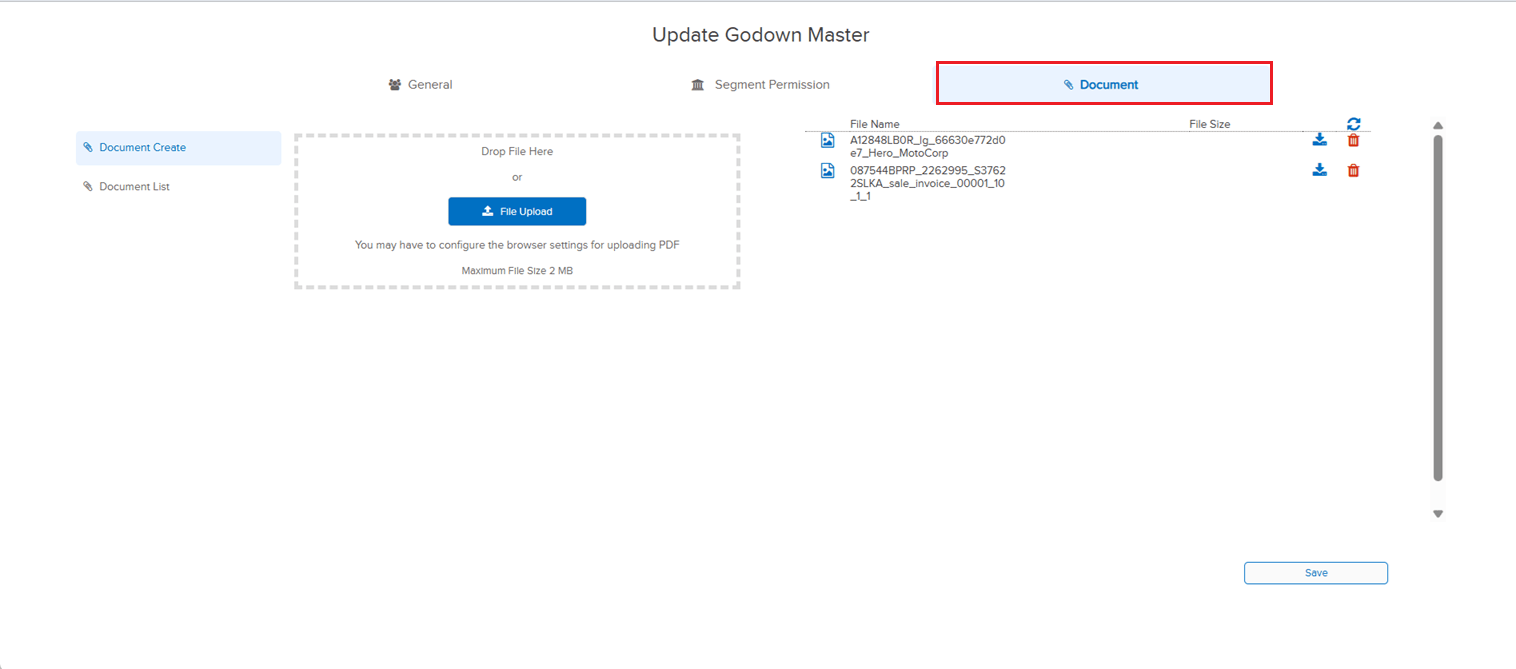
The Godown Master had no option to attach supporting documents against a godown record. The Ledger Master already supported document attachments with the ability to view them back in the edit screen, but the same capability did not exist for godowns — so any related paperwork (rental agreements, licences, location proofs, etc.) had to be kept outside the system or attached against an unrelated record.
🌟 What This Means for You
A Document Attachment option has been added to the Godown Master, mirroring the behaviour available in the Ledger Master:
• Attach documents directly against a godown record
• View attached documents from the Godown edit screen
All godown-related paperwork can now sit alongside the master record itself — consistent with how attachments are already handled for ledgers.
🎬 Where to Find It
📷 See It in Action
📌 What Was Needed
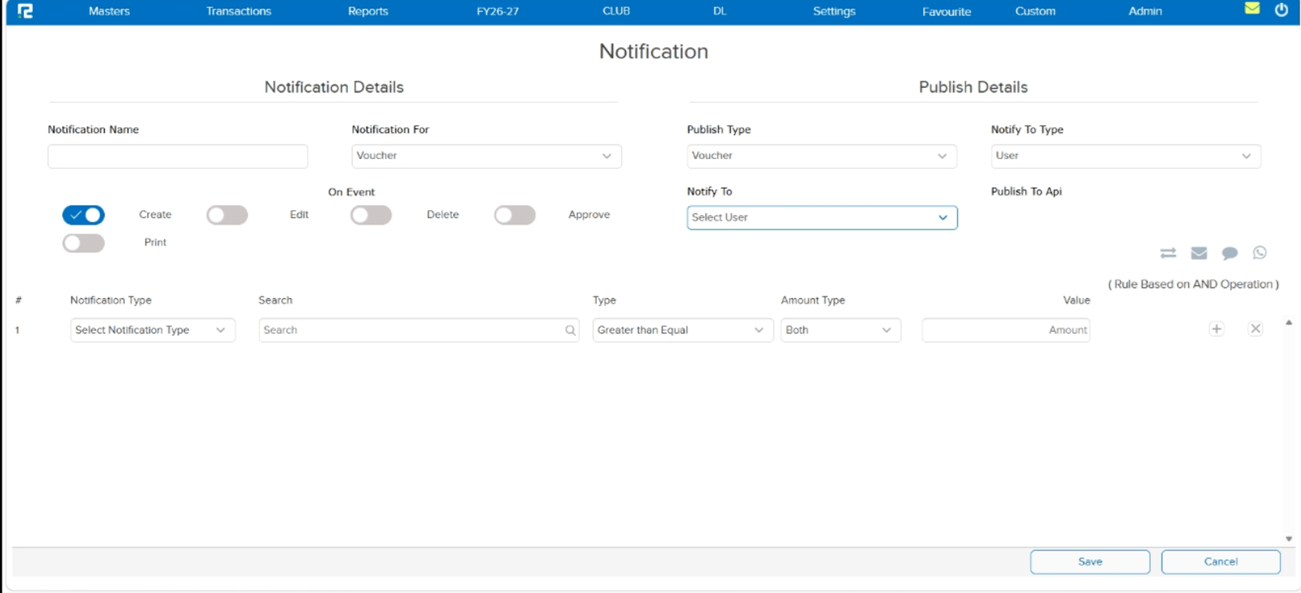
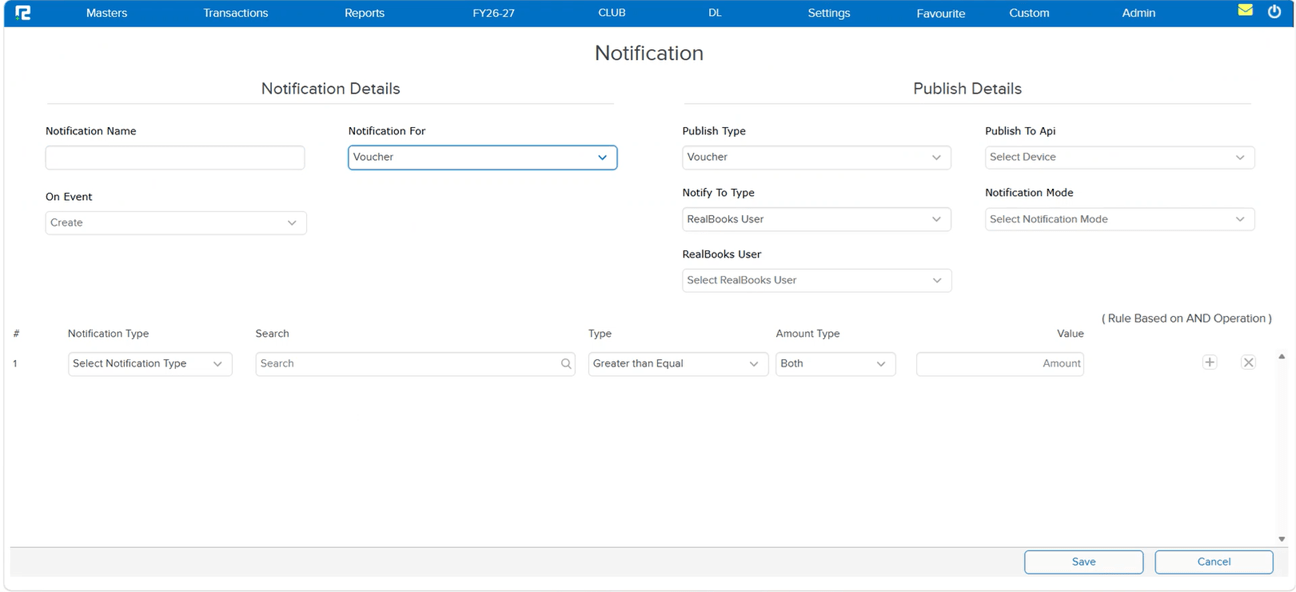
The Notification Master screen needed a cleaner layout and simpler multi-selection for notification channels and events.
🌟 What This Means for You
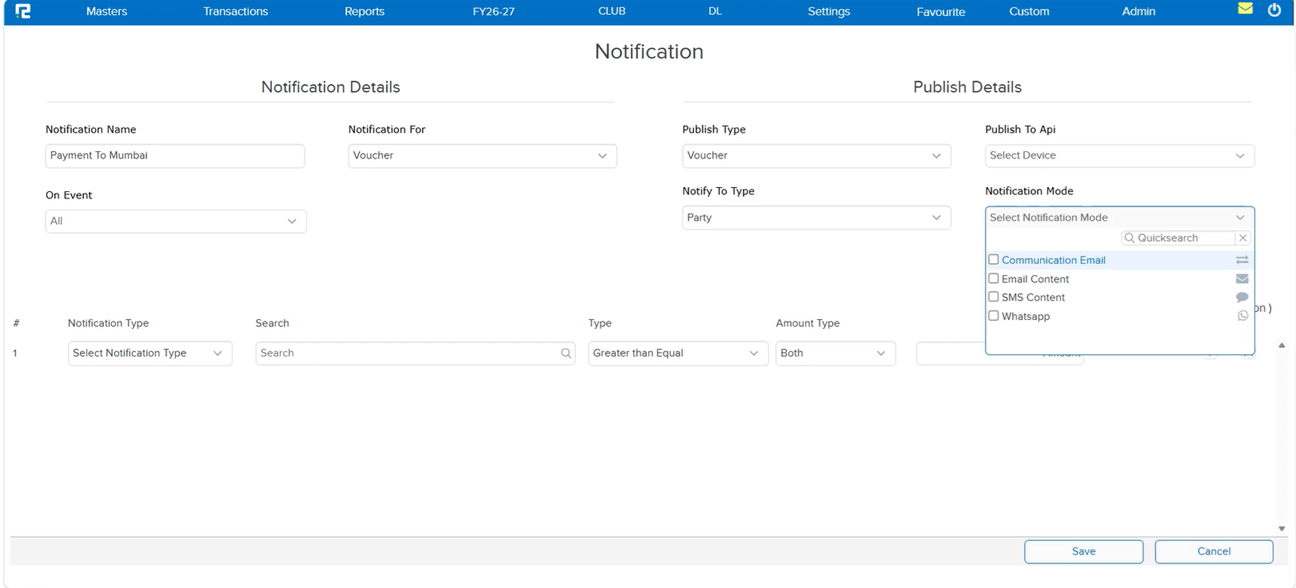
The Notification Master has been redesigned for clarity and ease of use:
• Publish To API moved to the position earlier held by Notify To Type.
• Notify To Type moved below the Publish Type field.
• The User option is now labelled RealBooks User.
• Notify To renamed to RealBooks User.
• Notification channel icons (Email, SMS, WhatsApp, Push Notification) replaced with a Multi-Select Dropdown.
• On Event moved to the left, with toggles replaced by a Multi-Select Dropdown (Create, Edit, Delete, Approve, Print).
📷 See It in Action
📌 What Was Happening
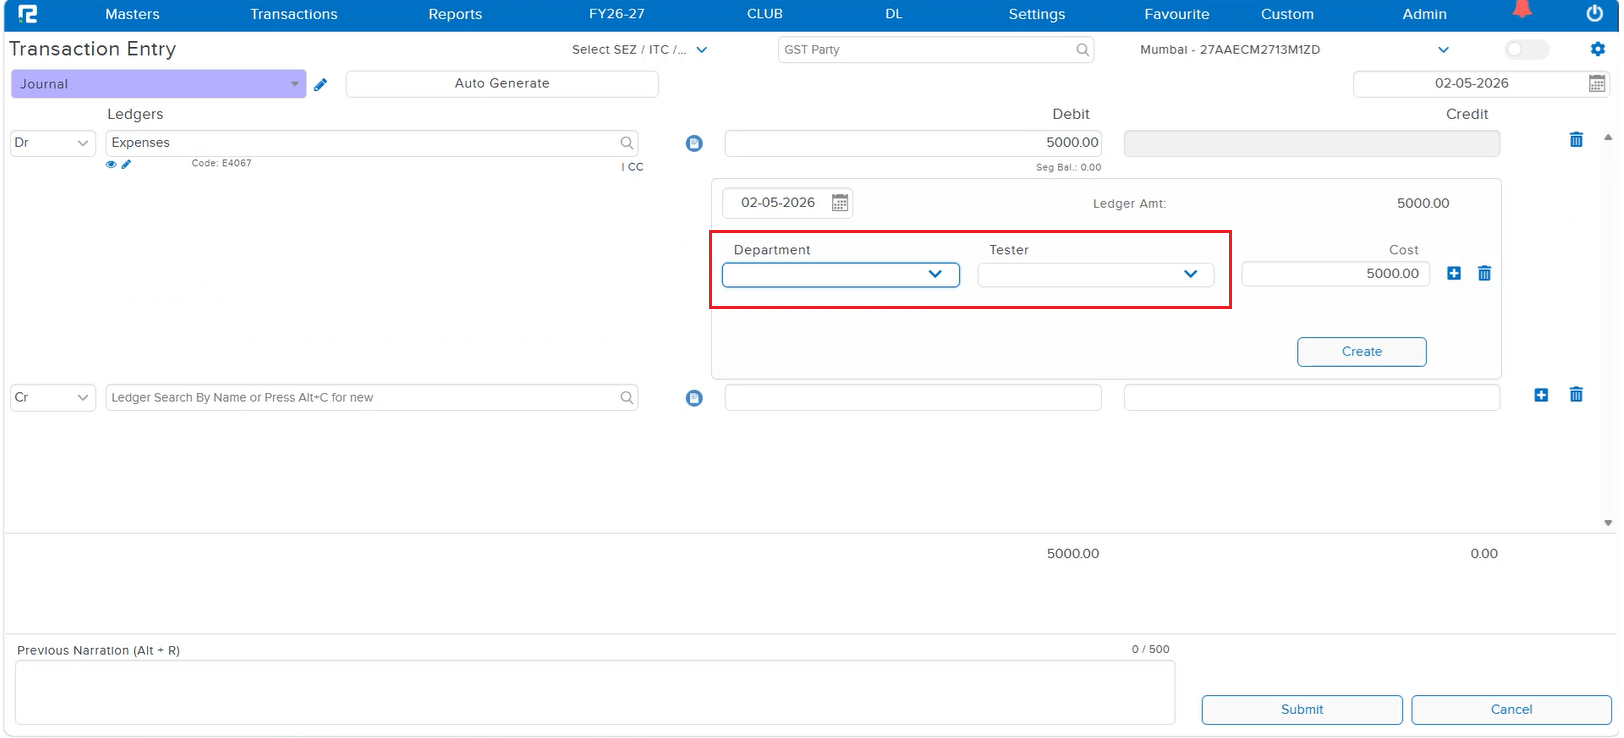
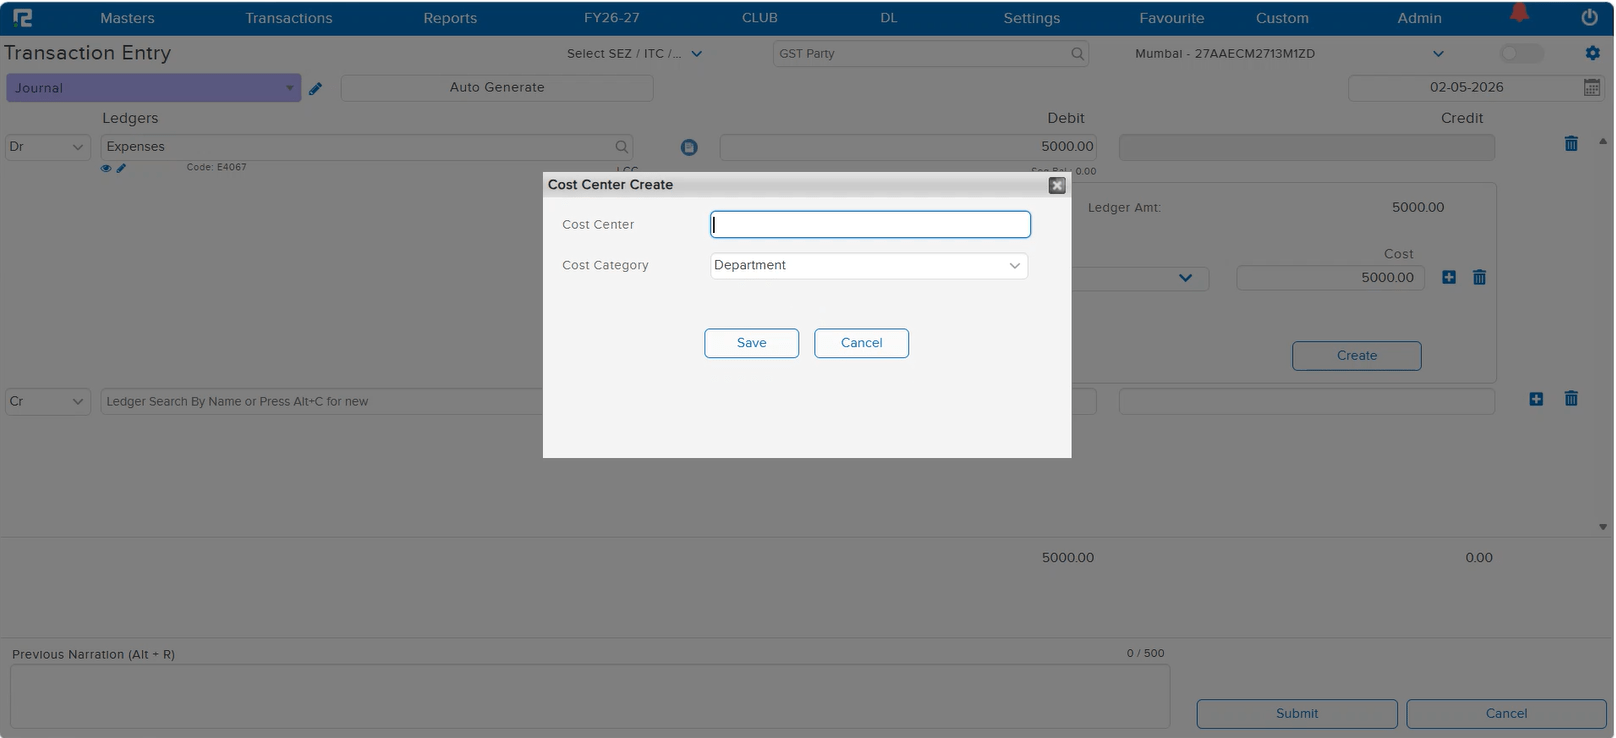
When a user created a Cost Centre using the Alt + C shortcut key from the Transaction Screen, the system was taking 15–20 seconds to load the pop-up. This significant delay disrupted the workflow and slowed down transaction entry, especially for users who frequently create cost centres on the fly during voucher posting.
🌟 What This Means for You
The Cost Centre Master creation pop-up launched via Alt + C from the Transaction Screen has been optimized. The pop-up now loads instantly without the previous 15–20 second delay — ensuring a smooth and uninterrupted workflow during transaction entry.
📷 See It in Action
📌 What Was Happening
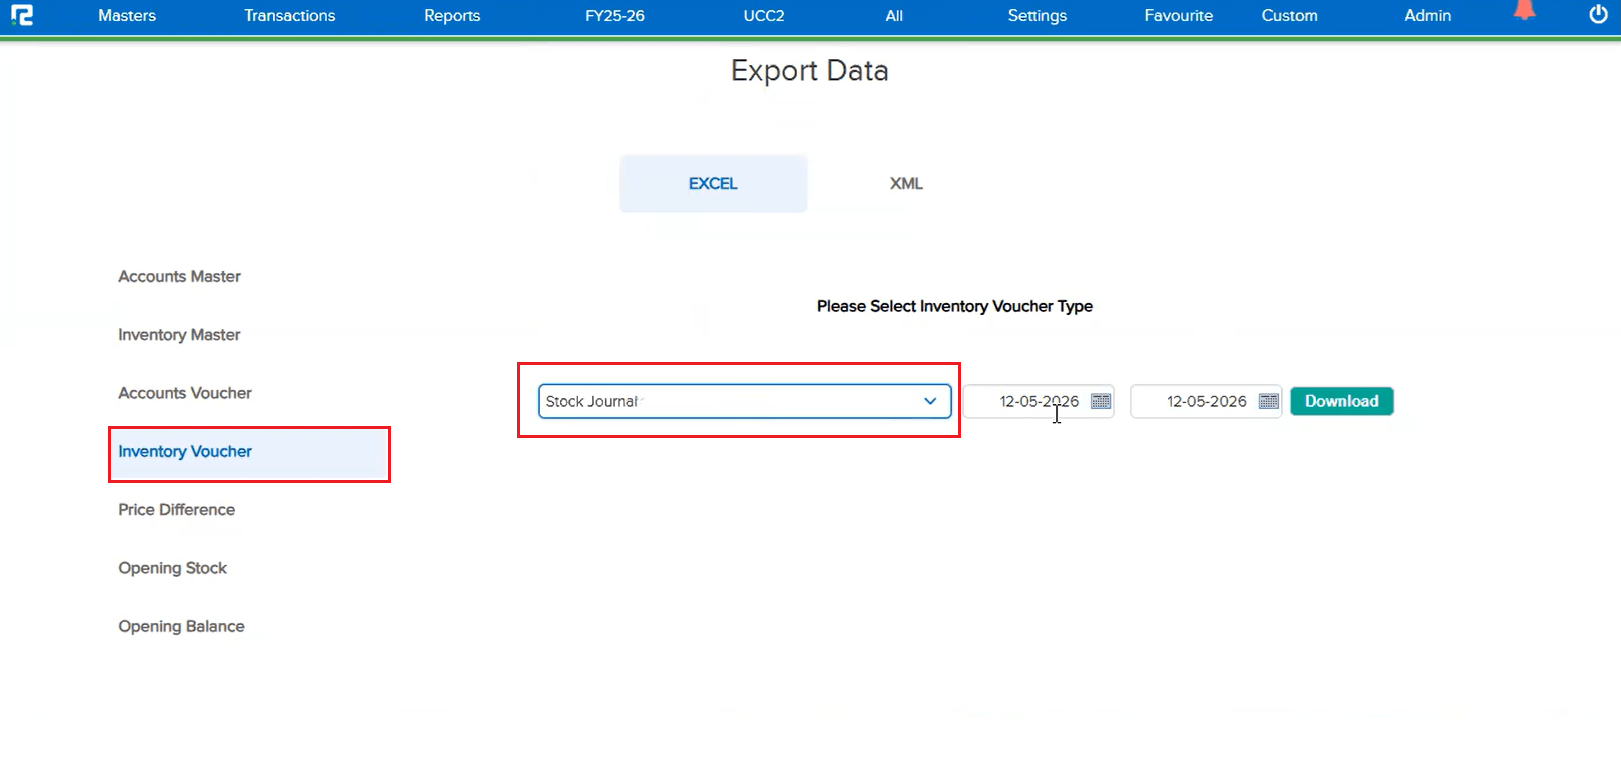
The Inventory Export in Import Format feature did not support Stock Journal entries. Users who needed to export Stock Journal vouchers in import format had no option to do so, limiting the export functionality for inventory-related transactions.
🌟 What This Means for You
The inventory export in import format now includes Stock Journal entries. You can export Stock Journal vouchers along with other inventory vouchers, making it easier to back up, transfer, or re-import inventory data as needed.
🎬 Where to Find It
📷 See It in Action
📌 What Was Happening
When inventory transactions contained a large number of items, opening them in edit mode would take a significant amount of time. This affected the following screens:
• Purchase
• Sale
• Purchase Return
• Sale Return
• Price Difference
The prolonged loading time made the experience frustrating for clients who had to wait for the screen to open before they could make any changes.
🌟 What This Means for You
The above screens have been optimized for edit mode. Even when the number of items is large, the screen now opens in edit mode within 1–2 seconds — making the workflow significantly faster and more efficient. No more waiting for heavy transactions to load before editing.
🎬 Where to Find It
📌 What Was Happening
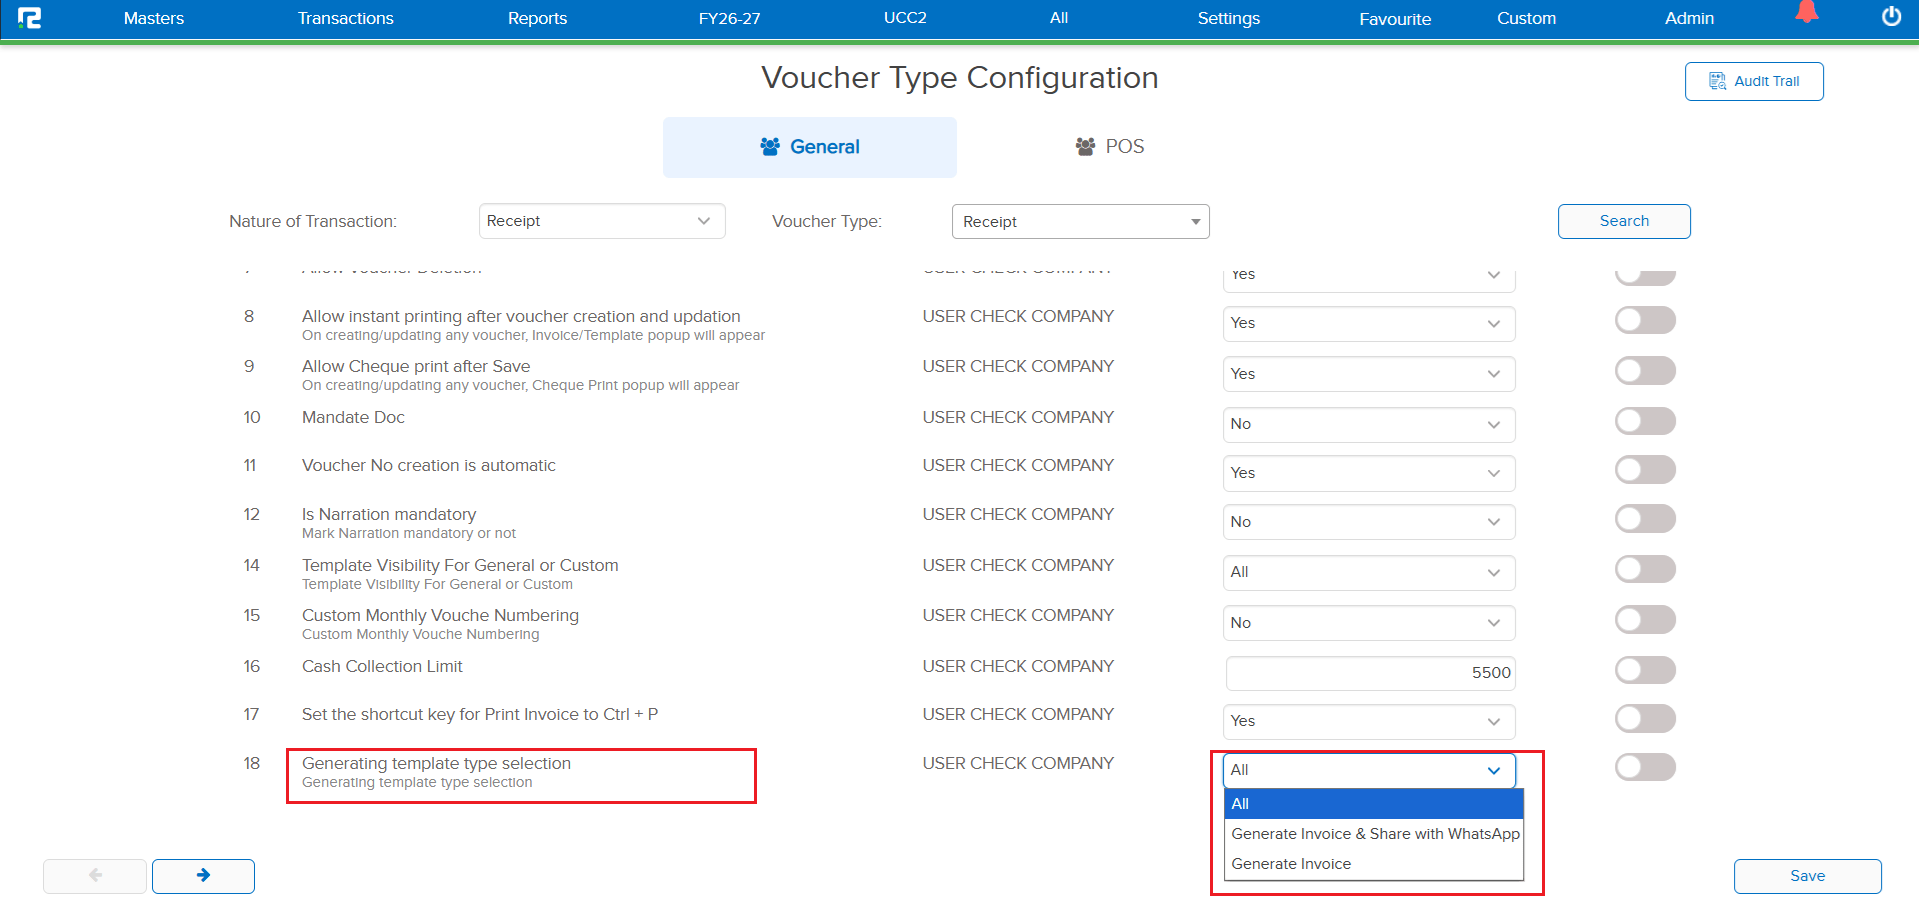
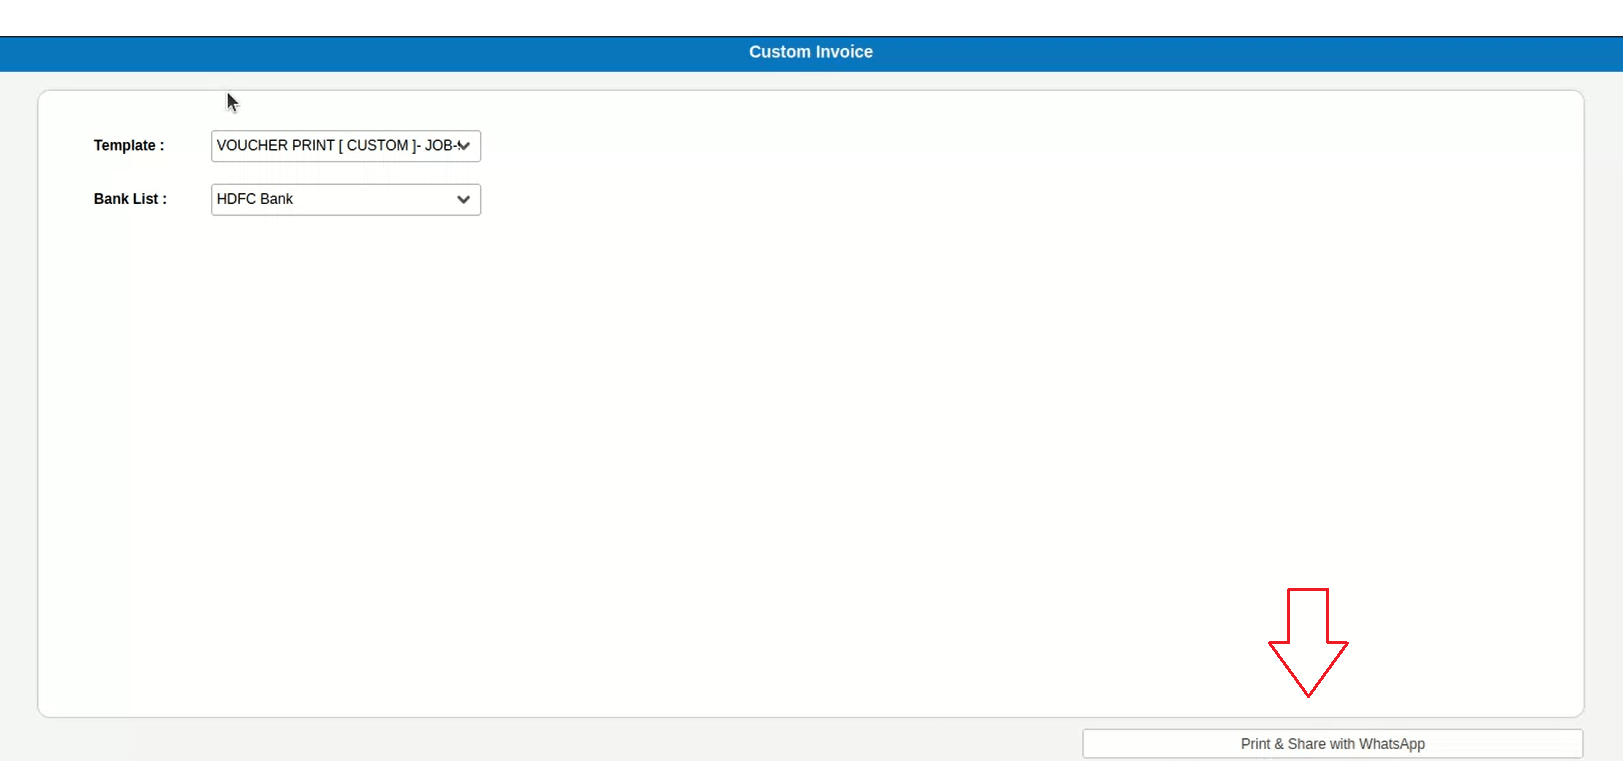
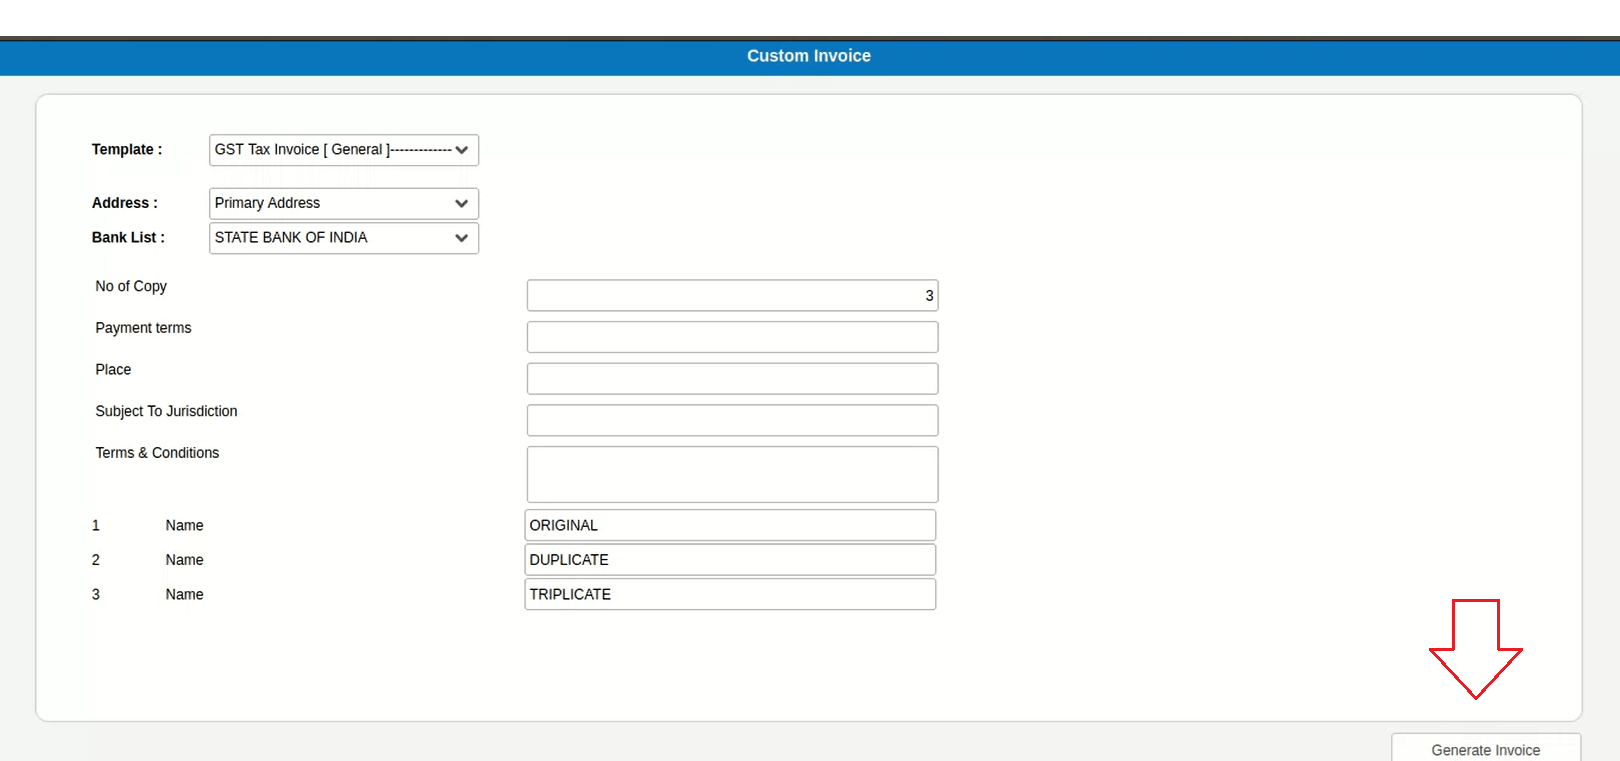
When generating a template from Voucher Types where WhatsApp Integration is applicable, users were presented with two print options:
• Generate Invoice & Share with WhatsApp
• Generate Invoice
There was no way to set a default option, so users had to manually choose the WhatsApp option each time — adding extra clicks to a repetitive workflow.
🌟 What This Means for You
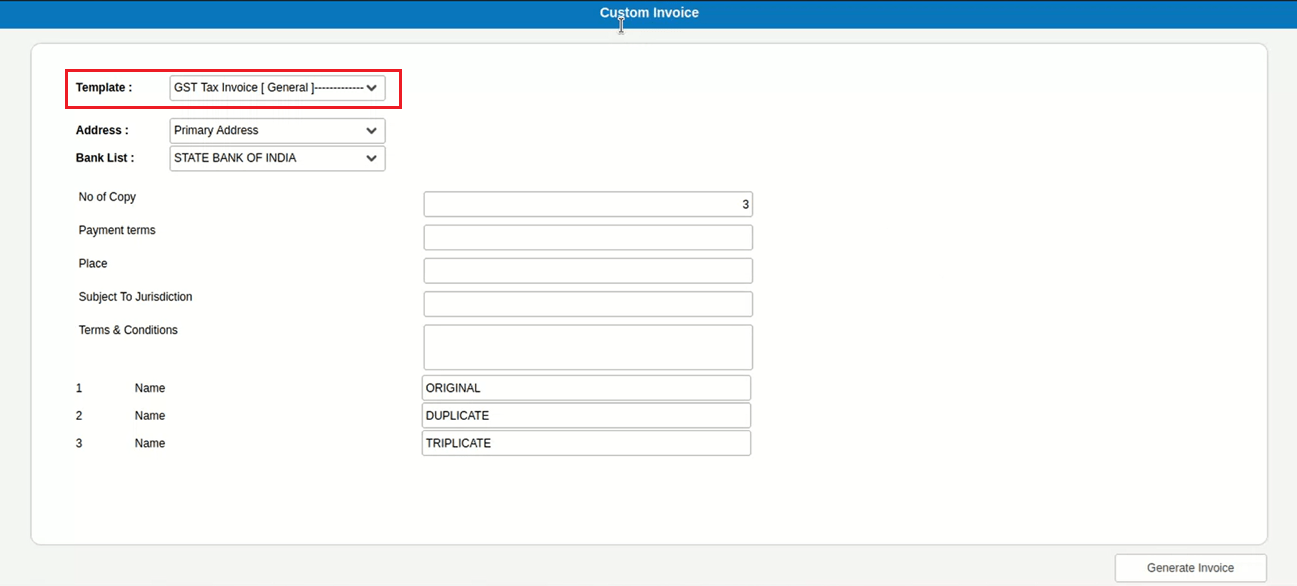
A new provision has been added in Txn Configuration to define “Generate Invoice & Share with WhatsApp” as the default print option. When enabled, only the WhatsApp sharing button will be available — streamlining the print flow and reducing manual clicks for users who primarily share invoices via WhatsApp.
🎬 Where to Find It
📷 See It in Action
📌 What Was Happening
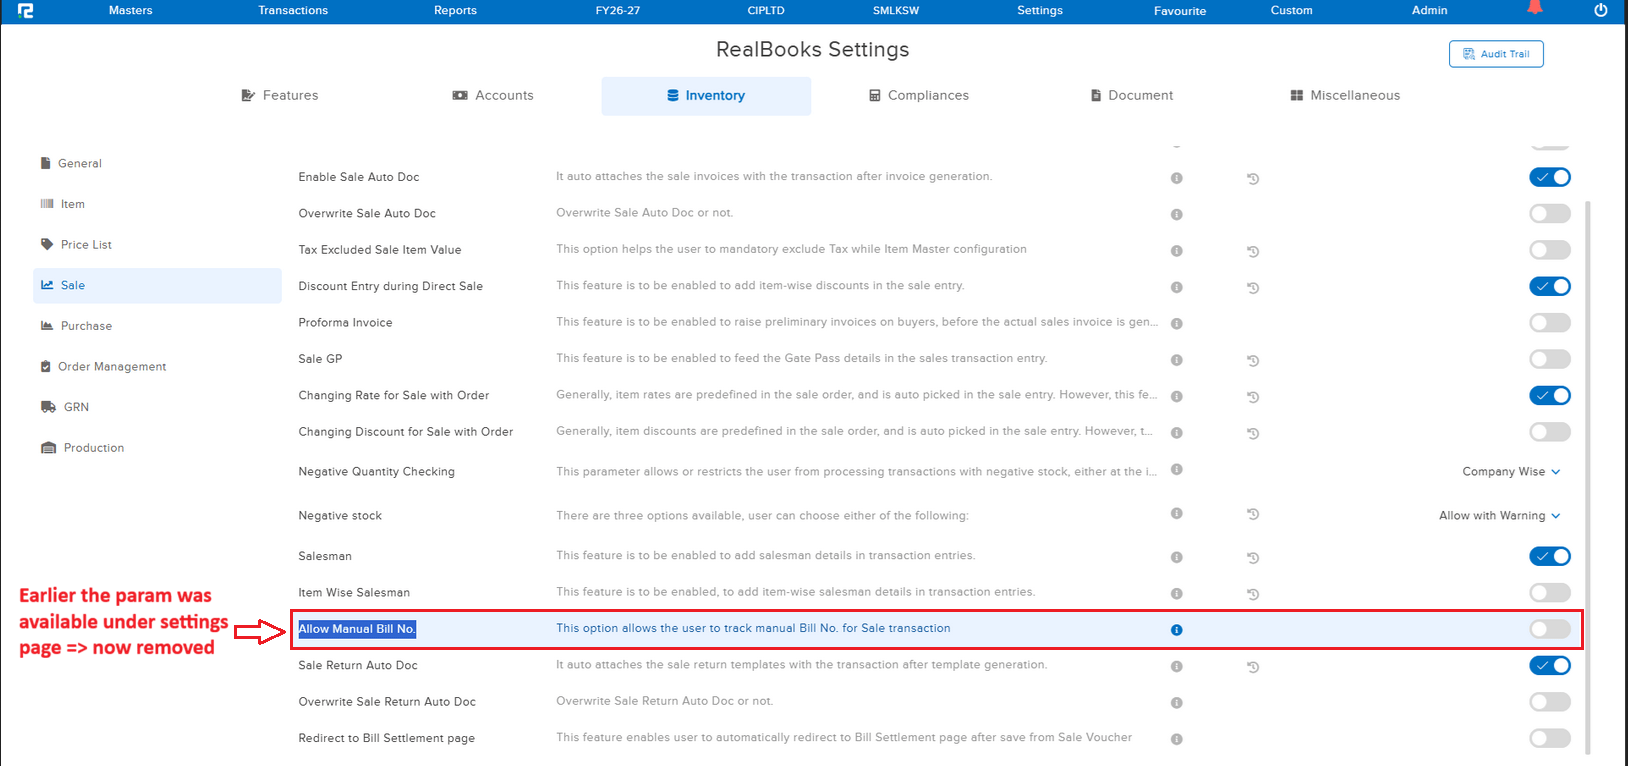
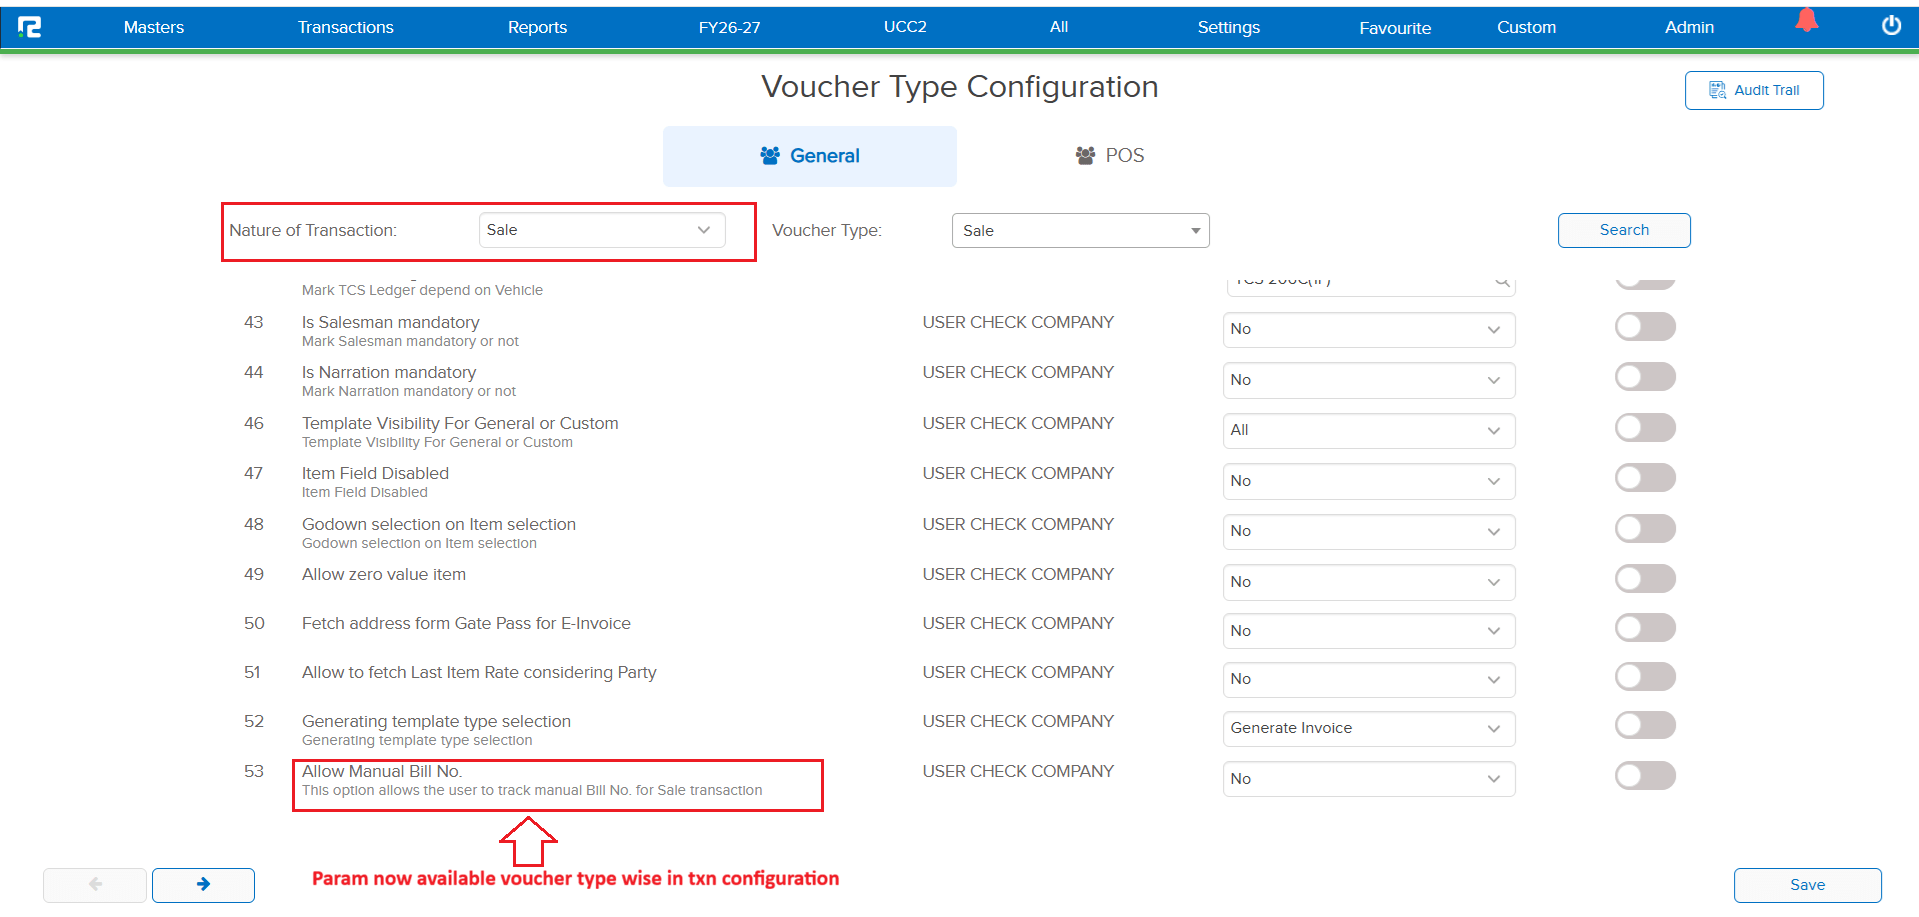
For voucher types with the nature Sale, the parameter “Allow Manual Bill No.” was only available under Configurations. It was not available under Transaction (TXN) Configurations, limiting the flexibility for users who needed to control this setting at the transaction configuration level for all Sale-type vouchers.
🌟 What This Means for You
The “Allow Manual Bill No.” parameter is now available under Transaction (TXN) Configurations for all voucher types having the nature Sale. This gives you more granular control over manual bill number entry directly from the transaction configuration screen.
🎬 Where to Find It
📷 See It in Action
📌 What Was Happening
If the Business Place was not saved in any accounting transaction, there was no option available to update it after the fact. Users had to either re-create the transaction or leave the Business Place field empty — which could cause issues in compliance and reporting workflows.
🌟 What This Means for You
A new option has been provided to update the Business Place in accounting transactions where it was not previously saved. You can now easily assign or correct the Business Place without needing to delete and re-create the transaction.
📷 See It in Action
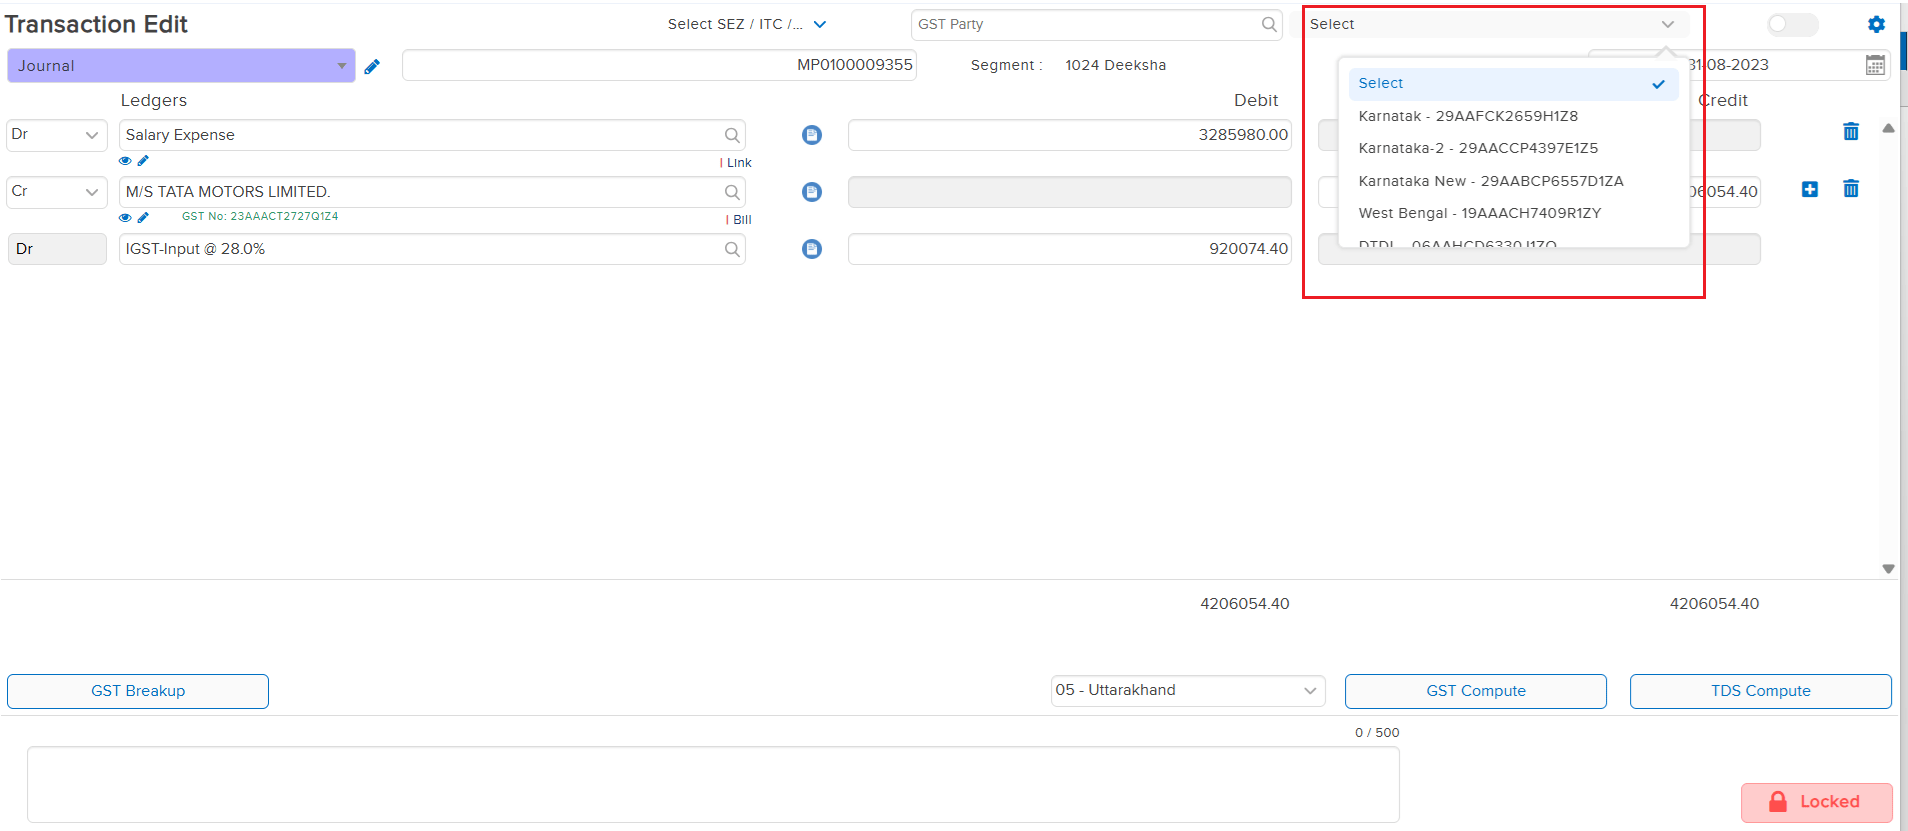
📌 What Was Happening
The Amount Restriction feature — which prevents entries from exceeding a specified amount — was available in standard Payment and Receipt voucher types. However, this restriction was not available for IBT Receipt & Payment voucher types (IBT_PAY and IBT_REC), leaving inter-branch transactions without any amount cap enforcement.
🌟 What This Means for You
The Amount Restriction feature has now been implemented for the following IBT voucher types:
• IBT_PAY (IBT Payment)
• IBT_REC (IBT Receipt)
Similar to standard Payment and Receipt vouchers, any transaction posted through these IBT voucher types will now be restricted from exceeding the specified amount limit — ensuring consistent control across all payment and receipt workflows.
🎬 Where to Find It
📷 See It in Action
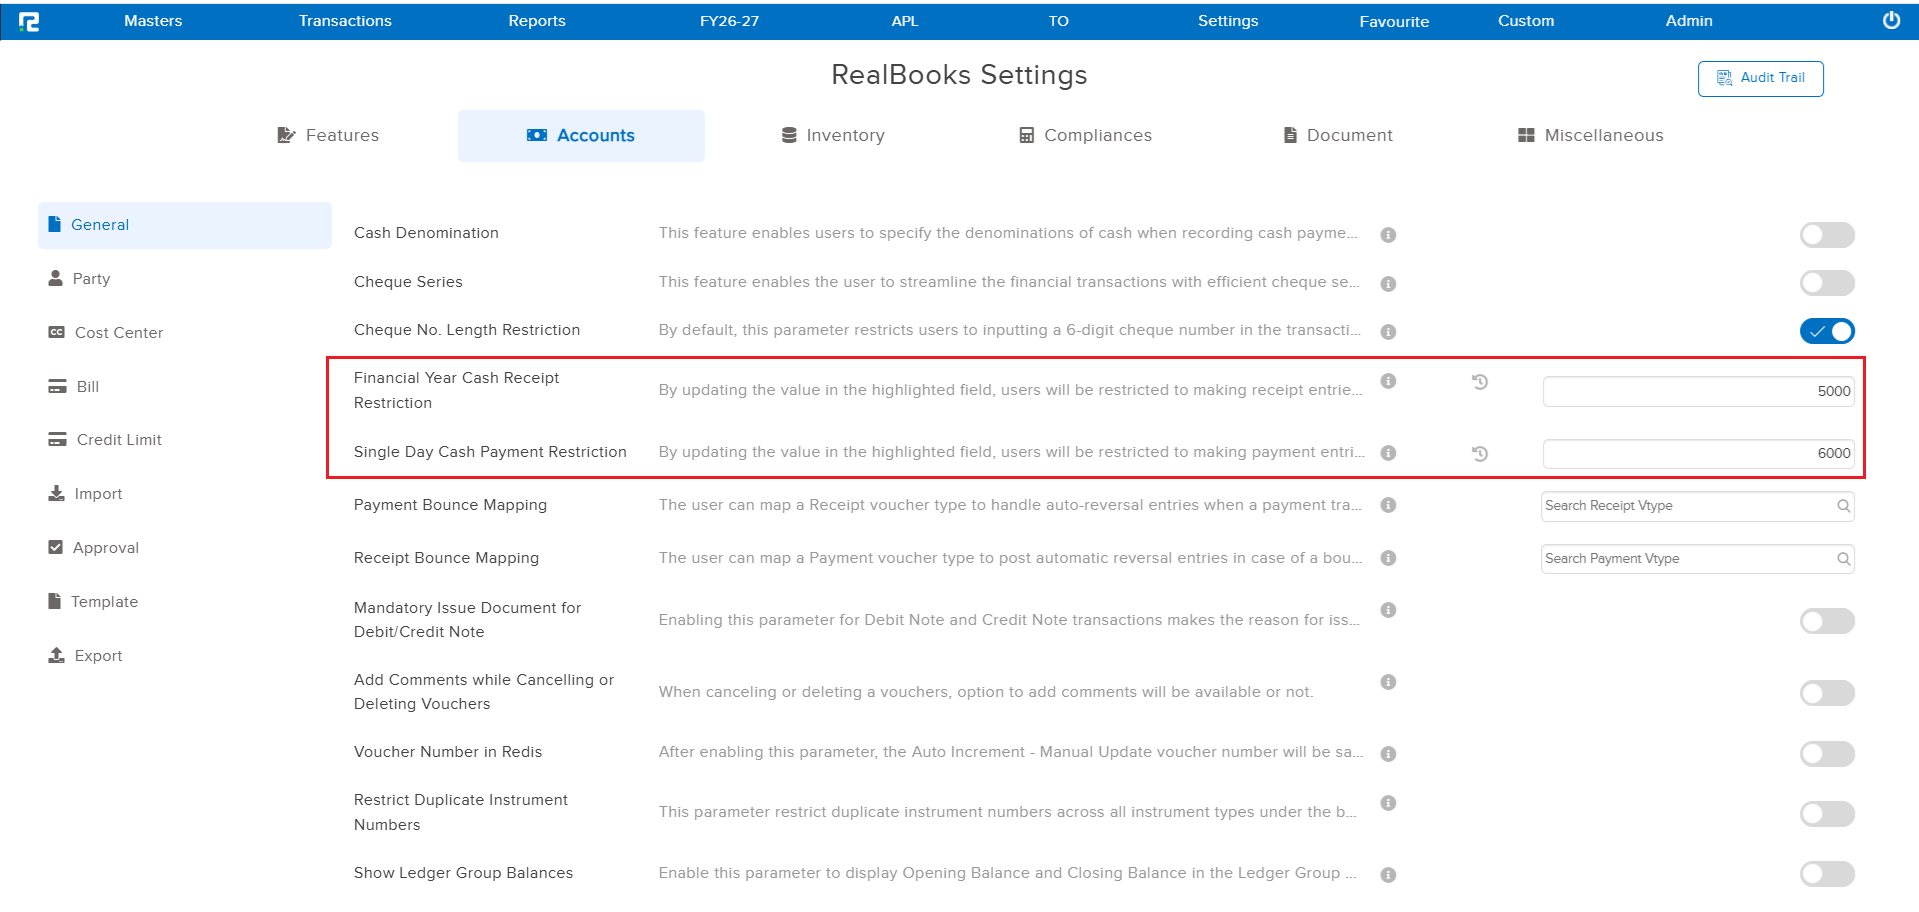
📌 What Was Happening
In the Purchase Order (PO) screen, there was no provision to specify a delivery date at the item level. Users who needed different delivery timelines for individual items within the same PO had no way to capture this information directly in the system.
🌟 What This Means for You
An item-wise Delivery Date field has been introduced in the Purchase Order screen. You can now specify a separate delivery date for each item line within a PO — allowing more precise tracking of expected delivery timelines per item.
Please Note: This feature is parametric and needs to be enabled from the backend before it becomes available on the PO screen.
🎬 Where to Find It
📷 See It in Action
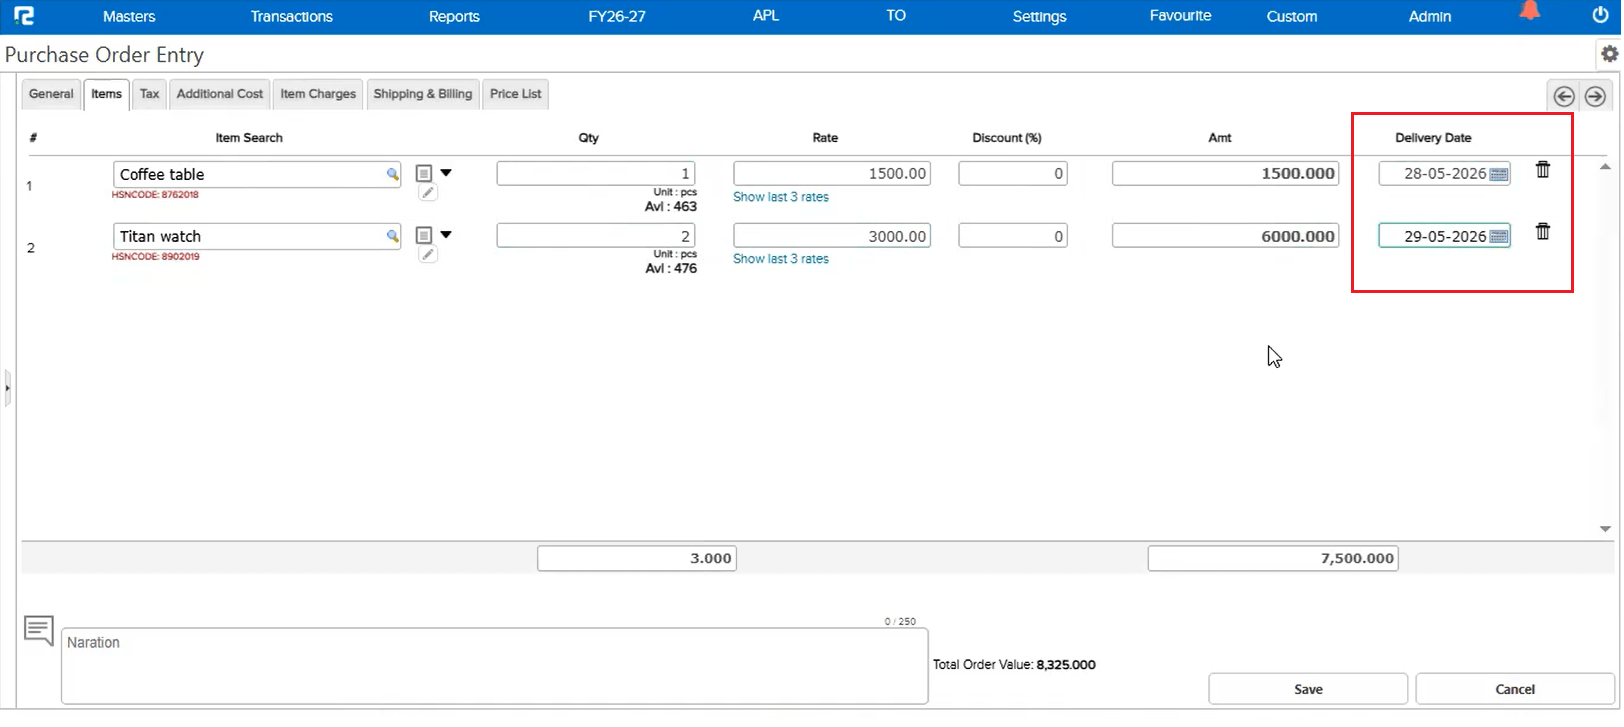
📌 What Was Happening
When transactions were created via Excel import, there was no way to trace which Excel file a particular transaction originated from. The source file ID was not being stored against the transaction, making it difficult to audit or track import history.
🌟 What This Means for You
The system now tracks and stores the Excel File ID against each transaction that is created through an Excel import. This is available across the following transaction types:
• Accounting Transactions
• Sale
• Sale Return
• Purchase
• Purchase Return
This makes it easier to audit, trace, and verify which Excel file was the source of any imported transaction.
🎬 Where to Find It
📷 See It in Action
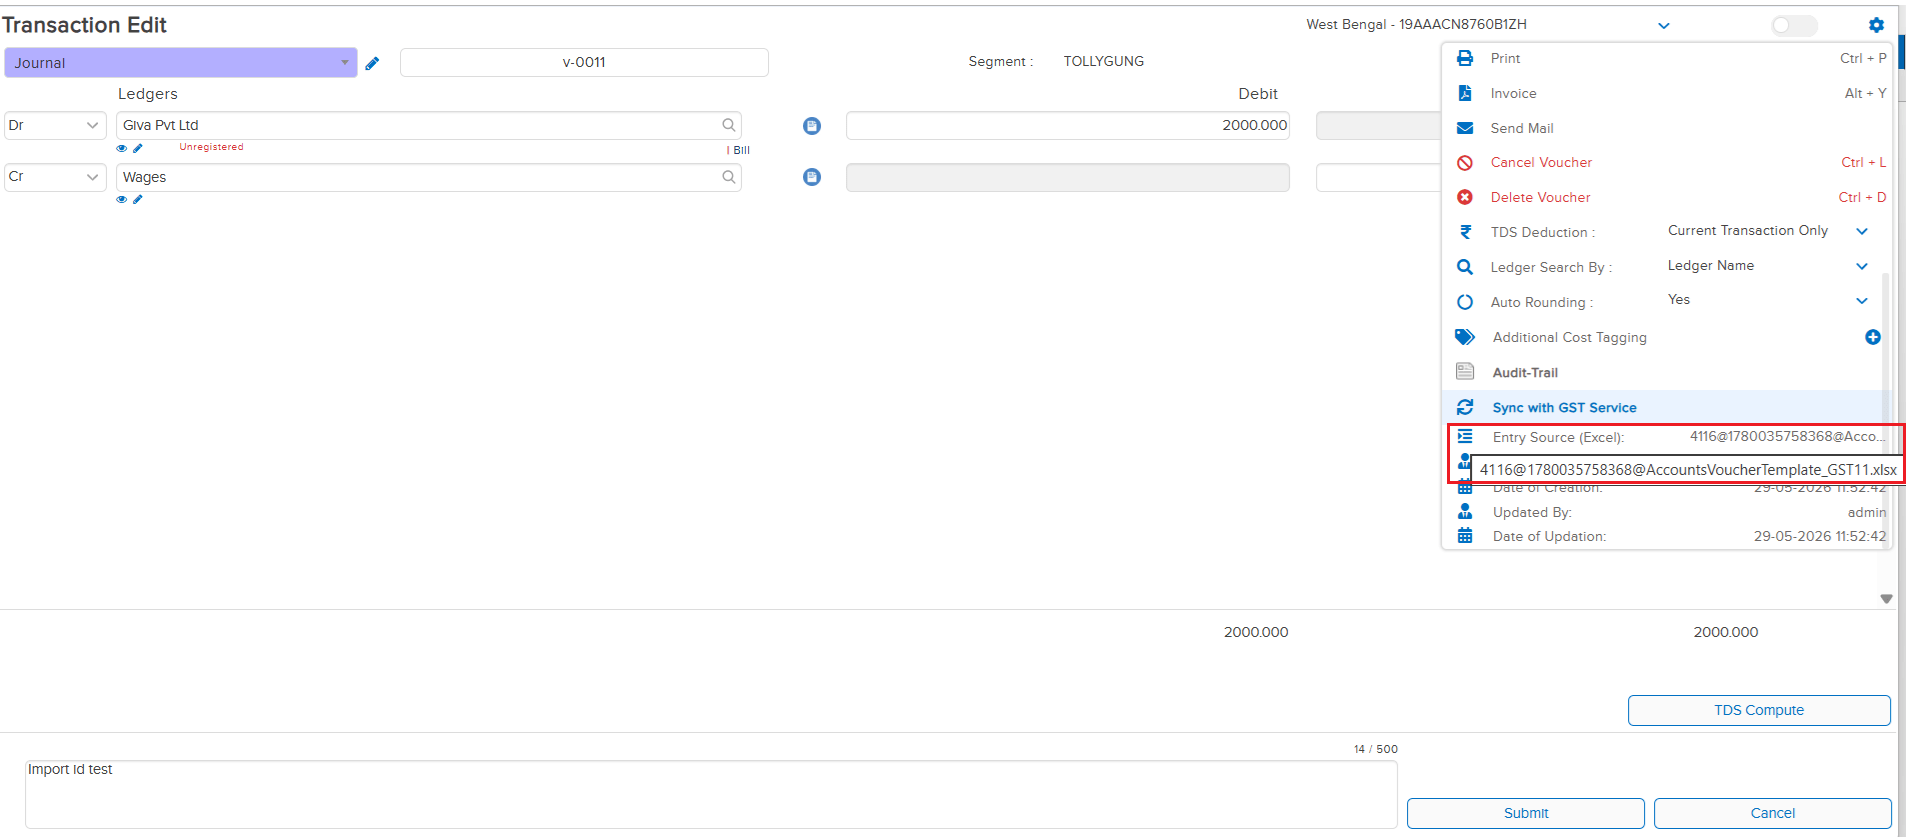
📌 What Was Happening
In the 30-05-2026 Beta Release, the Excel File ID tracking feature was introduced for Accounting, Sale, Sale Return, Purchase, and Purchase Return transactions. However, this tracking was not yet extended to IBT (Inter-Branch Transfer) transactions — meaning transactions created via Excel import through the IBT screen had no record of their source file.
🌟 What This Means for You
The Excel File ID tracking has now been extended to IBT transactions as well. When a transaction is created through an Excel import on the IBT screen, the system will now store the source Excel File ID against that transaction — bringing IBT imports in line with the other transaction types and ensuring complete audit traceability across all import workflows.
🎬 Where to Find It
📷 See It in Action
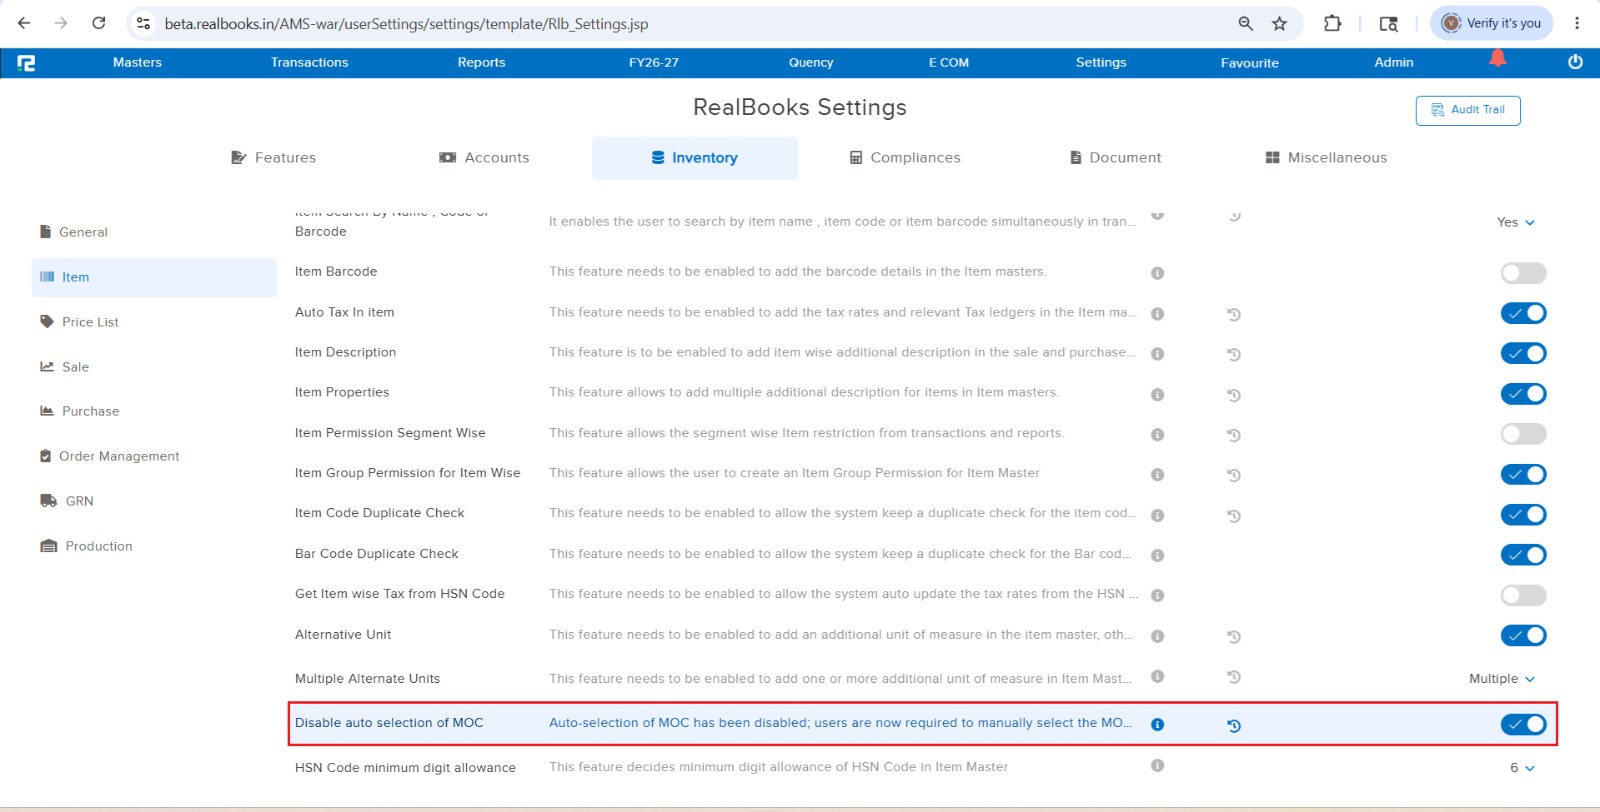
📌 What Was Happening
The Cheque Print option was available in the regular (non-IBT) Contra Voucher Type, but was not available in the Parent IBT Contra Voucher Type. Users creating inter-branch contra entries had no way to print cheques directly from the IBT Contra screen — forcing them to use a workaround or process the cheque separately, adding unnecessary steps to the workflow.
🌟 What This Means for You
The Cheque Print option is now available in the Parent IBT Contra Voucher Type, matching the behaviour of the regular Contra Voucher. You can now print cheques directly from IBT Contra entries — bringing consistency across contra voucher types and removing the need for any workaround when processing inter-branch contra transactions with cheque payments.
🎬 Where to Find It
📷 See It in Action
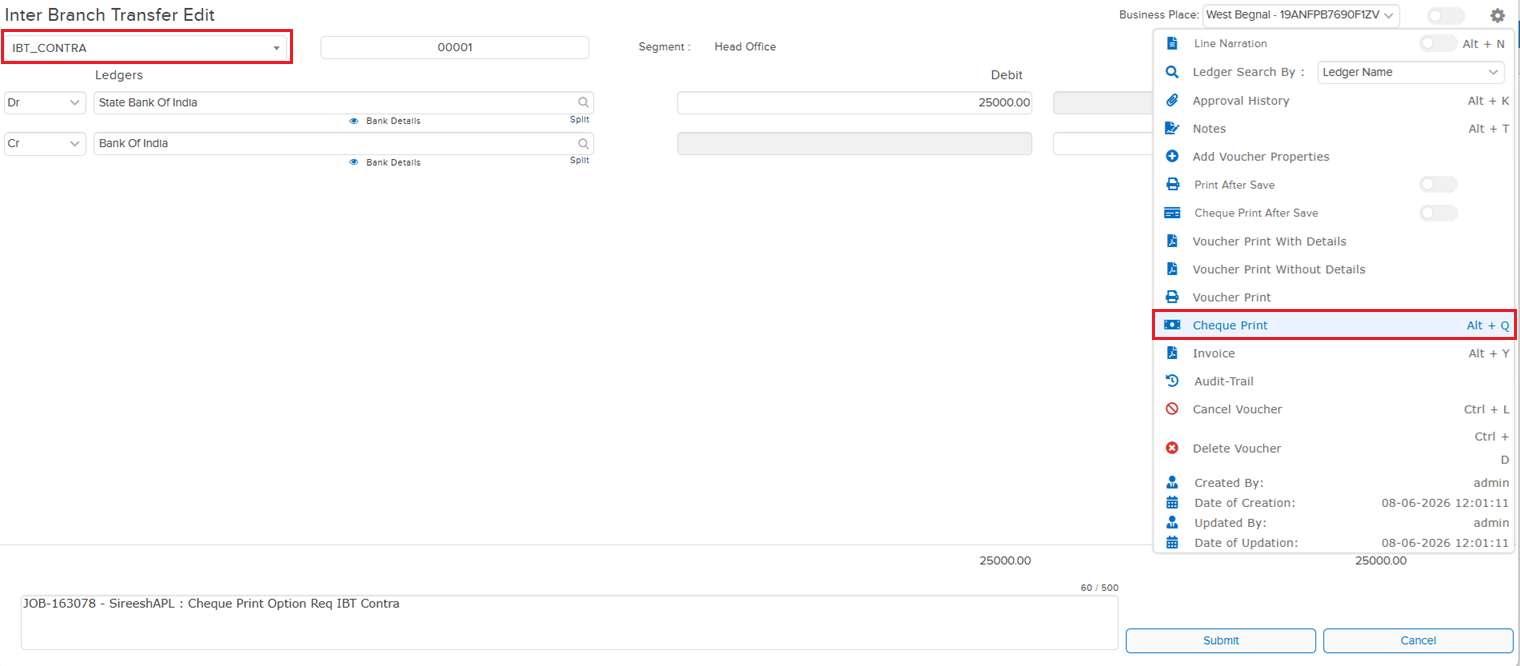
📌 What Was Happening
During Purchase Entry creation, selecting the Alt Unit caused the MOC to change from “W” to “P”. The equivalent setting on the Sale Entry side did not change the MOC on Alt Unit selection — because the existing settings parameter that controlled this behaviour was scoped to Sales only. As a result, the same business setup behaved differently in Sales vs Purchase, which was inconsistent for users entering Purchase vouchers.
🌟 What This Means for You
The existing settings parameter has been extended to cover both Sale and Purchase entries. Purchase Entry will now follow the same MOC behaviour on Alt Unit selection as Sale Entry — if the parameter is configured so that MOC does not change on Alt Unit selection in Sales, the same will apply to Purchase. Sales and Purchase flows are now consistent and driven by a single configuration.
🎬 Where to Find It
📷 See It in Action
📌 What Was Happening
The Stock Journal edit screen was carrying the older inventory transaction edit logic and could be slow to open, especially for entries with multiple line items. The same performance optimisation had already been rolled out earlier for Sale, Sale Return, Purchase and Purchase Return edit screens, but Stock Journal had not yet been brought in line — leaving an inconsistent edit experience across inventory voucher types.
🌟 What This Means for You
The Stock Journal edit screen has now been optimised in line with Sale / Sale Return / Purchase / Purchase Return. The edit screen opens faster and delivers noticeably better performance than before — bringing Stock Journal up to par with the other inventory transactions and giving a consistent, snappy edit experience across the board.
🎬 Where to Find It
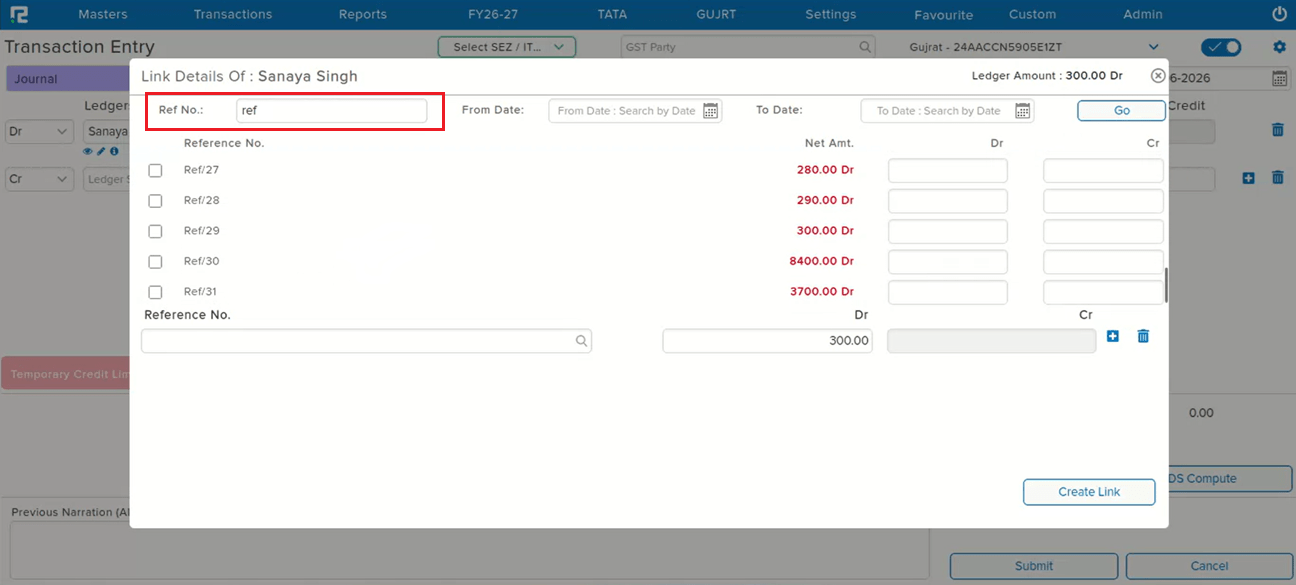
📌 What Was Happening
Vouchers could be linked to a reference (Link Ref) for traceability, but there was no dedicated search option to look up entries by that Link Ref on the voucher screens. Users had to scroll or filter by other fields to locate vouchers tied to a particular reference, which was slow when the reference was the only handle available.
🌟 What This Means for You
A Link Ref search option has been added to both the Voucher Entry and Voucher Edit screens. You can now search and pull up vouchers directly by their Link Ref from either screen — faster lookup when reconciling, reviewing, or following the trail from one linked entry to another.
🎬 Where to Find It
📷 See It in Action
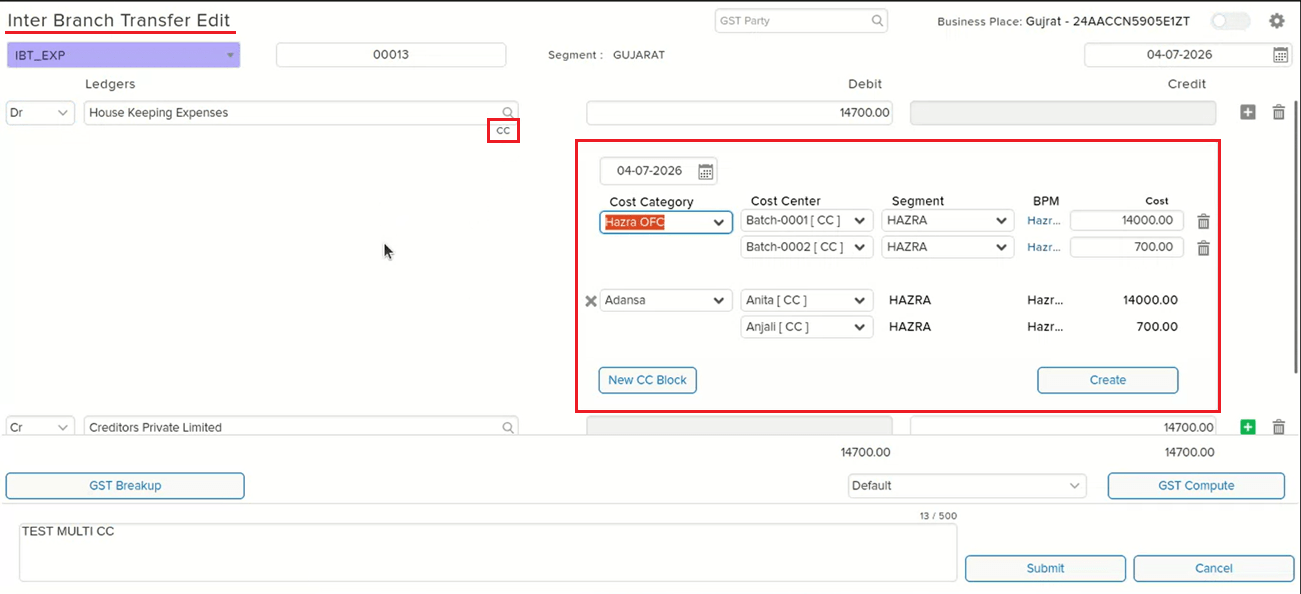
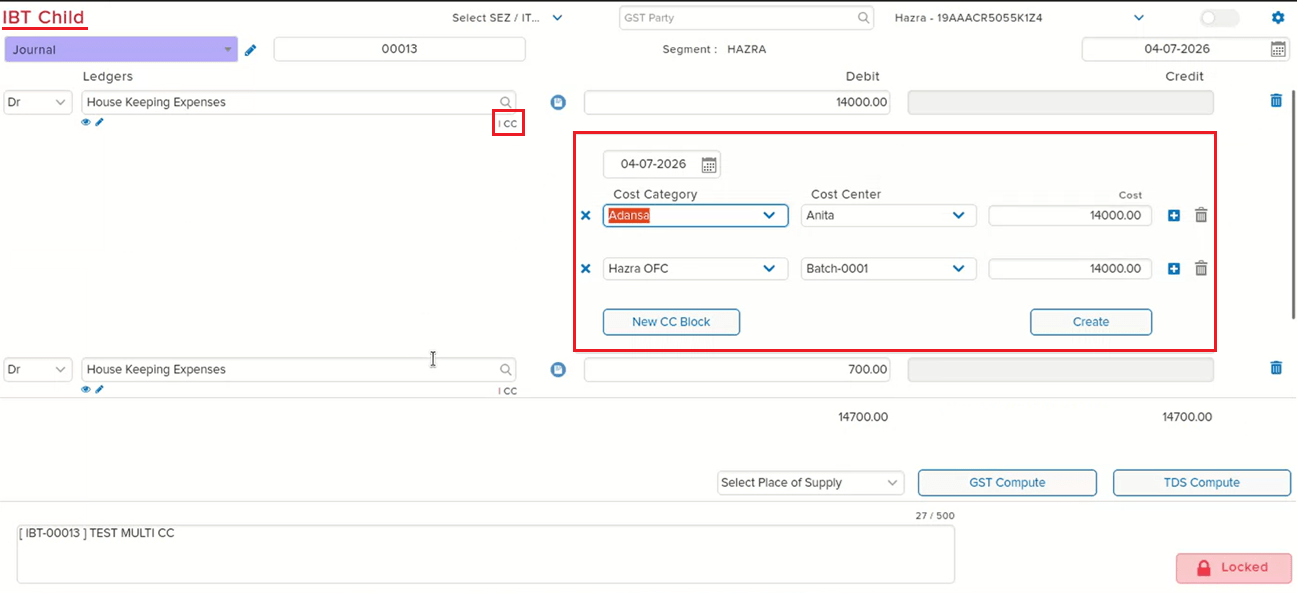
📌 What Was Happening
In an IBT (Inter-Branch Transfer) entry with two Cost Centre blocks entered, opening the corresponding child entry showed only one Cost Centre block in the Cost Centre view — even though the parent IBT entry correctly displayed both blocks. This mismatch was specific to the single cost centre configuration and caused the child entry to appear incomplete relative to the originating IBT.
🌟 What This Means for You
The Cost Centre view in the IBT child entry now correctly reflects the blocks entered in the parent IBT entry. When a single cost centre setup is used and multiple CC blocks are entered in the IBT, all blocks are now visible when opening the child entry — no more missing Cost Centre data on the child side.
🎬 Where to Find It
📷 See It in Action
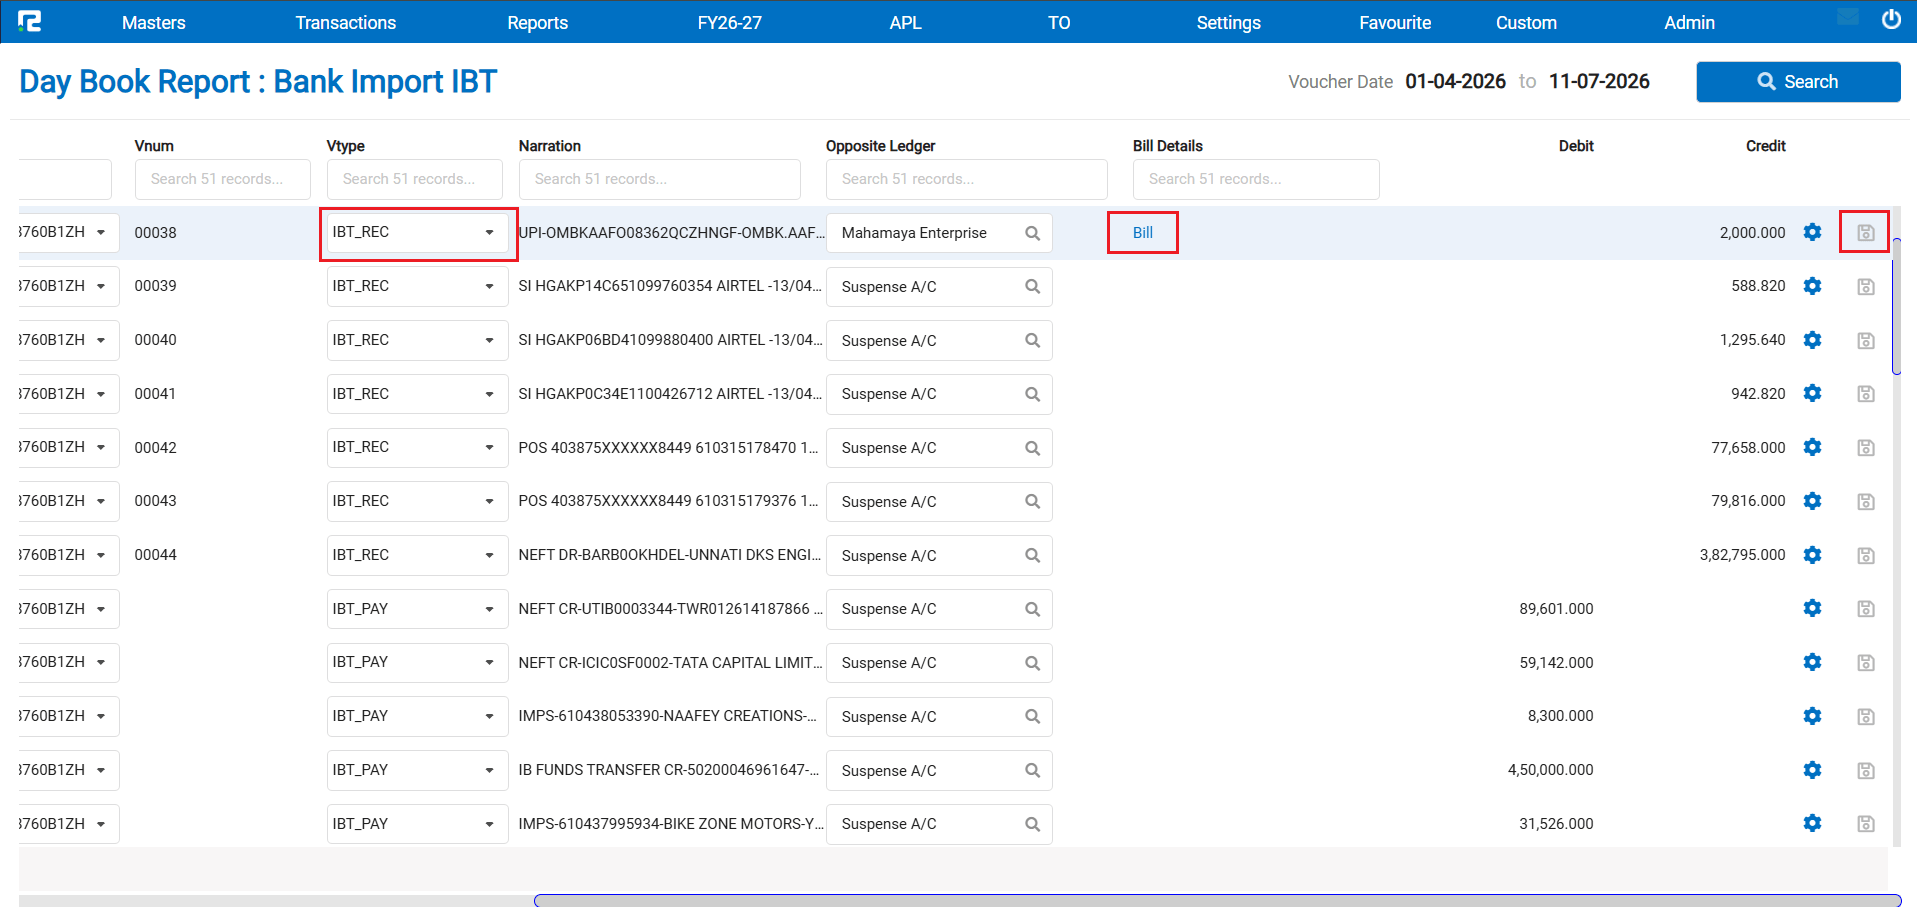
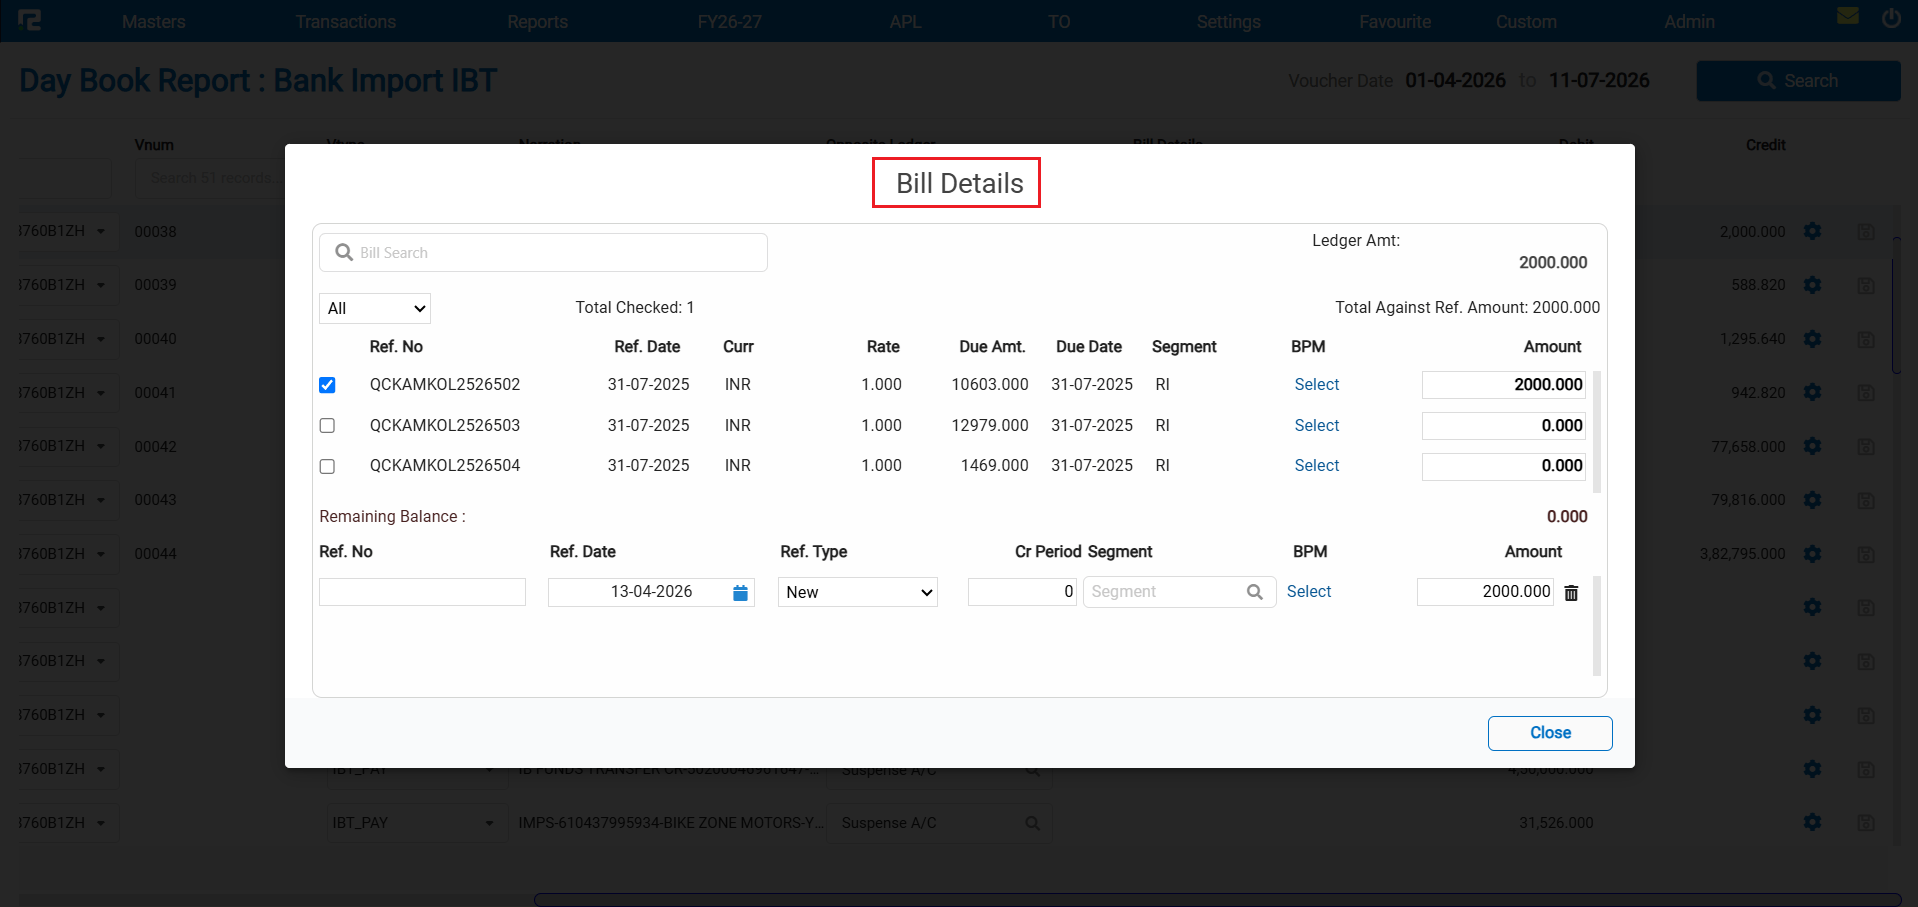
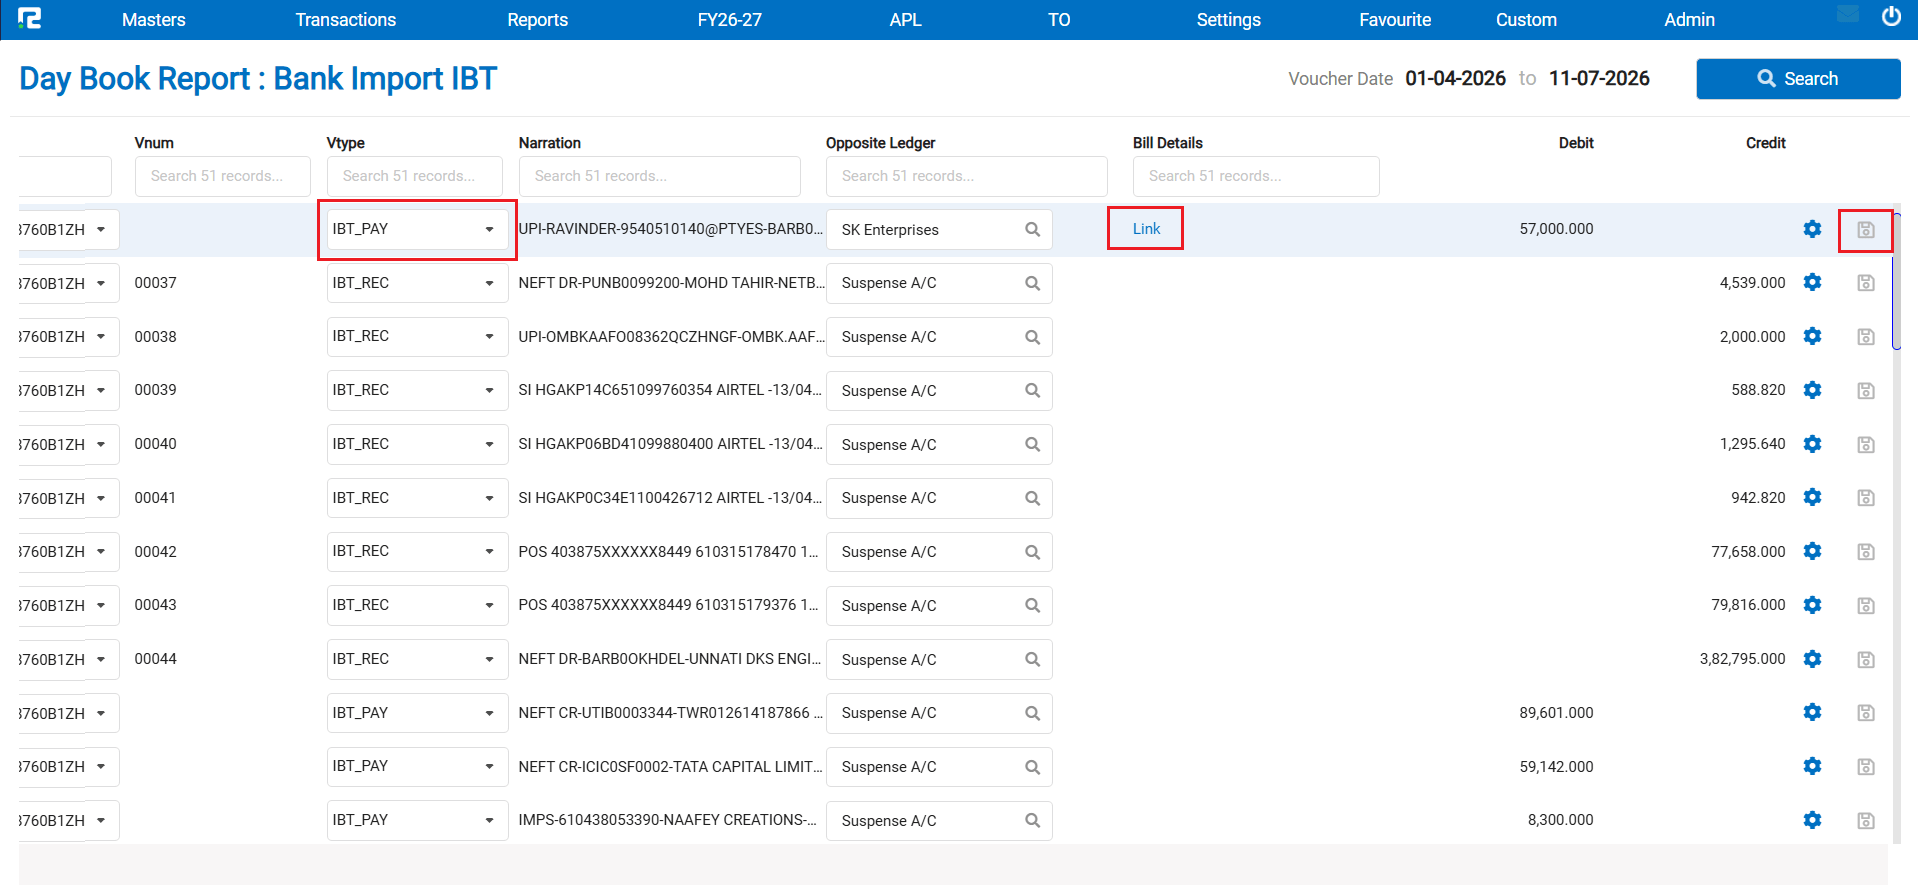
📌 What Was Happening
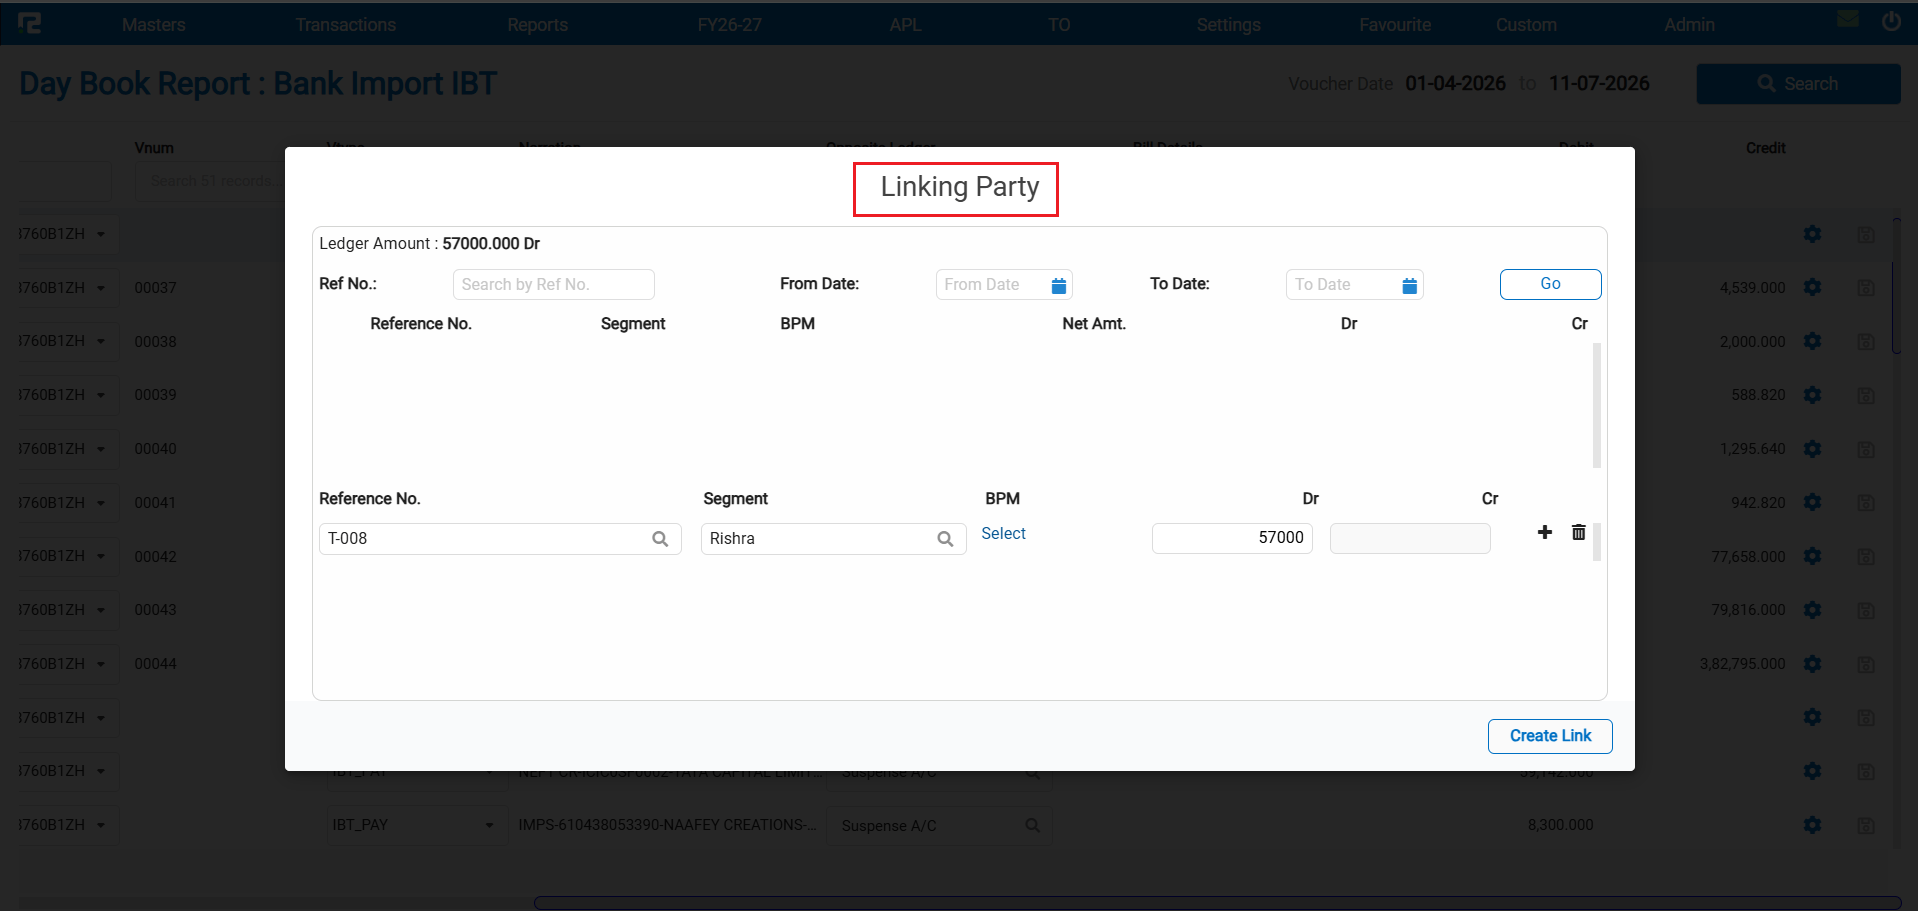
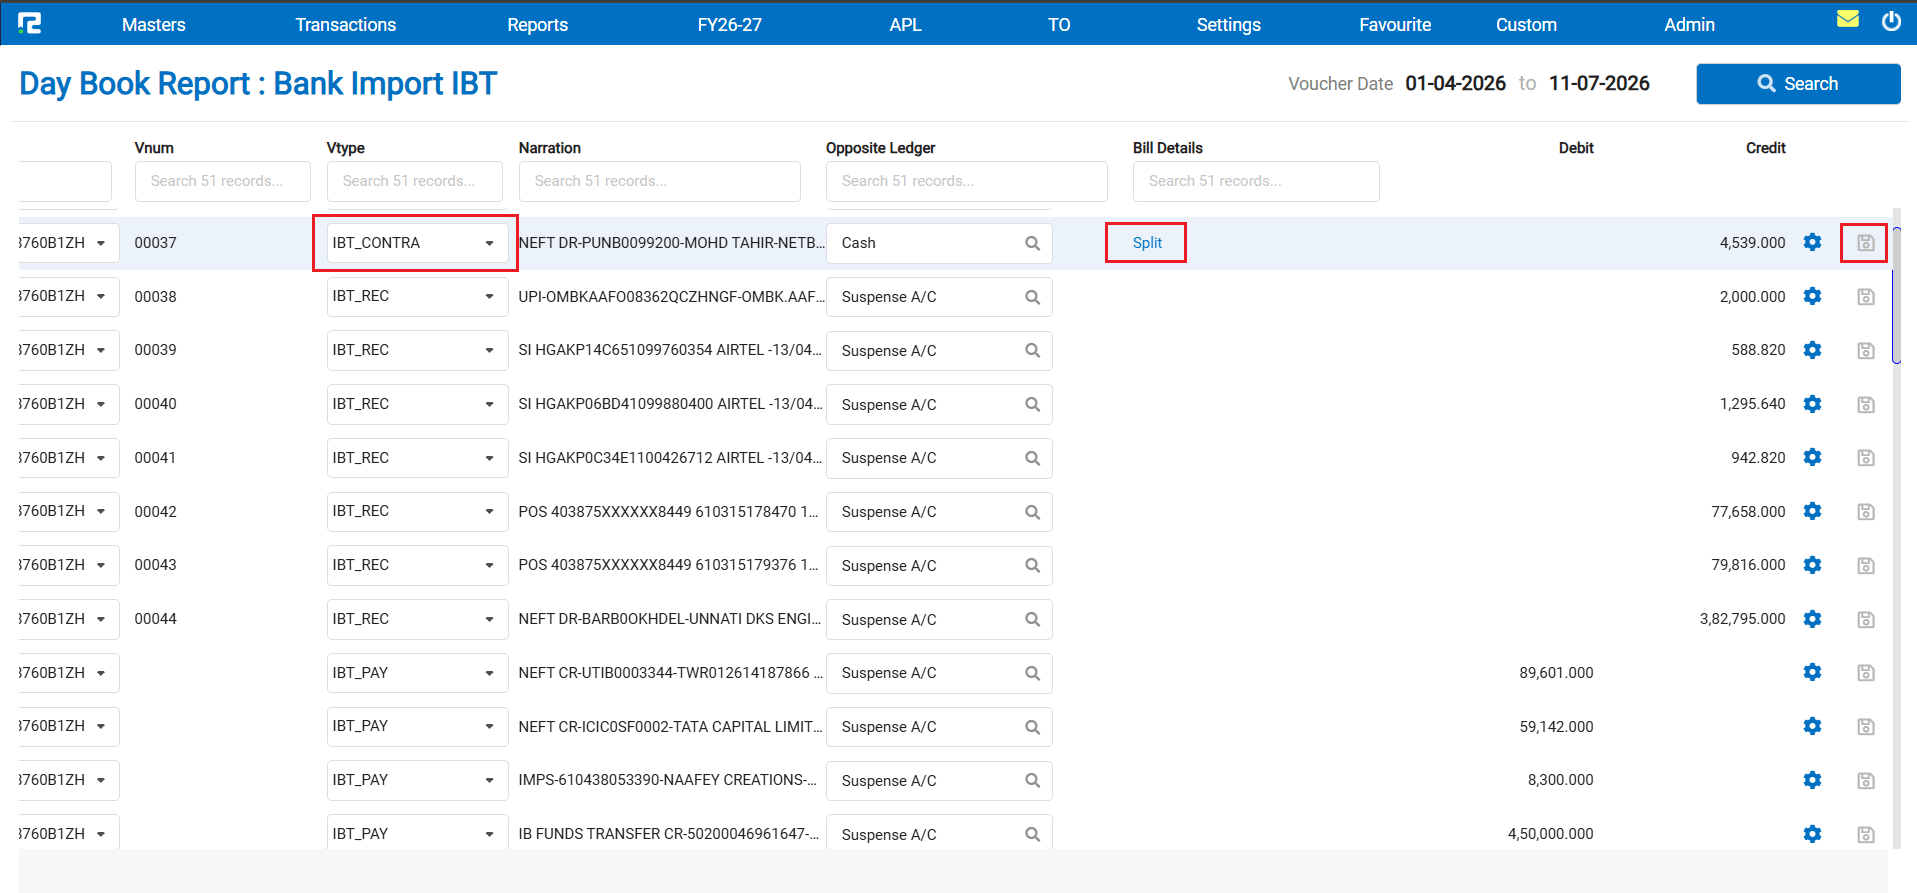
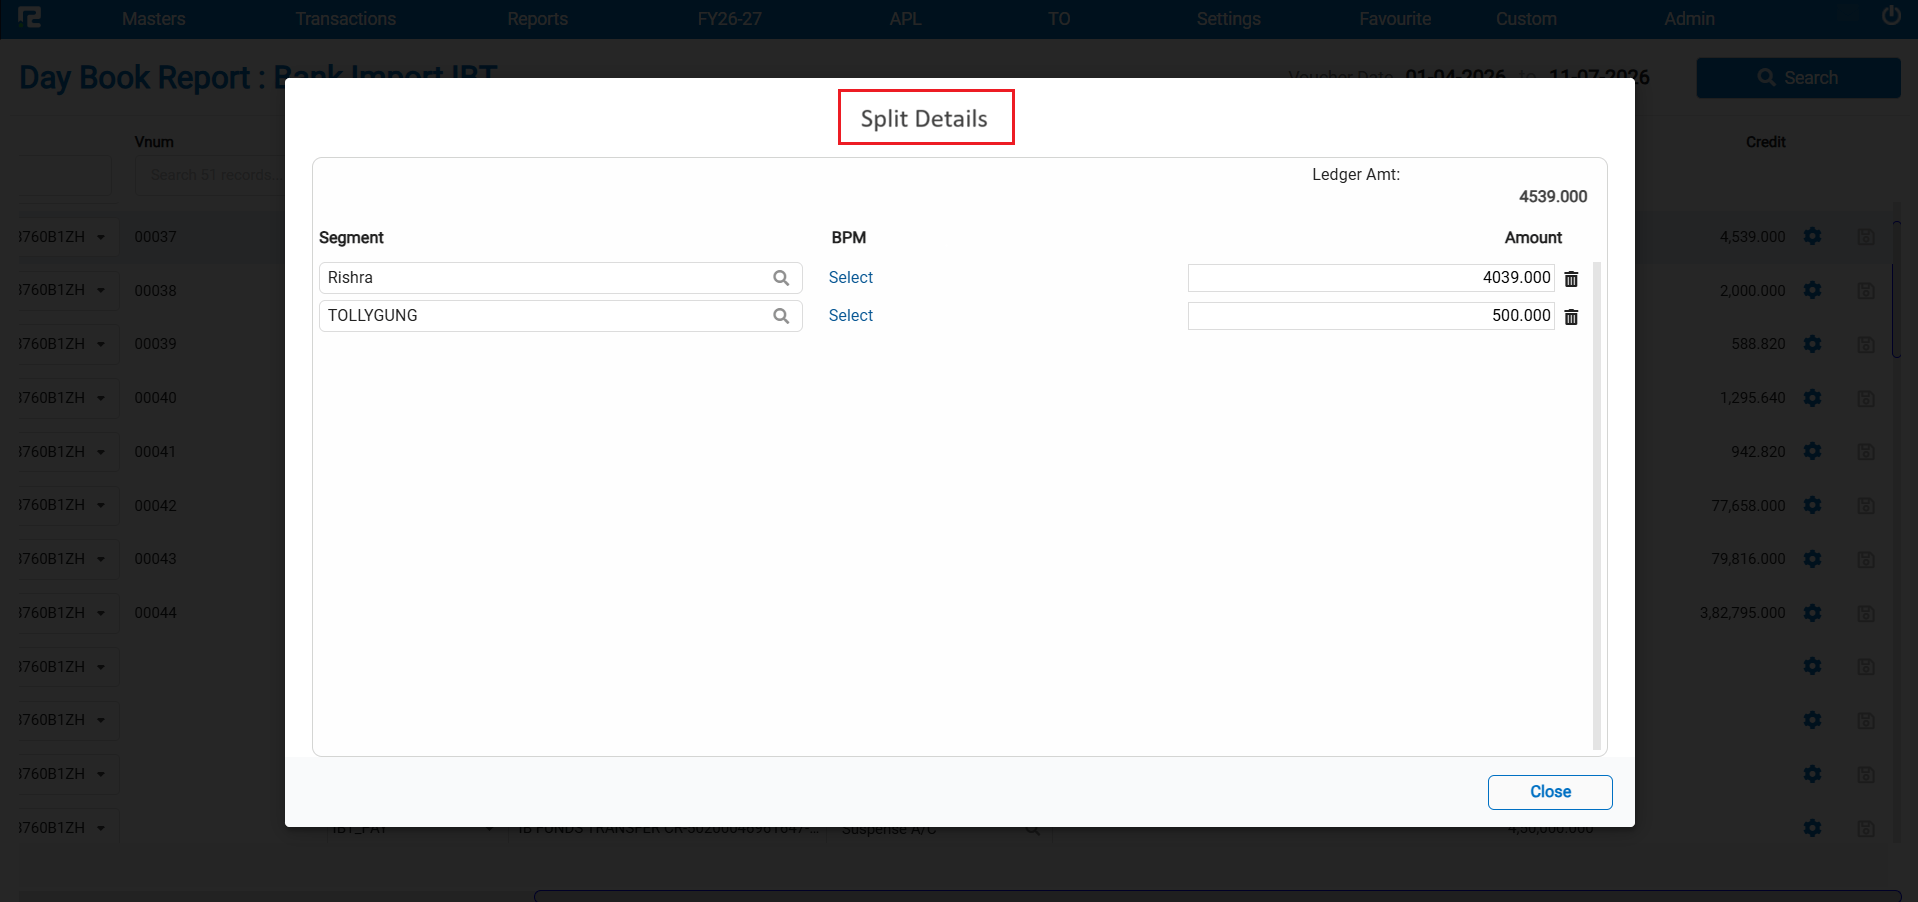
When a client uploads a bank statement via Bank Import and navigates to the Day Book option of Bank Import, they can update the suspense ledger, assign a customer or vendor, and tag bills. However, this split / breakup of segment functionality was not working for the following IBT voucher types:
• IBT PAY
• IBT RECEIPT
• IBT CONTRA
🌟 What This Means for You
The split / breakup behaviour for IBT voucher types in the Bank Import screen has been defined and implemented as follows:
• If both Bill and Link are enabled for a party — the user will not be allowed to split from either
• If either Bill or Link is enabled (but not both) — the user will be able to split
• If neither Bill nor Link is enabled for the party — the user will not be able to split
• If the suspense ledger is replaced by a Cash / Bank ledger, the voucher type automatically changes to IBT Contra within the same screen — no manual vtype switching needed
🎬 Where to Find It
📷 See It in Action
📌 What Was Needed
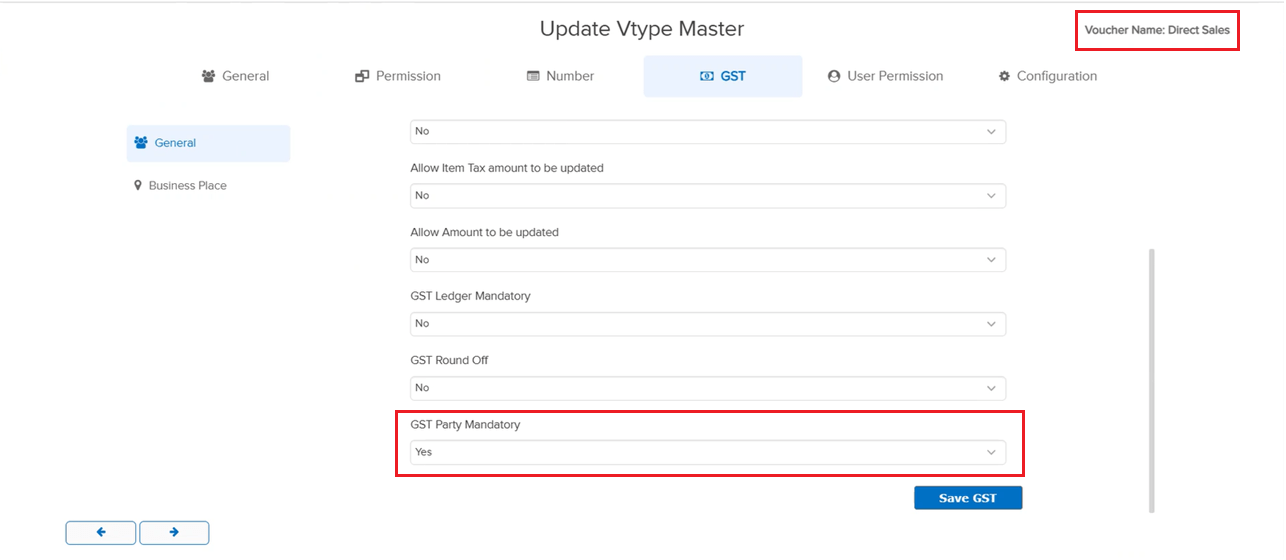
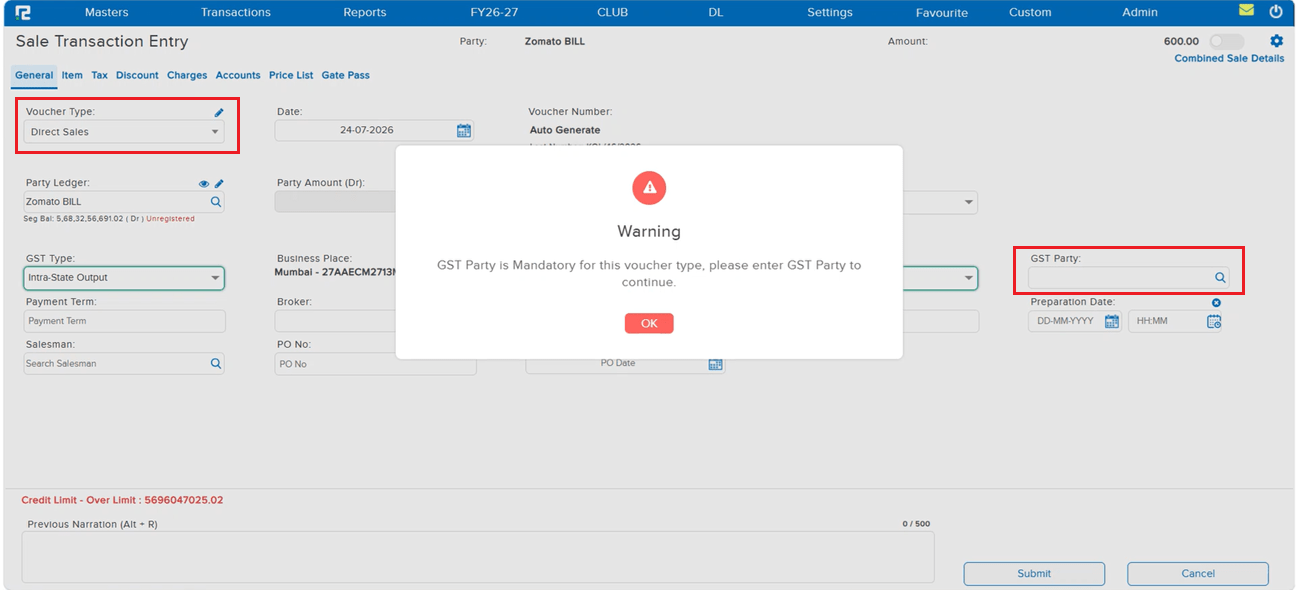
There was no way to enforce entry of the GST Party field on transaction screens where it was applicable, leaving it optional even when a business wanted to make it compulsory.
🌟 What This Means for You
A new GST Party Mandatory option has been added under Voucher Type Master → GST (disabled by default). When enabled for a voucher type, the GST Party field becomes mandatory on that voucher’s entry screen — a warning blocks submission until it is filled. Available for: Sale, Sale Return, Purchase, Purchase Return, Invoice, Journal, Debit Note, Credit Note, and Price Difference.
🎬 Where to Find It
📷 See It in Action
📌 What Was Needed
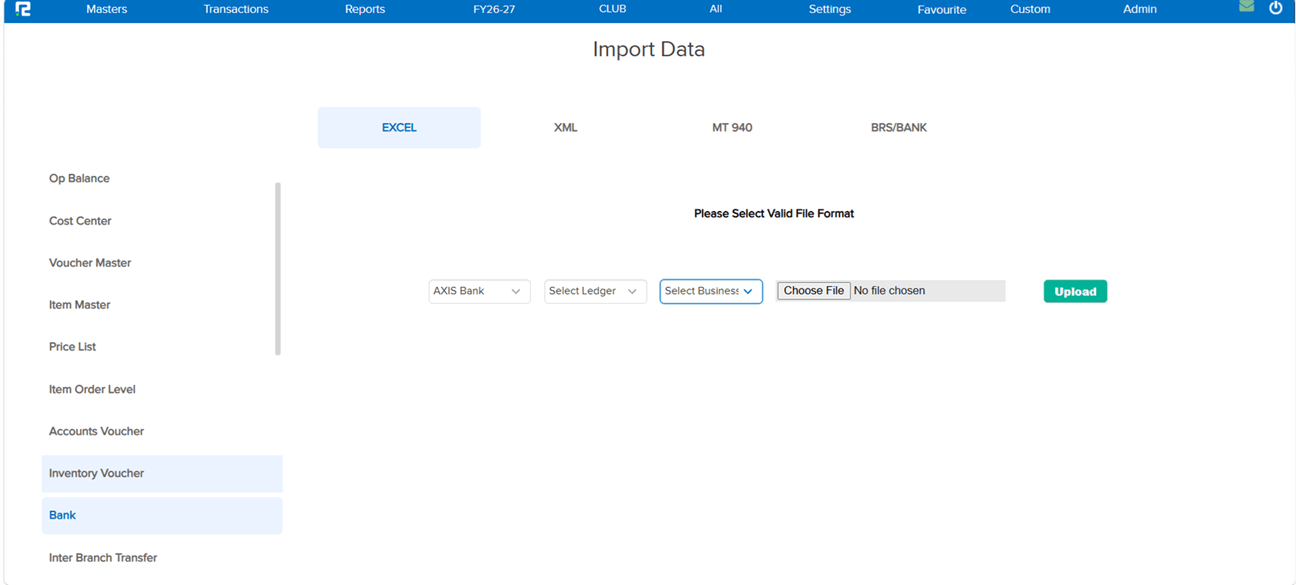
The Import Upload screen used a horizontal tab layout (Excel, XML, MT940, BRS/BANK) that became harder to navigate as import options grew, and its listing screen did not default to a useful date range.
🌟 What This Means for You
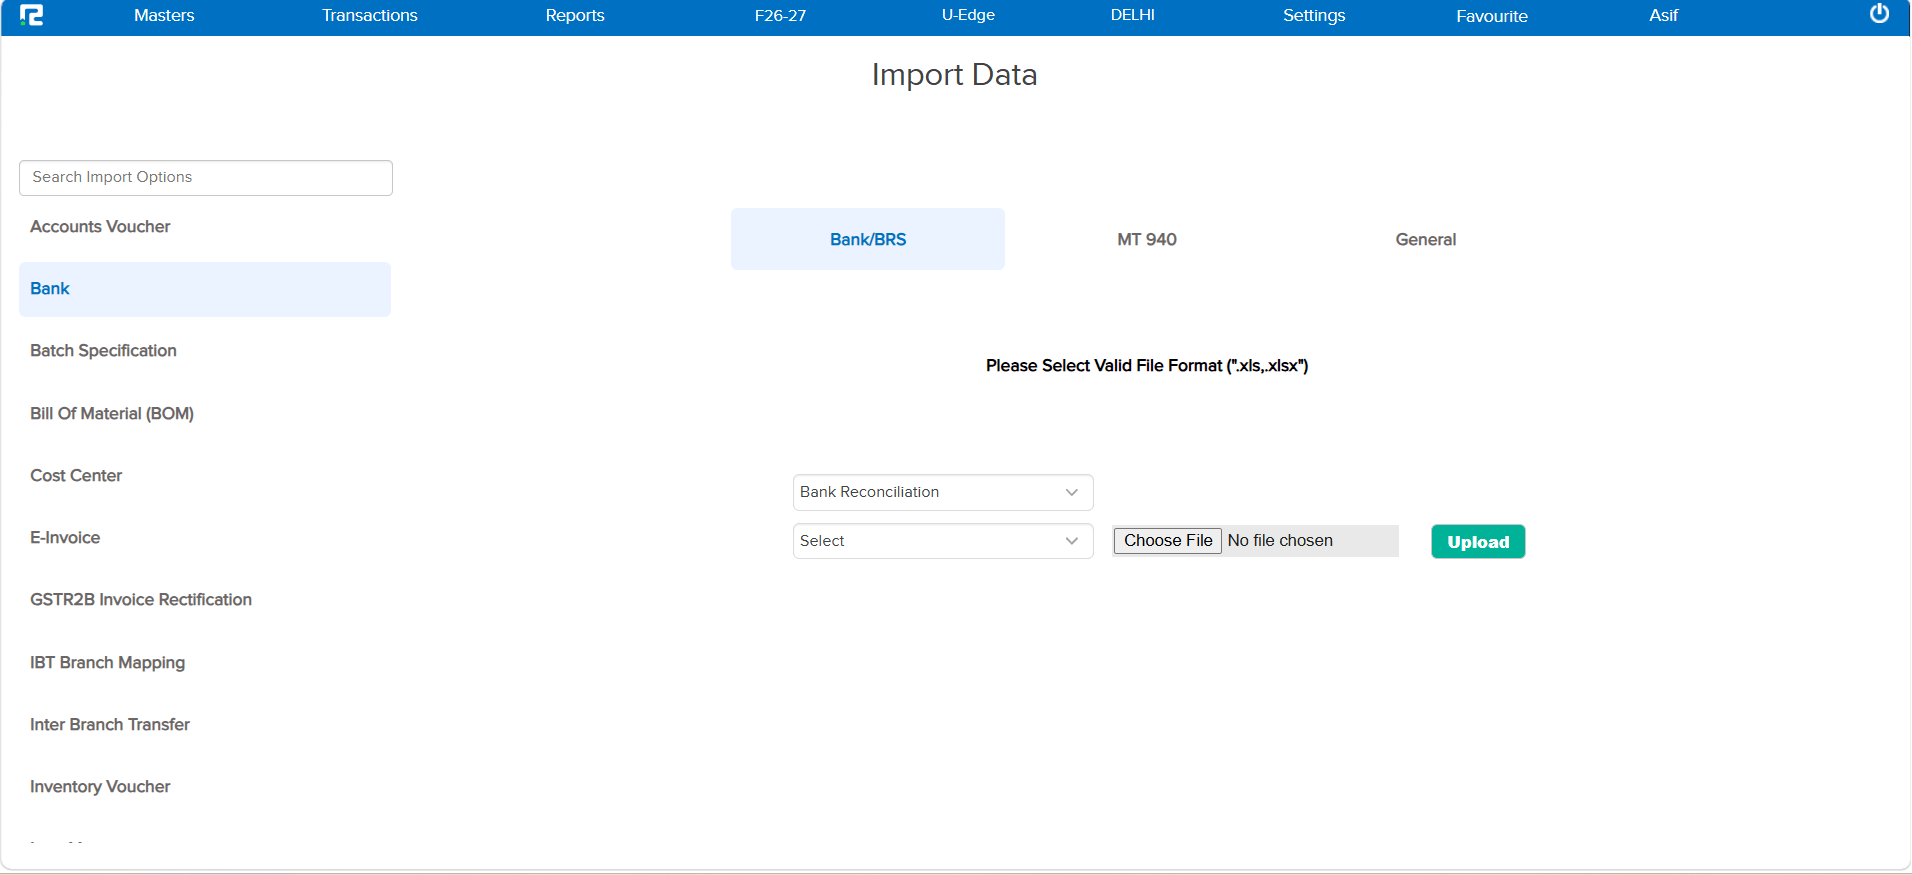
The Import Upload screen has been redesigned for easier navigation:
• The horizontal tabs are now a vertical navigation panel.
• All import options are listed in alphabetical order.
• A Search field at the top of the panel quickly locates any import option.
• The MT940 option now sits under the Bank/BRS section.
• The now-unnecessary Bank dropdown has been removed from the import screen.
• The Import Listing screen now defaults its date range to the current month.
🎬 Where to Find It
📷 See It in Action
📌 What Was Needed
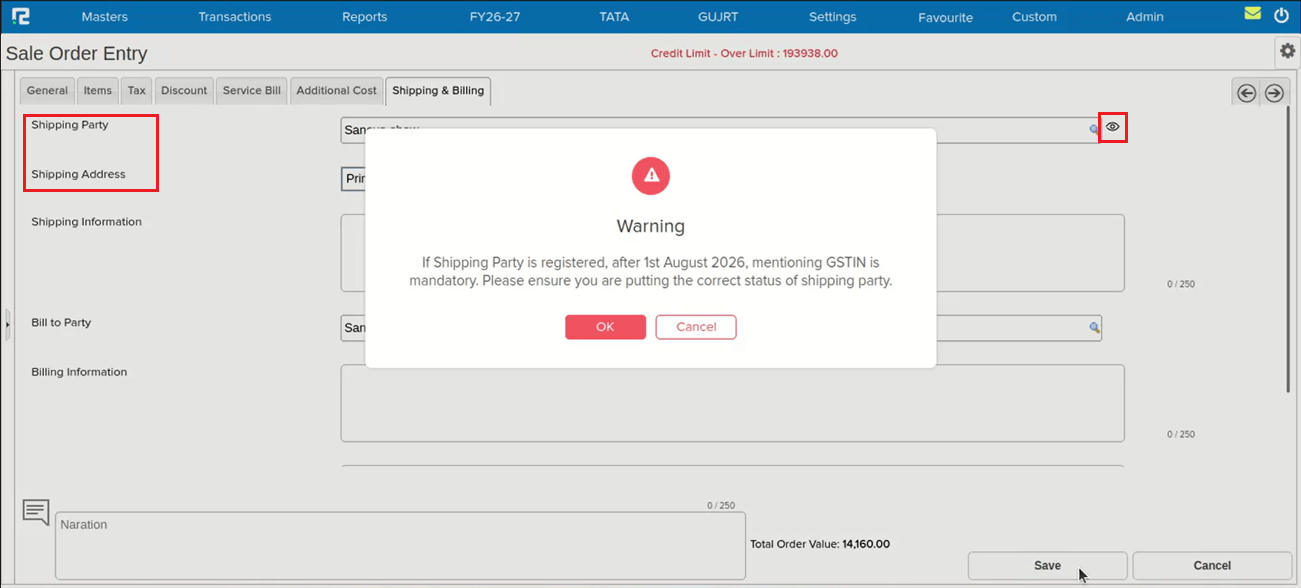
From 1st August 2026, Ship-To GSTIN is mandatory for all Bill-to/Ship-to e-Way Bill and e-Invoice transactions. Earlier, Ship-To parties were often created without a GSTIN. Users needed a prompt while preparing a Sales Order to confirm the correct GST status of the shipping party.
🌟 What This Means for You
While preparing a Sales Order, if a selected Shipping Party is unregistered, an alert is now shown:
“If Shipping Party is registered, after 1st August 2026, mentioning GSTIN is mandatory. Please ensure you are putting the correct status of shipping party.”
• Yes — continue with the entry.
• No — go back to edit the party and update its GST status.
The GST status is now also shown in the eye icon for the Shipping Party, just like it already appears for the Billing Party.
🎬 Where to Find It
📷 See It in Action
📌 What Was Needed
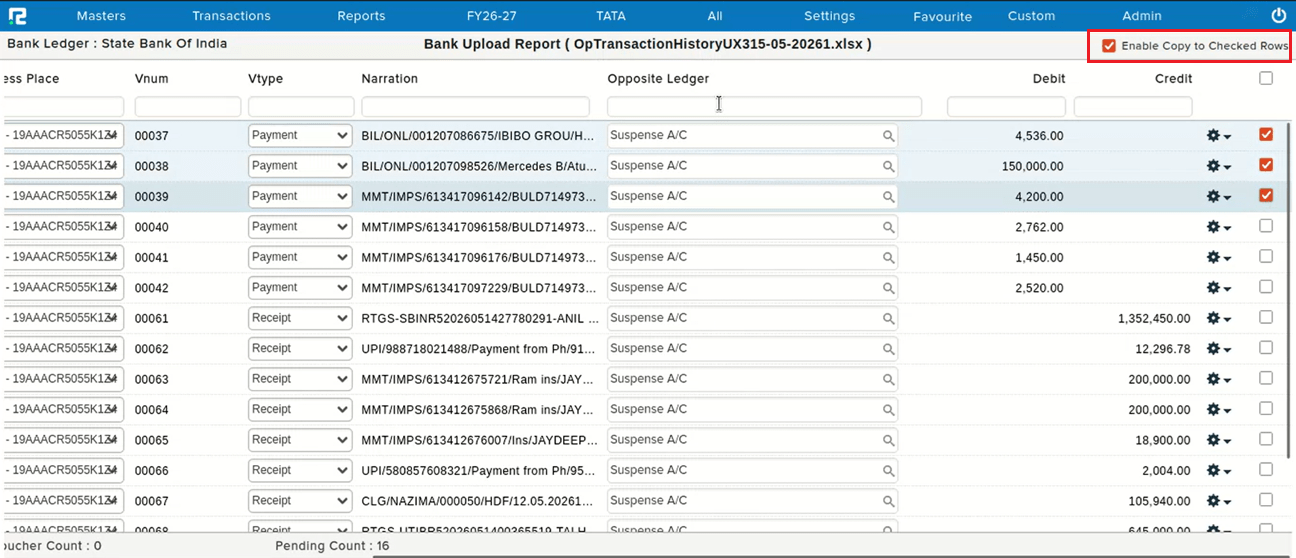
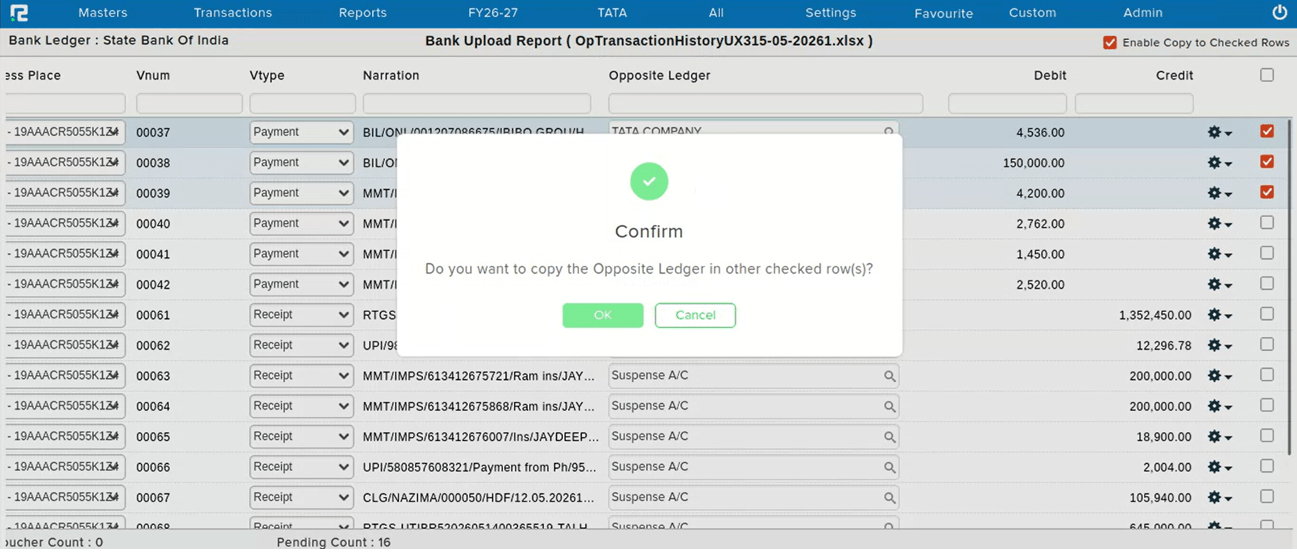
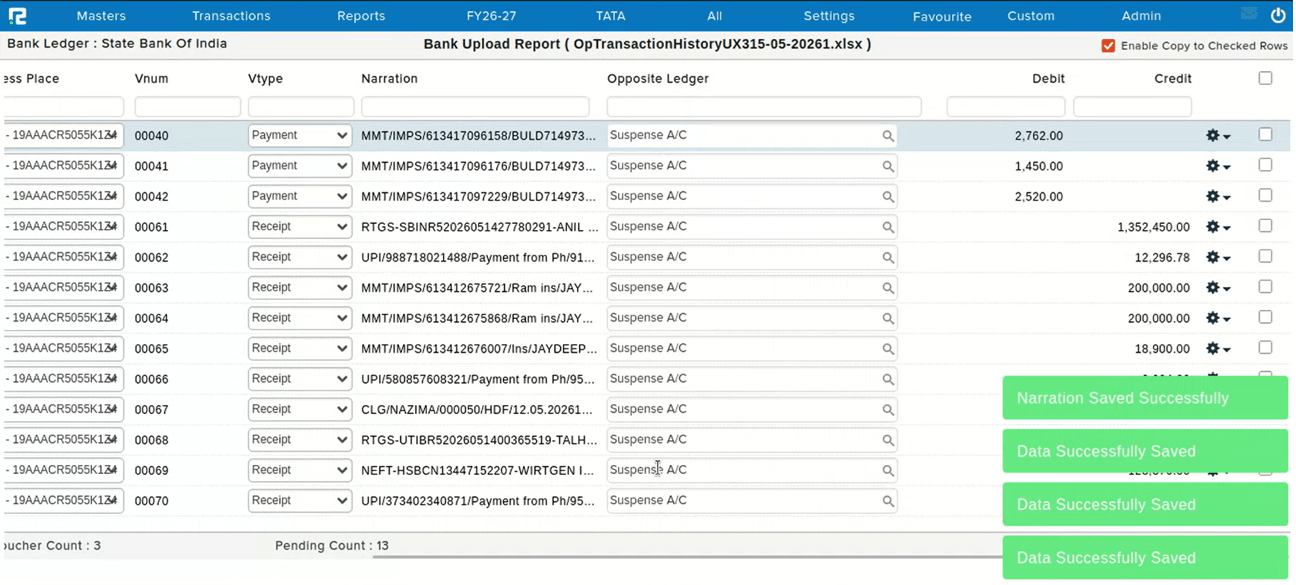
While posting entries from the bank statement, the opposite ledger was automatically posted to the Suspense Account. Users needed a way to replace the Suspense Account with the correct ledger in bulk for all entries requiring the same ledger, instead of editing them one by one.
🌟 What This Means for You
You can now replace Suspense Account ledgers in bulk — update all entries that need the same ledger in a single action, instead of correcting each entry individually.
📷 See It in Action
📌 What Was Happening
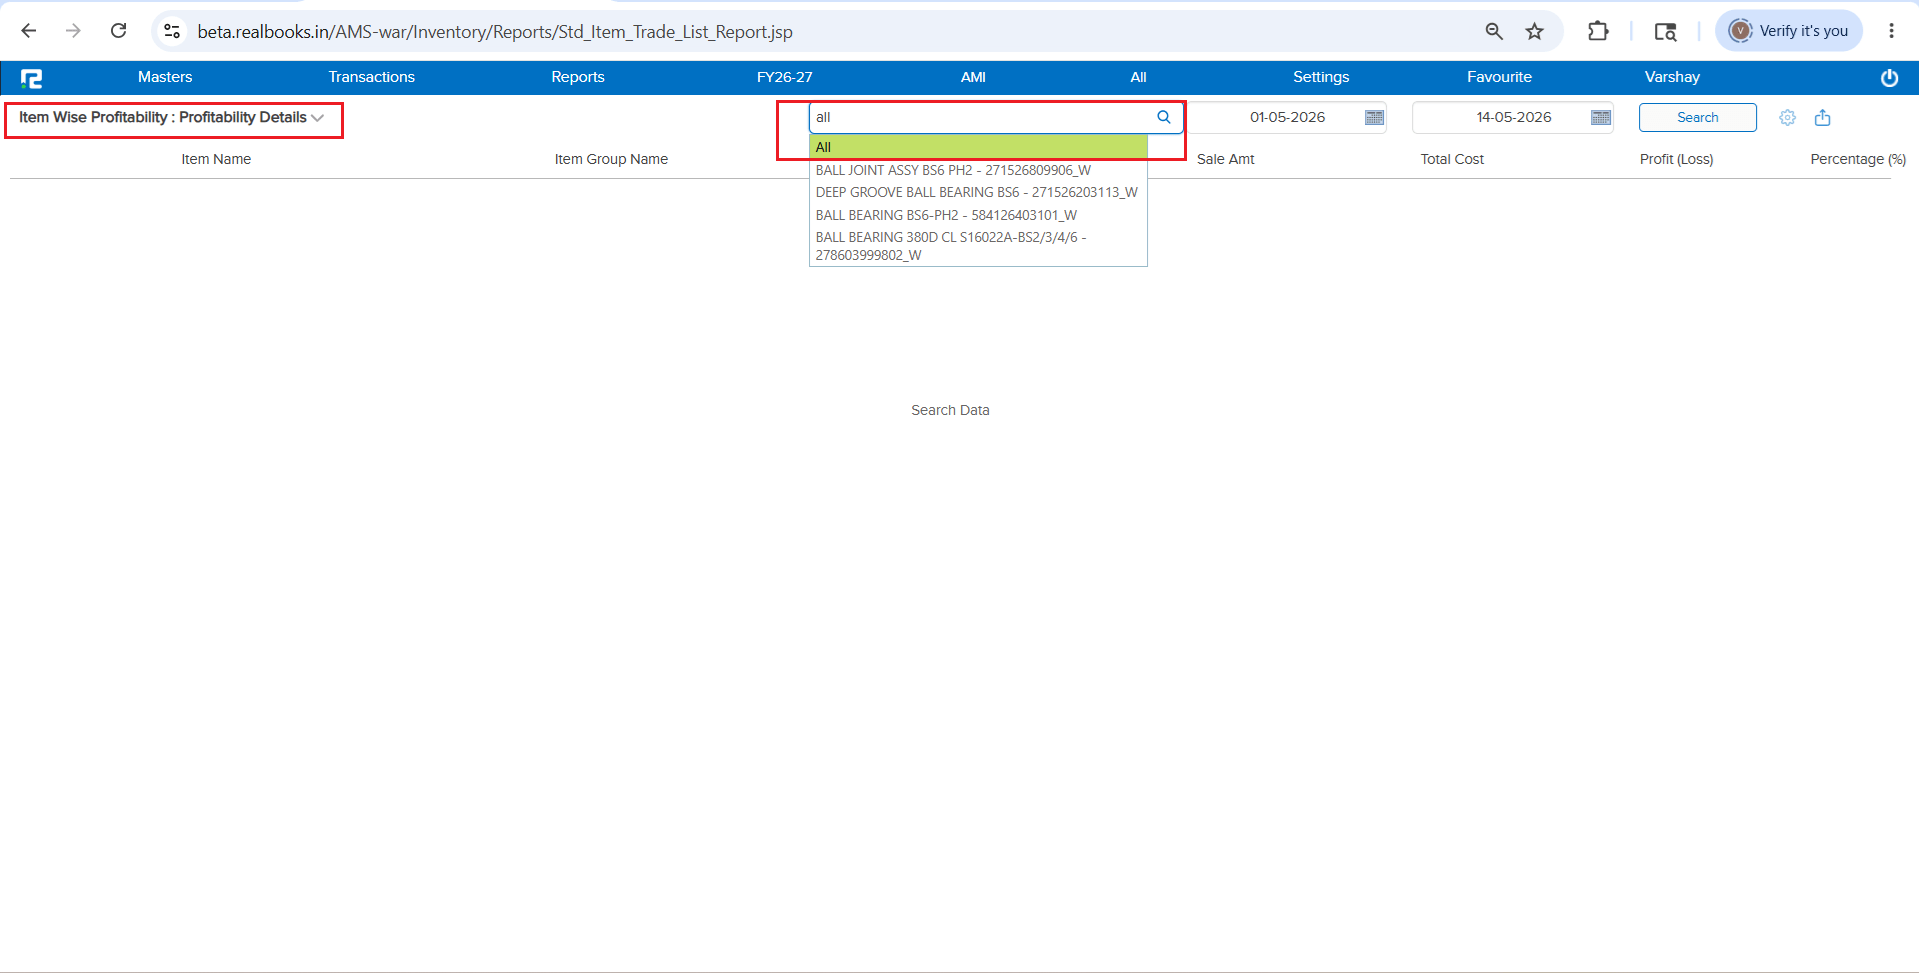
In the Item Wise Profitability Details Report, only a single item could be selected at a time. Users who needed profitability data for all items had to select and export each item individually — making it time-consuming and impractical for bulk analysis.
🌟 What This Means for You
An “All” items selection option has been added to the Item Wise Profitability Details Report. You can now select all items and directly export the report in Excel for the entire item list at once.
Behavior when “All” is selected:
• The Search option is disabled
• Only the Export option is available
🎬 Where to Find It
📷 See It in Action
📌 What Was Happening
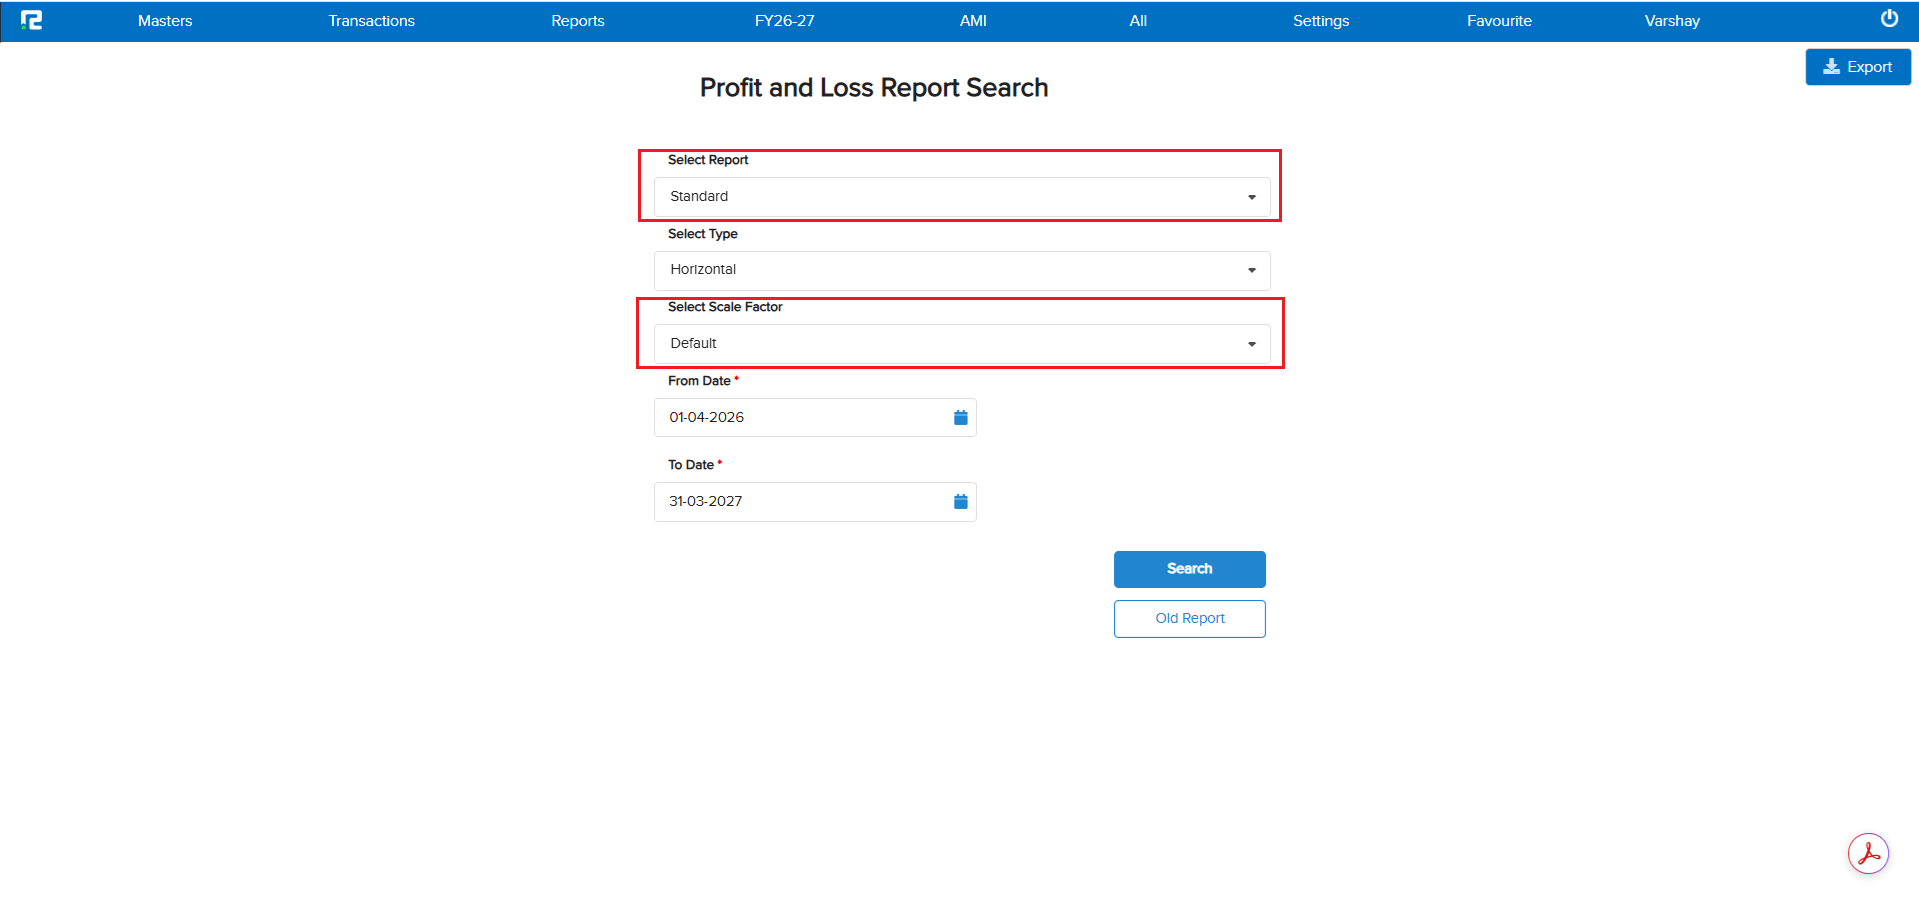
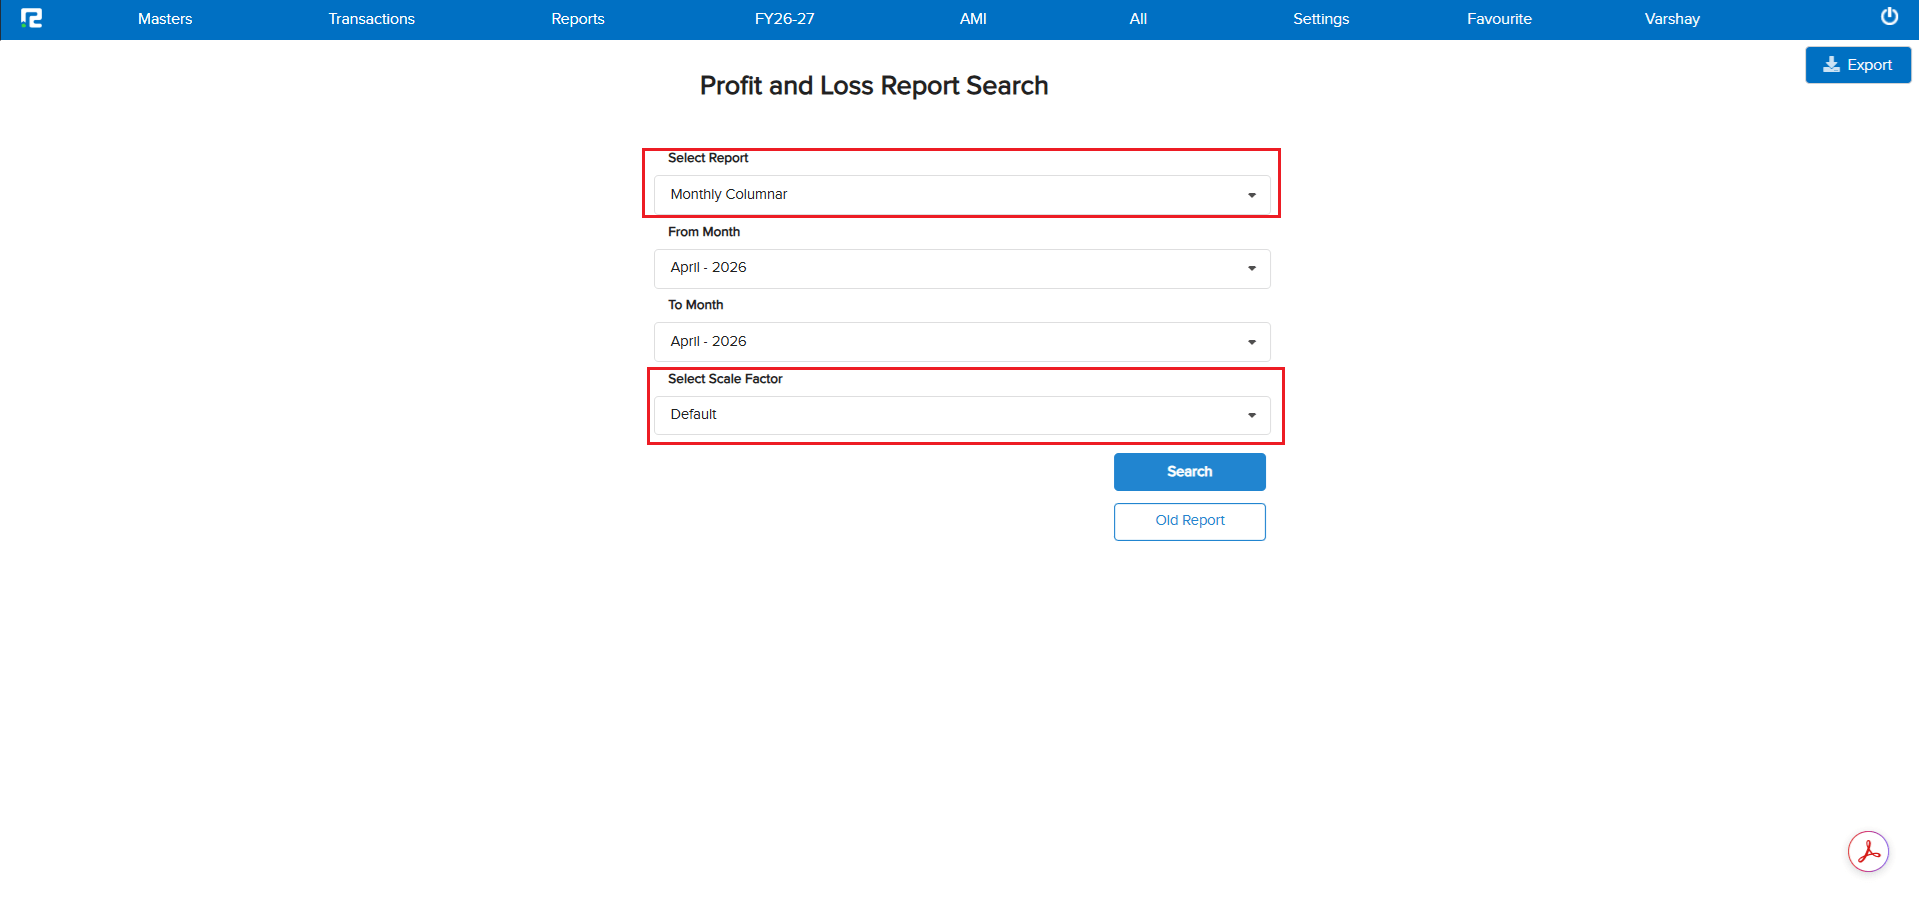
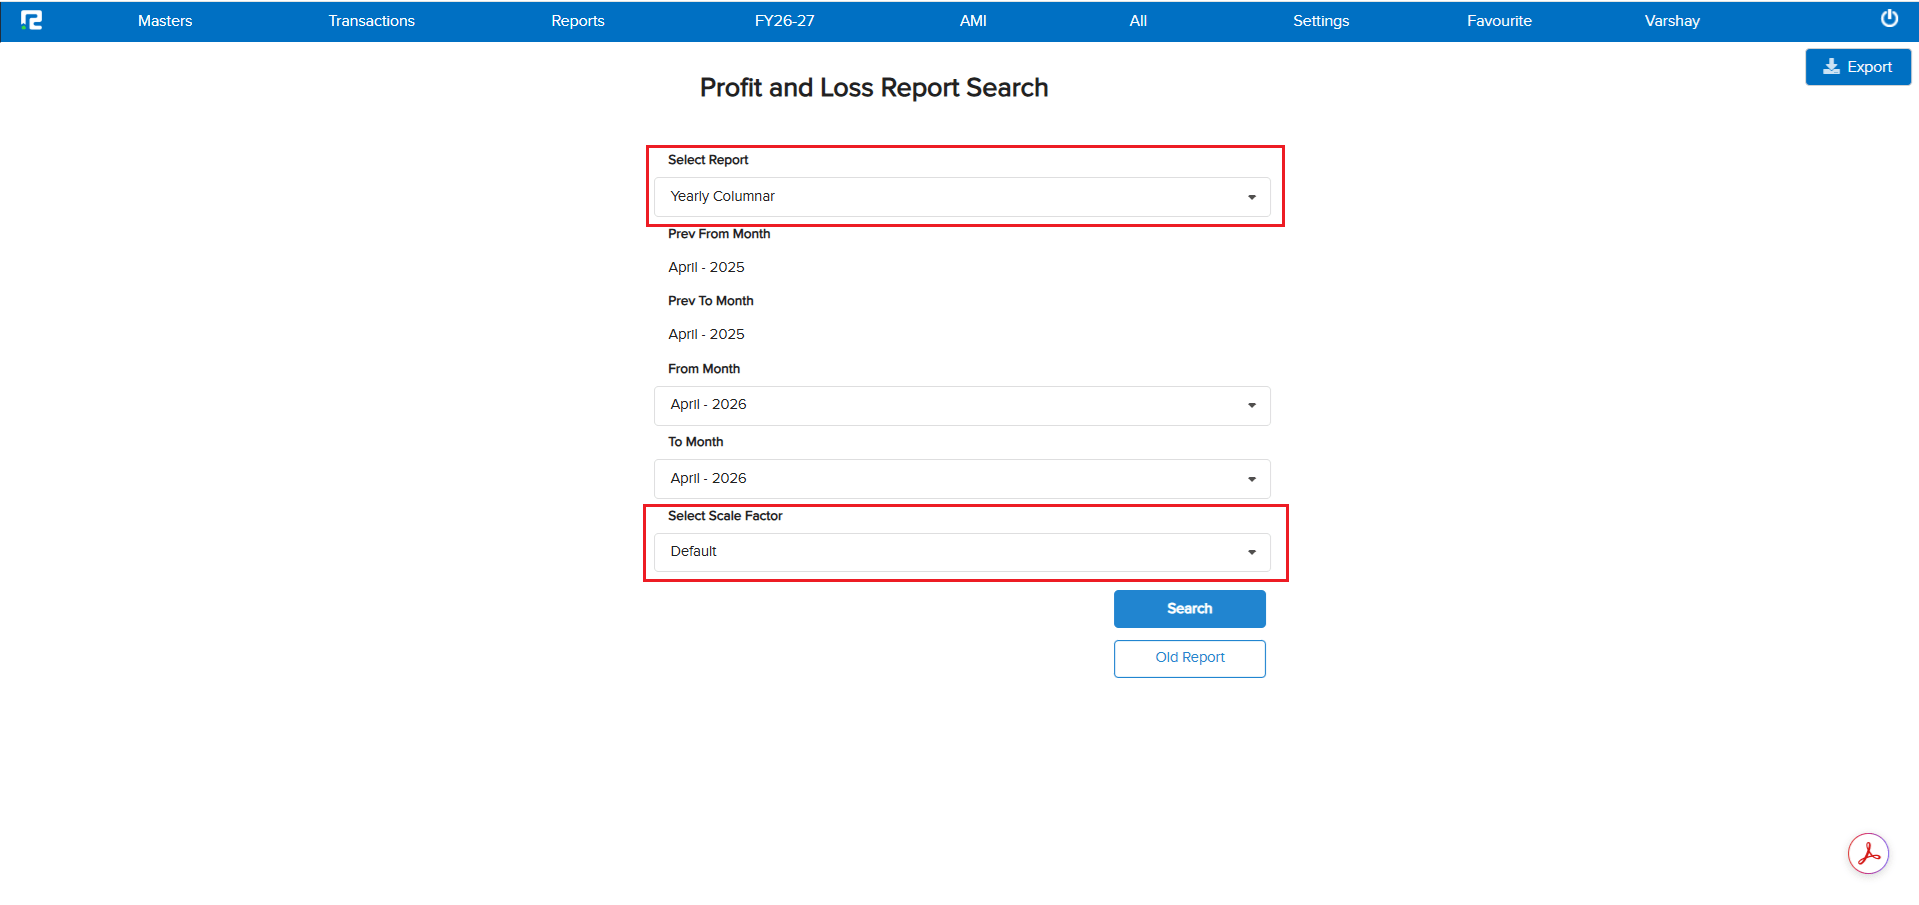
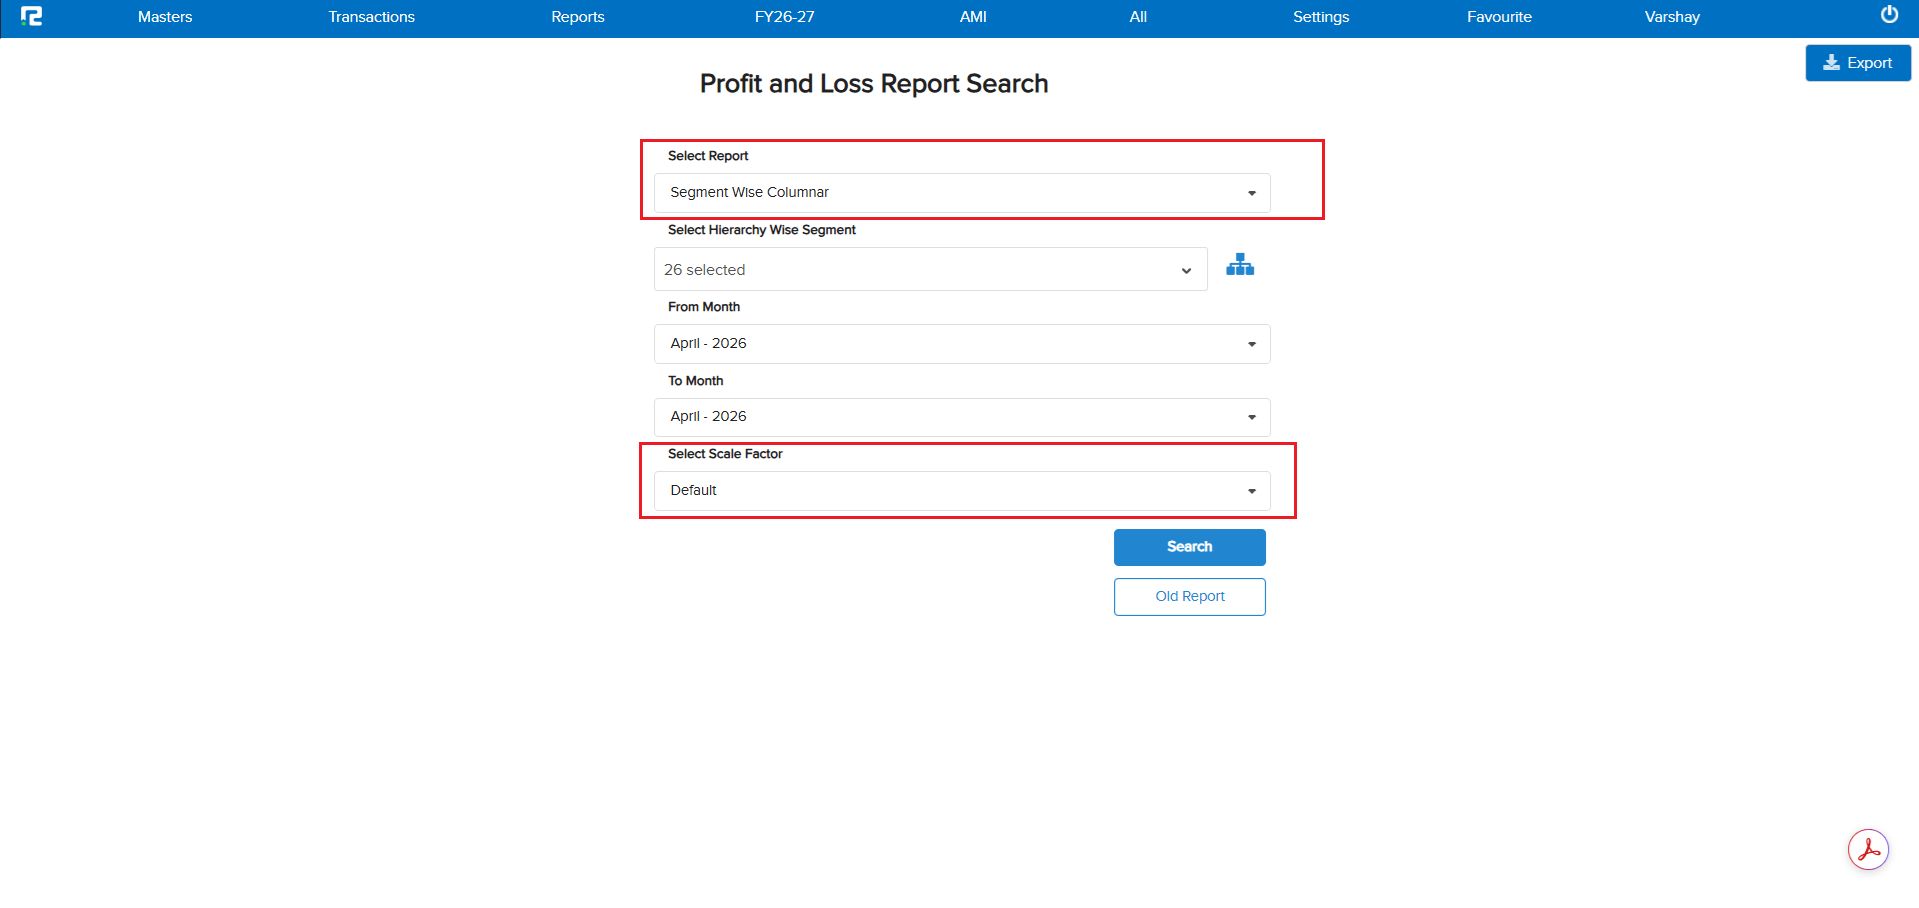
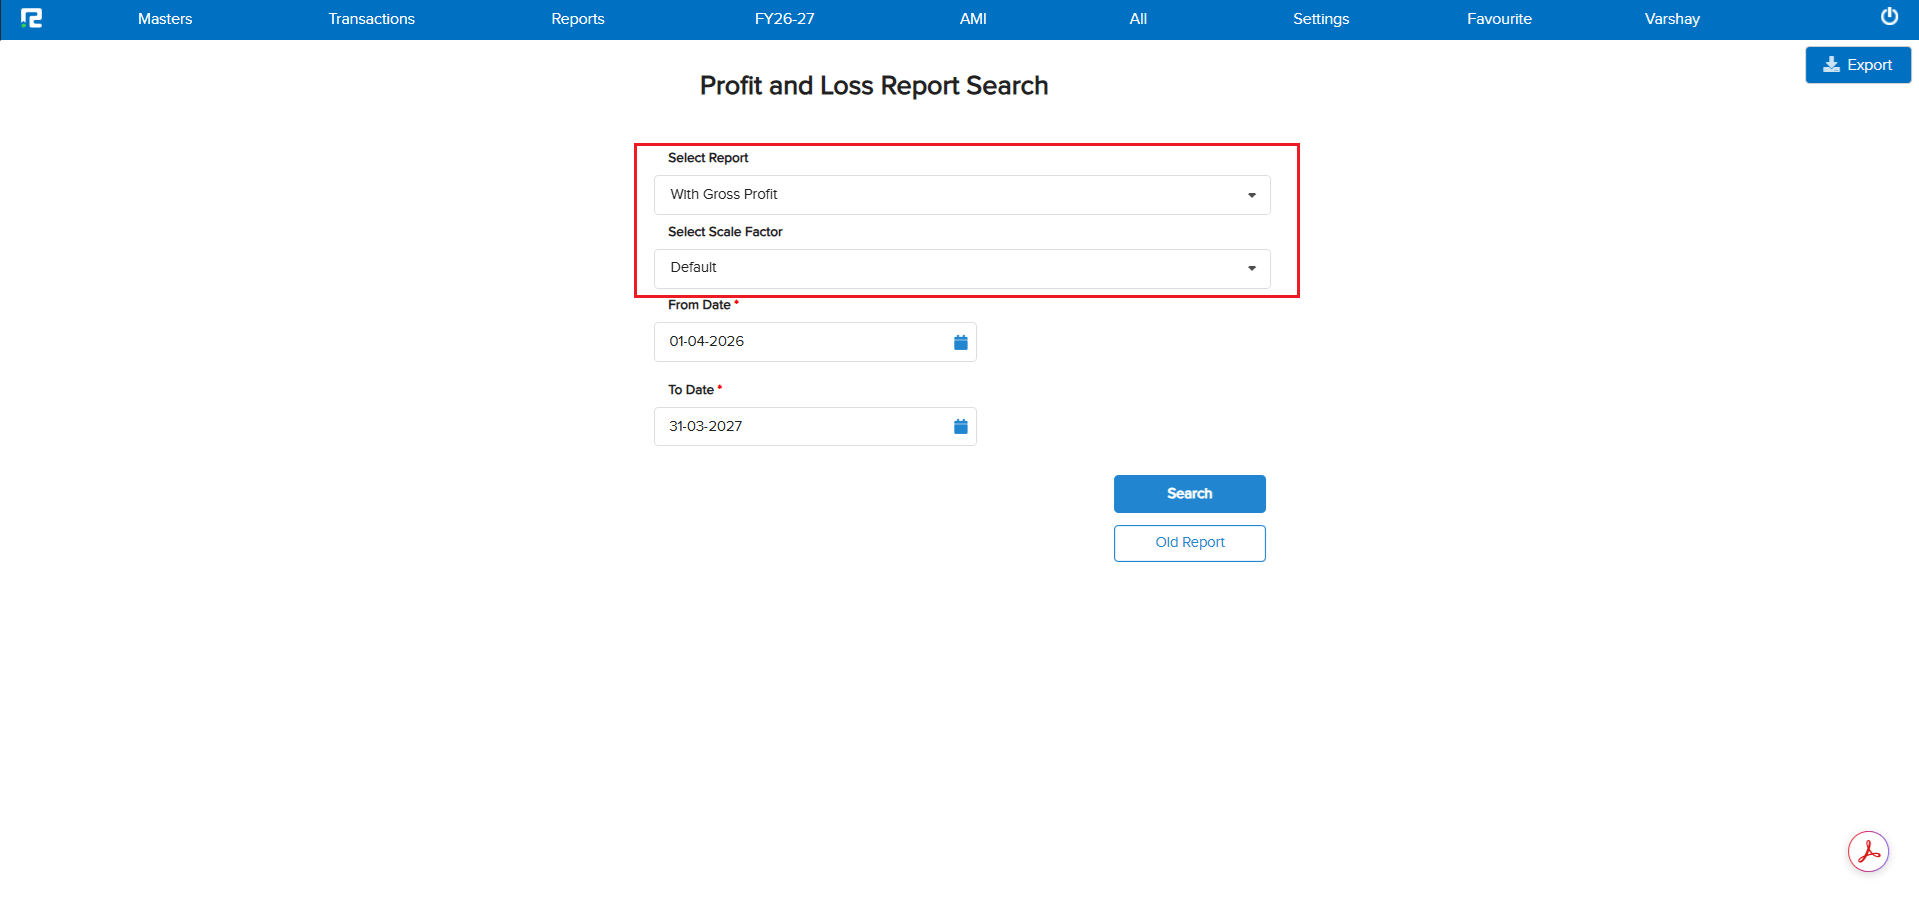
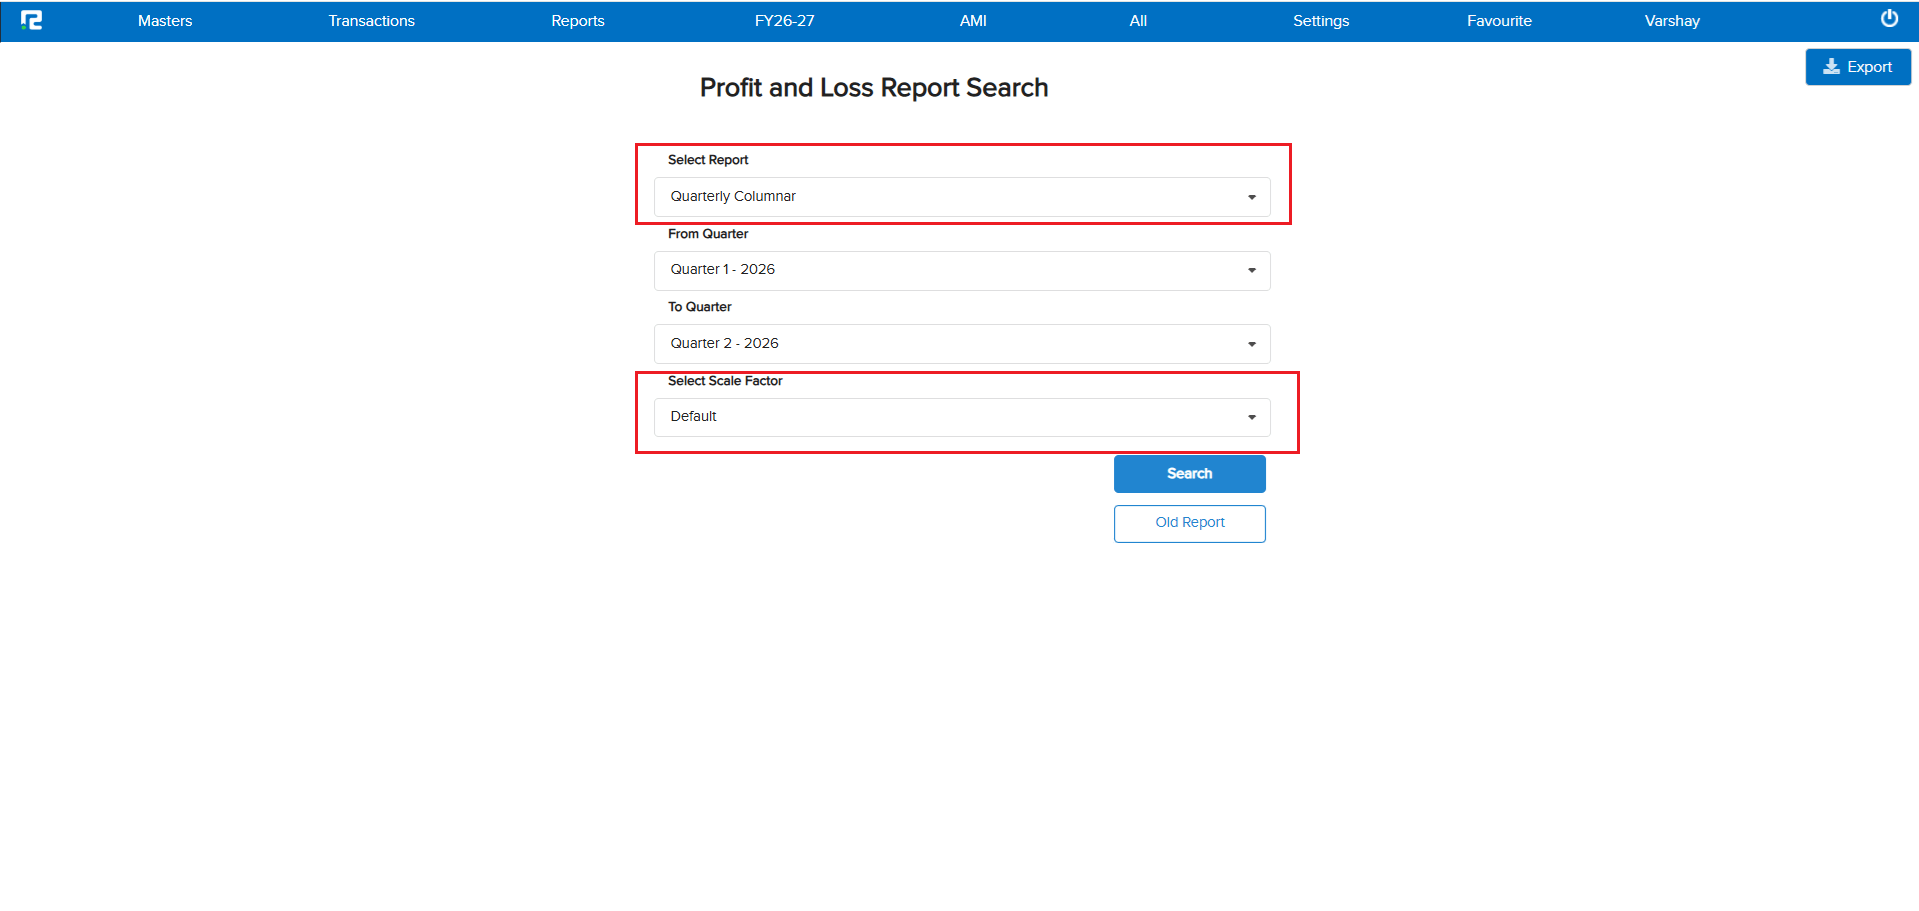
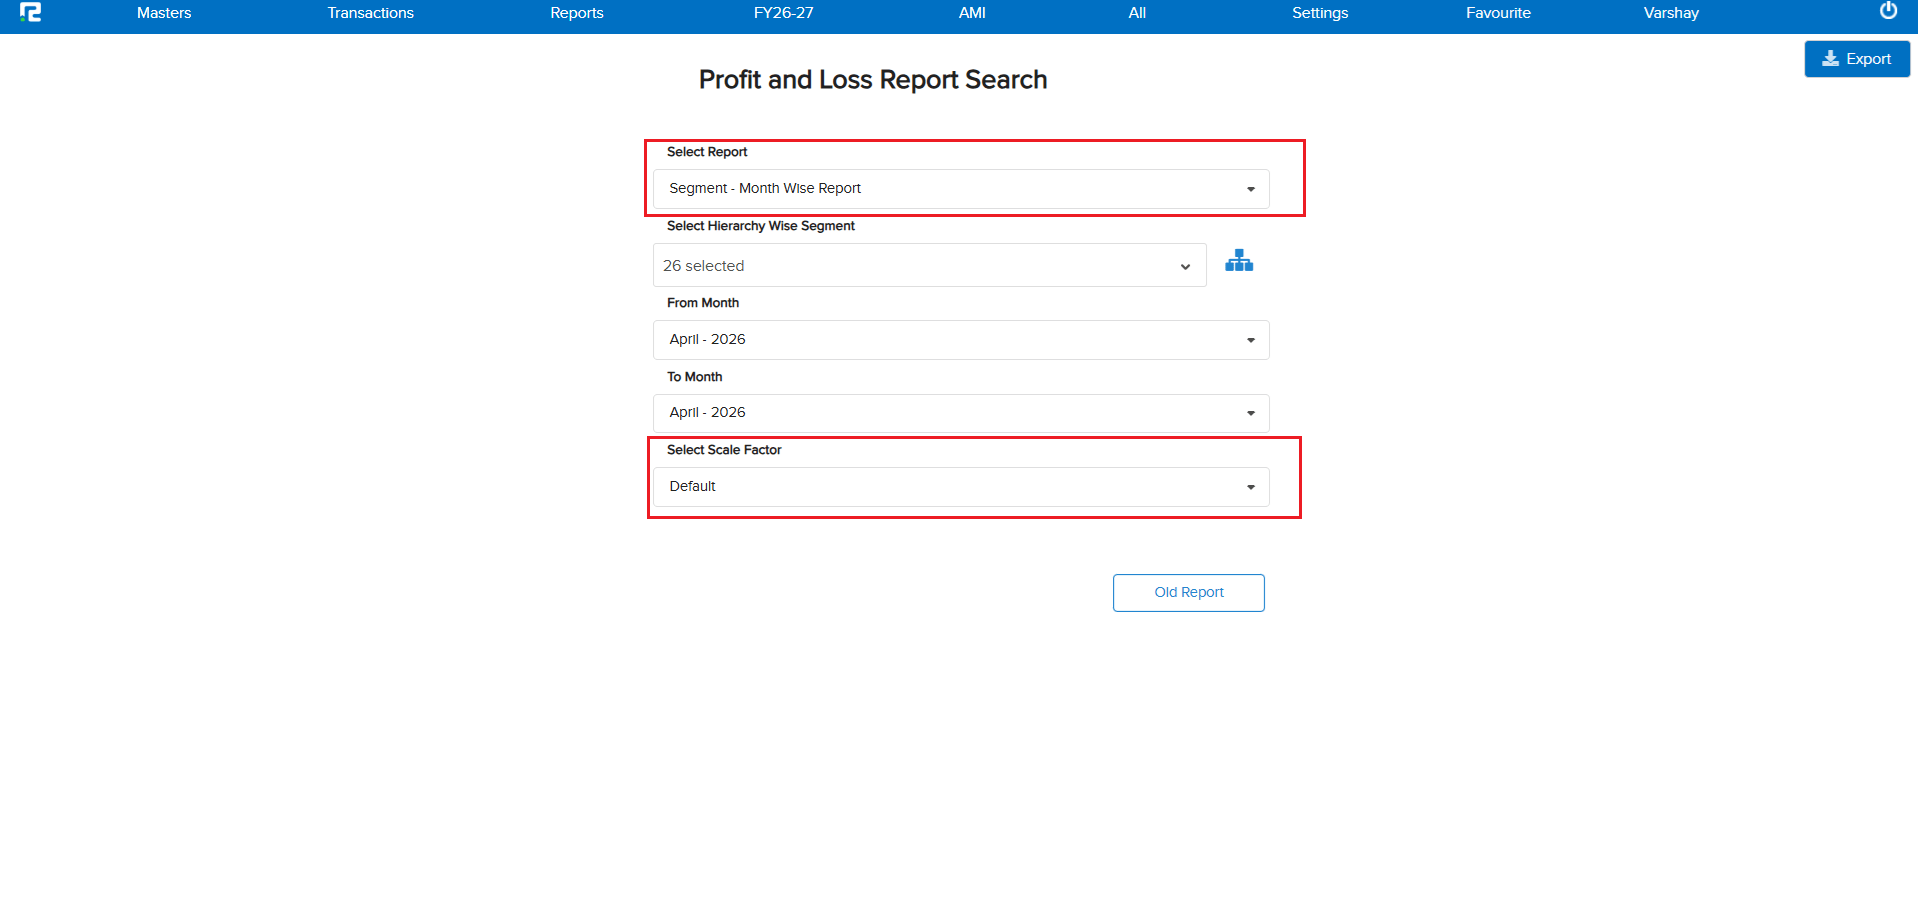
The Profit & Loss Account report variations under Management Reports did not have the Scale Factor option. Users had no way to view amounts in a summarized format (e.g., Crores, Lakhs) — making it difficult for higher management to quickly interpret large figures in these reports.
🌟 What This Means for You
A Scale Factor option has been introduced across 7 Profit & Loss report variations. You can now view amounts as per the selected scale factor — Default, Crores, Lakhs, Hundreds, Ten Lakh, Ten Thousands — making it comfortable for higher management to view and analyze P&L reports as per their requirement.
🎬 Report Variations & Navigation
Reports → Accounts → Management Reports → Profit & Loss Account
📷 See It in Action
📌 What Was Happening
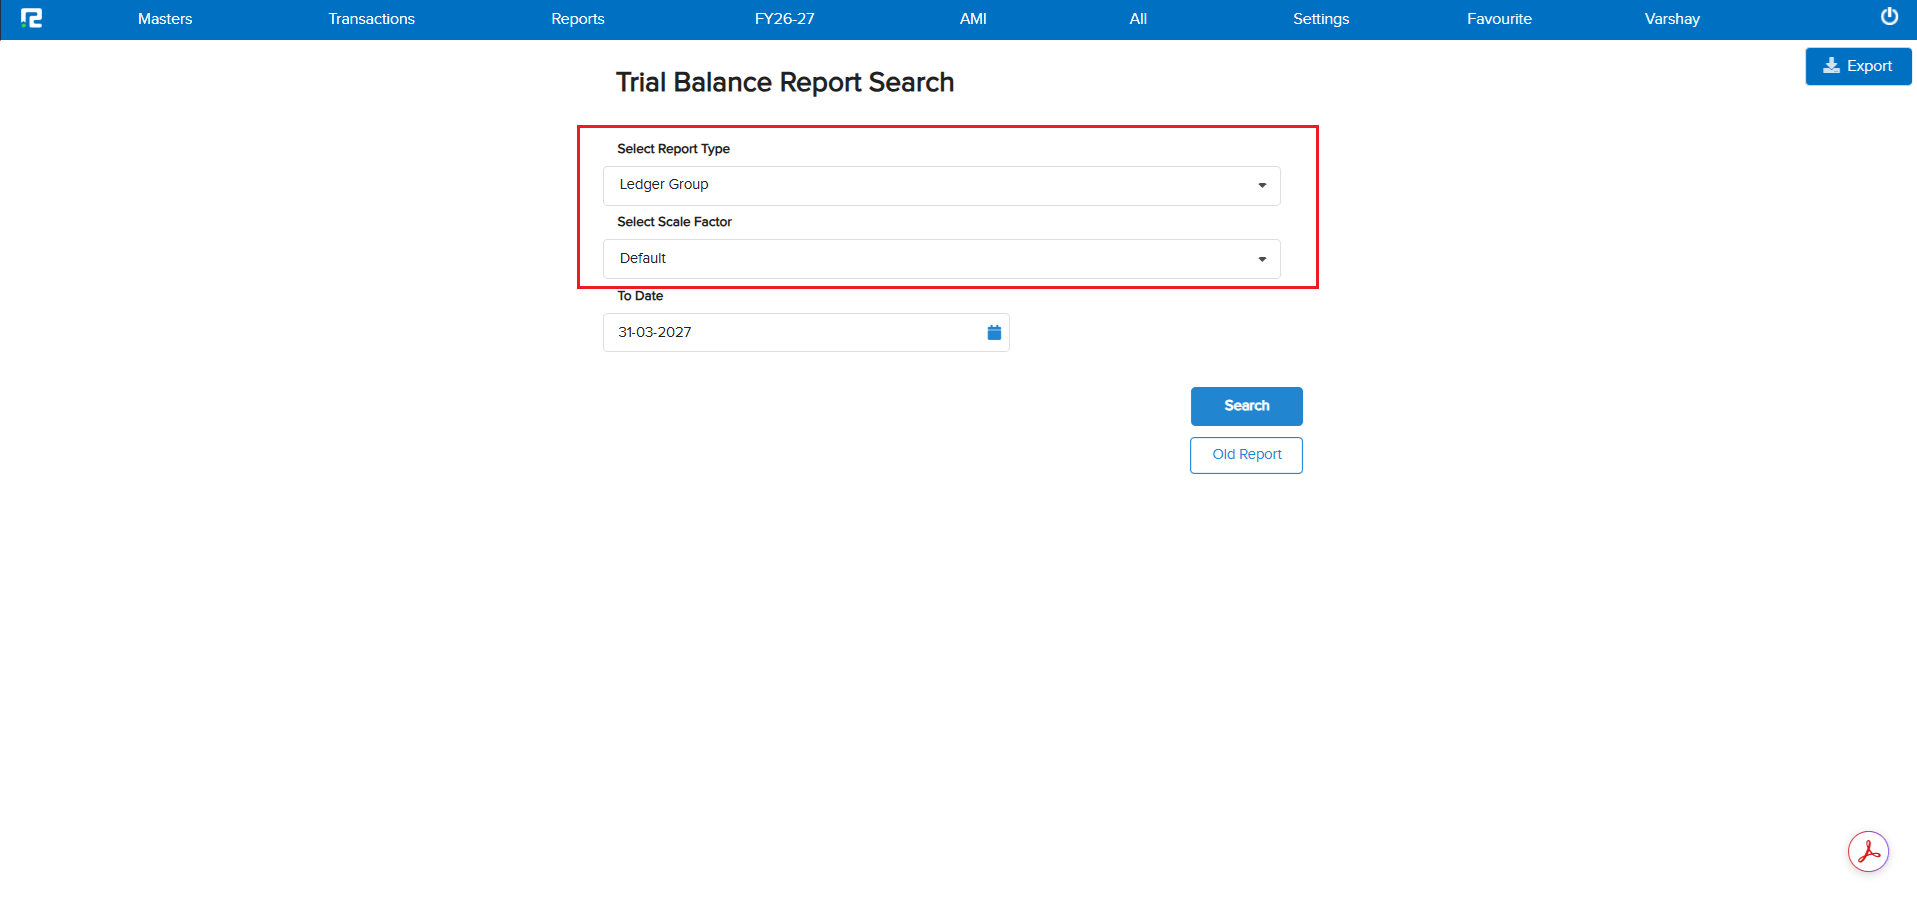
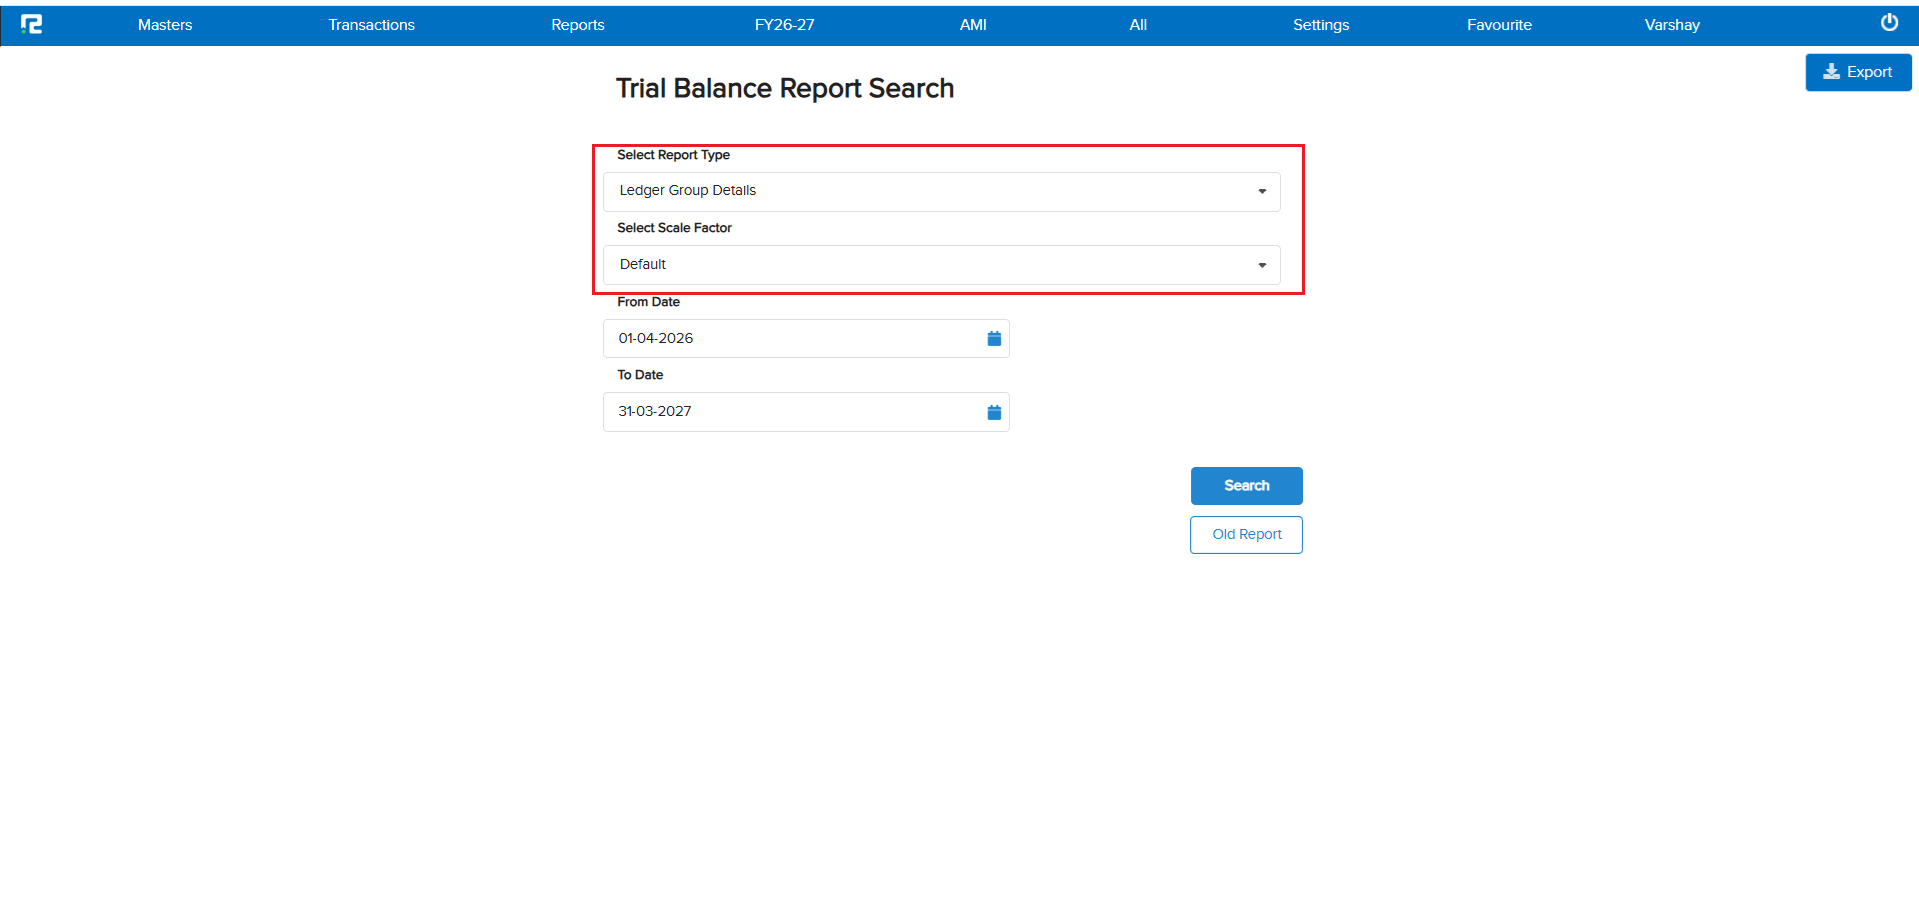
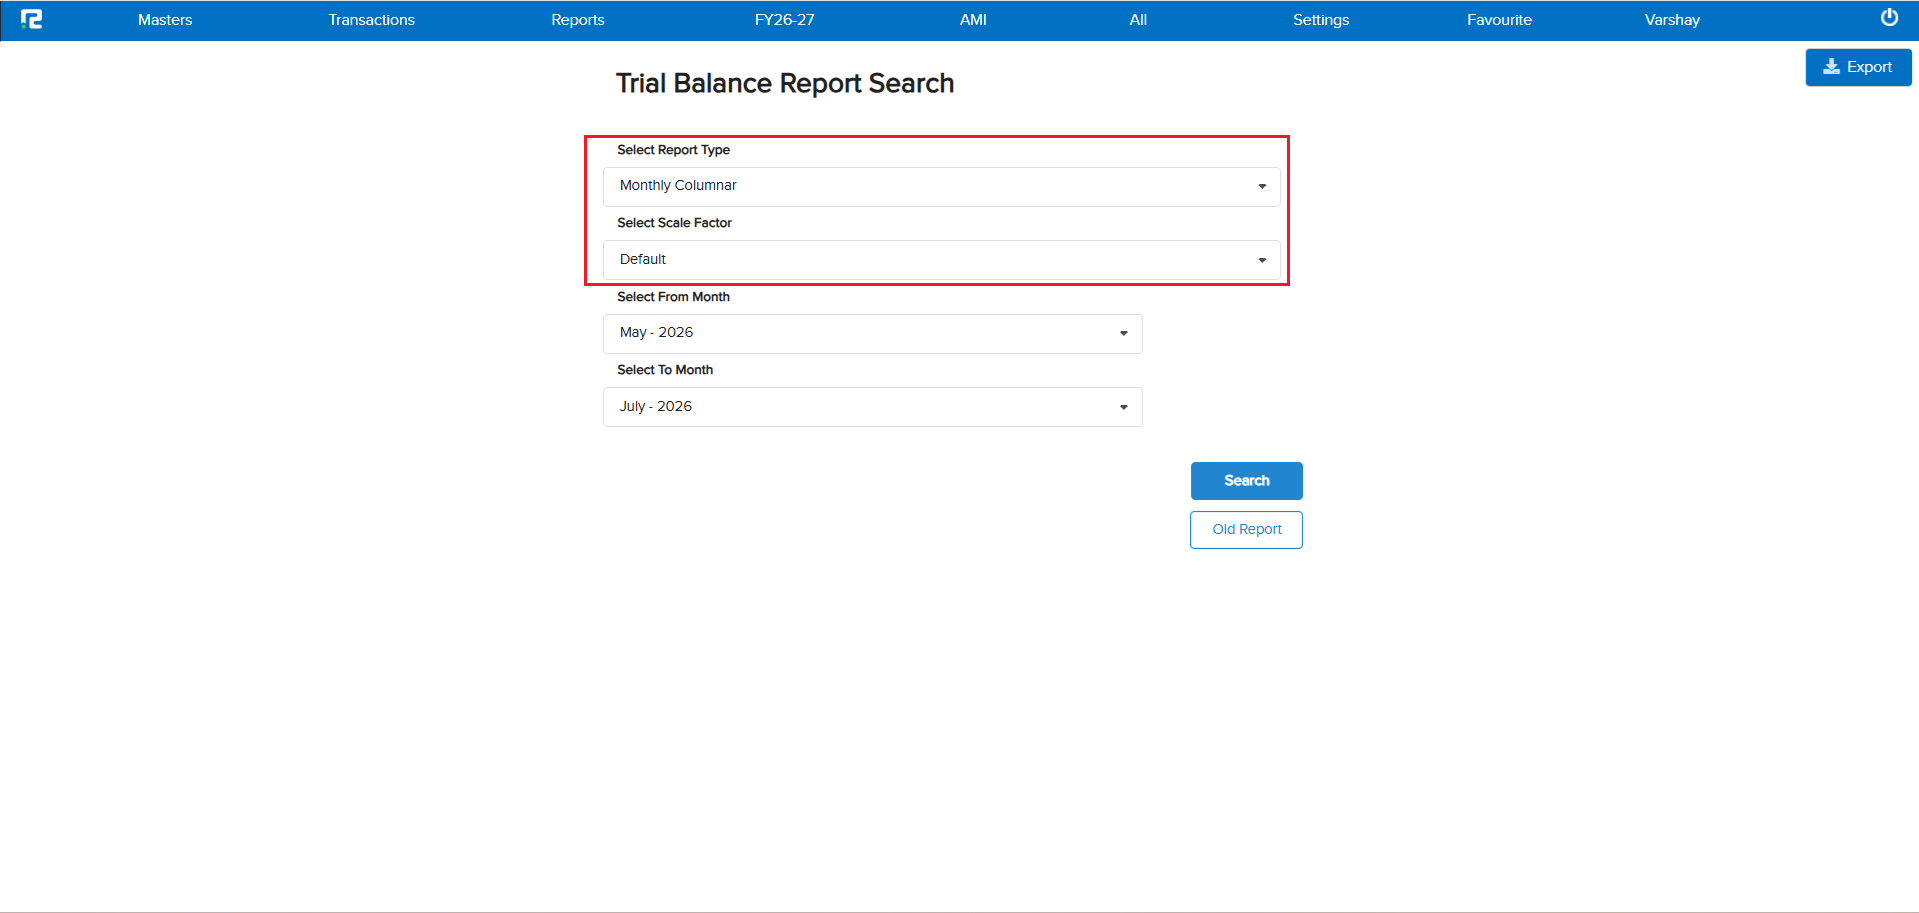
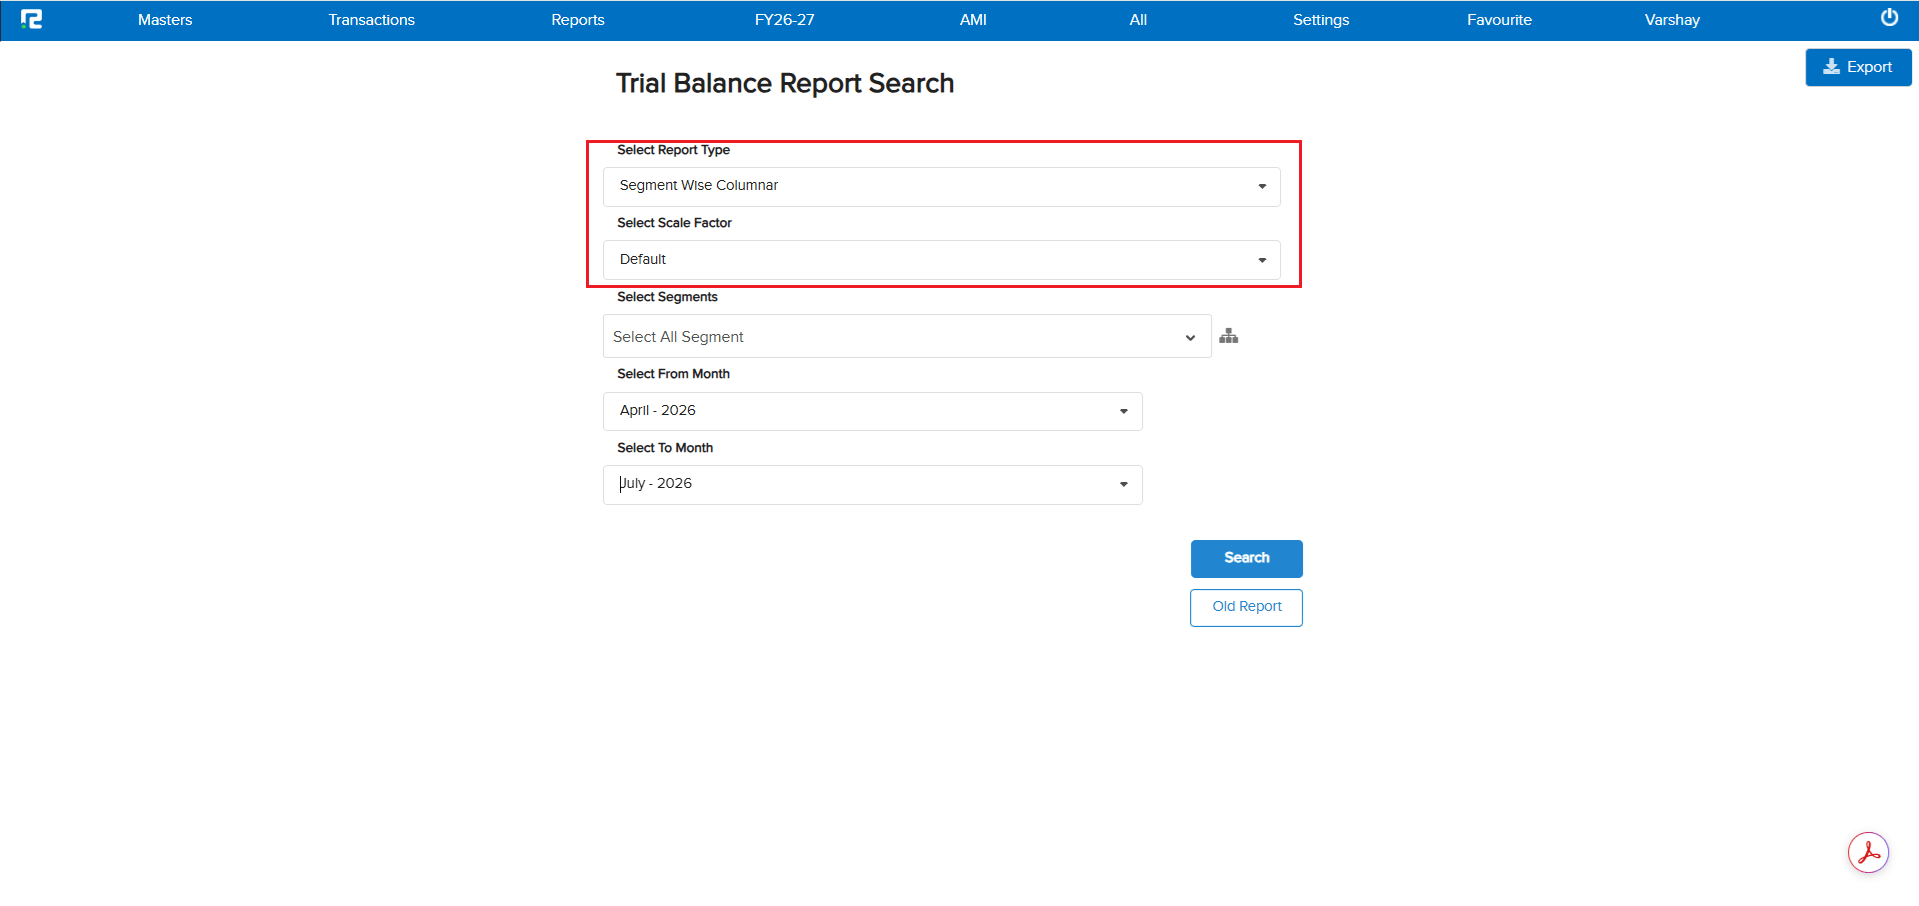
The Trial Balance report variations under Management Reports did not have the Scale Factor option. Users had no way to view amounts in a summarized format (e.g., Crores, Lakhs) — making it difficult for higher management to quickly interpret large figures in these reports.
🌟 What This Means for You
A Scale Factor option has been introduced across 4 Trial Balance report variations. You can now view amounts as per the selected scale factor — Default, Crores, Lakhs, Hundreds, Ten Lakh, Ten Thousands — making it comfortable for higher management to view and analyze Trial Balance reports as per their requirement.
🎬 Report Variations & Navigation
Reports → Accounts → Management Reports → Trial Balance
📷 See It in Action
📌 What Was Happening
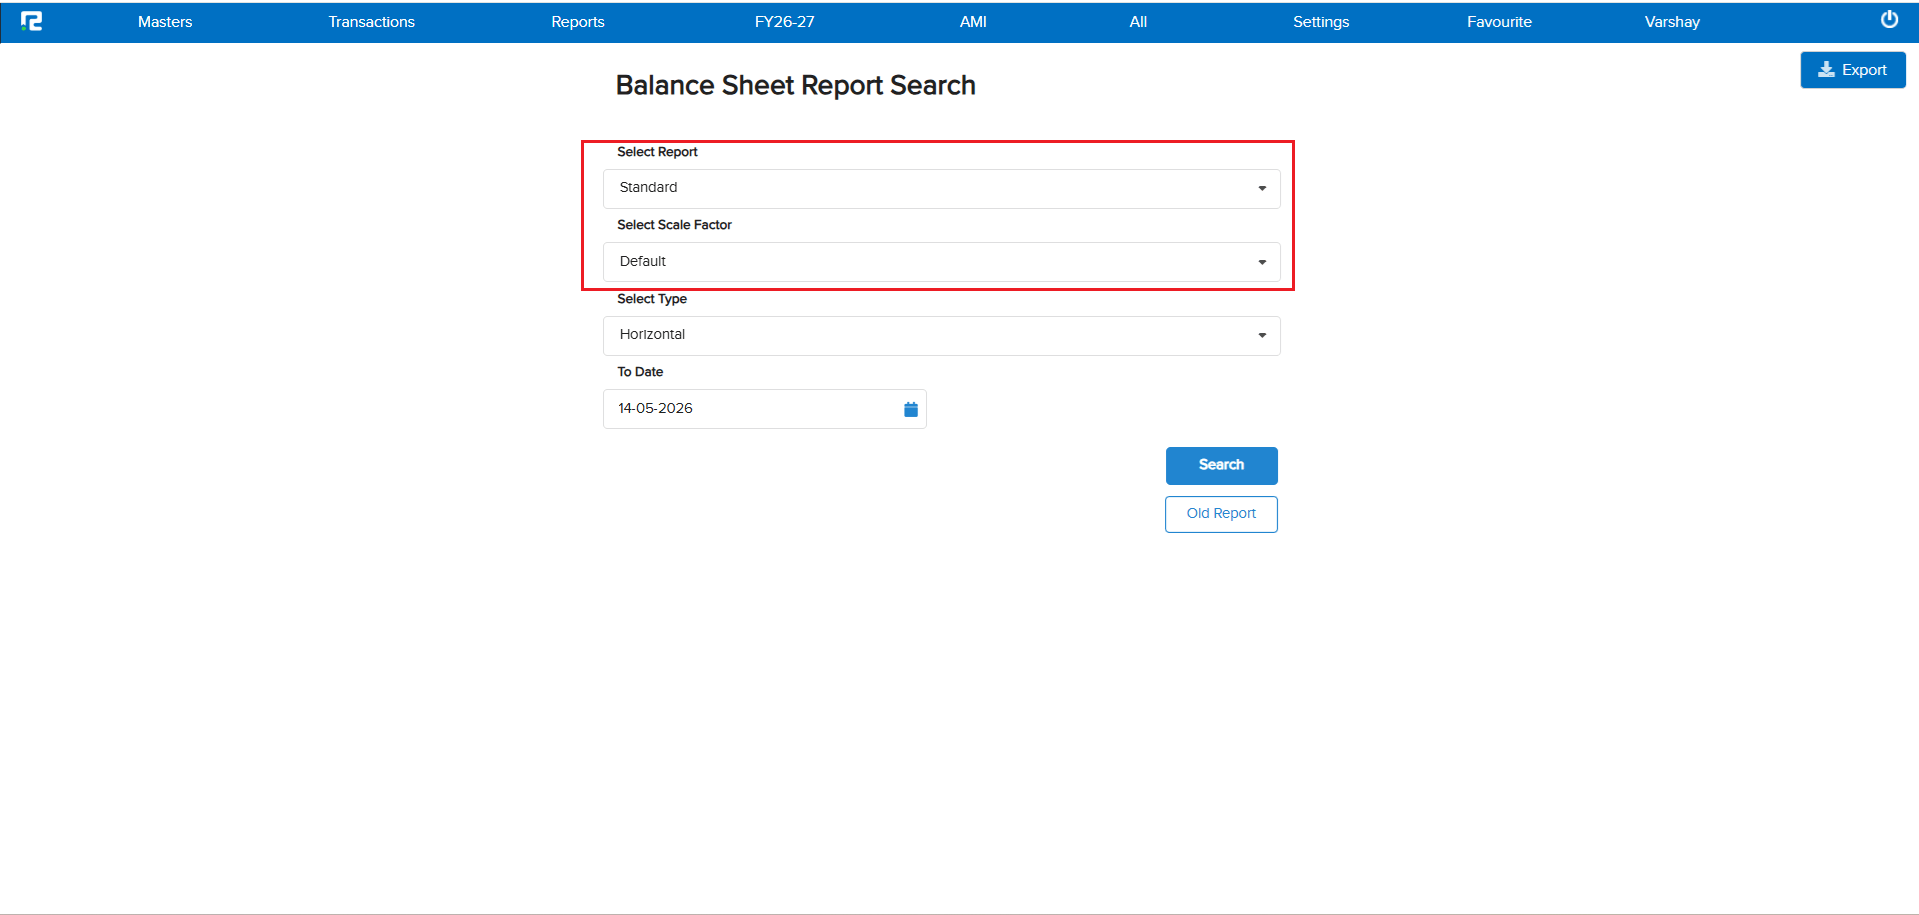
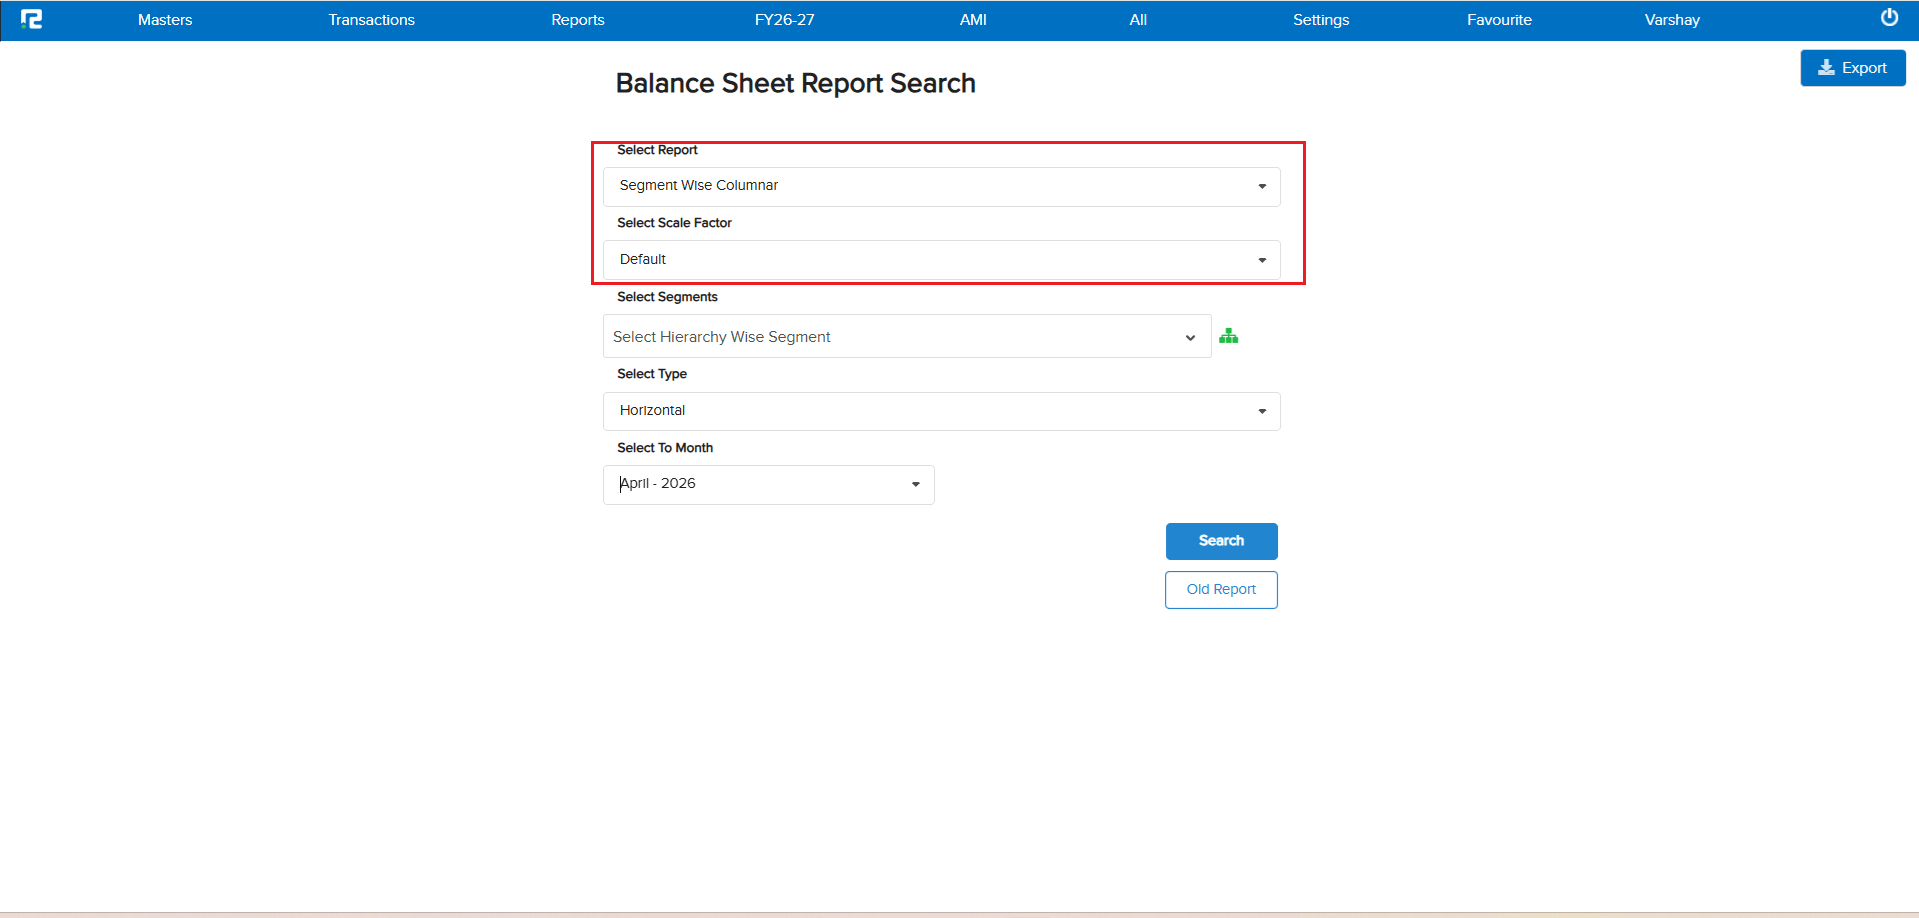
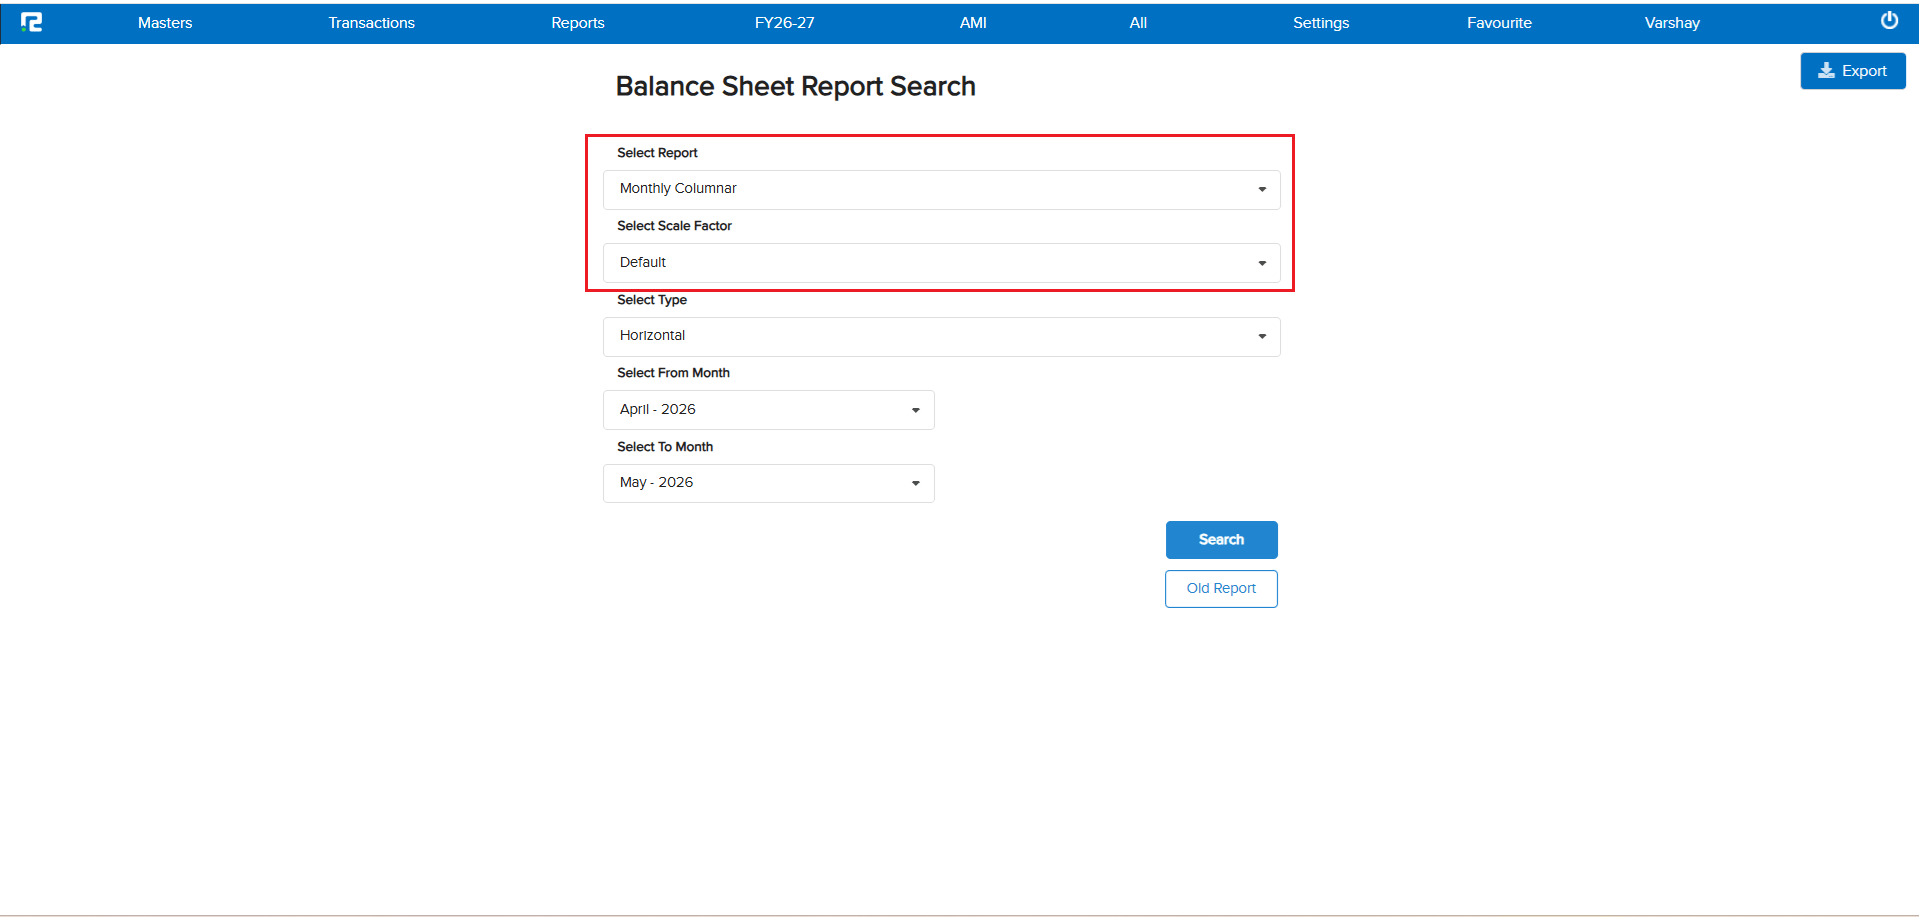
The Balance Sheet report variations under Management Reports did not have the Scale Factor option. Users had no way to view amounts in a summarized format (e.g., Crores, Lakhs) — making it difficult for higher management to quickly interpret large figures in these reports.
🌟 What This Means for You
A Scale Factor option has been introduced across 3 Balance Sheet report variations. You can now view amounts as per the selected scale factor — Default, Crores, Lakhs, Hundreds, Ten Lakh, Ten Thousands — making it comfortable for higher management to view and analyze Balance Sheet reports as per their requirement.
🎬 Report Variations & Navigation
Reports → Accounts → Management Reports → Balance Sheet
📷 See It in Action
📌 What Was Happening
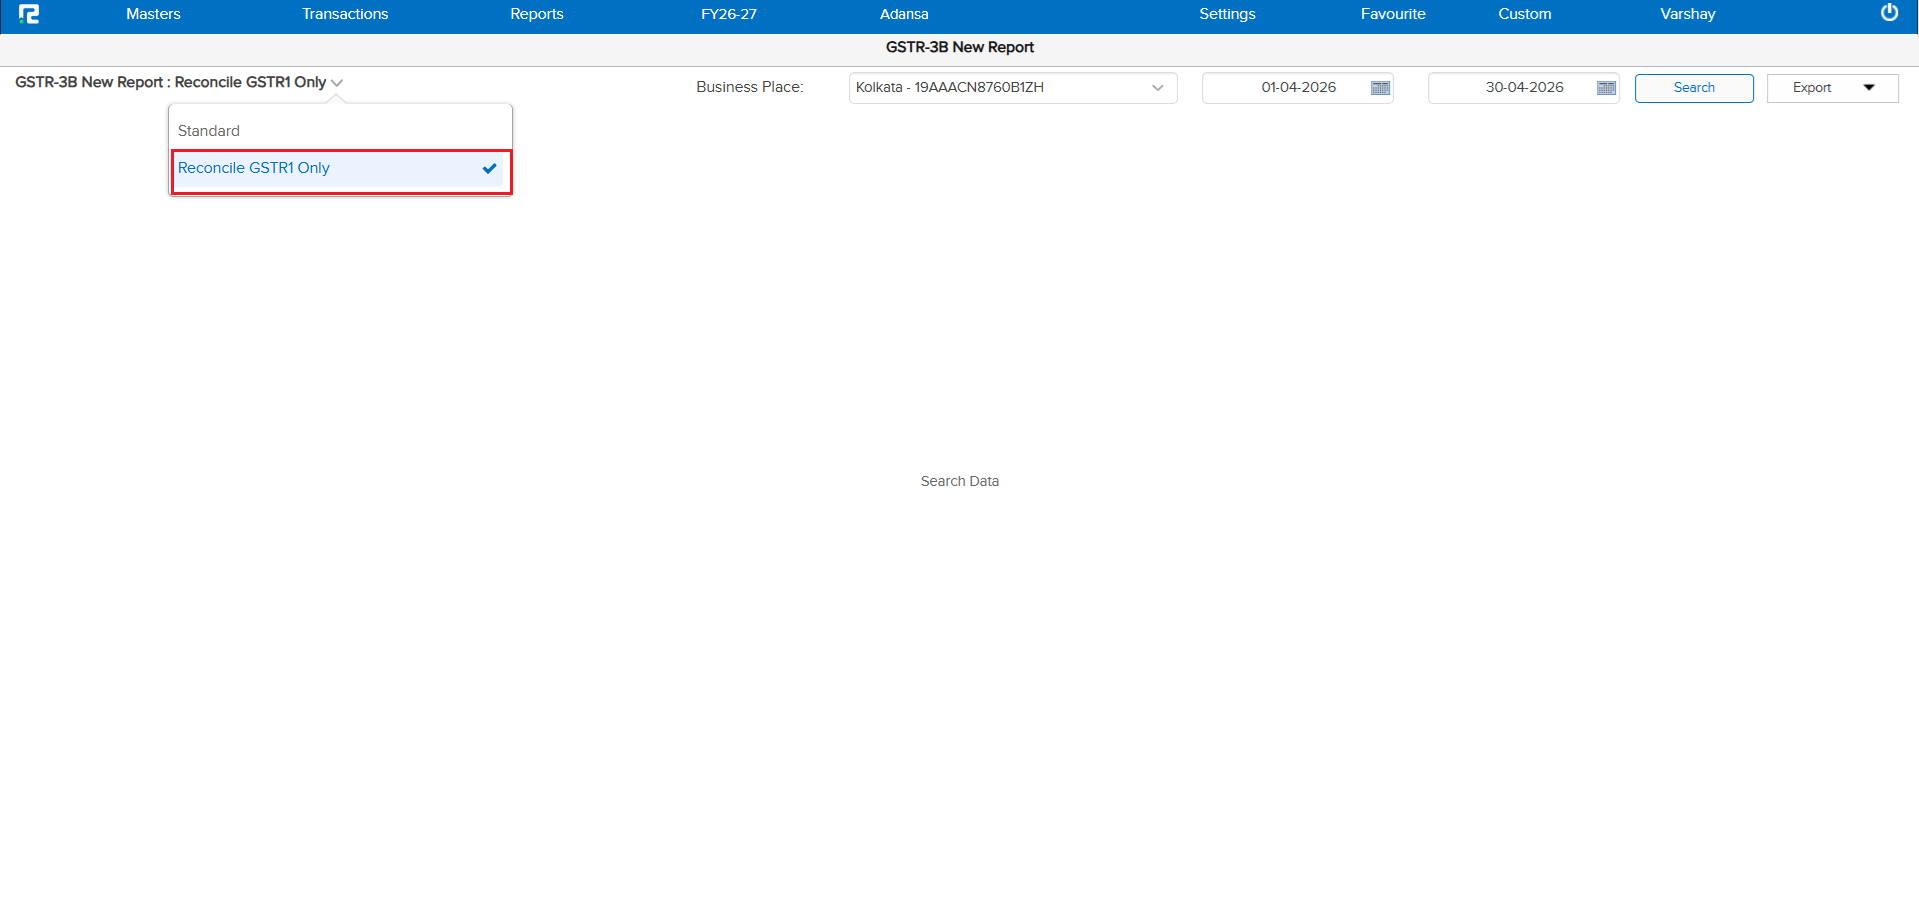
GSTR-3B displays the consolidated data of GSTR-1 & GSTR-2B, and depending on the volume of data, it takes considerable time to load and export. At the time of GSTR-1 filing, clients needed to reconcile GSTR-1 data with GSTR-3B side by side — but doing so caused slowness in GSTR-3B due to the combined data load, making the reconciliation process frustrating and time-consuming.
🌟 What This Means for You
A new dropdown option has been introduced in GSTR-3B that allows you to view only your GSTR-1 related data within GSTR-3B. This enables fast, side-by-side reconciliation of GSTR-1 data with GSTR-3B — without the slowness caused by loading the full consolidated data. Reconciliation during GSTR-1 filing is now significantly faster and smoother.
🎬 Where to Find It
📷 See It in Action
📌 What Was Happening
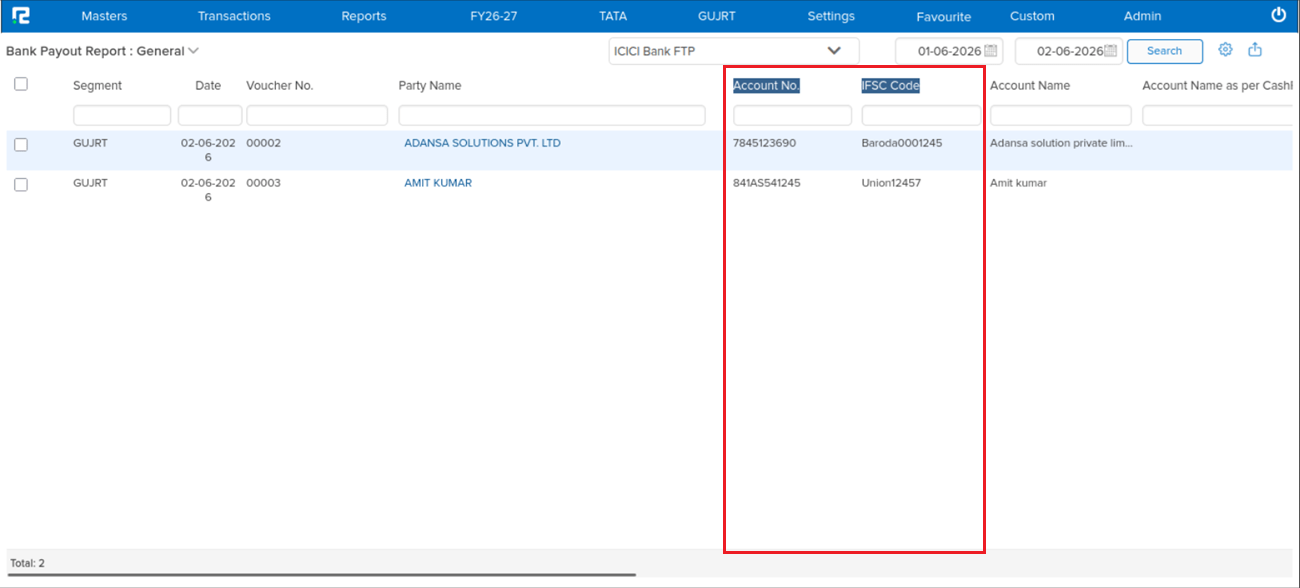
During the Bank Pay Review process, the reviewer could see the party name and account name but had no visibility of the Bank Account Number or IFSC Code from the party’s ledger master. This made it difficult to verify payment details before approving, requiring the reviewer to cross-check the master separately.
🌟 What This Means for You
Two new columns have been added to the Bank Pay Review screen, positioned between the Party Name and Account Name columns:
• Bank Account No — fetched from the party’s ledger master
• IFSC Code — fetched from the party’s ledger master
Reviewers can now verify bank details inline before approving payments — eliminating the need to navigate away to the ledger master for cross-checking.
🎬 Where to Find It
📷 See It in Action
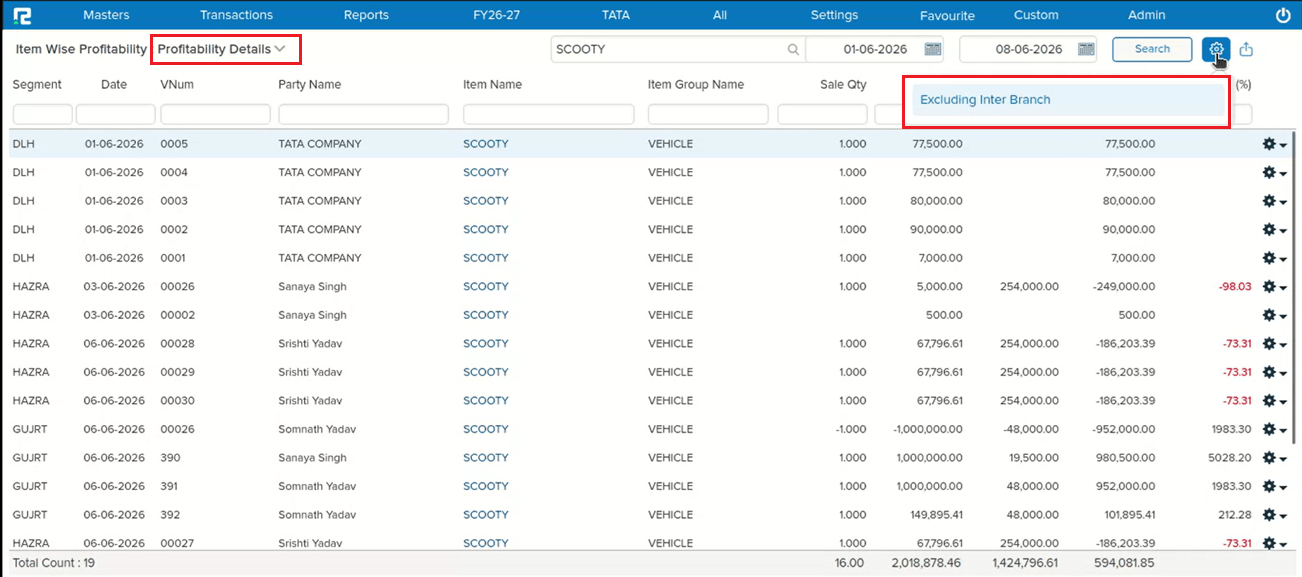
📌 What Was Happening
In the Item-wise Profitability → Profitability Details report, there was no option to exclude inter-branch transactions from the results. The “Exclude Inter-Branch” filter was already available in the Batch-wise Profitability Details report, but users viewing the item-wise breakdown had no equivalent control — meaning inter-branch transfers were always included, which could skew profitability figures for companies operating across multiple branches.
🌟 What This Means for You
The “Exclude Inter-Branch” option is now available in the Item-wise Profitability → Profitability Details report options, bringing it in line with the Batch-wise Profitability Details report. You can now filter out inter-branch transactions when analysing item-level profitability — giving a cleaner, more accurate picture of actual sales and margins without inter-branch noise.
🎬 Where to Find It
📷 See It in Action
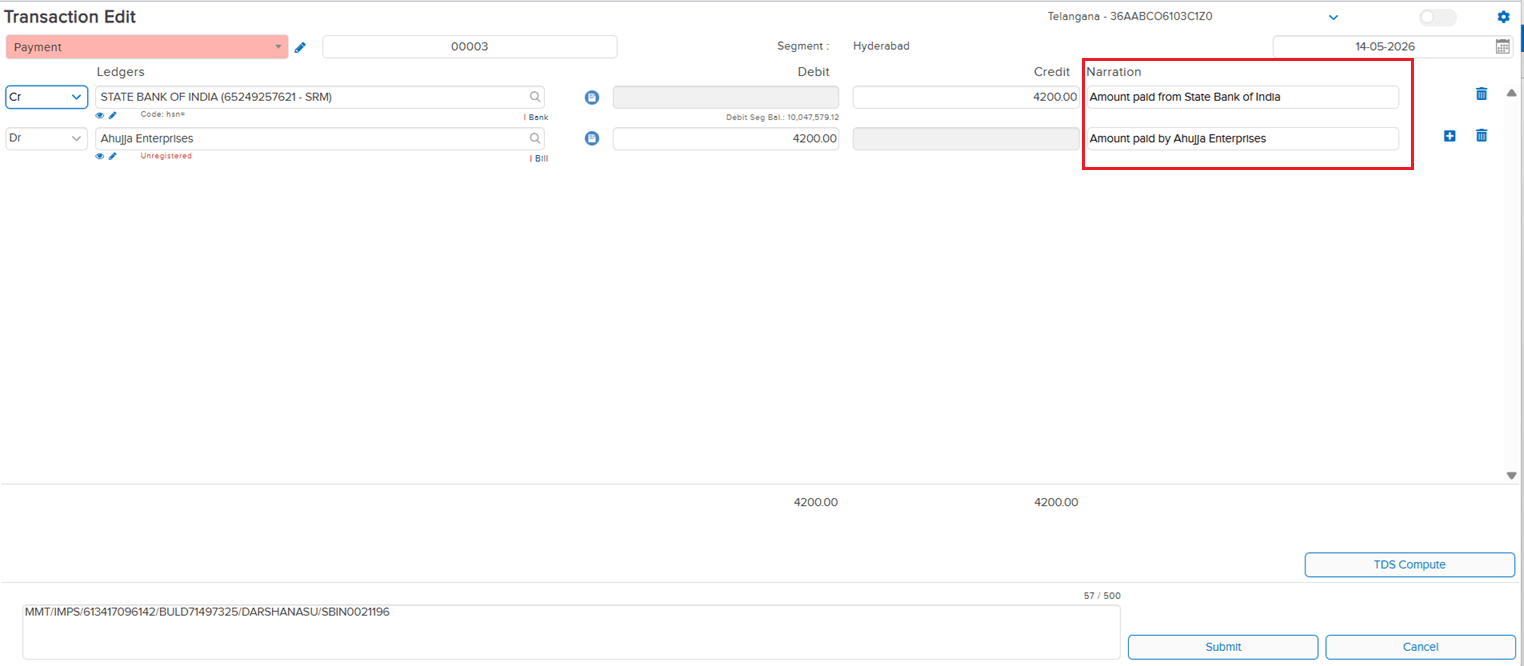
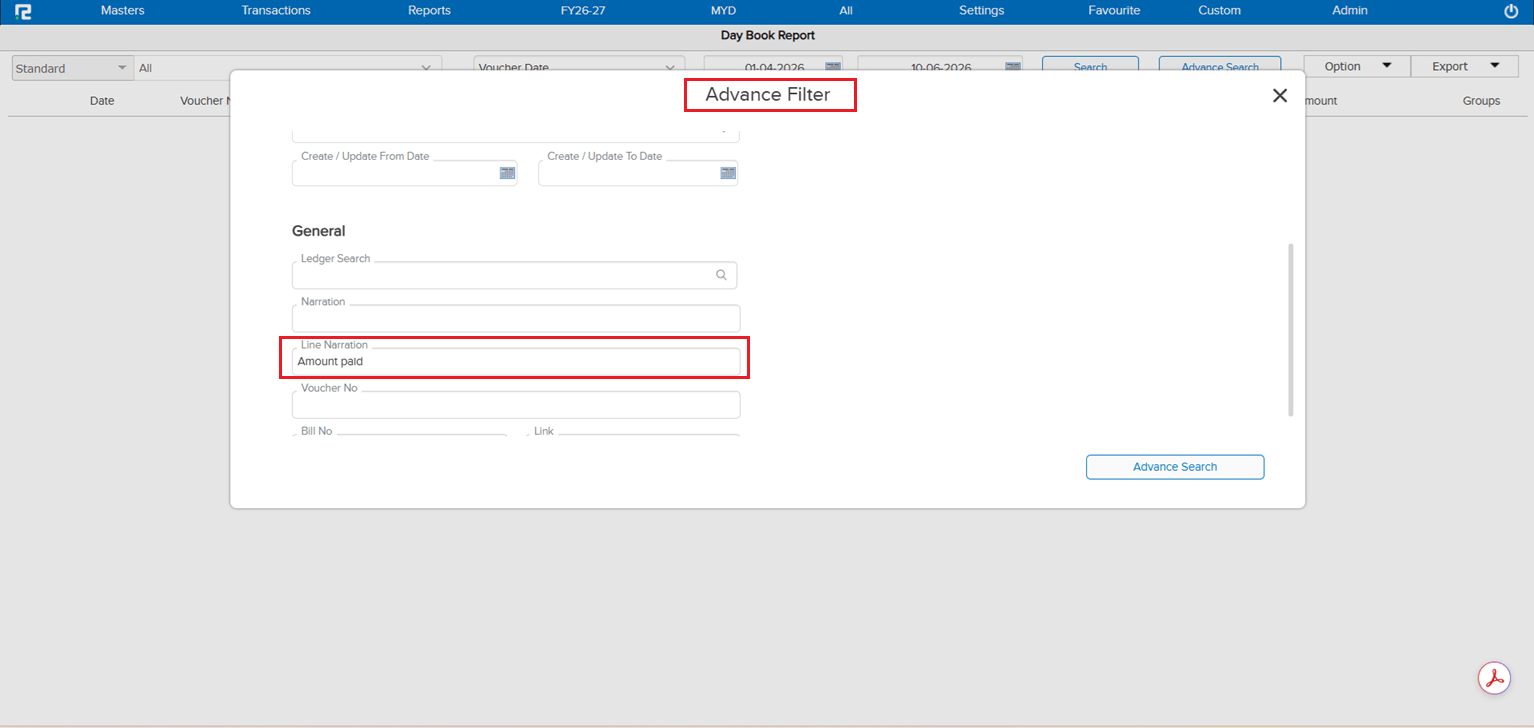
📌 What Was Happening
In the Daybook Advance Search, users could search by various fields but there was no option to search by Line Narration. When entries had narration recorded at the line level, there was no way to locate them using that narration text through the advance search — making it difficult to trace specific transactions where only the line narration was known.
🌟 What This Means for You
A Line Narration search option has been added to the Daybook Advance Search. You can now search daybook entries by line-level narration text — making it faster and easier to locate specific transactions when only the line narration is available as a reference.
🎬 Where to Find It
📷 See It in Action
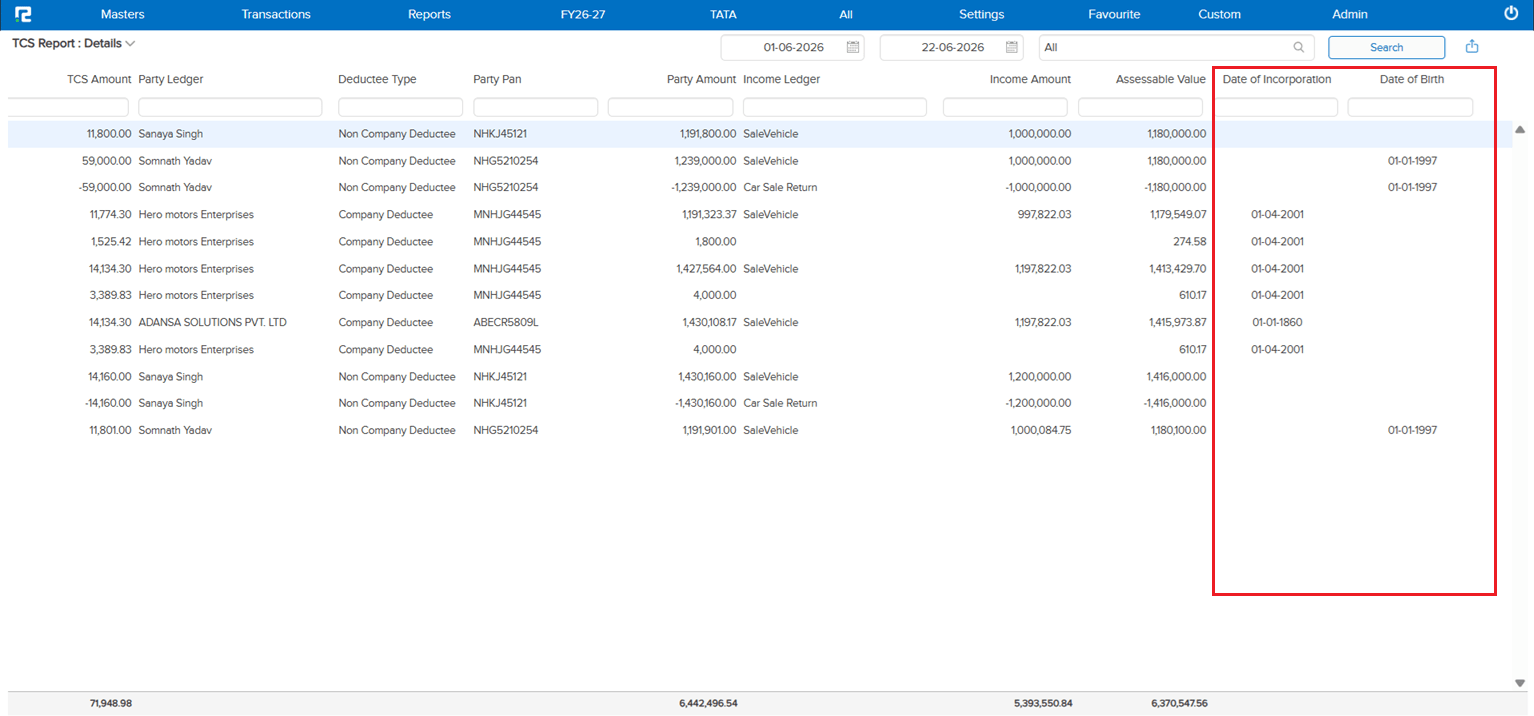
📌 What Was Happening
The new Date of Incorporation and Date of Birth fields being added to the Ledger Master → Party Information (see E1 / JOB-163337) were not being pulled into the TCS Report → Details. Without these party-level statutory dates in the TCS Details output, users had to cross-reference the ledger master separately when validating or filing TCS data.
🌟 What This Means for You
The Date of Incorporation and Date of Birth captured in the Ledger Master will now be fetched into the TCS Report → Details:
• Visible on the UI alongside the existing TCS detail columns
• Exportable via Excel so the dates flow through to downloaded reports as well
This keeps all party-level statutory information together in the TCS output — no extra lookup against the ledger master needed during validation or filing.
🎬 Where to Find It
📷 See It in Action
📌 What Was Happening
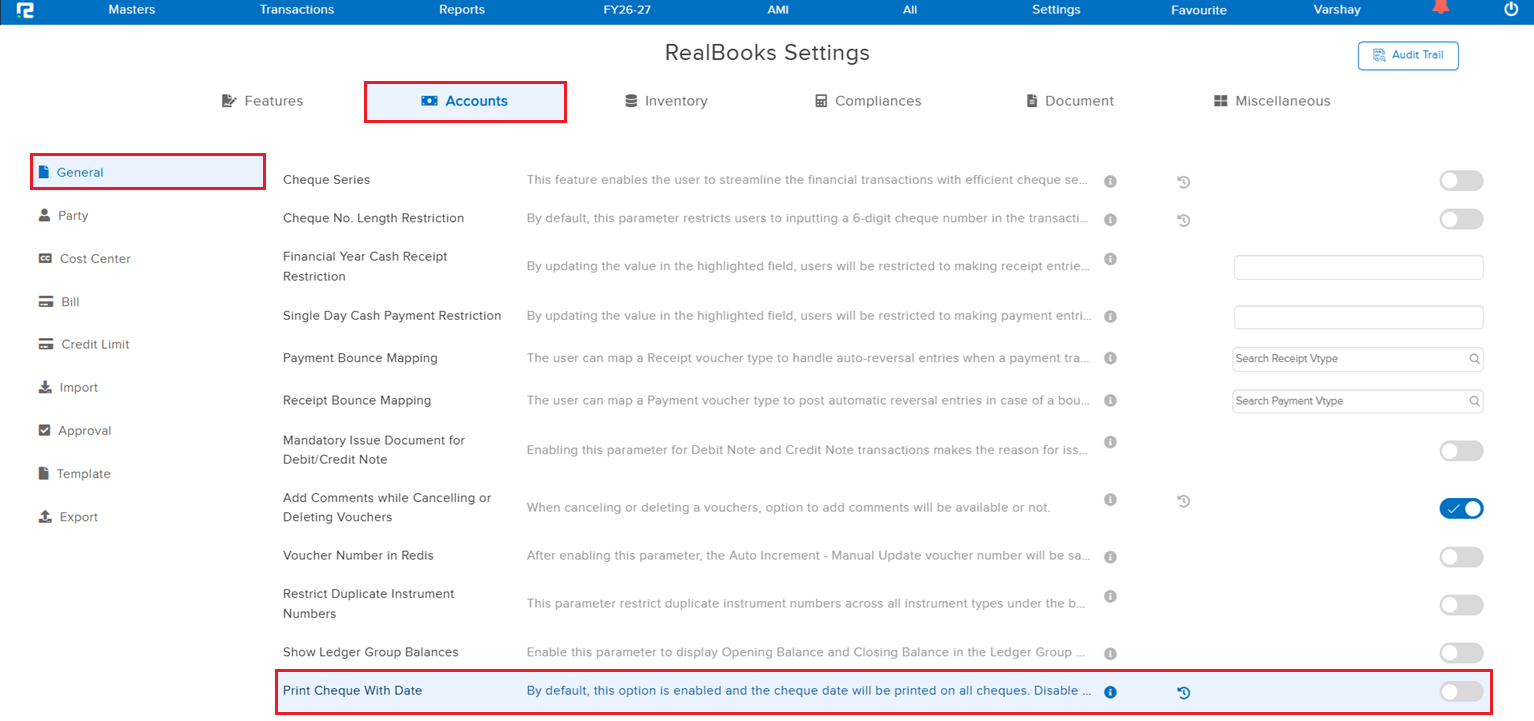
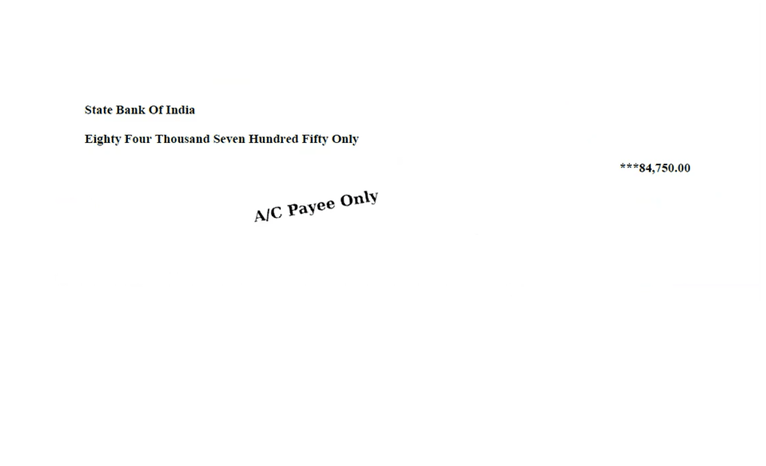
The Cheque Print option always printed the cheque date on the output — there was no way to print a cheque without the date. Users who needed to issue undated cheques (post-dated handover, manual date filling, etc.) had no setting to suppress the date from the printed cheque.
🌟 What This Means for You
A new parametric setting has been introduced to control whether the date prints on the cheque:
• Enabled (default): the cheque date is printed, matching the existing behaviour
• Disabled: the cheque date is suppressed and the cheque is printed without a date
Existing setups continue to work exactly as before with no change — the new option only kicks in when explicitly disabled.
🎬 Where to Find It
📷 See It in Action
📌 What Was Happening
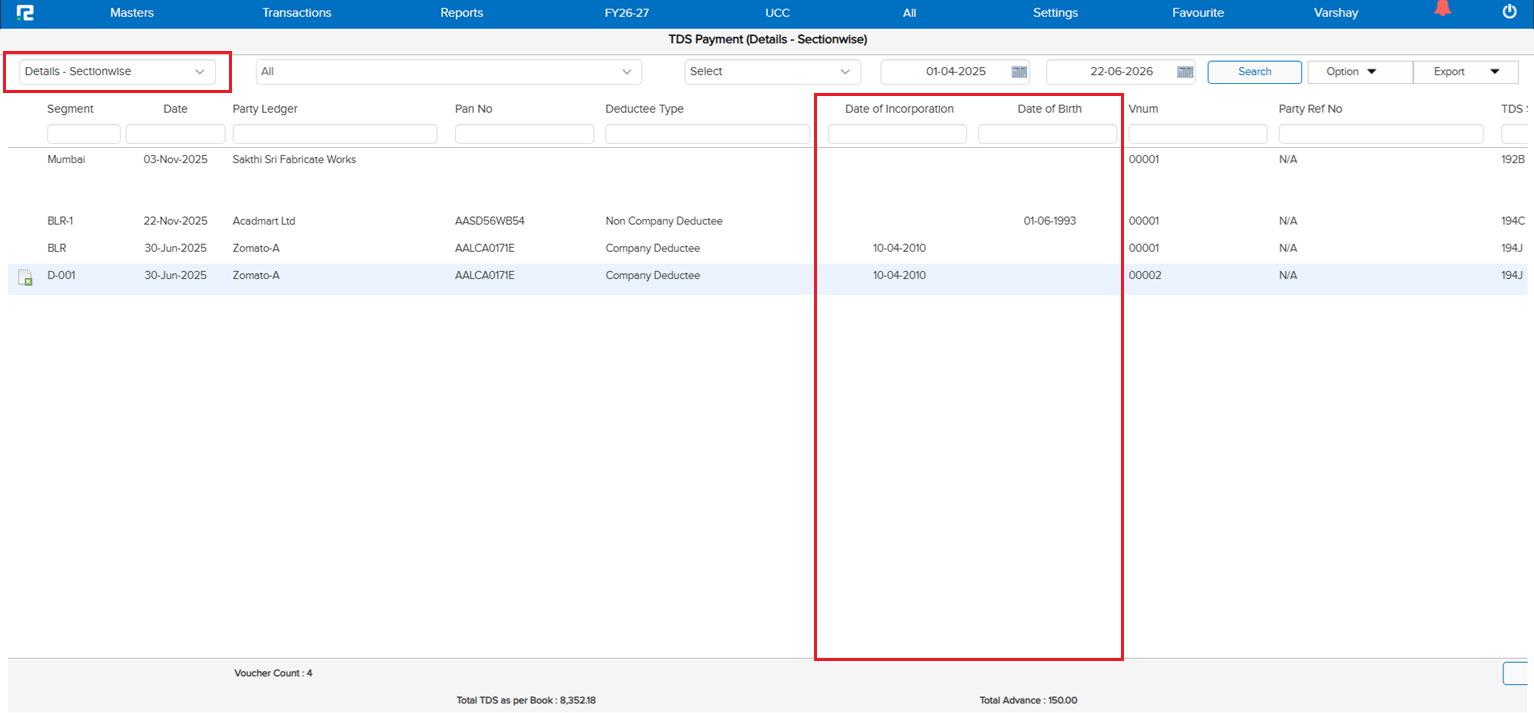
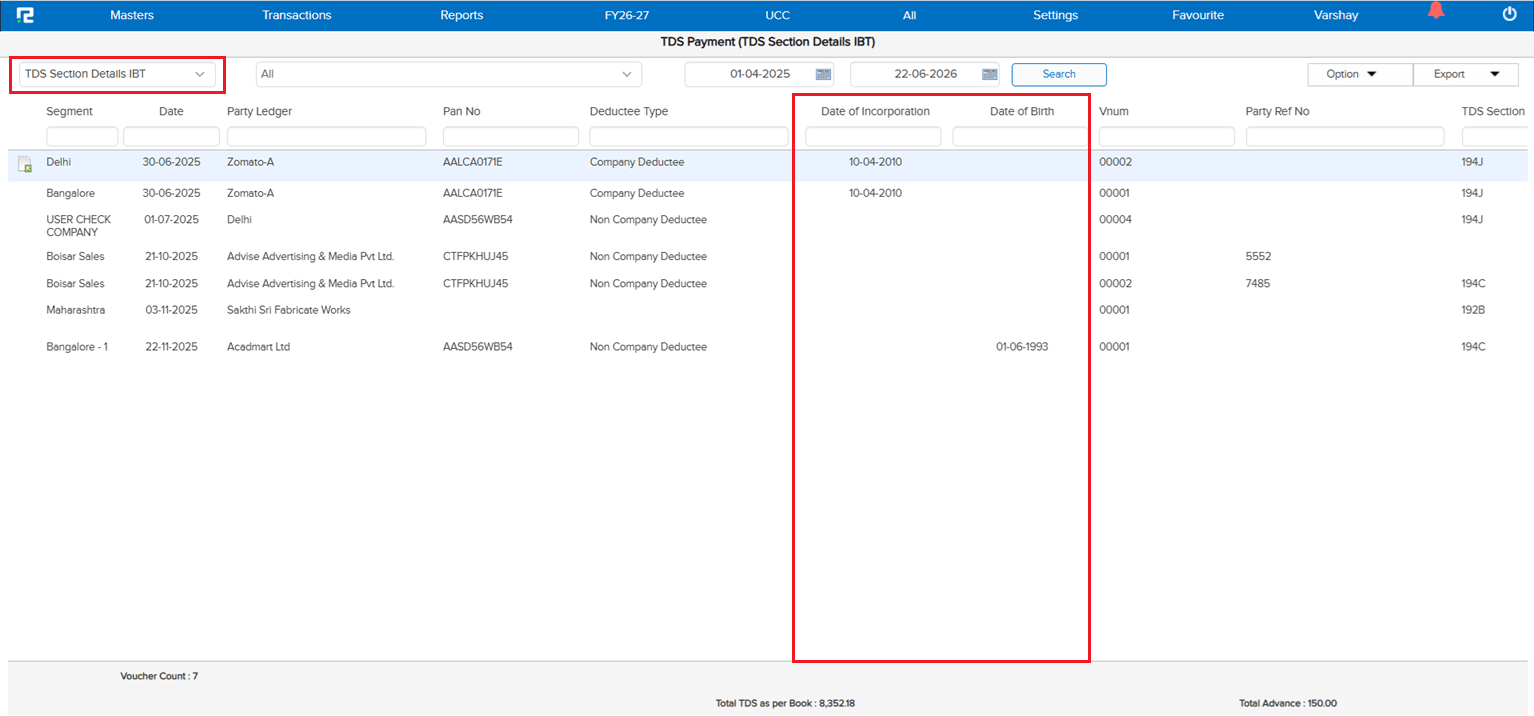
The new Date of Incorporation and Date of Birth fields being added to the Ledger Master → Party Information (see E1 / JOB-163337) were not being pulled into the TDS Details reports. Users had to cross-reference the ledger master separately when validating or filing TDS data — the same gap that existed on the TCS side (see E6 / JOB-163341).
🌟 What This Means for You
The Date of Incorporation and Date of Birth captured in the Ledger Master will now be fetched into the following TDS reports:
• TDS Details Section-wise
• TDS Section Details IBT
In both reports, the fields are visible on the UI alongside the existing TDS columns and exportable via Excel so the dates flow through to downloaded reports as well — keeping all party-level statutory information together in the TDS output, with no extra ledger lookup during validation or filing.
🎬 Where to Find It
📷 See It in Action
📌 What Was Happening
In the Ledger Report, the Stock Details option was available when searching normal ledgers — both on the UI and in the Excel export. However, when the same report was run for Stock Accounting ledgers, the Stock Details option was not available, so users had no way to view or export the stock breakdown for those ledgers from the Ledger Report screen.
🌟 What This Means for You
The Stock Details option has now been extended to Stock Accounting ledgers in the Ledger Report:
• Visible on the UI when a Stock Accounting ledger is searched
• Included in the Excel export so stock details flow through to downloaded reports as well
Ledger Report now behaves consistently for both normal and Stock Accounting ledgers — no more switching screens to pull the stock breakdown.
🎬 Where to Find It
📷 See It in Action
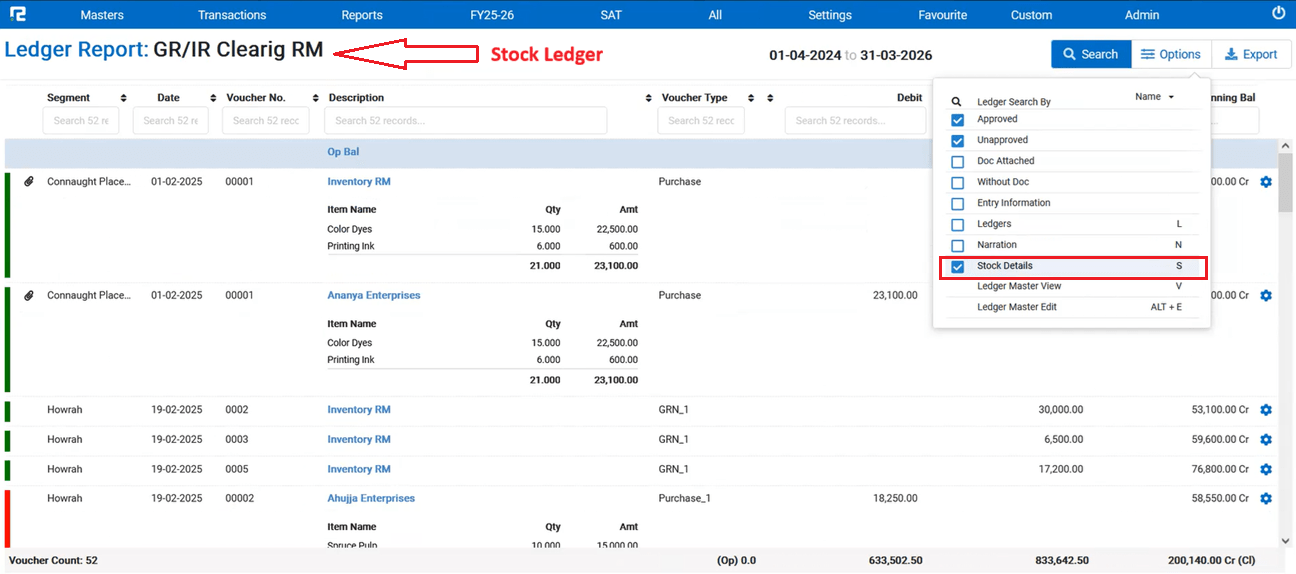
📌 What Was Happening
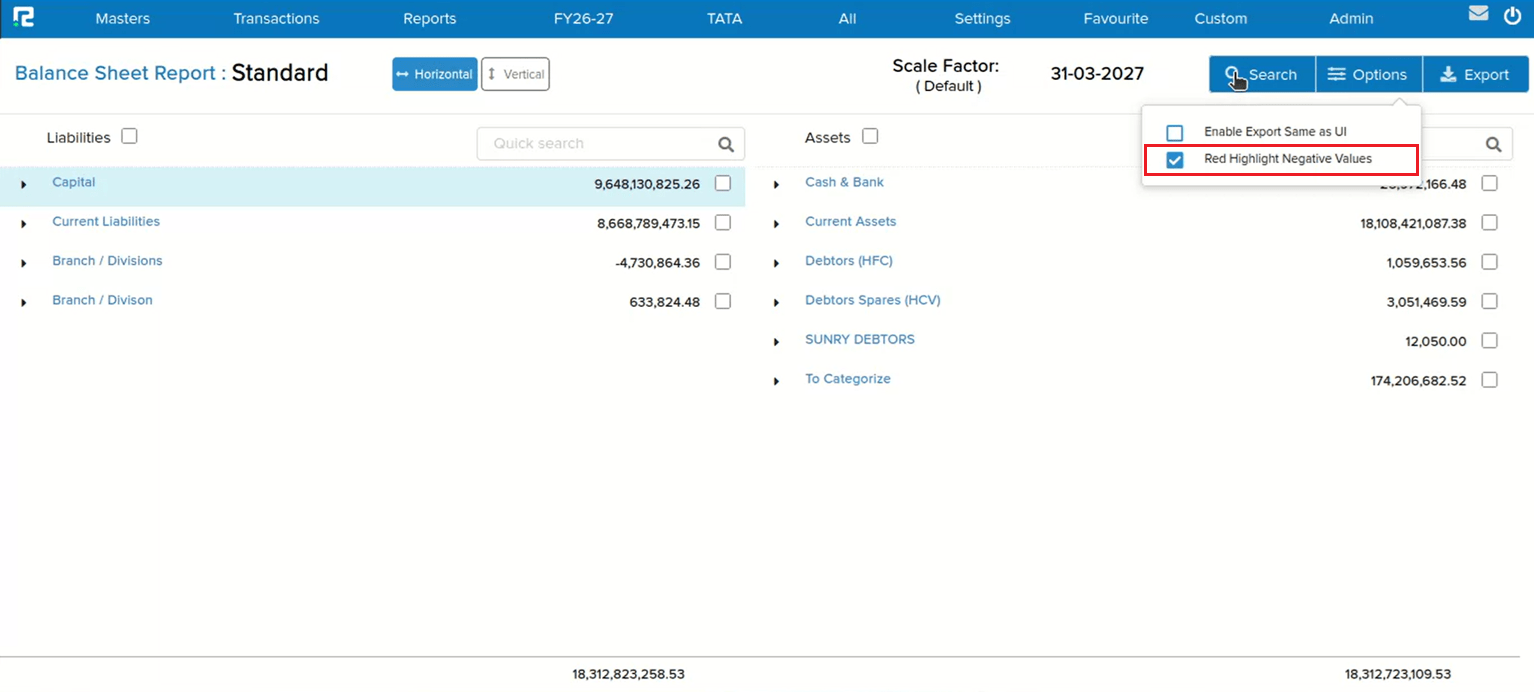
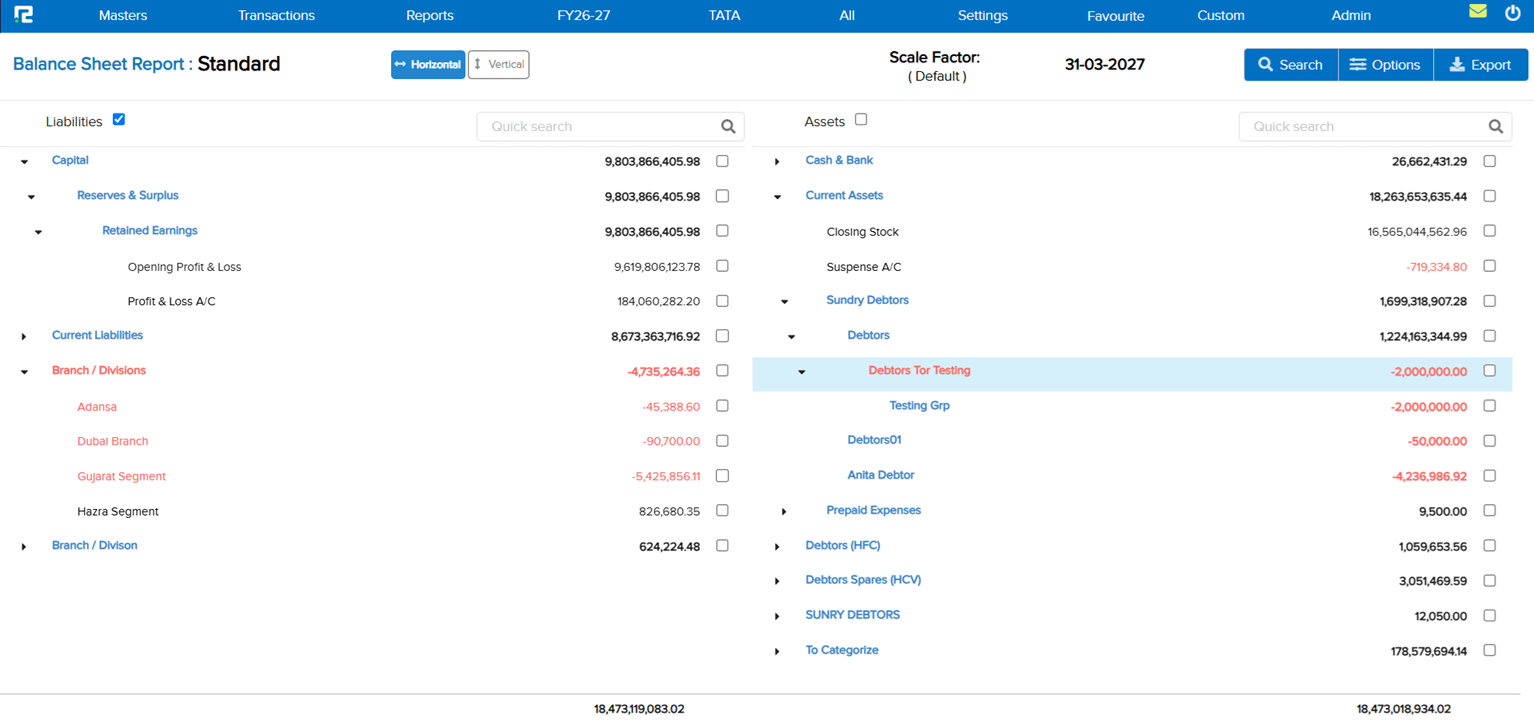
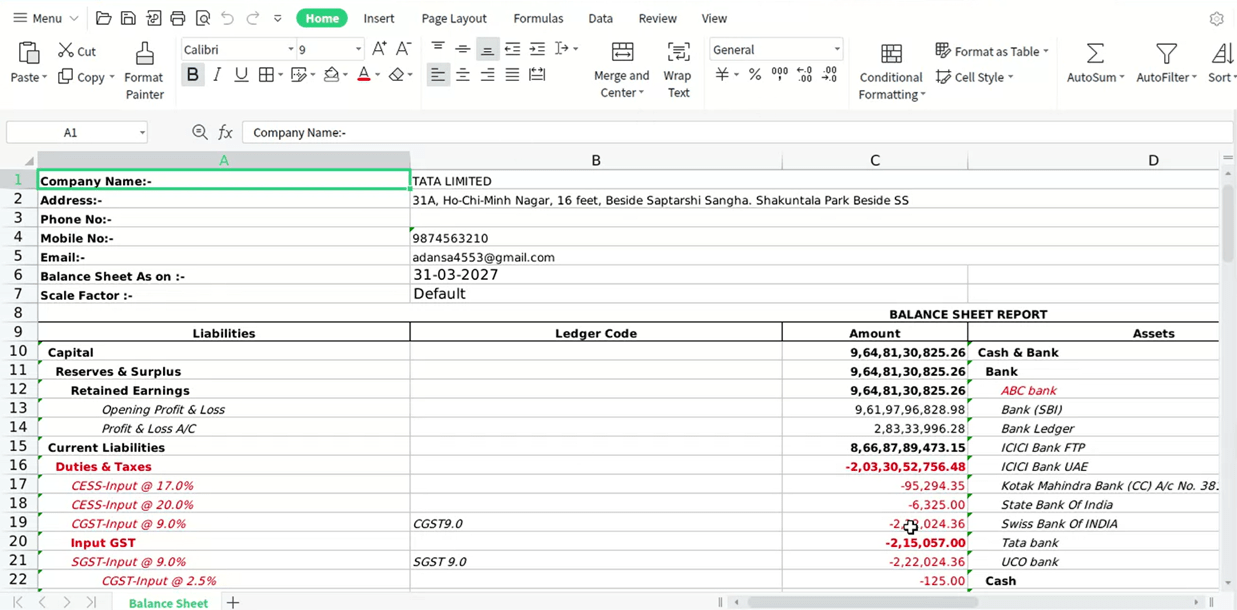
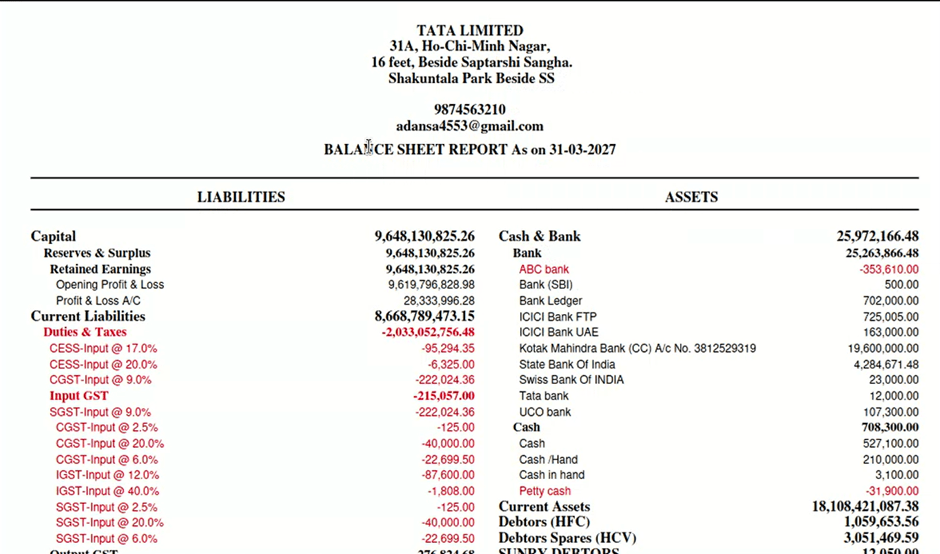
In the Balance Sheet (Standard), there was no visual distinction for negative (opposite-nature) values — a Cr balance in the Assets side or a Dr balance in the Liabilities side appeared in the same colour as all other figures. Users had to manually identify these anomalous balances by reading the values, with no at-a-glance signal that a closing balance was behaving contrary to its expected nature. This problem existed across the UI view, the PDF (Standard) download, and the Excel (Standard) export.
🌟 What This Means for You
A highlight toggle has been introduced to the Balance Sheet (Standard) that lets you switch RED highlighting on or off for negative / opposite-nature closing balance values:
• A tick box is available beside the Search button on the report screen — tick it to enable RED highlighting, leave it unticked for the regular report view
• The same tick box is available inside the Search popup as well, so you can set the preference before running the report
• When highlighted, both the Ledger Name and the Value are shown in RED for any entry where the closing balance is of opposite nature (Cr balance in Assets or Dr balance in Liabilities)
• Separate download options are provided so you can get PDF (Standard) with highlighted values and Excel (Standard) with highlighted values independently when the tick box is enabled
🎬 Where to Find It
📷 See It in Action
📌 What Was Happening
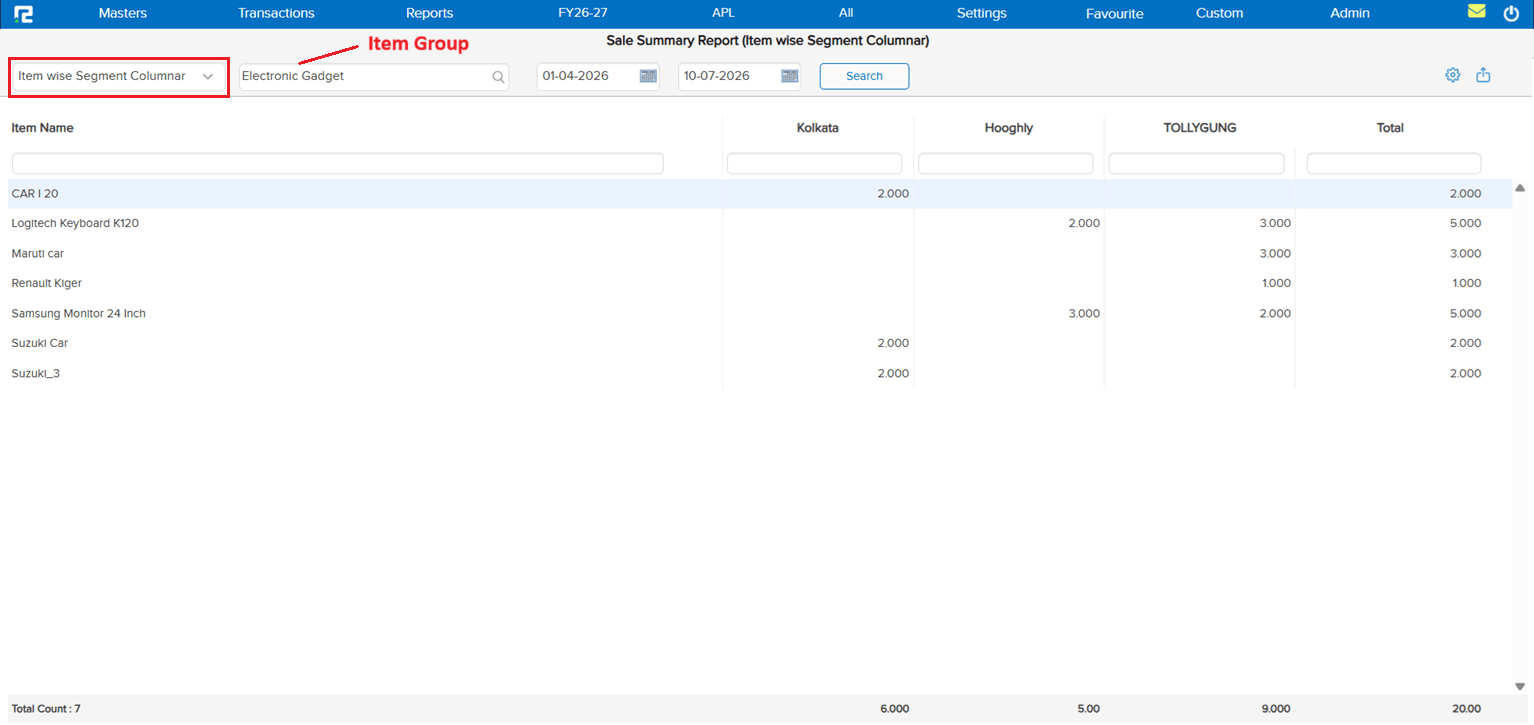
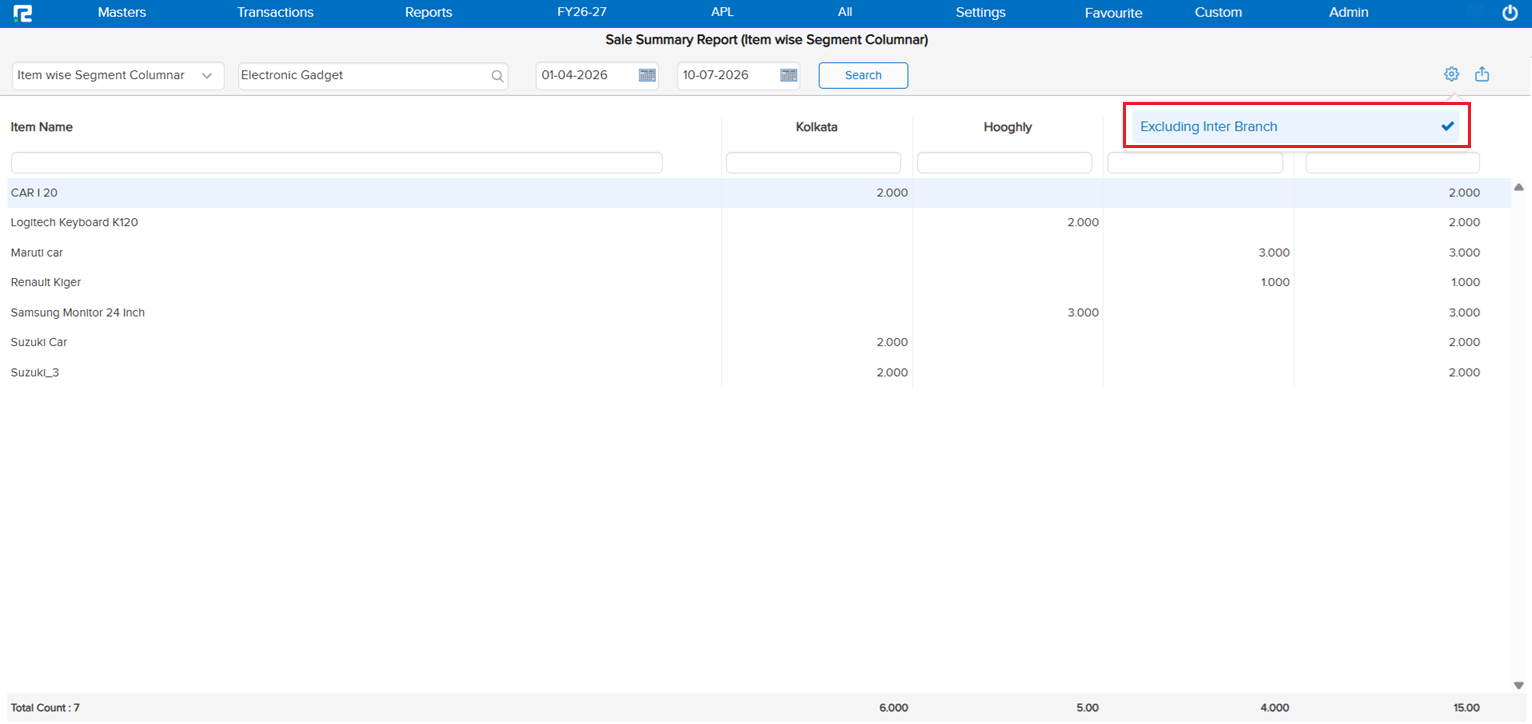
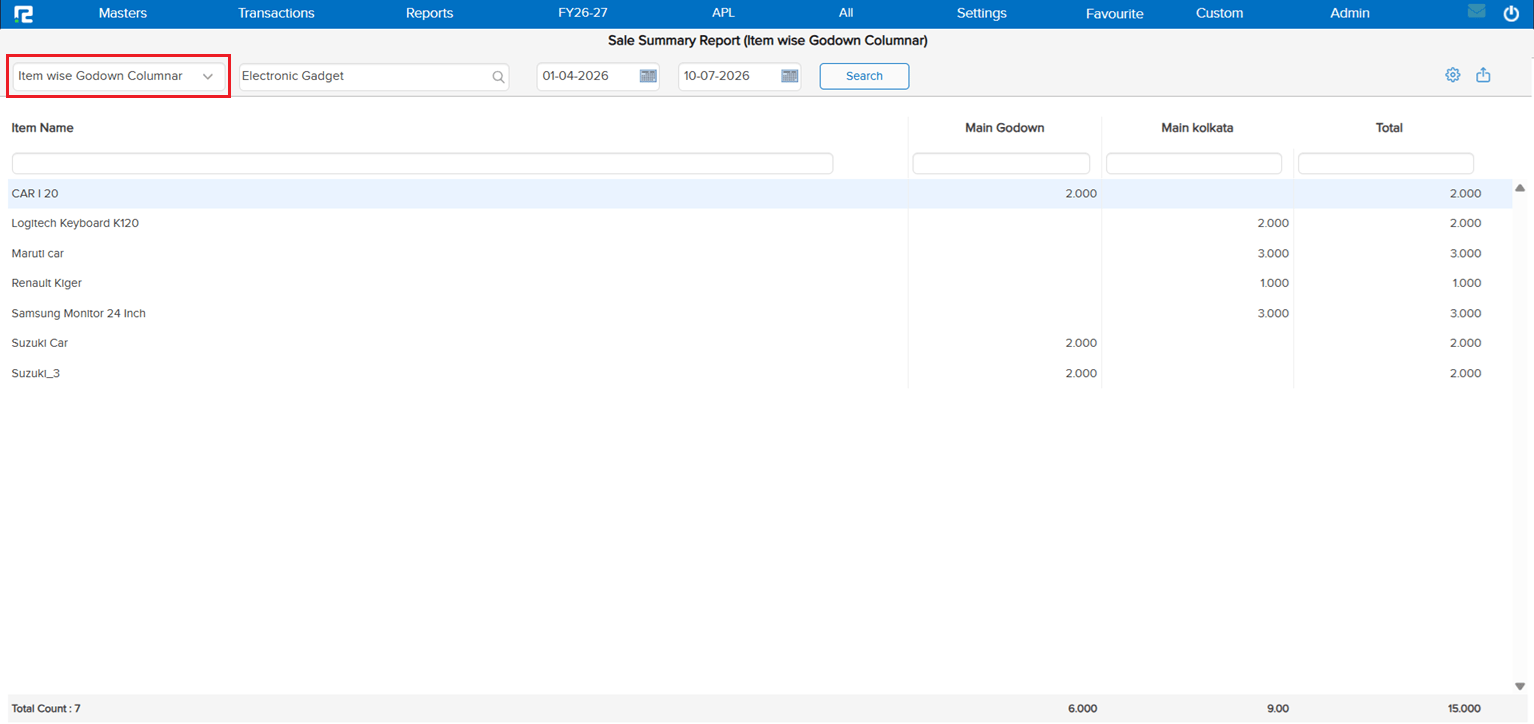
There was no dedicated sales report to view the quantity sold broken down by Godown or Segment across the company. Users had no single-screen view to compare sales volumes across locations or segments — making it difficult to analyse distribution performance without pulling and reconciling data from multiple sources.
🌟 What This Means for You
A new Sales Qty Godown / Segment Wise Report has been added. The report shows the quantity sold for each Godown or Segment across the company in the format agreed upon — giving a clear, consolidated view of sales volumes by location or segment in one place.
🎬 Where to Find It
📷 See It in Action
📌 What Was Happening
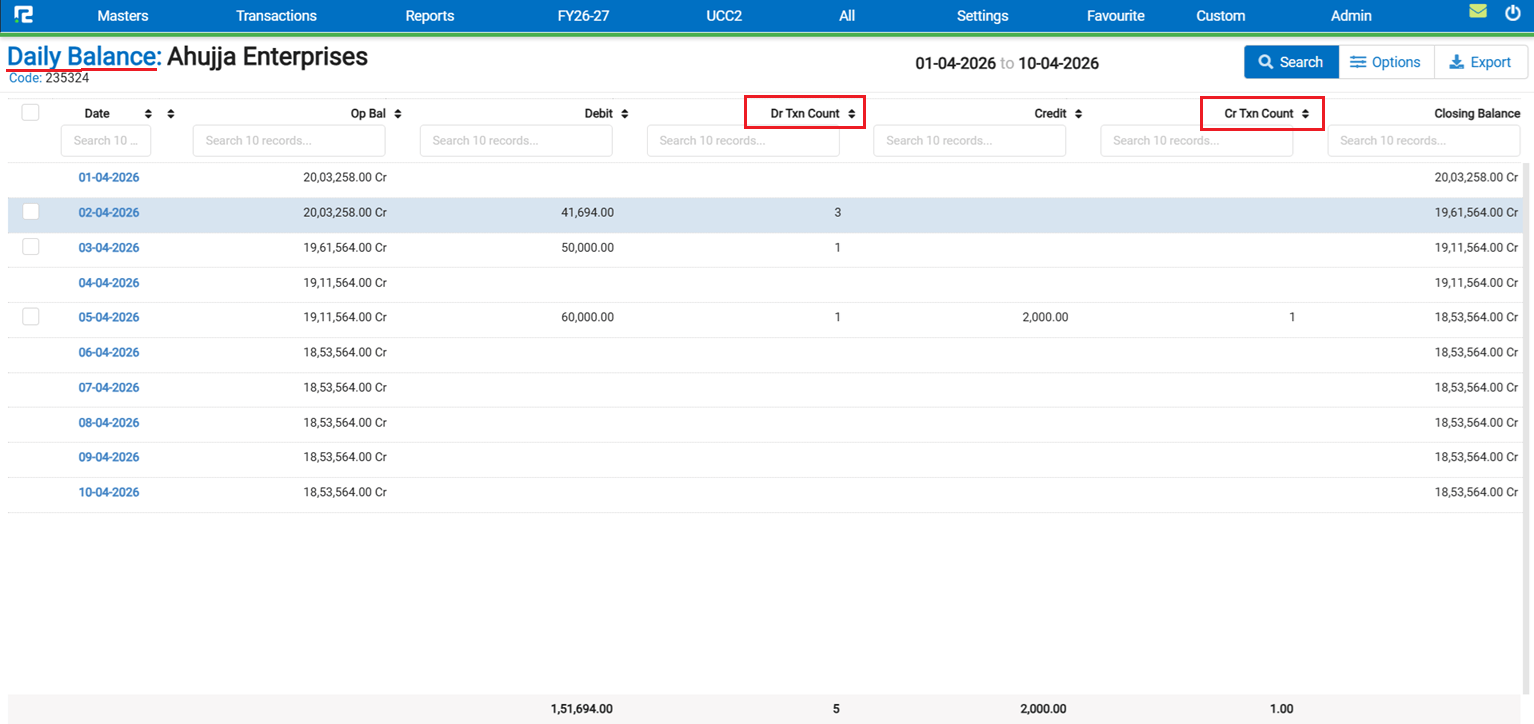
The Ledger Report → Daily Balance showed Debit and Credit amounts for each date but had no way to see how many individual transactions made up those totals. Users who needed to verify the count of entries for a particular date had to drill down or cross-check manually — the report gave amounts but no count of entries.
🌟 What This Means for You
The Ledger Daily Report now automatically shows the Transaction Count alongside amounts — no setting or toggle needed:
• Debit Transaction Count is displayed alongside the Debit amount for each date
• Credit Transaction Count is displayed alongside the Credit amount for each date
• The count reflects the total number of Debit / Credit entries posted for that date
• Transaction counts are included in the Excel and PDF outputs as well
🎬 Where to Find It
📷 See It in Action
📌 What Was Happening
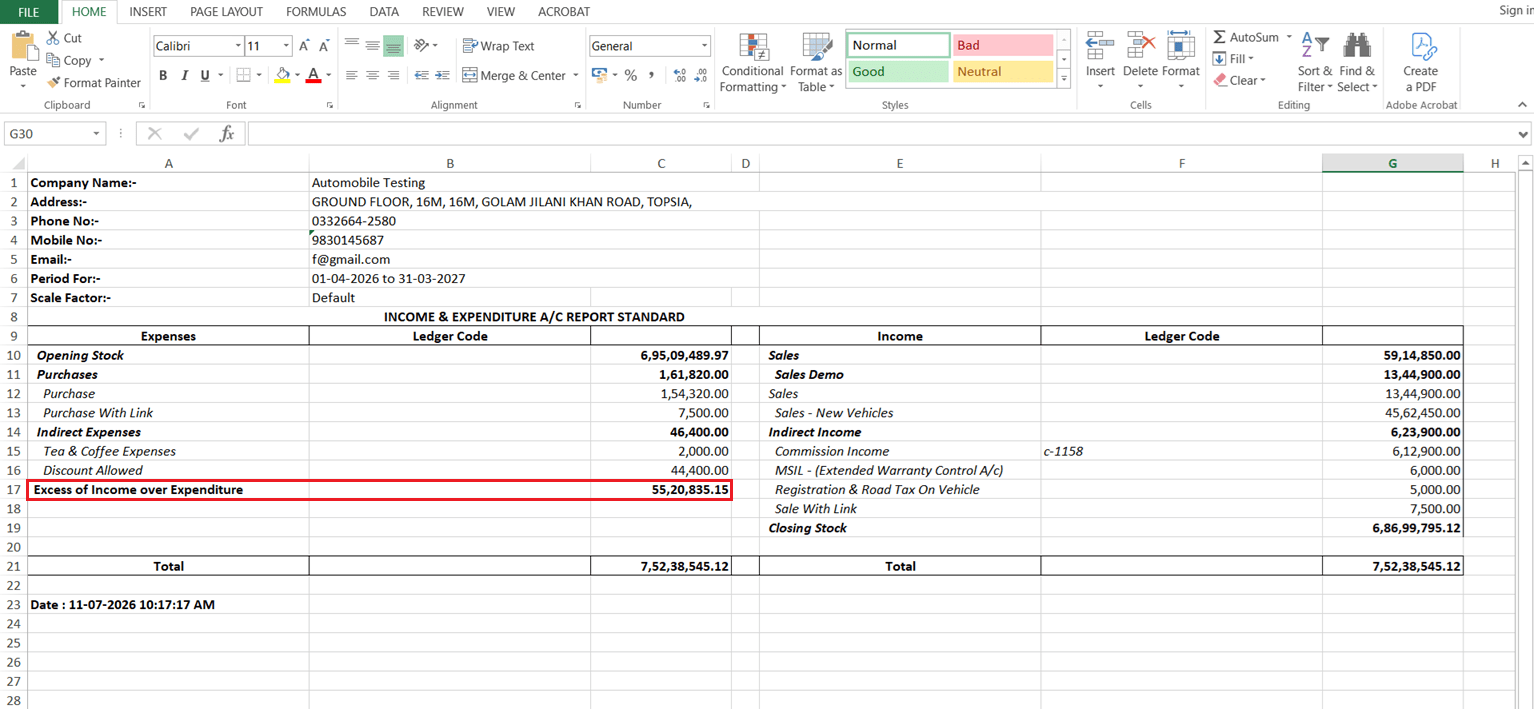
The Profit & Loss (Standard) report used P&L specific terminology throughout — the export was named “Profit & Loss” and the bottom line was labelled “Profit for the Period” or “Loss for the Period”. For organisations that follow the Income & Expenditure account format (trusts, societies, non-profits, and similar entities), this terminology was not appropriate — there was no alternate report format using the correct I&E labels.
🌟 What This Means for You
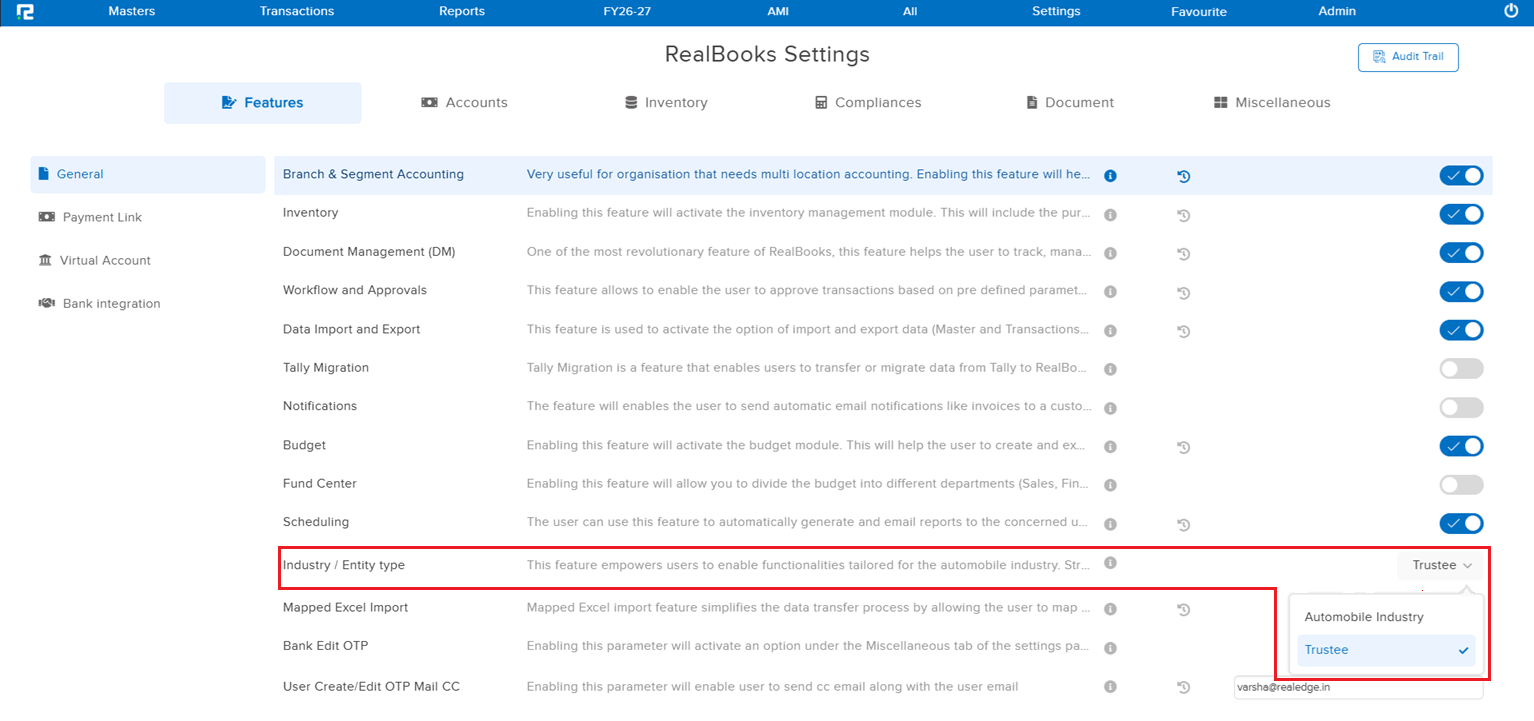
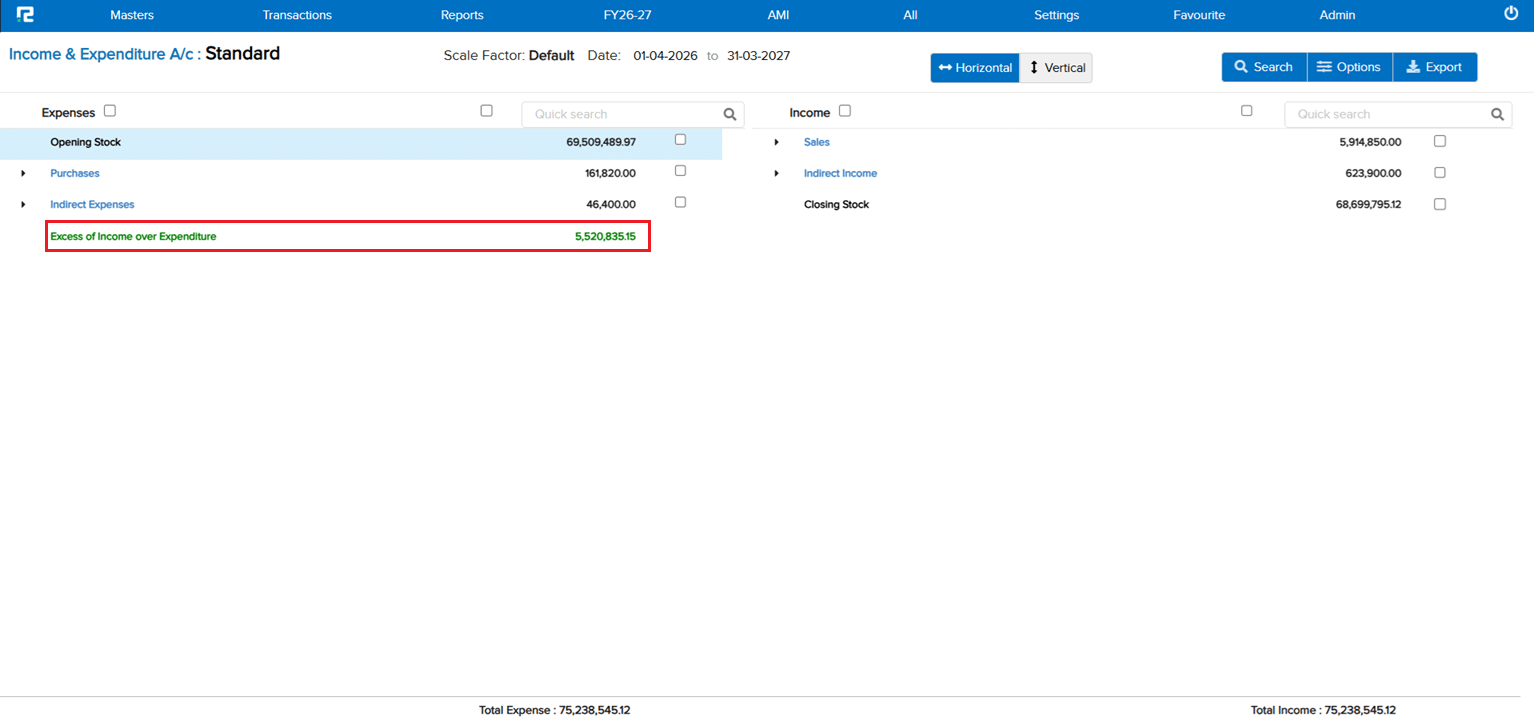
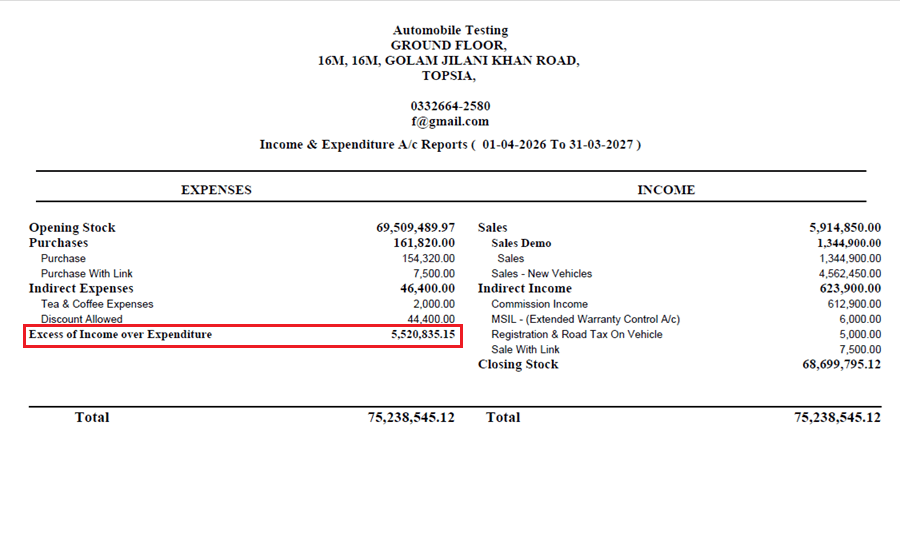
A new Income & Expenditure A/c report variant has been added under the P&L Standard path for eligible companies:
• The report export name is displayed as “Income & Expenditure A/c” instead of “Profit & Loss”
• The bottom-line label reads “Excess of Income over Expenditure” (surplus) or “Excess of Expenditure over Income” (deficit) instead of Profit / Loss for the Period
• This report is only visible when the company has the relevant marking enabled via Acc Param or Company Master — no impact on standard P&L companies
🎬 Where to Find It
📷 See It in Action
📌 What Was Happening
The GSTR-1 Report had two data mismatch issues:
• Place of Supply mismatch — the Place of Supply value was not being handled correctly in certain scenarios, causing discrepancies in the report
• Voucher-wise details mismatch for B2Cs — the voucher-level breakdown for B2C transactions was not aligning with the expected GSTR-1 format
Additionally, RCM (Reverse Charge Mechanism) entries were appearing in the B2B drill-down and were also being counted in the B2B summary, which was incorrect — RCM entries should be tracked separately and not inflate the B2B section count.
🌟 What This Means for You
The following corrections have been made to the GSTR-1 Report:
• Place of Supply data is now handled correctly, eliminating mismatches in the report
• Voucher-wise details for B2Cs now align accurately with the expected GSTR-1 format
• RCM entries will continue to appear in the B2B drill-down for reference, but will no longer be included in the B2B summary count — they will instead be correctly shown under the RCM section in the summary
🎬 Where to Find It
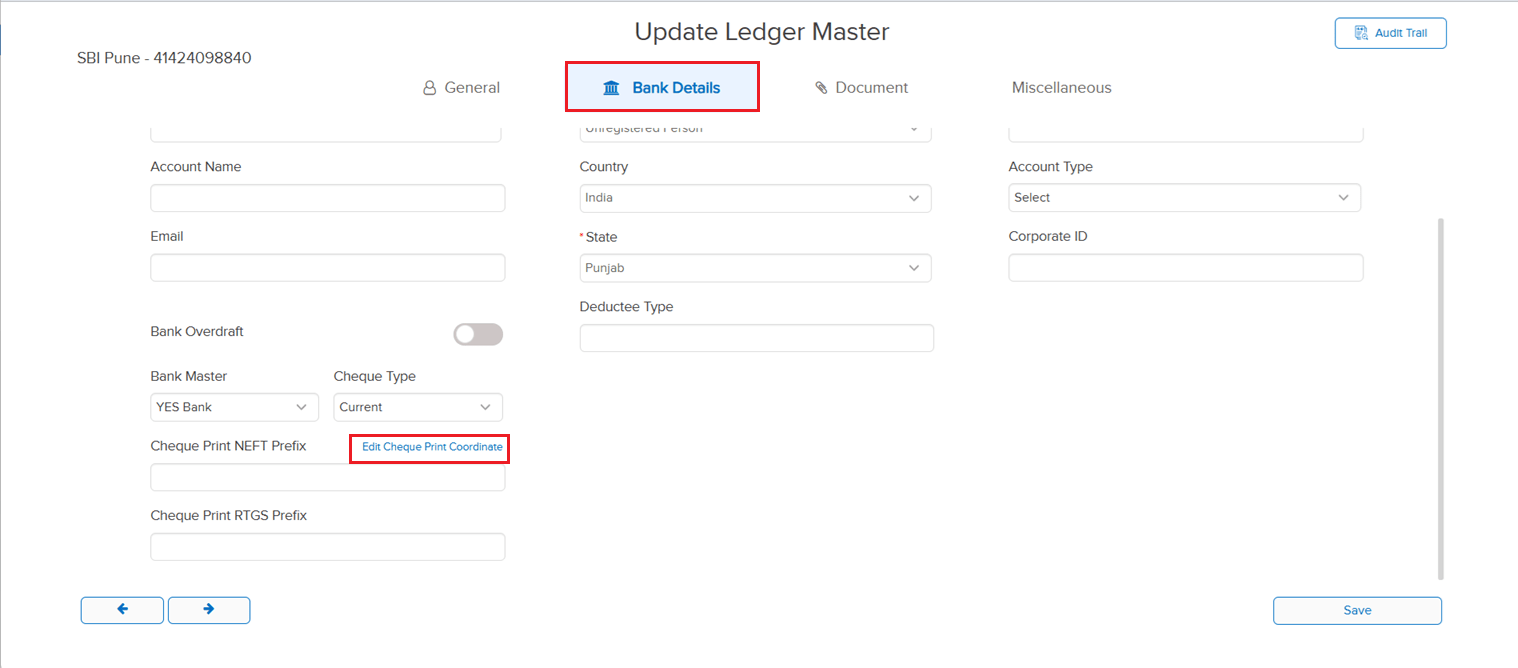
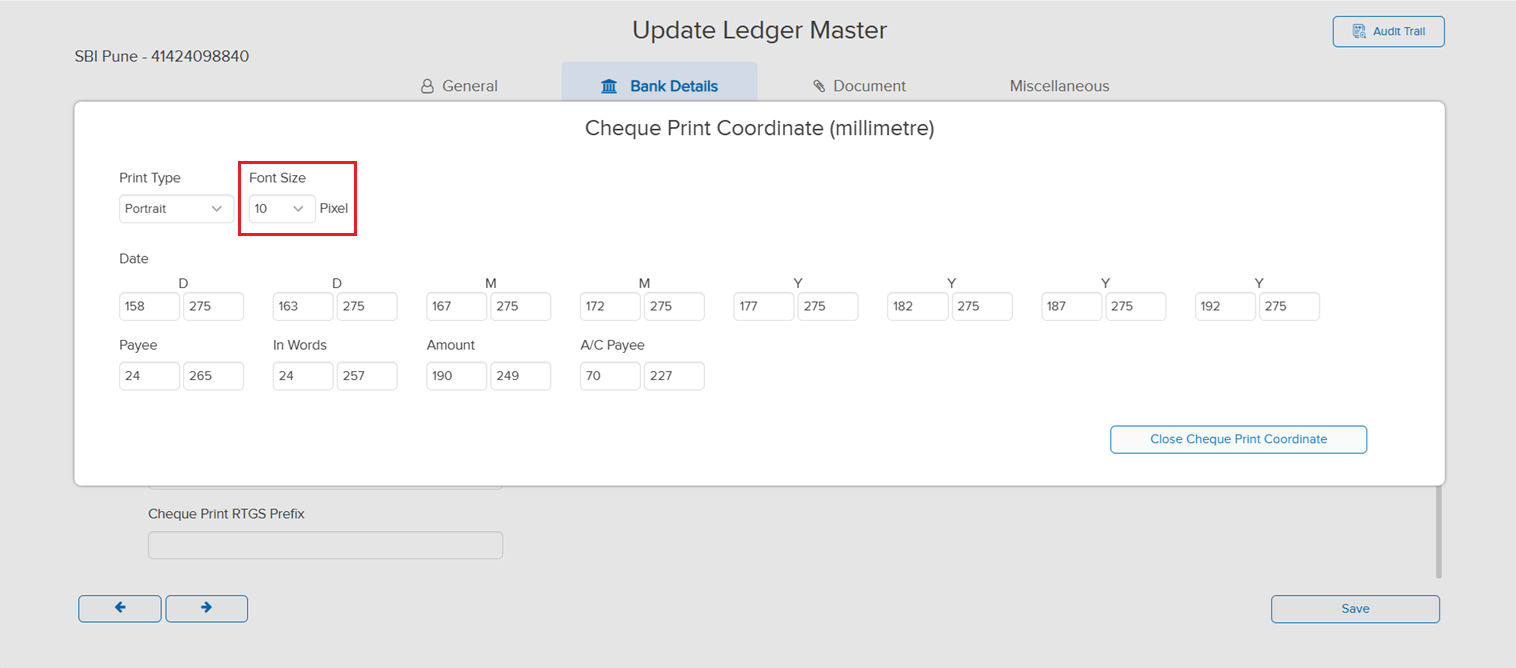
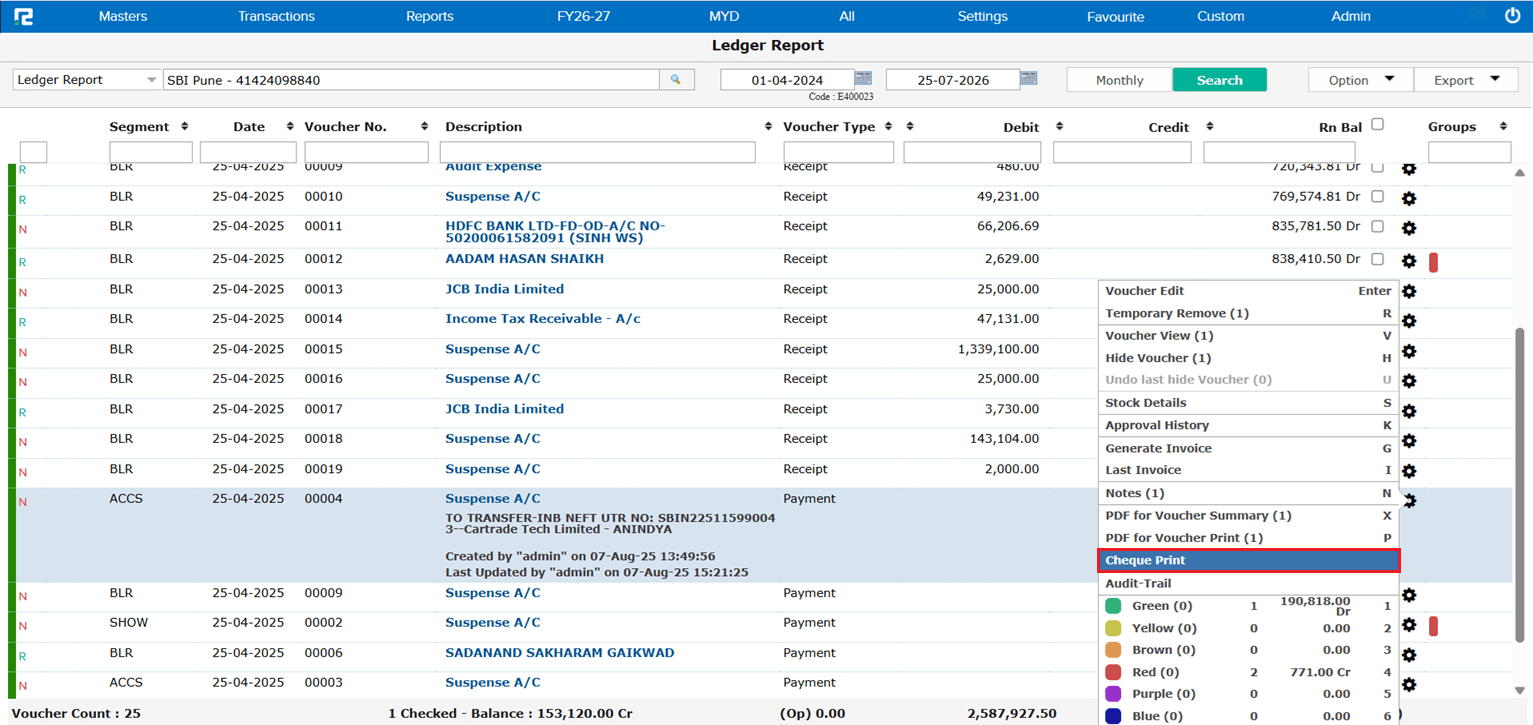
📌 What Was Needed
The Cheque Print Coordinate setup did not offer a way to adjust the font size of printed cheque text, limiting control over how the cheque printout appeared.
🌟 What This Means for You
A new Font Size option (in Pixels) has been added to the Cheque Print Coordinate setup, letting you increase or decrease the print font size to match your cheque leaf and printer settings.
🎬 Where to Find It
📷 See It in Action
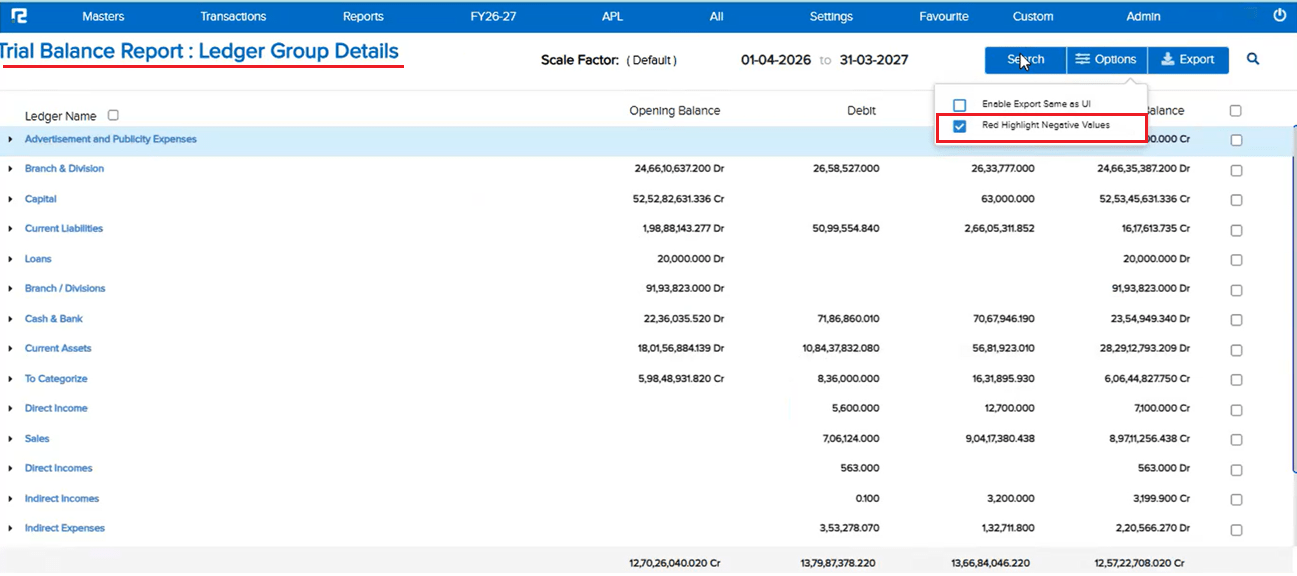
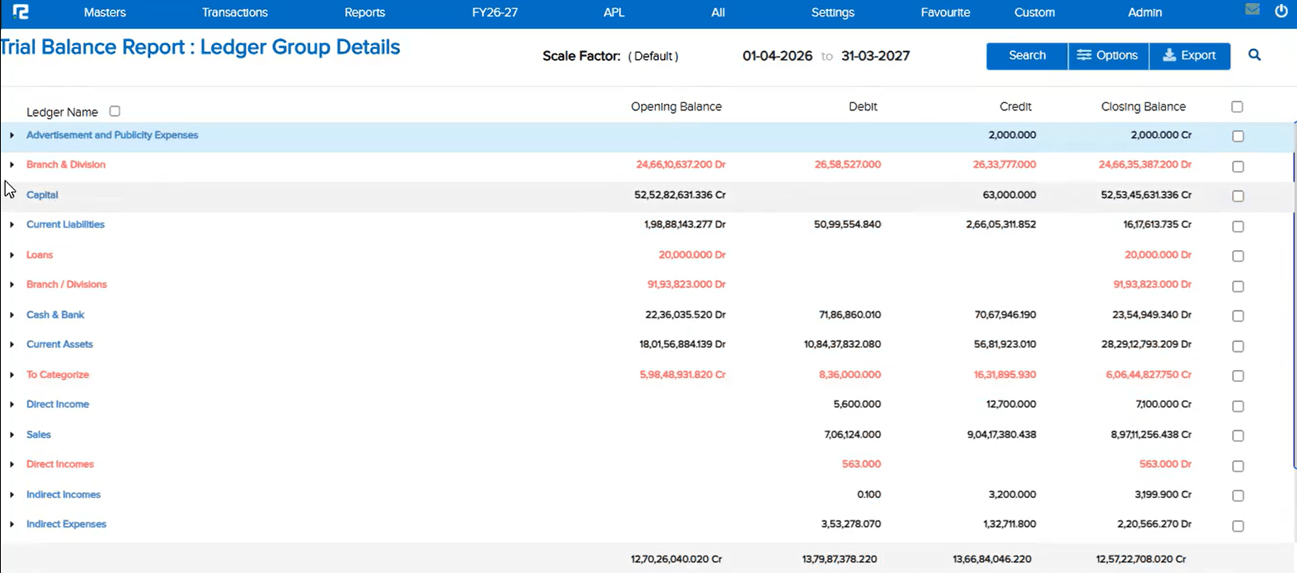
📌 What Was Needed
In the Trial Balance Report (Standard), there was no way to visually flag Ledger Groups showing a negative or opposite balance — an Asset group with a Credit closing balance, or a Liability group with a Debit closing balance — based purely on Closing Balance figures (not Opening).
🌟 What This Means for You
A new “Red Highlight Negative Values” checkbox is now available under Options (and in the Search popup) on the Trial Balance Report. When enabled, both the Ledger Name and Value are shown in red for any Asset group in Credit or Liability group in Debit, based on Closing Balance. The highlight applies consistently across the UI, PDF (Standard), and Excel (Standard) exports, with the checkbox available separately so you can choose to download with or without highlighting.
🎬 Where to Find It
📷 See It in Action
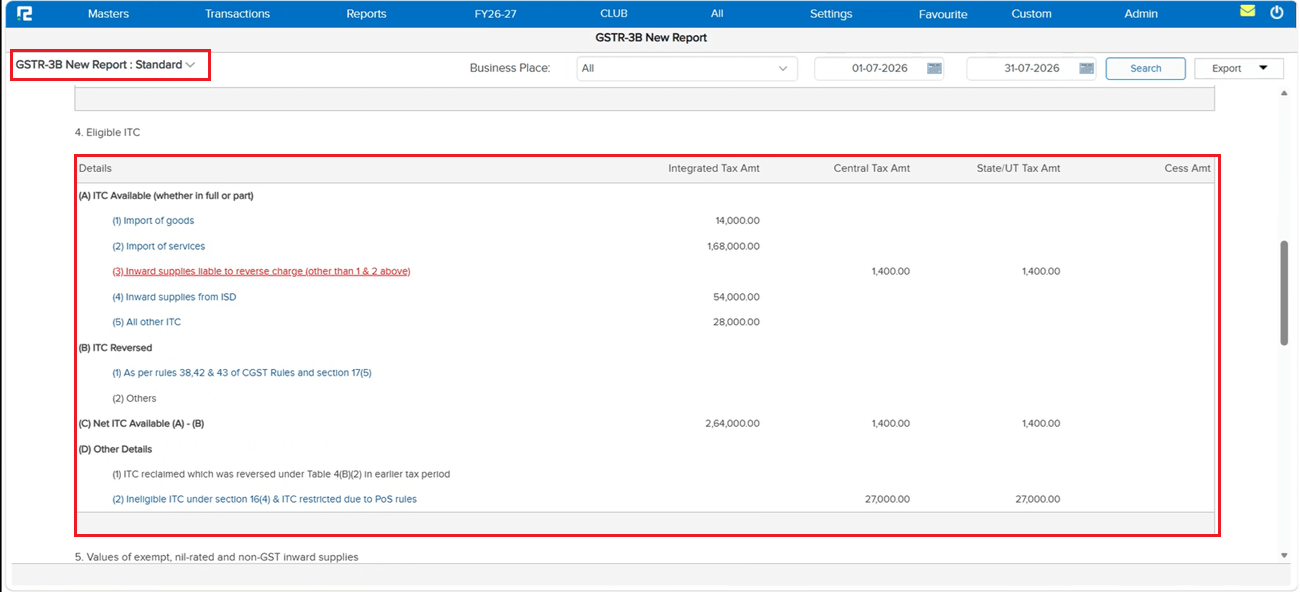
📌 What Was Needed
The GSTR-2 part of the new GSTR-3B screen was contributing to slower load times.
🌟 What This Means for You
The GSTR-2 part has been optimized in the new GSTR-3B screen, so GSTR-3B now loads faster than before.
📷 See It in Action
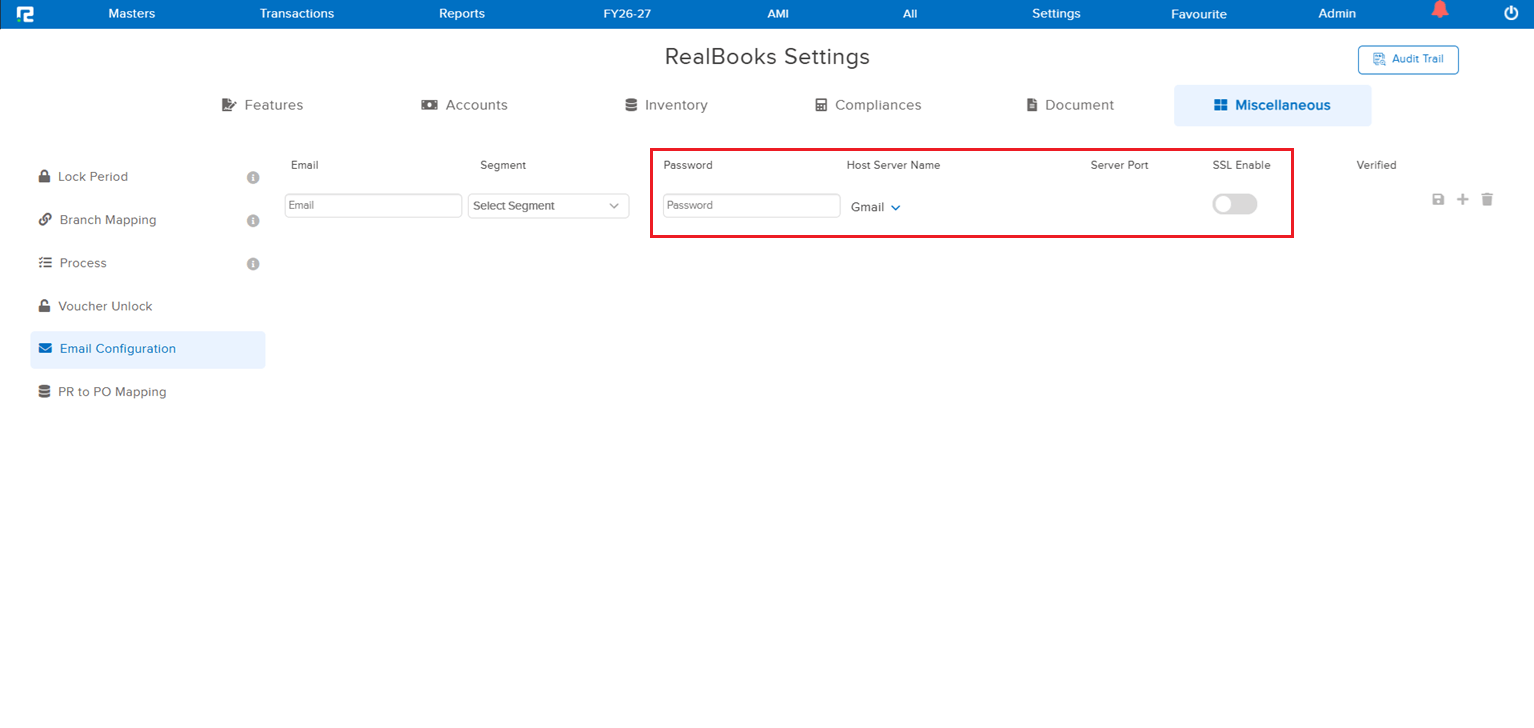
📌 What Was Needed
The Settings screen displayed several fields that had become irrelevant to the current structure. Since verification is now handled via AWS shared on the configured mail ID, those extra fields no longer served any purpose and only cluttered the screen.
🌟 What This Means for You
The irrelevant fields have been removed from the Settings UI, giving you a cleaner, simpler screen that shows only what is actually needed — with verification handled through the AWS mail on your configured mail ID.
🎬 Where to Find It
📷 See It in Action
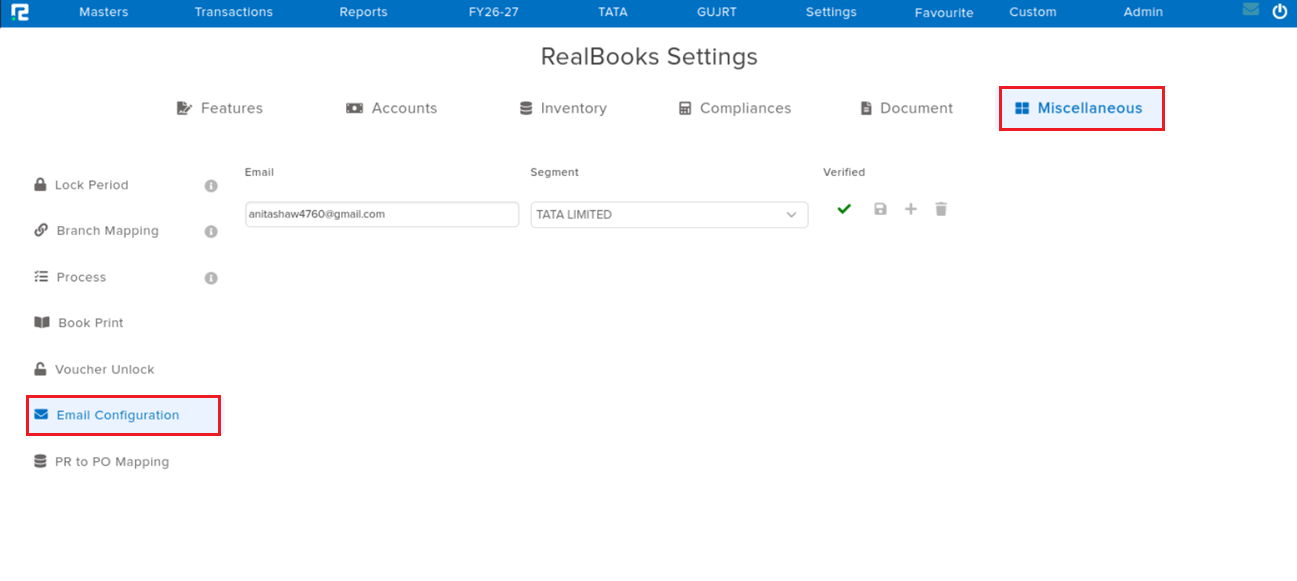
📌 What Was Needed
The lock voucher date is OTP based, but locking of the Chart of Accounts was not — so COA locking could override the lock date. Chart of Accounts locking needed the same OTP protection.
🌟 What This Means for You
Chart of Accounts locking is now OTP based, in line with the OTP-based lock voucher date. This prevents COA locking from overriding the lock date and keeps both controls consistently secured.
📷 See It in Action
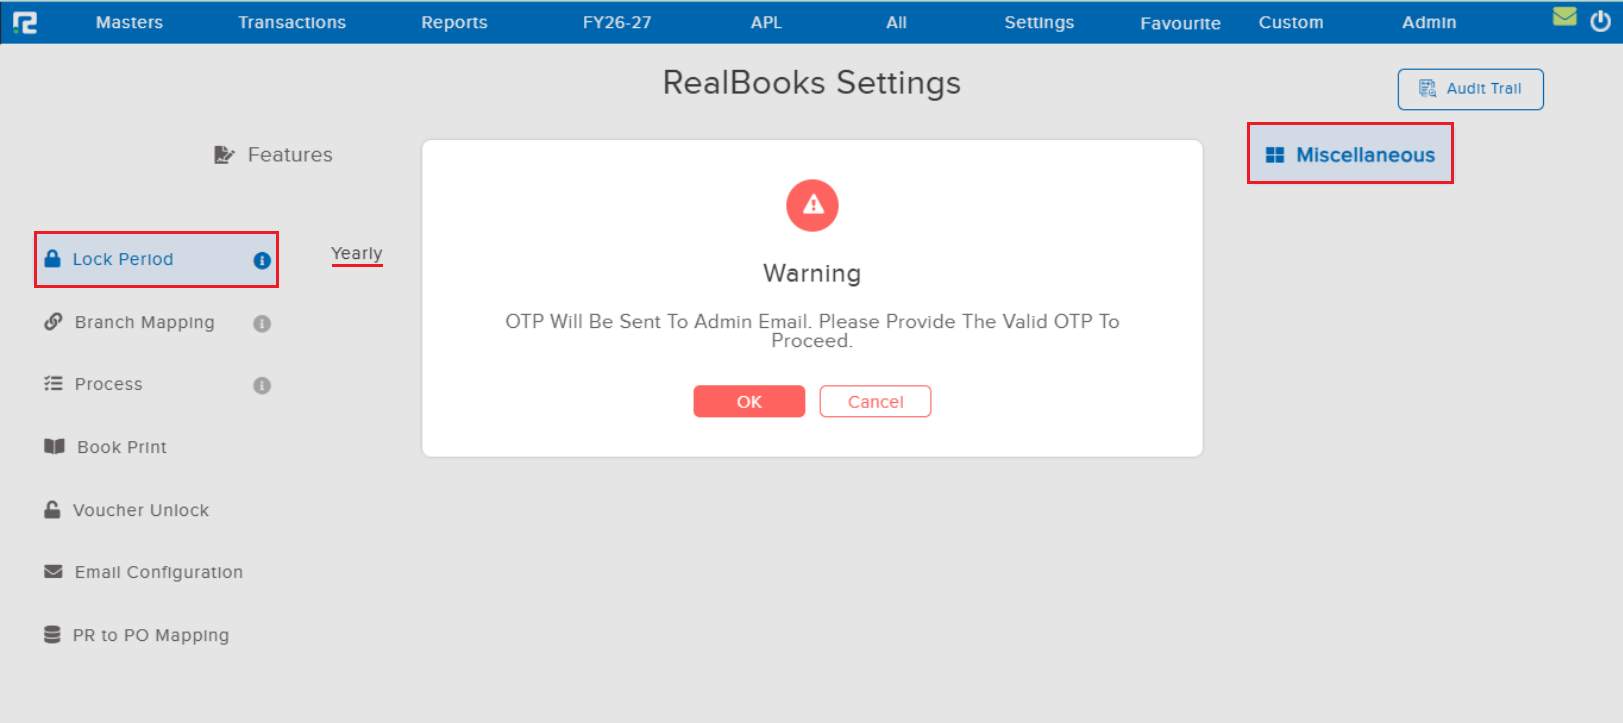
📌 What Was Happening
When creating a Cost Center and saving it, the focus was getting lost on the screen instead of automatically shifting back to the Cost Center field. Users had to manually click on the Cost Center field to continue working, breaking the keyboard-driven navigation flow and slowing down the master creation process.
🌟 How This Helps You
After saving a Cost Center, the focus now automatically shifts back to the Cost Center field as expected. This restores seamless keyboard navigation and allows you to continue working without needing to manually click on the field — improving efficiency during Cost Center master creation.
🛠 Where to Find It
📷 See It in Action
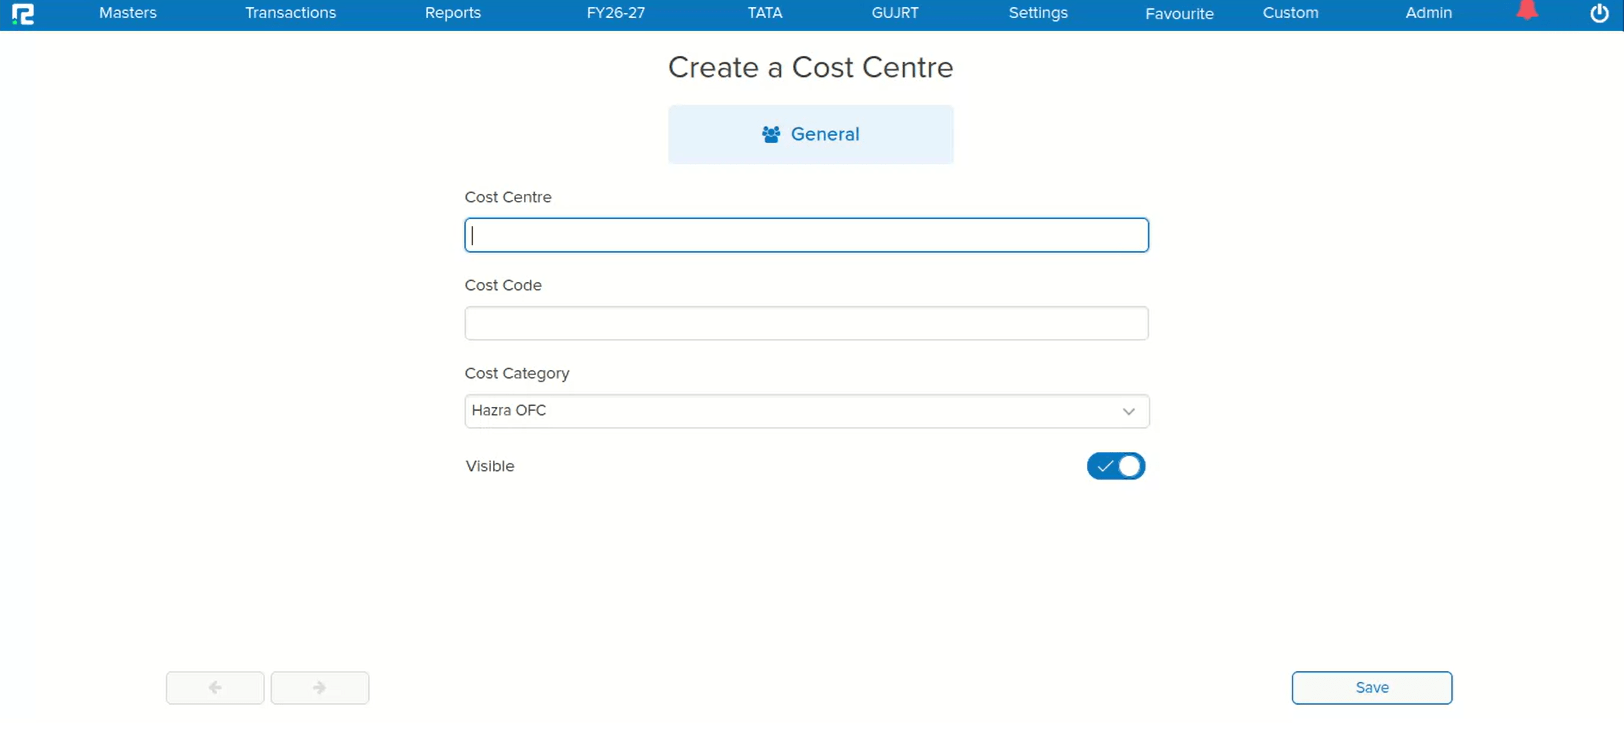
📌 What Was Happening
Two issues were identified in the Price List and Item Master:
• Issue 1 (Price Level Master): When deleting and adding a row at the same time during edit, the system was incorrectly throwing a duplicate error — even though the combination was not actually a duplicate.
• Issue 2 (Item Master): Users were able to save duplicate combinations from the Item Master, which should not have been allowed. The validation was missing, leading to inconsistent price list data.
🌟 How This Helps You
Both issues have been resolved:
• Price Level Master: Deleting and adding rows simultaneously during edit no longer triggers a false duplicate error — the save operation works correctly.
• Item Master: Proper duplicate combination validation has been added, preventing users from saving duplicate price list entries from the Item Master.
🛠 Where to Find It
📷 See It in Action
📌 What Was Happening
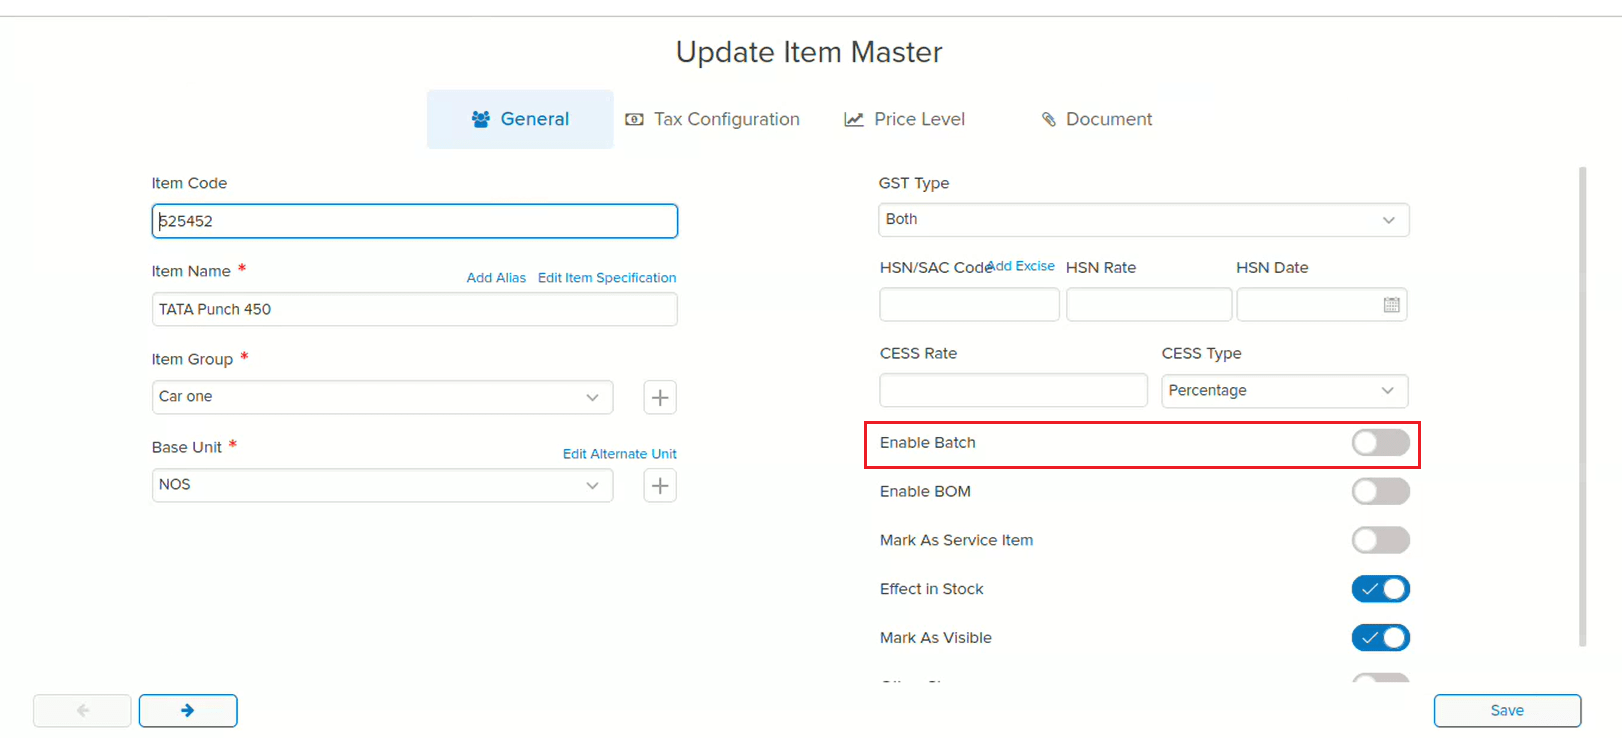
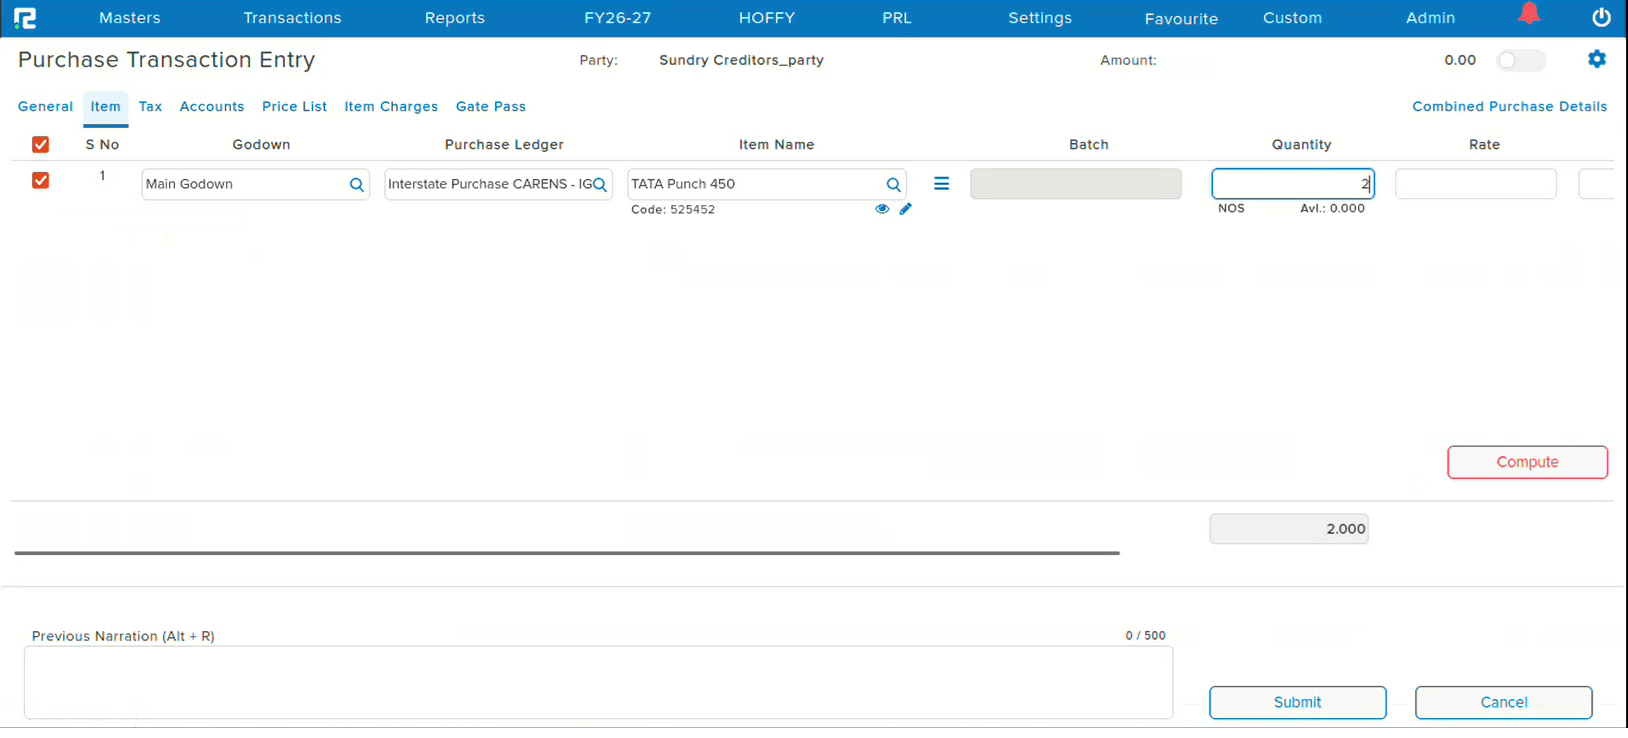
Even though the Batch setting was turned off for an item in the Item Master, the batch option was still visible during stock entry. This was caused by the API saving the batch enable value as null instead of 0 in some cases during item creation via API — leading the system to incorrectly treat the item as batch-enabled.
🌟 How This Helps You
The API logic has been corrected to ensure the batch enable value is properly saved as 0 (instead of null) when batch is disabled during item creation. Items with batch turned off will no longer show the batch option during stock entry — ensuring the behavior matches the Item Master configuration.
📷 See It in Action
📌 What Was Happening
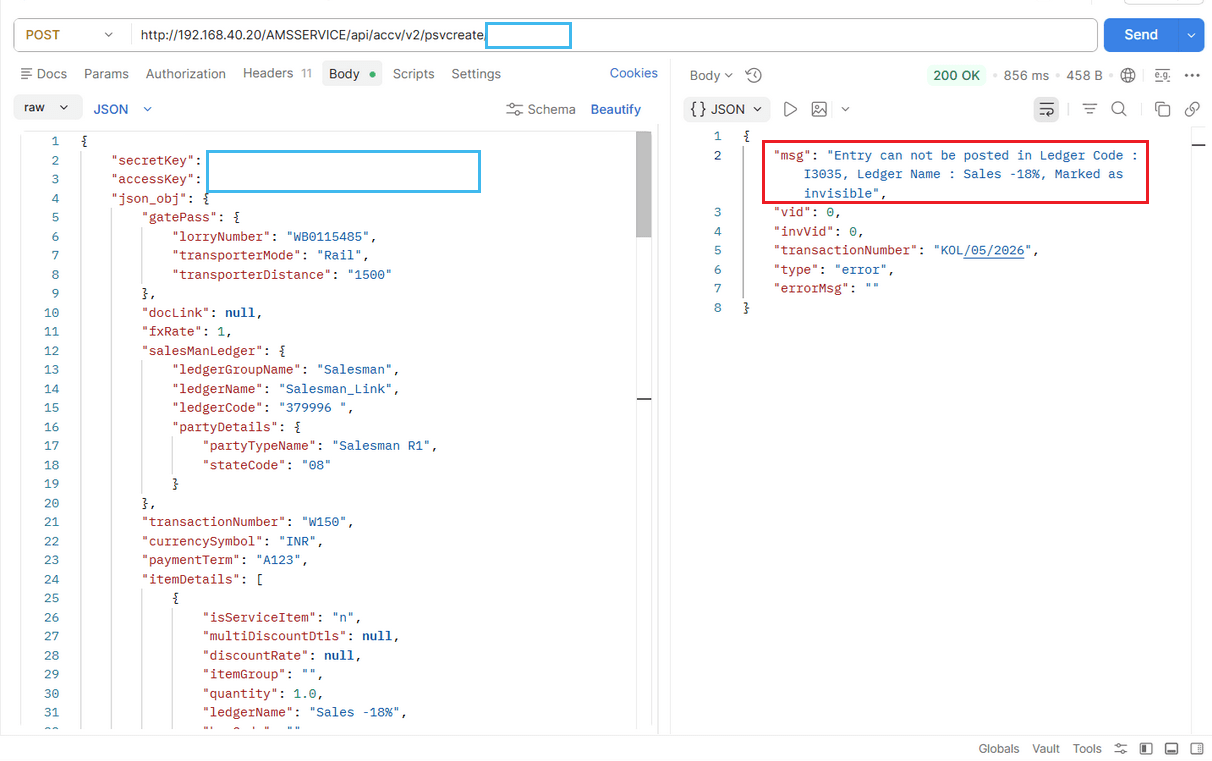
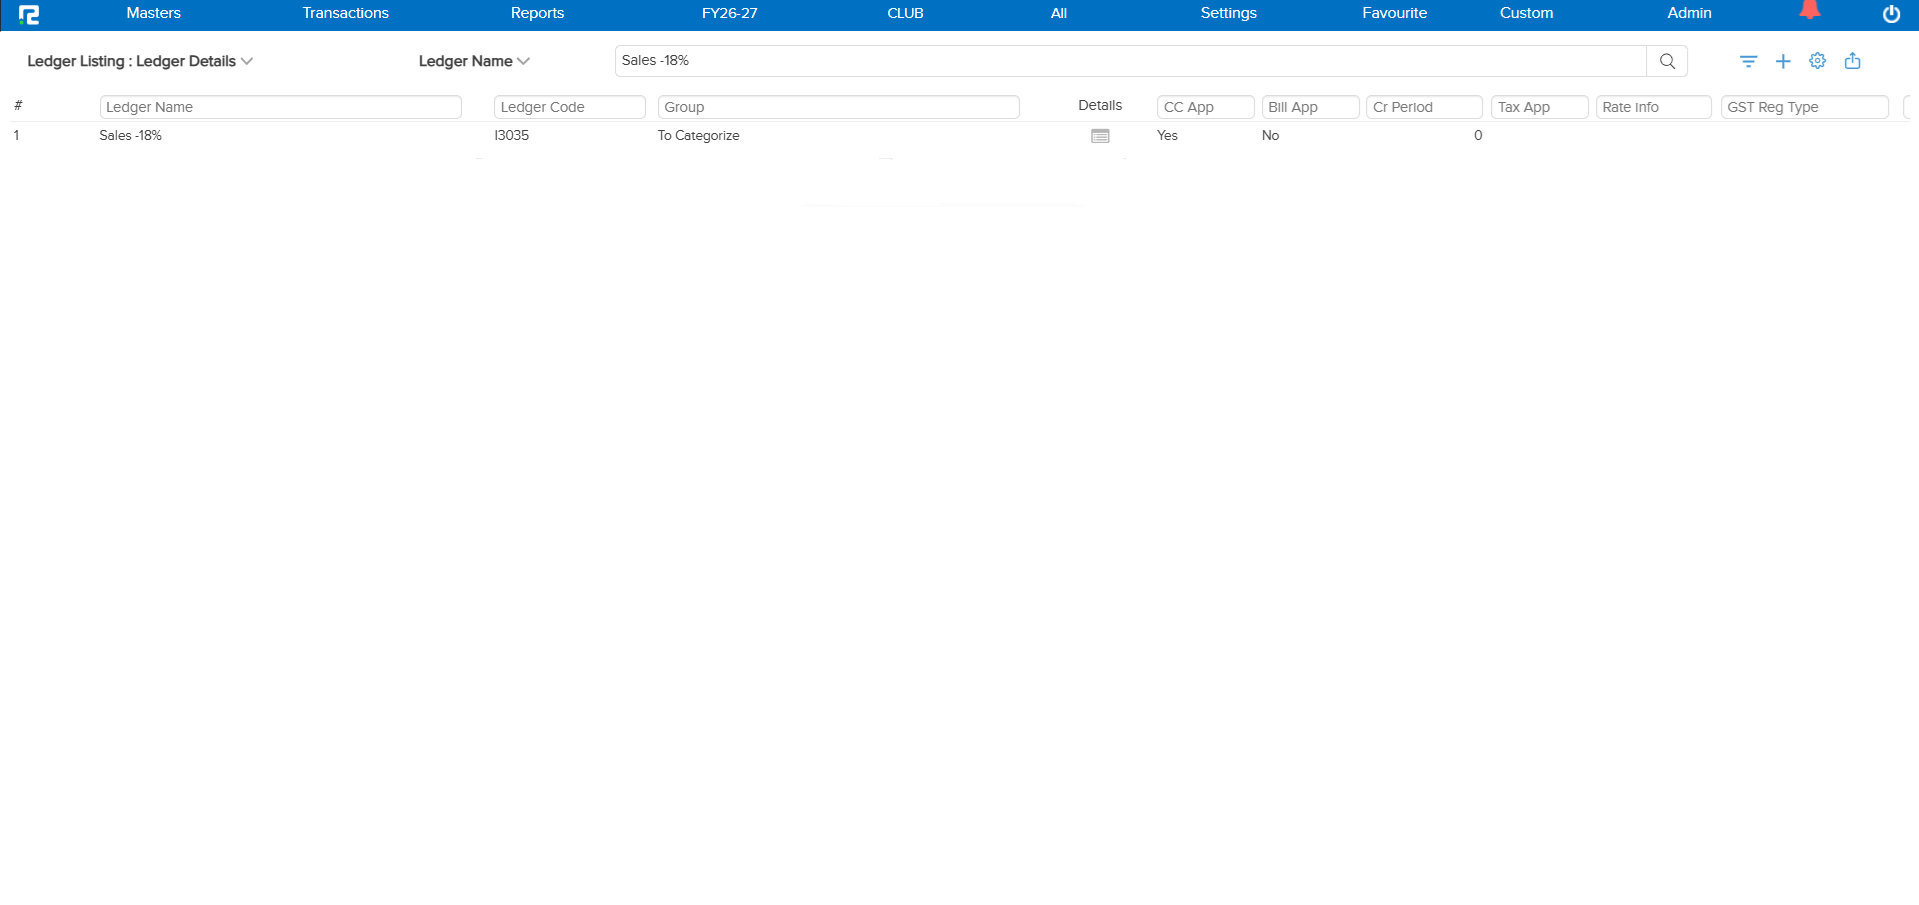
When the ledger code duplicate parameter check was enabled and a ledger was created with a specific code (e.g., L58742), disabling the visibility of that ledger caused an issue. If a user then posted an entry via API, instead of showing a duplicate check alert, the system allowed a new ledger to be created with the same ledger code — because the duplicate validation was not considering ledgers whose visibility was disabled.
🌟 How This Helps You
The duplicate ledger code validation has been corrected to include ledgers with disabled visibility in the duplicate check. Now, even if a ledger’s visibility is turned off, the system will correctly detect and prevent the creation of another ledger with the same code — whether created from the UI or via API.
📷 See It in Action
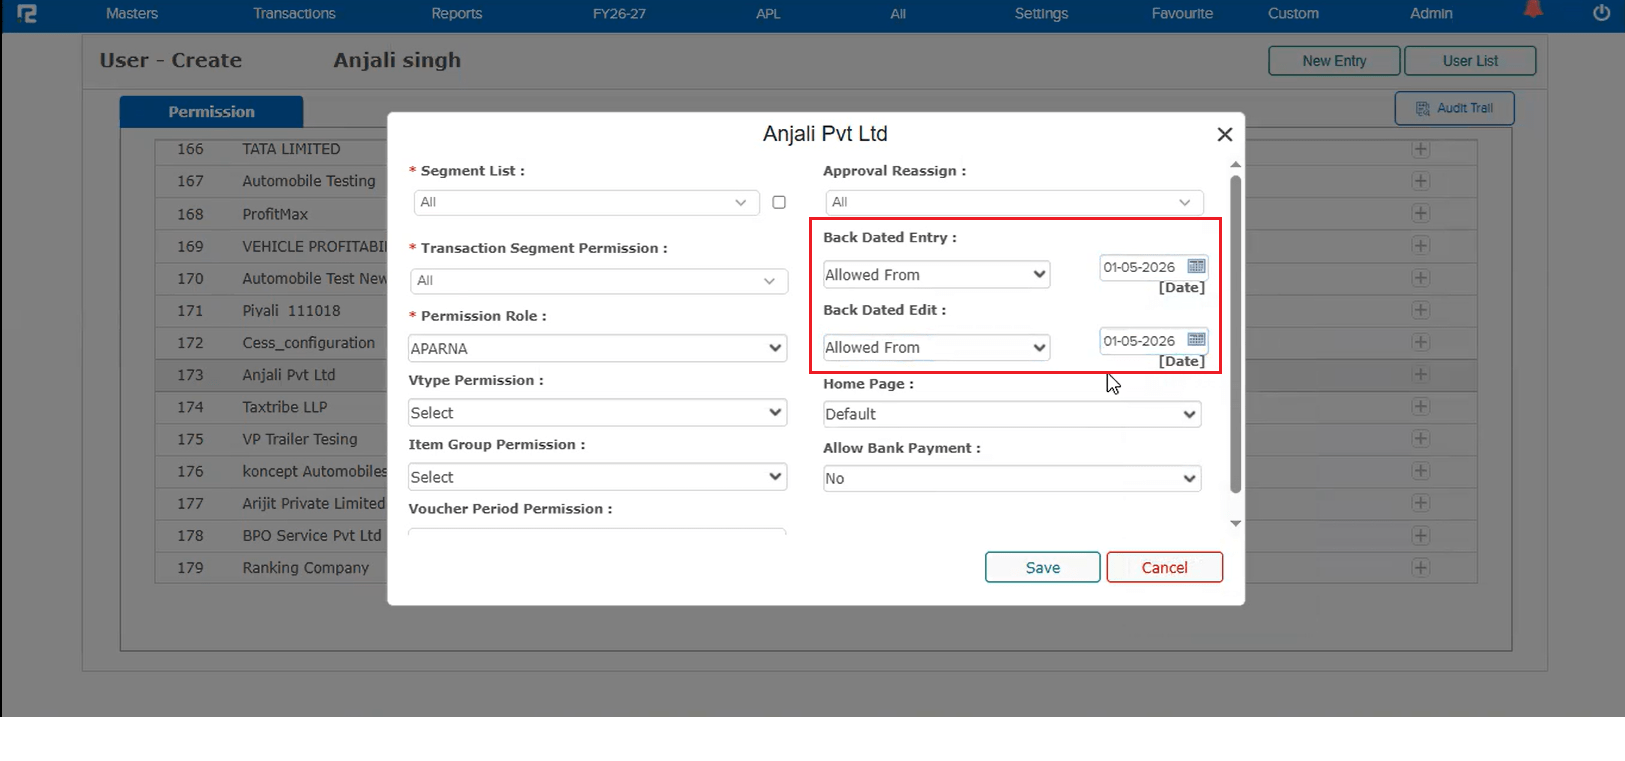
📌 What Was Happening
When a new user was created and the “Allowed From” option was selected for back date entry and edit during the initial setup (first go), the back date entry and edit values were not getting saved correctly in the backend. This caused incorrect permission behaviour for the newly created user regarding back-dated transactions.
🌟 How This Helps You
The saving mechanism for back date entry and edit permissions in User Master has been corrected. Now, when a user is created and the “Allowed From” option is selected for back date entry / edit in the first go, the values are saved correctly in the backend — ensuring accurate permission enforcement from the start.
🎬 Where to Find It
📷 See It in Action
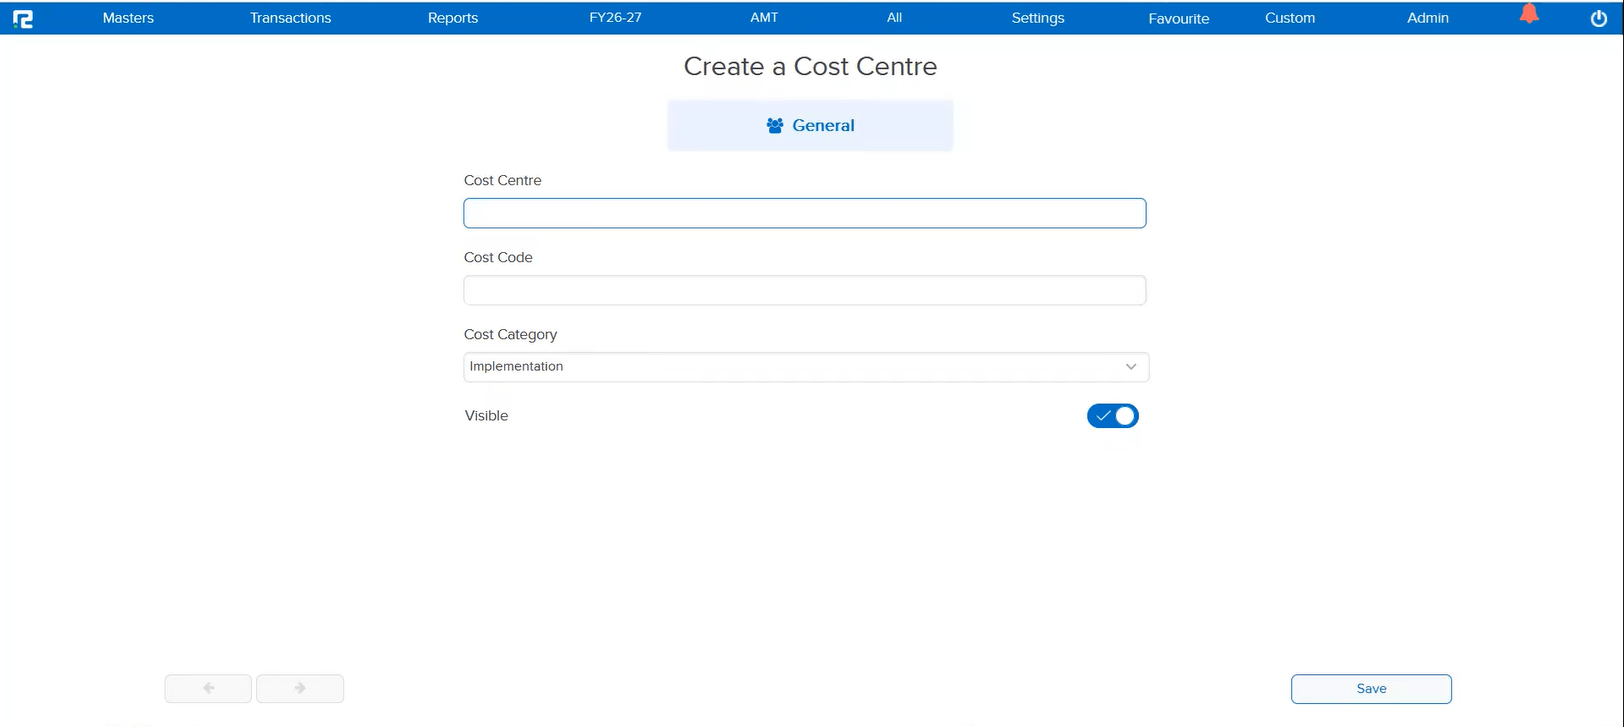
📌 What Was Happening
While creating a Cost Center Master, if the user selected the Cost Category using keyboard keys instead of the mouse, the Party field would sometimes appear even when it was not enabled for the selected Industry cost category. When this happened, the Party field became mandatory, preventing the user from saving the cost center without filling it — even though the category did not require it.
🌟 How This Helps You
The cost category selection logic has been corrected to properly evaluate the Party field visibility regardless of whether the selection is made via keyboard or mouse. The Party field will now only appear when it is genuinely enabled for the selected cost category — ensuring a consistent and error-free cost center creation experience.
🎬 Where to Find It
📷 See It in Action
📌 What Was Happening
The Cashfree verification status option was appearing on multiple screens without any parameter check. This meant the option was visible to all users regardless of whether the Cashfree feature was enabled for their company. The affected screens were:
• Approval Screen
• Ledger Master
• Ledger Master shortcut from Transaction Screen
• Ledger Master View
🌟 How This Helps You
The Cashfree verification status option is now parametric across all the above screens. It will only be visible when the Cashfree feature parameter is enabled for the company — ensuring a cleaner interface for users who do not use Cashfree and preventing unnecessary confusion.
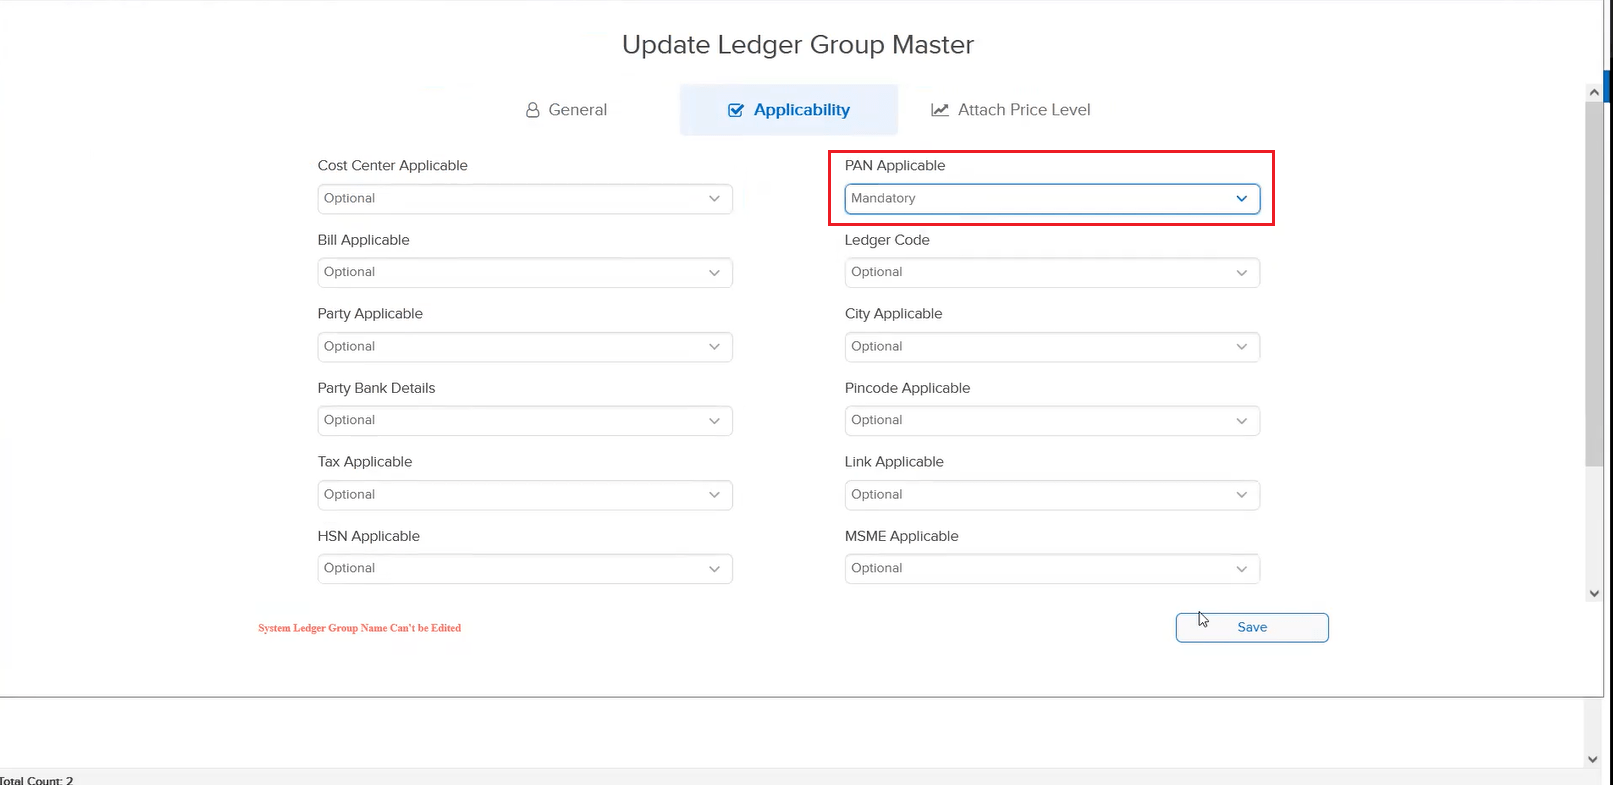
📌 What Was Happening
When PAN applicability was set to “Mandatory” for a ledger group, the Ledger Master was not getting saved. This prevented users from creating or updating any ledger under that group, blocking master data management entirely.
🌟 How This Helps You
The issue has been resolved. The Ledger Master now saves correctly even when PAN is marked as mandatory for the ledger group — ensuring uninterrupted ledger creation and updates.
🎬 Where to Find It
📷 See It in Action
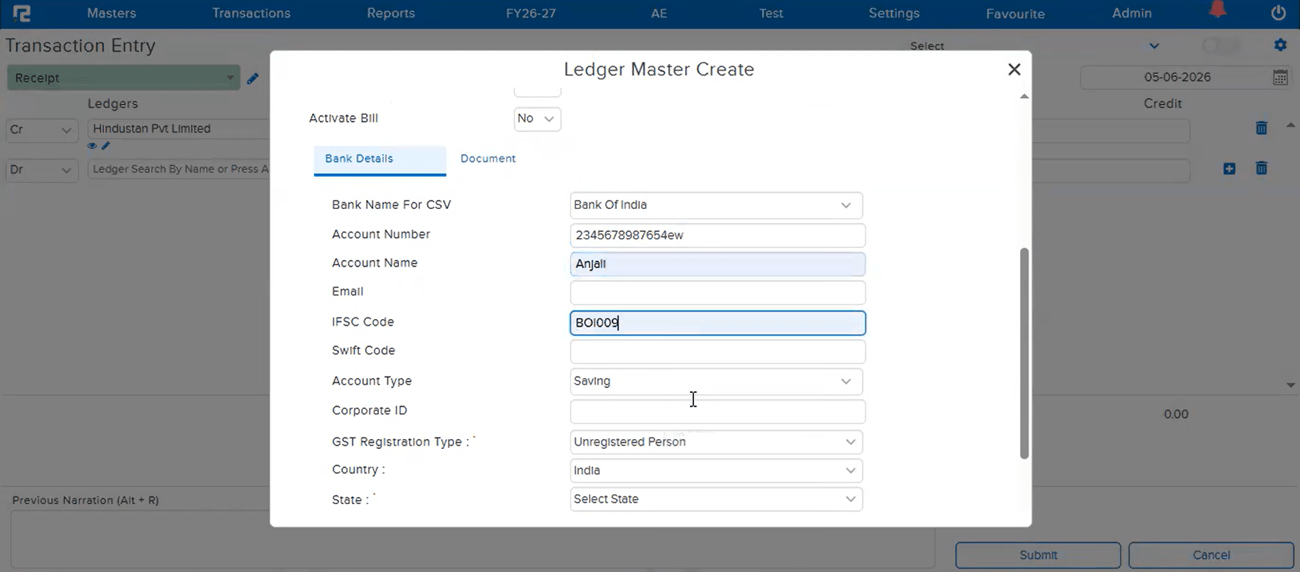
📌 What Was Happening
When a ledger was created directly from the transaction screen using the Alt+C shortcut key, the bank details or party details entered by the user were not being saved — even though all the necessary information had been filled in. This issue was occurring for companies where the Cashfree parameter is enabled, causing the details to silently drop without any error or indication to the user.
🌟 How This Helps You
The issue has been fixed. For companies with the Cashfree parameter enabled, bank details and party details entered while creating a ledger via Alt+C from the transaction screen will now be saved correctly — ensuring no information is lost after ledger creation.
🎬 Where to Find It
📷 See It in Action
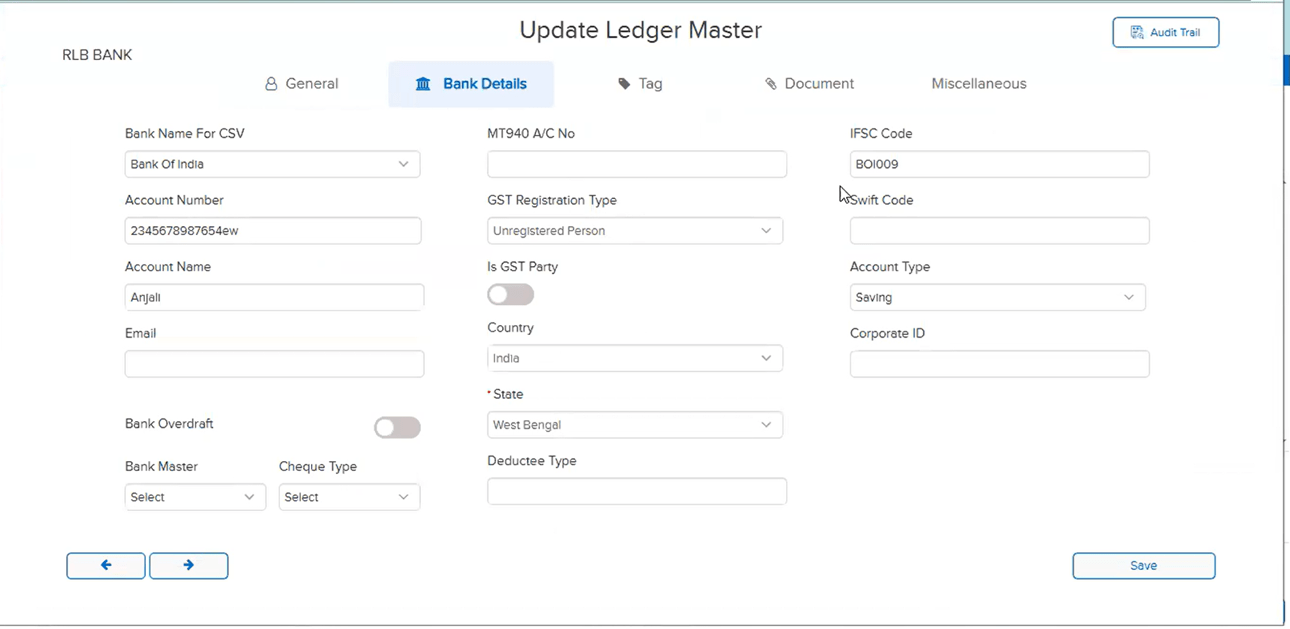
📌 What Was Happening
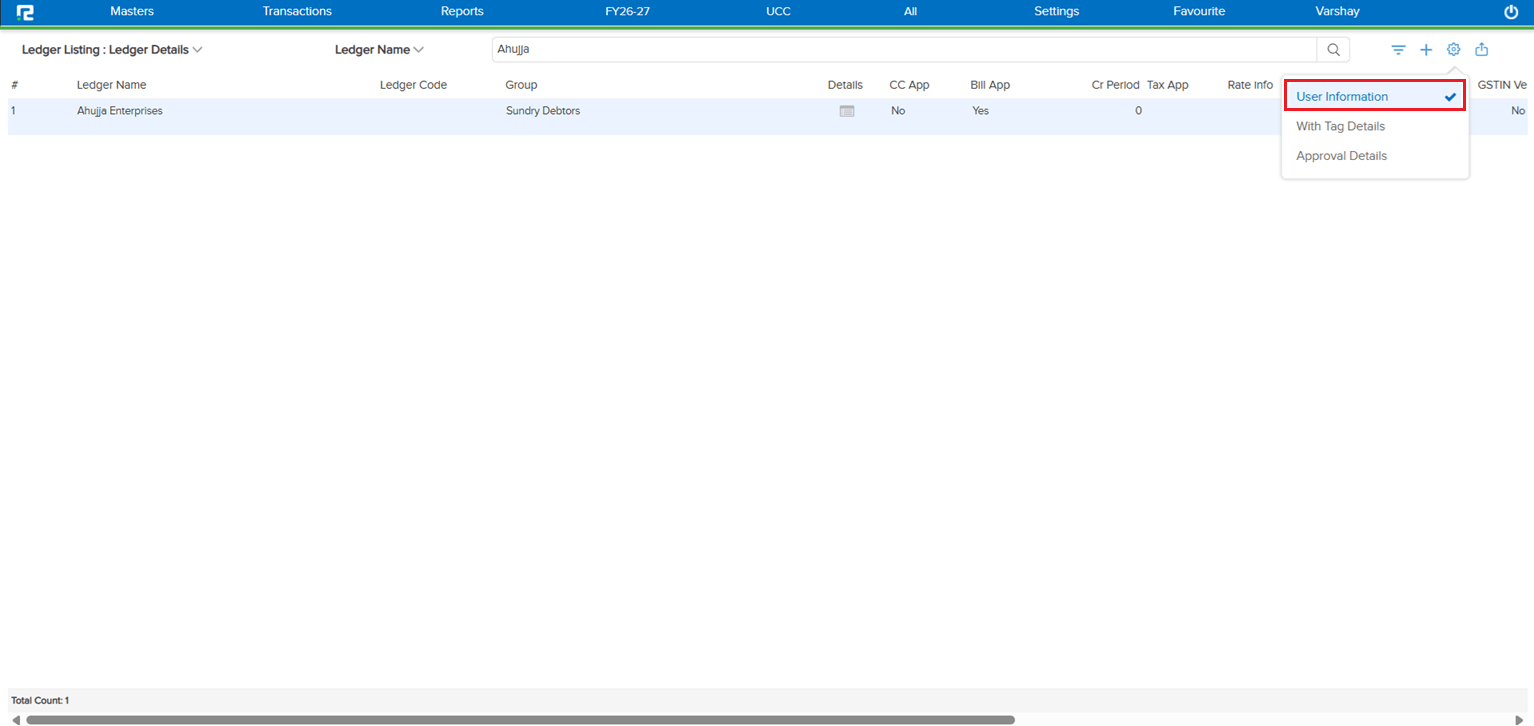
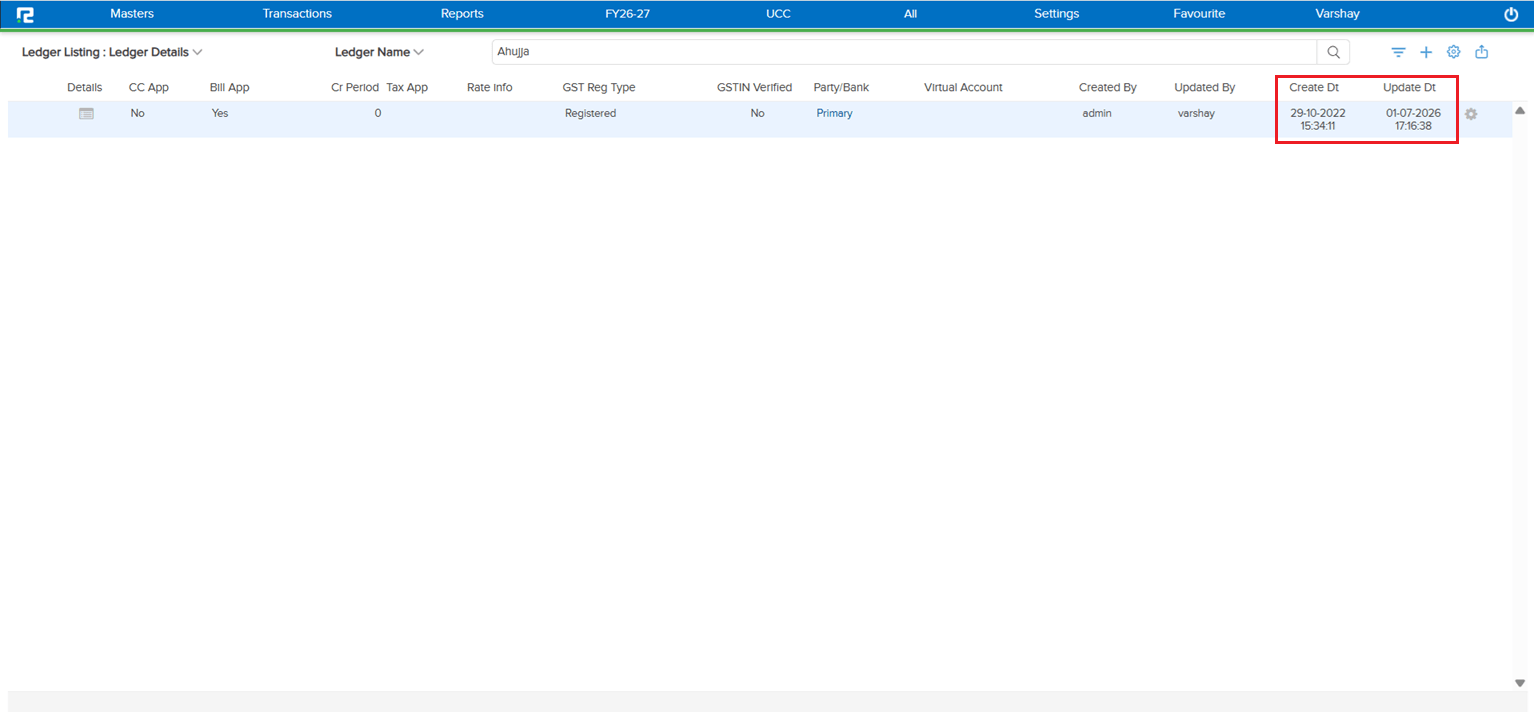
When a ledger was created via the API, the creation timestamp was being stored in 12-hour format without an AM / PM indicator. Since RealBooks displays timestamps in 24-hour format, this caused the time to be interpreted incorrectly — a ledger created at 12:34:19 PM was showing as 00:34:19 in Ledger Master → User Information → Create Dt.
🌟 How This Helps You
The API now stores the creation timestamp in 24-hour format, consistent with how RealBooks handles all creation and edit times. The Create Dt field in Ledger Master → User Information now shows the correct time for ledgers created via the API — no more midnight-looking timestamps for afternoon-created ledgers.
🎬 Where to Find It
📷 See It in Action
📌 What Was Happening
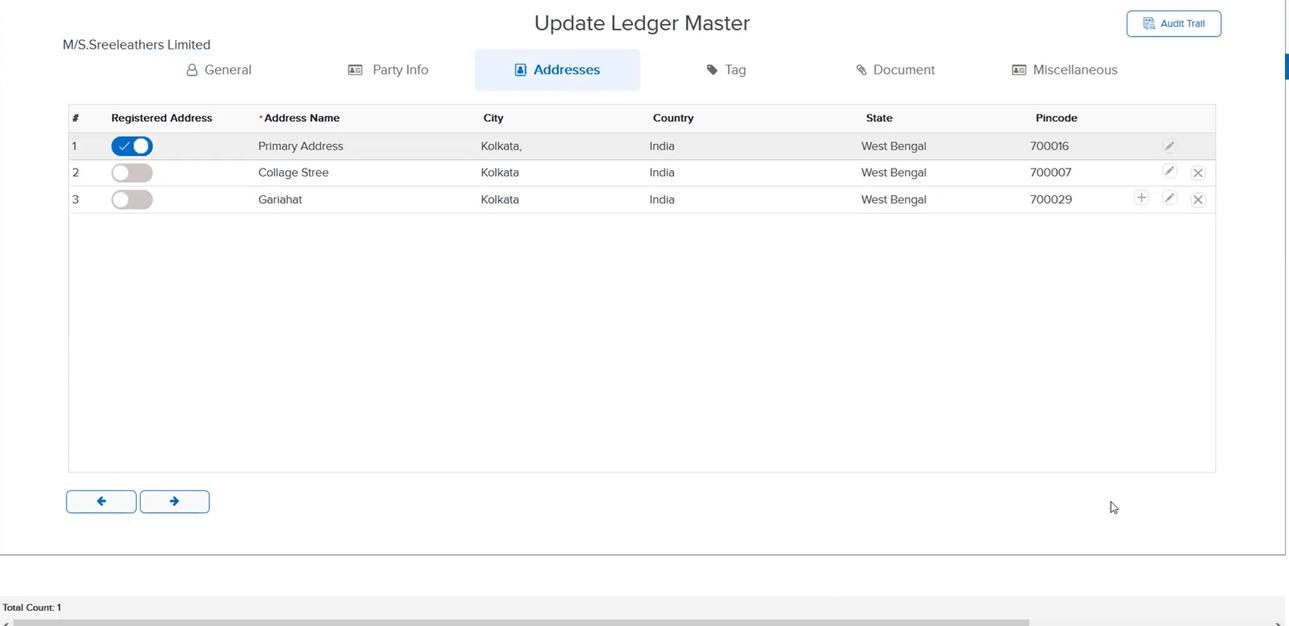
In the Party Ledger Master, address details entered in the Address tab were not getting saved. Users could enter the address, but on saving and reopening the ledger, the address fields were blank — forcing repeated re-entry with no reliable way to persist the data.
🌟 How This Helps You
The bug in the address saving tab of the Party Ledger Master has been fixed. Address details entered against a party ledger are now saved and retained correctly on subsequent opens.
🎬 Where to Find It
📷 See It in Action
📌 What Was Happening
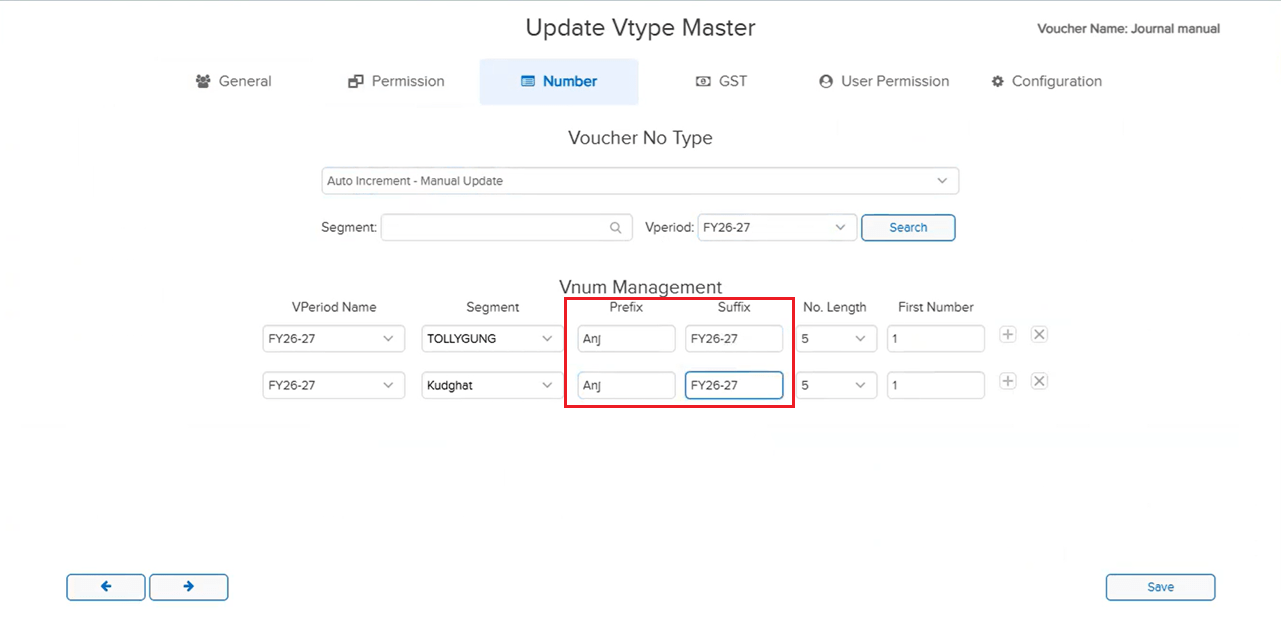
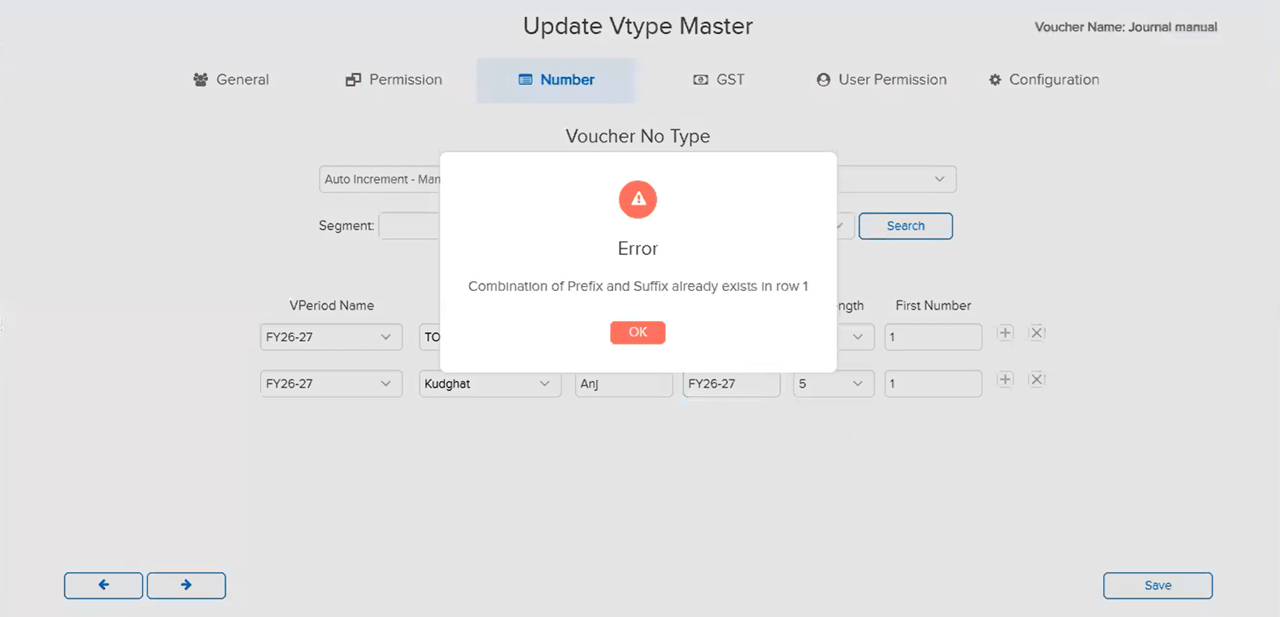
In the Auto-Increment Manual Update numbering configuration, it was possible to assign the same Prefix / Suffix combination to two different Segments under the same Voucher Type. This caused duplicate voucher numbers to be generated across those segments, since both segments shared the same numbering sequence identifier — leading to numbering conflicts within the voucher type.
🌟 How This Helps You
The system now restricts the use of the same Prefix / Suffix combination across different Segments within the same Voucher Type under Auto-Increment Manual Update — preventing duplicate voucher numbering at the source.
Note: The same Prefix / Suffix can still be used across two different Voucher Types with any Segment combination — this restriction applies only within a single Voucher Type.
🎬 Where to Find It
📷 See It in Action
📌 What Was Happening
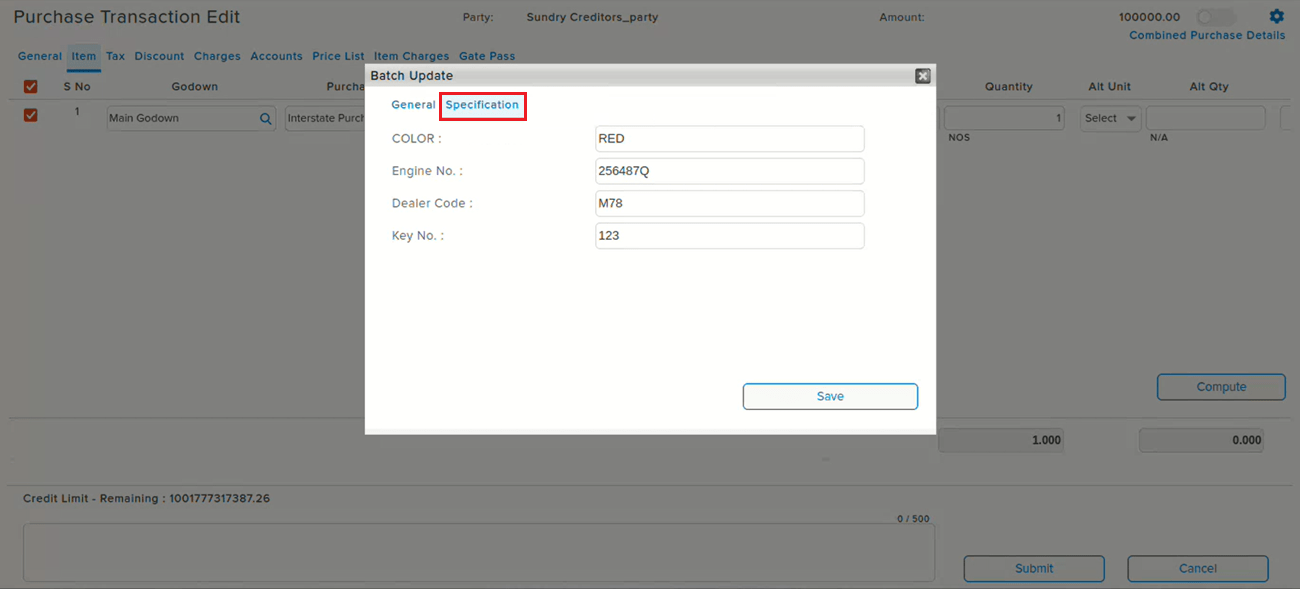
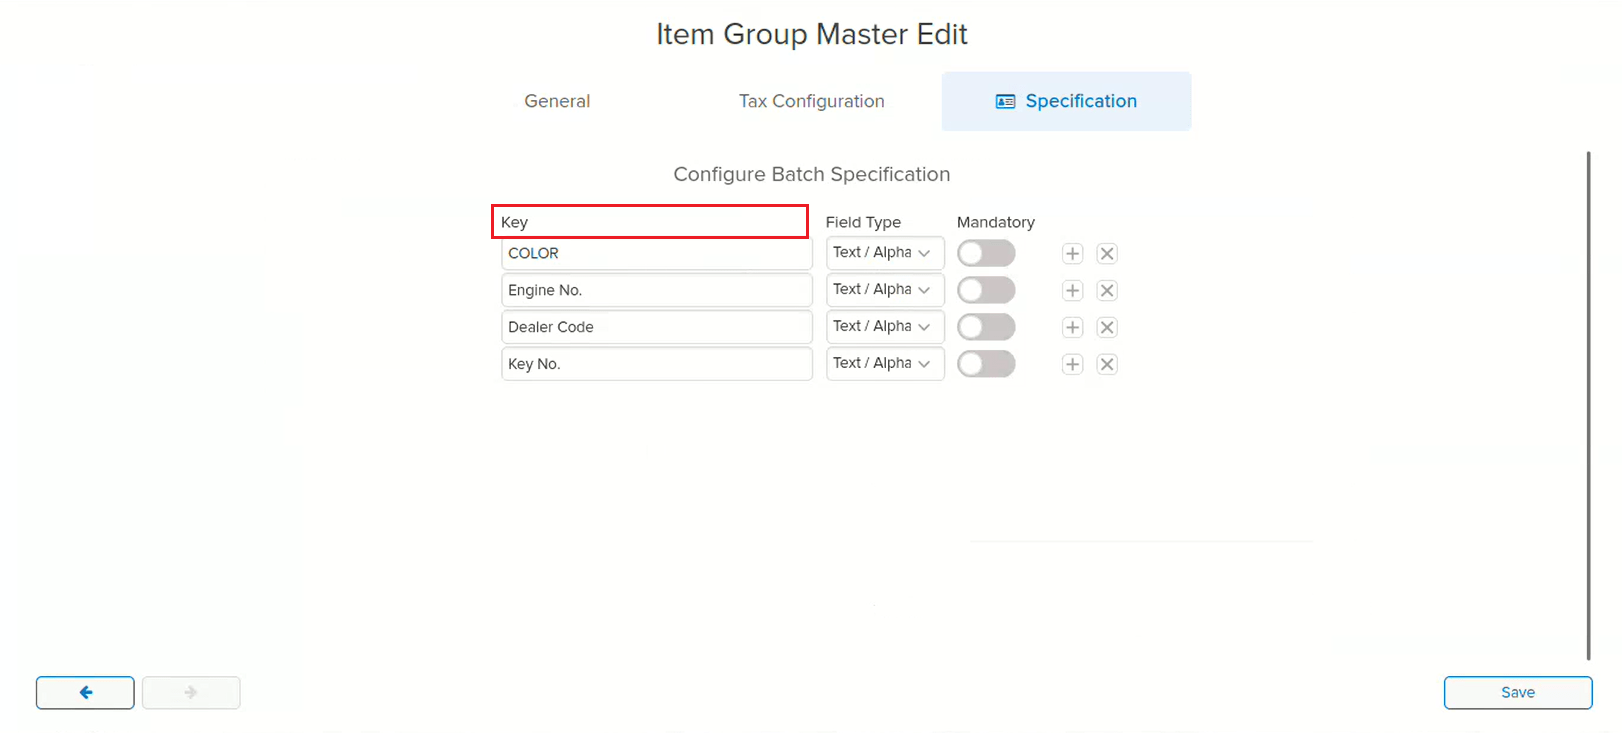
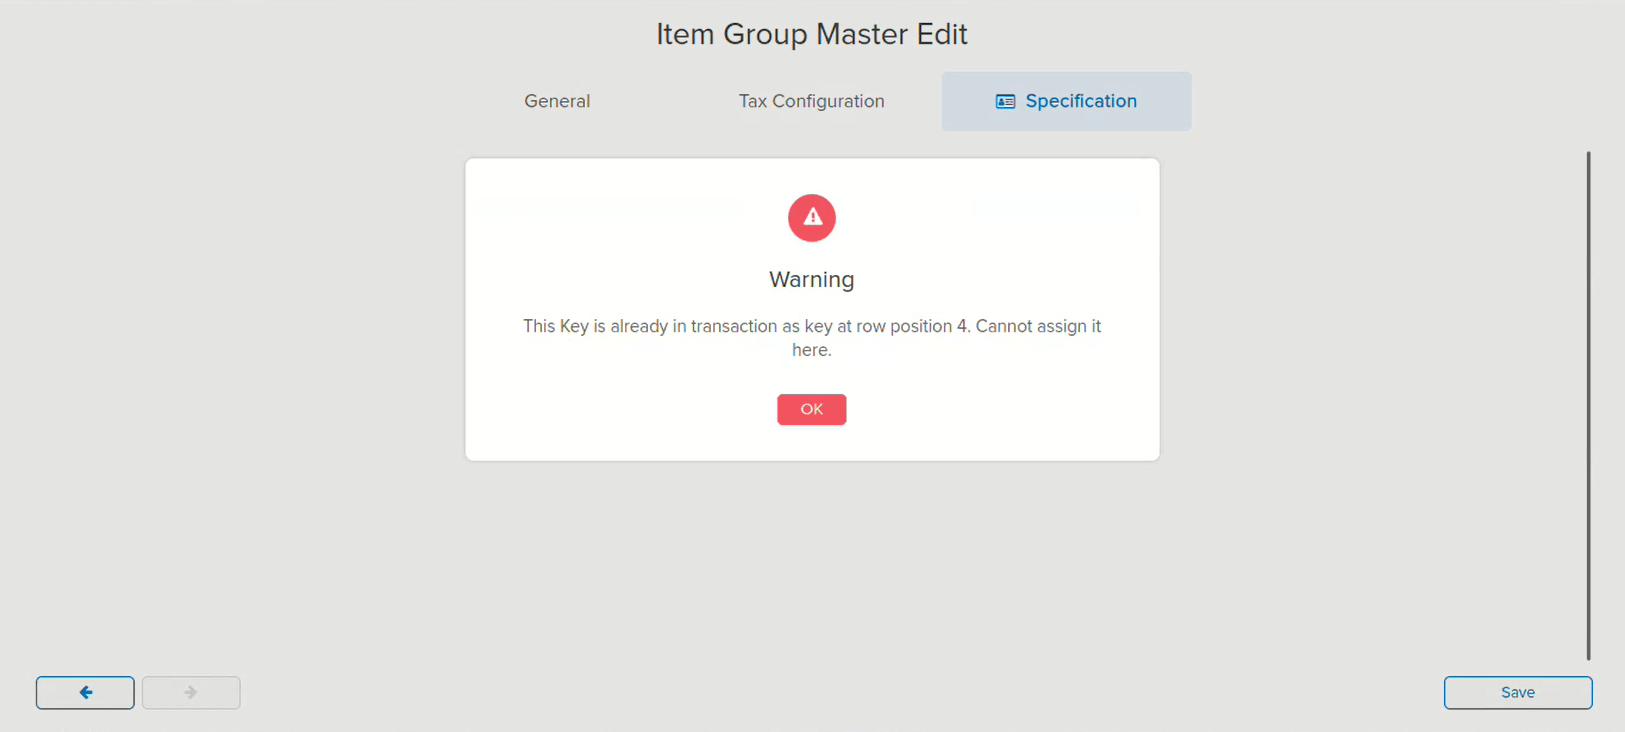
The Key Name under Batch Specification in Item Group Master was editable even after transactions using that batch specification already existed. If a transaction was created using a Batch Specification, and the Key Name was later modified in the Item Group and then changed back to its original value and saved, the Batch Specification shown in the existing transaction was displayed incorrectly — even though the Key Name reverted to what it originally was.
🌟 How This Helps You
The Key Name in Batch Specification is now locked (non-editable) once it has been used in a transaction. Attempting to reassign a Key Name that is already in use as a key in a transaction now shows a warning — preventing the edit at the source and keeping the Batch Specification on existing transactions accurate.
🎬 Where to Find It
📷 See It in Action
📌 What Was Happening
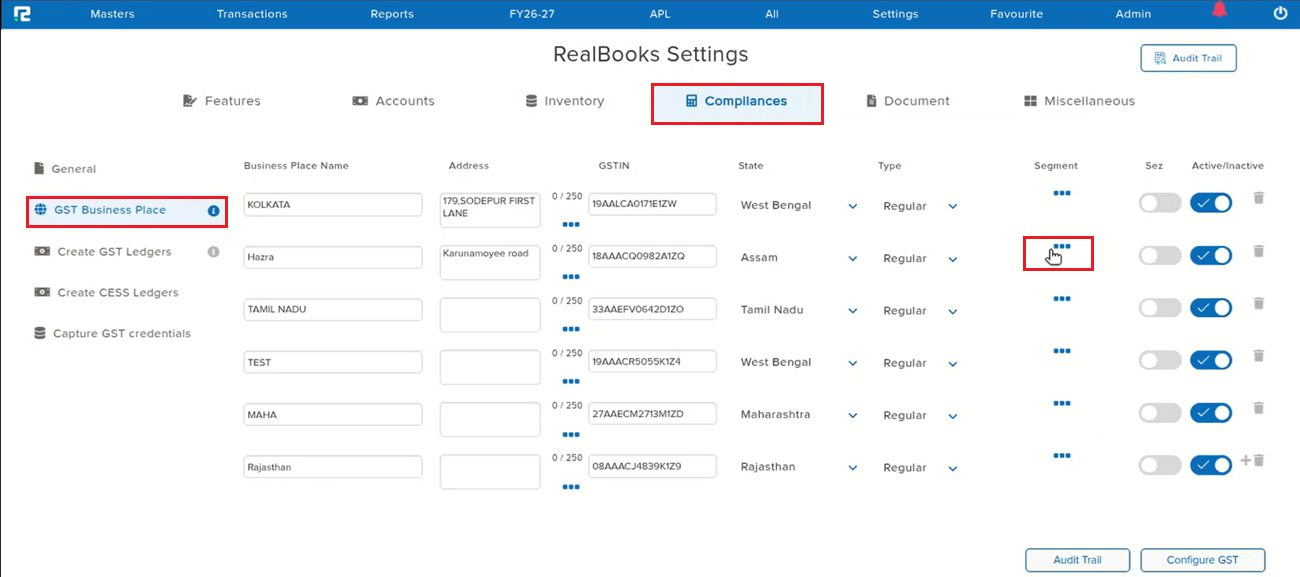
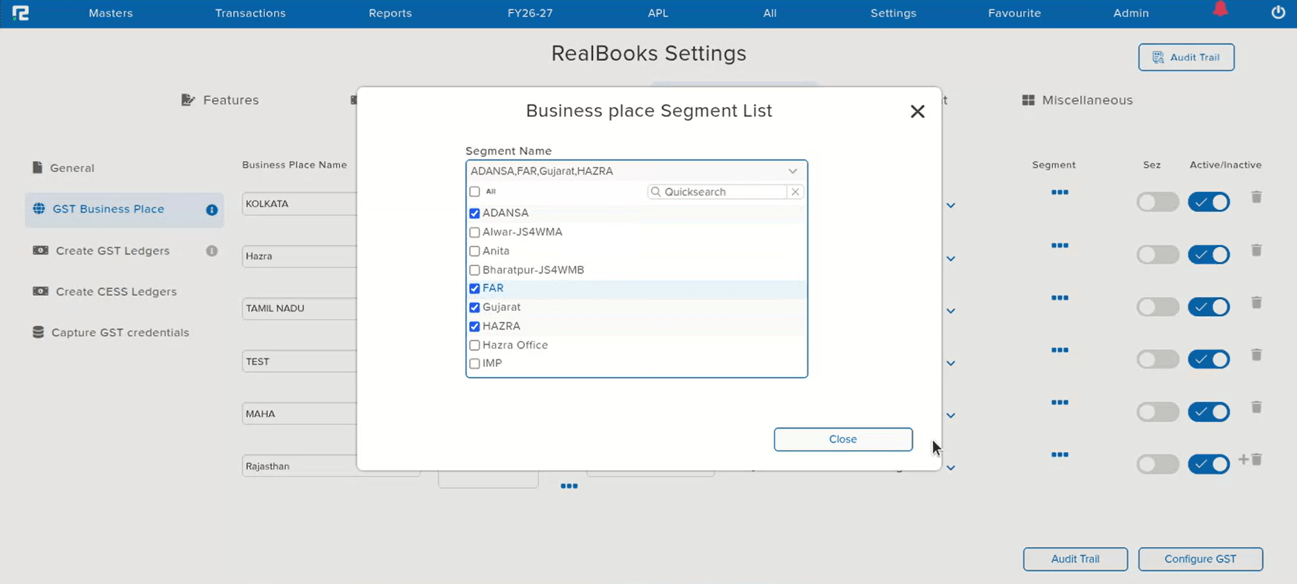
When configuring the Business Place Segment List under GST Business Place and removing any segment, the change was not reflected — the removed segment continued to be displayed as if it were still assigned. The root cause was that the Segment ID and Voucher ID were the same, which caused the business place configuration to save incorrectly.
🌟 How This Helps You
The Segment ID / Voucher ID conflict has been corrected. Removing a segment from the Business Place Segment List now saves and reflects correctly — a removed segment no longer continues to appear against the business place.
🎬 Where to Find It
📷 See It in Action
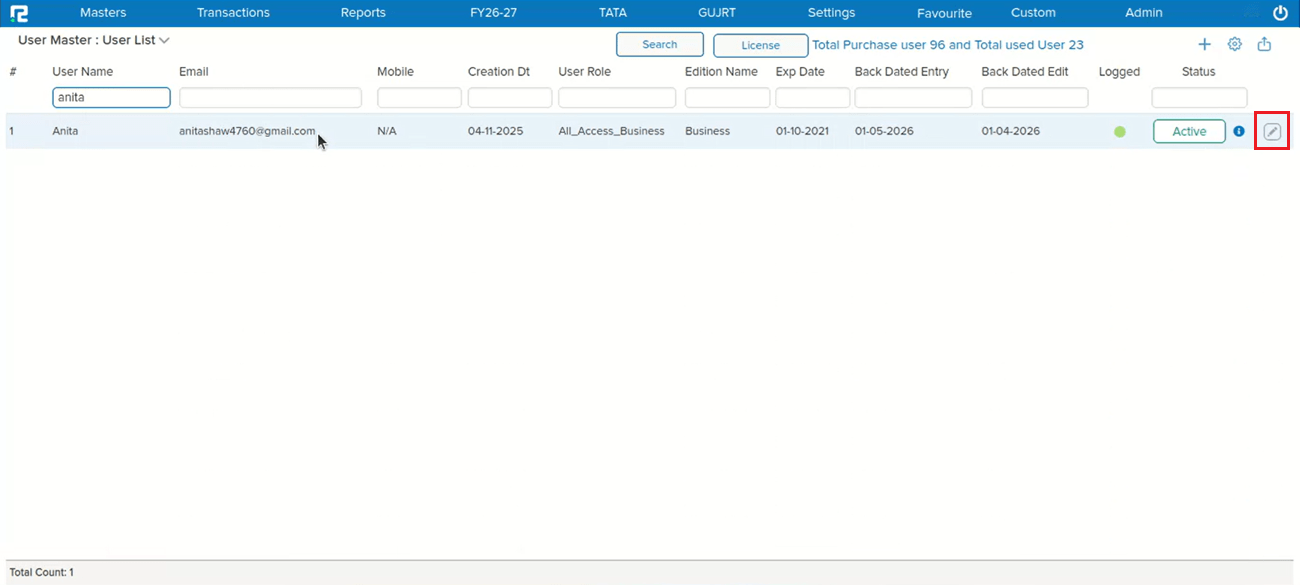
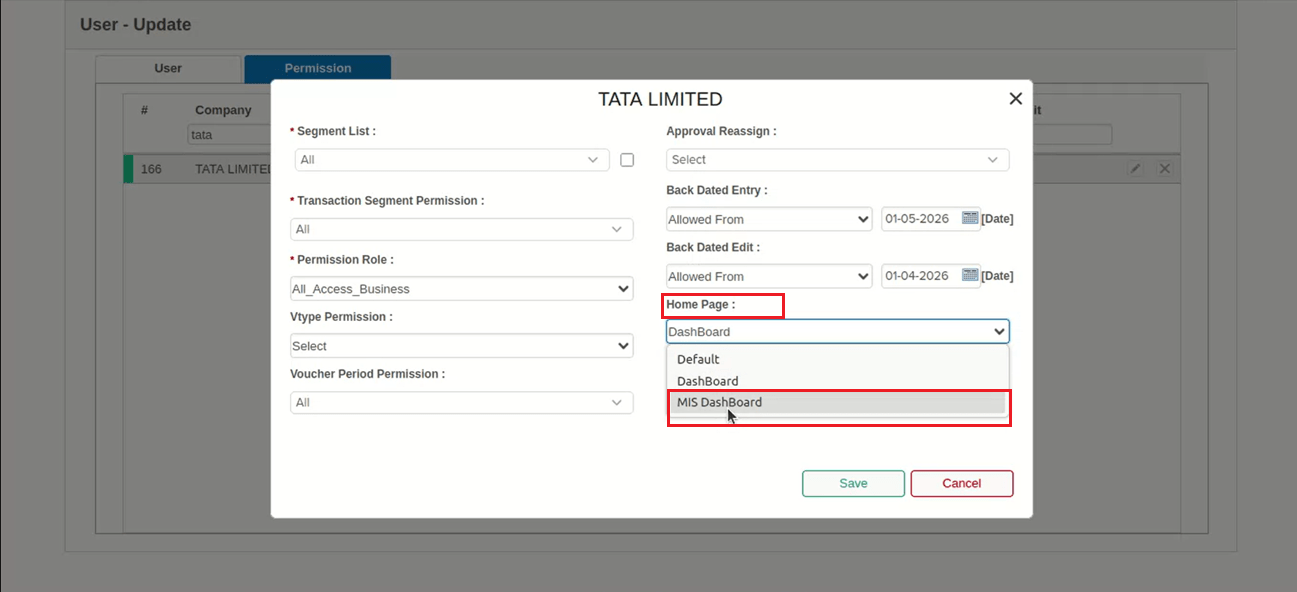
📌 What Was Happening
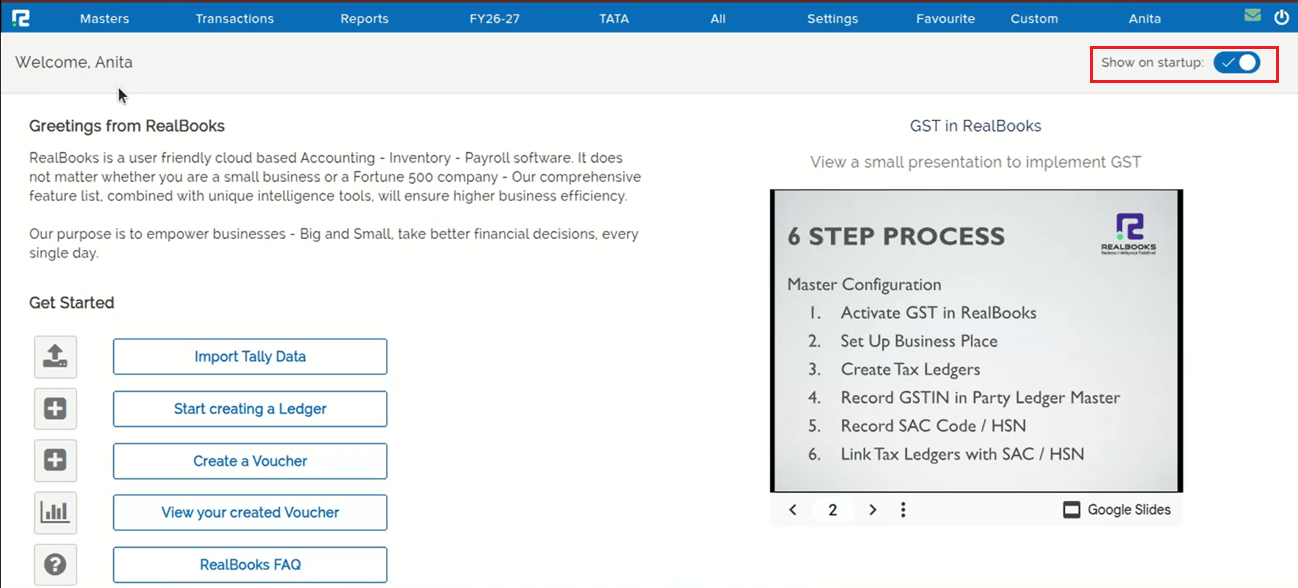
Users were unable to set or switch the Home Page to MIS DashBoard in User Master → Permission — even after saving, the same issue persisted. The root cause: if the user’s Home Page had “Show on startup” enabled (already bookmarked) and that page got loaded, a duplicate value was inserted in the database for home_page. This duplicate param caused the user to remain unable to view the MIS DashBoard, even when it was correctly assigned in User Master.
🌟 How This Helps You
The duplicate home_page parameter issue has been corrected. Setting or switching the Home Page to MIS DashBoard in User Master → Permission now saves correctly, and the assigned dashboard loads as expected — including when “Show on startup” is enabled.
🎬 Where to Find It
📷 See It in Action
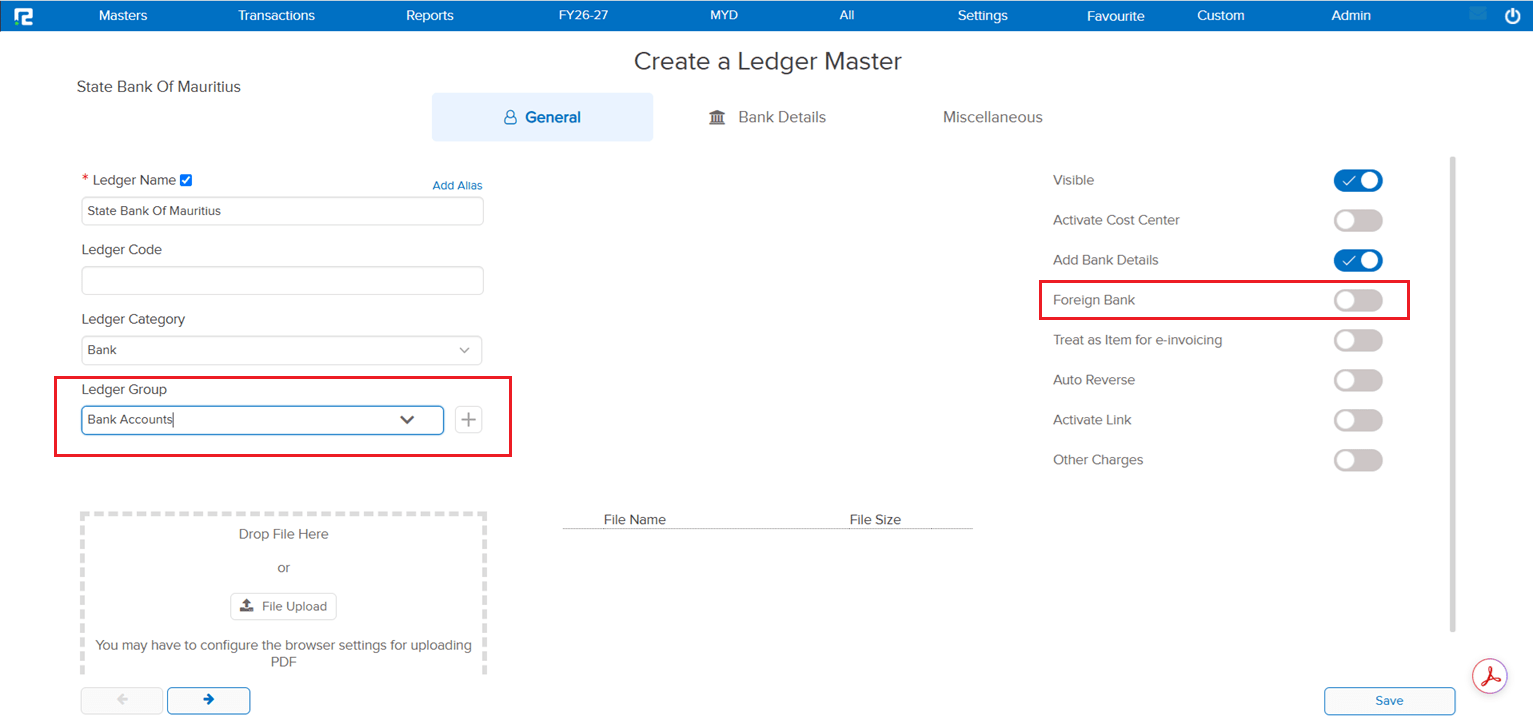
📌 What Was Happening
On the Bank Ledger, the Foreign Bank pop-up option was shown only when the ledger was grouped directly under “Bank”. If the Bank Ledger was grouped under “Bank Account”, the Foreign Bank pop-up option did not appear — because marking a foreign bank was fixed to the “Bank” group only.
🌟 How This Helps You
This is now fixed — the Foreign Bank pop-up option is displayed for Bank Ledgers grouped under “Bank Account” as well, so you can mark a foreign bank regardless of which of these groups the ledger sits under.
📷 See It in Action
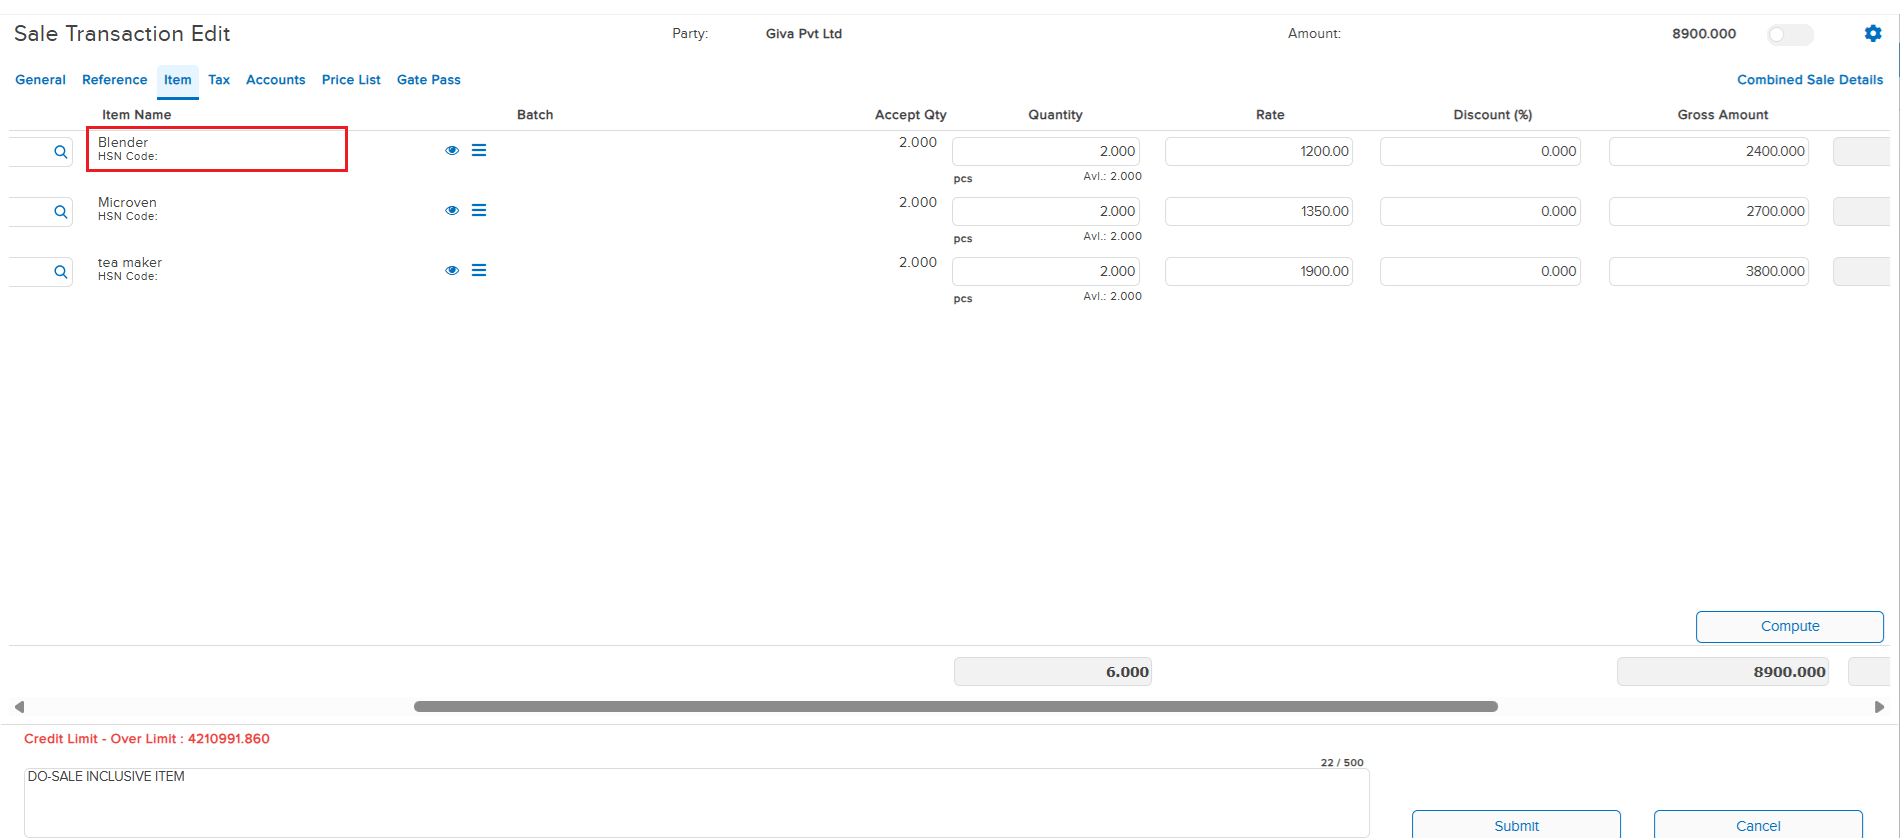
📌 What Was Happening
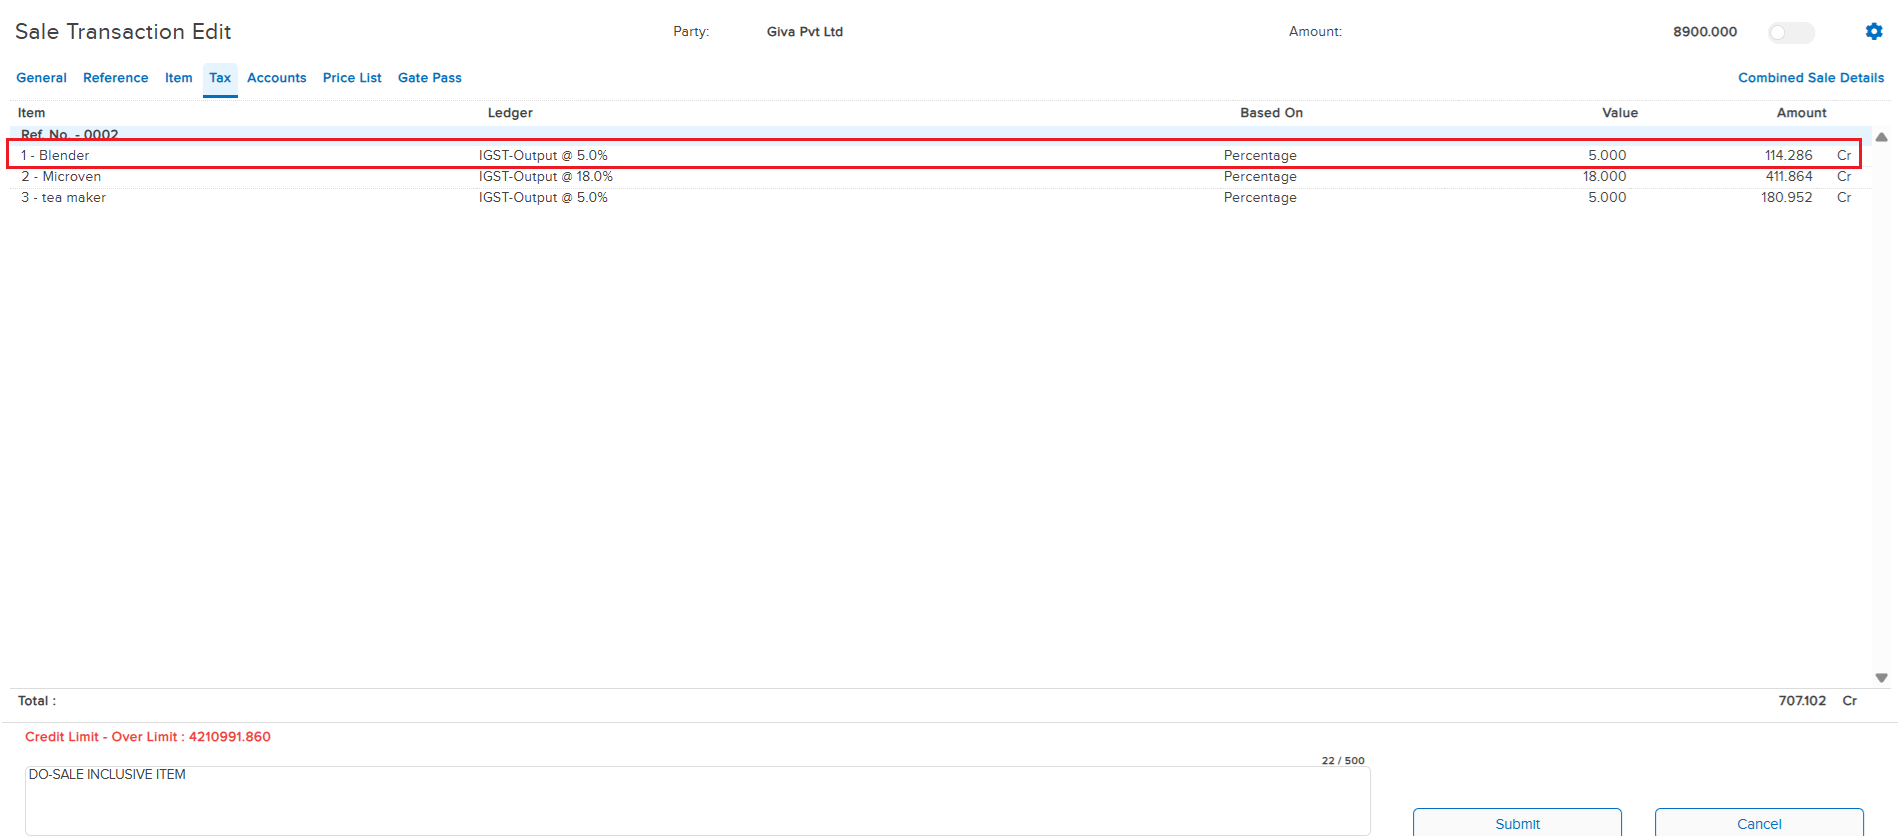
When a Sale entry was created by chaining from a Delivery Order (DO) to Sale, the inclusive tax of the item was not getting calculated correctly in the sale entry. This led to incorrect tax calculations in the sale voucher, causing discrepancies in the final transaction amounts.
🌟 How This Helps You
The inclusive tax calculation during DO to Sale chaining has been corrected. When creating a sale entry from a Delivery Order, the item’s inclusive tax is now computed accurately — ensuring correct tax amounts and reliable transaction totals in the sale voucher.
📷 See It in Action
📌 What Was Happening
The back dated entry and edit permission defined in the User Master was not being considered when transactions were posted via API. This meant users could create or edit back-dated entries through the API without the system enforcing the configured permission restrictions — bypassing the intended access control.
🌟 How This Helps You
The back dated entry and edit permission defined in the User Master is now correctly enforced during API-based transaction posting. The system will validate the permission and restrict back-dated entries and edits via API, ensuring consistent behavior across both UI and API workflows.
📌 What Was Happening
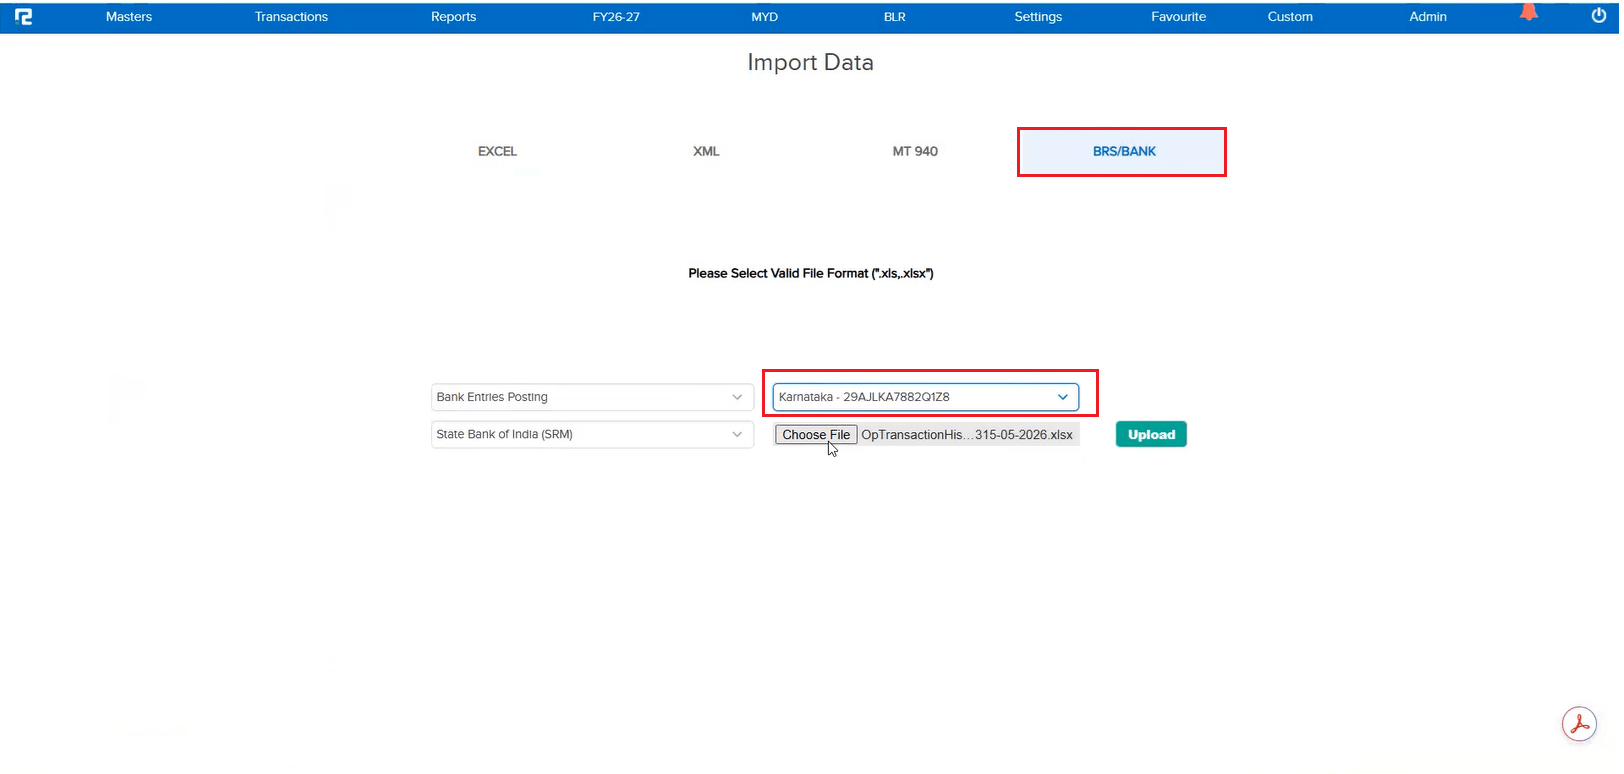
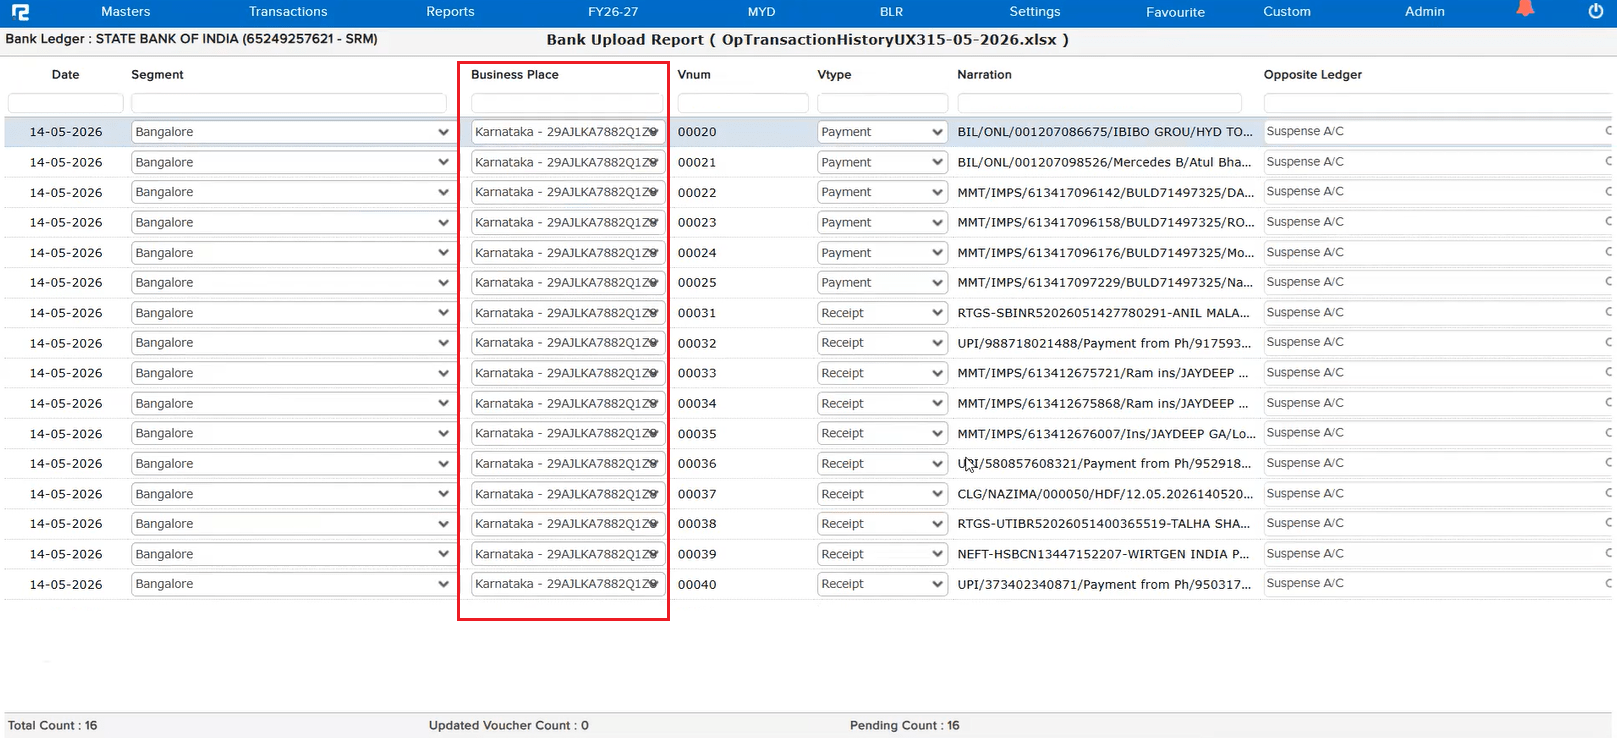
During Bank Statement import for entry posting, even when the user selected a Business Place, it was not getting saved in the transaction screen. This meant the Business Place information was lost after posting, requiring manual correction of each affected transaction.
🌟 How This Helps You
The issue has been corrected. The Business Place selected during Bank Statement import now saves correctly in the transaction screen — ensuring accurate transaction data without the need for manual post-import corrections.
🎬 Where to Find It
📷 See It in Action
📌 What Was Happening
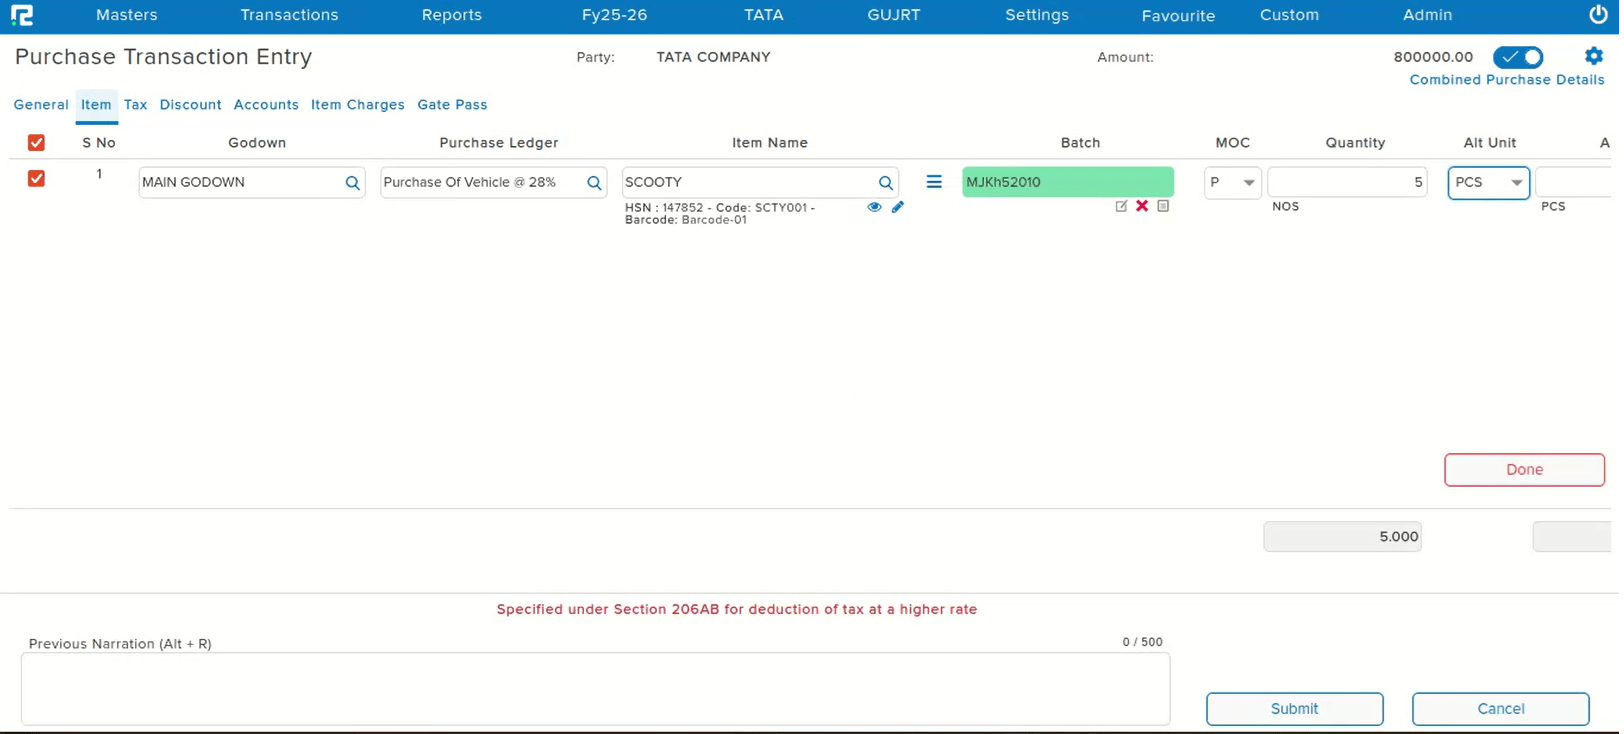
While posting a Purchase entry, when navigating through fields using the Tab key, the cursor was supposed to move sequentially through each field. However, after the Quantity field, pressing Tab was skipping the Alt Unit and Alt Qty fields entirely and jumping directly to the Rate field — even though data needed to be entered in both Alt Unit and Alt Qty.
🌟 How This Helps You
The Tab key navigation in the Purchase entry screen has been corrected. The cursor now moves sequentially through Quantity → Alt Unit → Alt Qty → Rate — ensuring no fields are skipped and data entry is smooth and complete.
🎬 Where to Find It
📷 See It in Action
📌 What Was Happening
Following the recent release of the optimized inventory screen, a bug was introduced for companies where the Stock Accounting module is enabled. In such companies, the Purchase ledger must always be in Multi Purchase format — regardless of whether the Multi Purchase parameter is enabled or disabled. However, the new optimized inventory screen was not enforcing this rule, causing incorrect ledger behaviour for Stock Accounting companies.
🌟 How This Helps You
The issue in the optimized inventory screen has been fixed. For companies where Stock Accounting is enabled, the Purchase ledger will now always appear in Multi Purchase format — irrespective of the Multi Purchase parameter setting — ensuring correct and consistent accounting behaviour.
🎬 Where to Find It
📷 See It in Action
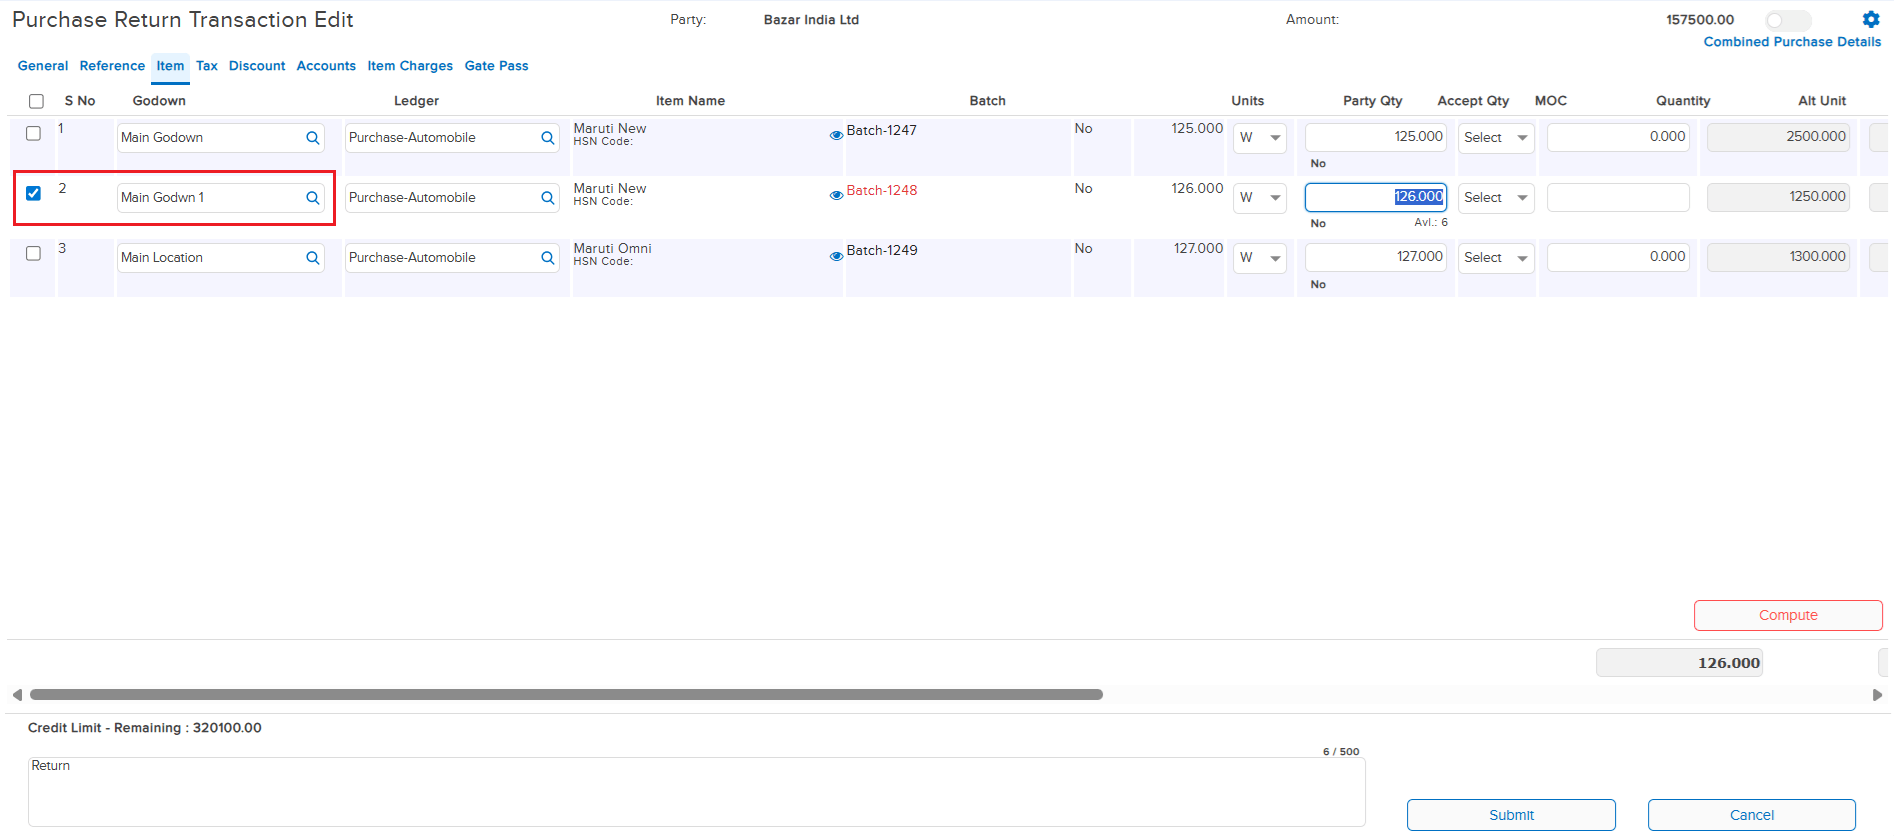
📌 What Was Happening
When a user opened a Purchase Return entry in edit mode and unticked and re-checked the tagged purchase reference, the godown of the previous item line was automatically getting replaced into the newly checked item row. This caused incorrect godown values to be populated without any user input, leading to data integrity issues in the Purchase Return entry.
🌟 How This Helps You
The issue has been fixed. When editing a Purchase Return and re-selecting the tagged purchase reference, the godown value of each item row is now retained correctly and will no longer be overwritten by the previous line’s godown — ensuring accurate and reliable data in Purchase Return entries.
🎬 Where to Find It
📷 See It in Action
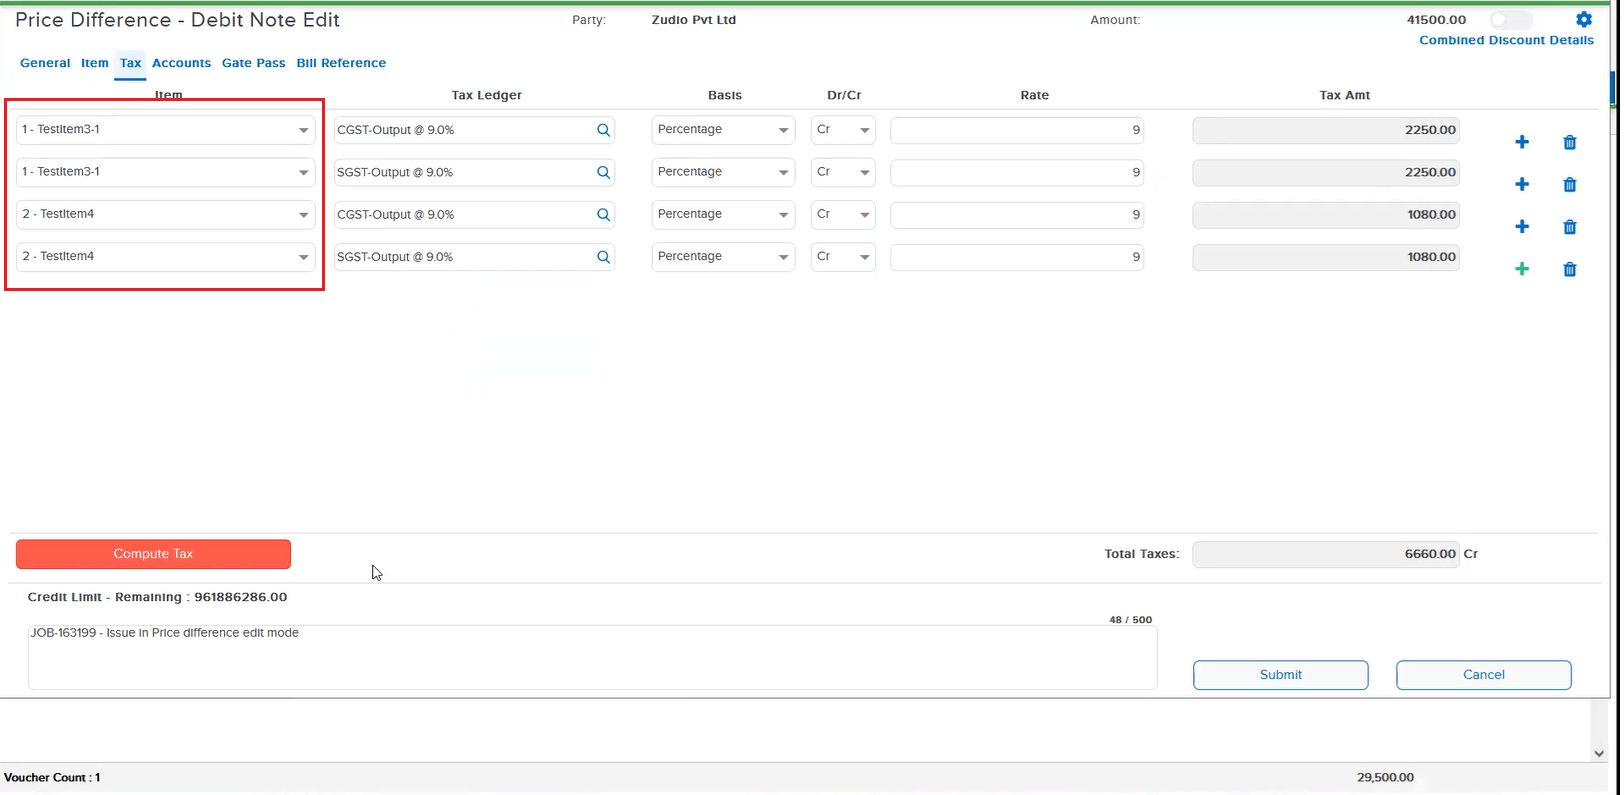
📌 What Was Happening
When opening a Customer Debit Note (Price Difference) in edit mode, adding a new item, and then navigating to the Tax tab to add a new tax line for that item, two issues were observed:
• The previous item line was getting automatically removed, prompting the user to re-select the item
• The tax ledger could not be selected in the new tax line, blocking the user from completing the entry
🌟 How This Helps You
Both issues in the Price Difference edit mode have been resolved. The item line is now retained correctly when switching to the Tax tab, and the tax ledger can be selected without any issues — ensuring a smooth and uninterrupted editing experience for Customer Debit Note entries.
🎬 Where to Find It
📷 See It in Action
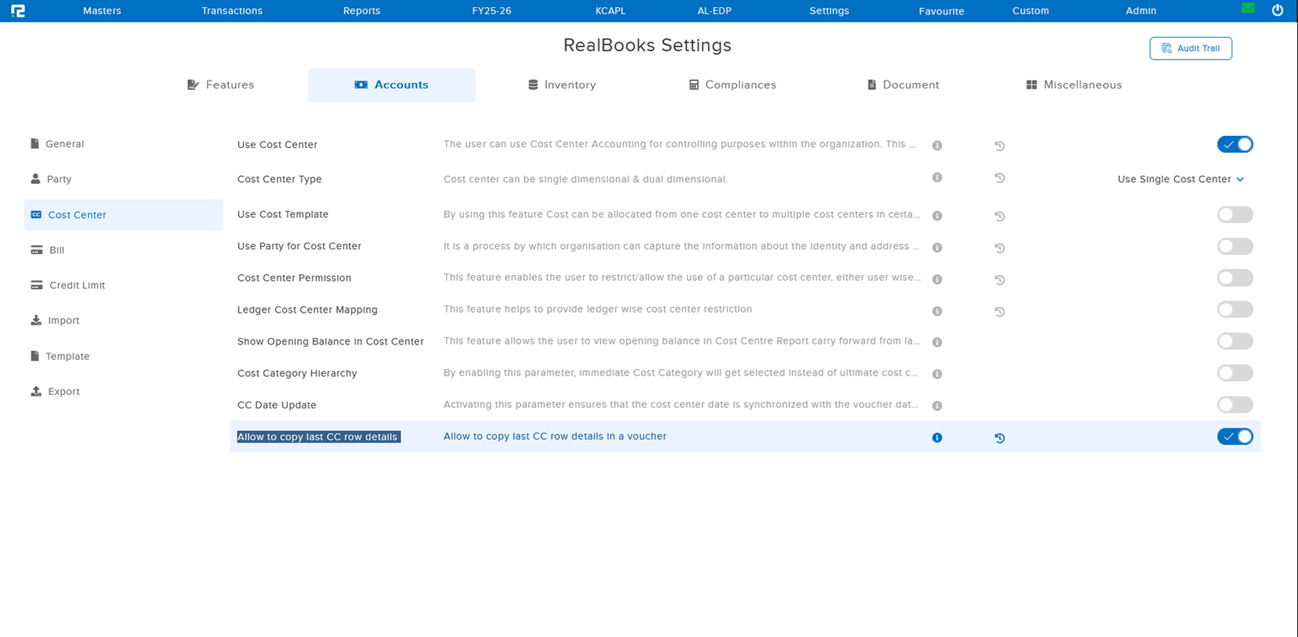
📌 What Was Happening
While posting a Purchase entry with PO tagging, two issues were observed related to Cost Center (CC) allocation across line items. These issues occurred only when the parameter “Allow to copy last CC row details” under Cost Center settings was enabled — disabling the param made it work correctly:
• Issue 1 — CC Split not working: After selecting a single Cost Center for the first line item, when attempting to assign a different CC to subsequent items, the split was not being applied — the same CC was being carried over regardless.
• Issue 2 — CC Removal not working: After selecting multiple Cost Centers of the same category in the first line item, when trying to remove the CC for other items, the removal was not taking effect.
🌟 How This Helps You
Both Cost Center issues in PO-tagged Purchase entries have been resolved. With the “Allow to copy last CC row details” parameter enabled, you can now:
• Split Cost Centers independently per line item without the previous item’s CC being forced onto subsequent rows
• Remove Cost Centers from individual line items even when multiple CCs of the same category were selected in an earlier row
🎬 Where to Find It
📷 See It in Action
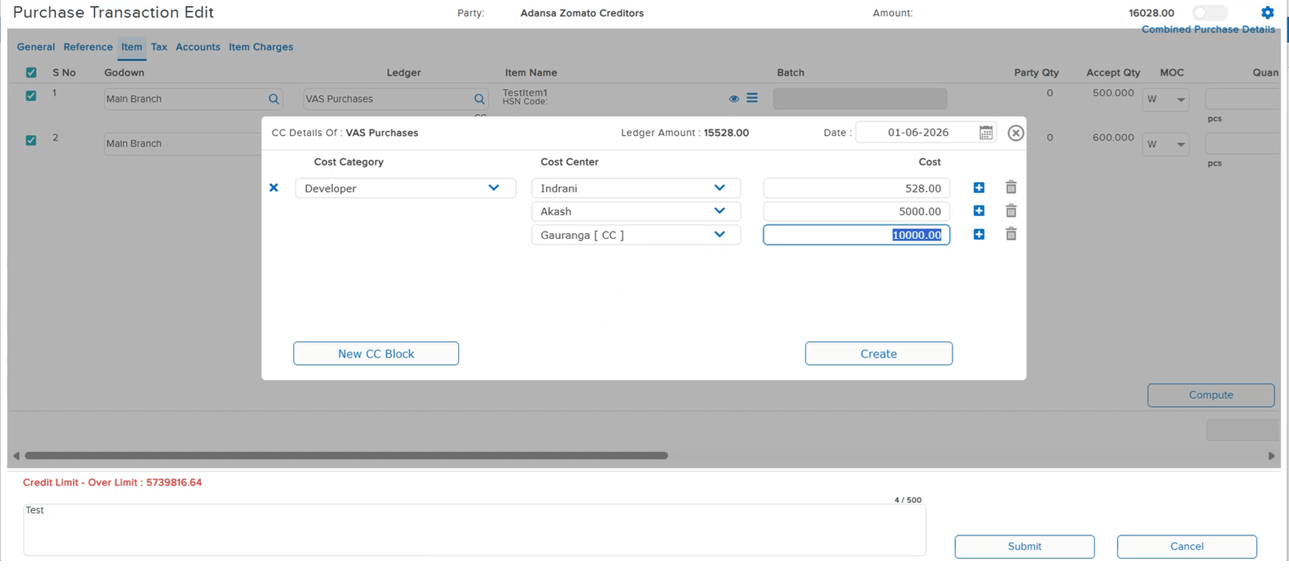
📌 What Was Happening
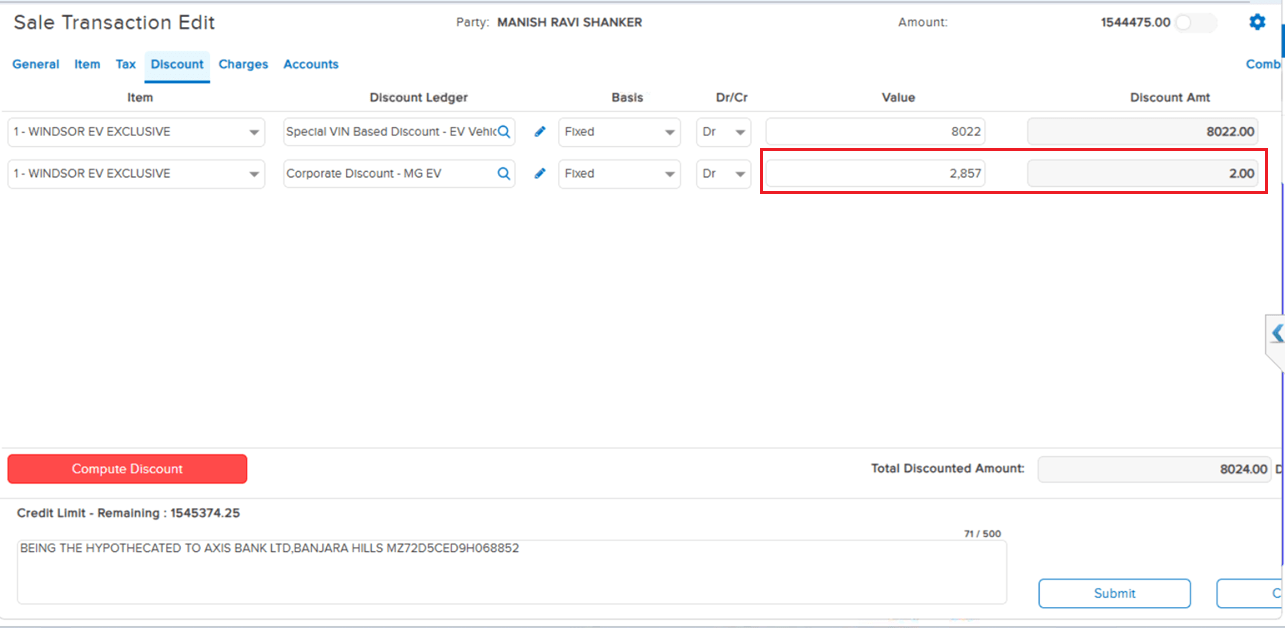
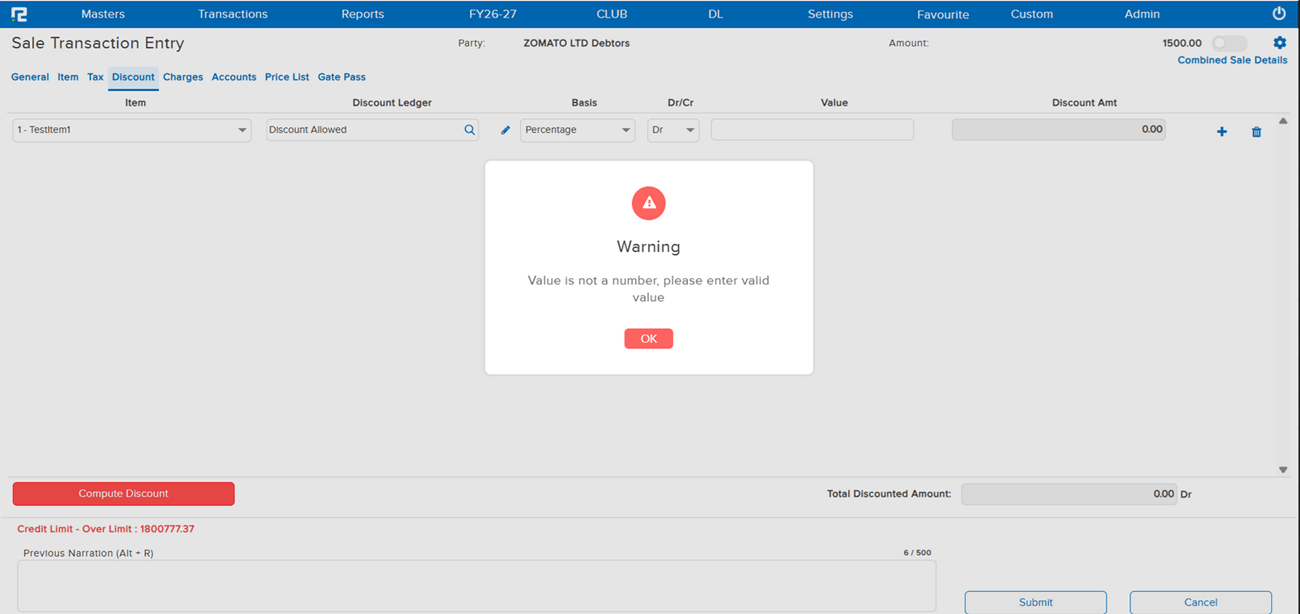
In an inventory entry, the system was allowing a comma to be entered in the Discount Amount field under the Discount tab. The entry was getting saved with the comma intact, resulting in an invalid numeric value being stored. This caused the invoice to not get generated for that entry.
🌟 How This Helps You
The validation on the Discount Amount field has been corrected. The system will now reject any value entered with a comma, preventing invalid data from being saved. Invoice generation will no longer be blocked due to a malformed discount amount.
🎬 Where to Find It
📷 See It in Action
📌 What Was Happening
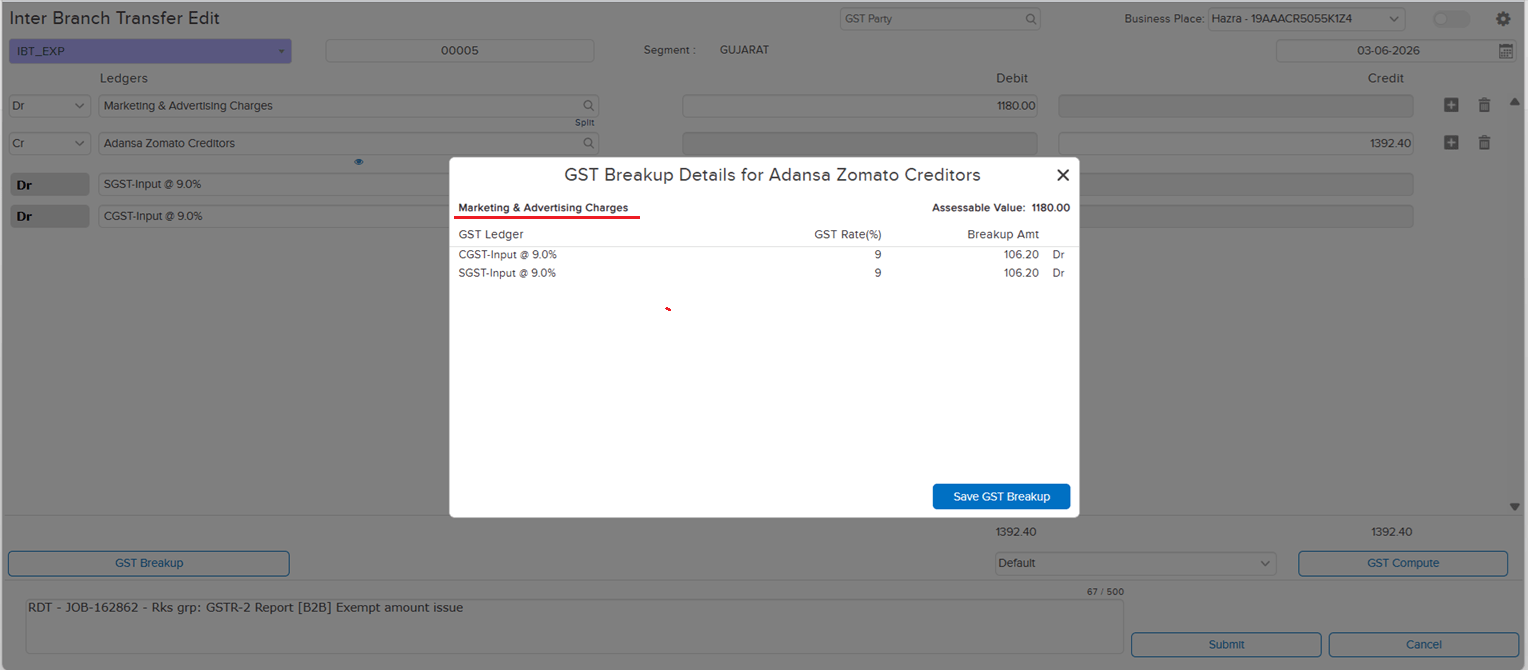
In the GSTR-1 Report — B2B section, two issues were observed for certain entries:
• Issue 1 — Incorrect Exempt Amount: An entry was showing an exempt amount of ₹1,118.66 even though the ledger was already marked as taxable. The amount was incorrectly being reflected as exempt.
• Issue 2 — Blank Invoice Number: For the same transaction, despite a bill reference number being present, the Invoice Number field was showing blank in the report.
Root Cause: In the IBT parent screen, when the expense ledger was changed and the entry was saved without re-computing auto GST, the GST ledgers were not getting removed cleanly — causing the GST data to be dropped from the transaction, leading to both the exempt amount discrepancy and the missing invoice number.
🌟 How This Helps You
The issue has been fixed. When the expense ledger is changed in the IBT parent screen, the system will now correctly handle GST ledger removal and data recomputation — ensuring GST data is not silently lost. Entries will no longer appear with incorrect exempt amounts or blank invoice numbers in the GSTR-1 B2B report.
🎬 Where to Find It
📷 See It in Action
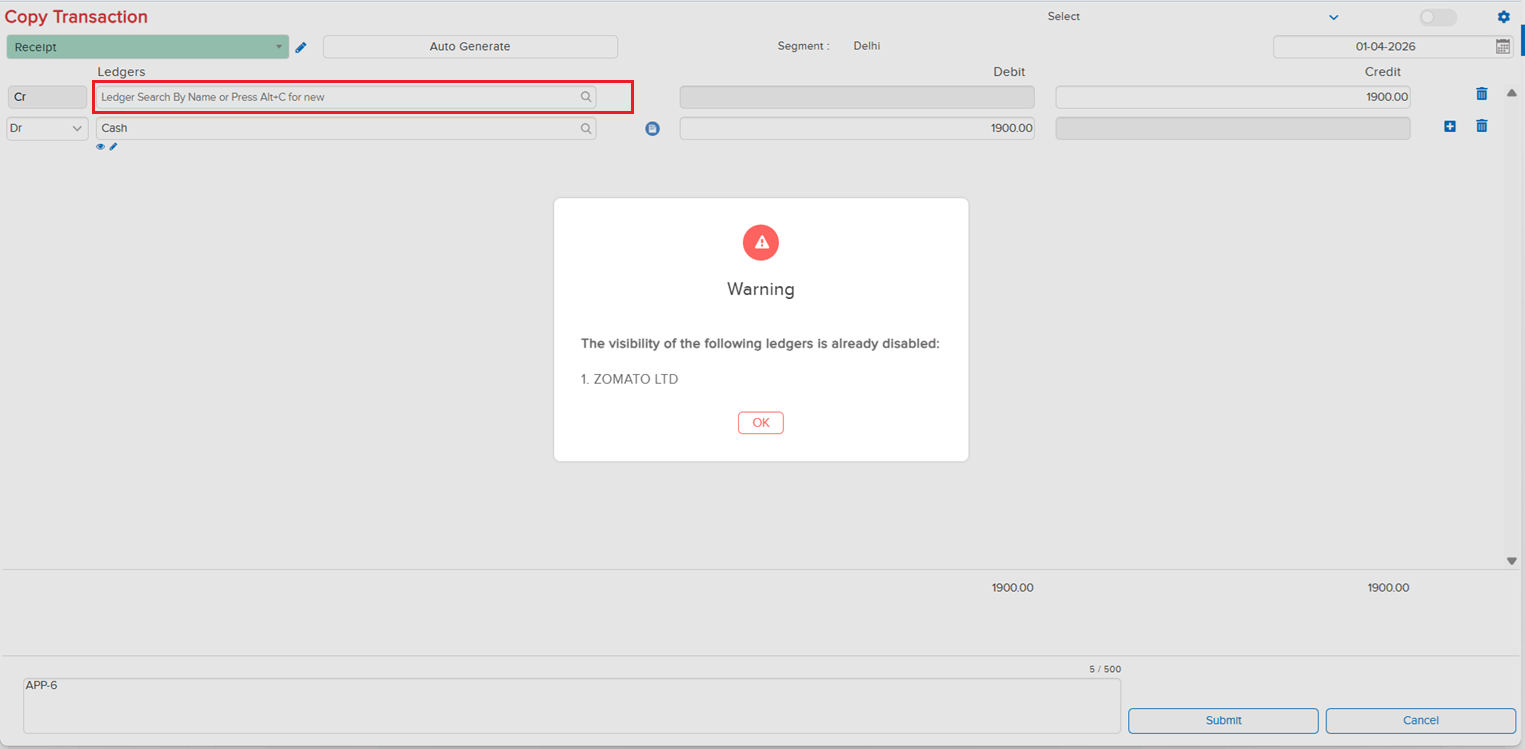
📌 What Was Happening
When a ledger had its Visibility disabled, the restriction was being enforced in regular entry screens but not at the Copy Accounting Transaction level. Users could still copy transactions that contained visibility-disabled ledgers — effectively bypassing the visibility control and creating fresh entries against ledgers that were meant to be restricted.
🌟 How This Helps You
The restriction has now been extended to the Copy Accounting Transaction flow. If any ledger involved in the source transaction has Visibility disabled, the copy is blocked and a clear restriction message is displayed along with the Ledger Name — so users can immediately identify which restricted ledger is preventing the copy, and the visibility control is honoured consistently across regular entry and copy-transaction flows.
🎬 Where to Find It
📷 See It in Action
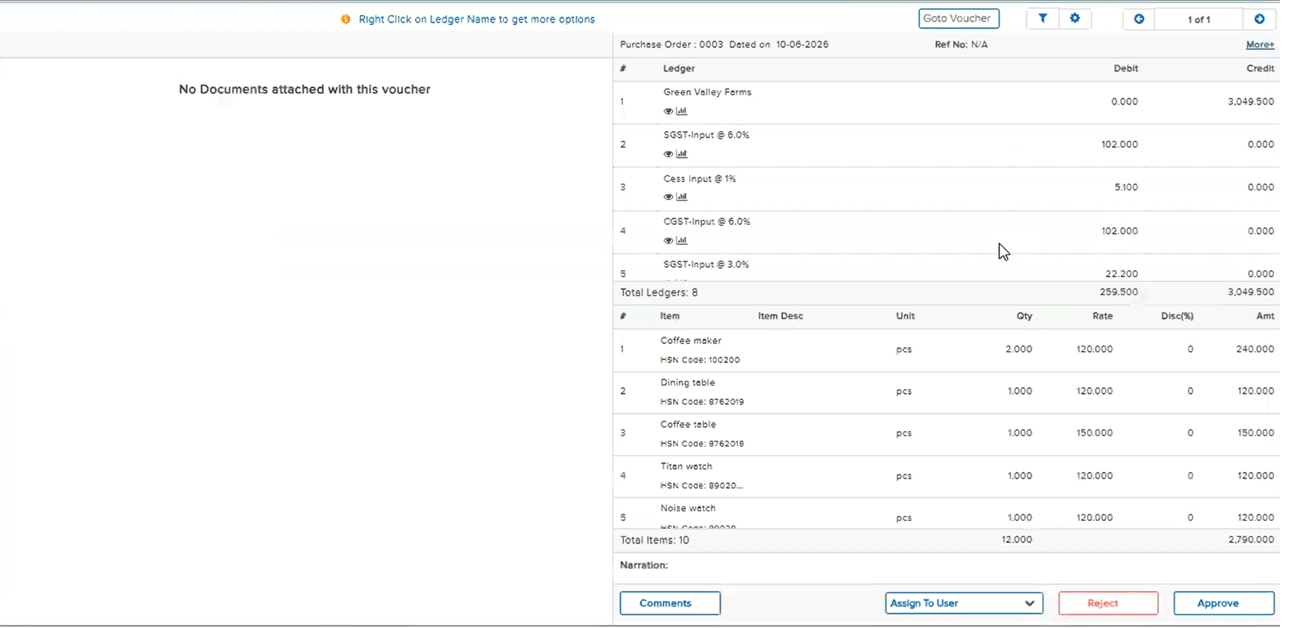
📌 What Was Happening
On the Purchase Order Approval screen, users were unable to view the full item list of the PO — the page kept buffering for a long time and never finished loading. The regression was traced back to a recent Cashfree fix, where the Cashfree parameter was inadvertently added to the approval screen as well. As a result, on sites where Cashfree was disabled, the approval screen would hang and users were unable to approve Sale Orders or Purchase Orders.
🌟 How This Helps You
The Cashfree parameter has been scoped back out of the approval screen. The Purchase Order Approval screen now loads the full item list without buffering, and Sale Order / Purchase Order approvals work normally on sites where Cashfree is disabled — restoring the approval flow that broke after the earlier Cashfree fix.
🎬 Where to Find It
📷 See It in Action
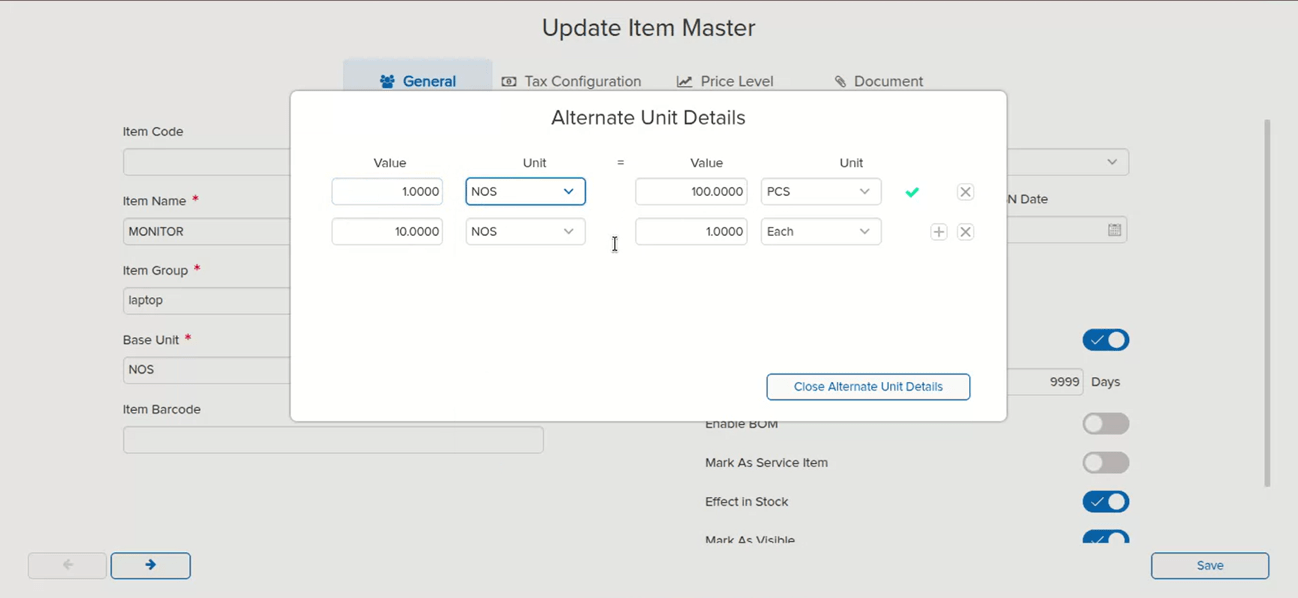
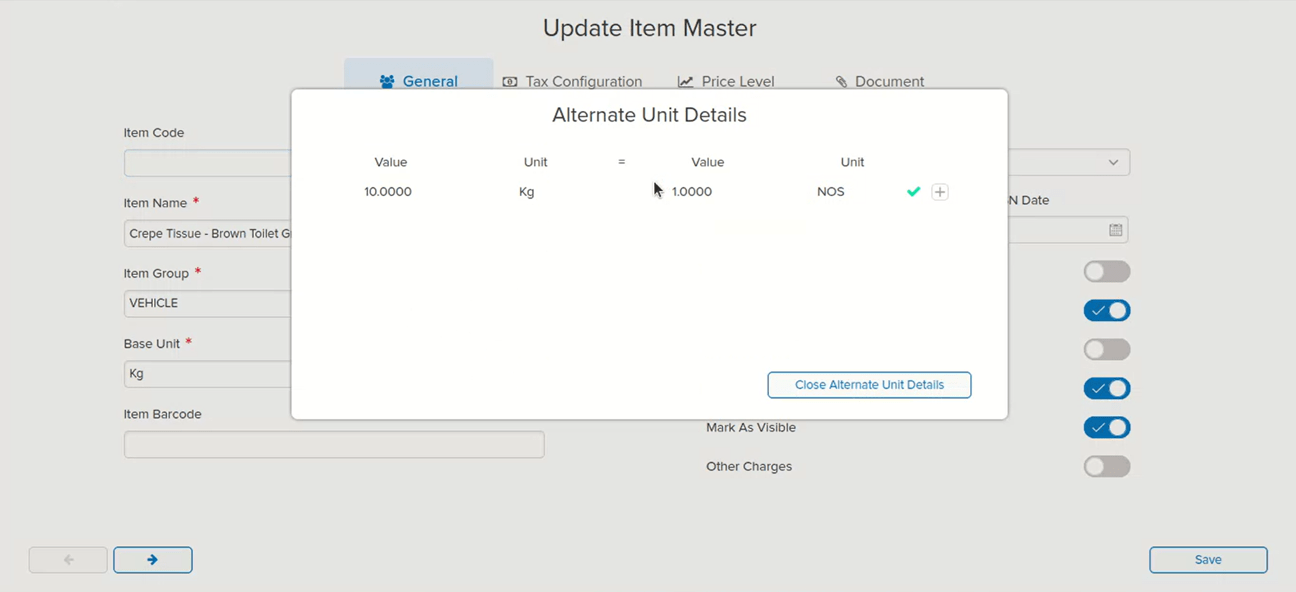
📌 What Was Happening
The issue arose from a specific sequence of actions:
1. Assign Alt Unit details in the Item Master and create a Sales Order (SO) using that Alt Unit combination
2. Go back to the Item Master and update (change) the Alt Unit details
3. When creating the Sale transaction against that SO, the Alt Unit field appeared blank — because the system no longer recognised the original combination as valid
As a result, the Alt Qty was wrongly carried / considered in the affected SO and Sale transactions, leading to incorrect quantity data.
🌟 How This Helps You
To prevent this at the source, editing Alt Unit details in the Item Master is now blocked once any transaction exists in the system against that item — whether it is a Sales Order, Purchase Order, Sale, or Purchase. This ensures that the Alt Unit combination used in transactions always remains consistent with the Item Master, so Alt Qty is never incorrectly applied or left blank in downstream transactions.
🎬 Where to Find It
📷 See It in Action
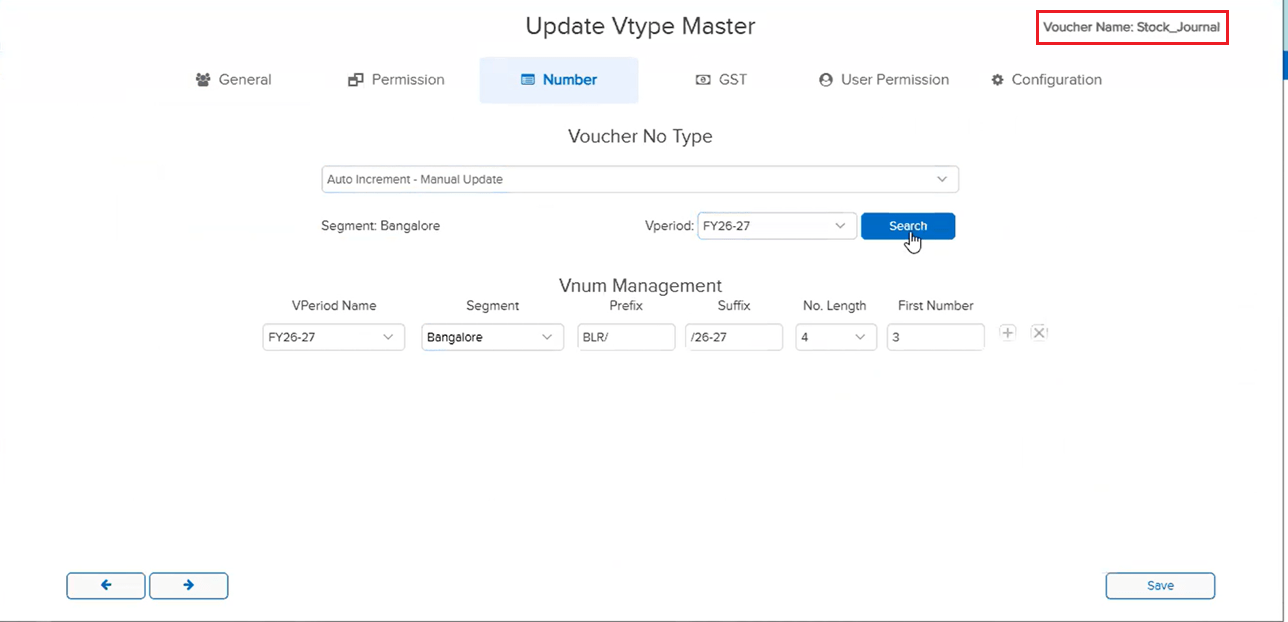
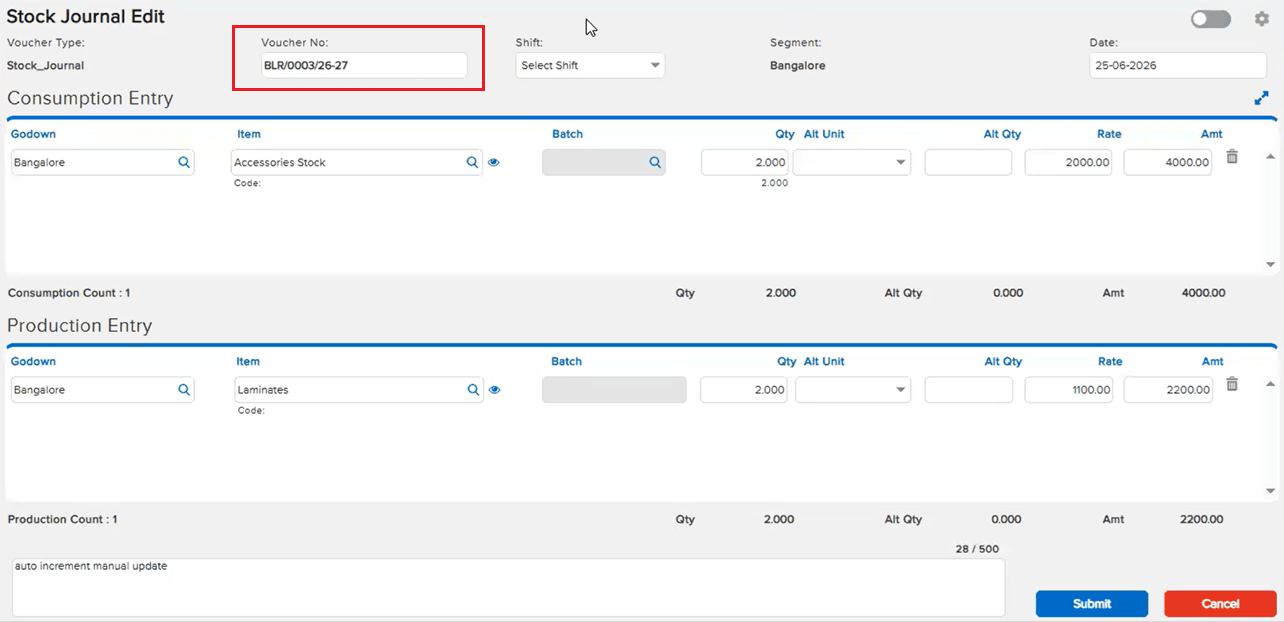
📌 What Was Happening
The Stock Journal edit screen was recently optimised for better performance (see E4 / JOB-156882 in Beta Release 18-06-2026). During that optimisation, a specific edge case was not handled:
The Voucher Type Master for Stock Journal does not expose an Auto-Increment Manual Update option in the UI. However, one client had configured this numbering setting via an Excel import, and the system had accepted it. Because this configuration path was not accounted for in the optimised version, Stock Journal entries with this numbering setup could not be opened in Beta.
🌟 How This Helps You
The optimised Stock Journal edit screen now handles the Excel-imported Auto-Increment Manual Update numbering configuration correctly. Entries that previously failed to open due to this edge case now open as expected — the performance optimisation is preserved and the missing case is covered.
🎬 Where to Find It
📷 See It in Action
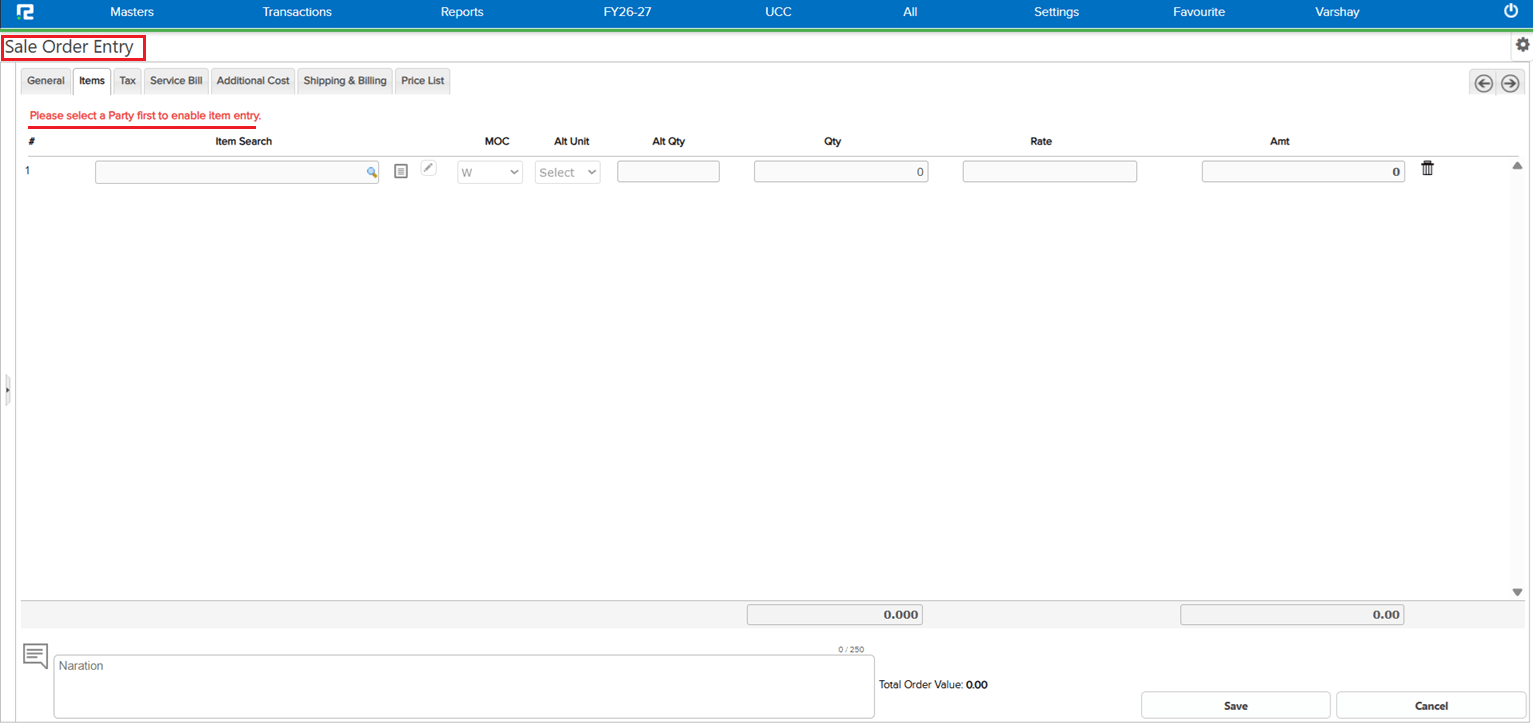
📌 What Was Happening
In a Sales Order (SO), when an item was populated from a pricelist before the Party was selected, the amount reflected incorrectly — tax was calculated properly but was not included in the displayed amount. The amount only corrected itself when the user clicked the Tab key, requiring an extra manual step to trigger the recalculation.
The root cause was the order of entry: adding item details before selecting the Party meant pricelist and tax values were applied without a complete party context, resulting in an incorrect amount.
🌟 How This Helps You
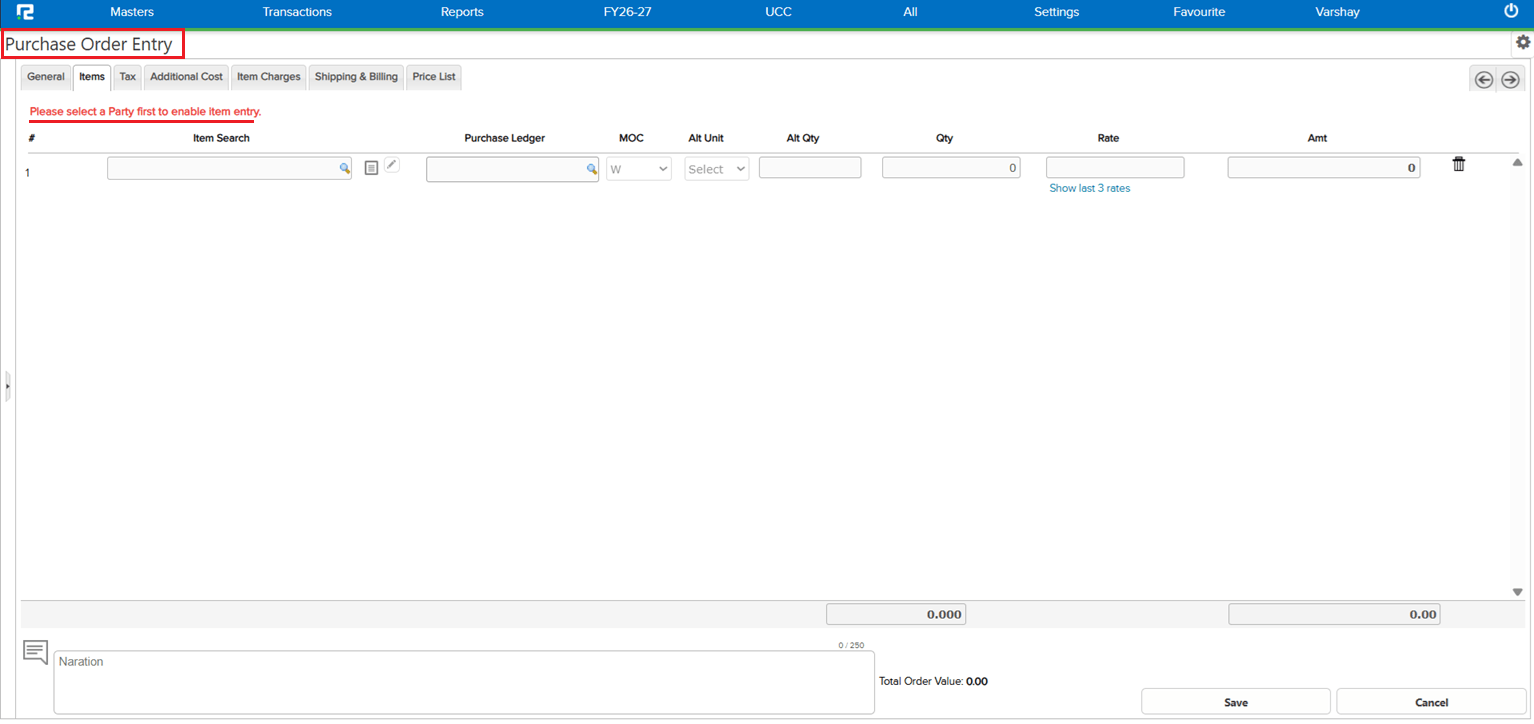
To prevent this at the source, the system now restricts users from adding items before selecting the Party in both Sales Order and Purchase Order. Party must be selected first, ensuring that pricelist values and tax are always calculated with the correct party context — the amount is accurate from the moment the item is added, with no Tab-key workaround needed.
🎬 Where to Find It
📷 See It in Action
📌 What Was Happening
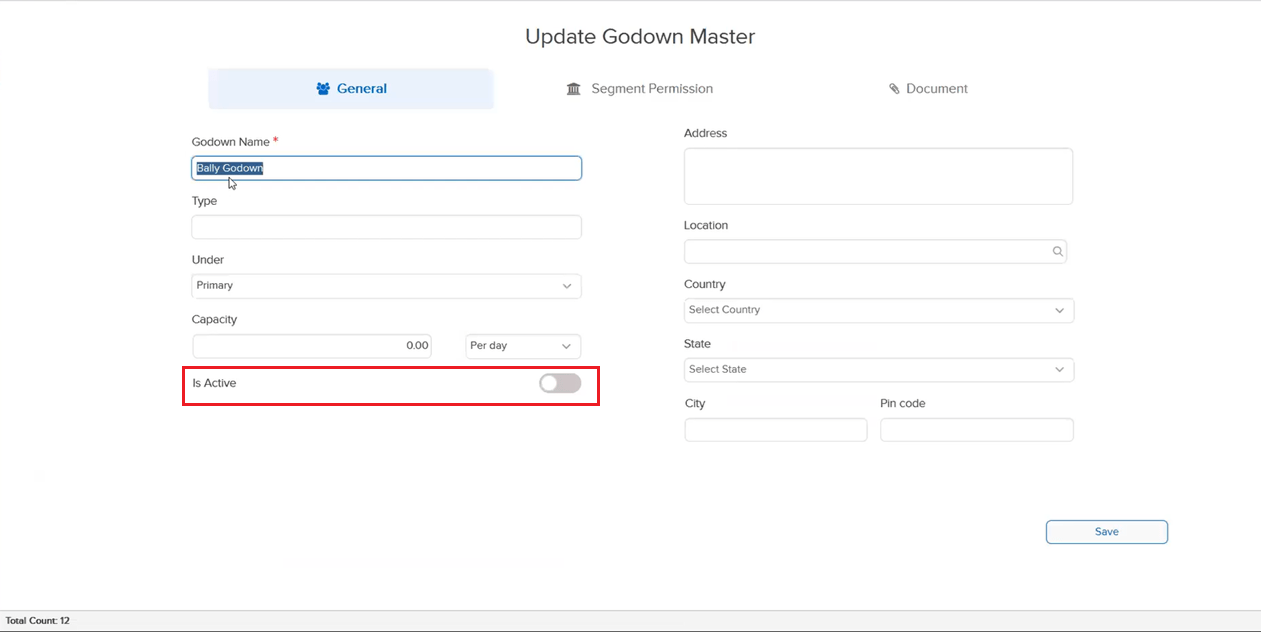
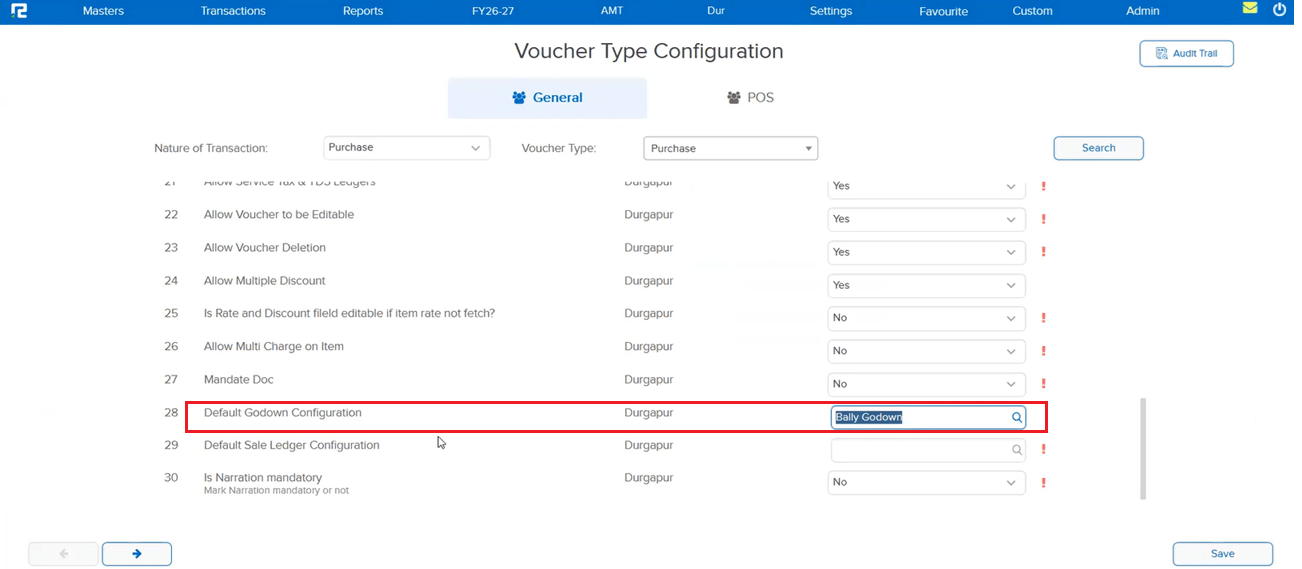
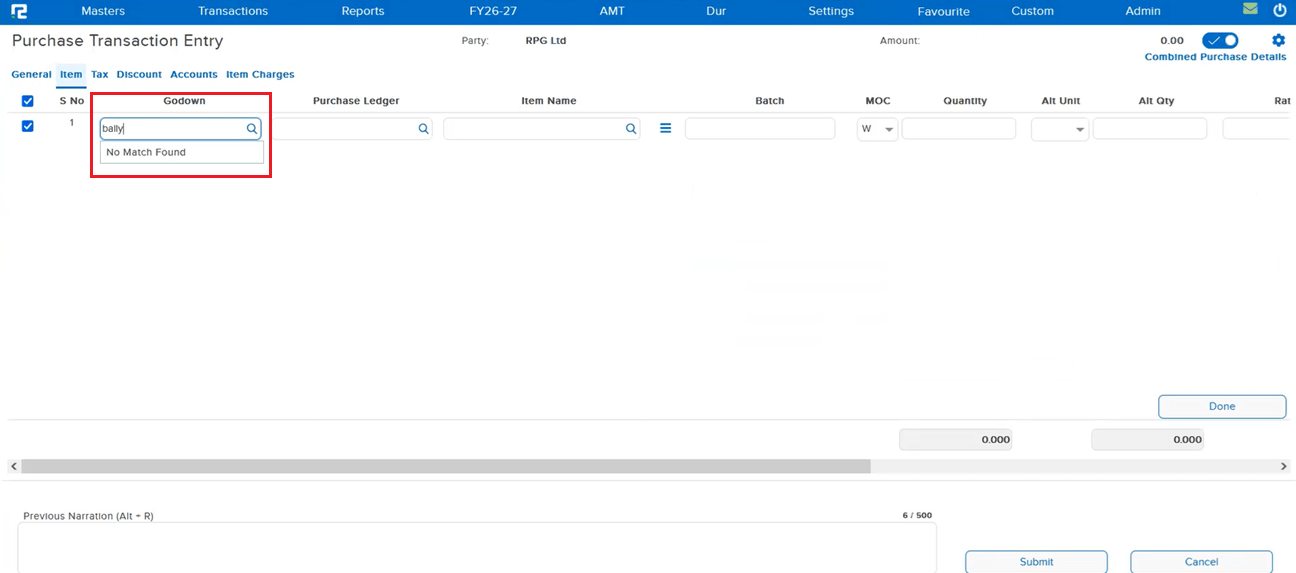
RealBooks correctly blocks manual search of an inactive godown in transaction screens. However, there was a gap when the Default Godown feature was in use:
If a godown was set as the default godown in the inventory screen via Txn Configuration → Param, it would be auto-populated into the entry. If that godown was subsequently marked inactive in Godown Master, the inactivity check was not applied to this auto-populated value — allowing the inactive godown to silently slip into new and edited entries.
🌟 How This Helps You
The inactive godown validation has been extended to cover the Default Godown auto-population path on Entry pages. If the configured default godown is inactive, it will no longer be auto-populated into the entry — ensuring that only active godowns can appear in transactions, whether entered manually or filled automatically.
🎬 Where to Find It
📷 See It in Action
📌 What Was Happening
When opening a Sales Entry in Edit mode, two issues were present in the Accounts tab:
• The tax amount was not displayed — the field appeared blank even though tax had been applied to the entry
• Any ledger added in the Accounts tab during editing was not retained when the Sales Entry was saved and reopened in Edit mode — the added ledger disappeared, requiring the user to re-enter it each time
🌟 How This Helps You
Both issues in the Sales Entry Accounts tab have been corrected:
• The tax amount now displays correctly when opening a Sales Entry in Edit mode
• Ledgers added in the Accounts tab are now saved and correctly reflected when the entry is reopened in Edit mode — no more re-entering ledger details on every edit
🎬 Where to Find It
📷 See It in Action
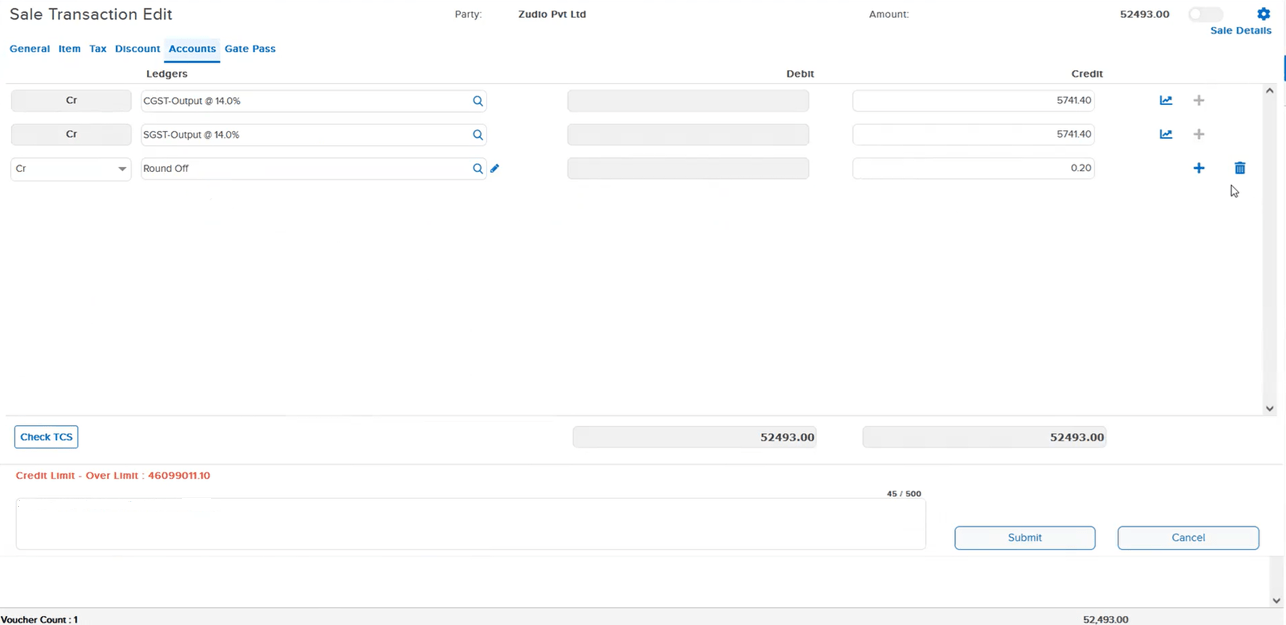
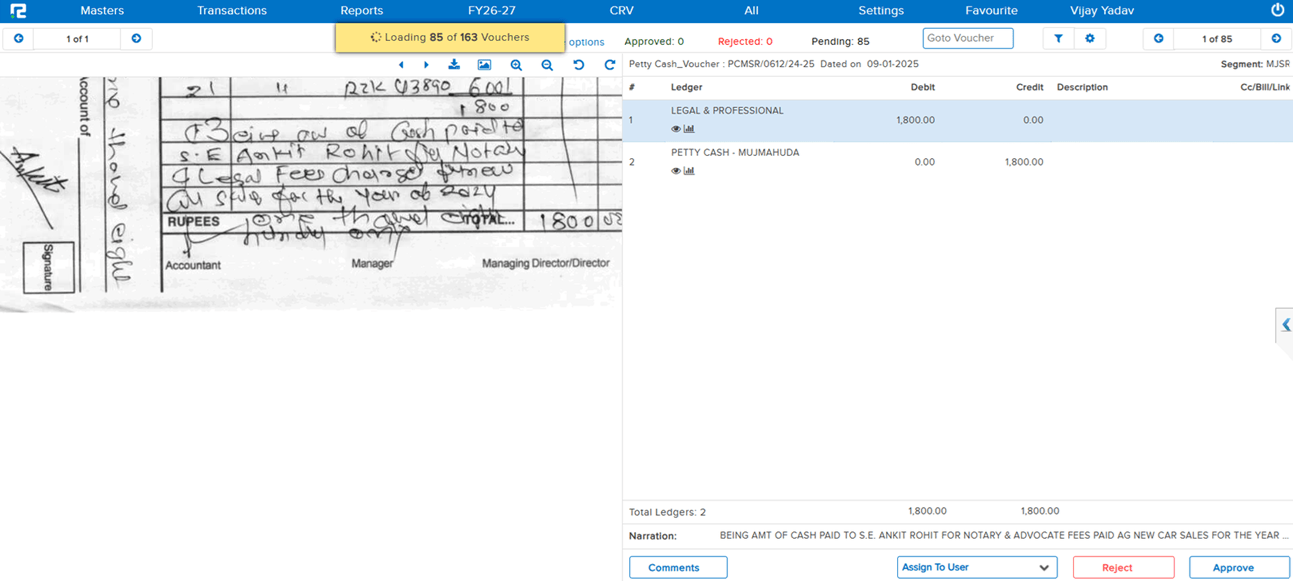
📌 What Was Happening
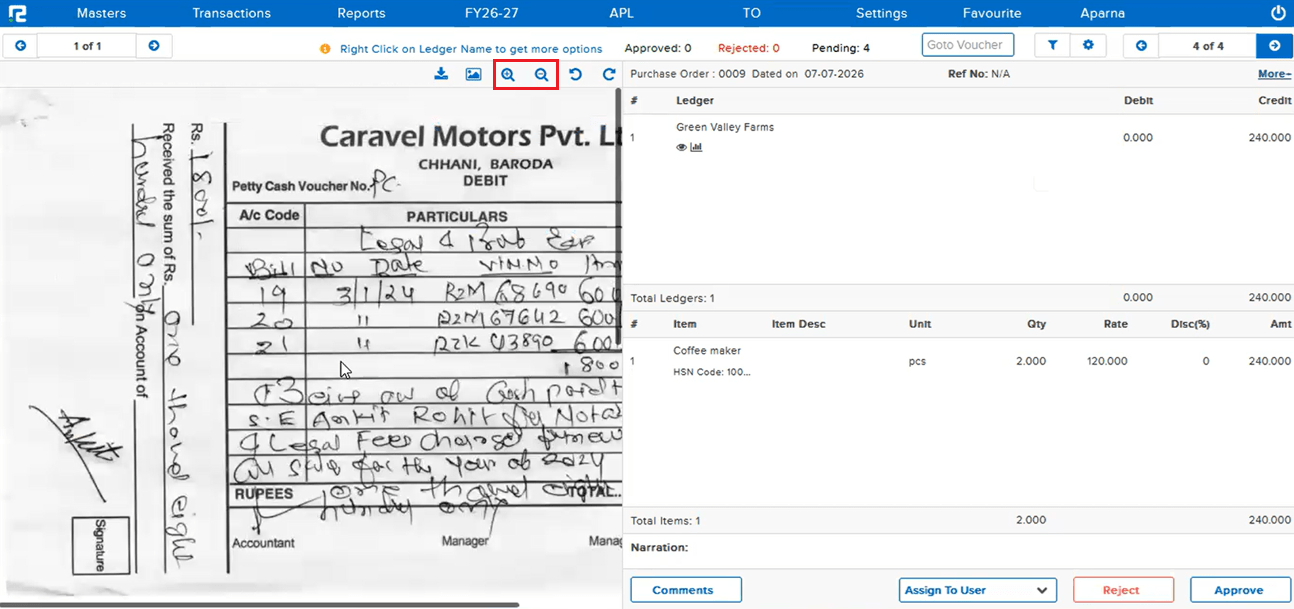
When trying to view an attached document from the Approval List, the full image of the document was not loading in the viewer. Although the zoom in / zoom out controls were present, certain documents were failing to load completely — forcing users to download the document every time just to see its full content, which was time-consuming and disruptive to the approval workflow.
🌟 How This Helps You
The document loading issue in the Approval List viewer has been fixed. Attached documents that previously failed to render fully now load completely within the viewer — users can view the full document directly from the Approval List without needing to download it. The zoom in / zoom out controls work as intended for all documents.
🎬 Where to Find It
📷 See It in Action
📌 What Was Happening
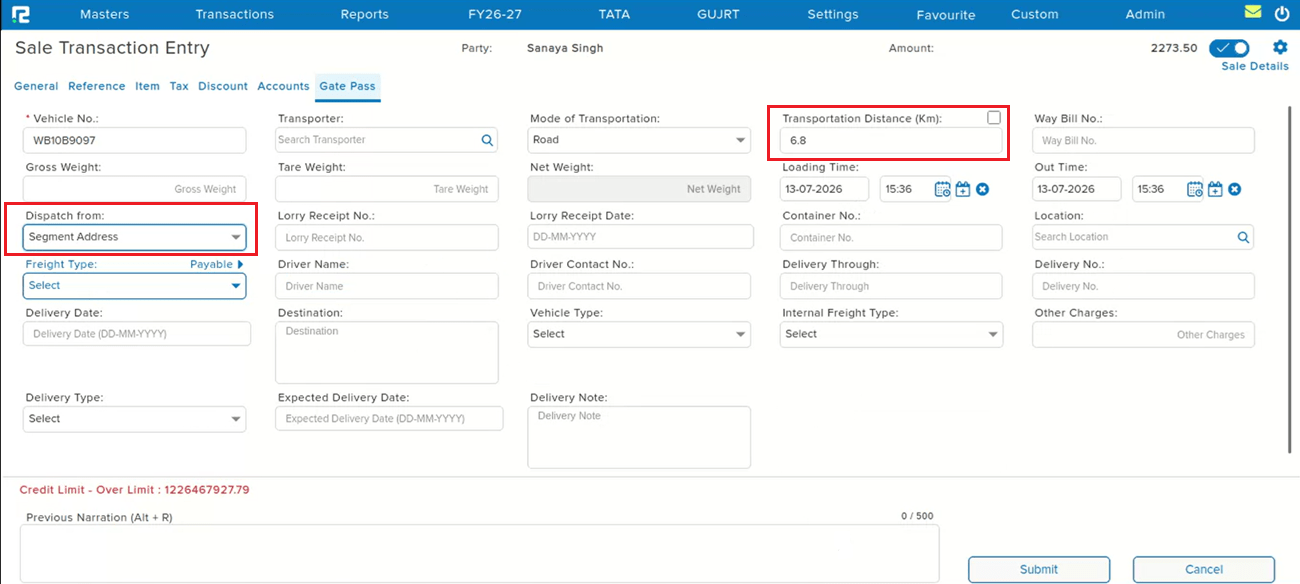
In the Gate Pass tab of transaction entries, the Transportation Distance (Km) was not being fetched even when both the Party PIN Code and Godown PIN Code were provided. Additionally, when the Dispatch from: Segment option was selected, the Transportation Distance was not calculated in that case either. Entries saved during this issue retained a distance value of 0.00.
🌟 How This Helps You
The Transportation Distance (Km) is now correctly fetched and calculated in the Gate Pass tab — both when Party and Godown PIN Codes are provided, and when Dispatch from: Segment is selected.
🎬 Where to Find It
📷 See It in Action
📌 What Was Happening
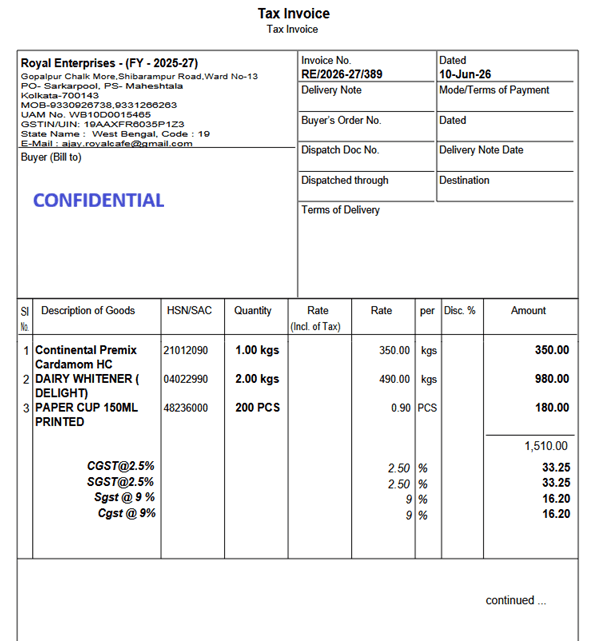
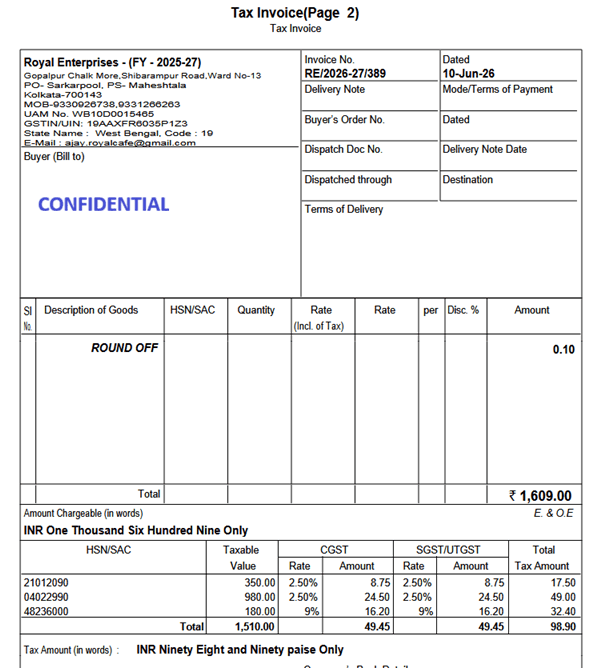
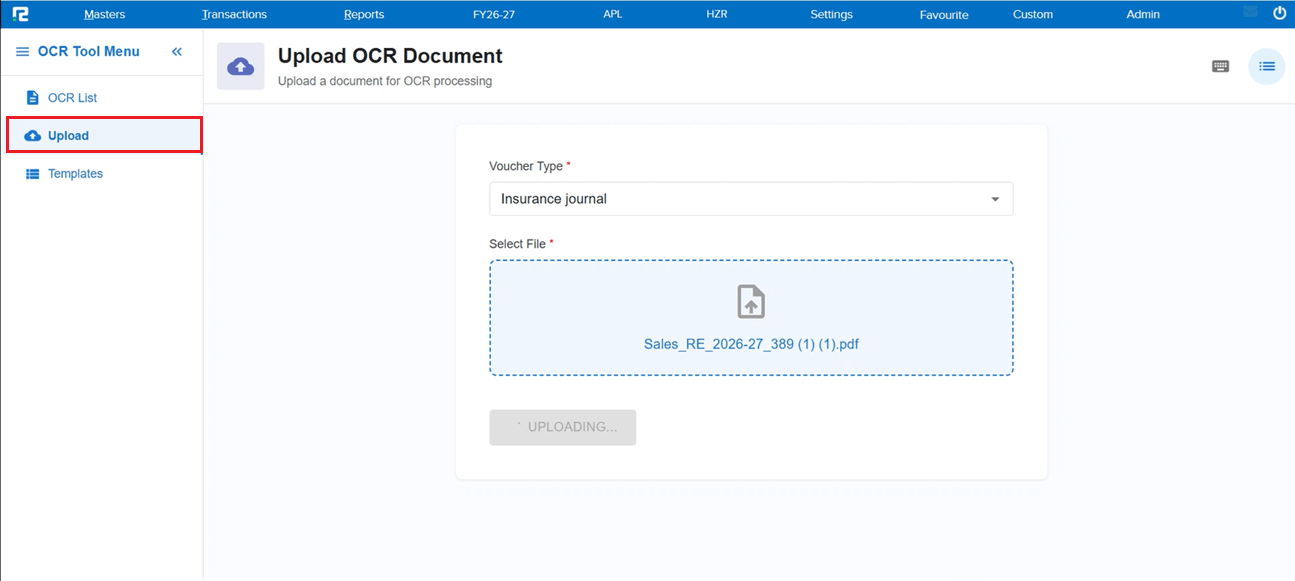
When a Voucher AI–processed invoice had multiple line items taxed at different GST rates, the system combined the Purchase Ledger values into a single entry instead of posting them separately. Because the values were merged, GST was also calculated on the combined amount rather than per line item, resulting in incorrect GST posting.
Example:
• Item 1 — Taxable Value: ₹1,330 @ 5% GST → GST = ₹66.50
• Item 2 — Taxable Value: ₹180 @ 18% GST → GST = ₹32.40
Instead of keeping these separate, the Purchase Ledger was posted as a single combined entry of ₹1,510, with GST calculated on that combined logic — leading to incorrect accounting entries. This occurred only when multiple GST rates existed within a single invoice.
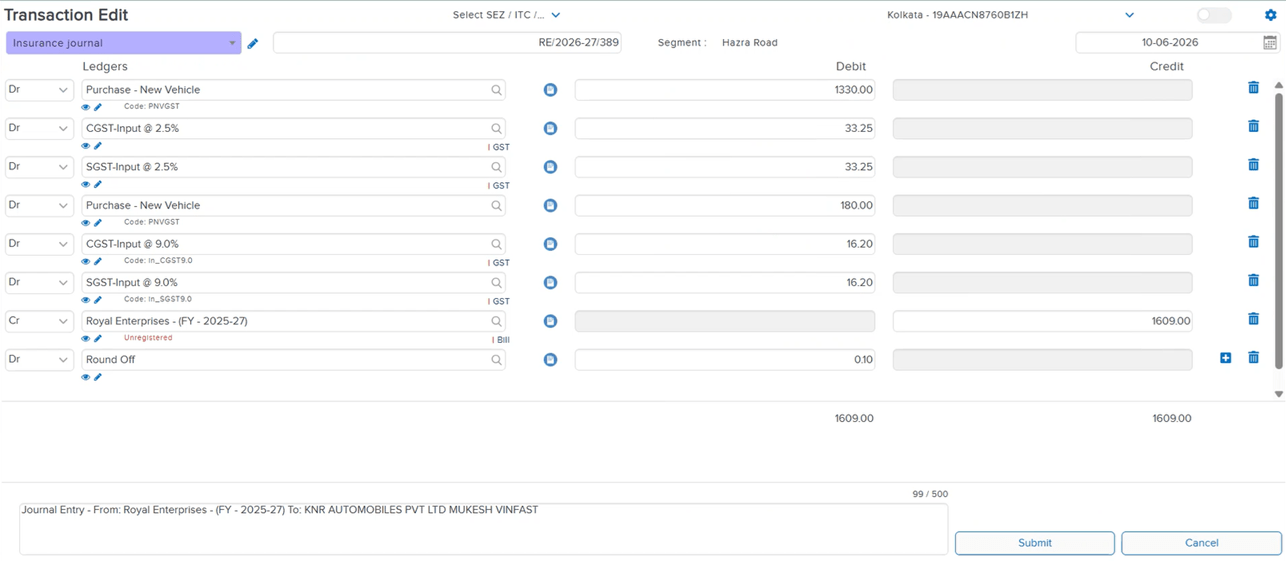
🌟 How This Helps You
The system now posts separate Purchase Ledger entries based on GST rate instead of combining them:
• Purchase Ledger — ₹1,330 (@ 5% GST)
• Purchase Ledger — ₹180 (@ 18% GST)
CGST/SGST is now calculated separately for each line item based on its own taxable value and rate, and taxable values are no longer combined when GST rates differ — ensuring accurate accounting entries for every invoice with mixed GST rates.
🎬 Where to Find It
📷 See It in Action
📌 What Was Happening
While making a TDS payment, the TDS Challan Tagging pop-up screen was not reflecting newly added TDS sections in RealBooks. This left users unable to tag payments against the latest TDS sections from within the Challan Tagging popup.
🌟 How This Helps You
The TDS Challan Tagging pop-up now correctly reflects all new TDS sections in RealBooks — the section dropdown stays in sync with the latest sections, so payments can be tagged accurately without any missing entries.
🎬 Where to Find It
📷 See It in Action
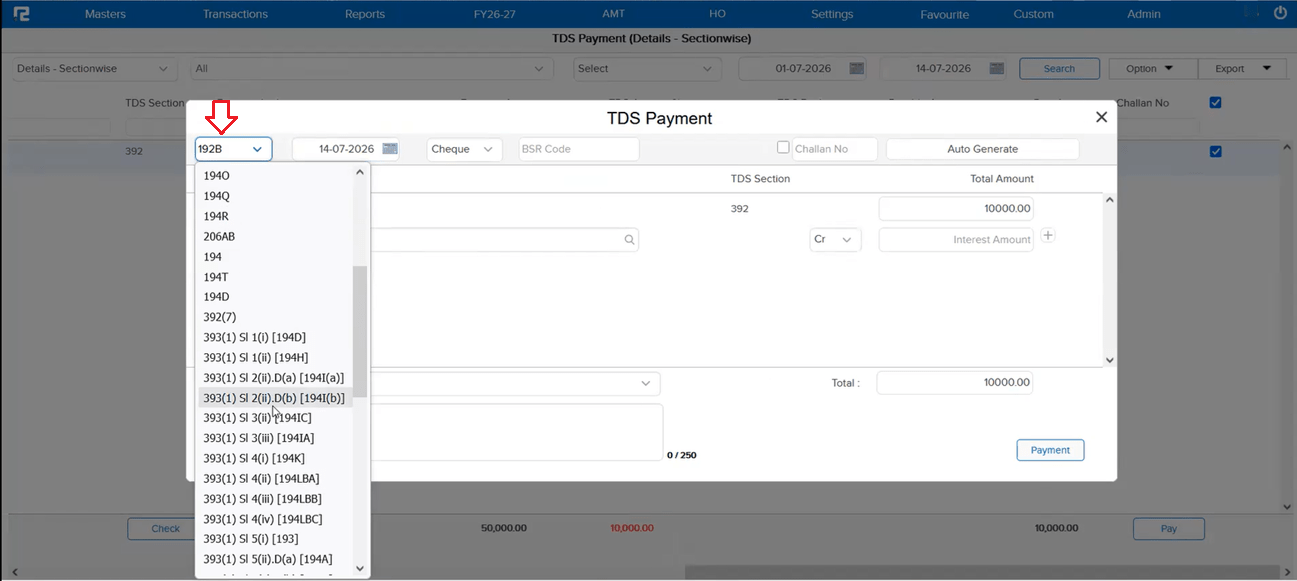
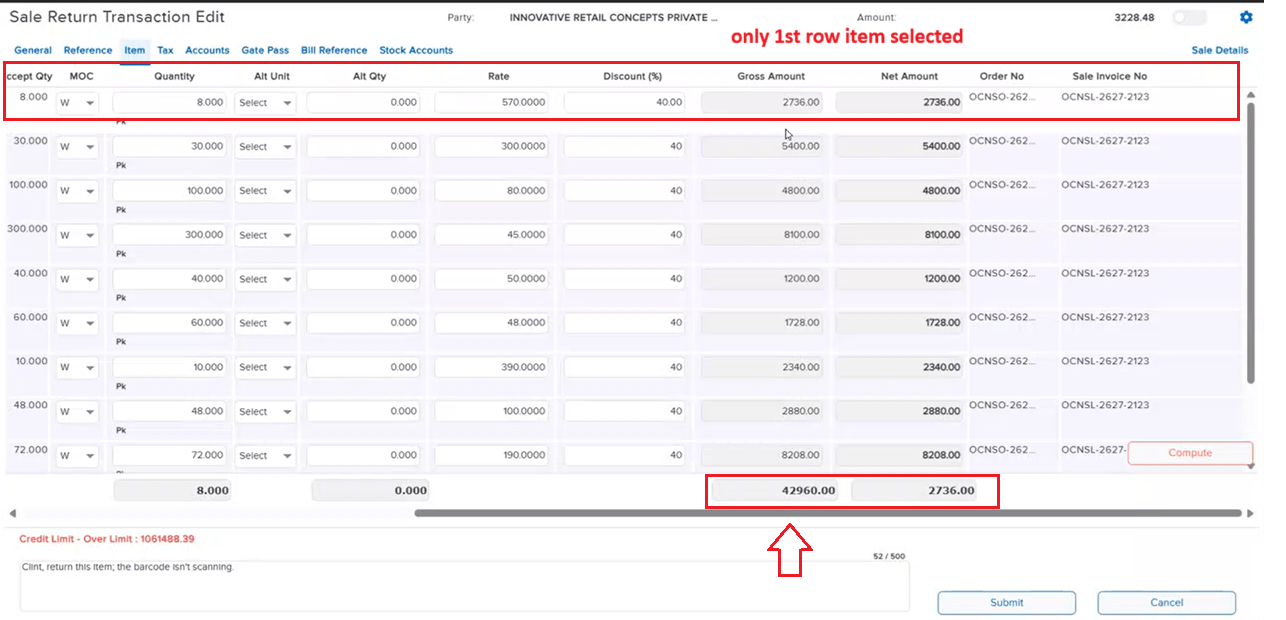
📌 What Was Happening
In the Sale Return voucher, clicking Search under the Reference tab displayed an incorrect Gross Amount. Even when only a specific item (or subset of items) was selected, the Gross Amount shown reflected the total of all items in the voucher instead of just the selected one(s).
🌟 How This Helps You
The Gross Amount under Reference tab Search in the Sale Return voucher now correctly reflects the amount of only the selected item(s), matching the Net Amount and giving an accurate figure to work with.
🎬 Where to Find It
📷 See It in Action
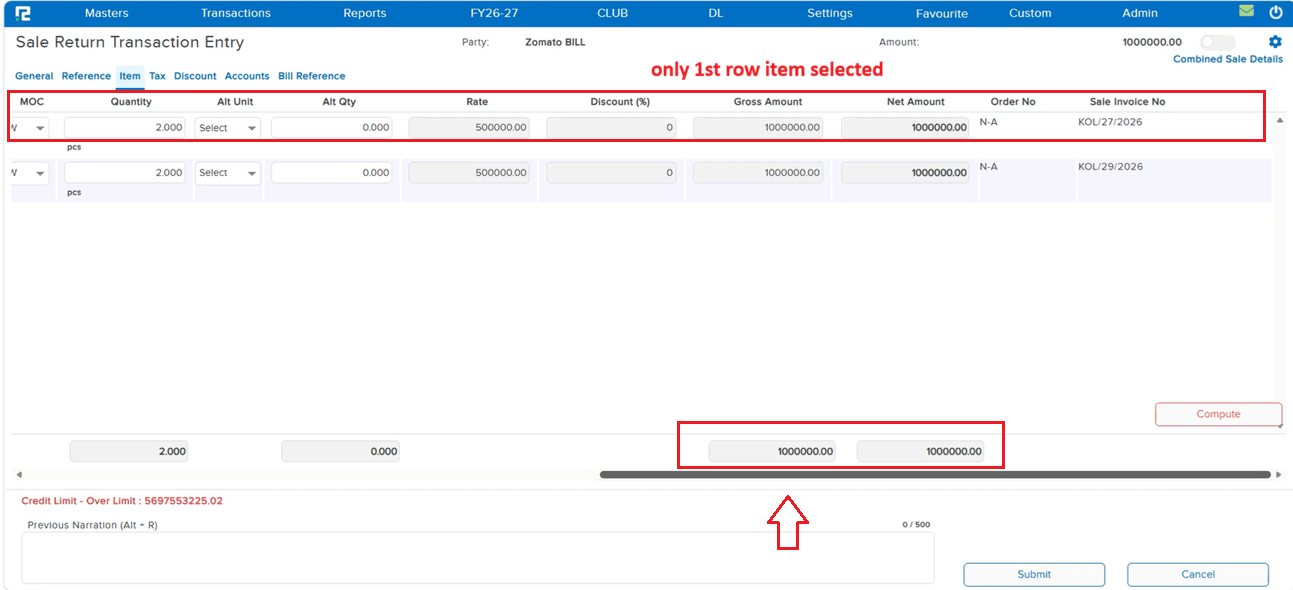
📌 What Was Happening
Ideally, Sale Order (SO) quantity can be greater than or equal to the Sale quantity, but never less. When a Sale was created by tagging an SO, and the setting to allow changing SO qty after tagging was enabled, that setting was meant only to allow increasing the SO qty. However, if the user went back to the SO, added a new row, and then edited the qty of an item already tagged to the Sale, they were able to decrease its SO qty below the tagged Sale qty — creating a discrepancy between SO qty and Sale qty.
🌟 How This Helps You
The allow to change SO qty after tagging setting now correctly permits only an increase in SO qty for items already tagged to a Sale — decreasing it below the tagged Sale qty is no longer possible, keeping SO qty and Sale qty consistent.
🎬 Where to Find It
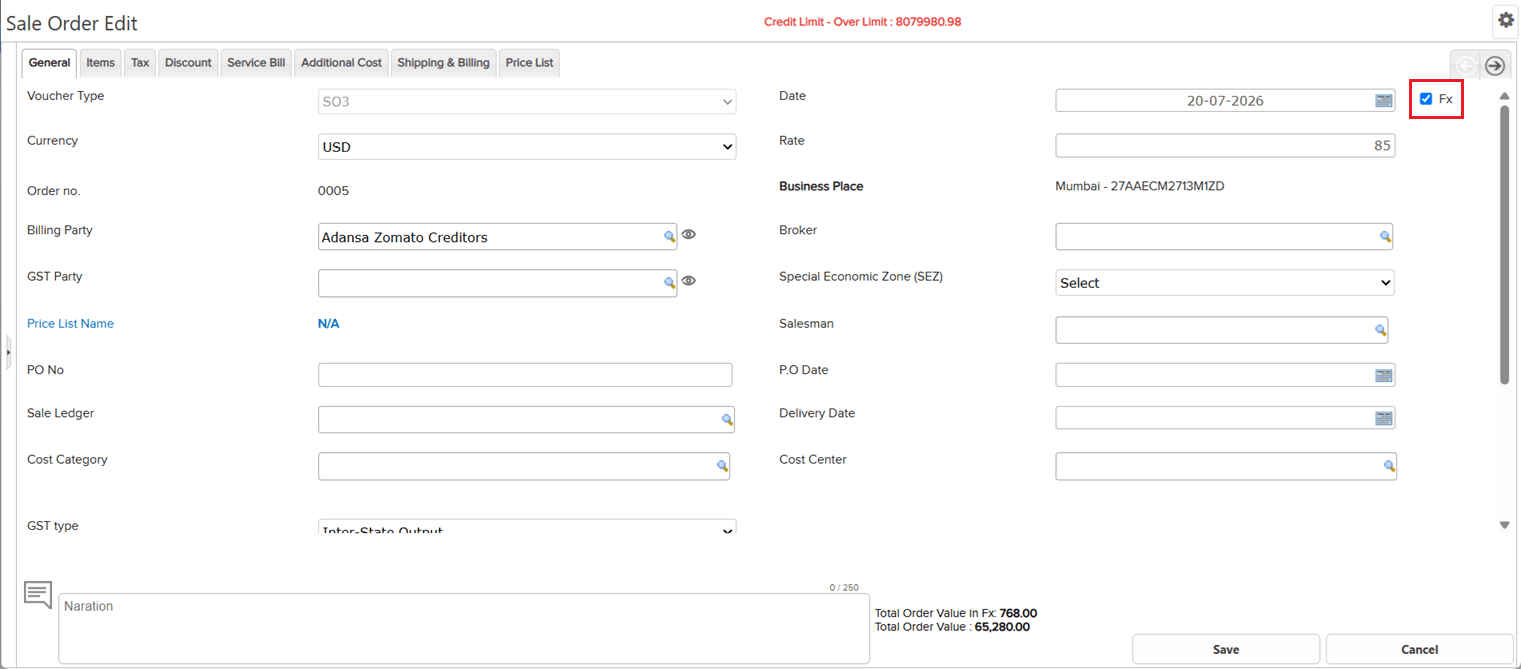
📌 What Was Happening
When a Sale entry was saved with the Fx (foreign currency) option enabled, and the Accounts tab had additional ledger data added, reopening that entry in Edit mode failed to load its Item details correctly.
🌟 How This Helps You
Item details now load correctly when editing a Sale entry that was saved with Fx enabled and has data in the Accounts tab — no more missing item information on edit.
🎬 Where to Find It
📷 See It in Action
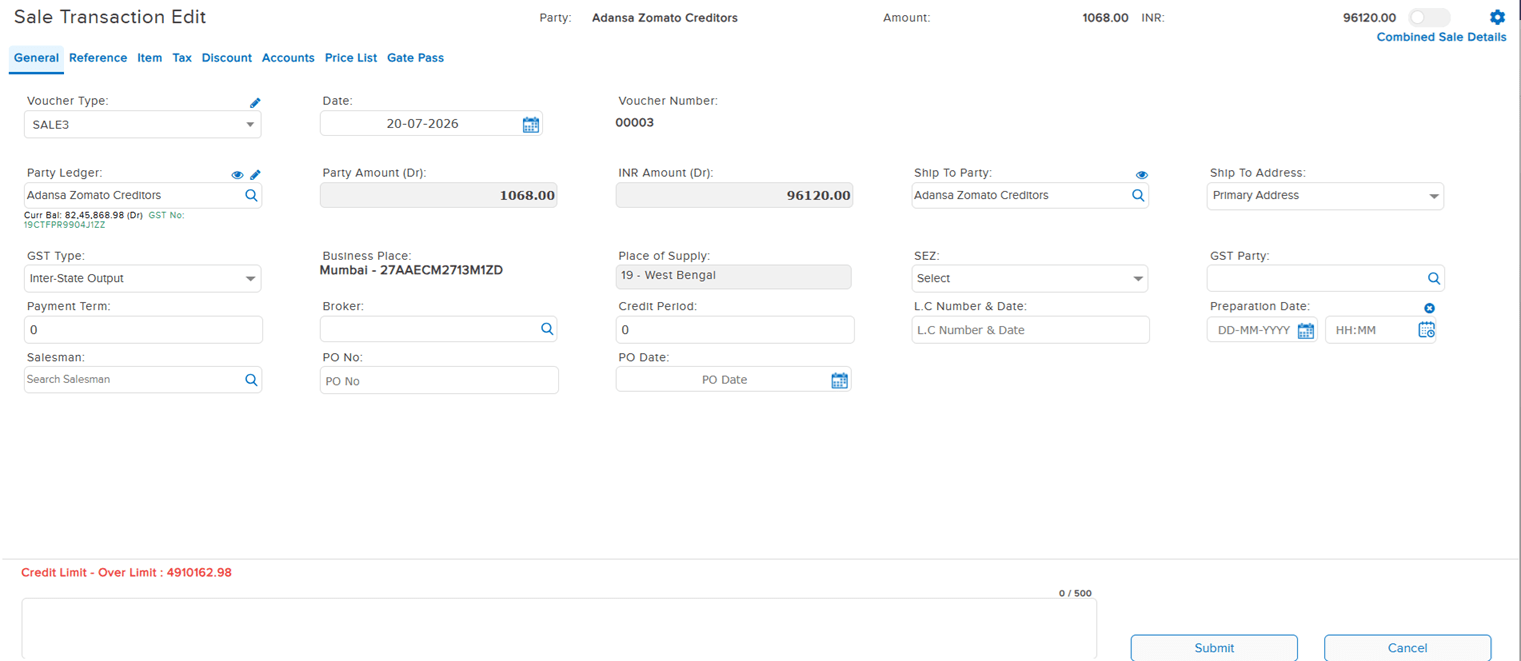
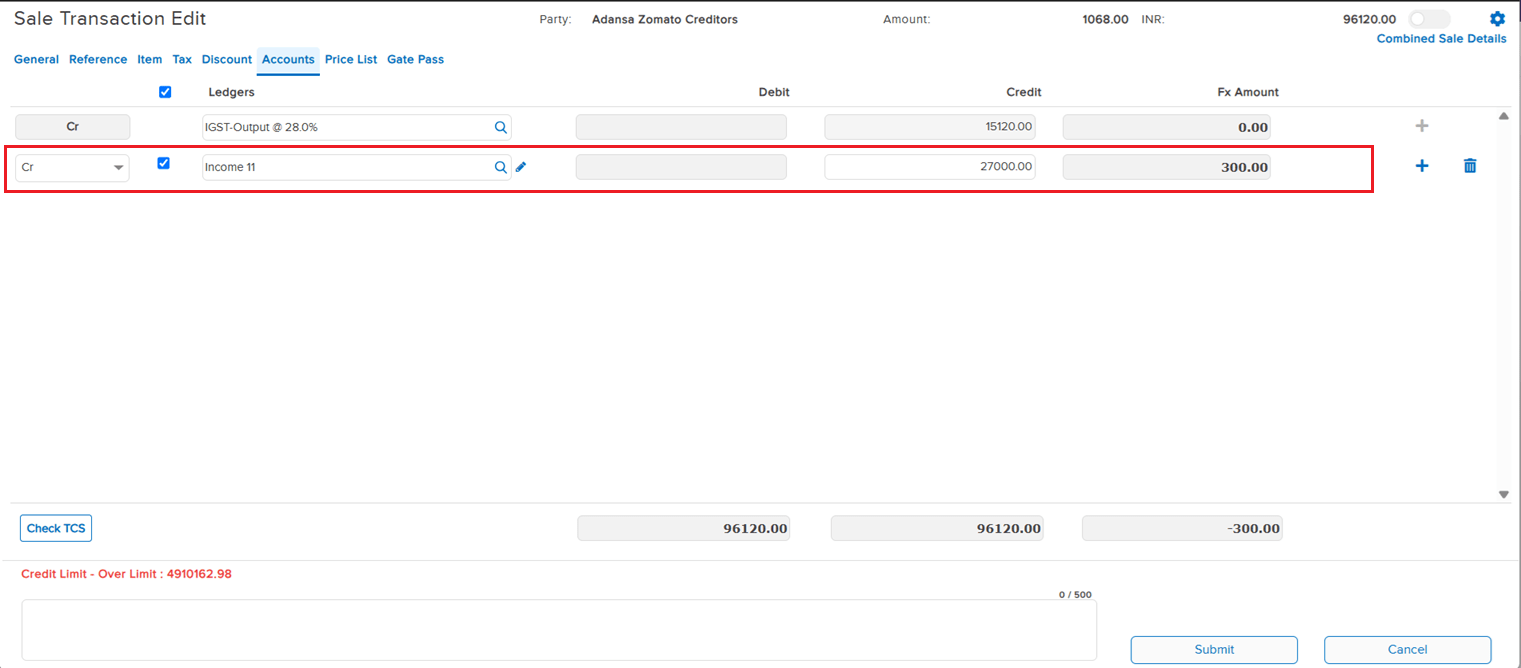
📌 What Was Happening
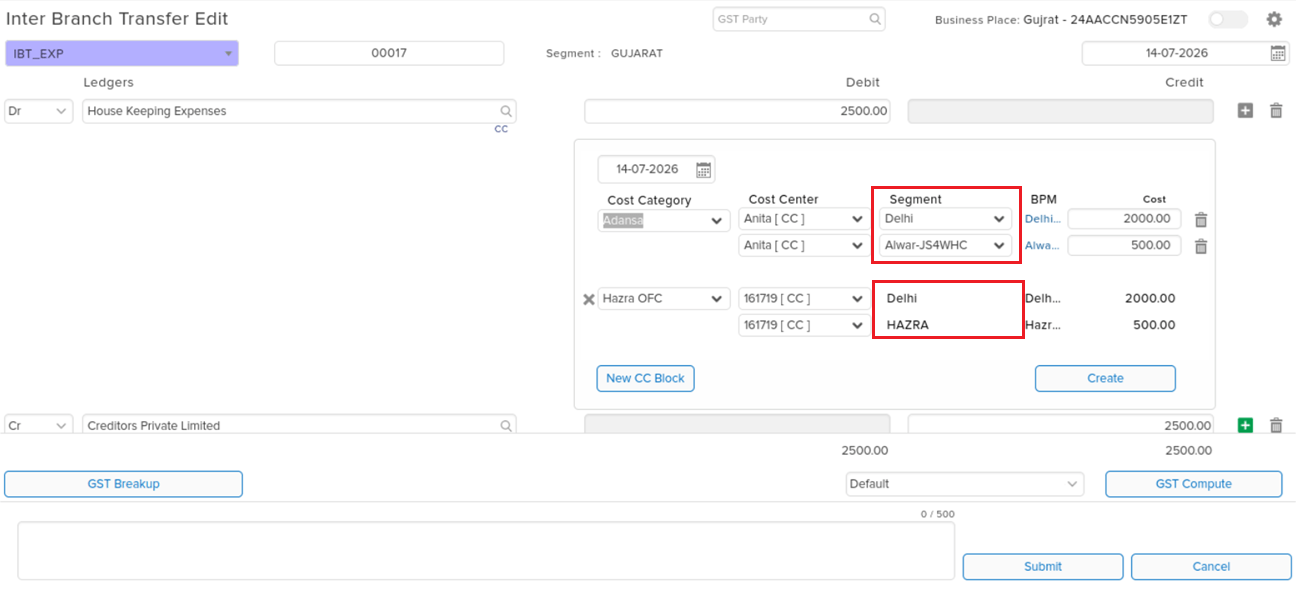
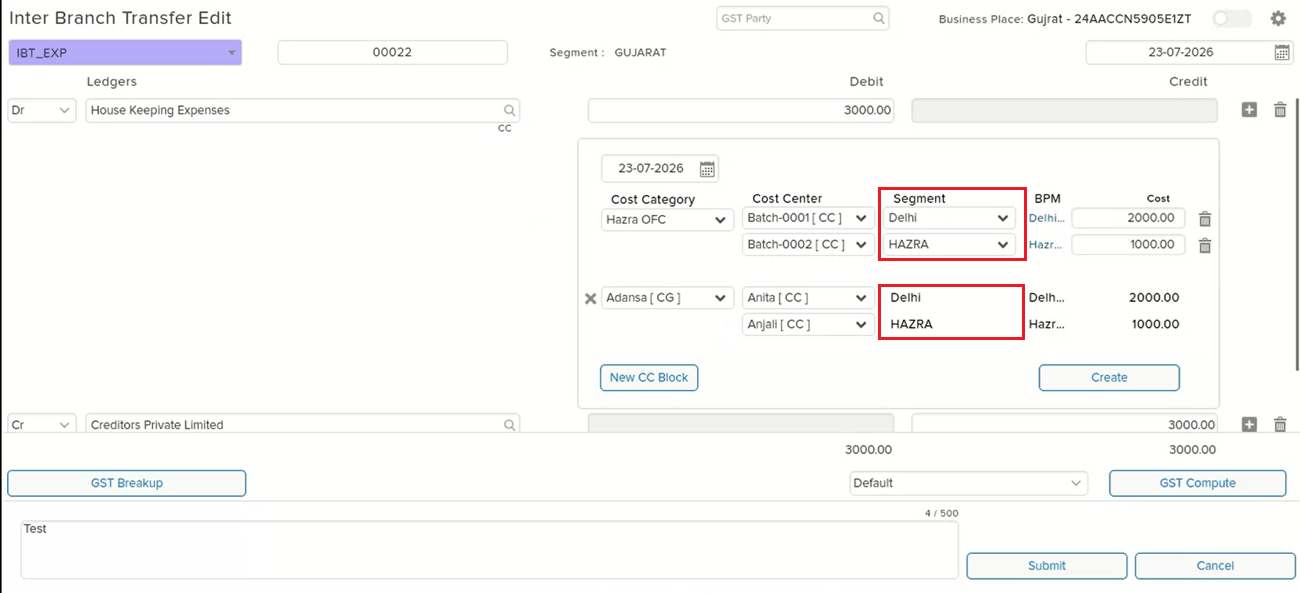
In the Cost Center (CC) view within transaction entry, it was possible to assign two different Segments across two separate CC blocks on the same ledger line — this should not have been allowed, since a single ledger line’s CC blocks are expected to stay within a consistent Segment assignment.
🌟 How This Helps You
The CC view now prevents assigning mismatched Segments across CC blocks on the same ledger line, keeping Segment assignment consistent and avoiding incorrect cost allocation.
🎬 Where to Find It
📷 See It in Action
📌 What Was Happening
When the Cost Center hierarchy was structured with a Cost Category nested under another Cost Category (e.g. Cost Category 1 → Cost Category 2 → Cost Center A) and the Single Cost Centre feature was enabled for the company, reopening a transaction in Edit mode showed the Cost Category as blank — even though the correct Cost Category and Cost Center were already saved in the database.
🌟 How This Helps You
The Cost Category now correctly reflects in Edit mode for transactions using a nested Cost Center hierarchy with Single Cost Centre enabled, matching what was actually saved.
🎬 Where to Find It
📷 See It in Action
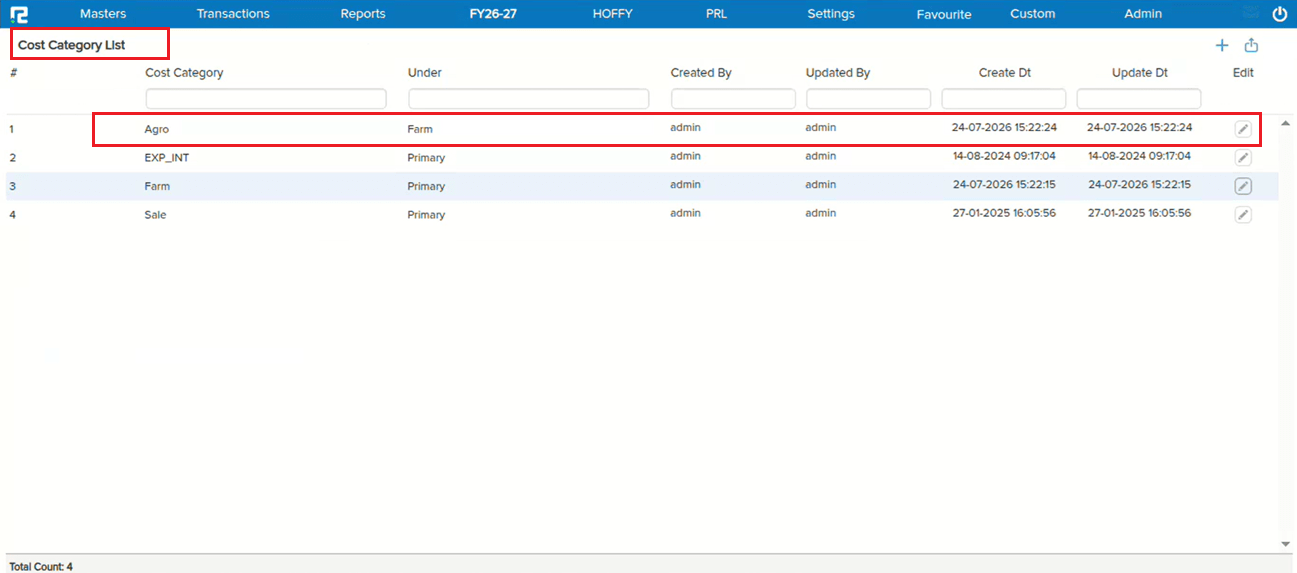
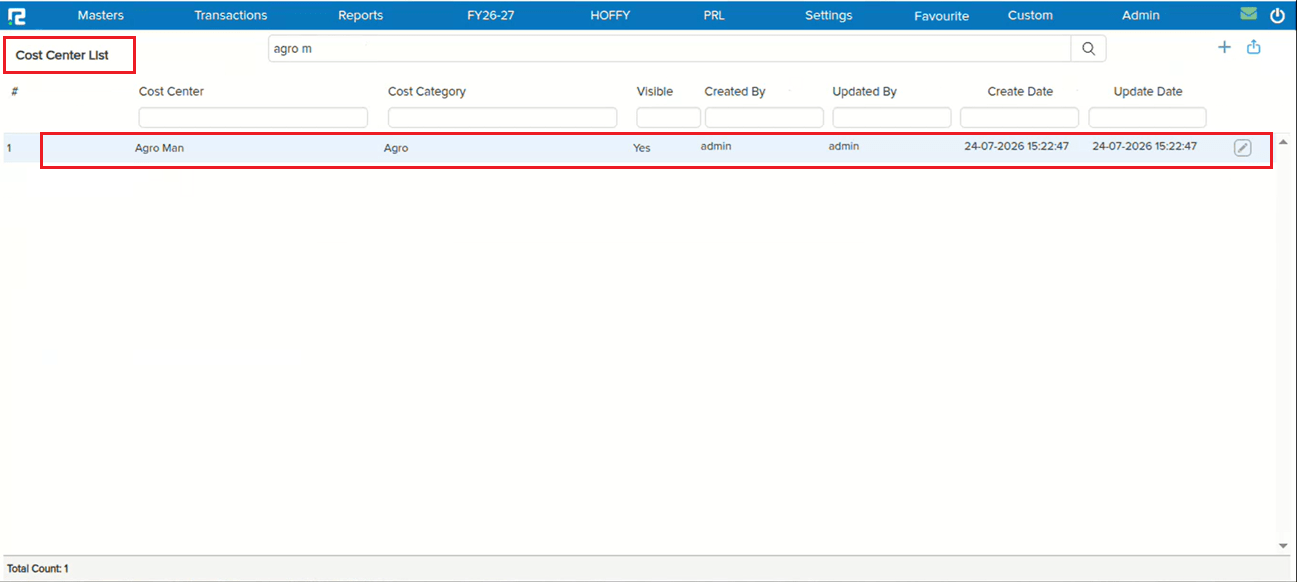
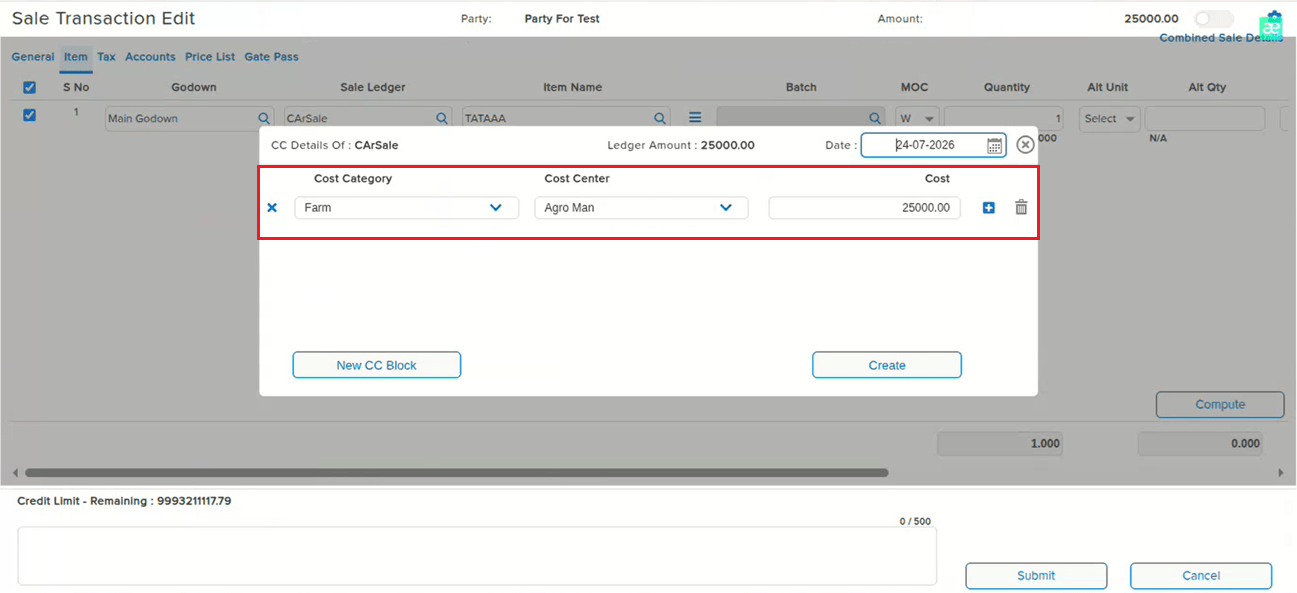
📌 What Was Happening
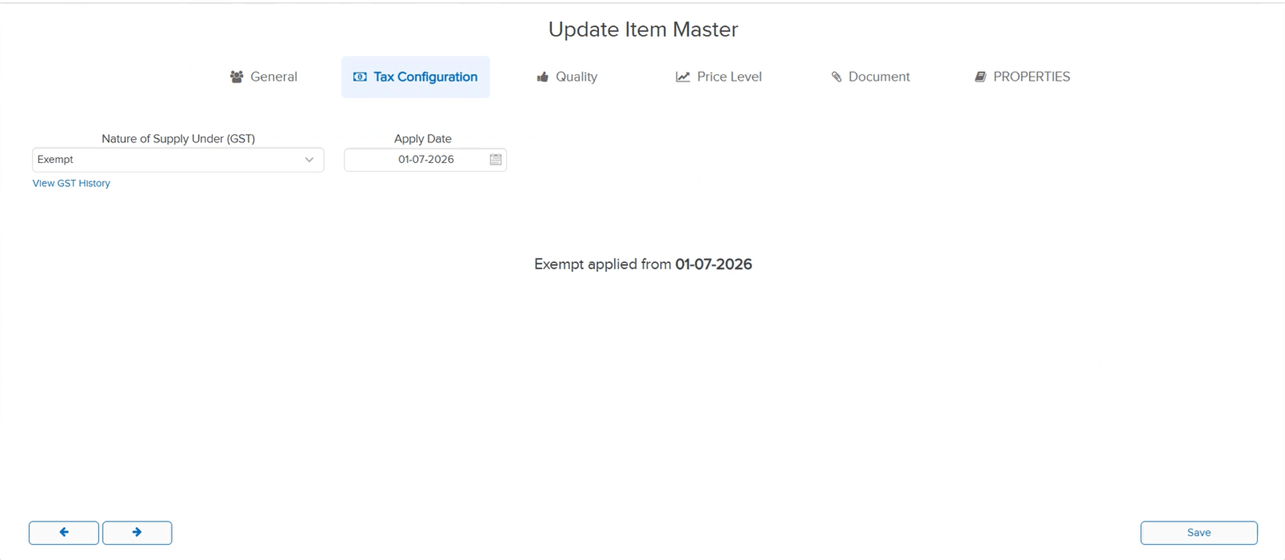
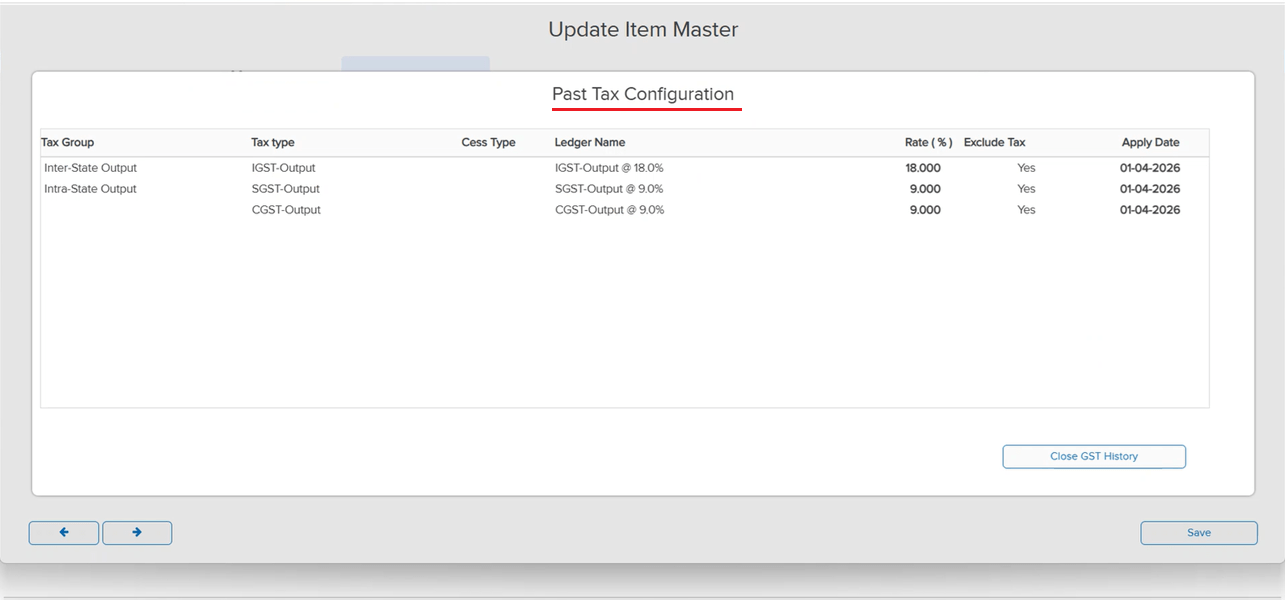
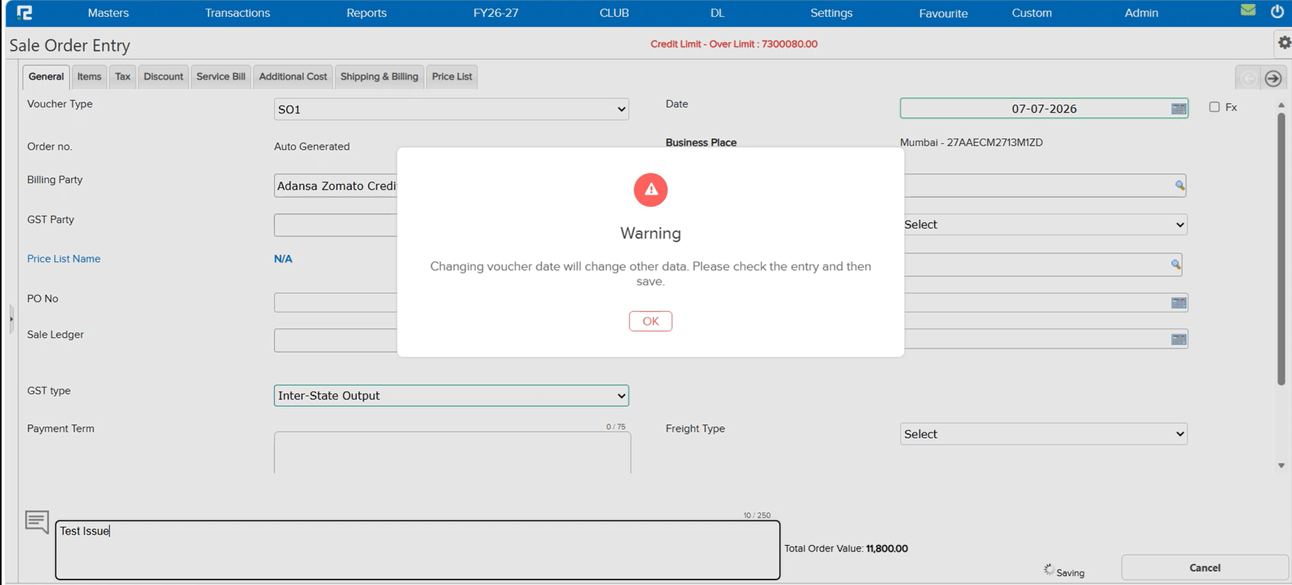
Consider an item that was taxable till 30-06-2026 and marked exempt from 01-07-2026. If the user opened a Purchase Order or Sale Order with the date 15-05-2026 and entered all details, the item tax was computed as per the item master rate. But if the user then changed the voucher date to 07-07-2026 just before saving, the tax rate was not removed — the entry saved with tax even though the configuration marked the item as exempt on the entered voucher date.
🌟 How This Helps You
The tax is now recomputed against the final voucher date before saving. If the item is exempt as on the entered voucher date, the tax rate is correctly removed — so PO/SO entries always save with tax that matches the item’s configuration for that date.
🎬 Where to Find It
📷 See It in Action
📌 What Was Happening
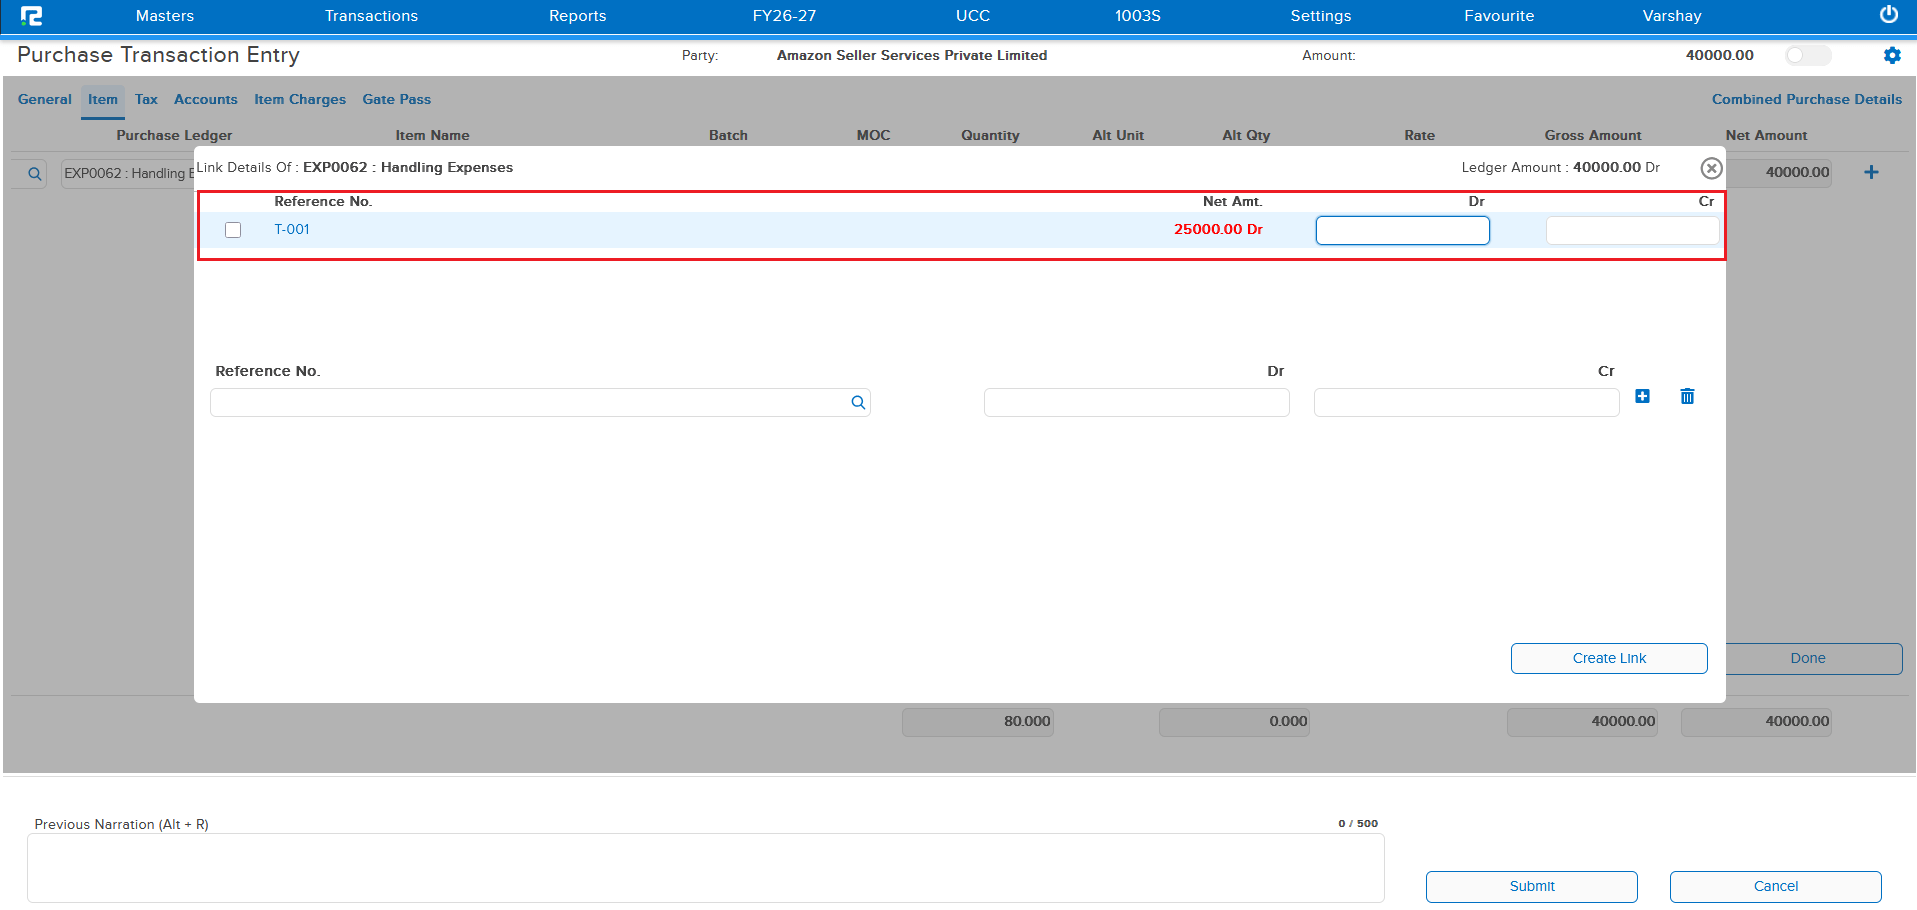
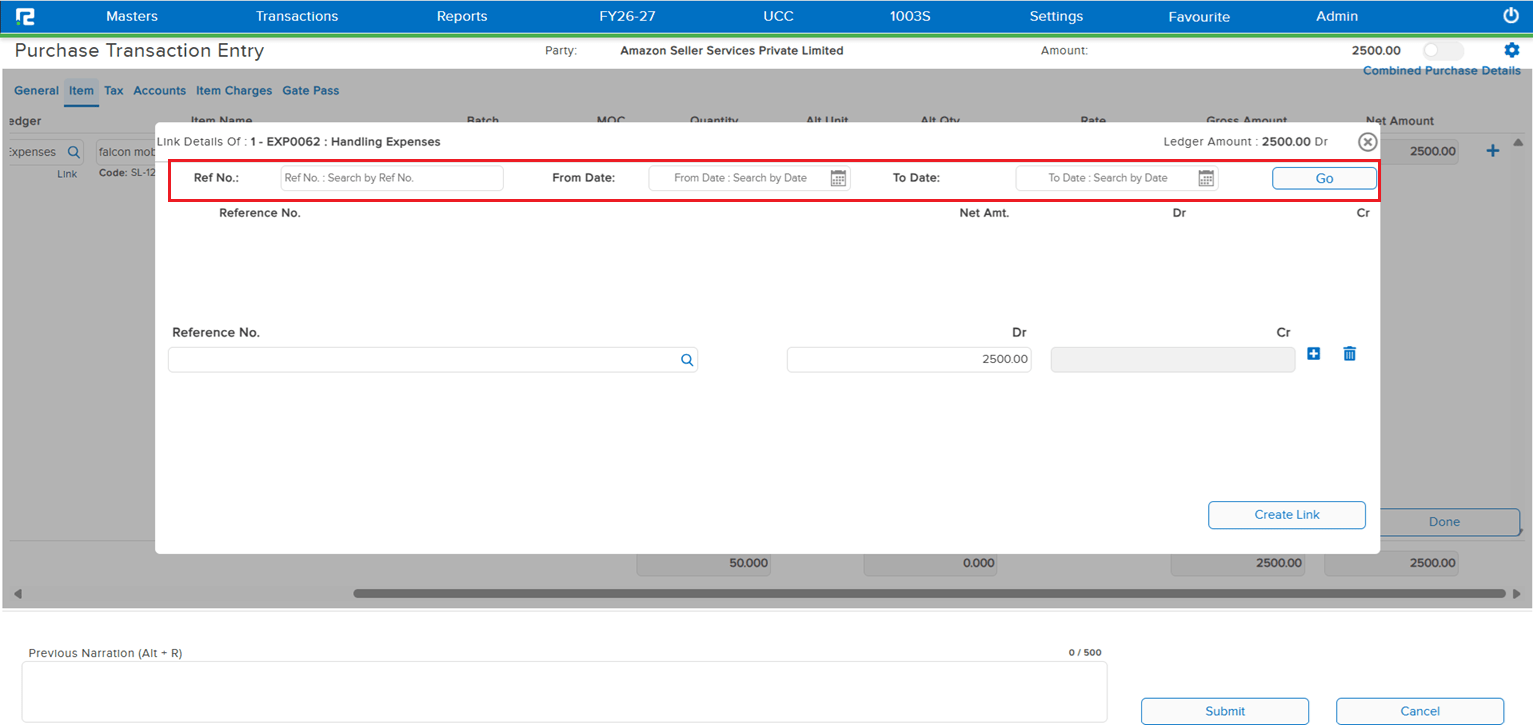
For a selected ledger with a large number of link references, the Link Details pop-up — which lists all the links used for that ledger — took a long time to load on the UI, because it tried to load every reference link at once.
🌟 How This Helps You
A From Date – To Date filter (similar to the Accounts screen) has been added to the pop-up, so you can search the link references for a specific period. This loads only the required data and makes the pop-up open much faster.
🎬 Where to Find It
📷 See It in Action
📌 What Was Happening
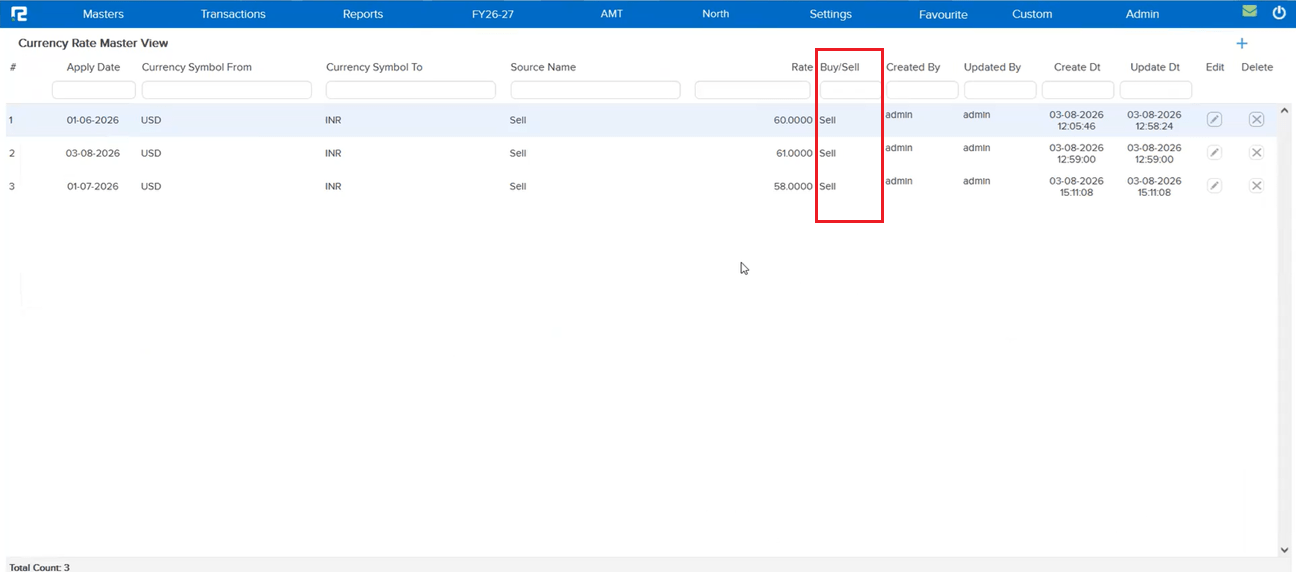
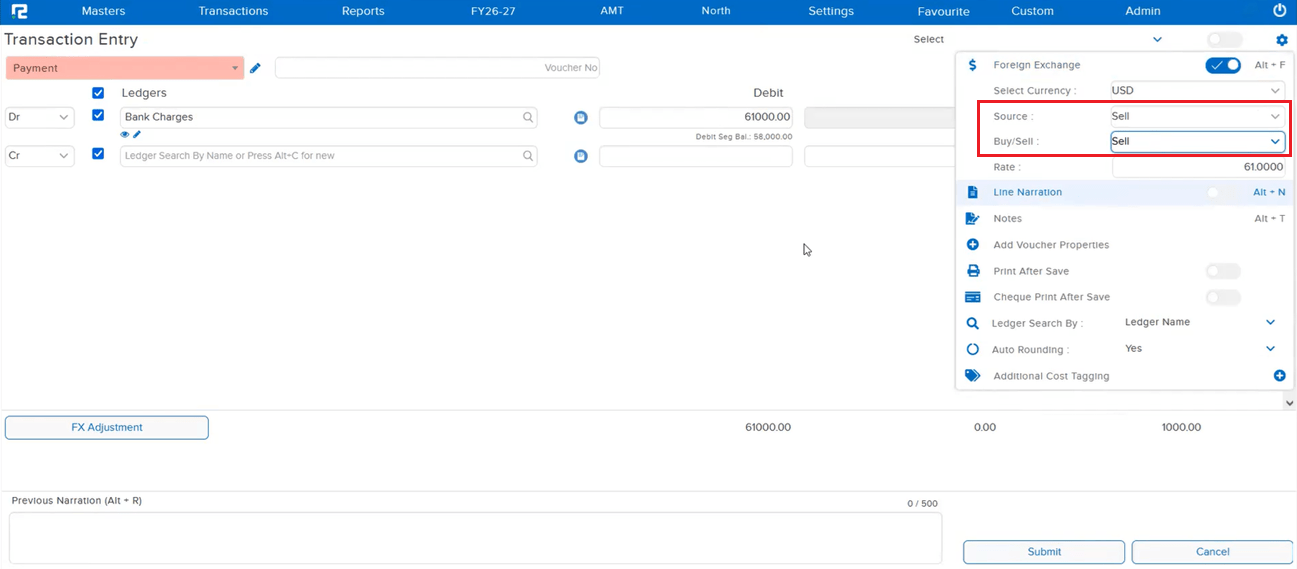
While passing a Foreign Exchange entry, the FX rate was not fetched correctly on the first attempt as per the Currency Master. Even though Source and Buy/Sell were already selected, an incorrect FX rate was picked up — the user had to reselect Source and Buy/Sell every time to get the correct rate.
🌟 How This Helps You
This is now fixed — the correct FX rate as per the Currency Master is fetched automatically on the first selection, without needing to reselect the Source and Buy/Sell options.
📷 See It in Action
📌 What Was Happening
Even though negative stock was disabled for the company, a stock transfer entry could still be posted from a batch with no available quantity. The outward quantity (2) ended up greater than the inward quantity (1) — producing negative stock at the batch level despite the setting.
🌟 How This Helps You
This is now fixed — when negative stock is disabled, the system correctly blocks outward entries from a batch with no available quantity, so the outward quantity can no longer exceed the available stock.
📋 Steps to Replicate
1. Copy the existing Batch Entry.
2. Change the Transaction Date to a date before the first Sale transaction.
3. Re-select the Item — the system auto-selects a batch with available quantity and pre-fills Qty as 1.
4. Open the Batch Listing using the Batch icon next to the Item field.
5. Select a batch that has no available quantity.
6. Press Ctrl + S to save the transaction.
📷 See It in Action
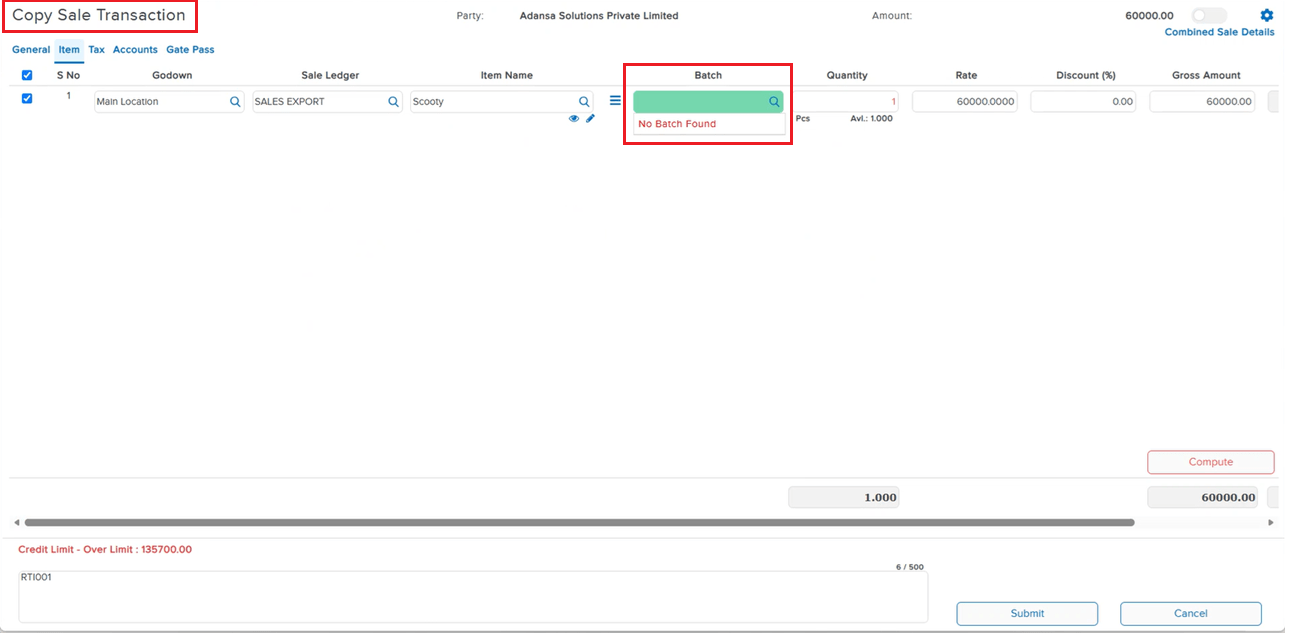
📌 What Was Happening
While running the DayBook Columnar report, the Voucher Property data was not appearing on the UI or in the exported Excel file. The column header was present, but the actual data was blank in both the on-screen view and the Excel export — making it impossible to identify voucher properties from this report.
🌟 How This Helps You
The Voucher Property column in the DayBook Columnar report now correctly displays data both on the UI and in the Excel export. You can now view and export voucher property information directly from the DayBook Columnar report without any missing data.
🛠 Where to Find It
📷 See It in Action
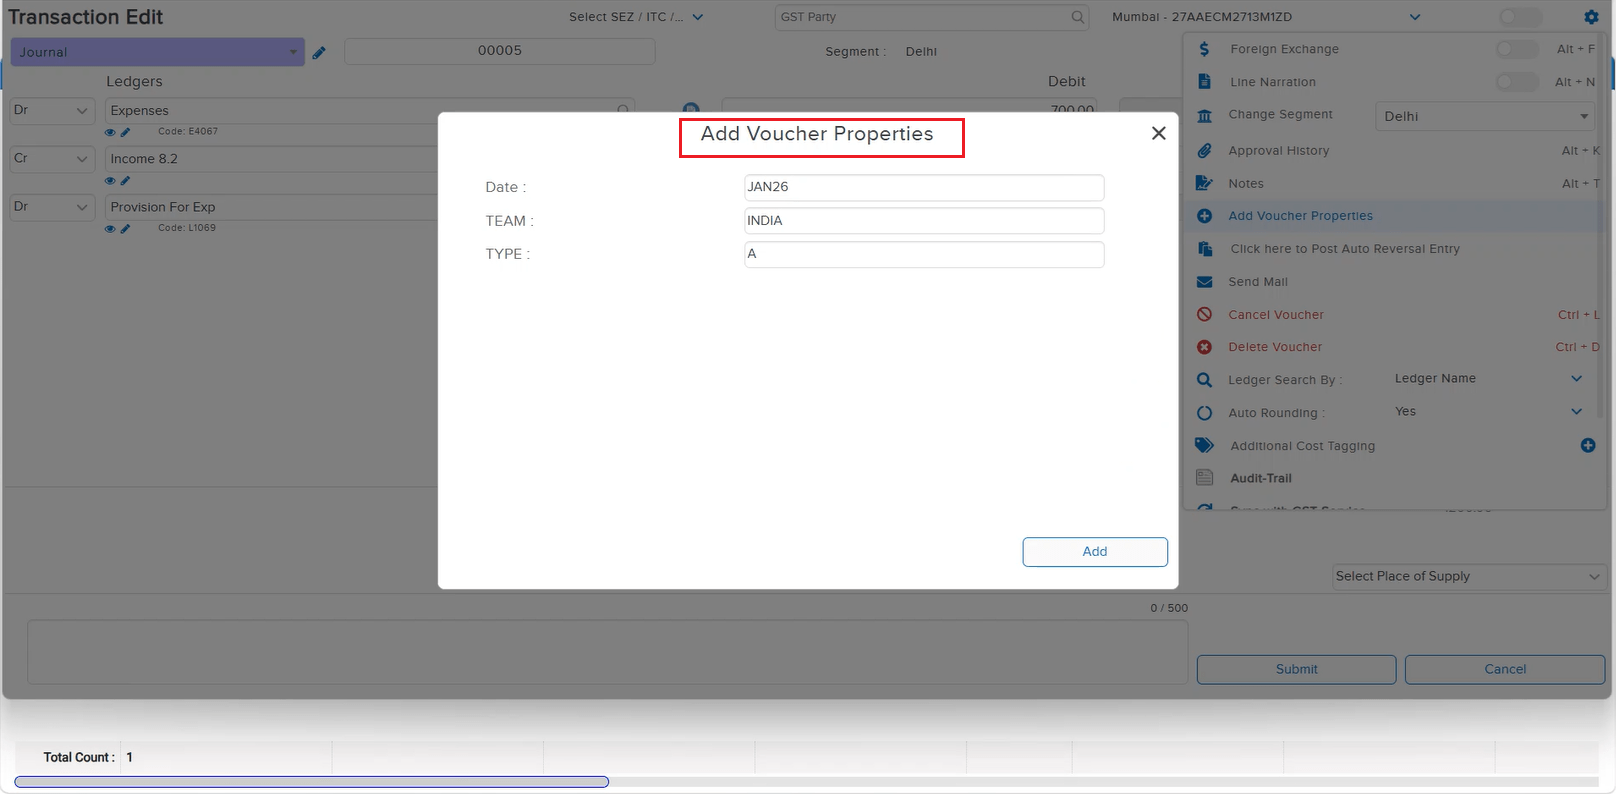
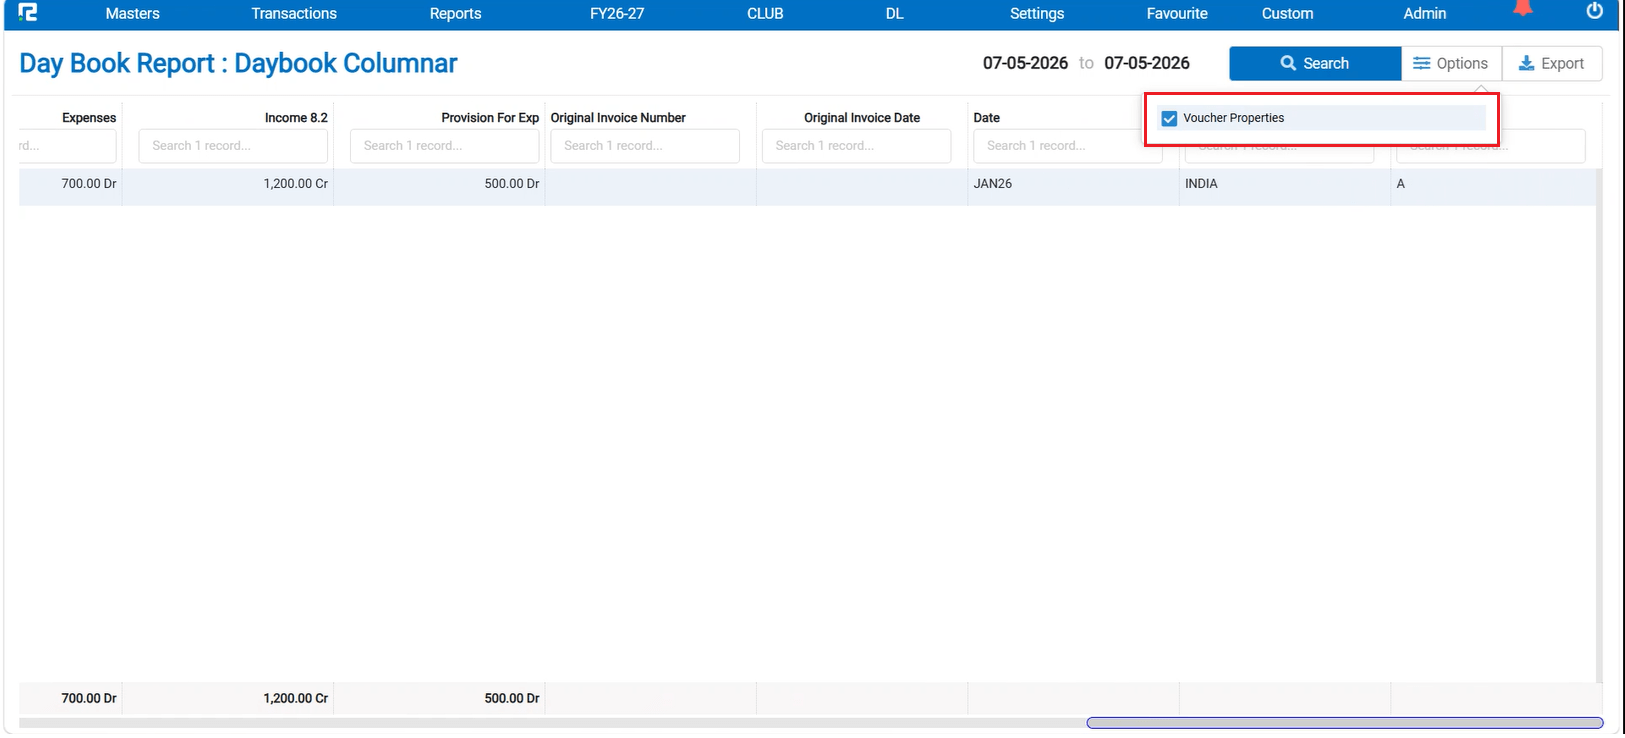
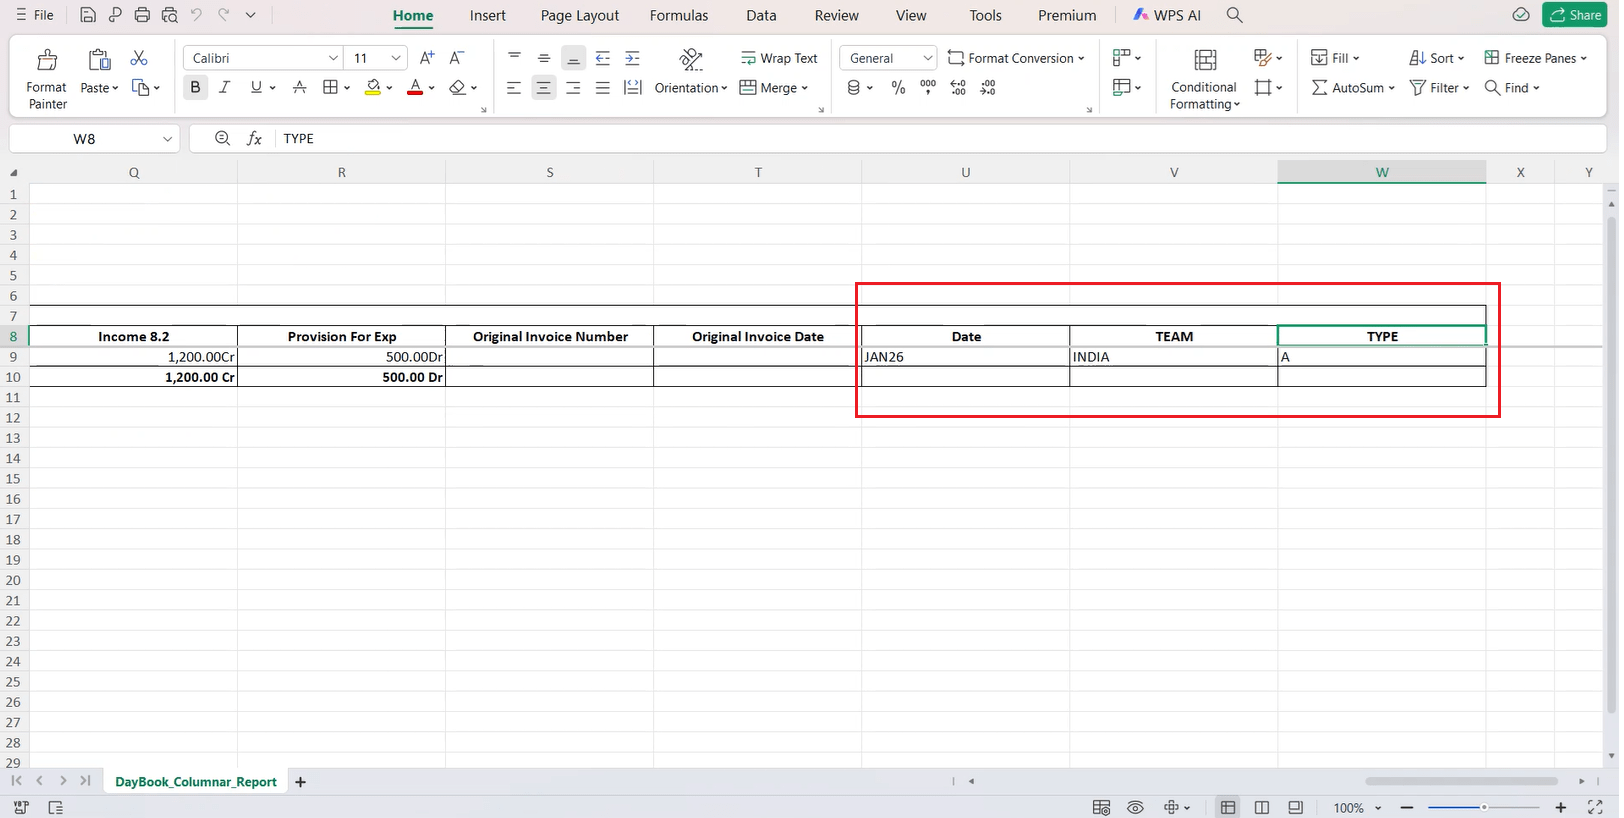
📌 What Was Happening
When the opening balance was updated as on 31-03-2026 and a user ran the Ledger Report from 01-04-2024, the opening balance was appearing randomly among the transaction entries instead of being displayed first. In some cases, the ledger balance was reflected in place of the opening balance — causing confusion and incorrect report interpretation.
🌟 How This Helps You
The Ledger Report now correctly displays the opening balance at the top, followed by the transaction entries in proper order. The issue where the ledger balance was incorrectly shown in place of the opening balance has been resolved — ensuring accurate and consistent report output.
🎬 Where to Find It
📷 See It in Action
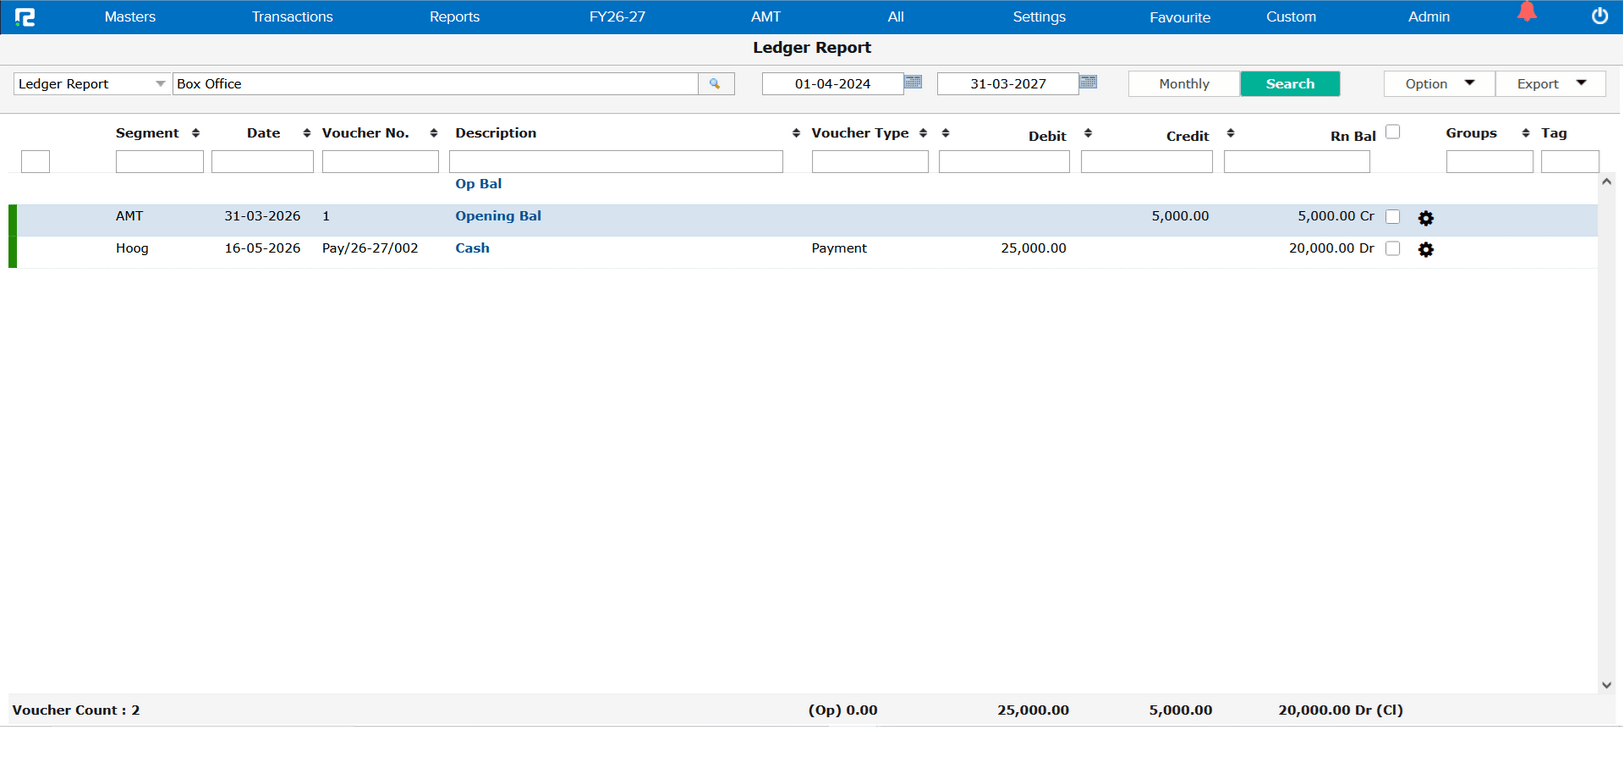
📌 What Was Happening
In the previously released Voucher Wise Bill Status Report, the From Date field was available on the report screen. However, this field had no relevance to the report output — the report logic only required a cut-off date. Having the From Date field was misleading and could cause confusion for users.
🌟 How This Helps You
The From Date field has been removed from the Bill Status Report. Now only the Till Date field is available, making the report interface cleaner and aligned with the actual report logic.
🎬 Where to Find It
📷 See It in Action
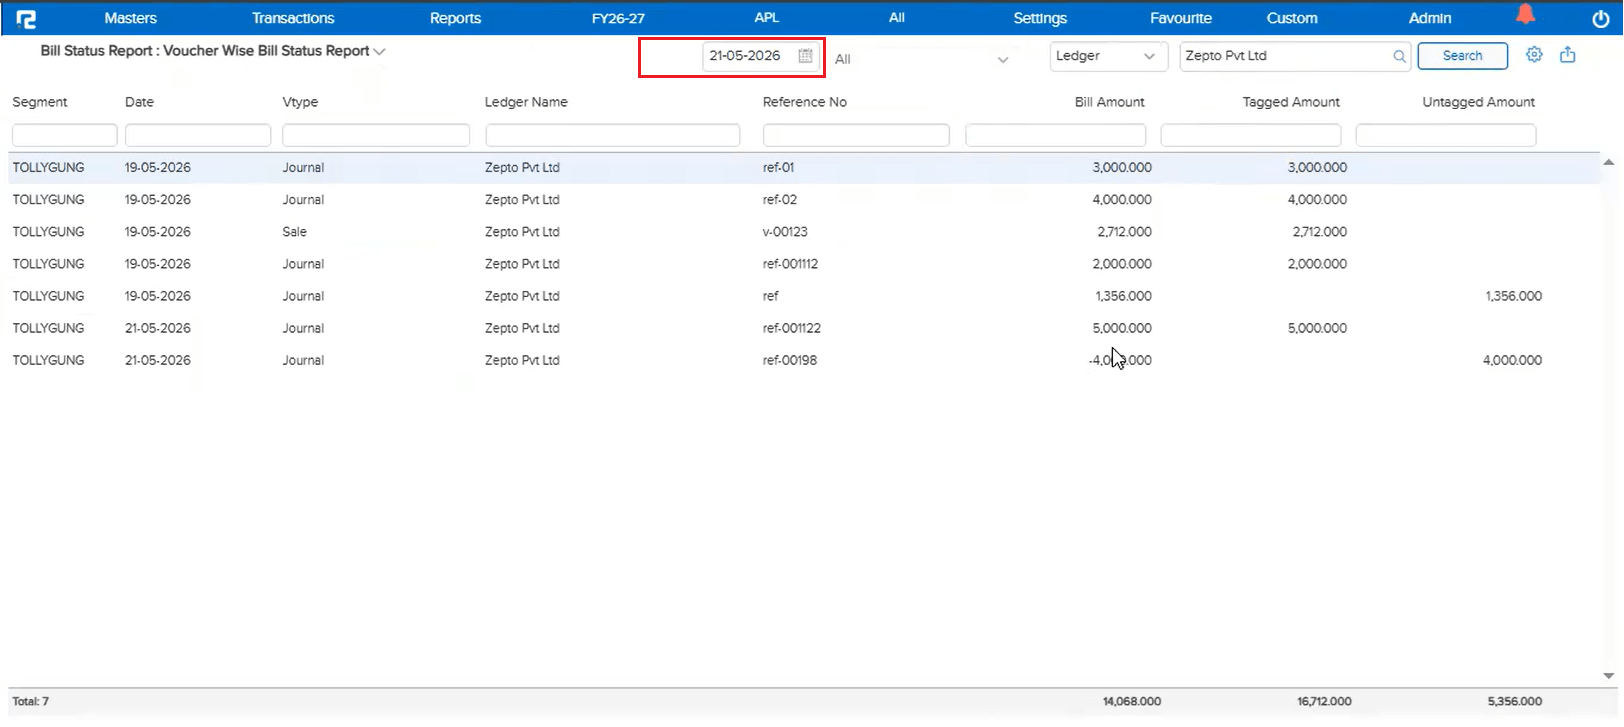
📌 What Was Happening
When an entry was created in RealBooks in March 2026 but the corresponding entry reflected in the JSON in April 2026 (i.e., crossing the financial year boundary), the auto match was not working. This happened even though the system is configured to check and match data 3 months before and after the entry post date in JSON. The issue was specifically related to the financial year beginning logic.
🌟 How This Helps You
The financial year boundary handling in GSTR-2B matching has been corrected. Auto matching now works correctly for entries that span across the financial year beginning — ensuring entries created in March are properly matched with their corresponding April JSON data without manual intervention.
📷 See It in Action
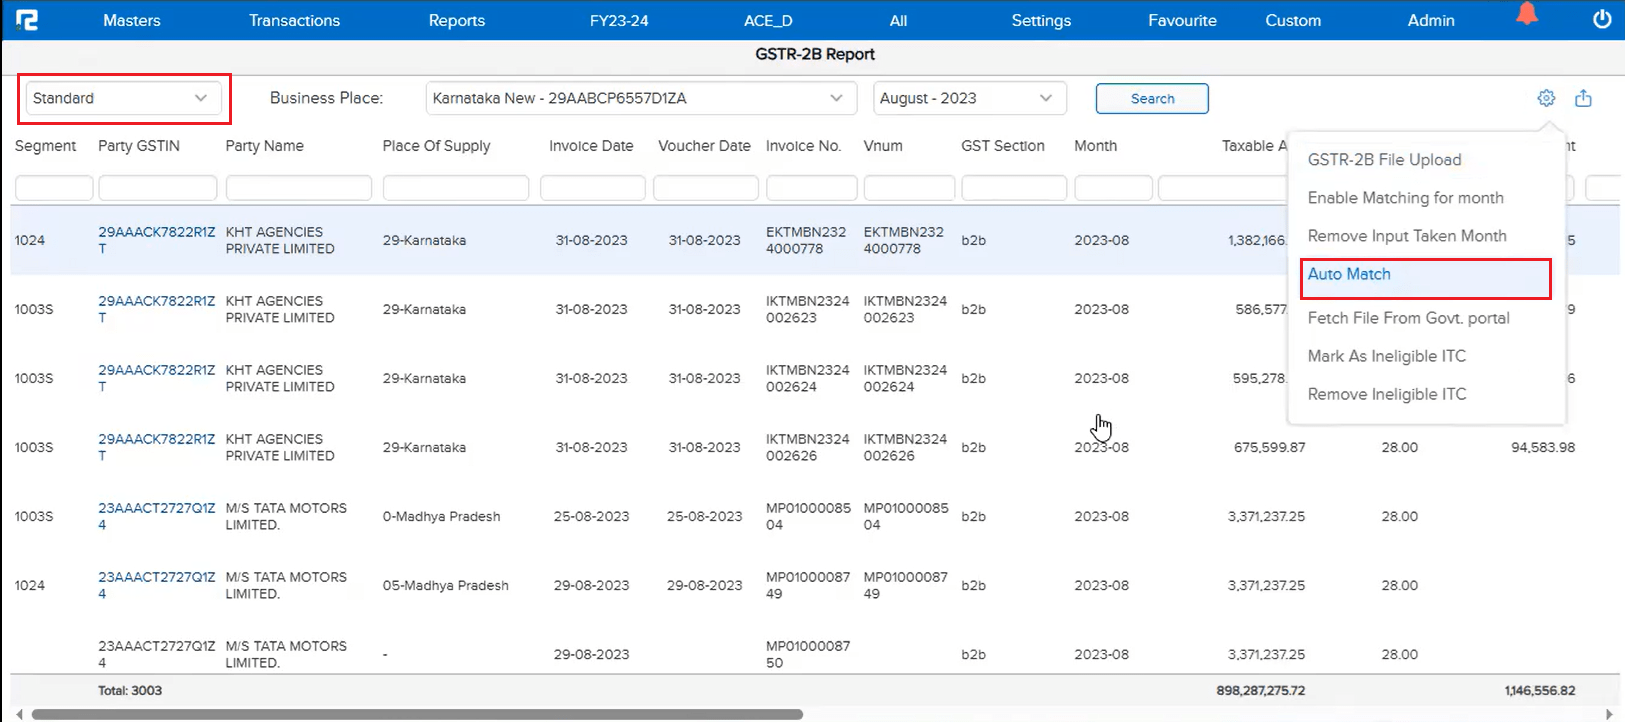
📌 What Was Happening
In the Daybook Advance Search, the Ledger Search was not functioning correctly — when a ledger name was entered in the search field, the data was not getting filtered or returned, leaving users unable to narrow down daybook entries by ledger through the advance search screen.
🌟 How This Helps You
The issue has been fixed. The Ledger Search in Daybook Advance Search now works correctly — entering a ledger name will filter and return the matching entries as expected, restoring full search functionality in the advance search screen.
🎬 Where to Find It
📷 See It in Action
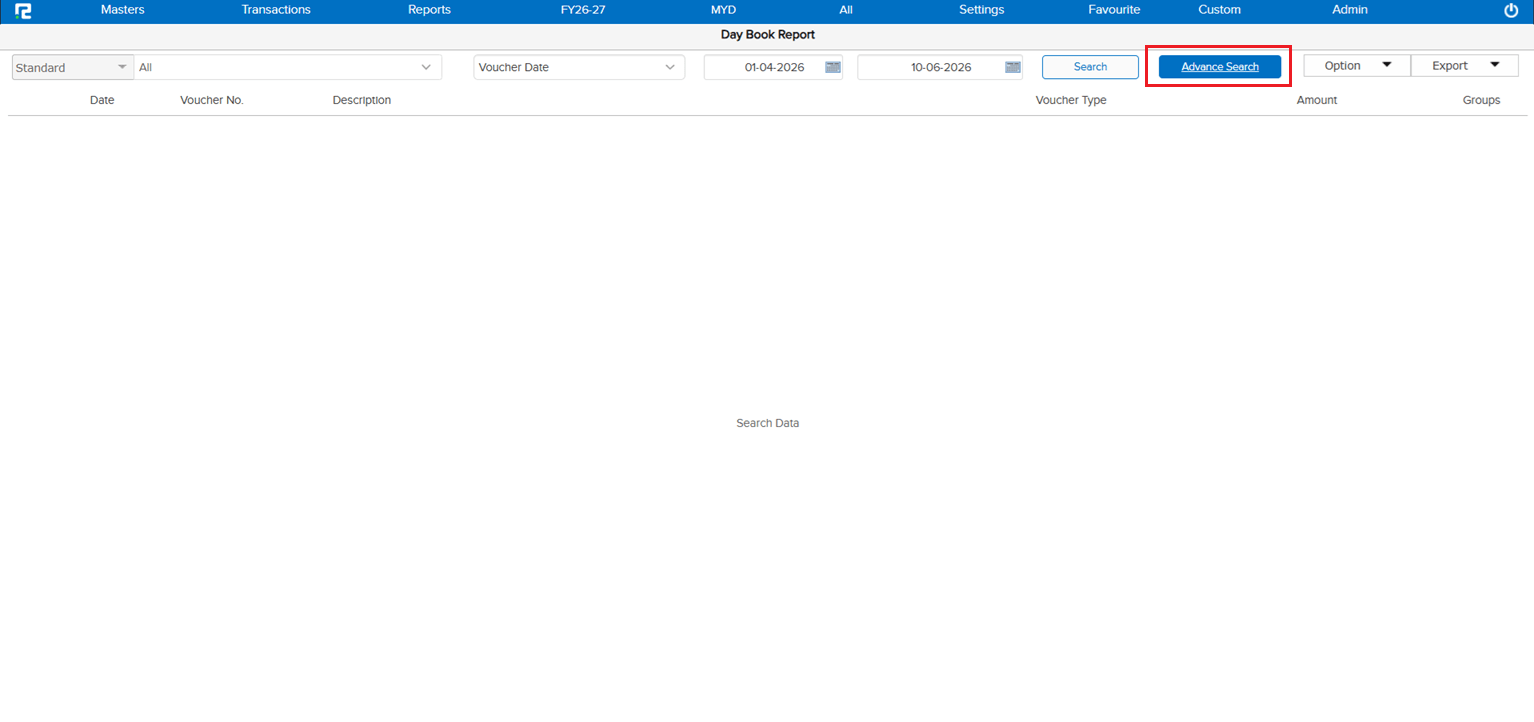
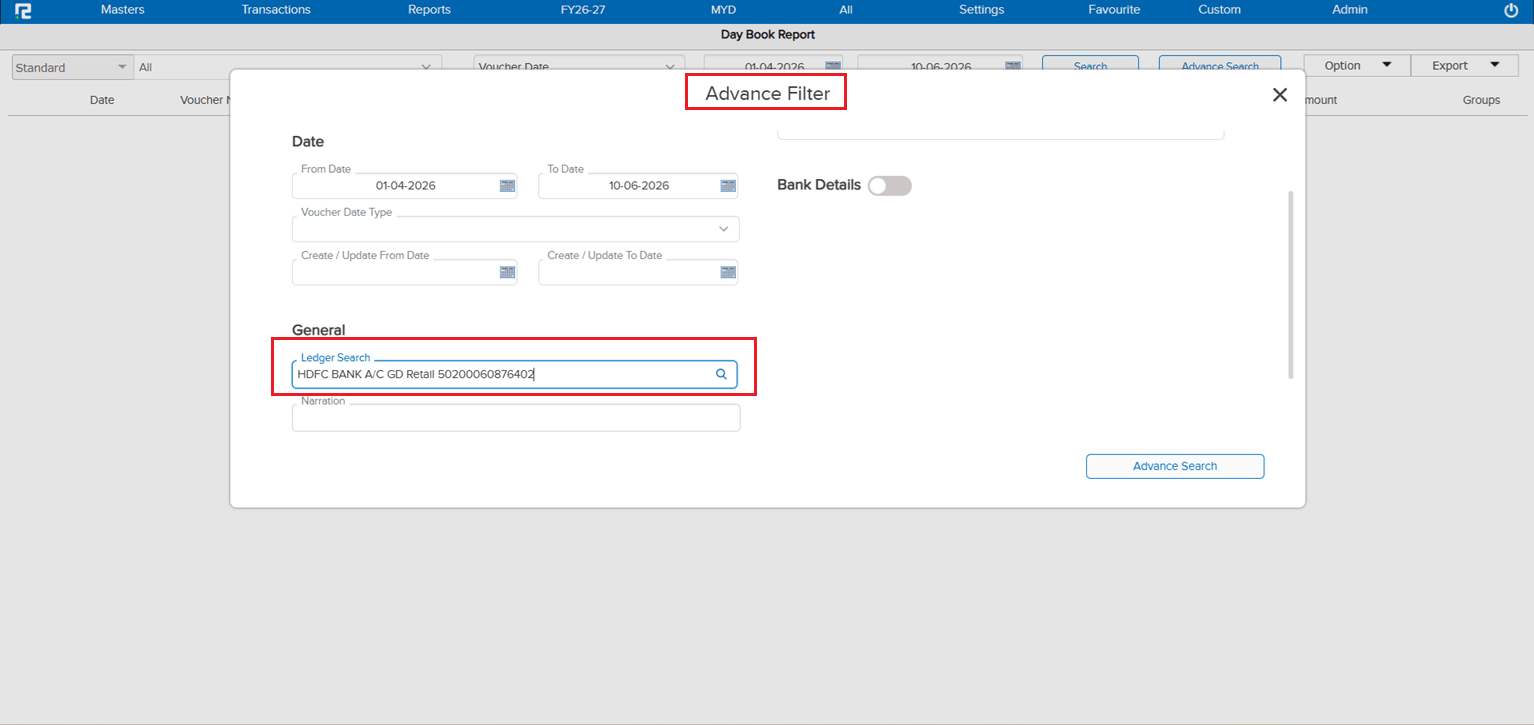
📌 What Was Happening
When an Income Ledger was configured with “Nature of Supply (GST)” set to Tax Payable Under RCM, and the transaction involved a B2B party, the entry was not appearing in the GST e-Invoice screen — even though it should have been reflected there for e-invoice processing.
🌟 How This Helps You
The issue has been fixed. RCM-tagged income ledger transactions with B2B parties will now reflect correctly in the e-Invoice screen as per the following behaviour:
• Registered Party: Transaction is displayed under RCM, shown in the B2B dropdown as “under posting”, and appears in the Sales e-Invoice Report
• Unregistered Party: Transaction is displayed under error and does not appear in the Sales e-Invoice Report
🎬 Where to Find It
📷 See It in Action
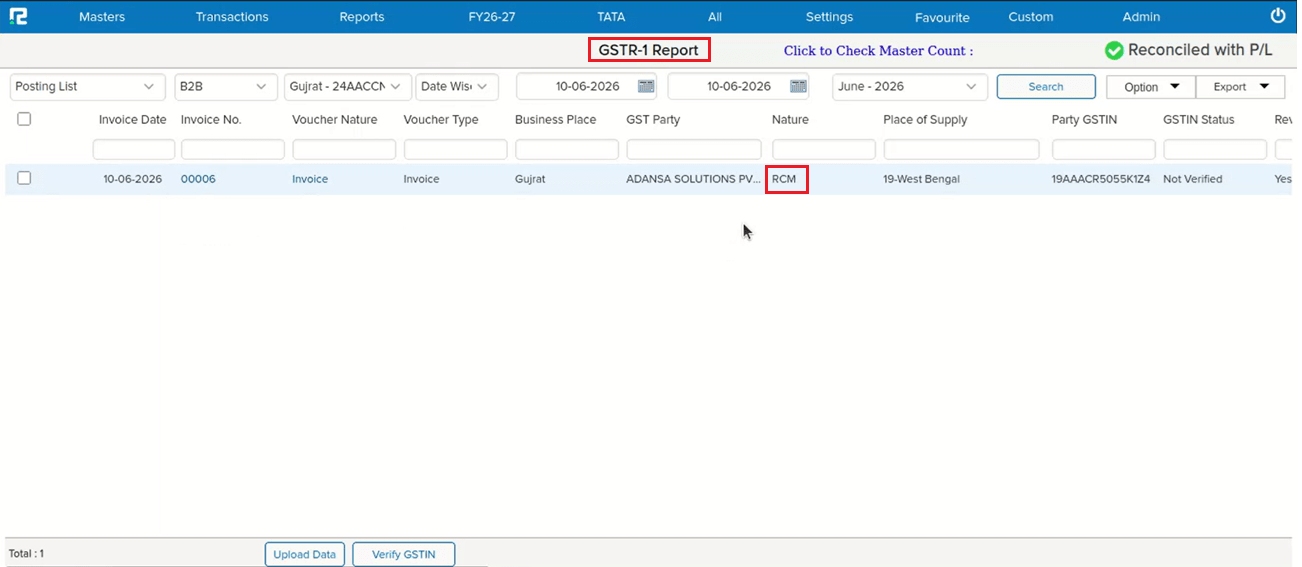
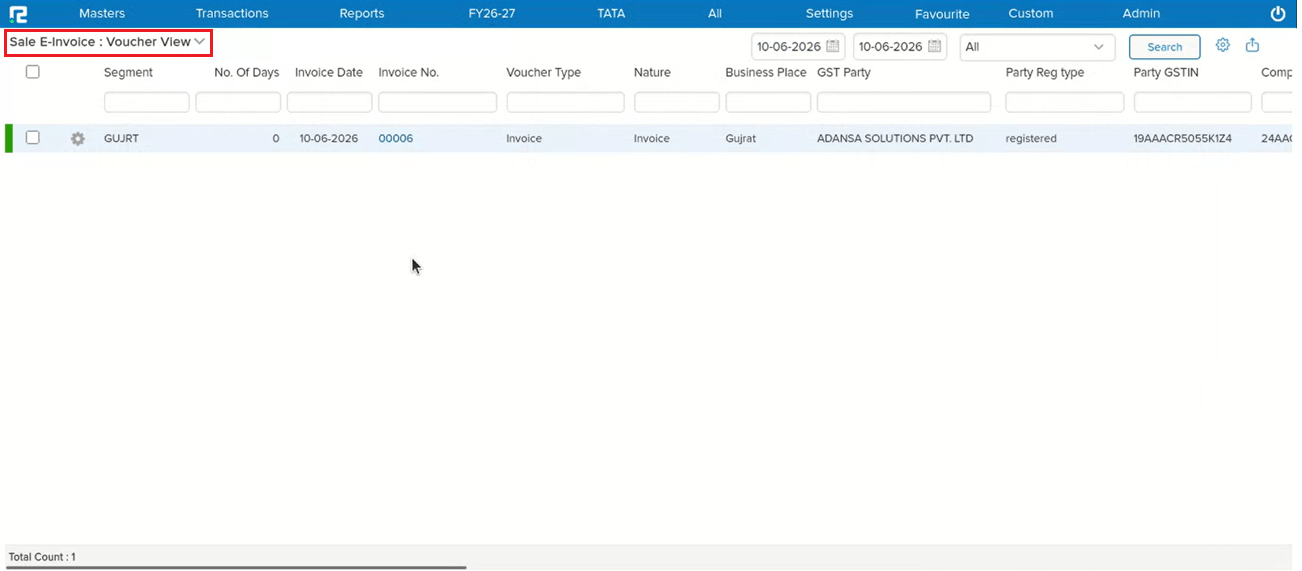
📌 What Was Happening
In the Batch-wise Profitability Details report, the Percentage (%) column was not displaying any value. The calculation logic was missing or incorrect, leaving the % field blank for all batch-wise profitability entries regardless of the data available.
🌟 How This Helps You
The percentage calculation has been corrected. The % column in the Batch-wise Profitability Details report will now display values based on the following logic:
• If COGS data is available: % = (Net Margin ÷ COGS) × 100
• If COGS is blank: % = −(Net Margin ÷ Sale Return Amount) × 100
• If Net Margin is 0: % = 0
🎬 Where to Find It
📷 See It in Action
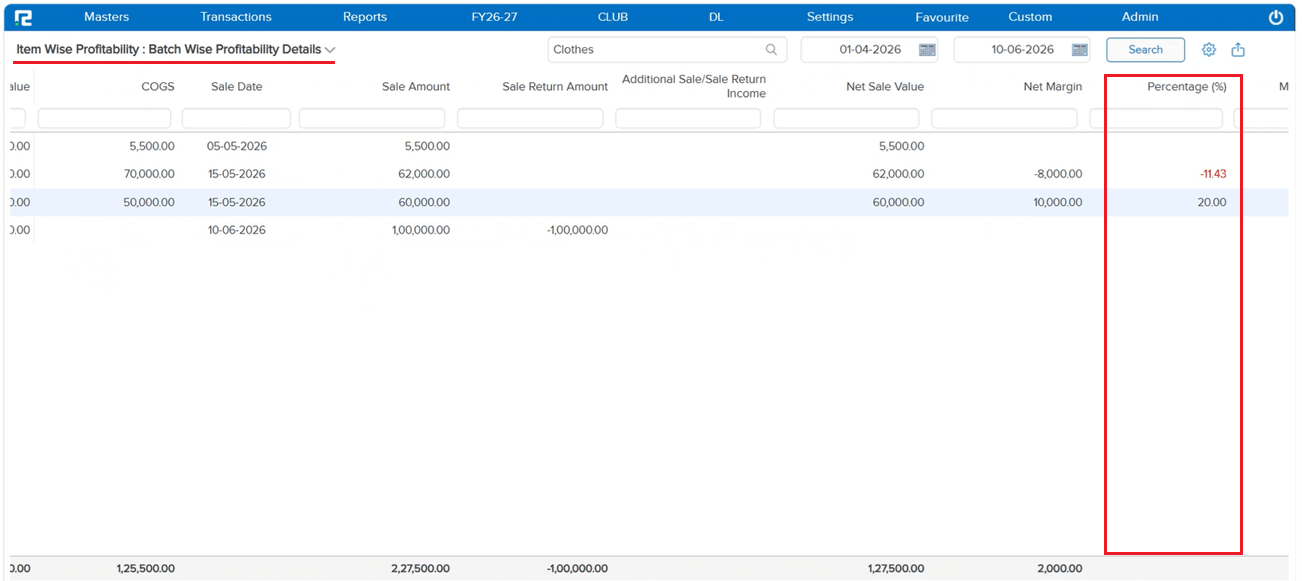
📌 What Was Happening
On the BRS entry UI screen, when users selected multiple checkboxes and applied a common date, the Bank Date filter was not working correctly. As a workaround, users had to first apply the “Set Voucher Date” option and then the Bank Date filter — only then did the filter behave as expected.
🌟 How This Helps You
The issue has been fixed. Selecting multiple checkboxes and setting a common date on the BRS entry screen will now apply the Bank Date filter correctly in a single step — no need to first run the “Set Voucher Date” workaround. BRS reconciliation flows are now consistent regardless of the order in which the date options are applied.
🎬 Where to Find It
📷 See It in Action
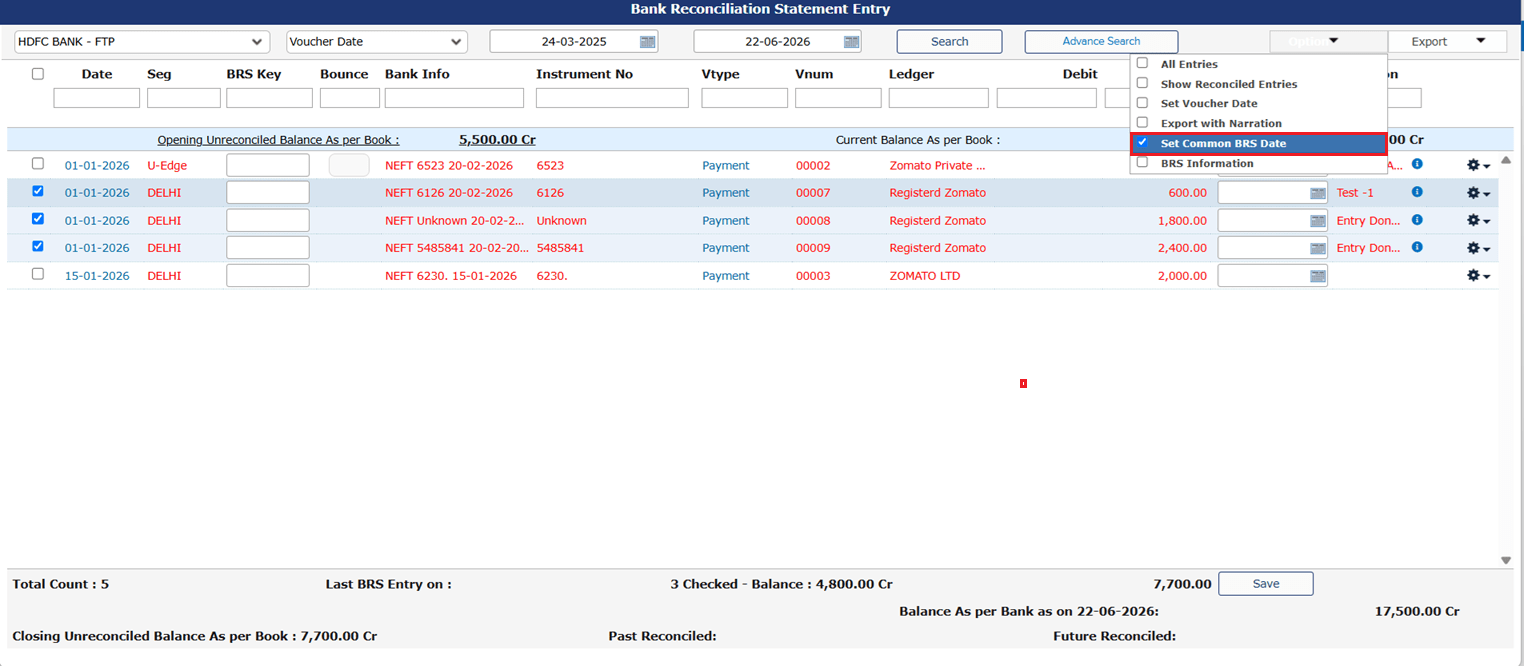
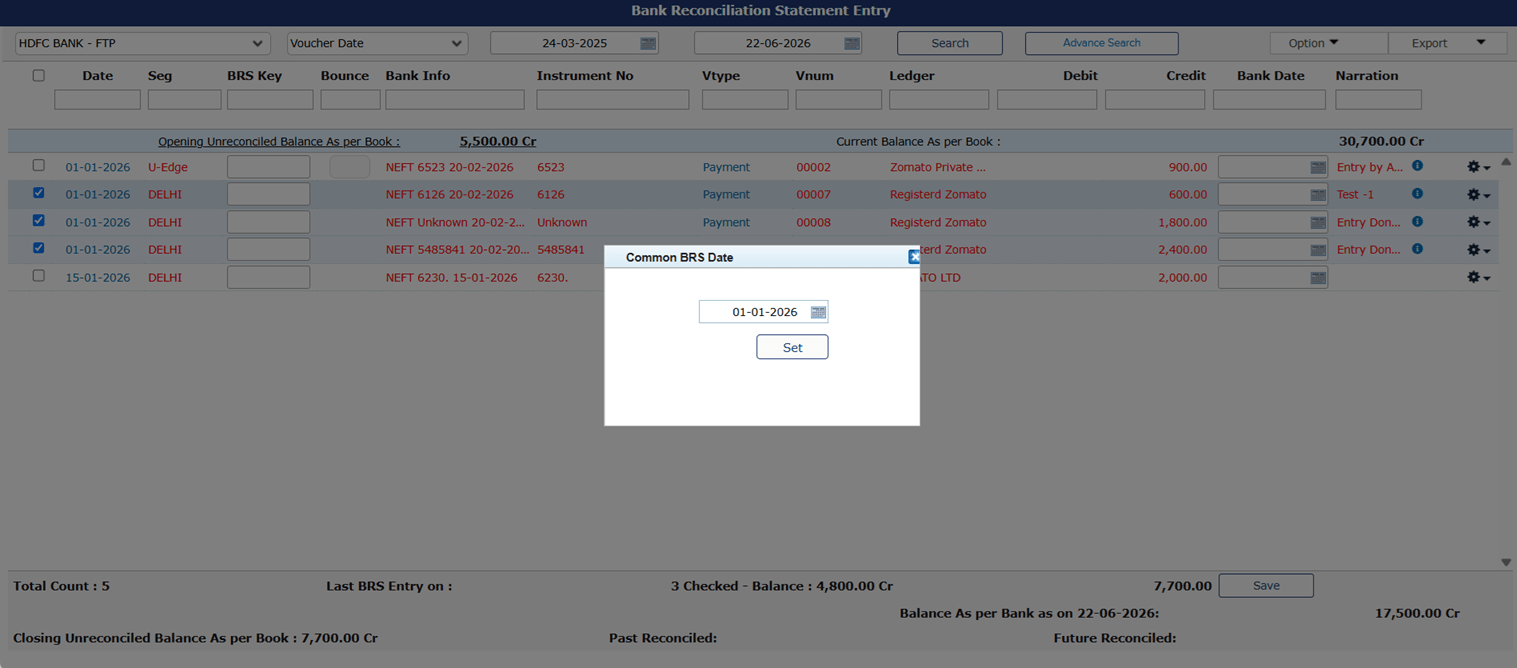
📌 What Was Happening
In the GSTR-3B (As Per Input Taken) report, entries were correctly visible in the GSTR B2B screen when drilling down from the report UI. However, when exporting the GSTR 2 B2B Report via “Excel with GST Details”, those same entries were missing from the export — creating a discrepancy between what was shown on screen and what was downloaded.
🌟 How This Helps You
The export logic has been fixed. Entries that appear in the GSTR B2B drill-down from the GSTR-3B (As Per Input Taken) report are now correctly included in the “Excel with GST Details” export — the on-screen view and the downloaded file are now consistent.
🎬 Where to Find It
📷 See It in Action
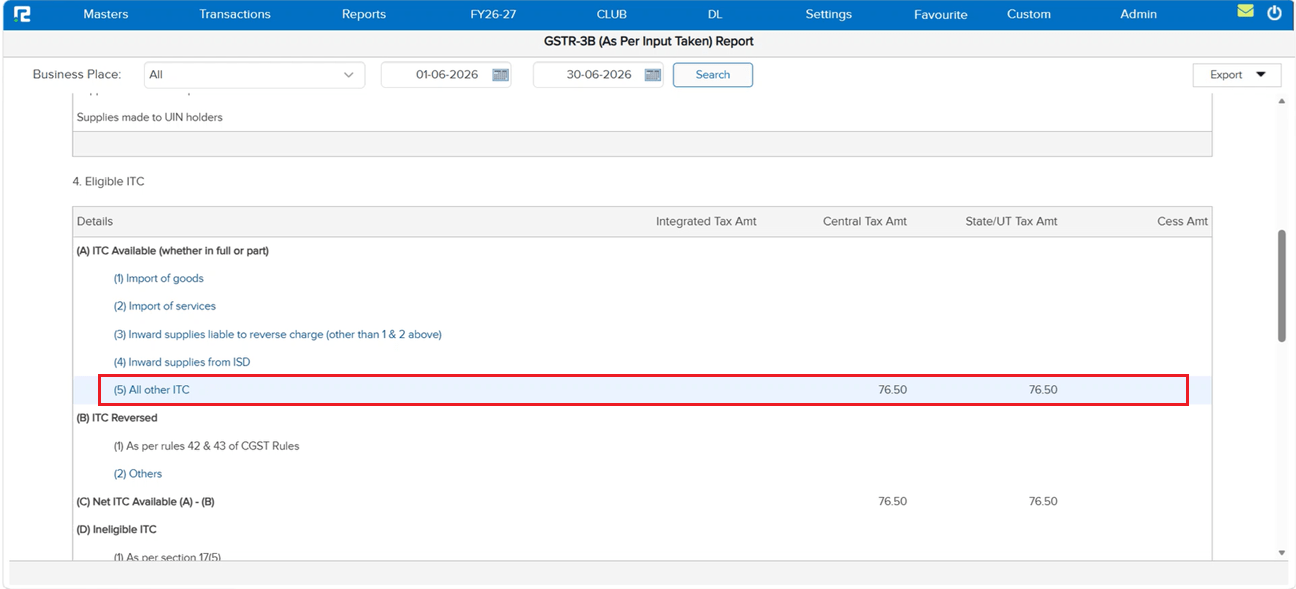
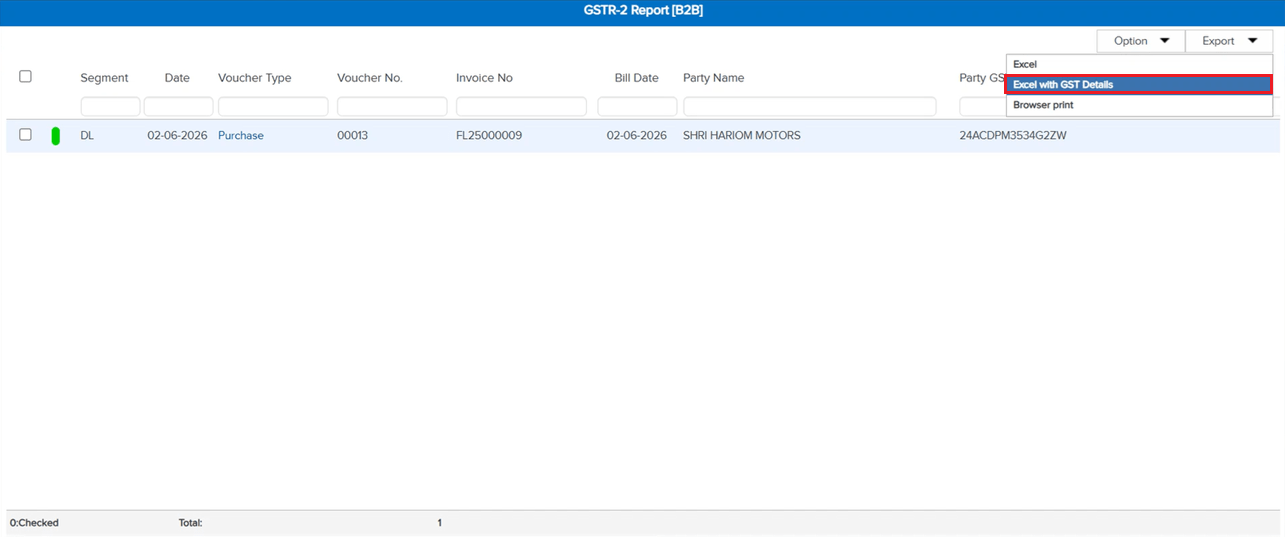
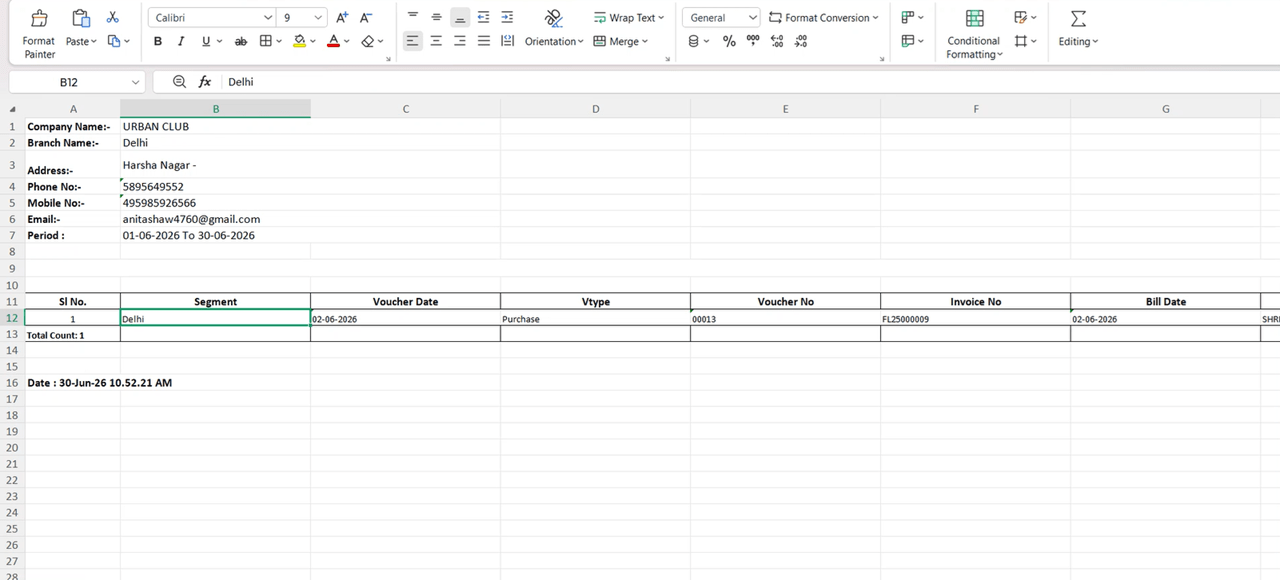
📌 What Was Happening
In the Purchase Register, after selecting the Voucher Type from the filter, the cursor was not automatically moving to the Party field. Users who navigate primarily using the keyboard had to manually click or tab to the Party field before they could continue, breaking the natural keyboard-driven flow through the report filters.
🌟 How This Helps You
The cursor now automatically moves to the Party field after a Voucher Type is selected in the Purchase Register. Keyboard-first users can move through the report filters without interruption — no extra click or tab needed to land on the next field.
🎬 Where to Find It
📷 See It in Action
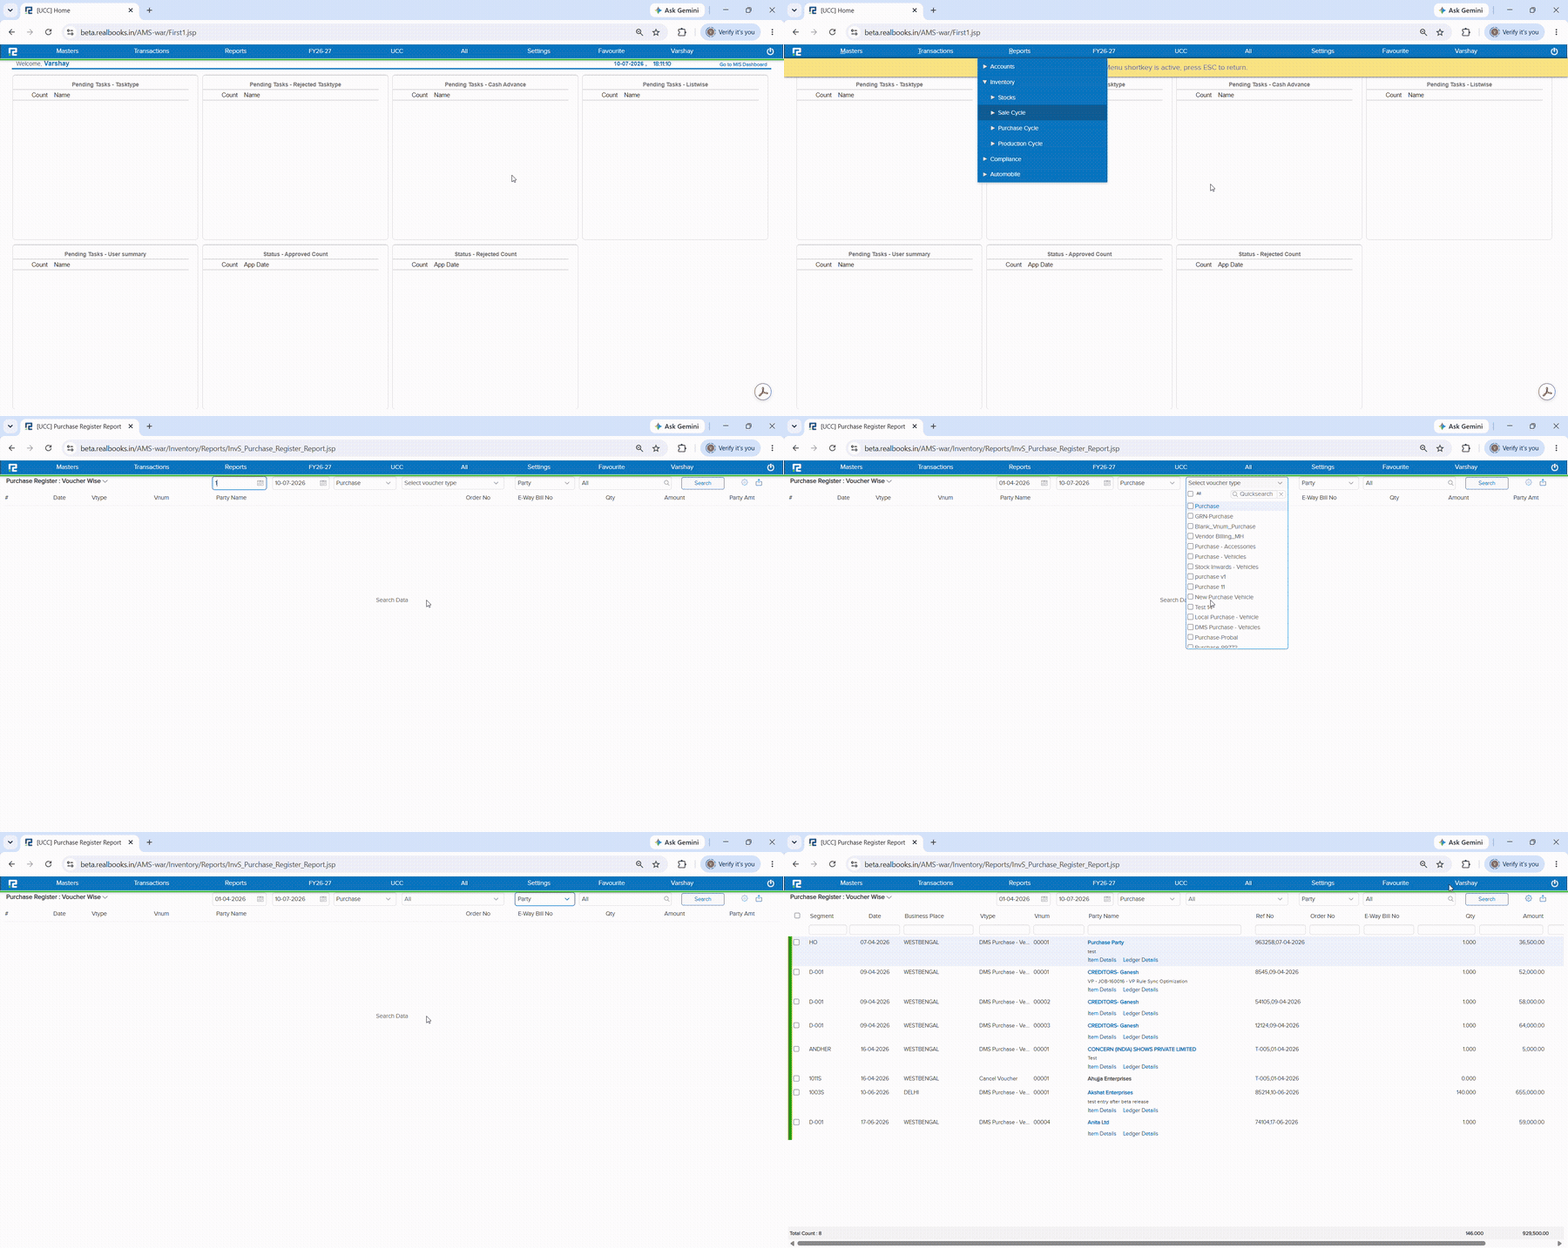
📌 What Was Happening
In the Purchase Requisition, when opening an entry that was in Partial status and changing its status to Open, the system displayed the message “Data not saved” — preventing the status update from being applied. Users were unable to revert a Partial requisition back to Open without this error blocking the save.
🌟 How This Helps You
The issue has been fixed. Editing a Purchase Requisition with Partial status and changing it to Open now saves correctly without any “Data not saved” error — the status update is applied and retained as expected.
🎬 Where to Find It
📷 See It in Action
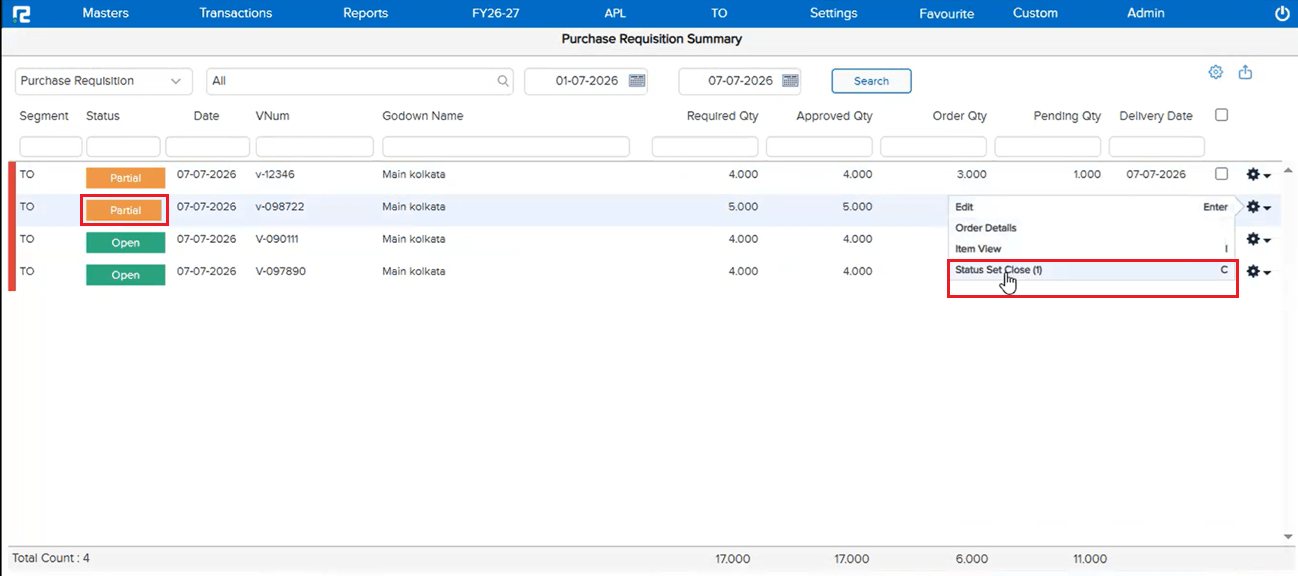
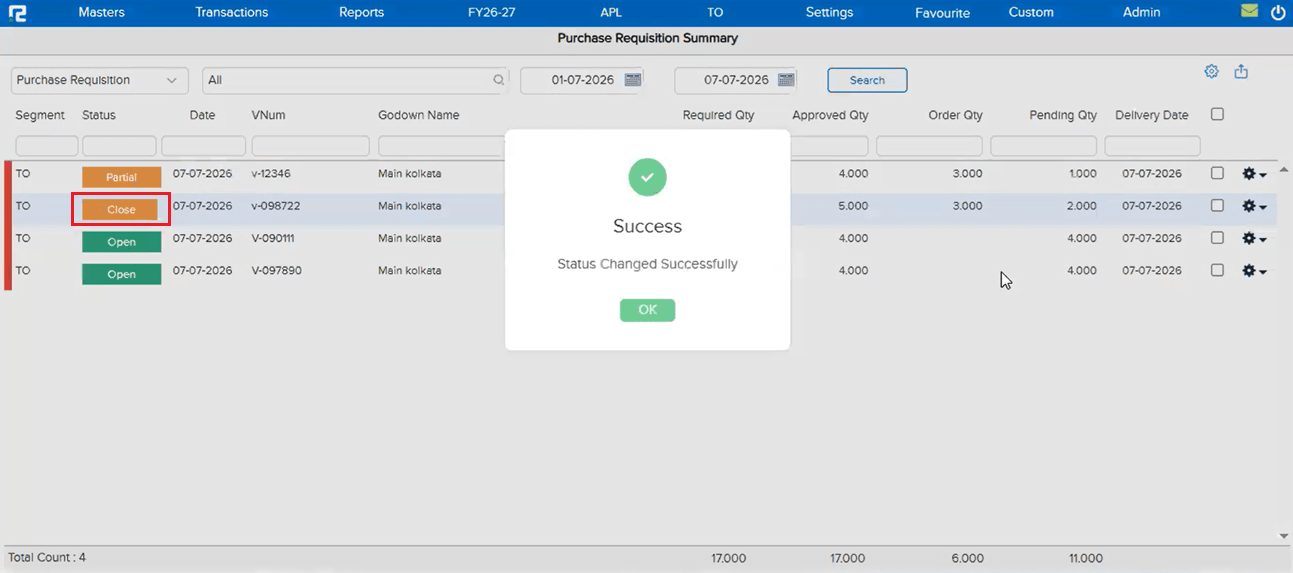
📌 What Was Happening
In the Godown Report, godowns that had been marked as inactive in Godown Master were not appearing in the following report variations:
• Item Wise — inactive godowns were missing from the item-level breakdown
• Group Wise — inactive godowns were missing from the group-level breakdown
This meant that stock held in or associated with an inactive godown was silently excluded from these report views, leading to incomplete data.
🌟 How This Helps You
The Godown Report now correctly reflects inactive godowns in both the Item Wise and Group Wise variations. Stock data associated with inactive godowns is no longer excluded from these views — giving a complete and accurate picture across all godowns regardless of their active / inactive status.
🎬 Where to Find It
📷 See It in Action
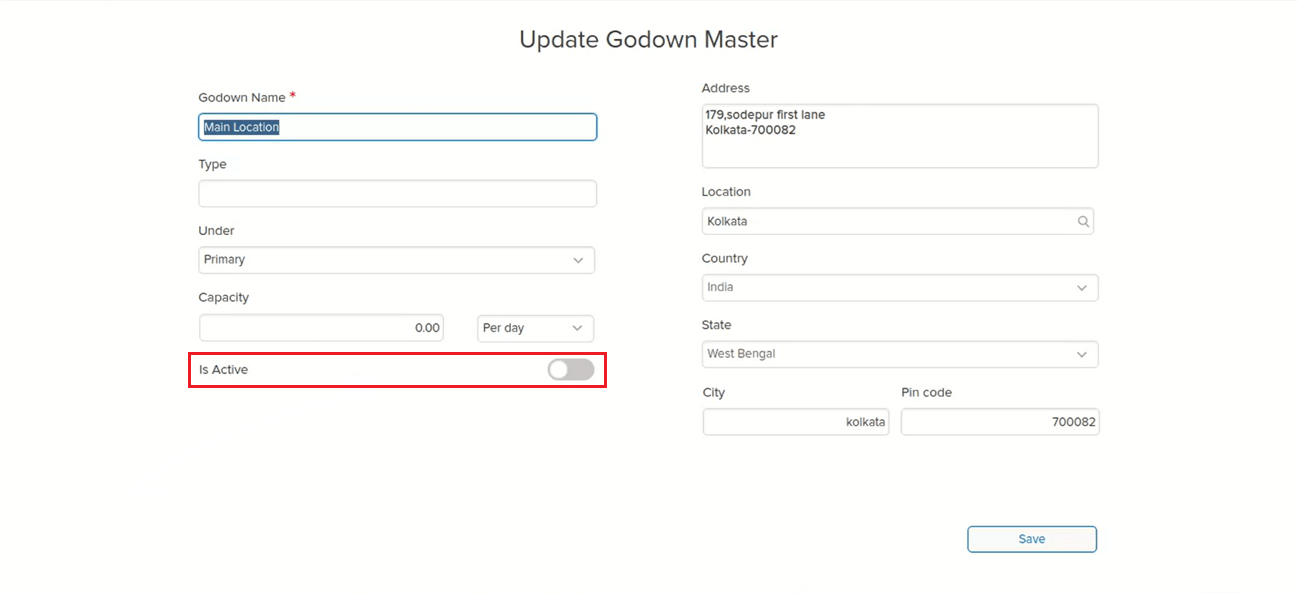
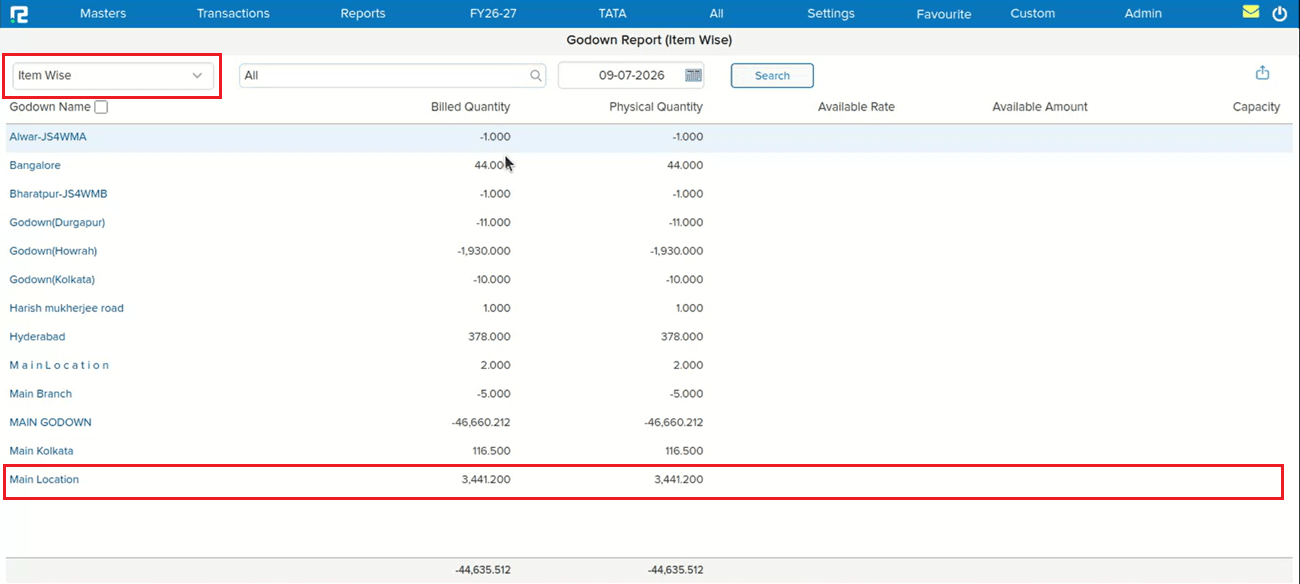
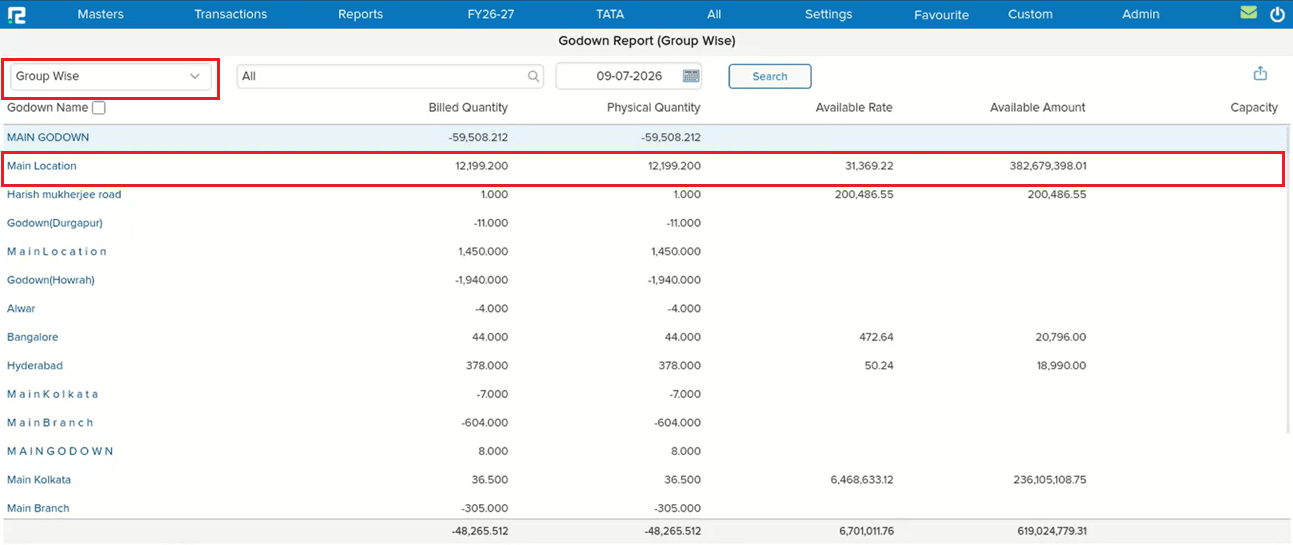
📌 What Was Happening
An entry was not reflecting in the BRS (Bank Reconciliation Statement) screen. To correct this, the entry was fired from the Exception Report: Missing in Bank using the Rectify Voucher option — but it got refired twice by mistake due to multiple clicks on the option. As a result, the entry started reflecting twice in the BRS screen instead of once.
🌟 How This Helps You
The Rectify Voucher option on the Exception Report: Missing in Bank screen now blocks multiple clicks, ensuring the entry is fired only once. This prevents duplicate entries in BRS caused by accidentally clicking Rectify Voucher more than once.
🎬 Where to Find It
📷 See It in Action
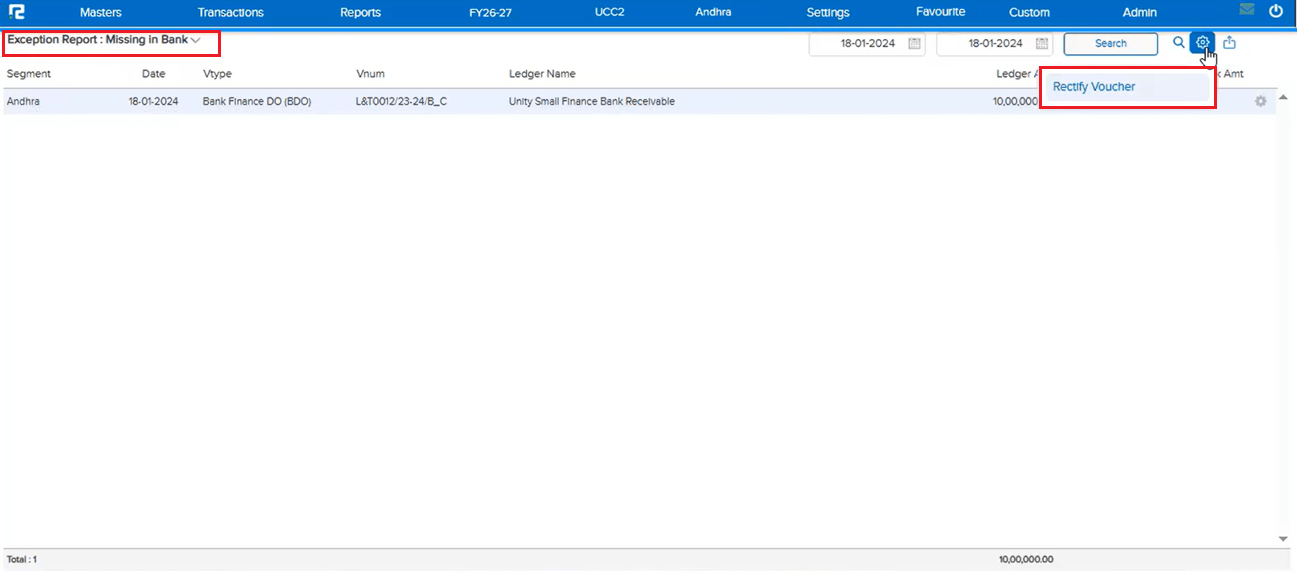
📌 What Was Happening
Multiple items were not getting searched in Reports. These items had the Mark As Visible toggle disabled in Item Master — but visibility being off should only affect selection in transaction entry screens, not report search. Because the same restriction was incorrectly applied to report search, these items could not be found in report item filters.
🌟 How This Helps You
Items with Mark As Visible disabled now appear correctly in report search across Item Register Reports (Item Wise and Item Segment Wise Quantity, and other report item filters) — the visibility setting no longer blocks an item from being searched and reported on.
🎬 Where to Find It
📷 See It in Action
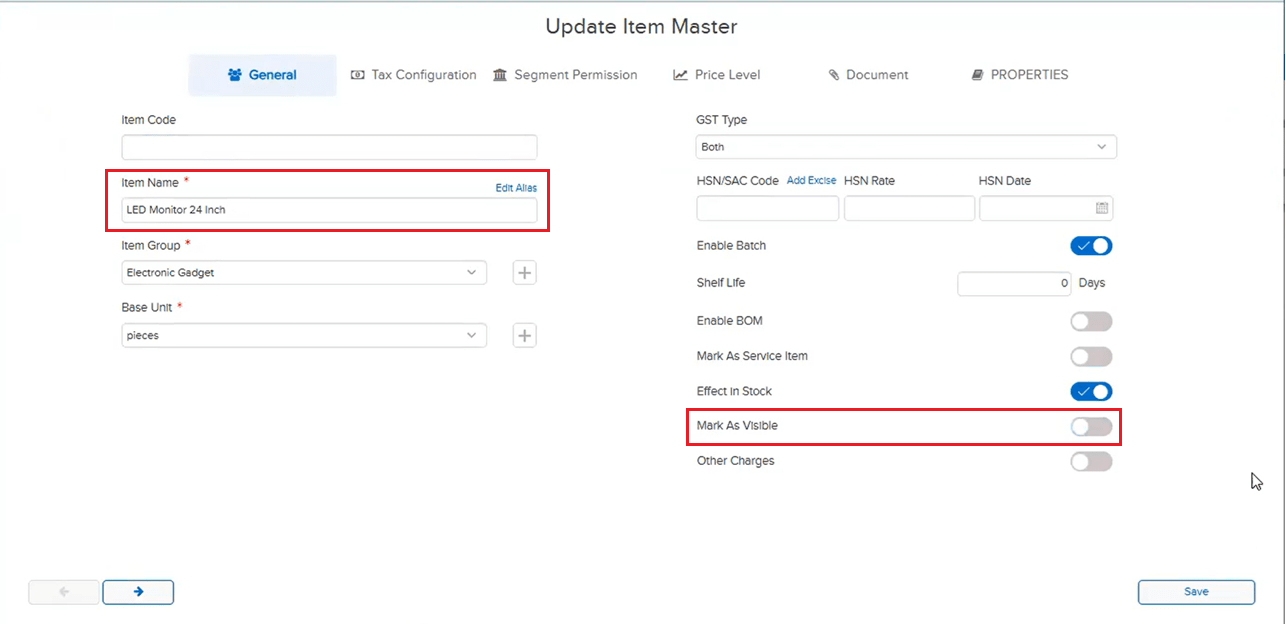
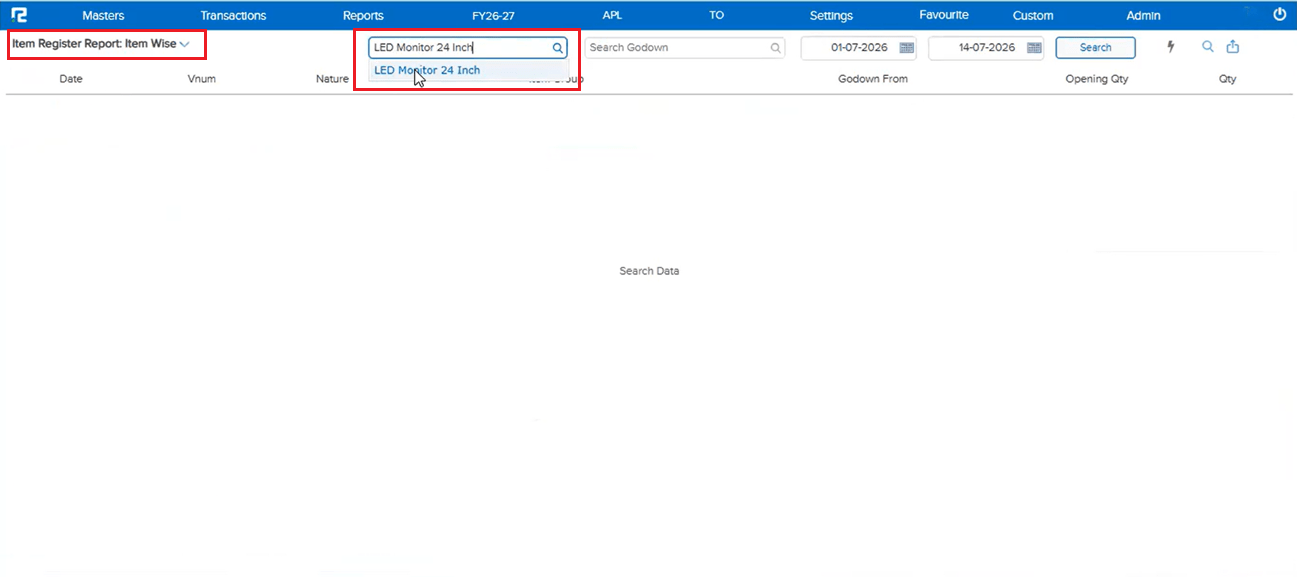
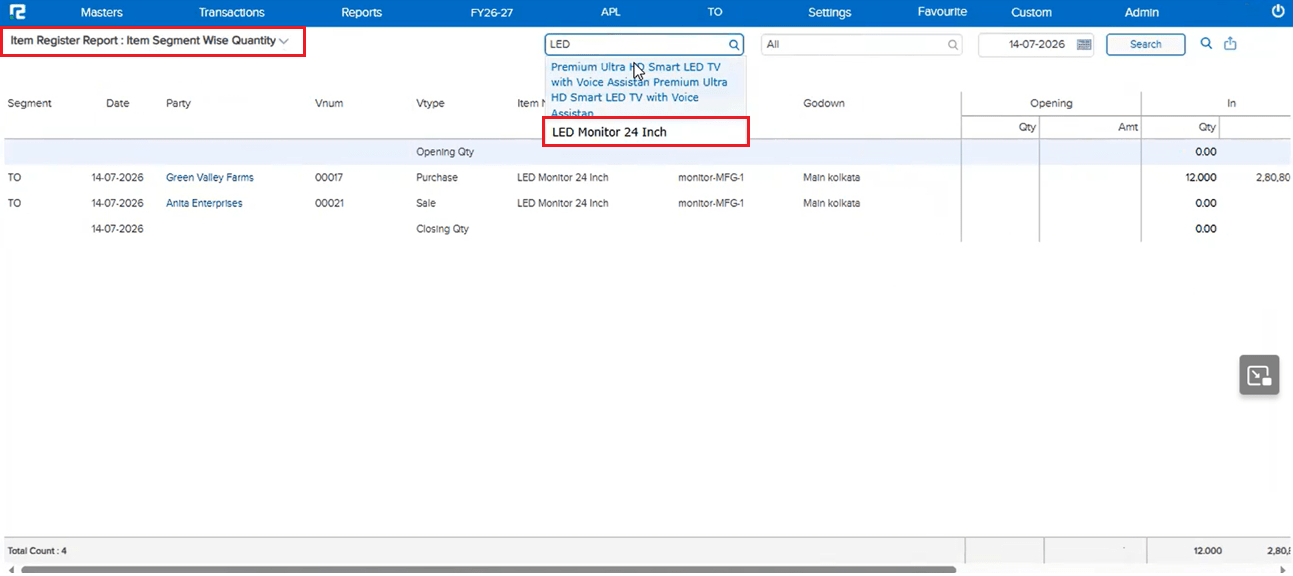
📌 What Was Happening
In the Batch Register search field, the text being typed automatically disappeared mid-entry, making it difficult to search for the intended batch.
🌟 How This Helps You
The Batch Register search field now retains typed text correctly — the auto-clearing issue has been fixed, allowing uninterrupted searching.
🎬 Where to Find It
📷 See It in Action
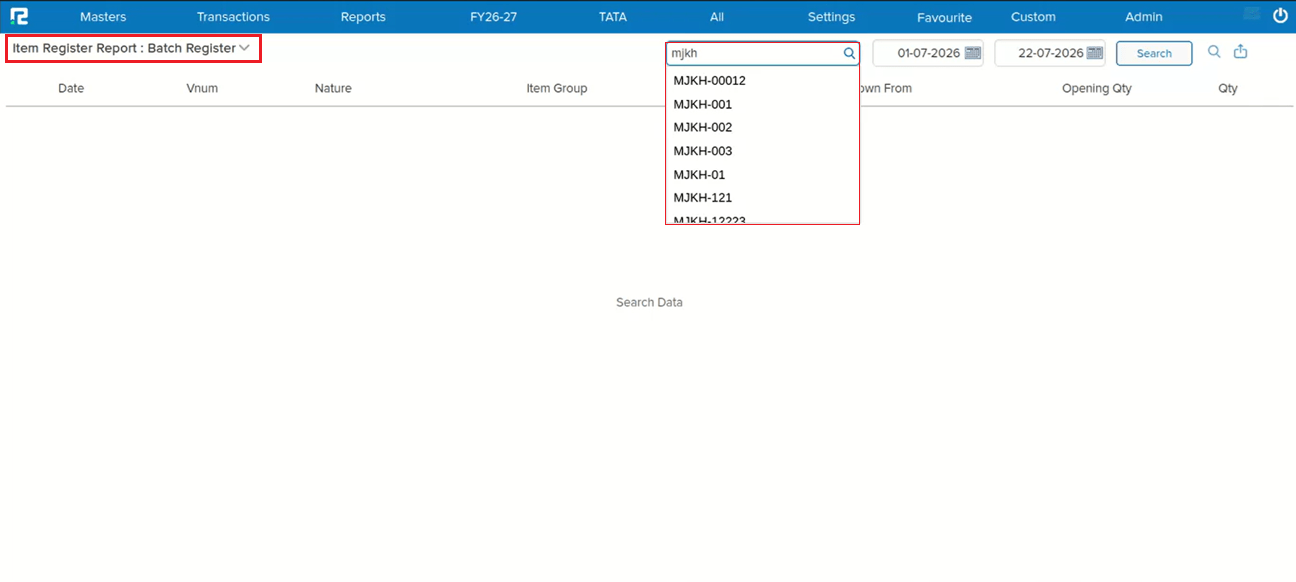
📌 What Was Happening
The Delivery Order (DO) Status Report was not working — it kept buffering indefinitely without loading results. The root cause: when a user without full Ledger / Ledger Group permission searched using the Ledger Group filter, the report threw an error instead of loading.
🌟 How This Helps You
The Delivery Order Status Report now loads correctly for users with restricted Ledger / Ledger Group permission — searching by Ledger Group no longer errors out or leaves the report stuck buffering.
🎬 Where to Find It
📷 See It in Action
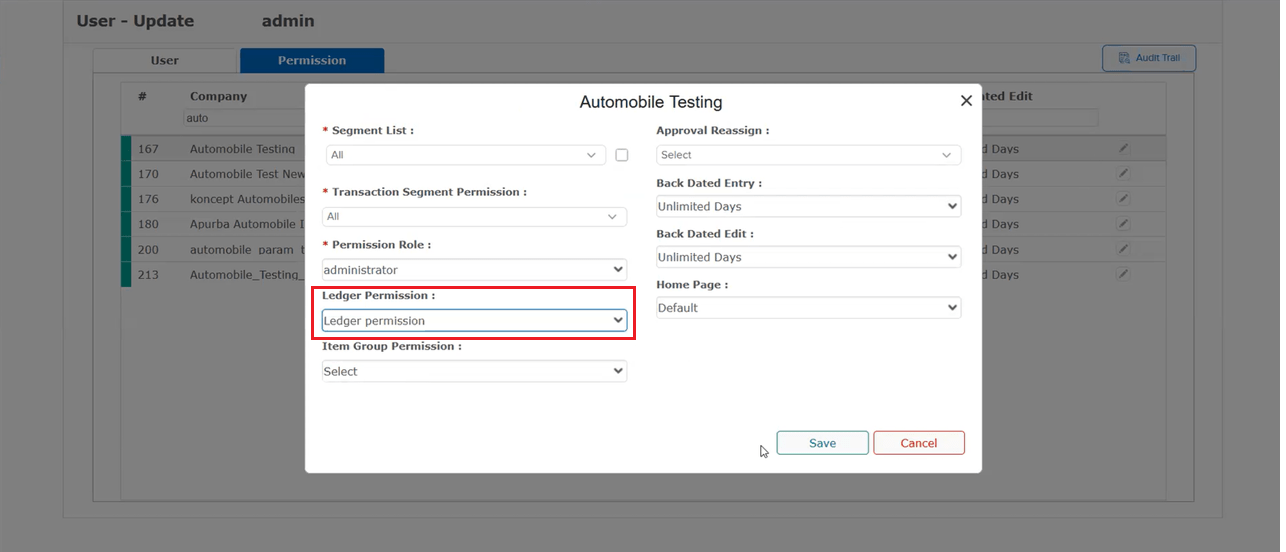
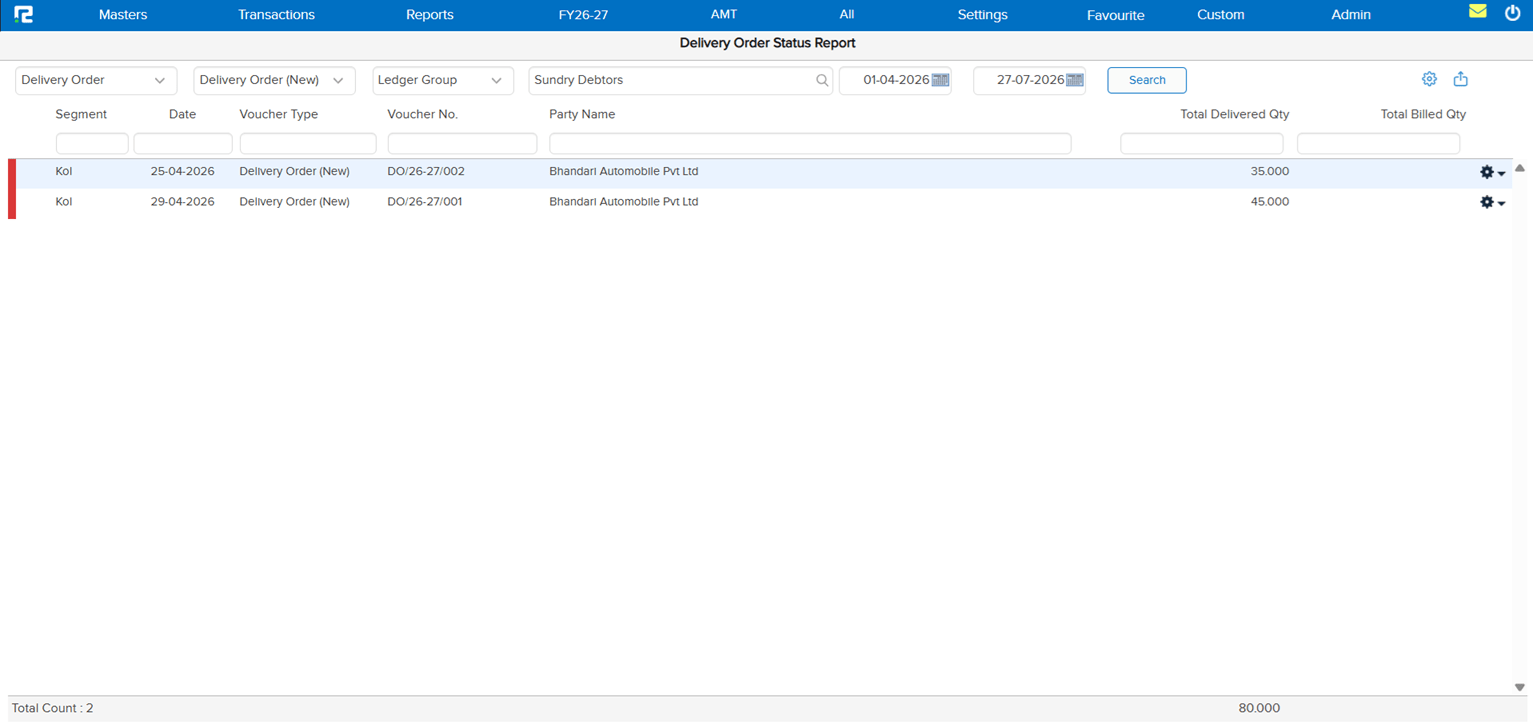
📌 What Was Happening
The Rate column in Sale Register: Item Wise and Purchase Register: Item Wise was showing the last rate of an item instead of its average rate when multiple entries existed for the same item at different rates — producing a misleading Rate figure.
🌟 How This Helps You
The Rate column now correctly shows the average rate, calculated from Total Amount ÷ Total Quantity, in both the Sale Register and Purchase Register (Item Wise) — giving an accurate rate figure across all matching entries.
🎬 Where to Find It
📷 See It in Action
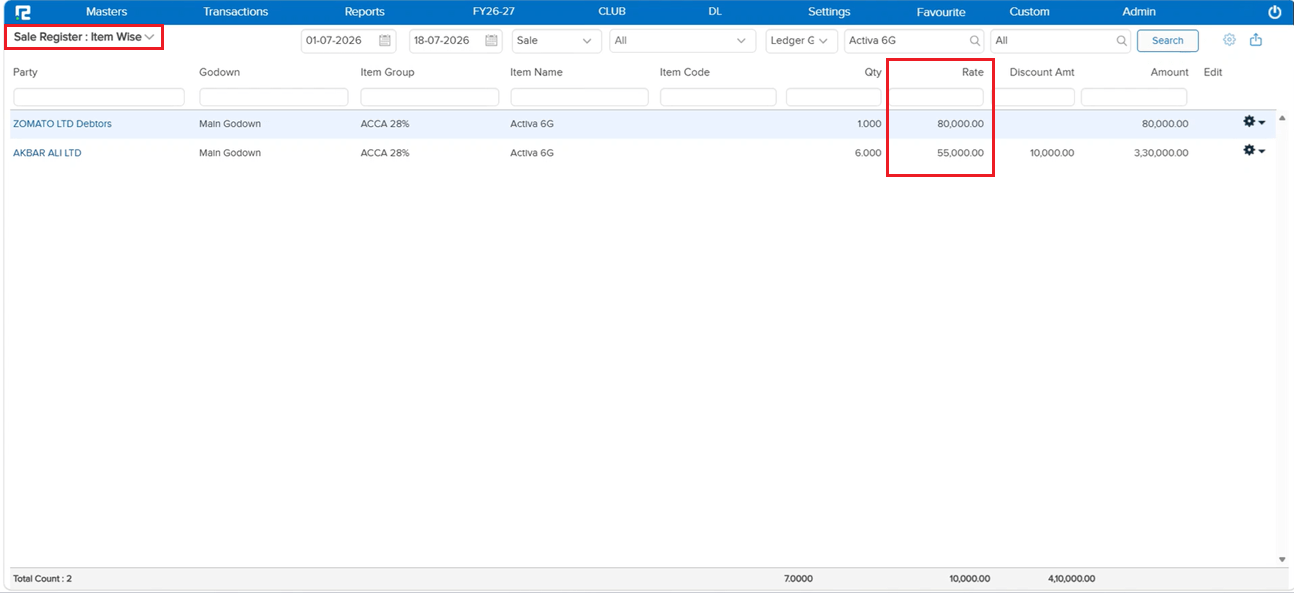
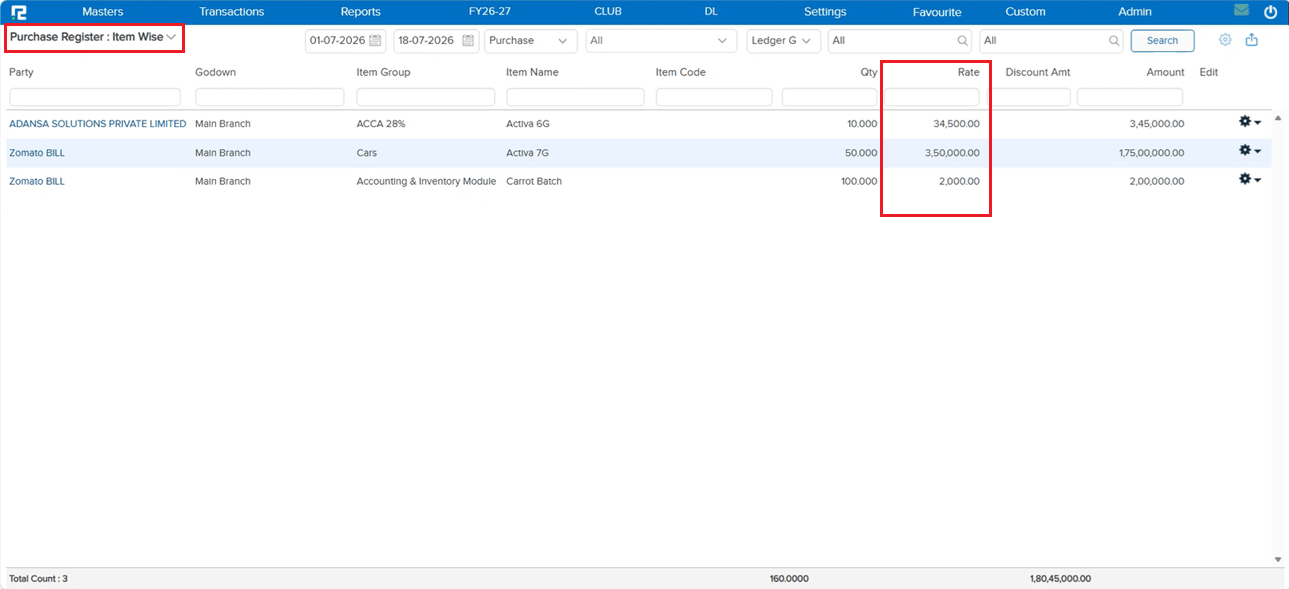
📌 What Was Happening
In Item Master → Item List, exporting the Item Tax Structure to Excel produced a 0 KB (empty) file. The export was built on the old Excel structure, which could not handle a large item count — for big datasets it hit the Excel column limit and errored out instead of generating the file.
🌟 How This Helps You
The Item Tax Structure Excel export has been rebuilt to handle large volumes of item data — the export now completes successfully and downloads a valid, fully populated Excel file without the column-limit error.
🎬 Where to Find It
📷 See It in Action
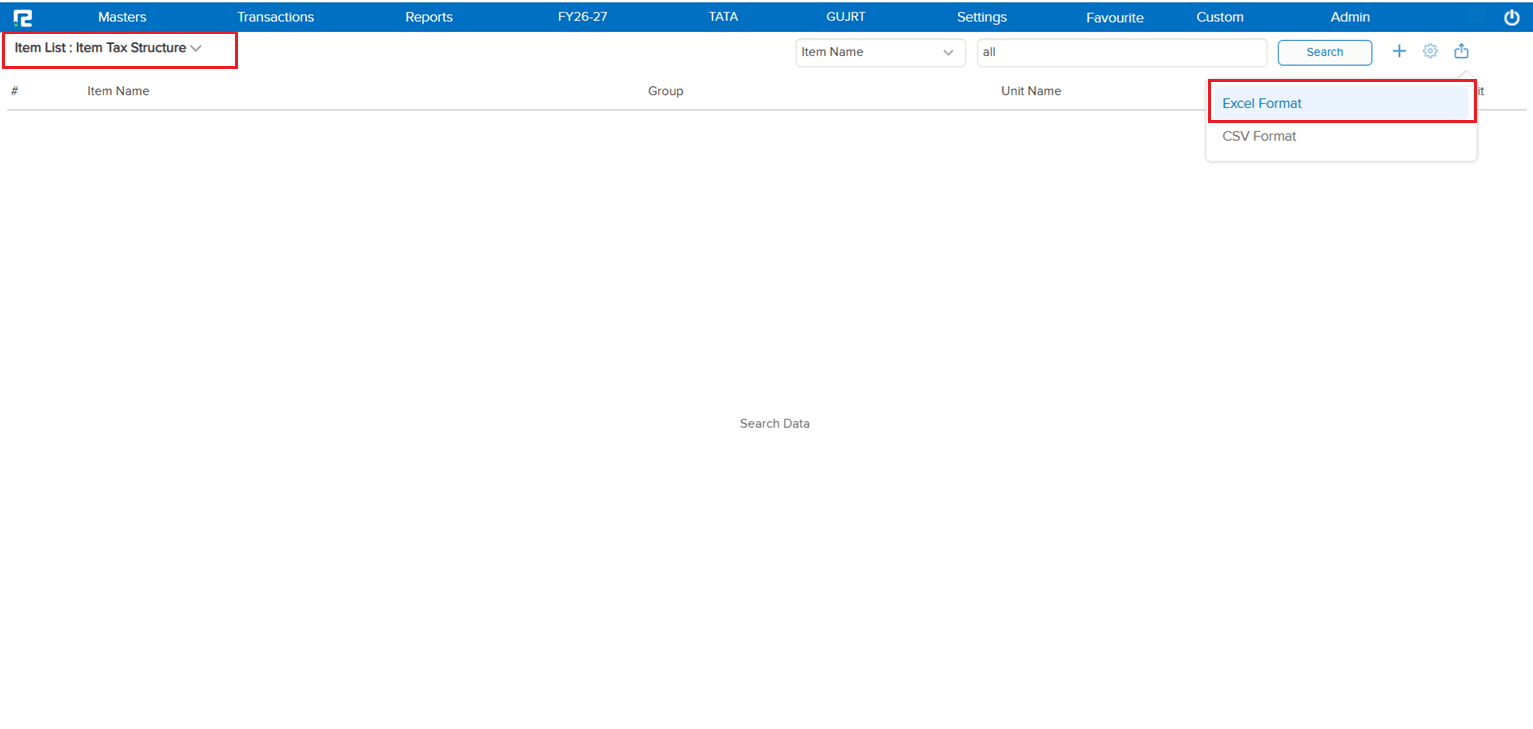
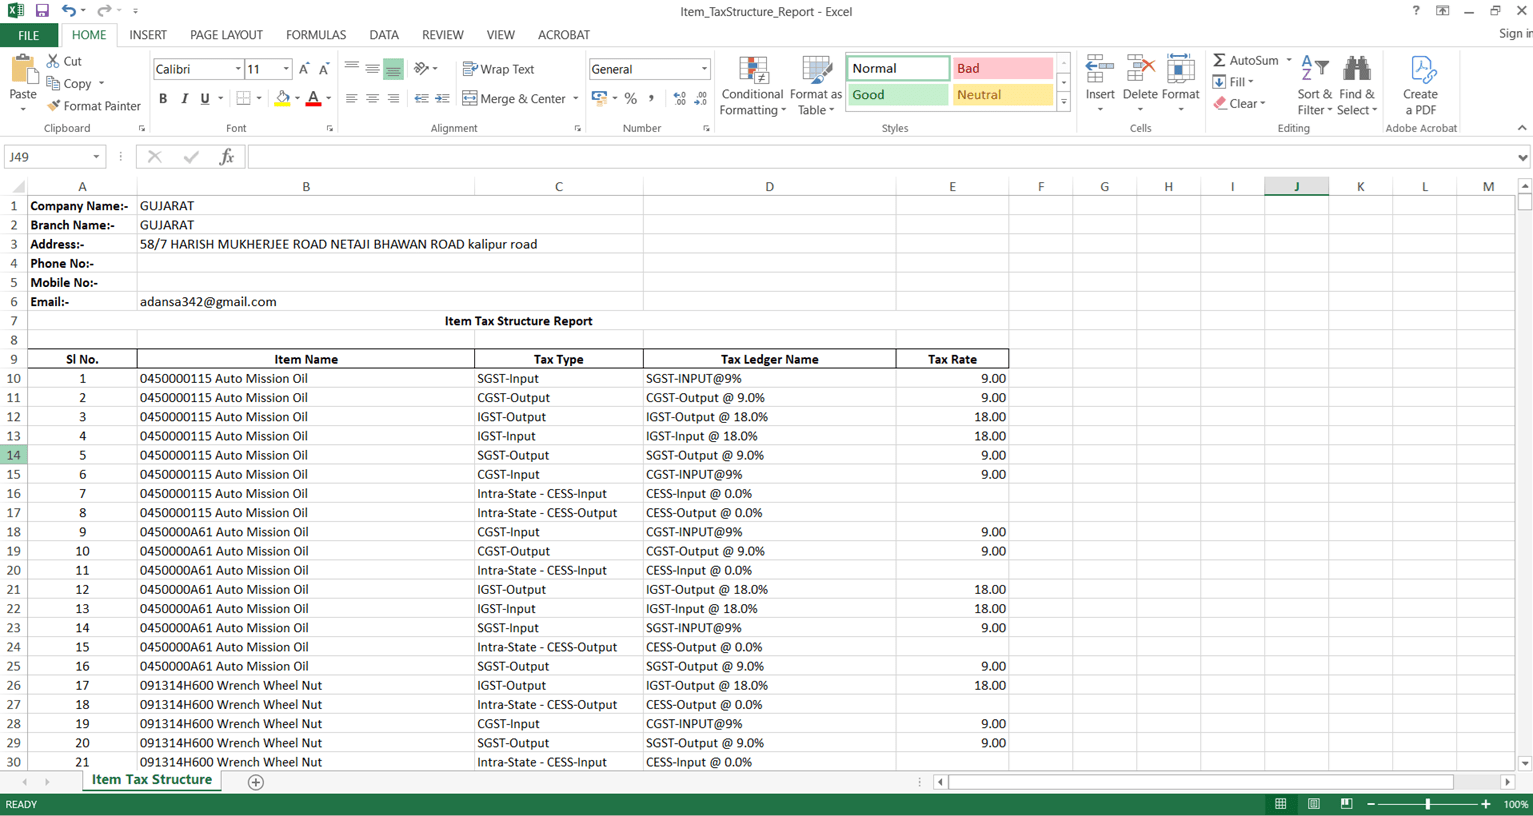
📌 What Was Happening
After logging in and navigating to the Mapped Excel Import screen, changing the company caused the software to automatically log out the user.
🌟 How This Helps You
This is now handled — after changing the company, the application redirects to the Home page instead of logging you out, regardless of whether the switched company has the “Enable Mapped Excel” feature enabled or not.
🎬 Where to Find It
📷 See It in Action
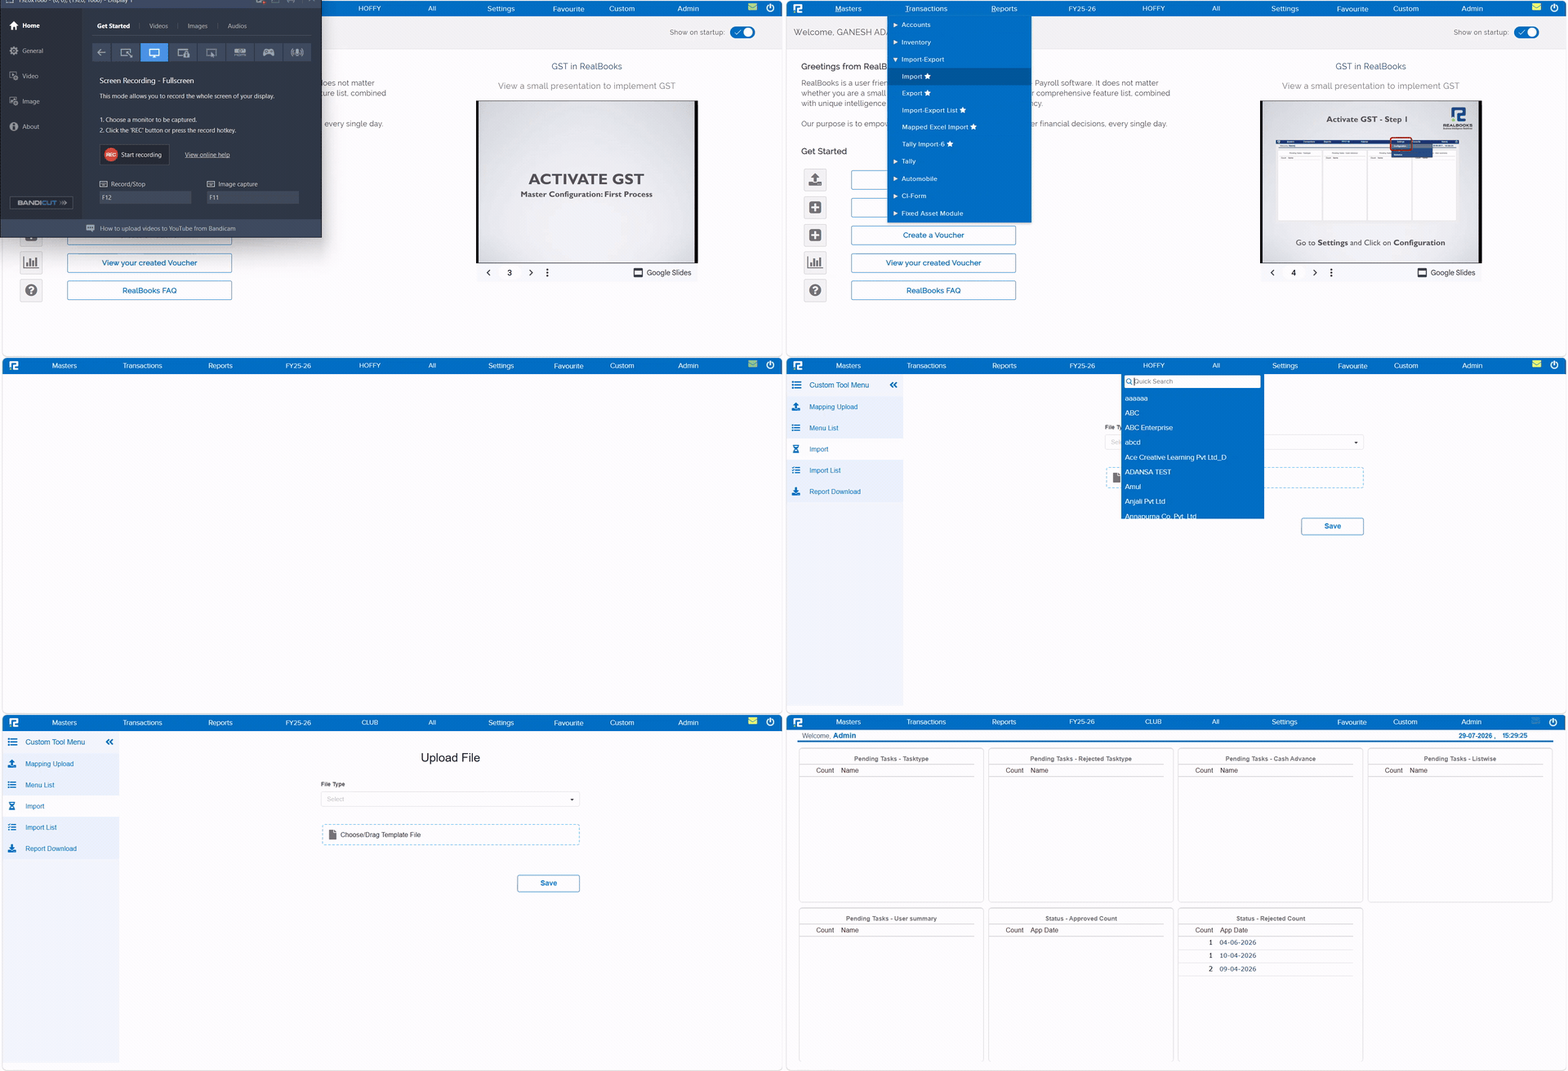
📌 What Was Happening
When generating an invoice from the Inventory Day Book screen, it showed “no template found” — even though the same invoice generated correctly from the standard Day Book screen.
🌟 How This Helps You
This is now fixed — the invoice generates successfully from the Inventory Day Book screen using the correct template, just like the standard Day Book screen.
🎬 Where to Find It
📷 See It in Action