A transaction that involves multiple branches is called an “inter-branch transaction.”
In RealBooks, the inter-branch transactions are auto-posted to the respective branches via Inter-Branch Transfer.
The auto-posting is done based on the following criteria:
1) Split of income/expense amount.
2) The bill is tagged against the customer/vendor, as this belongs to a specific segment.
3) The branch ledger that has been mapped against the segments.
How to Create an Inter Branch Transfer Payment Entry
STEP 1: Transactions ⇒Accounts⇒ Inter Branch Transfer
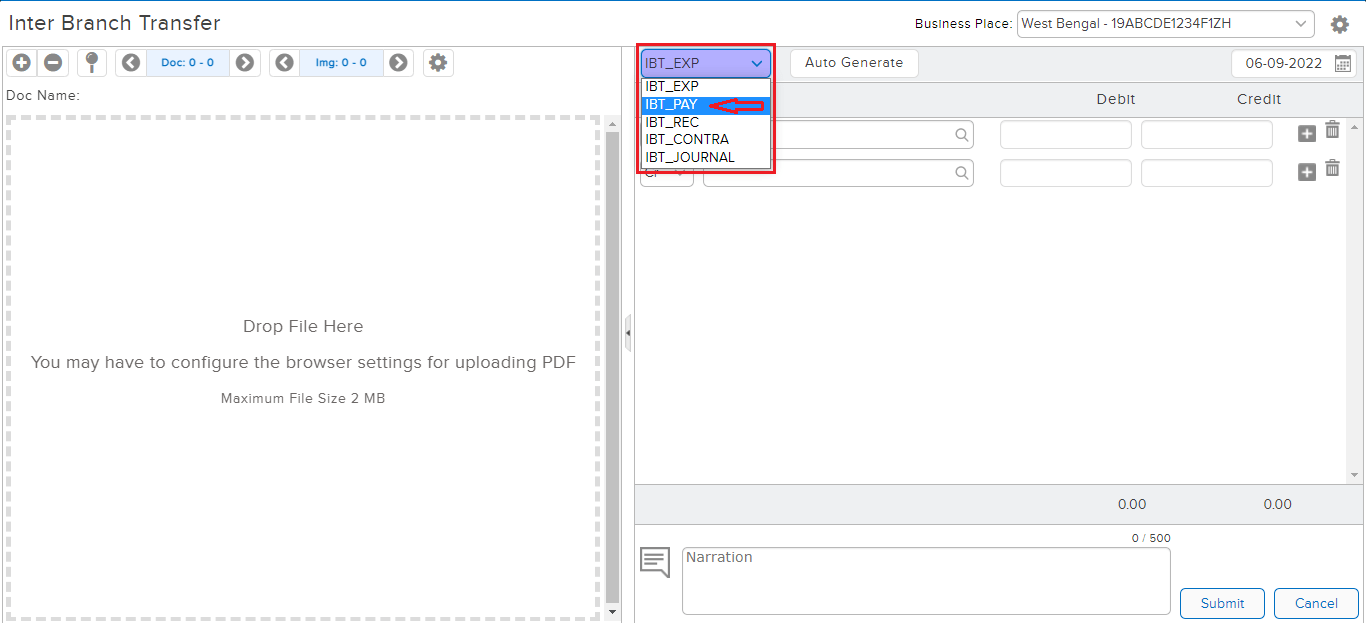
 A Transaction Entry page will open. Select the Voucher type from the Dropdown list. The Business place as per GST is displayed by default, however in the case of Multiple Business Places, the same can be selected from the Dropdown list.
STEP 2: On the Debit Side, search the Vendor/Party ledger (type minimum 3 letters, then select the ledger) and put the party amount.
Note: The billing feature must be enabled in the vendor ledger master for posting IBT entries.
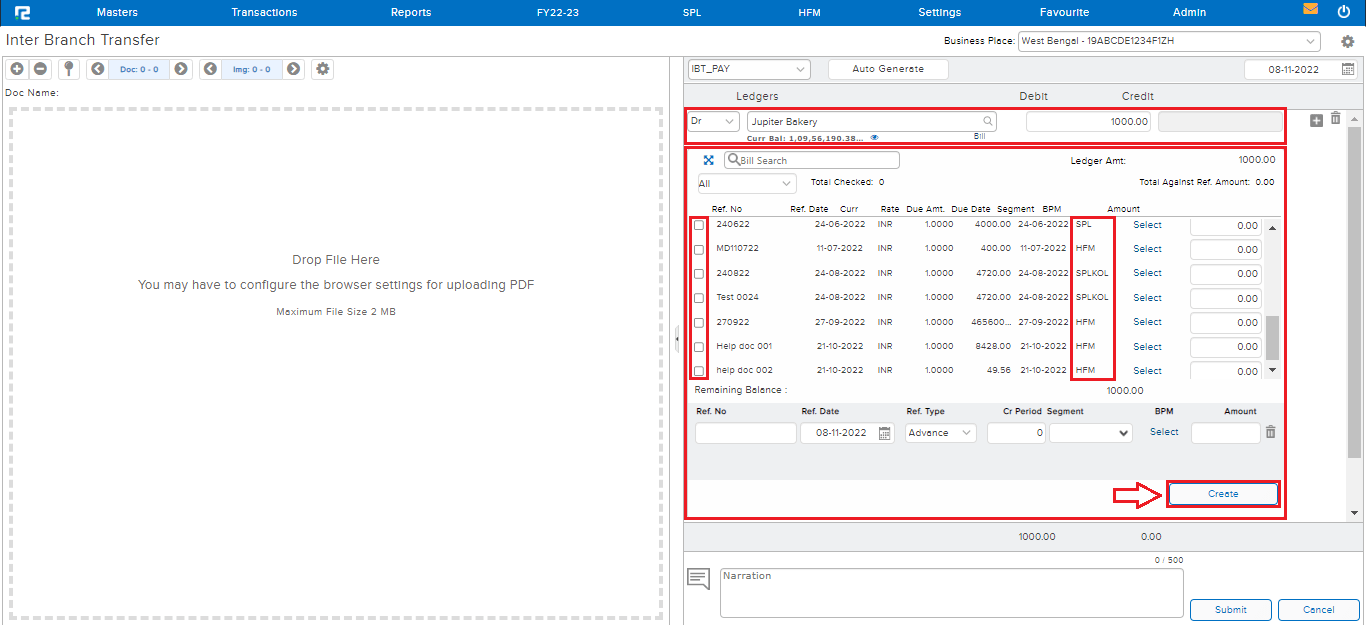
STEP 3: Tag the Bill reference, and click on Create.
STEP 4: On the Credit side, search the Bank/Cash ledger and enter the payment amount.

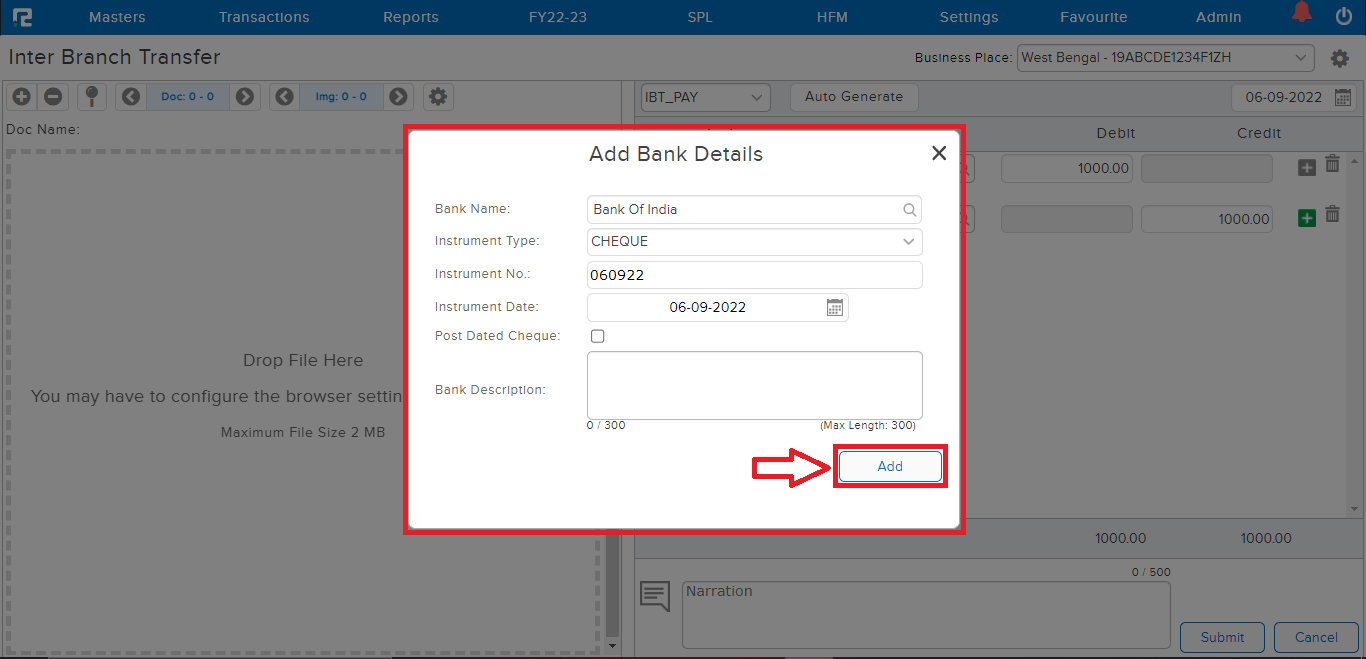
Note: In the case of a Bank Ledger, if capture Bank Details are enabled in configurations, then whenever a bank ledger is selected, the bank details pop-up will open.
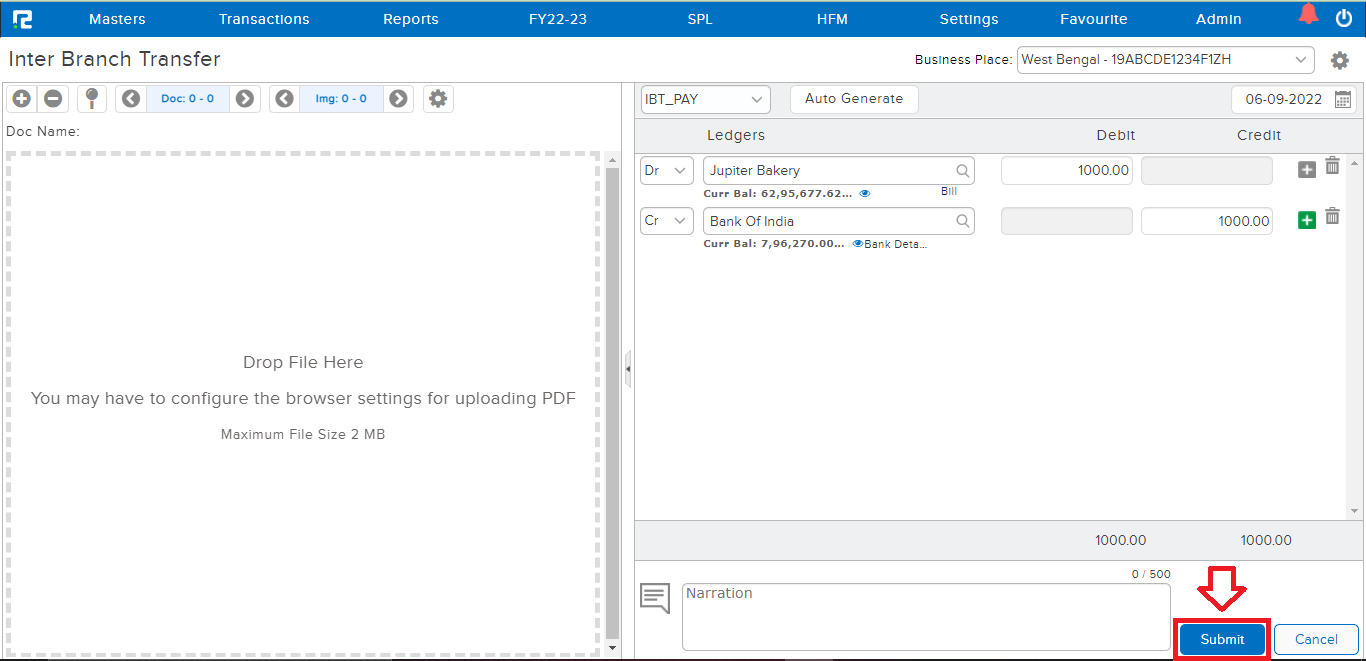 STEP 5: CLICK on the “SUBMIT” button to save the voucher.
Note: Supporting Documents can be attached by simply dragging & dropping them in the left half of the screen.
How to Create an Inter Branch Transfer Contra Entry
STEP 1: Transactions ⇒Accounts⇒ Inter Branch Transfer

A Transaction Entry page will open. Select the Voucher type from the Dropdown list. The Business place as per GST is displayed by default, however in the case of Multiple Business Places, the same can be selected from the Dropdown list.
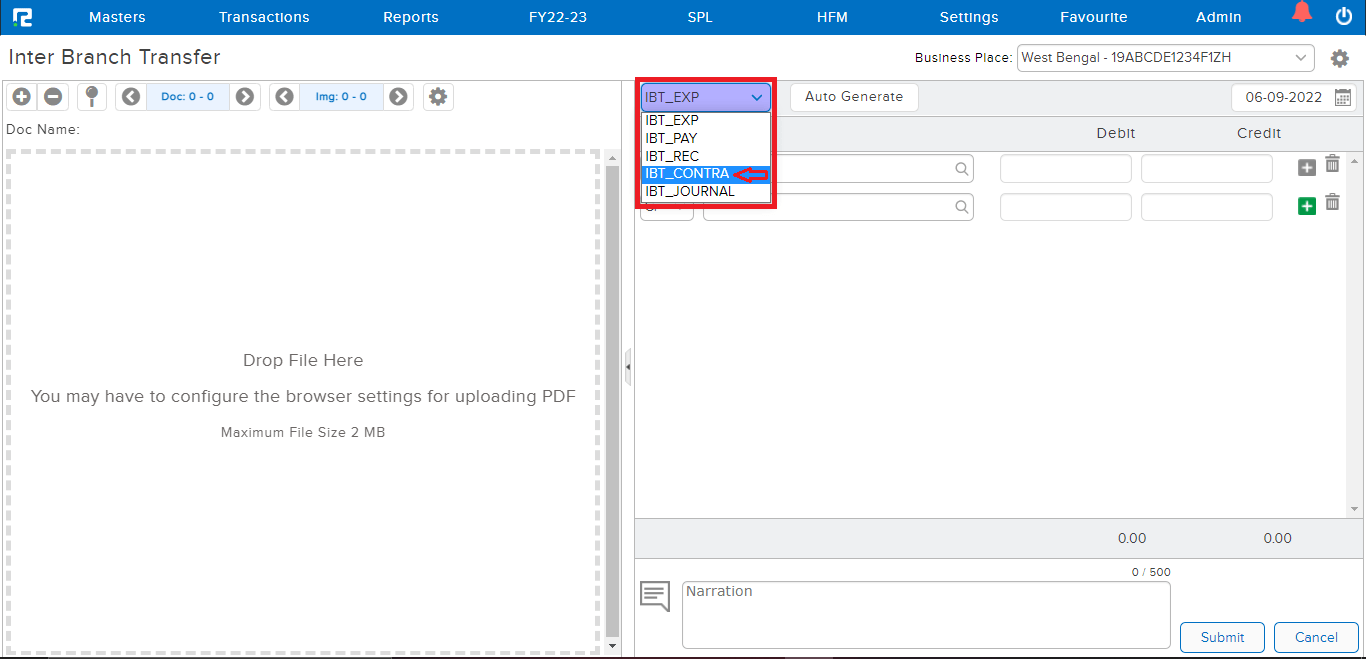
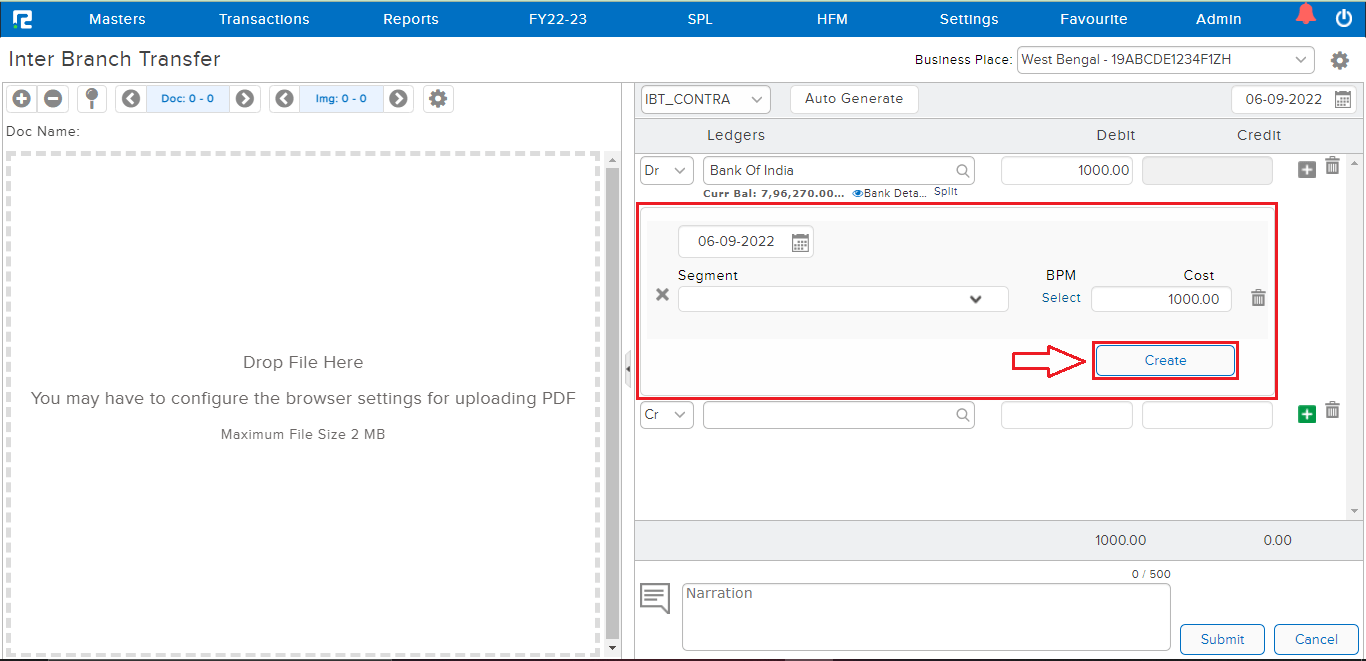
STEP 2: On the Debit Side, search the Bank/Cash ledger (type minimum 3 letters, then select the ledger) and put the amount.
Note: In the case of a Bank Ledger, if capture Bank Details are enabled in configurations, then whenever a bank ledger is selected, the bank details pop-up will open.
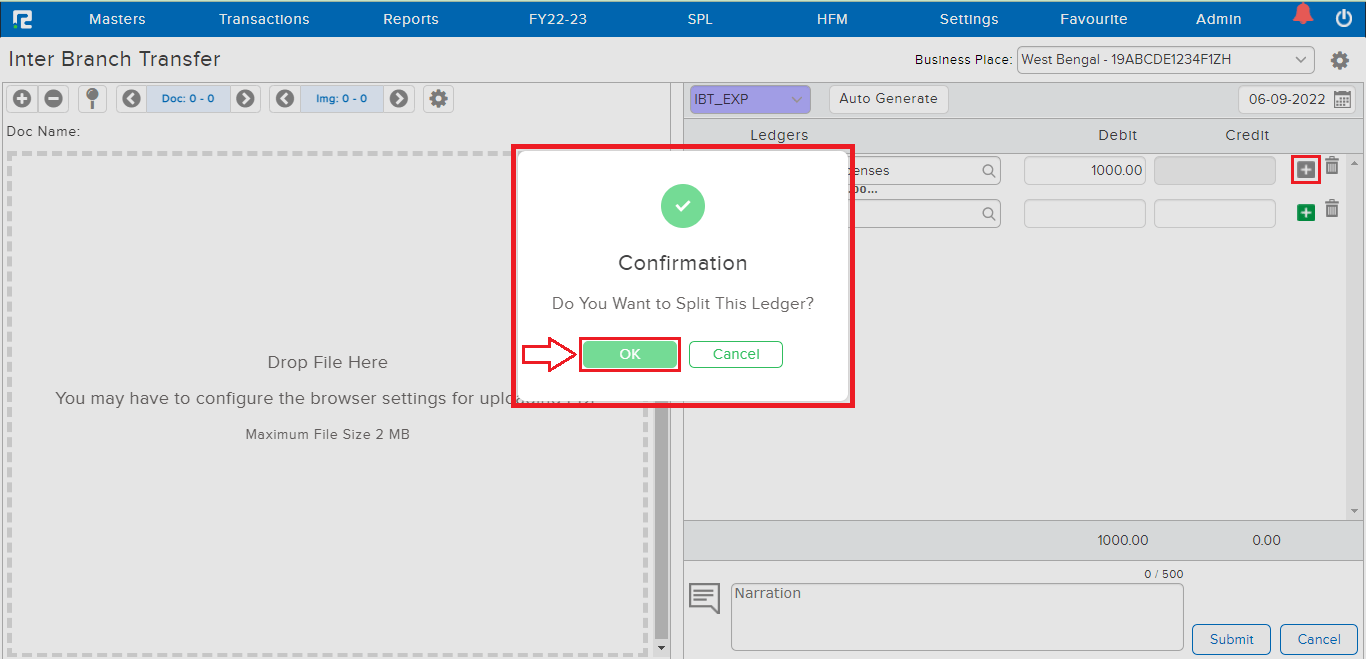
After entering the amount a pop-up will display asking for confirmation whether you want to split the ledger.
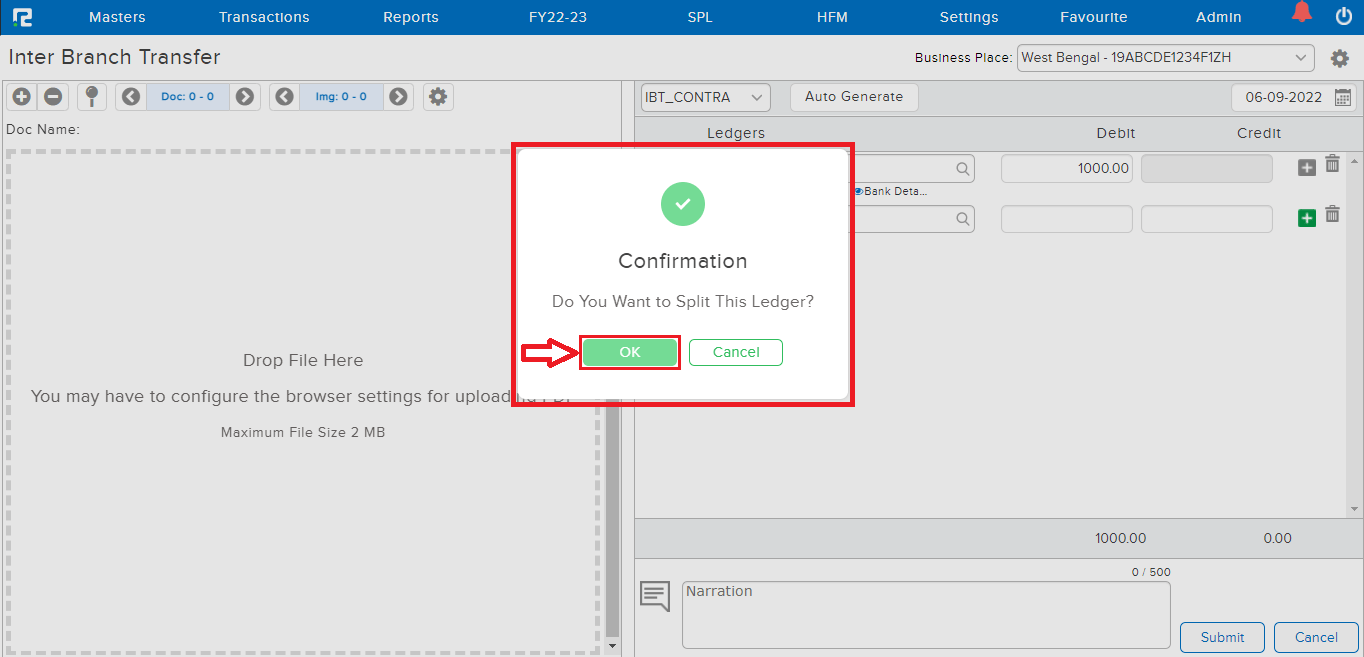
STEP 3: Click on OK and then a popup box will open. Select the segments from the dropdown list to split the ledger balance and click “CREATE.”
STEP 4: Also on the credit side, search the Bank/Cash ledger and enter the amount.
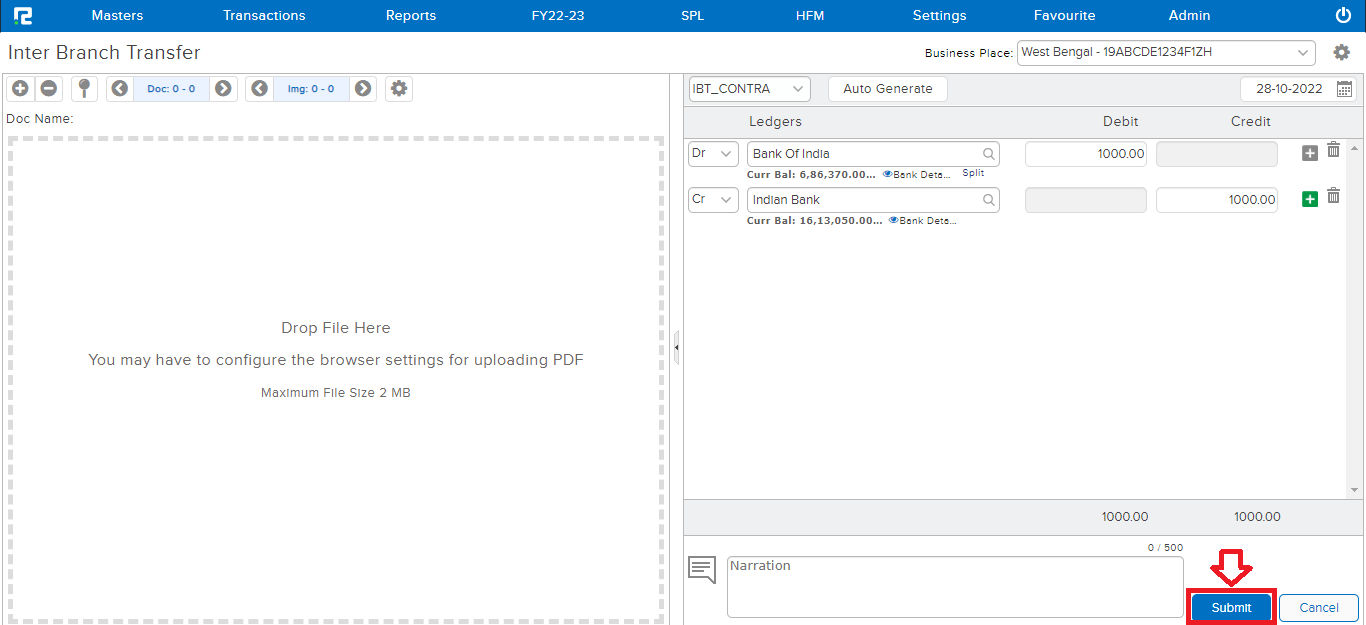
STEP 5: CLICKon the “SUBMIT” button to save the voucher.
Note: Supporting Documents can be attached by simply dragging & dropping them in the left half of the screen.
How to Create an Inter Branch Transfer Expenses Entry
STEP 1: Transactions ⇒Accounts⇒ Inter Branch Transfer

A Transaction Entry page will open. Select the Voucher type from the Dropdown list. The Business place as per GST is displayed by default, however in the case of Multiple Business Places, the same can be selected from the Dropdown list.
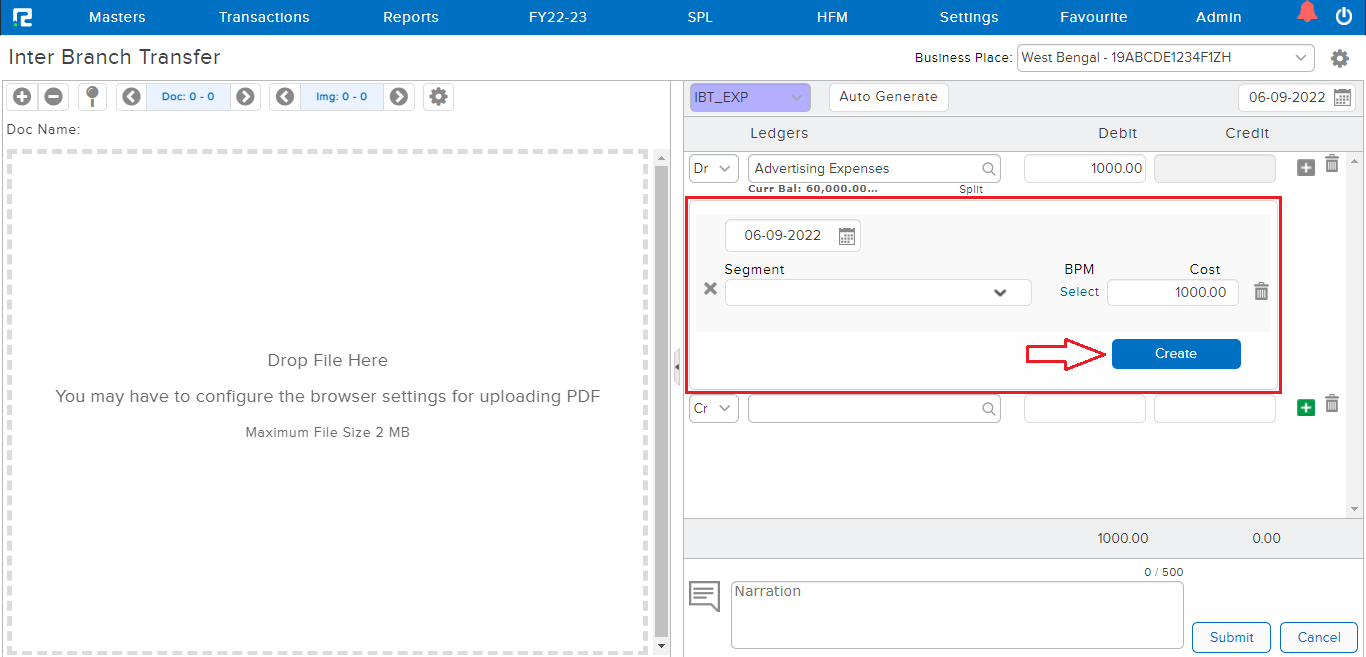
STEP 2: On the Debit Side, search the Expenses ledger (type minimum 3 letters, then select the ledger) and put the amount.
After entering the amount a pop-up will display asking for confirmation whether you want to split the ledger.
STEP 3: Click on OK and then a popup box will open. Select the segments from the dropdown list to split the ledger balance and click “CREATE.”
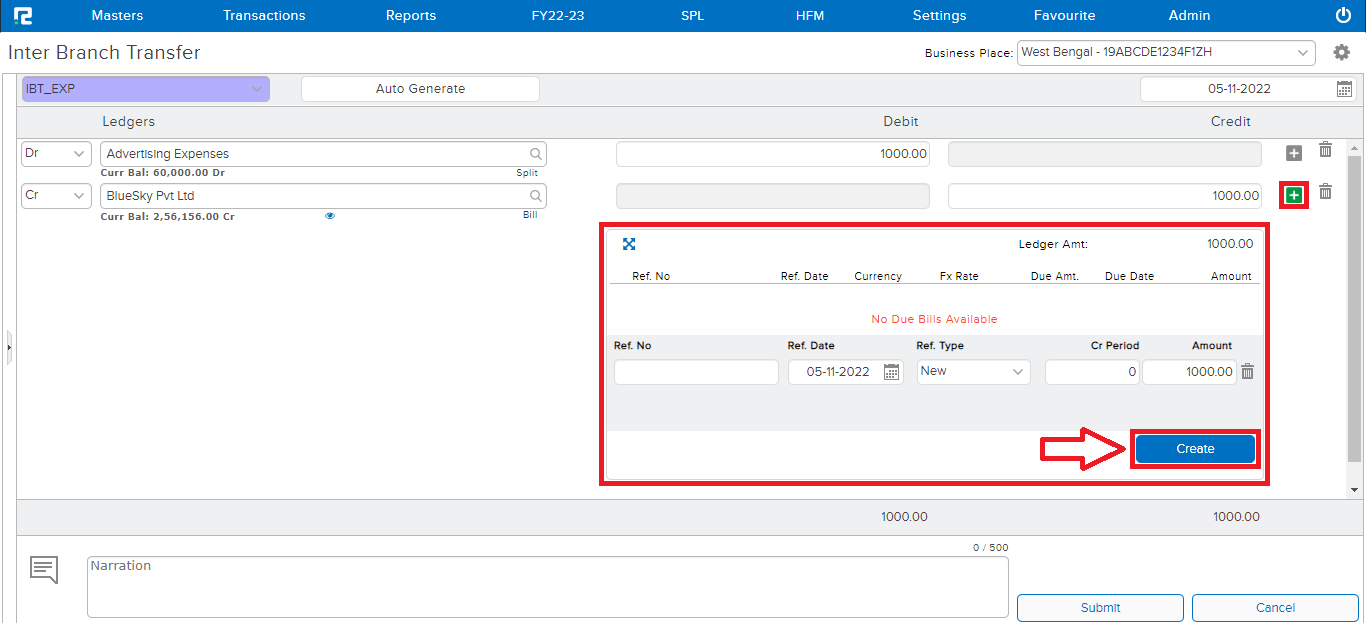
STEP 4: On the Credit side, search the Vendor ledger and enter the bill amount.
Note: The billing feature must be enabled in the vendor ledger master for posting IBT entries.
STEP 5: Enter the Bill details, and click on Create.
To insert the GST details, click on the “+” icon or press enter so that a new row gets added.
STEP 6: Search the Input GST Ledger, on selecting the same, the GST Breakup pop-up will appear, make the necessary changes, and click on Save GST Breakup.
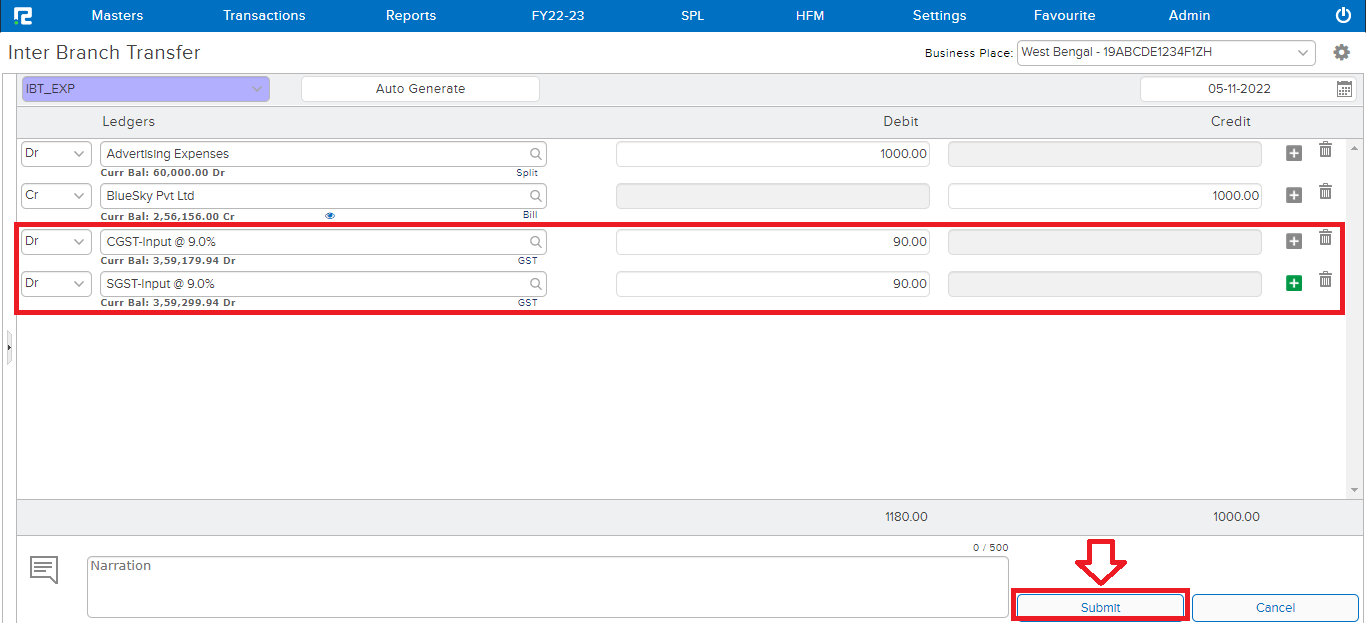
STEP 7: The GST amount as per the break up will populate on the Debit Side. In the case of Intra-State GST, both SGST & CGST need to be entered, in the case of IGST only one row for IGST input needs to be entered.
STEP 8: CLICK on the “SUBMIT” button to save the voucher.
Note: Supporting Documents can be attached by simply dragging & dropping them in the left half of the screen.
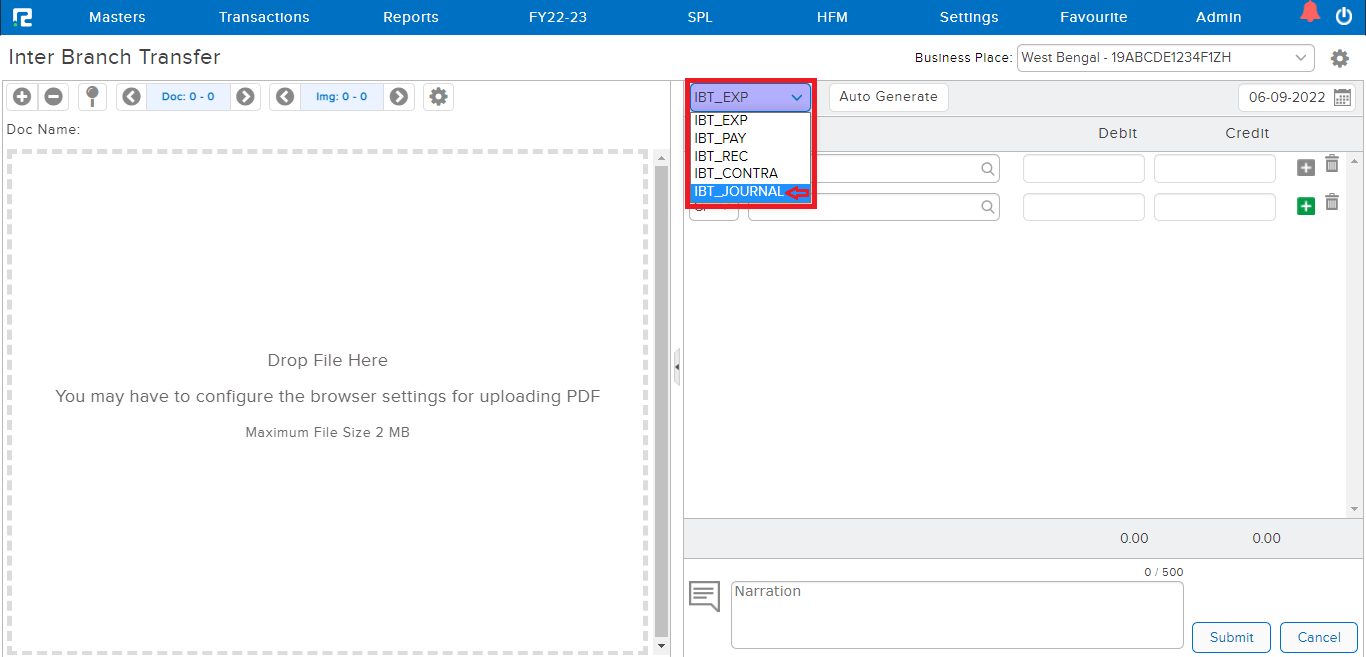
How to Create an Inter-Branch Transfer Journal Entry
STEP 1: Transactions ⇒Accounts⇒ Inter Branch transfer

A Transaction Entry page will open. Select the Voucher type from the Dropdown list. The Business place as per GST is displayed by default, however in the case of Multiple Business Places, the same can be selected from the Dropdown list.
STEP 2: On the Debit Side, search the Vendor ledger and enter the bill amount.
Note: The billing feature must be enabled in the vendor ledger master for posting IBT entries.

STEP 3: Enter the Bill details, and click on Create.
STEP 4: Also on the Credit side, search the Vendor ledger and enter the bill amount.

STEP 5: Enter the Bill details, and click on Create.
STEP 6: CLICK on the “SUBMIT” button to save the voucher.
Note: Supporting Documents can be attached by simply dragging & dropping them in the left half of the screen.
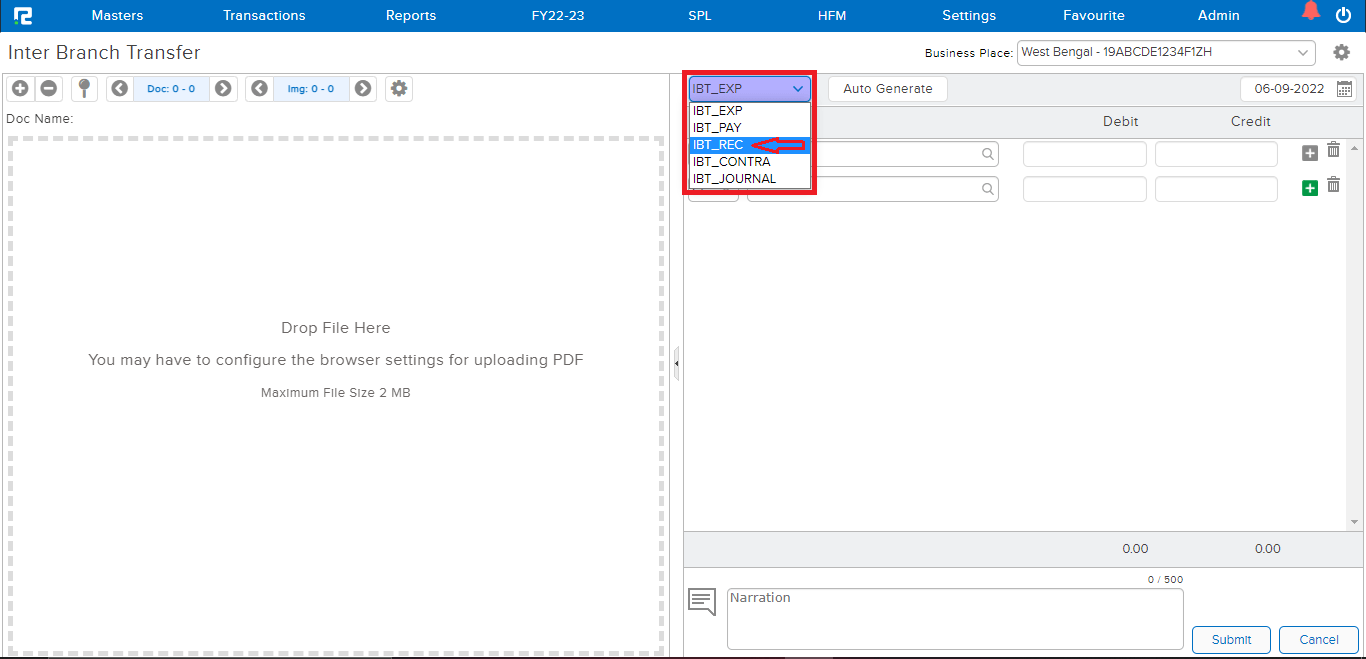
How to Create an Inter Branch Transfer Receipt Entry
STEP 1: Transactions ⇒Accounts⇒ Inter Branch Transfer

A Transaction Entry page will open. Select the Voucher type from the Dropdown list. The Business place as per GST is displayed by default, however in the case of Multiple Business Places, the same can be selected from the Dropdown list.
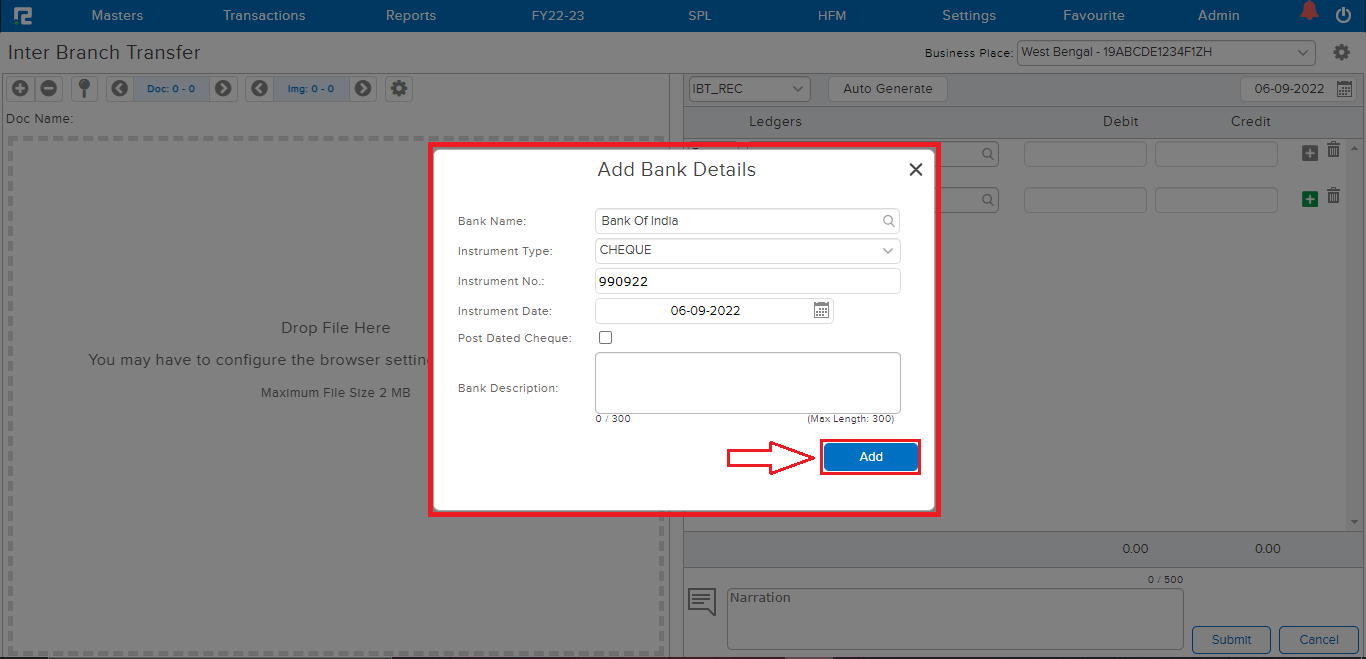
STEP 2: On the Debit Side, search the Bank/Cash ledger (type minimum 3 letters, then select the ledger) and put the amount.
Note: In the case of a Bank Ledger, if capture Bank Details are enabled in configurations, then whenever a bank ledger is selected, the bank details pop-up will open.
STEP 3: On the Debit Side, search the Vendor/Party ledger (type minimum 3 letters, then select the ledger) and put the party amount.
Note: The billing feature must be enabled in the vendor ledger master for posting IBT entries.
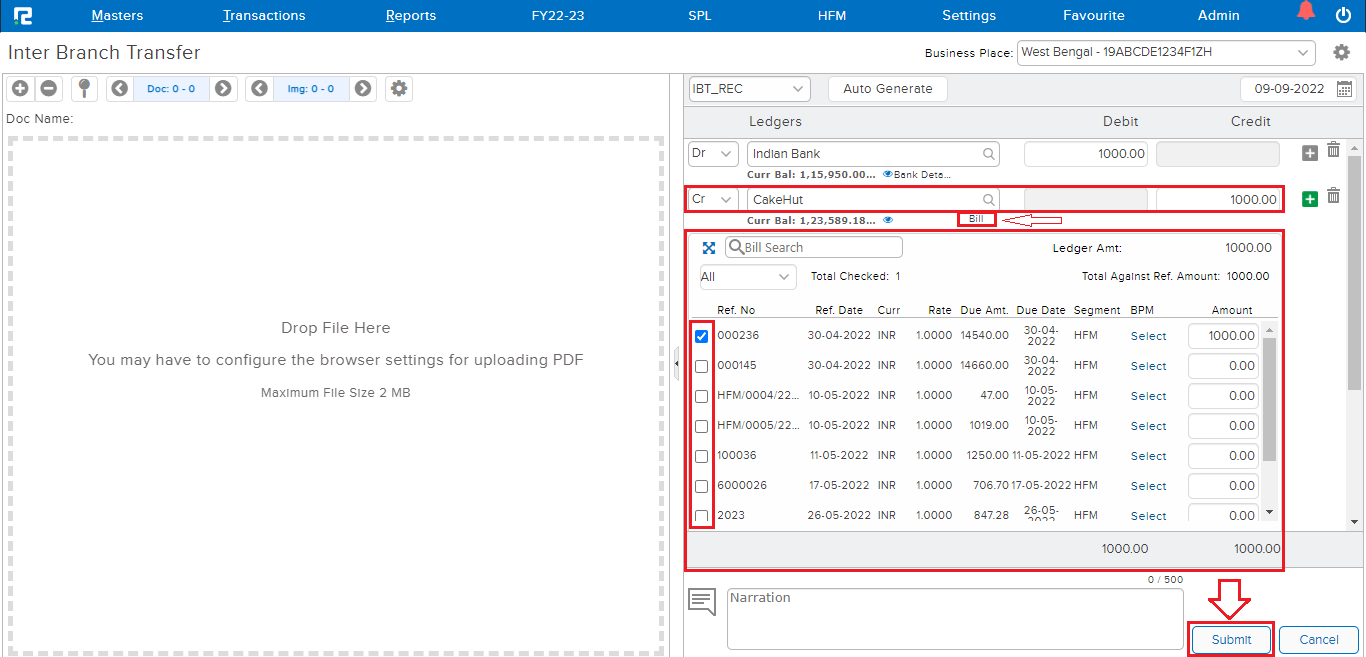
STEP 4: Tag the Bill reference, and click on Create.
STEP 5: CLICK on the “SUBMIT” button to save the voucher.
Note: Supporting Documents can be attached by simply dragging & dropping them in the left half of the screen.
How to Edit an Inter Branch Transfer Entry
Users can view, edit, cancel, or delete an IBT entry from almost every report available in the system. For ex: daybook, ledger report, etc.
TRANSACTION EDIT VIA DAY BOOK
Go to Reports⇒ Accounts⇒ Daily reports⇒ Day Book
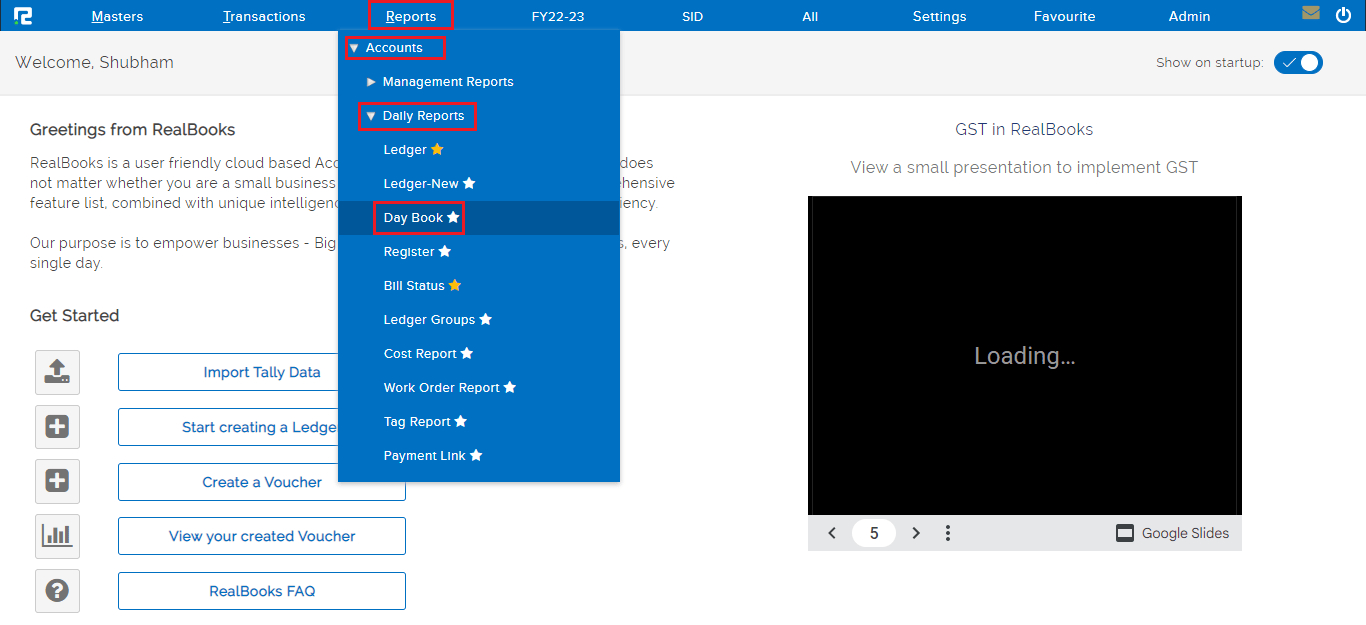
To edit an entry, click on the settings icon on the right-hand side of the entry & click on the Voucher Edit option, or alternatively, press Enter on the keyboard.
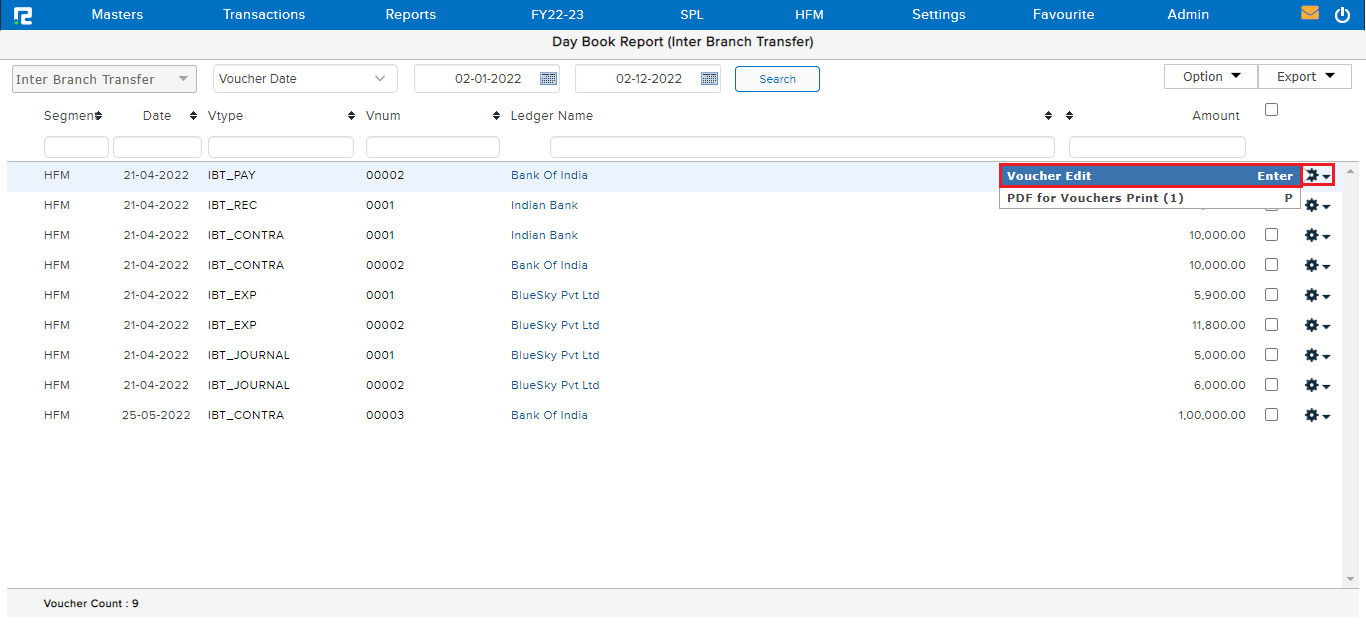
Do the necessary changes as required and click on the submit button.
Note: These are the parent entries which if edited will have an impact on the child entry automatically.
TRANSACTION EDIT VIA LEDGER REPORT
Go to Reports⇒ Accounts⇒ Daily reports⇒ Ledger
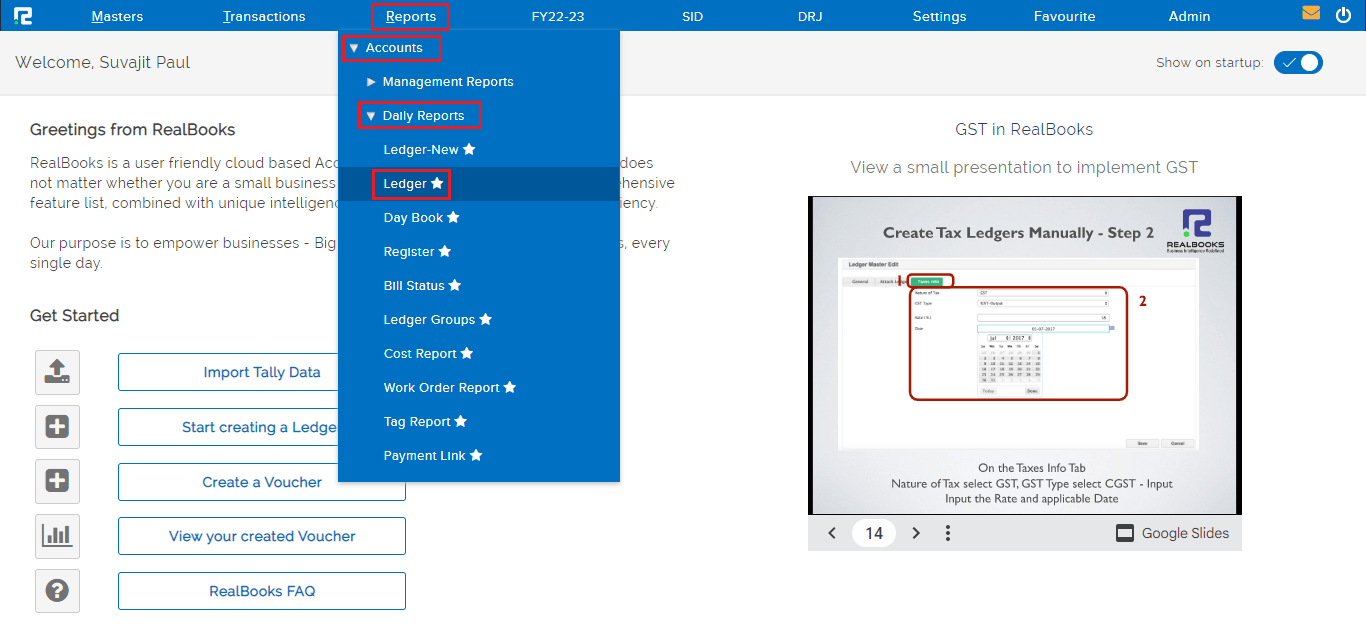
To edit an IBT entry, click on the settings icon of the “I” marked entries, which denote that the entry is IBT, & click on the IBT Voucher Edit option.
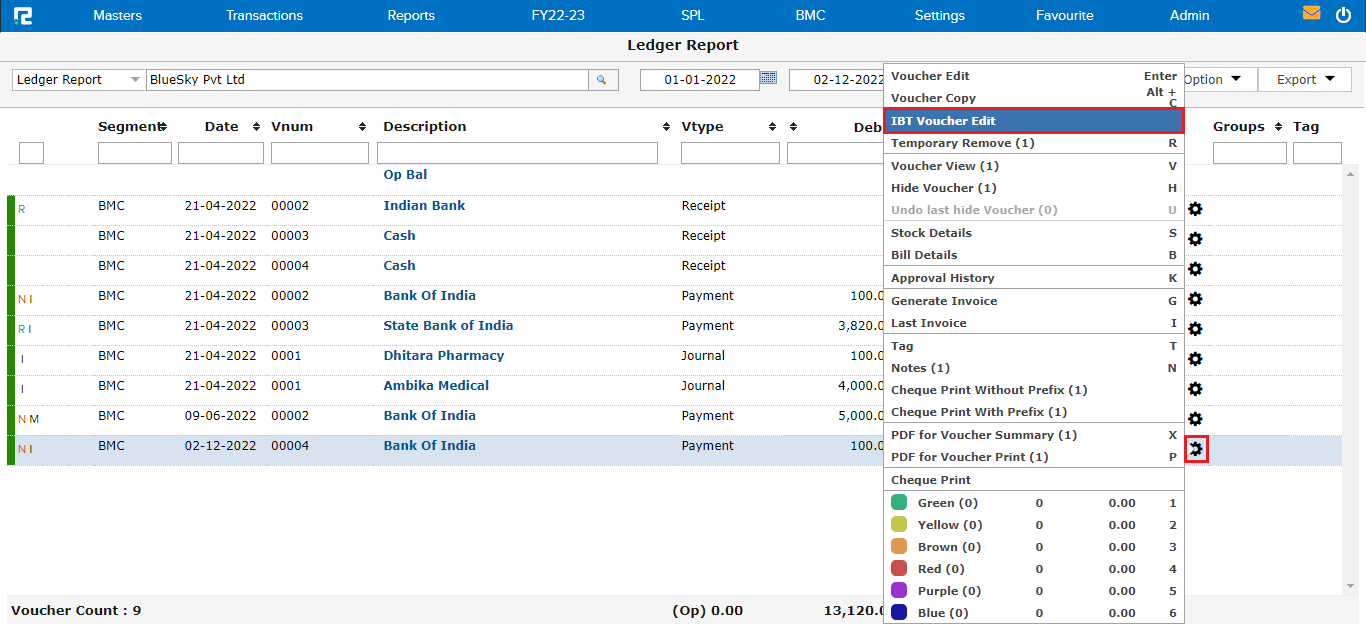
Do the necessary changes as required and click on the submit button.
Note: These are the parent entries which if edited will have an impact on the child entry automatically.
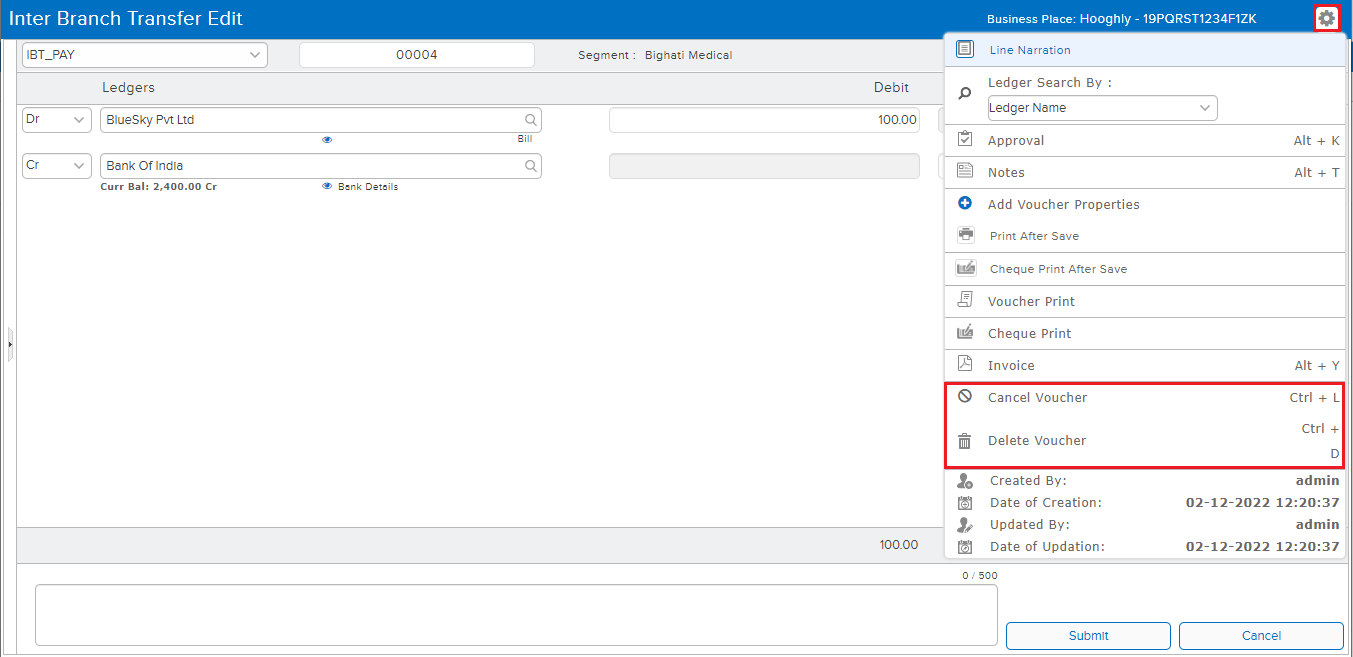
How to Delete or Cancel an Entry
DELETE/CANCEL– To cancel/delete an entry, open the entry in edit mode, then go to the Settings icon on the right-hand side of the page. From the dropdown menu select the cancel/delete voucher as required, enter the reason for cancellation/deletion, and then click on cancel/delete.