A purchase cycle or an order-to-pay cycle encompasses all the activities needed to complete a procurement cycle timely and effective. This feature can help organizations to automate the procurement process by creating a chain between each step.
Configure Order Management & GRN
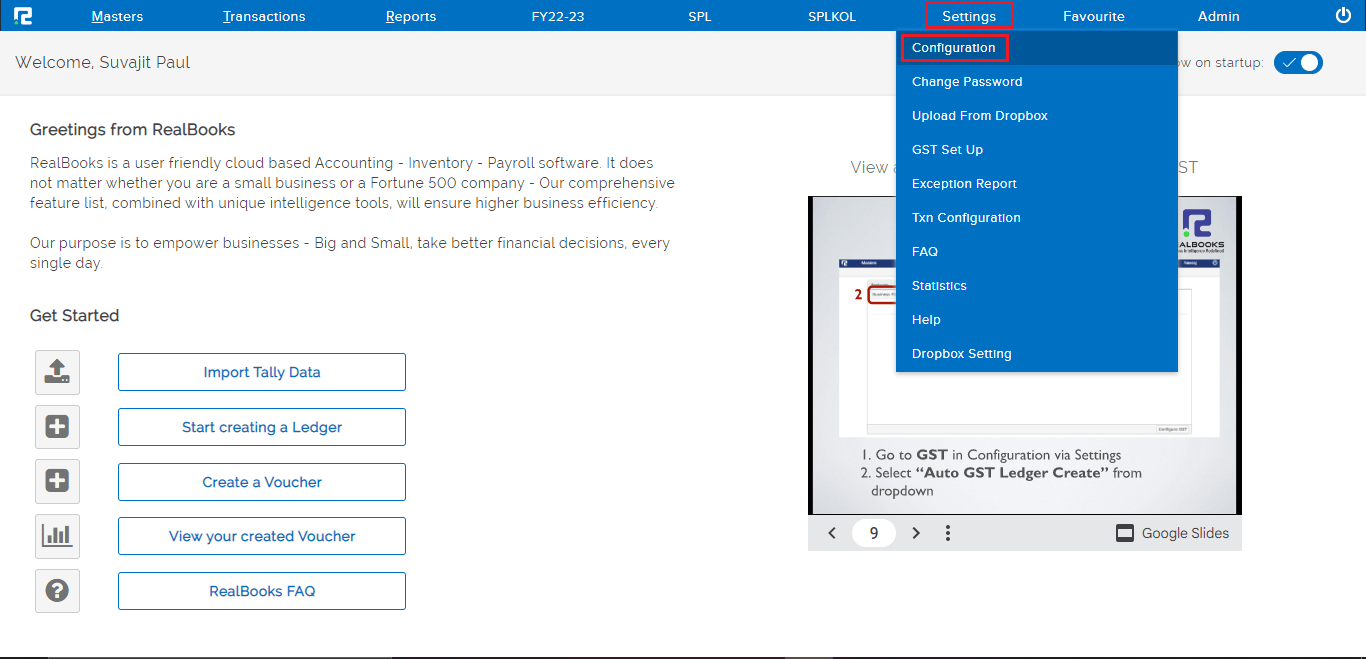
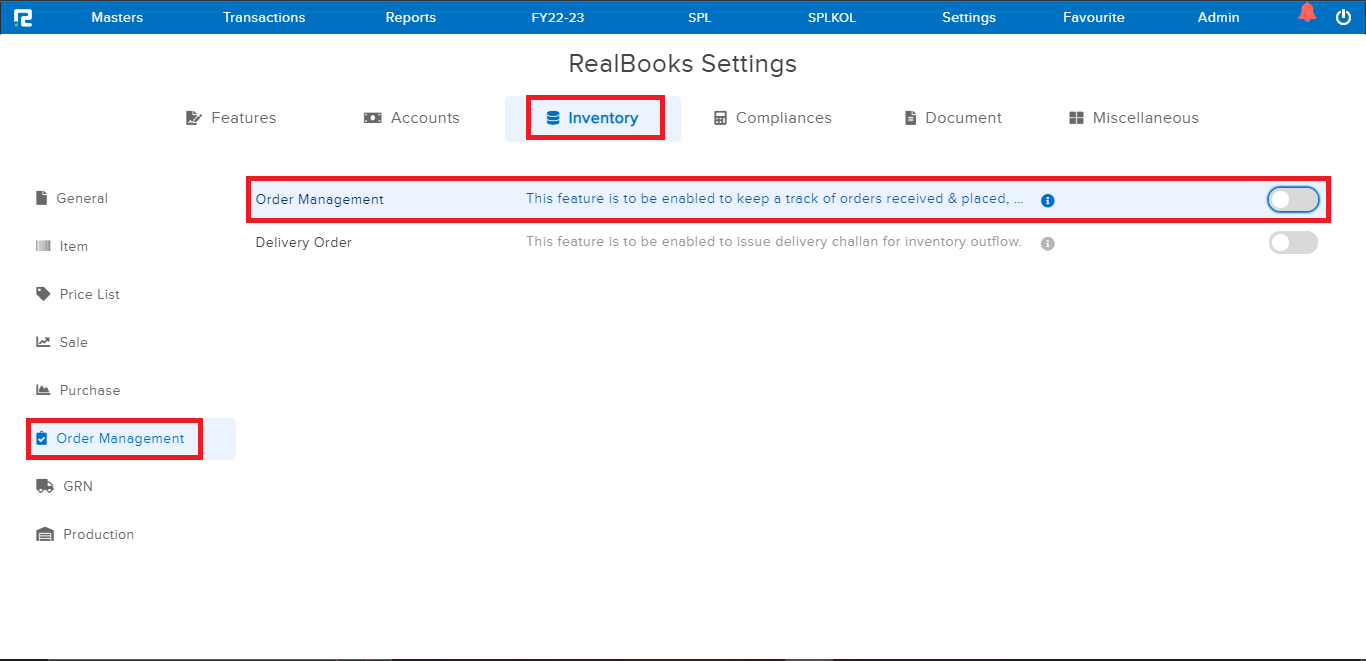
STEP 1: Go to Settings⇒ Configuration⇒ Inventory⇒ Order Management
STEP 2: Enable Order Management
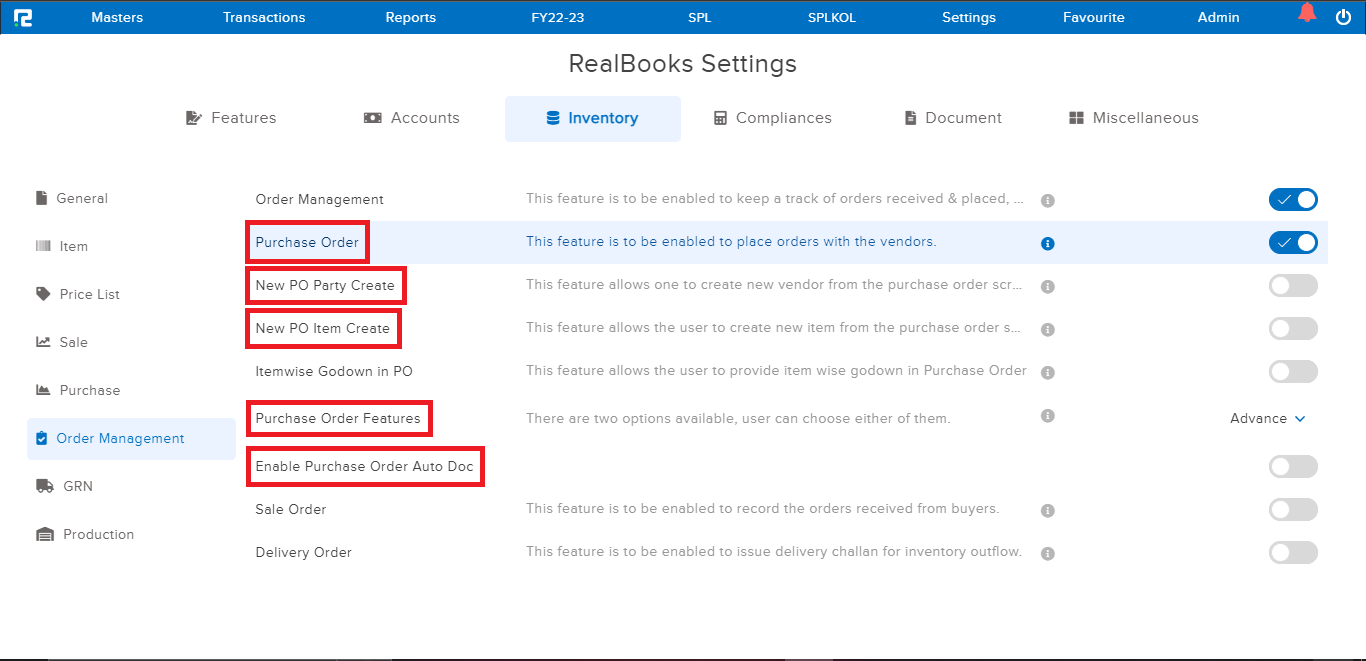
STEP 3: Enable further options as per requirements-
1. Purchase Order– This feature is to be enabled to place orders with the vendors.
2. New PO Party Create– This feature allows one to create a new vendor from the purchase order screen.
3. New PO Item Create– This feature allows the user to create a new item from the purchase order screen.
4. Purchase Order Features– There are two options available, the user can choose either of them.
a. Basic– This enables the user to generate simple POs, with basic item details & taxes.
b. Advance– This enables the user to capture additional information like shipping details, additional costs, etc. in the PO.
5. Enable the purchase order auto doc option to allow auto attachment of the generated PO print out to the Order Entry.
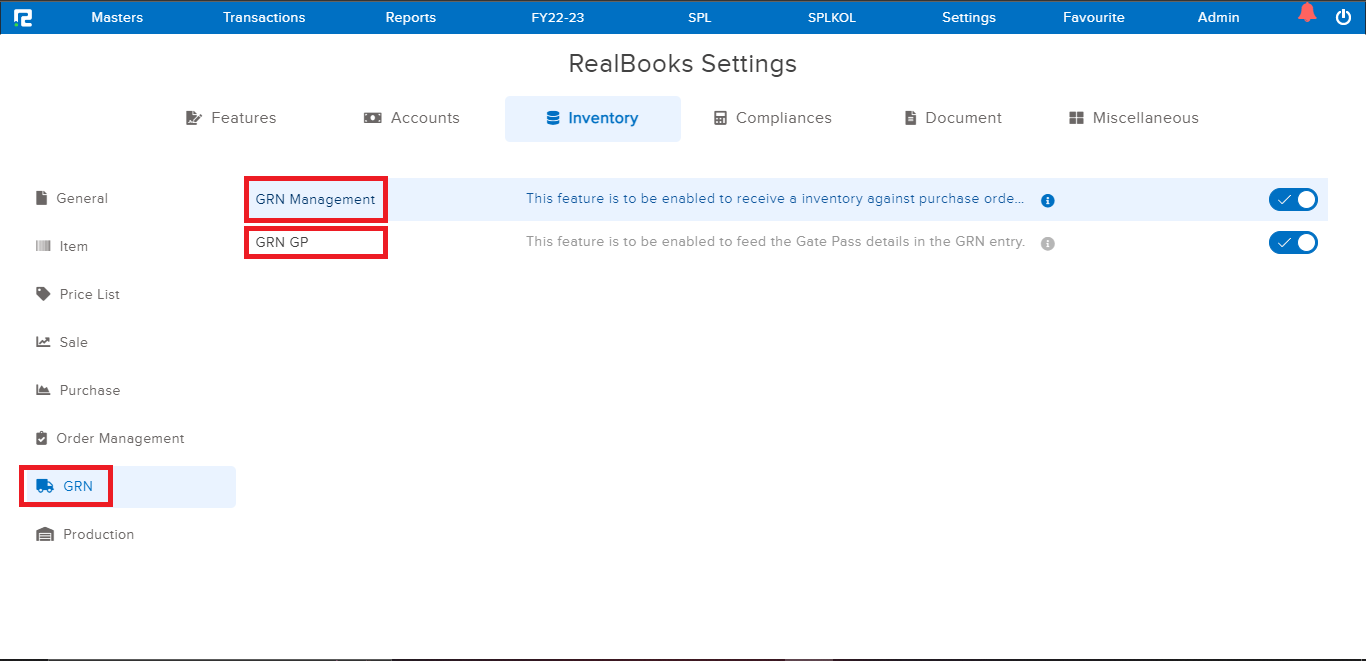
STEP 4: Go to GRN⇒ Enable GRN Management
GRN GP– This feature is to be enabled to feed the Gate Pass details in the GRN entry.
Create The Order to Pay Chain Process
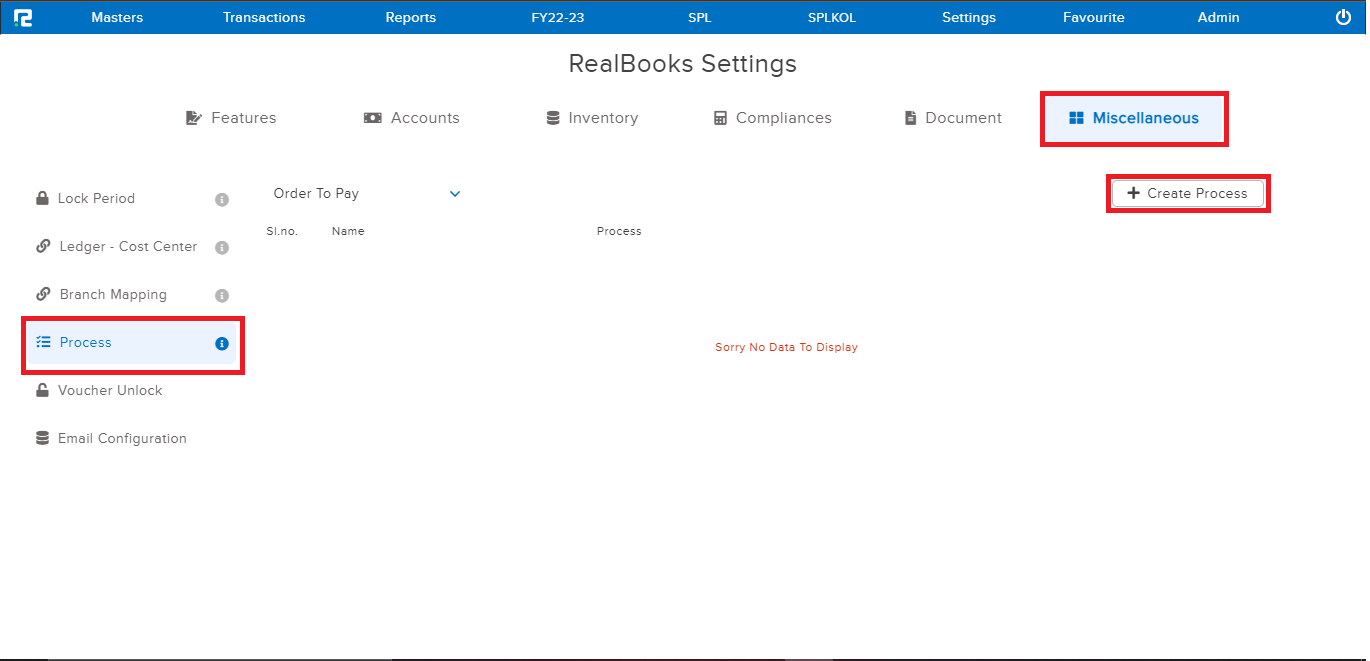
STEP 1: Settings⇒ Configurations⇒ Miscellaneous⇒ Process⇒ Create Process
STEP 2: Assign the template name.
Select the appropriate voucher type for each process, from the drop-down list displayed
In order to use the entire chain of PO-GRN-Purchase, click on the checkbox available beside each process type. This signifies that the user wants to activate each step of the process cycle.
Note: The user can change the sorting sequence by dragging the process name upwards or downwards.
So, if the user changes the sequence to Order-Purchase-GRN, it means, that after entering the order, the user will have to enter the purchase entry before the GRN.
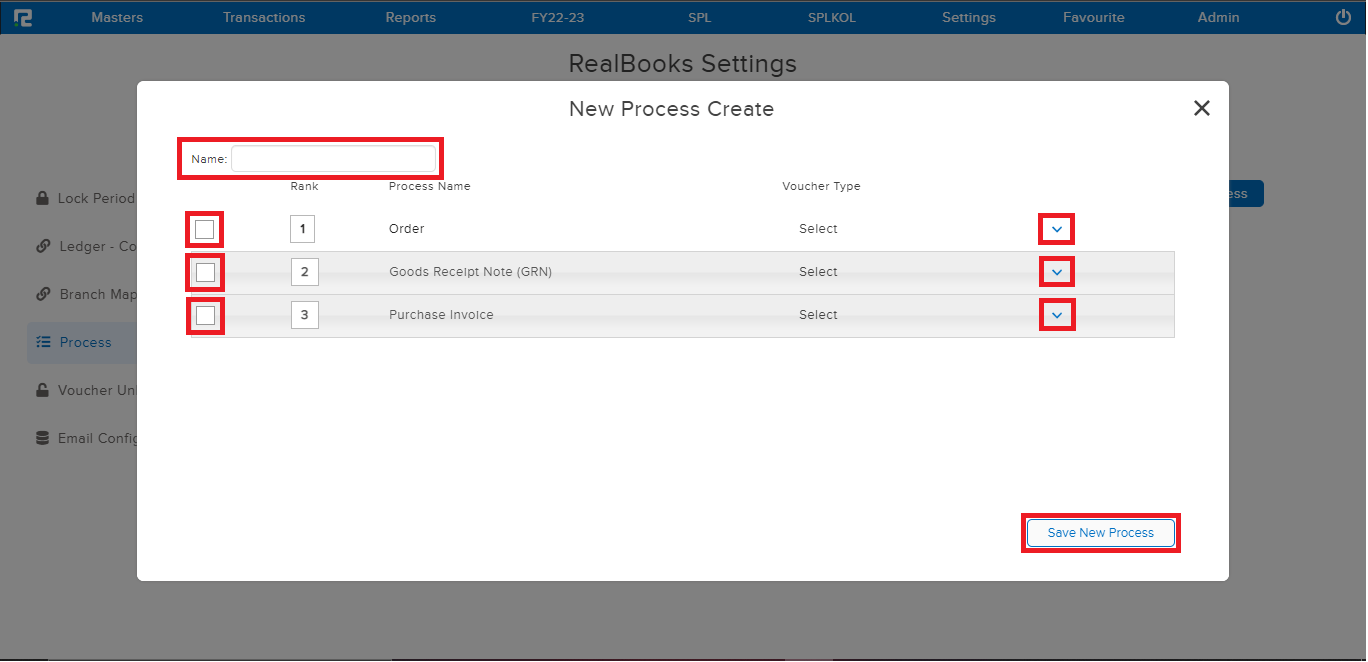
STEP 3: Click on the SAVE NEW PROCESS and the new process will be created successfully.
Create a Purchase Order Entry
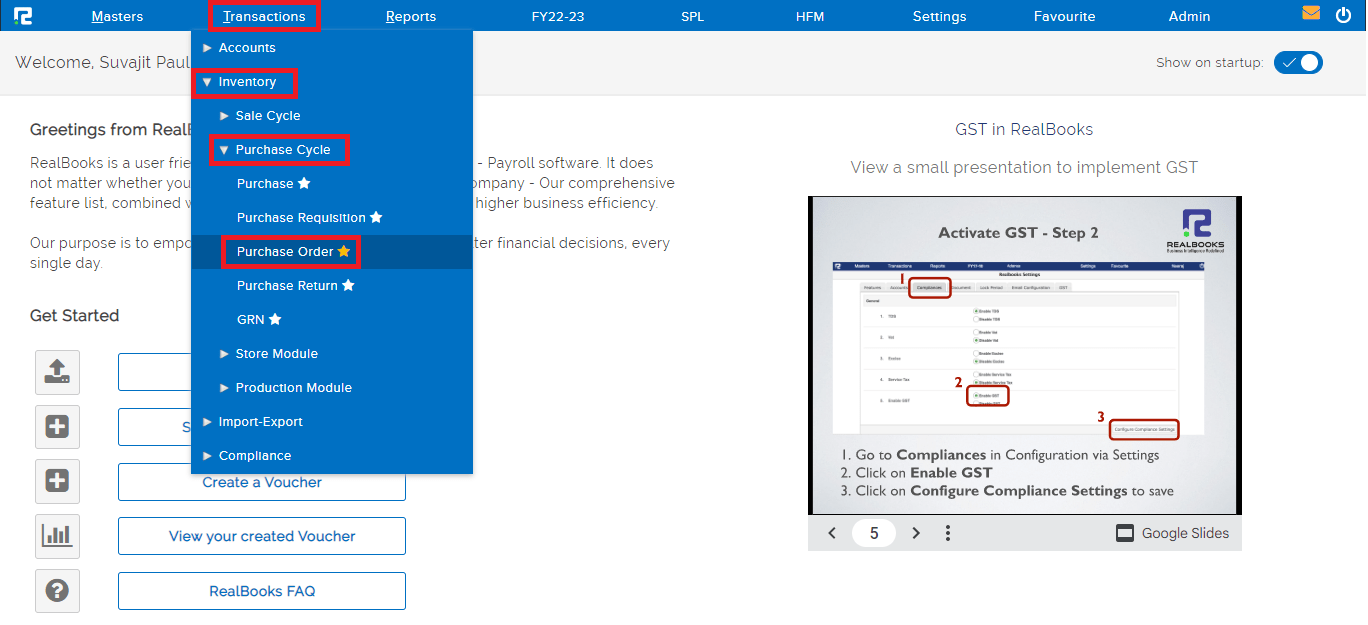
STEP 1: Go to Transactions⇒ Inventory ⇒ Purchase cycle ⇒ Purchase Order
A purchase order entry page will open-
STEP 2: Fill in the following details:
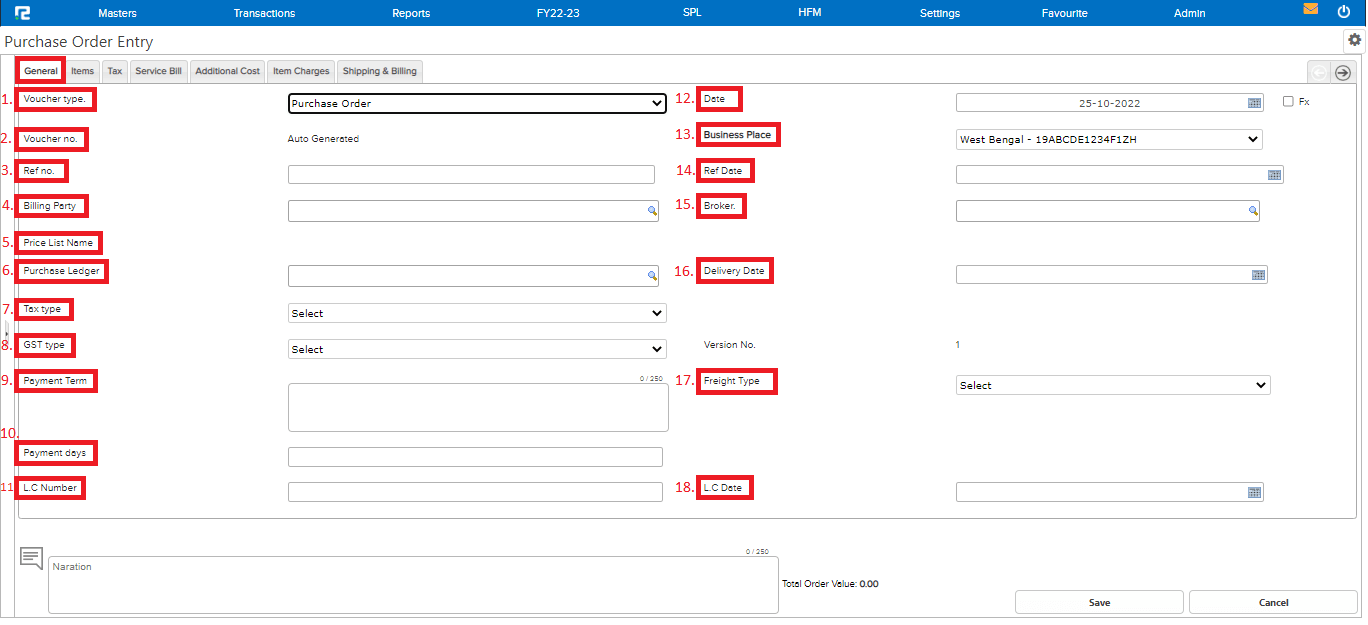
Under the GENERAL tab
1. Voucher type– Select the appropriate voucher type from the dropdown list displayed.
2. Voucher number– Based on the numbering pattern set in the voucher master, this number will be displayed.
3. Reference number– Enter the vendor’s reference number.
4. Billing party– Enter the name of the billing party.
5. Price list name– Fetched from master settings, if any.
6. Purchase ledger– Enter the purchase ledger.
7. Tax type– This is auto-filled.
8. GST type– This is auto-fetched based on the company’s business place & party’s state.
9. Payment term– If there is a payment term agreed upon, it can be added here.
Note: It should not exceed 250 words.
10. Payment days– Add the credit period.
11. LC number– Add the LC number, if any.
12. Date– Set the voucher date.
13. Business place– Usually, it is auto-selected, but in the case of multiple business places, this needs to be selected from the dropdown.
14. Reference date– Enter the vendor’s invoice date.
15. Broker– Search the broker ledger, if any.
16. Delivery date– Add the date on which the delivery is expected.
17. Freight type– Select the most appropriate freight type from the dropdown list displayed.
18. LC date– Add the LC date, if applicable.
Note: Other than Billing Party, Order No. & Date, all are optional fields and can be skipped.
STEP 3: Go to the ITEM tab and fill in the details-
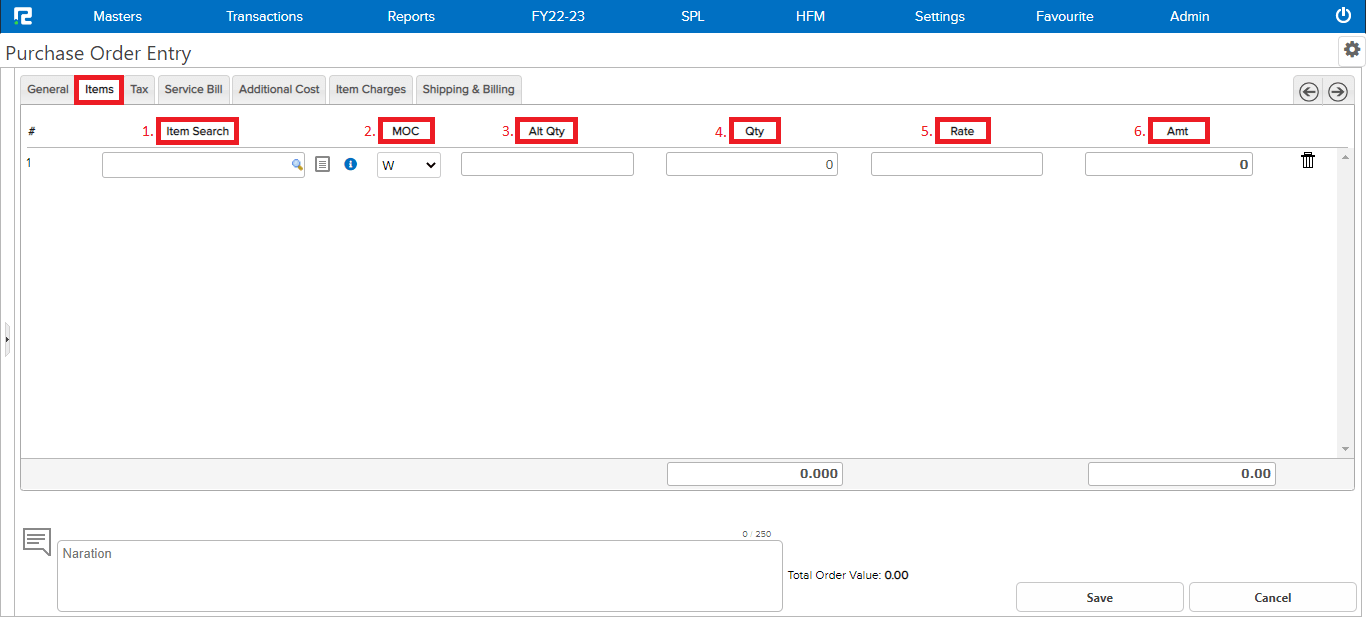
1. Item search– Search the item name.
2. MOC– Method of Calculation or MOC gets activated only where alt qty is active.
There are 3 options for calculating the item-wise value:

a. W – This multiplies the Qty with Rate
b. P– This multiplies the Alt Qty with Rate
c. F – If F is chosen, then the amount needs to be filled, and the rate is calculated by dividing Amount by Qty.
3. Alt qty– To be entered only if an alternative unit of measurement is enabled.
4. Qty– Enter the base order quantity.
5. Rate– Enter the base rate for the order.
6. Amt– The amount will be calculated accordingly with the qty and rate that you have entered.
Note: If required, the amount can be entered manually, by changing the transaction configurations.
STEP 4: The GST details are displayed on the Tax tab, based on taxes configured in the item master & the item value as per the purchase order.
Note: Taxes are calculated automatically only in cases, where the GST has been configured as Automatic in the voucher master.

STEP 5: Once the details have been updated, click on the SAVE button below to save the purchase order.
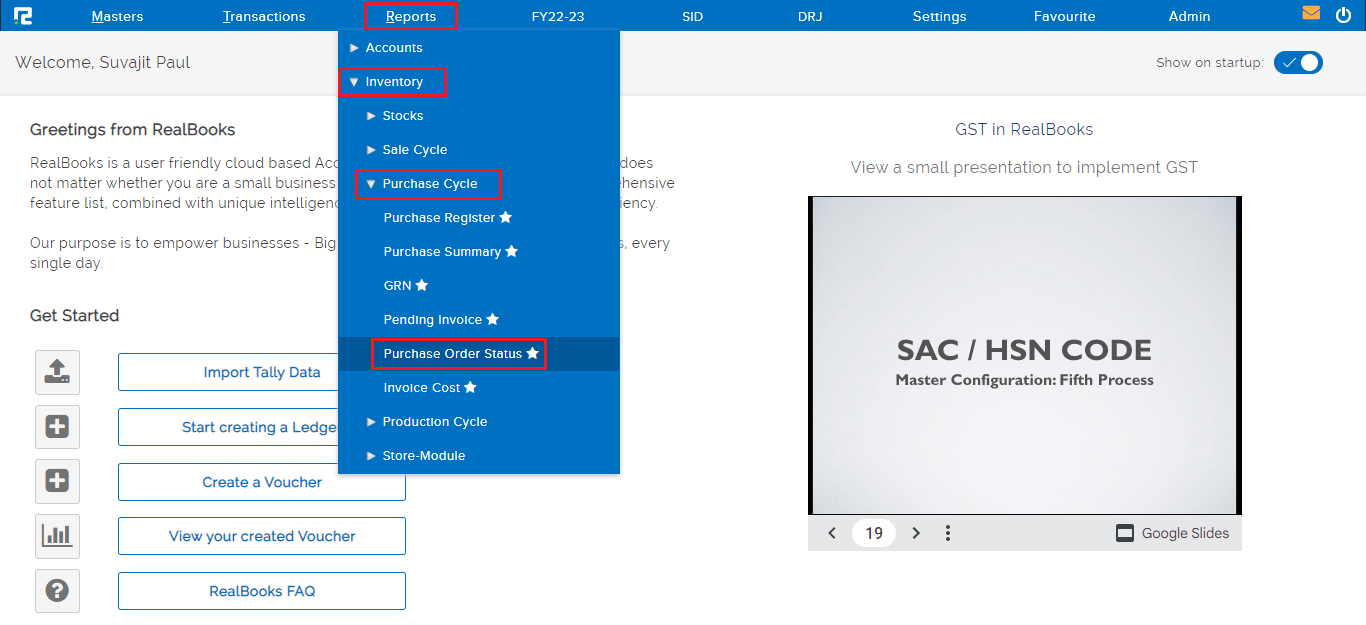
To View and Edit Purchase Order
Go to Reports⇒ Inventory⇒ Purchase Cycle⇒ Purchase Order Status
Create a GRN Entry
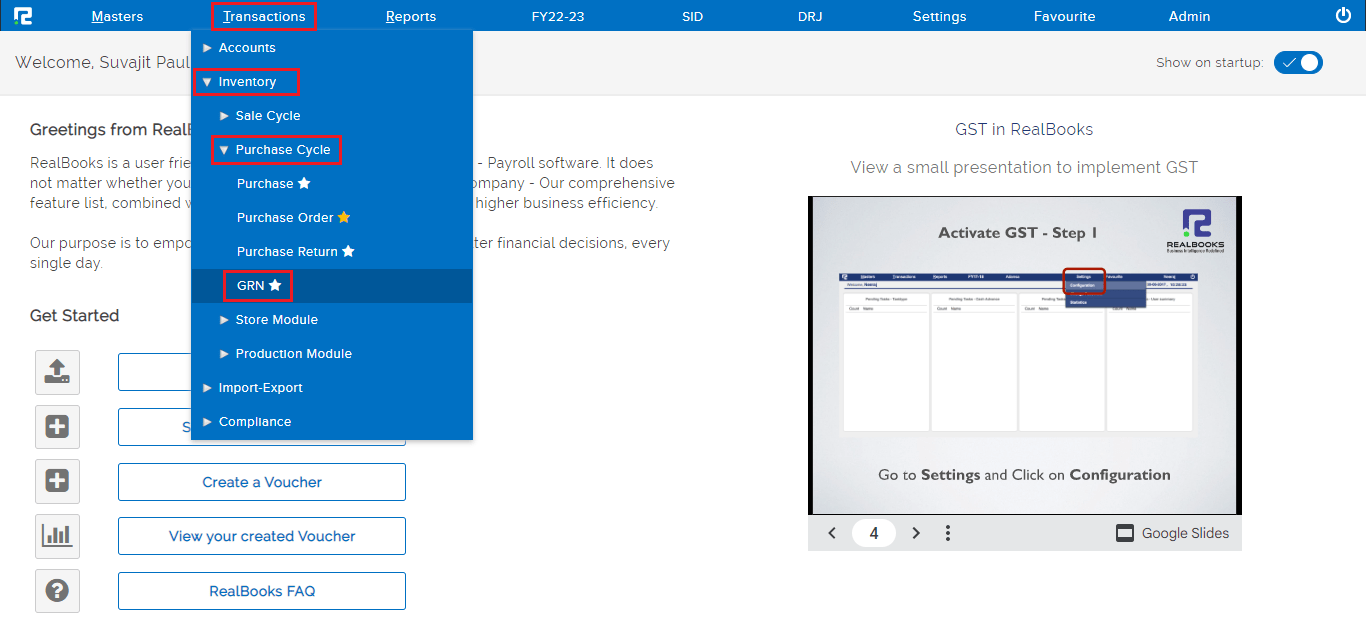
STEP 1: Go to Transactions⇒ Inventory ⇒ Purchase cycle ⇒ GRN
A GRN entry page will open-
STEP 2: Fill in the following details:
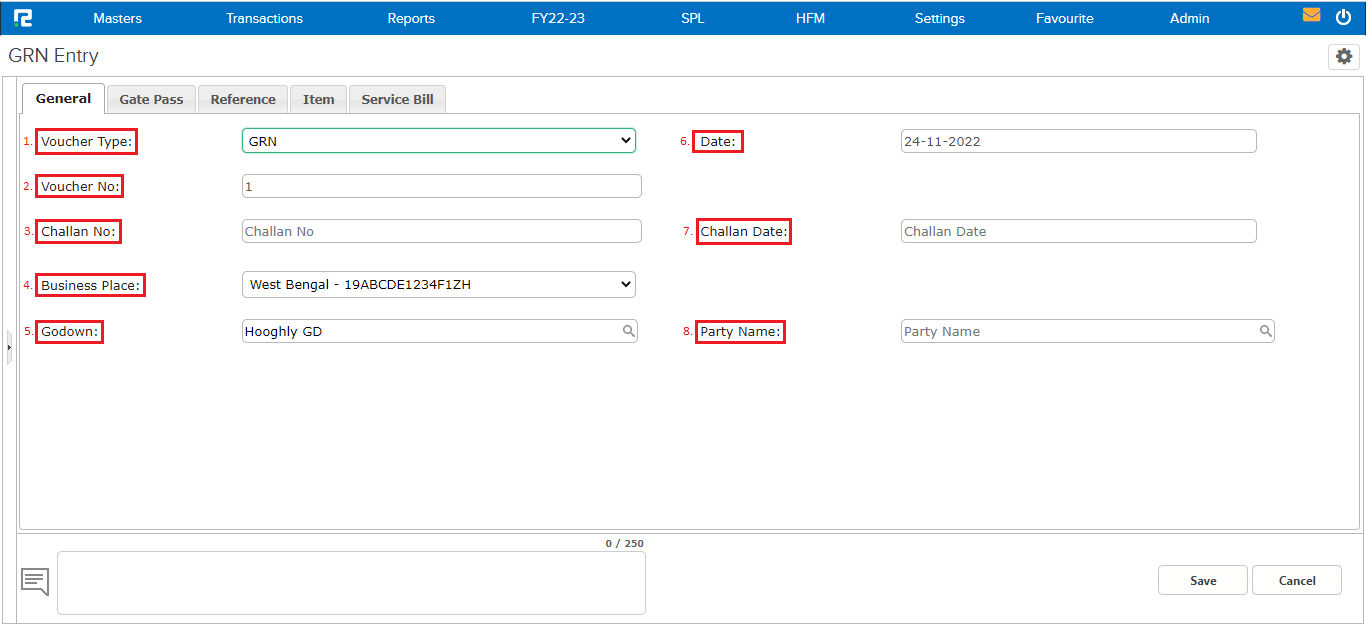
1. Voucher type– Select the appropriate voucher type from the dropdown list displayed.
2. Voucher number– Based on the numbering pattern set in the voucher master, this number will be displayed.
3. Challan Number– Enter the challan name, if any.
4. Business place– Usually, it is auto-selected, but in the case of multiple business places, this needs to be selected from the dropdown.
5. Godown– Type the name of the Godown/Warehouse location for the stock inflow.
6. Date– Set the voucher date.
7. Challan Date– Set the challan date.
8. Party Name– Enter the Party name.
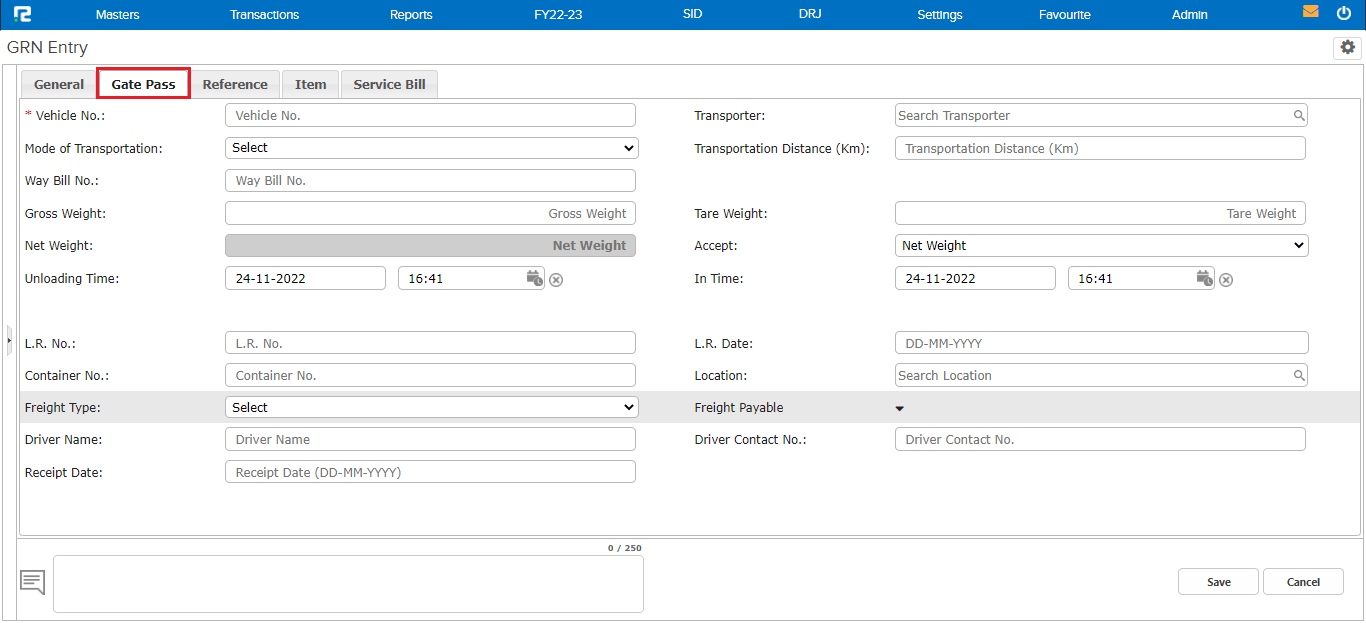
STEP 3: Go to the GATE PASS tab, Fill in the required details
STEP 4: Go to the REFERENCE tab, all the open purchase orders related to the specific vendor will be displayed here.
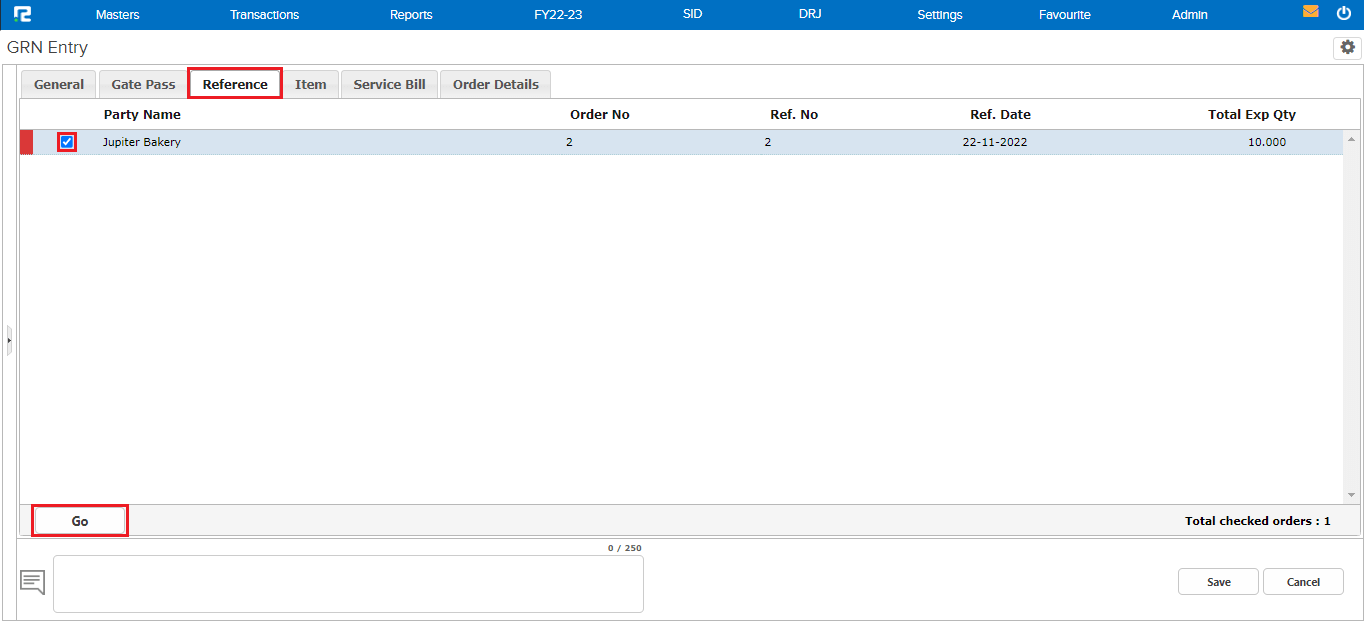
Tag the PURCHASE ORDER reference by clicking on the checkbox available at the left-hand side of each entry and click on GO.
Note: Users can tag multiple purchase orders at a time.
the page will be redirected to the ITEM tab, as per the purchase order total details about item have come.
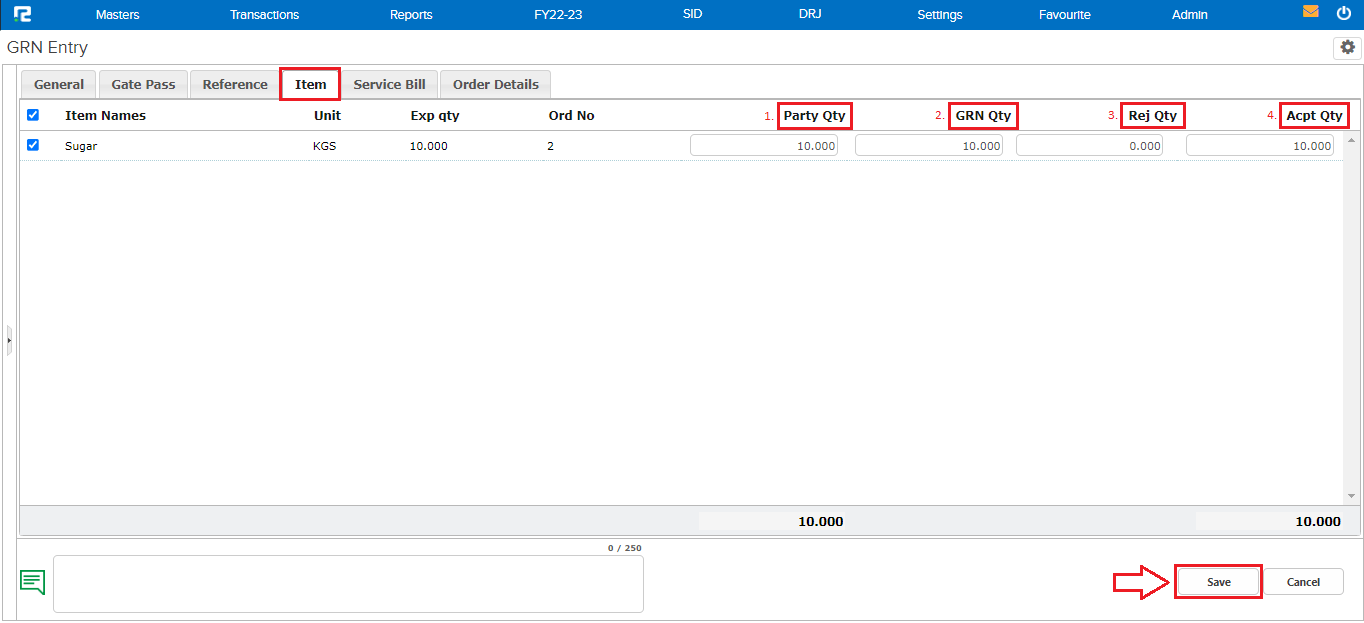
1. Party Quantity–The total purchase order quantity is auto-populated here.
2. GRN Quantity–By default, the same quantity as the party quantity will display, but here the user can change it.
3. Reject Quantity– The user can enter a reject quantity here if any.
4. Accept Quantity– It is fetched from the GRN Quantity, but the user can enter the quantity of the item received.
STEP 5: Once the details have been updated, click on the SAVE button below to save the GRN.
To View or Edit a GRN Entry
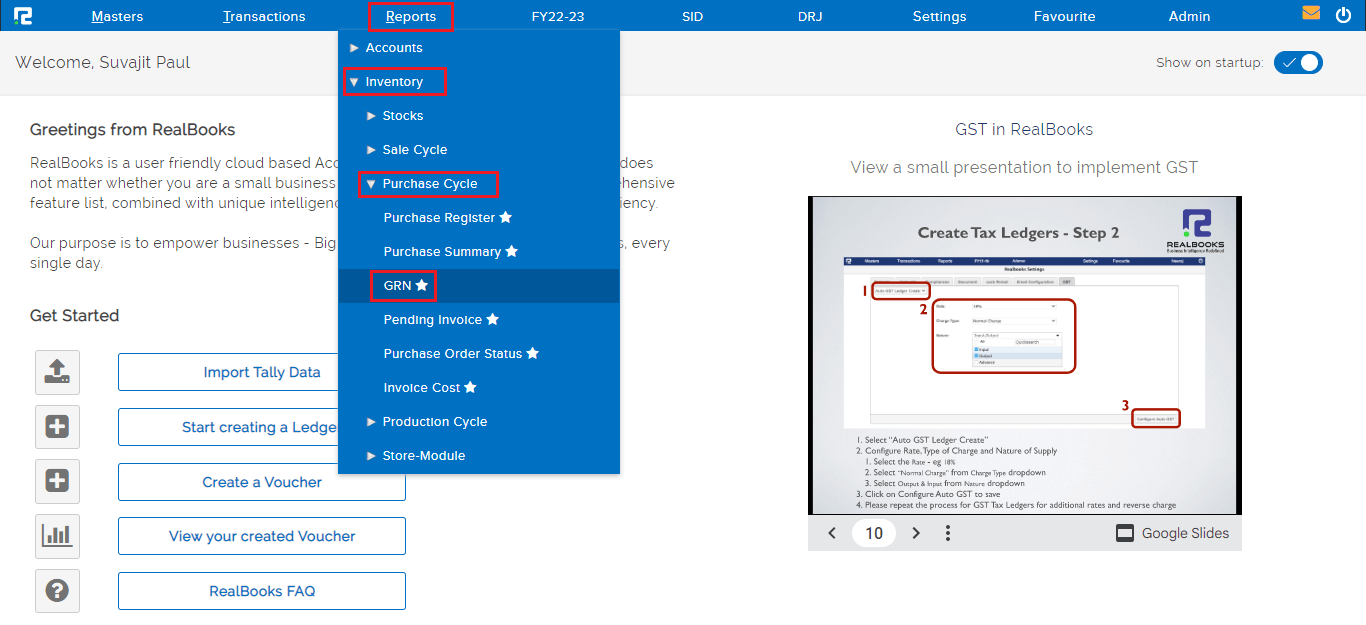
Go to Reports⇒ Inventory⇒ Purchase Cycle⇒ GRN
Create a Purchase Entry
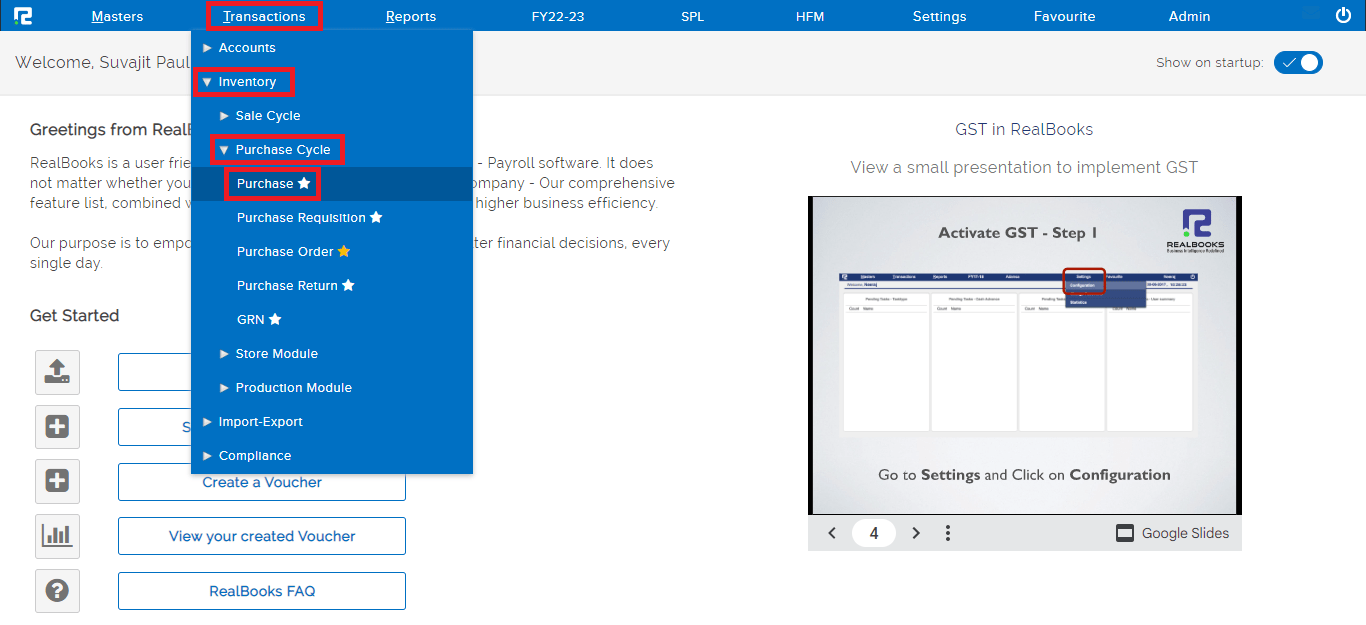
STEP 1: Go to Transactions⇒ Inventory ⇒Purchase Cycle⇒ Purchase
A purchase transaction entry page will open-
STEP 2: Fill in the following details:
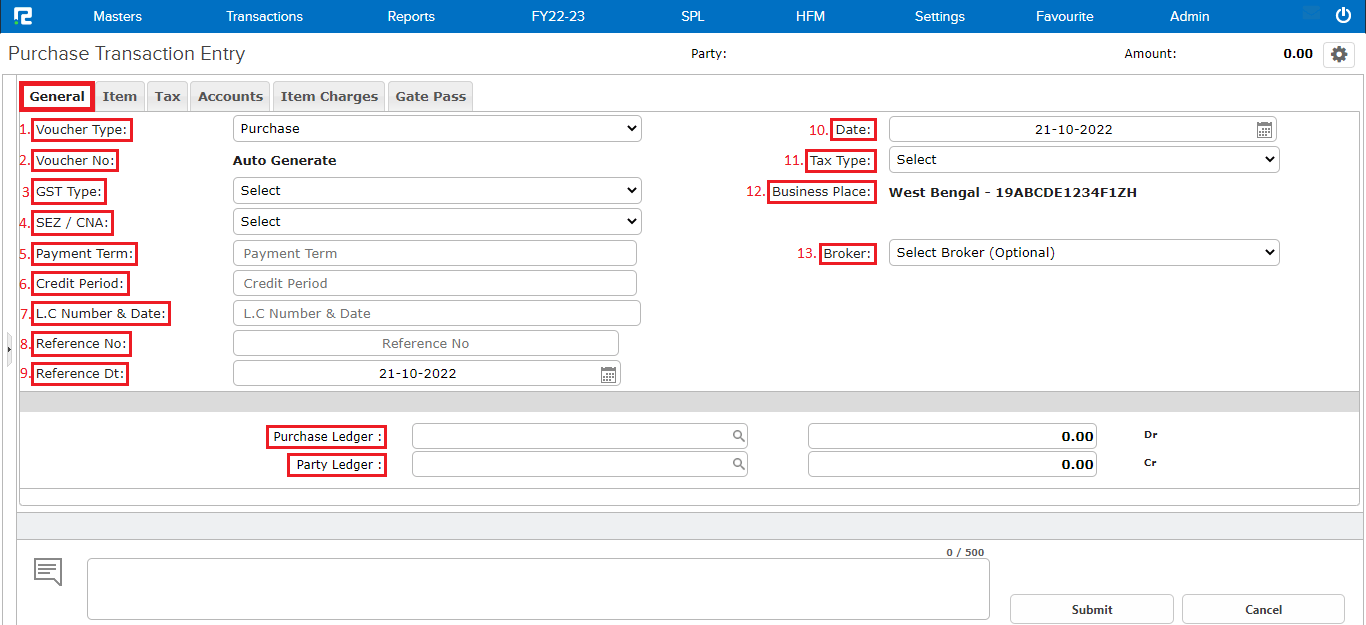
Under the general tab
1. Voucher type– Select the appropriate voucher type which is mapped in the Order to Pay process from the dropdown list displayed.
2. Voucher number– Based on the numbering pattern set in the voucher master, this number will be displayed.
3. GST type– This is auto-fetched based on the company’s business place & party’s state.
4. SEZ/CNA– If the billing party belongs to an SEZ location then select SEZ or if GST input credit is not available then select CNA from the dropdown list.
5. Payment term– If there is a payment term agreed upon, it can be added here.
Note: It should not exceed 250 words.
6. Credit Period– Add the credit period i.e. credit days.
7. LC number and date– Add the LC number and date, if any.
8. Reference date– Enter the vendor’s invoice date.
9. Reference number– Enter the vendor’s invoice number.
Note: Ref number is mandatory.
10. Date– Set the voucher date.
11. Tax type– This is auto-filled.
12. Business place– Usually, it is auto-selected, but in the case of multiple business places, this needs to be selected from the dropdown.
13. Broker– Search the broker ledger, if any.
Search and enter the Purchase & Vendor ledger in the respective fields, namely, Purchase & Party.
STEP 3: Once the party ledger is added, the page will be redirected to the REFERENCE tab-
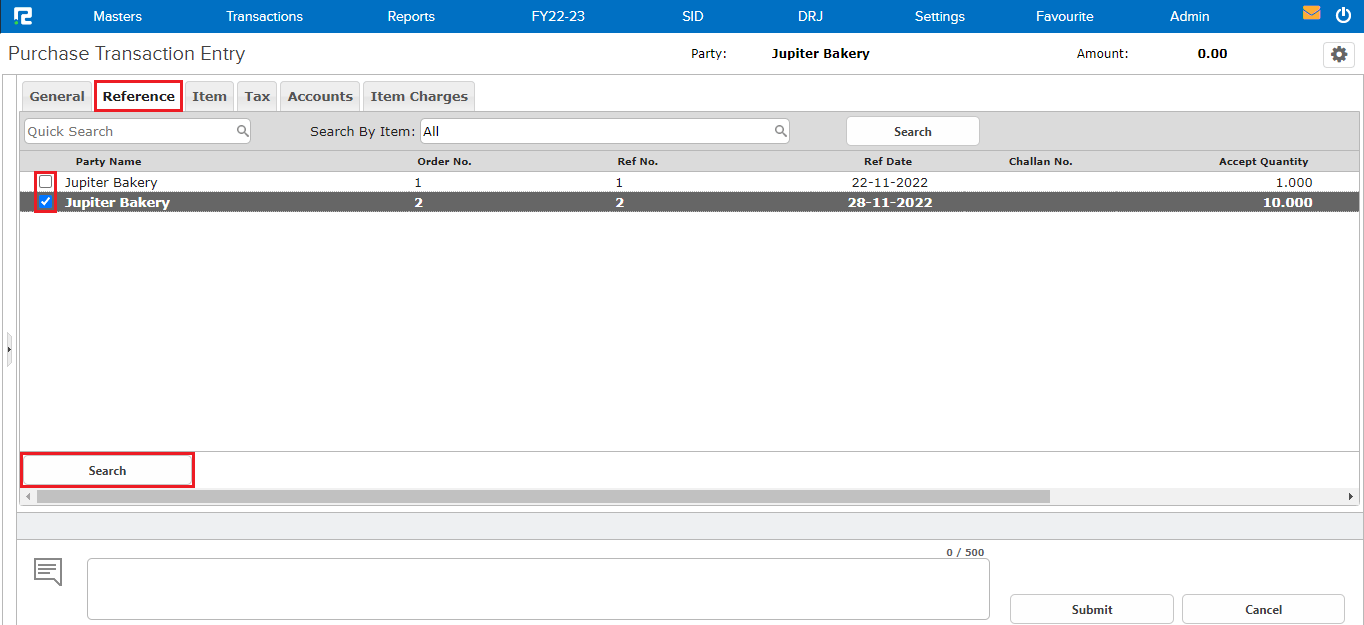
all the open GRN related to the specific vendor will be displayed here.
Tag the GRN reference by clicking on the checkbox available at the left-hand side of each entry and click on SEARCH.
Note: The user can tag multiple GRNs at a time.
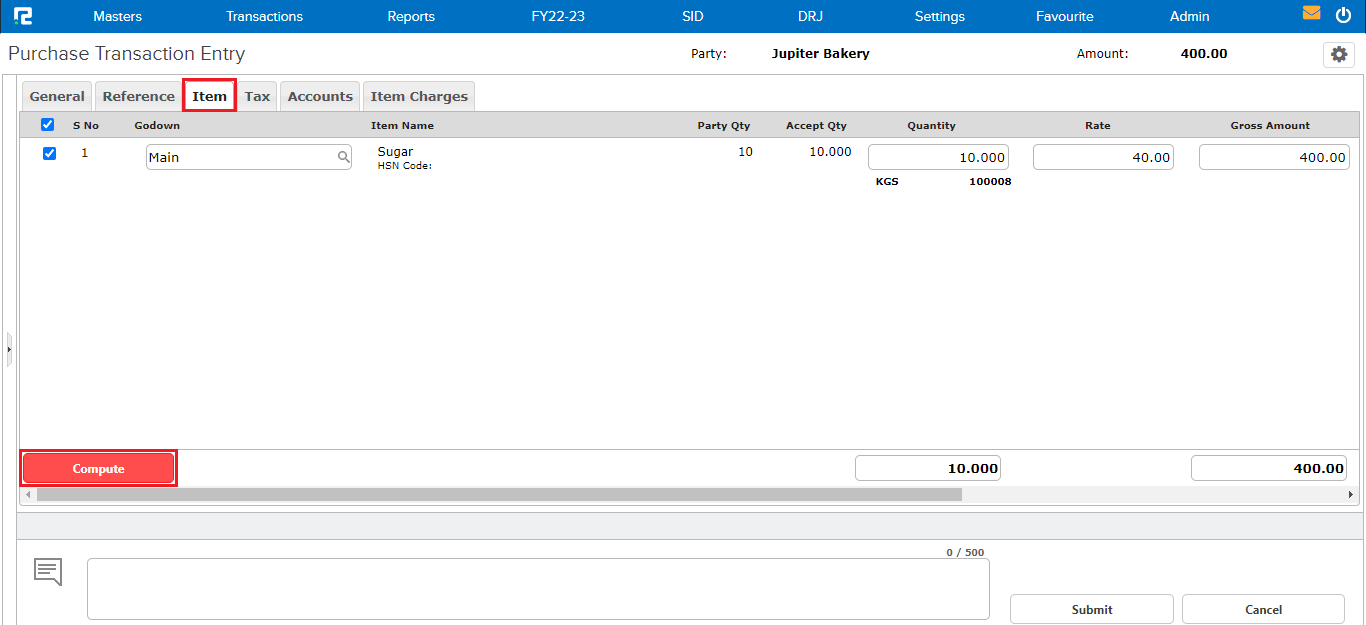
STEP 4: the page will be redirected to the ITEM tab, make changes as required and click on COMPUTE.
The page will be redirected to the ACCOUNTS tab
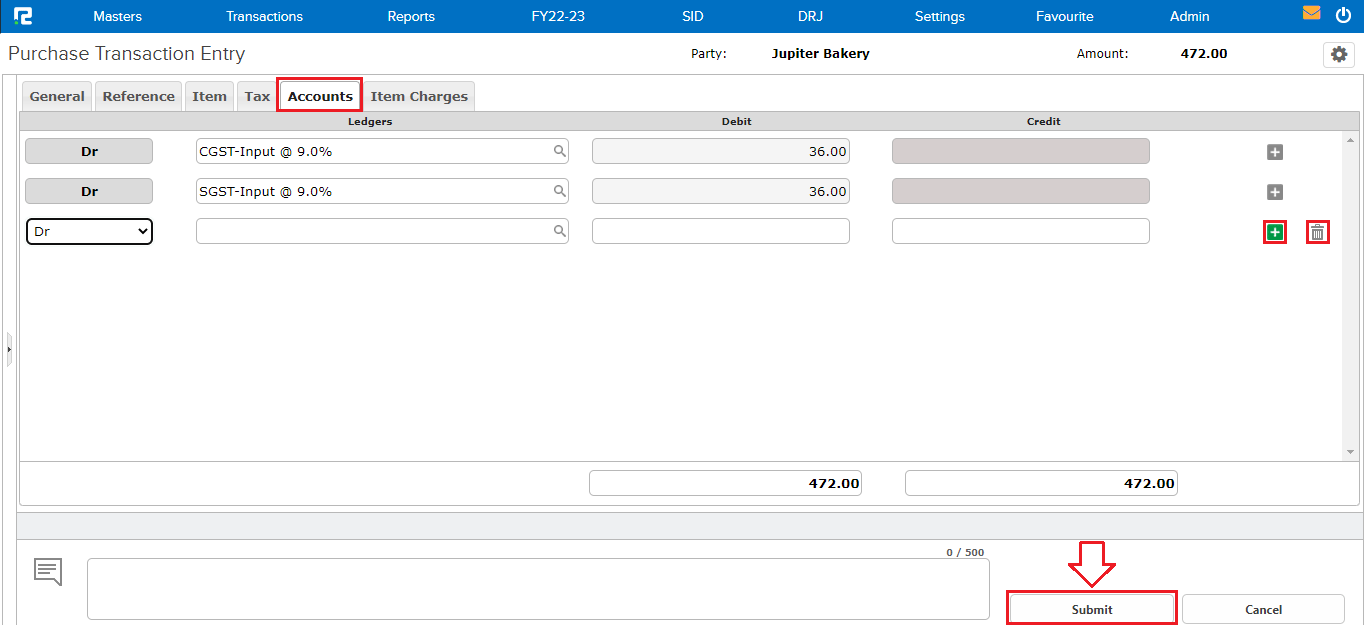
STEP 5: The tax ledgers will auto-populate in the accounts tab. To add any additional ledgers, click on the “+” icon or press enter to add a new row.
Note: To use Automatic GST computation, configure GST Calculation as Automatic in Voucher Master.
STEP 6: Click on the “SUBMIT” button, and the entry will be saved successfully.
To View or Edit a Purchase Entry
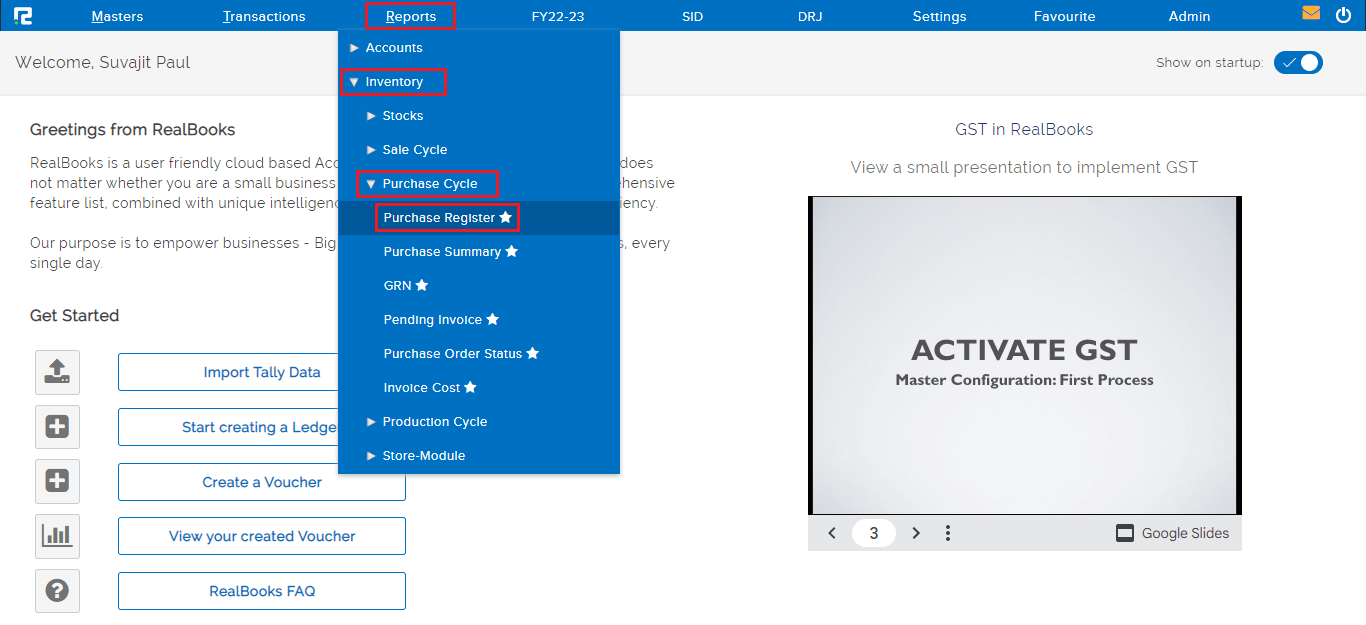
Go to Reports⇒ Inventory⇒ Purchase Cycle⇒ Purchase Register