A Ledger is a set of numbered accounts of a business used to keep a track of its financial transactions and to prepare financial reports. Each account is a unique record summarizing each type of asset, liability, revenue, and expense.
How To Create a Ledger Master
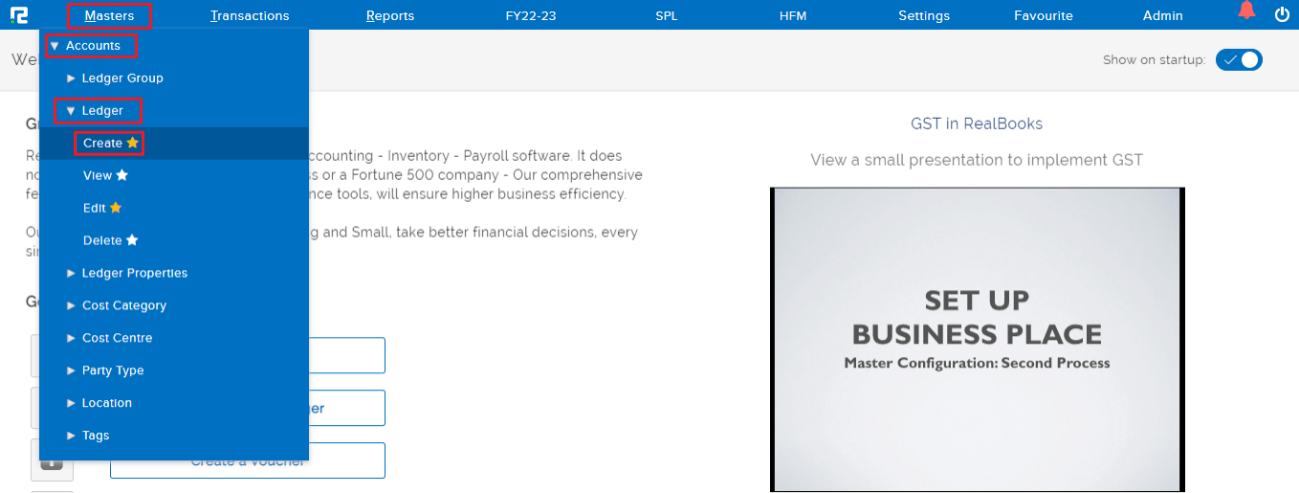
STEP 1: Go to Masters ⇒ Accounts ⇒ Ledger ⇒ Create
STEP 2: Fill in the following information after selecting the Create option.
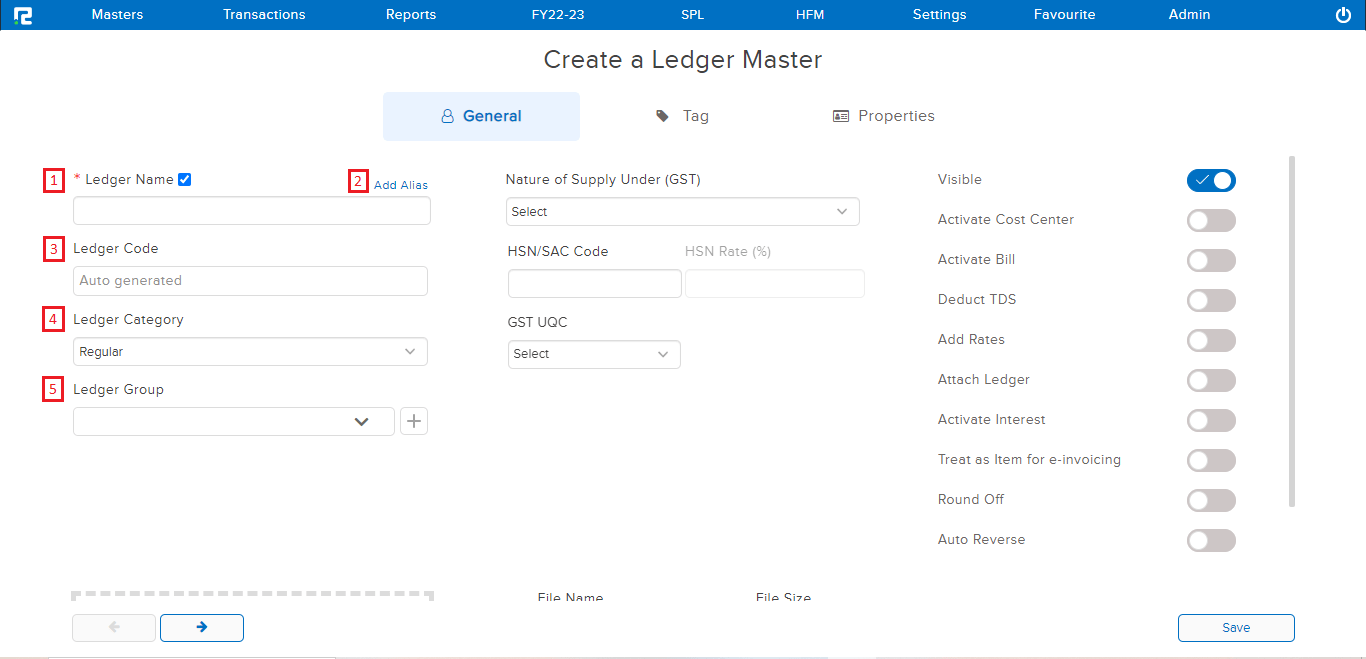
1. Ledger Name: Enter the Ledger’s Name.
2. Aliases should be added: There are three fields in Alias
a) Print Name: The ledger name entered here is only used for printing purposes.
b) Cheque Favour Name: The ledger name provided in this section is considered for cheque print only.
c) Regional Language Print Name: Enter the regional language name here to read reports in a language other than English.
3. Ledger Code: If applicable, the Ledger Code (Now the ledger code can be auto-generated as well).
4. Ledger Category: In RealBooks, there are six different types of ledger categories to choose from.
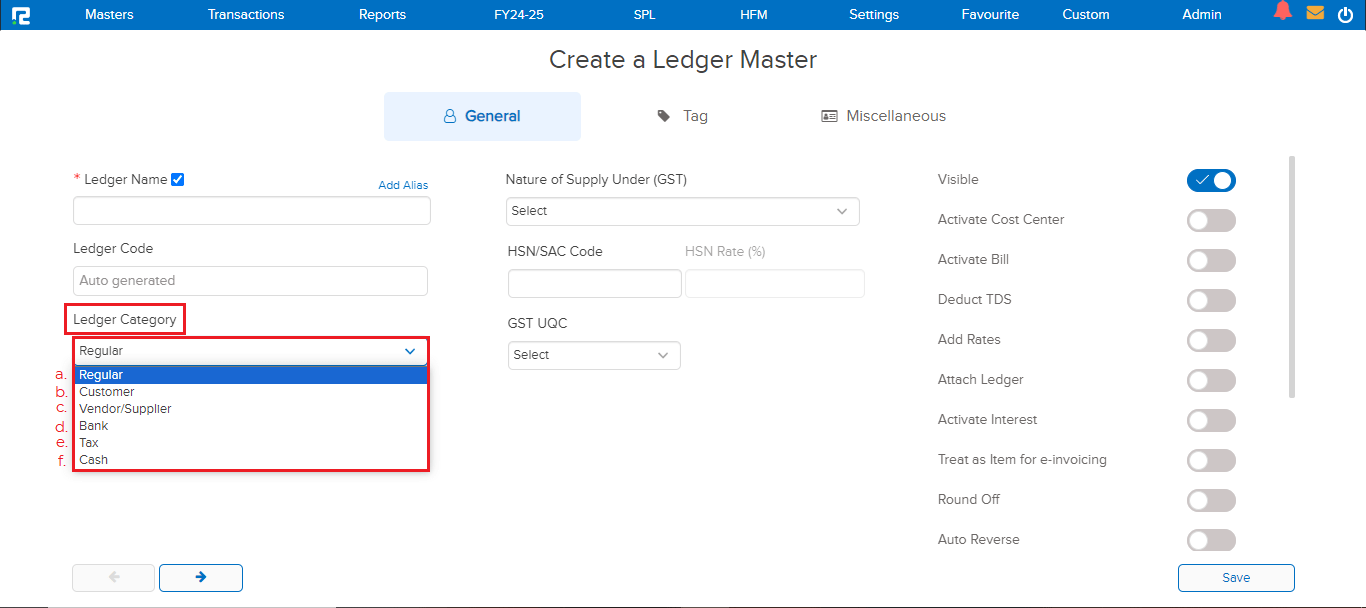
a) Regular – Other than the ledgers falling under the specific categories, all ledgers will be categorized as Regular.
b) Customer – For any type of customer ledgers.
c) Vendor/Supplier – For any type of vendor/supplier ledgers.
d) Bank – This is used for the Bank ledger.
e) Tax – For any type of tax ledger, such as TDS, GST, TCS, CESS, and so on.
f) Cash – This is used for the Cash ledger.
5. Ledger Group: According to the chart of accounts, search for or pick the Ledger Group from the options.
A. If we choose Regular as the Ledger Category
Except for the ledgers belonging to the party, bank, and tax categories, all other ledgers falls under this category. If the ledger category is selected as Regular, then the following details are required to be filled in.
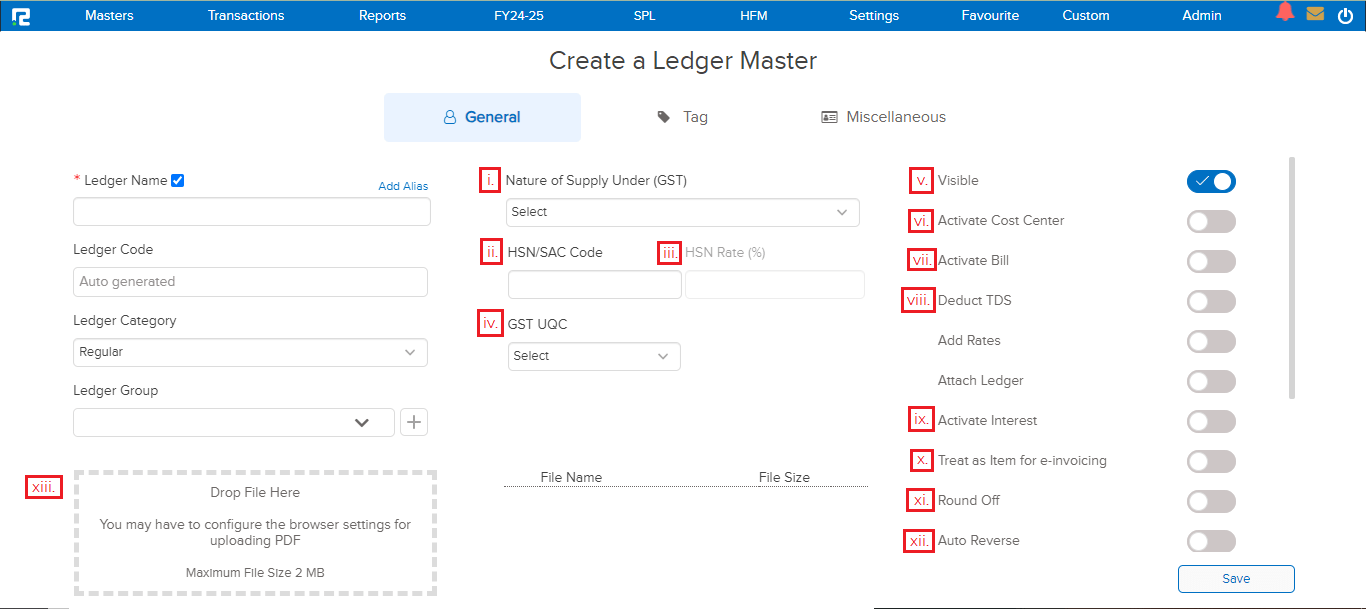
i) Nature and supply under (GST): From the drop-down menu, choose the tax liability type for the ledger.
ii) Code for HSN/SAC: If applicable, enter the SAC code.
iii) HSN Rate: Enter the applicable tax rate here to automatically configure GST in the ledger.
iv) GST UQC: If applicable, select GST Unique Quantity Code.
v) Visible: This radio button must be activated in order for a ledger to remain enabled.
vi) Activate Cost Centre: This radio button must be enabled in order to capture cost centre information.
vii) Activate Bill: This radio button must be enabled in order to capture bill details.
viii) Deduct TDS: Whenever TDS is applicable on a ledger, this radio button must be enabled in order to generate a correct TDS report.
ix) Activate Interest: This radio button must be enabled in order to calculate interest on a ledger.
x) For e-invoicing, treat as an item: This radio button must be activated in order to add an HSN code instead of SAC for e-invoicing purposes.
xi) Round Off: This radio button must be enabled in order to calculate the round off.
xii) Auto Reverse: This radio button must be enabled in order to set up auto reverse entries.
xiii) Additionally, if any supporting documents are available, upload them to the ledger master.
Once you’ve filled in all of the information, click the Save button.
B. If we choose Ledger Category as Customer or Vendor/Supplier –
Always choose Customer or Vendor/Supplier as the ledger category when creating a party ledger – Debtors or Creditors. This also has an impact on GST reports. Apart from the mentioned information under the General tab in the Regular Category, the following information must be filled in-
Party Information-
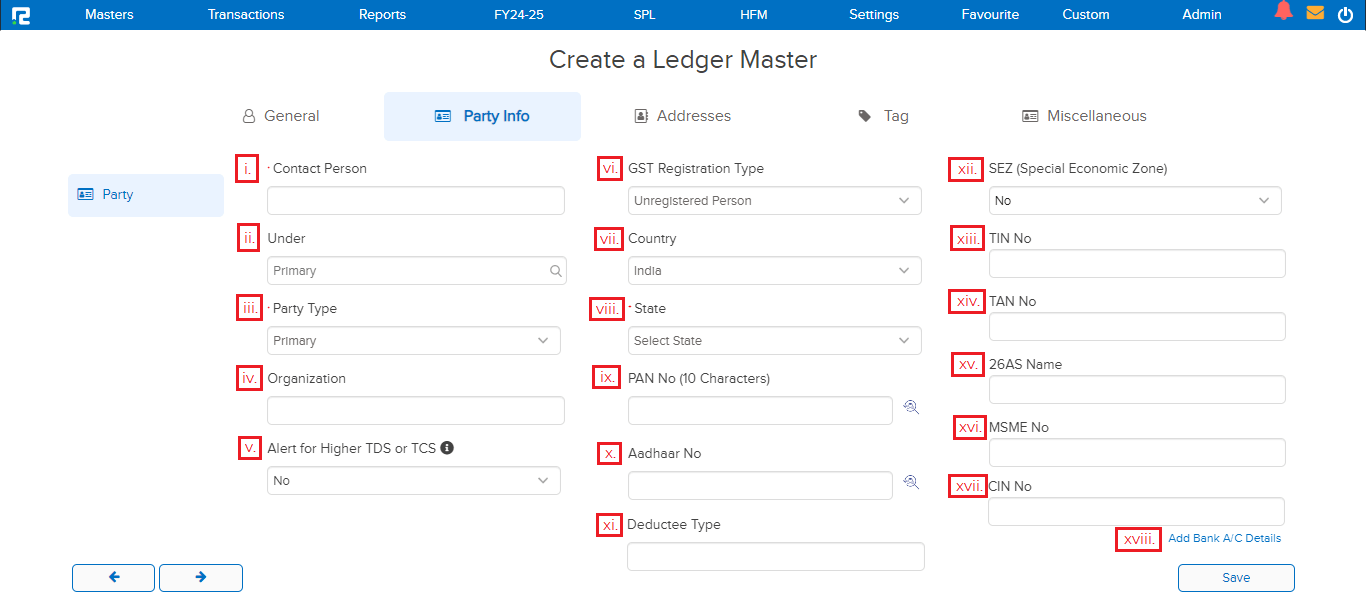
i) Contact person – The name of the point of contact.
ii) Under – Assign it under any other ledger to keep it as a sub-ledger.
iii) Party Type – This column categorizes various ledgers that belong to the same ledger group, based on their usage, type, location, and other factors. Consider the following scenario: If you have numerous salespeople in a retail business, you can put them under the Ledger group Salary/Employee and then sub-classify them as a salesman in the party type.
iv) Organization — For printing purposes, there is a text box.
v) Alert for Higher TDS or TCS – If this option is chosen, the system will prompt you to deduct higher TDS or TCS during transaction entry.
vi) GST Registration Type – Select the appropriate option based on the party’s registration status.

a) Unregistered — For those who are not registered under the GST Registration Act, mark them as “Unregistered.”
b) Registered — Mark ledgers as “Registered” for people who have been registered under the GST Registration Act. When a ledger is marked as a registered person, the following information must be filled in.
1) Registration Nature– Depending on the nature of the party’s registration, choose one of the following options:

i) Regular
ii) Government
iii) eCommerce
iv) Under Composition Scheme
v)ISD
2) GSTIN No. – Enter the Party’s GSTIN.
c) Foreign Person– The ledger must be identified as a foreign person when dealing with a party who is not a domestic resident.
d) Remind me later– When the registration details/state of a party are unknown at the time of ledger creation, the party can be marked as Remind me Later.
e) Foreign goods custom – In cases where the import of goods occurs while creating a ledger for the Customs Duty Commissionerate mark the ledger as Foreign Goods Custom to have a proper impact on it in GSTR3B.
3) You can verify your GSTIN by clicking this magnifying glass icon.
vii) Country- Choose a country from the drop-down menu.
viii) State –The system auto-picks the state on the basis of the GSTIN provided otherwise select manually.
ix) PAN No. – If the GSTIN is provided, the PAN number will be automatically entered; otherwise, the PAN number must be manually filled.

Note: You can verify your PAN number by clicking this magnifying glass icon.
x) Aadhaar No. – Enter the Aadhaar number, if required.

Note: You can verify your Aadhaar number by clicking this magnifying glass icon.
xi) Deductee Type – Deductee Type is auto-populated based on the PAN number entered.
xii) SEZ – If the party falls under SEZ then select the option as yes, else no.
xiii) TIN No – This field can be used to enter the TIN number.
xiv) TAN No – This field can be used to enter the TAN number.
xv) 26AS Name — This field can be used to enter the 26AS Name.
xvi) MSME No – This field can be used to enter the MSME number.
xvii) CIN No- This field can be filled with the CIN number.
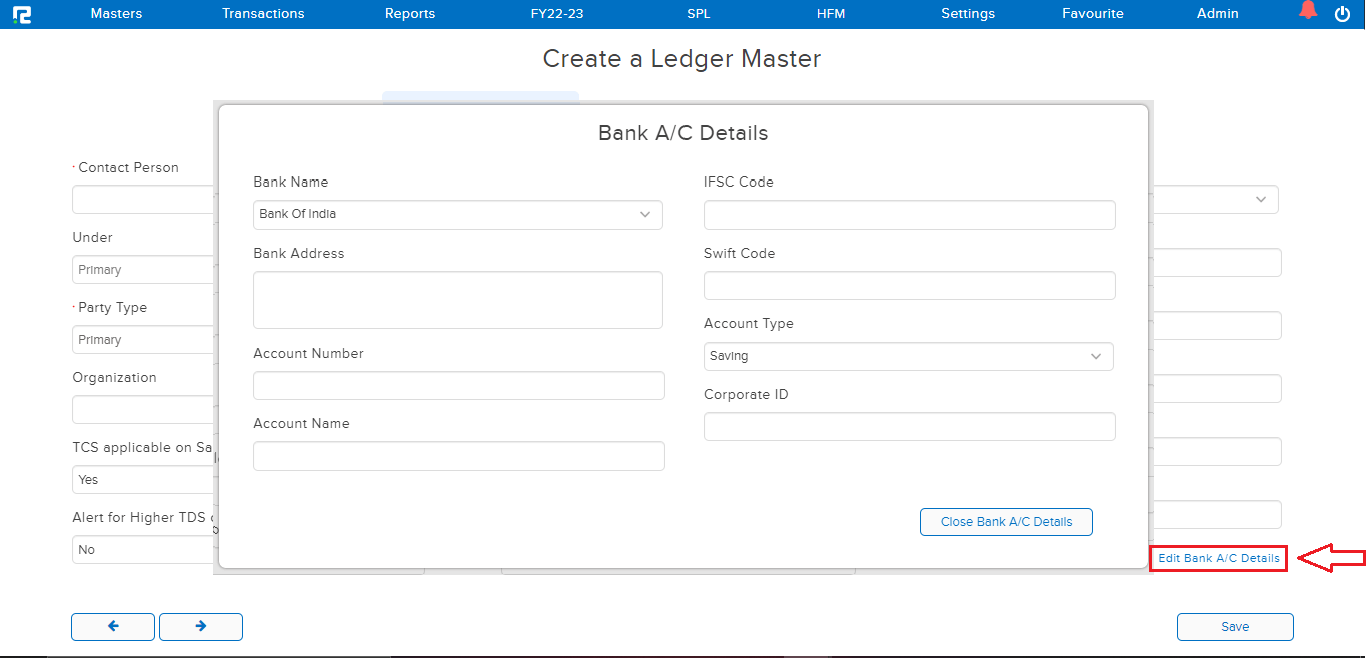
xviii) Add Bank A/C Details – The party’s bank account information can also be entered into the ledger master.
Addresses
The next tab to the party info is Addresses, where you can enter the party’s address information, which will be printed on all reports and bills issued for the party. For a single ledger, the system allows many addresses to be created.
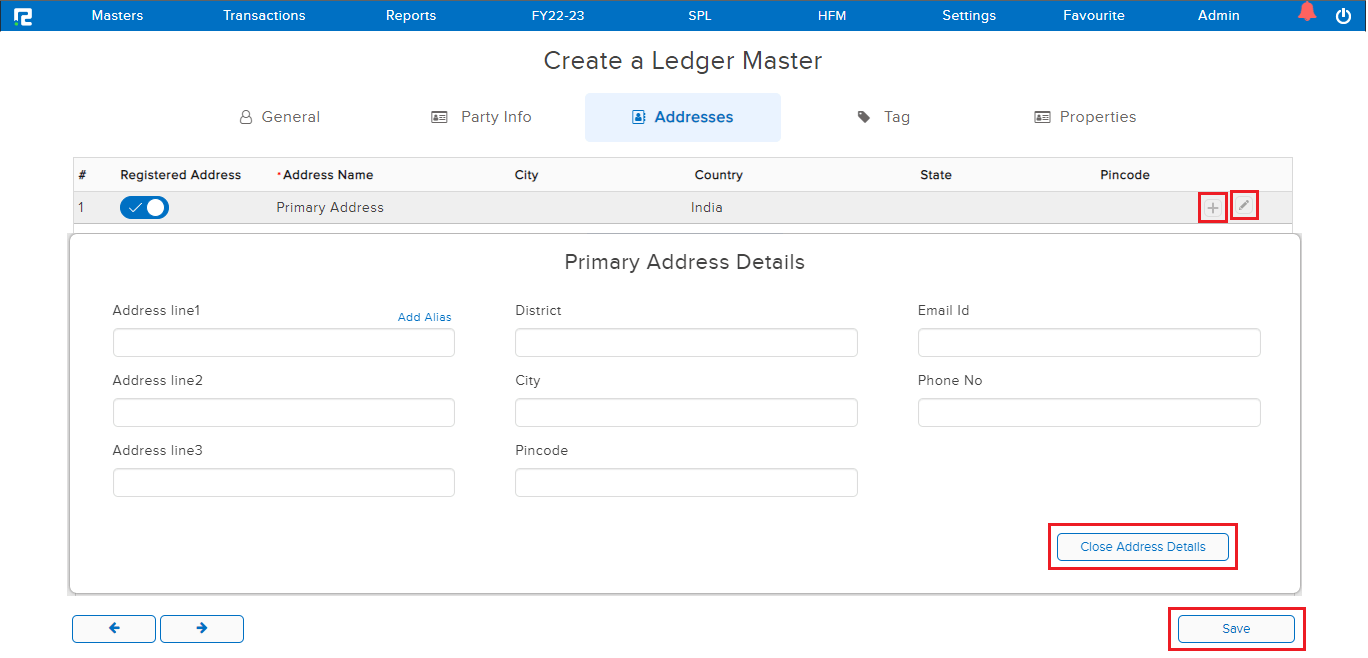
Click the pencil icon in the right corner of the address line to update or fill in the address.
To add multiple addresses, click the “+” sign, available on the right corner of the address line,
After you’ve filled in all of the information, click the Save button.
C. If we select BANK as Ledger Category –
All such ledgers must be labeled as banks, which are used for banking purposes. Choose Bank as the ledger category. Apart from the information listed under the General tab in the Regular Category, the following information must be filled in-
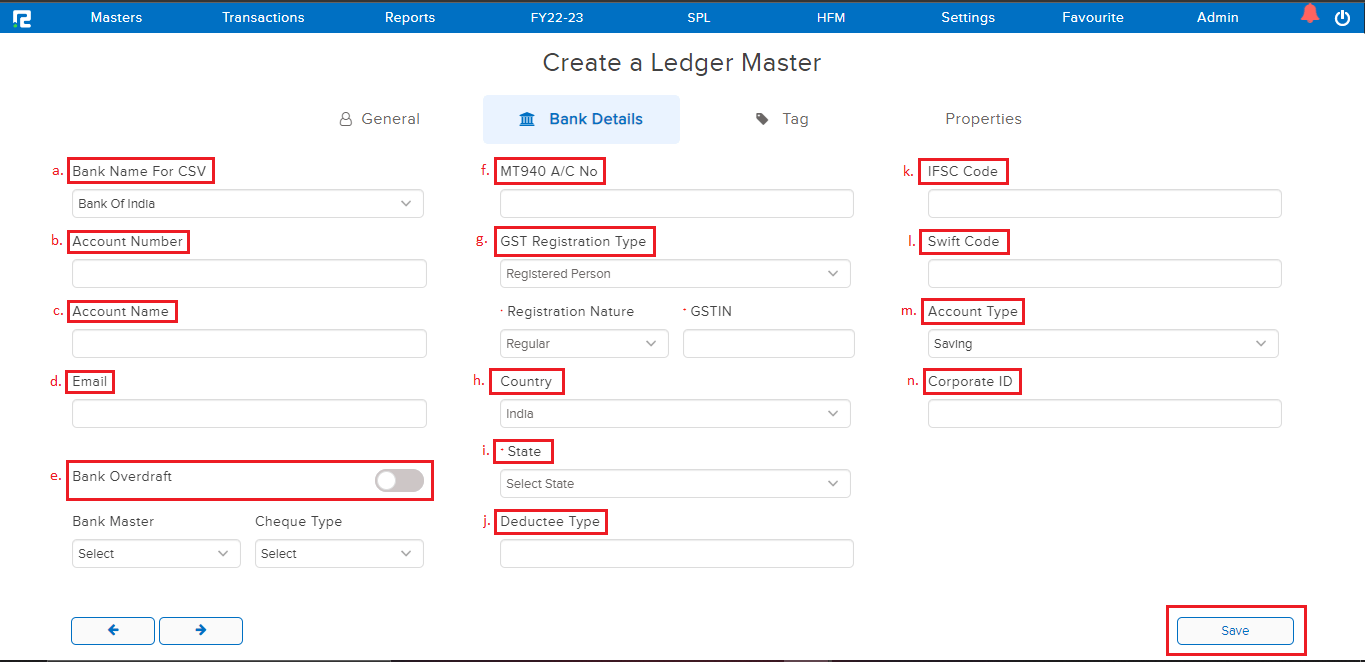
Bank Details
a) Bank Name For CSV – From the drop-down list, choose the appropriate bank name.
b) Account Number- This field contains the company’s account number in that bank.
c) Account Name – Fill in the name of the relevant bank account.
d) Email – If applicable, provide the account’s email address here.
e) Bank Overdraft —Where a bank ledger is used for Overdraft, activate the radio button.
Overdraft Limit- When a ledger is marked as bank overdraft, another field, Overdraft Limit, appears, allowing the user to define the maximum amount of overdraft allowed.
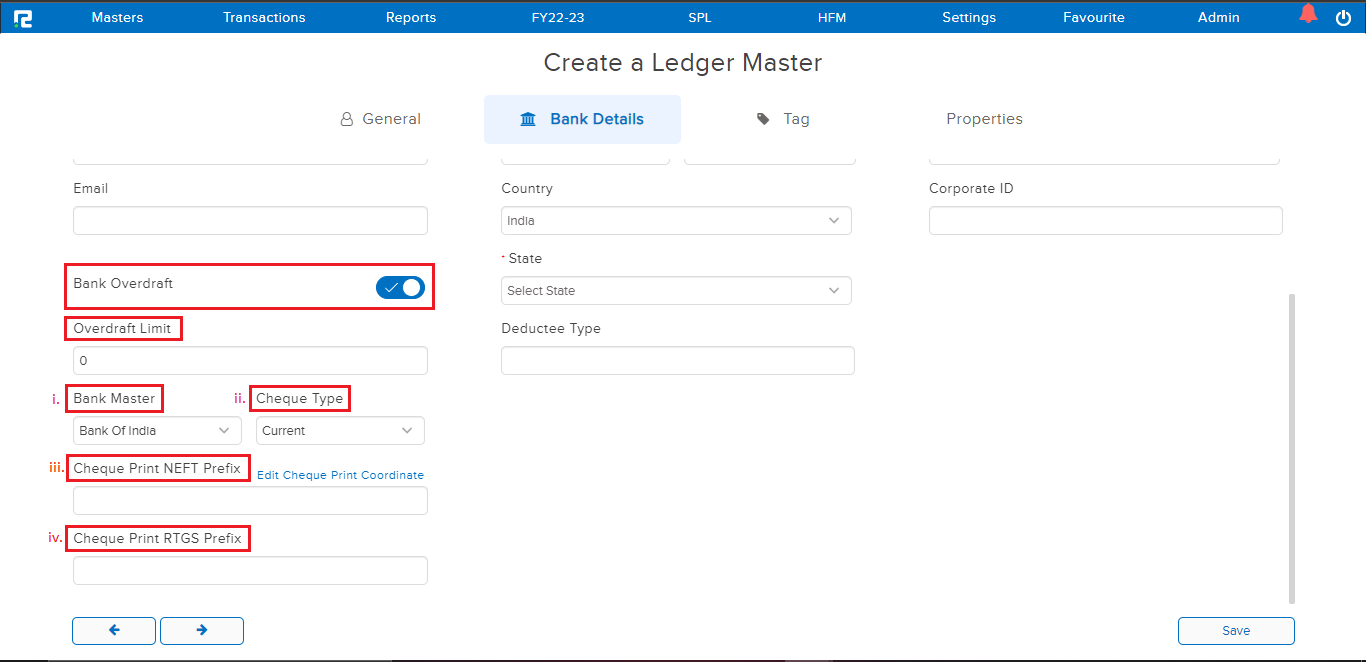
i) Bank Master- Choose the bank’s name from the drop-down menu.
ii) Cheque Type- Choose whether the cheque is for a current account or a savings account.
Depending on the selections for (i) & (ii), the cheque coordinate details will be set to system defaults. It is fully editable as per the user’s requirements.
iii) Cheque Print NEFT Prefix – Enter the prefix that will be printed on NEFT cheques.
iv)RTGS Prefix for Cheque Printing – Enter the RTGS prefix to be printed on RTGS cheques.
f) MT940 A/C No.- Enter the MT940 account number, if any
Note: This should only be filled, if an automatic BRS system using MT940, is to be incorporated
g) GST Registration Type – Select the right option based on the bank’s registration status.

1) Unregistered — For those who are not registered under the GST Registration Act, mark them as “Unregistered.”
2) Registered — Mark ledgers as “Registered” for people who have been registered under the GST Registration Act. When a ledger is marked as a registered person, the following information must be filled in.
A) Registration Nature– Depending on the nature of the party’s registration, choose one of the following options:
Regular
Government
eCommerce
Under Composition Scheme
ISD
2) GSTIN No. – Enter the Party’s GSTIN.
iii) Foreign Person– The ledger must be identified as foreign person when dealing with a party who is not a domestic resident.
iv) Remind me later– When the registration details/state of a party are unknown at the time of ledger creation, the party can be marked as Remind me Later.
v) Foreign goods custom – In cases where import of goods occurs while creating a ledger for Custom Duty Commissionerate mark the ledger as Foreign Goods Custom to have a proper impact on it in GSTR3B.
h) Country- Choose a country from the drop-down menu.
i) State –The system auto-picks the state on the basis of the GSTIN provided otherwise select manually.
j) Deductee Type – Deductee Type is a field that can be filled in.
k) IFSC Code – The Bank’s IFSC code is entered in this field.
l) Swift Code- The Bank’s swift code is entered in this field
m) Account Type – Select the account type.
n) Corporate ID- Fill in the corporate ID, if any.
Once you’ve filled in all of the information, click the Save button.
D. If we select TAX as Ledger Category –
The ledgers used to post the taxes must be labeled as tax ledgers. Choose tax as a ledger category. Apart from the information listed under the General tab in the Regular Category, the following information must be filled in:
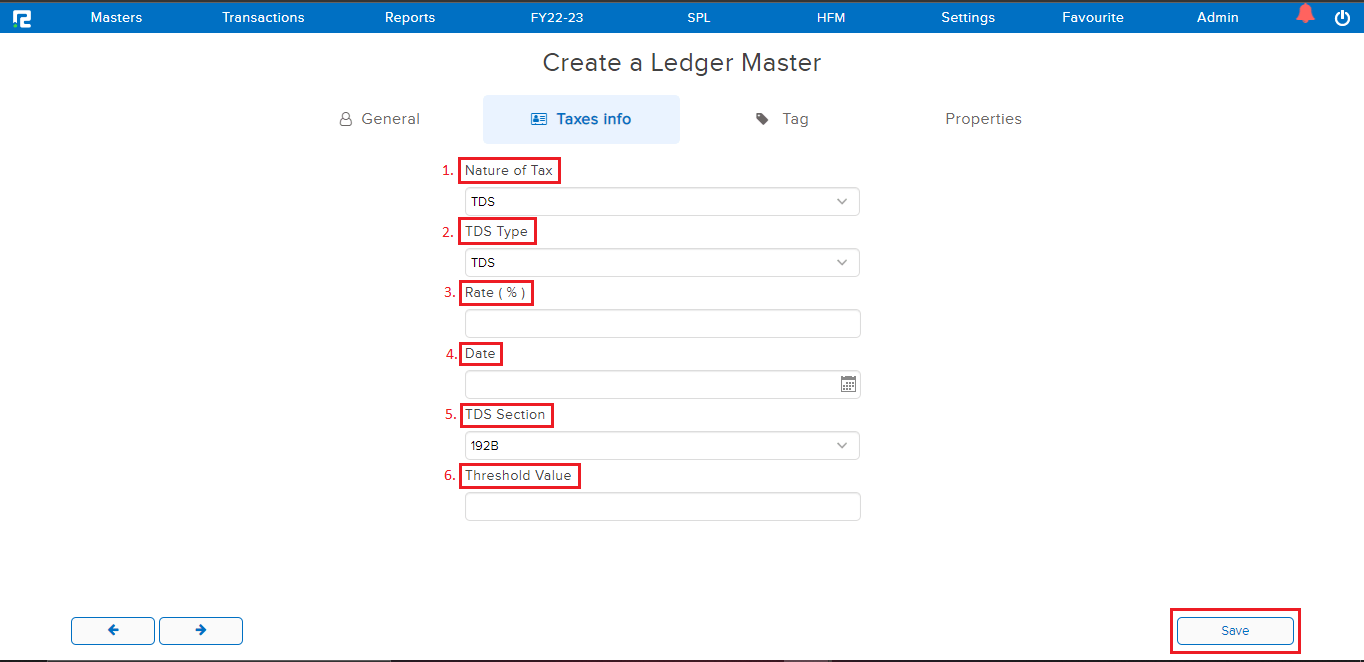
1. Nature of Tax – select the applicable type of Tax.
For example, if we configure it for TDS, the Nature of Tax will be TDS.
2. TDS Type – choose a TDS Type from the dropdown menu, whether it is Receivable or Payable.
For Payable: select it as TDS
For Receivable: select it as TDS_REC
3. Rate (%) – Put the tax rate in the box.
4. Date – Enter the date from which the rate shall apply on transactions.
5. TDS Section — From the drop-down menu, choose the TDS section.
6. Threshold Value – Set the threshold limit, else this can be skipped.
After you’ve filled in all of the information, click the Save button.
How To Edit a Ledger Master
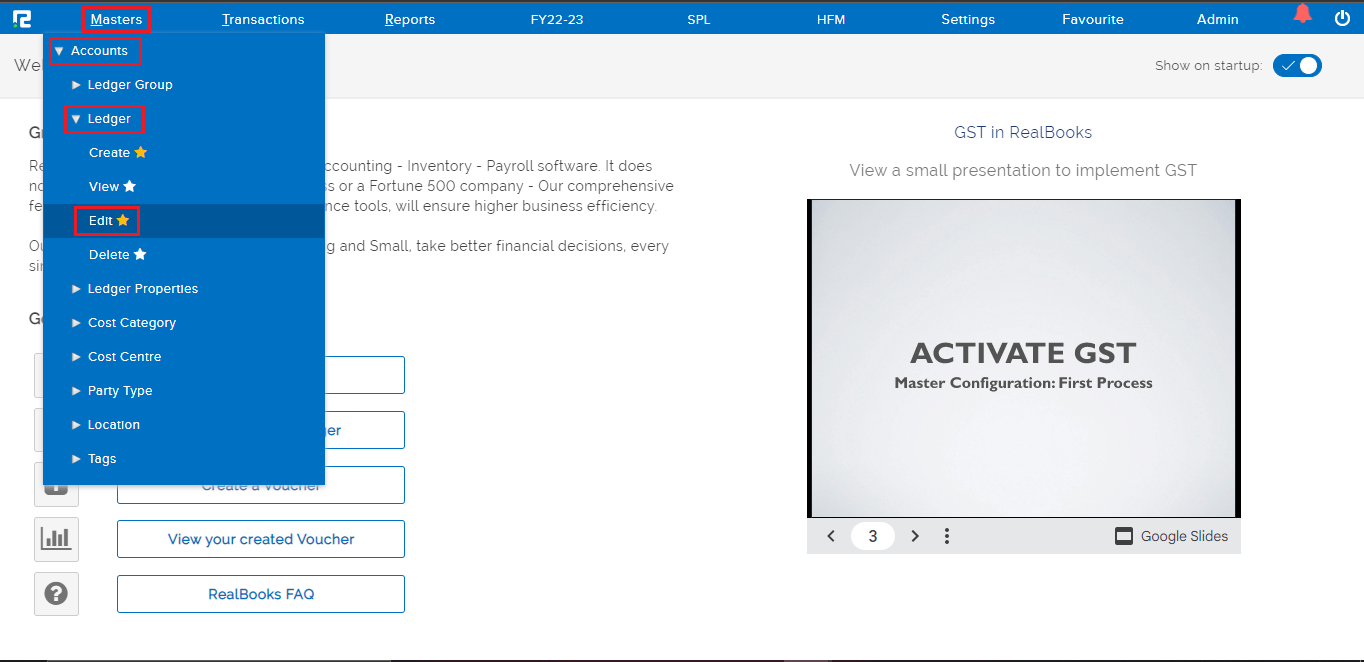
STEP 1: Go to Masters ⇒ Accounts ⇒ Ledger ⇒ Edit
STEP 2: After clicking EDIT, a search page displays, as shown below, where you can see the whole list of ledgers that have been produced. In order to search for a name, you must enter at least three characters in the search box.
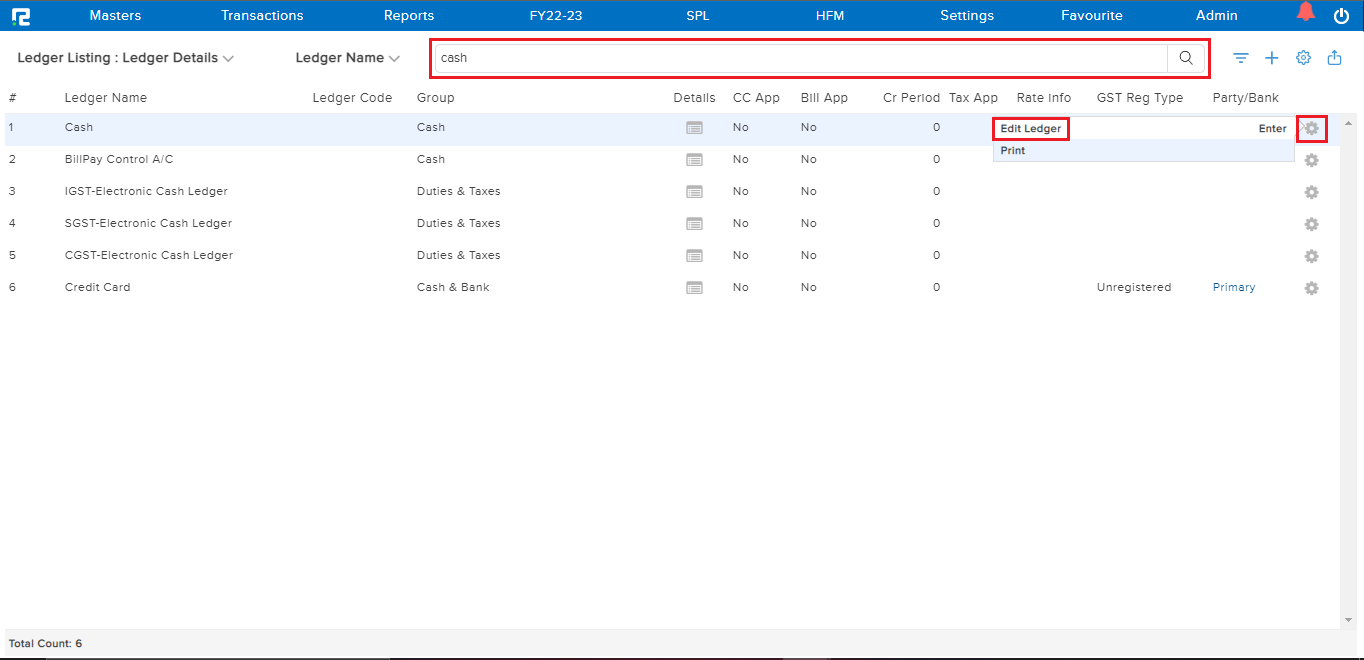
STEP 3: In the search name box, type “cash” and press enter or the search button. A list of all ledgers or ledger groups with the same name will show on the screen.
STEP 4: When the ledger list appears, click the setting icon next to the ledger or press enter to edit it.
STEP 5: The “Update Ledger Master” edit screen appears, allowing you to change the ledger details.
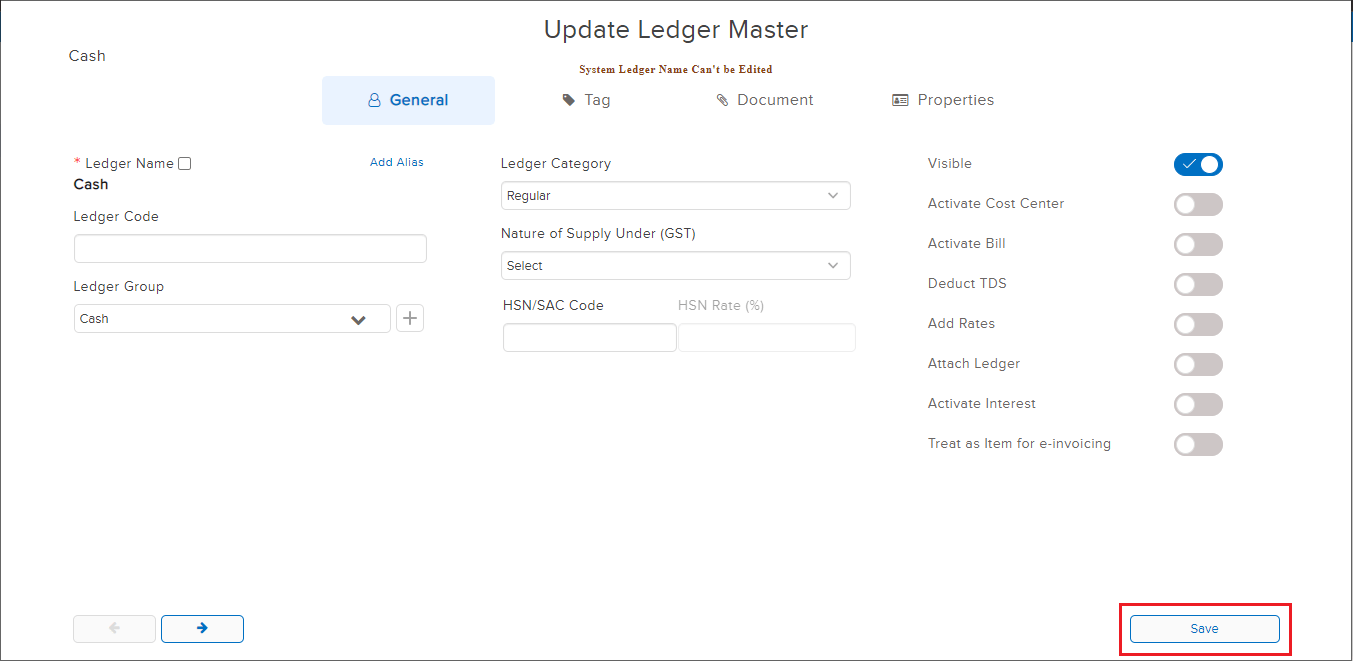
STEP 6: Alternatively, in the same way, you can search “ALL” ledgers.
How To View a Ledger Master
STEP 1: Go to Masters ⇒ Accounts ⇒ Ledger ⇒ View
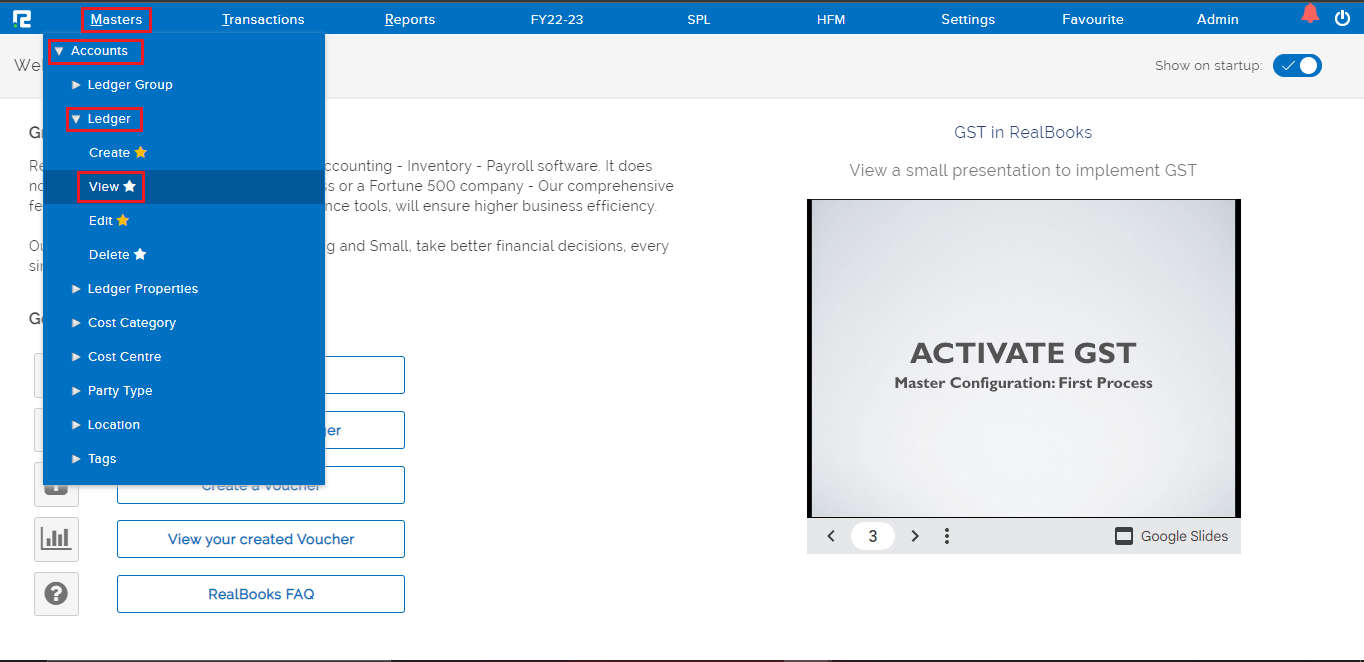
STEP 2: Type “All” in the “search name” field, then press enter or click the search button to view the complete ledger listing.
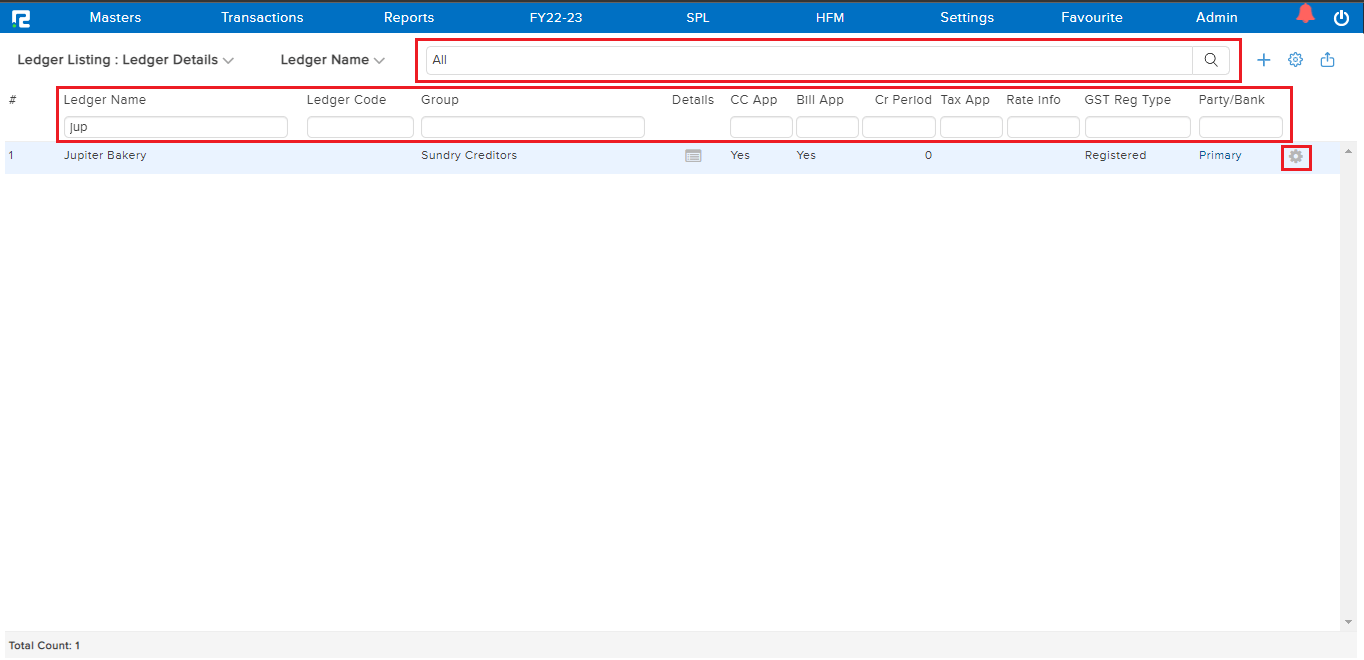
STEP 3: Type at least 3 keywords or specific ledger names in the “search name” field, then press enter or click the search button to view the related ledger listing.
STEP 4: The highlighted fields above can also be used to perform a quick search from the list.
STEP 5: To access the ledger detail, click the setting icon in the right-end corner of the ledger name.
How To Delete a Ledger Master
STEP 1: Go to Masters ⇒ Accounts ⇒ Ledger ⇒ Delete
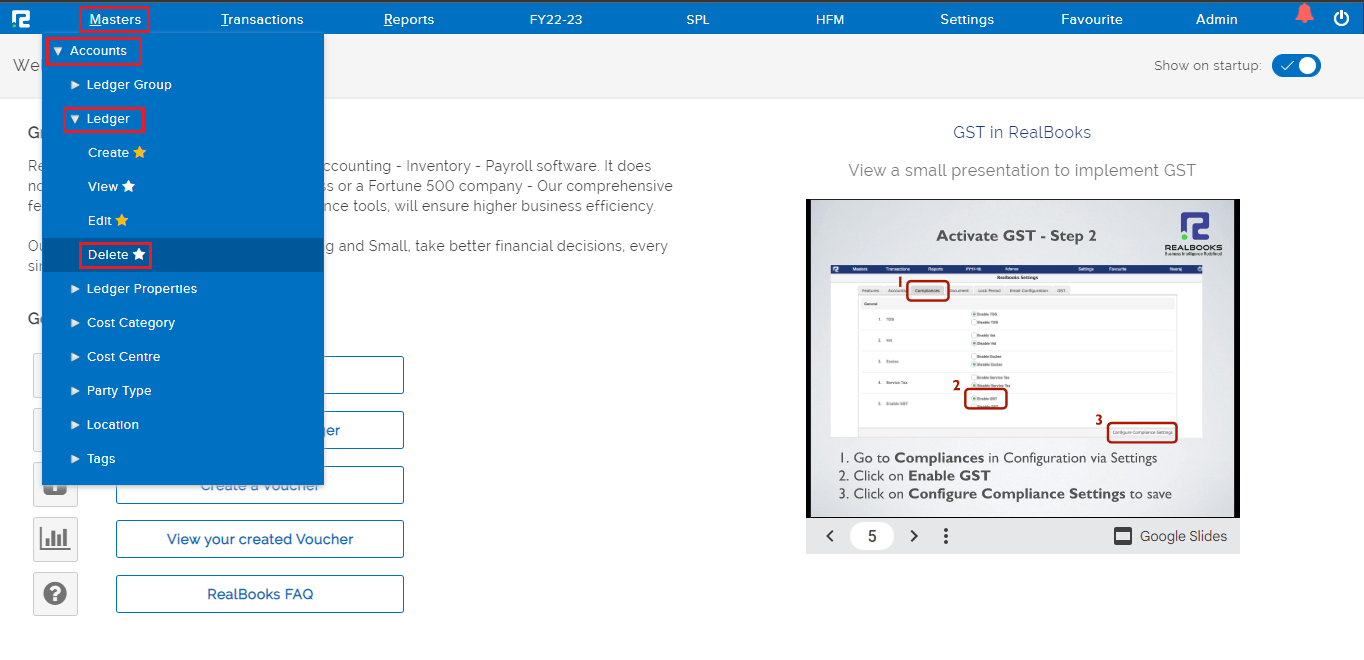
STEP 2: After clicking DELETE, a search screen will appear, as shown below.
STEP 3: In the search name box, type “ledger name” and press enter or the search icon; the ledger name will show on the screen.
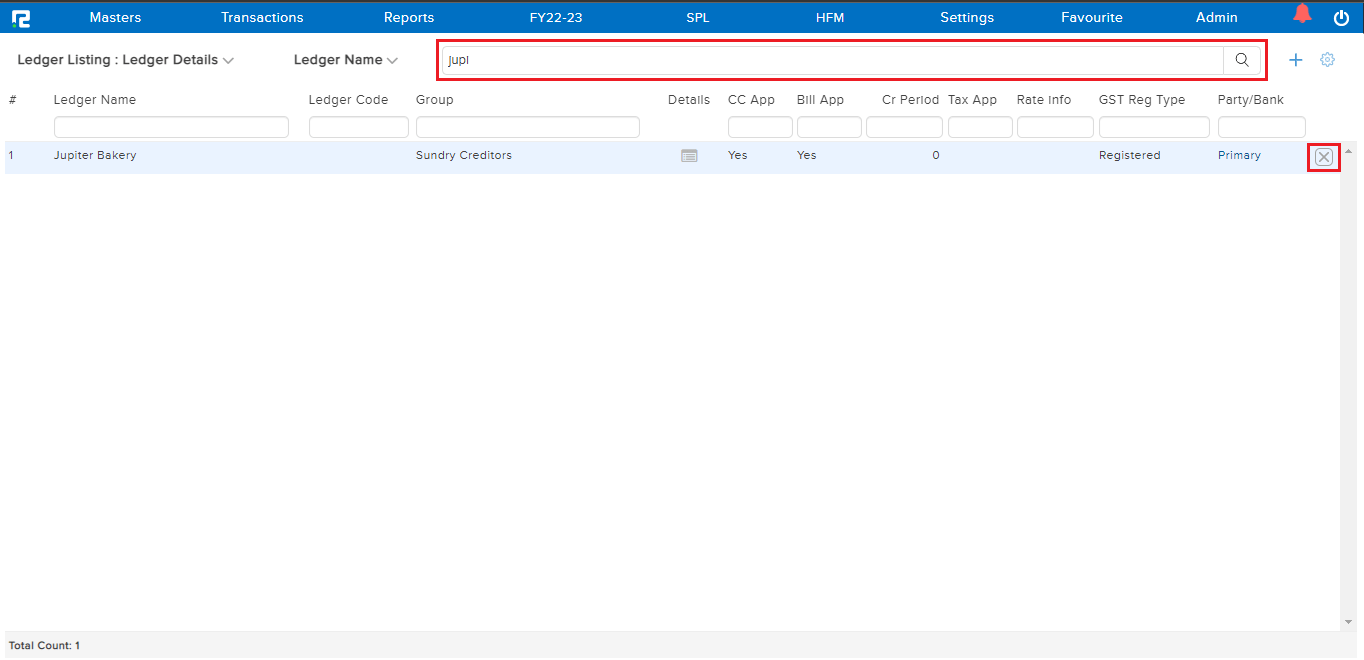
STEP 4: Once the ledger has appeared, delete it by clicking on the highlighted icon next to it, or by pressing delete.
Frequently Asked Questions
Q) Can I see all the ledgers created under a specific ledger group?
A) Yes, instead of searching for a ledger name, in the search bar type the ledger group name and press enter, system will display all ledgers created under the searched ledger group.
Q) Can I export the ledger master?
A) Yes, on the Ledger Edit screen, click on the export option(right top corner), click on any format, and the data will be downloaded.
Q) Can I see the list of inactive ledgers?
A) Yes, you can view the list of inactive ledgers from the ledger edit screen. Additionally, you can download the list from the export option.
