A sales order is a document that confirms the sale of the goods or services involved in a particular transaction. It is created by the seller and provided to the consumer.
How to Create a Sale Order (With Automatic GST Calculation)
Where the need is system-based calculations of GST in the sale order, this method can be followed.
Note: To calculate GST automatically, enable the automatic option against GST Computation Method in the GST Tab of Voucher Master & Configure the Tax in Item Master.
STEP 1: Go to Transactions⇒ Inventory⇒ Sale cycle⇒ Sale Order

A sales order creation page will open-
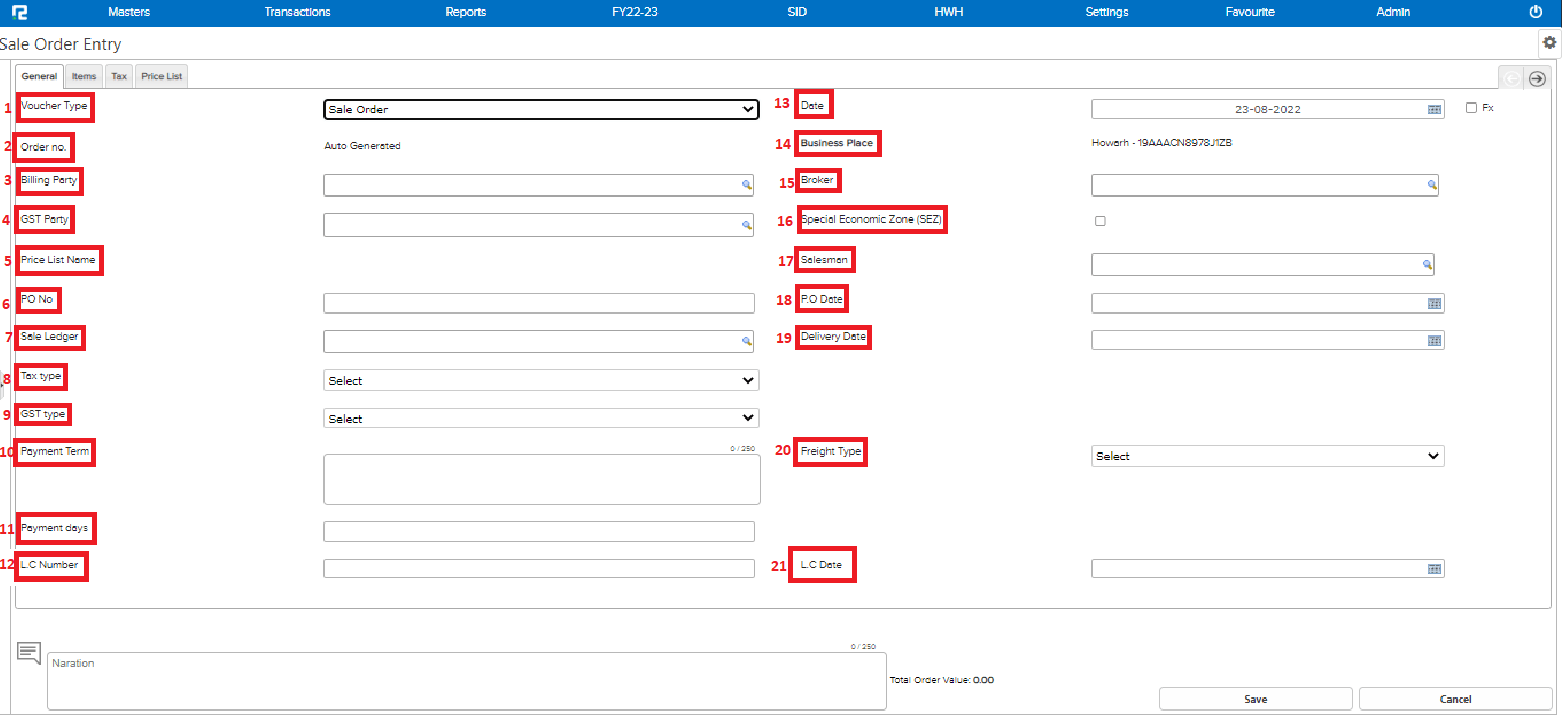
STEP 2: Under the general tab fill in the basic details-
1. Voucher type– select the appropriate voucher type from the dropdown list displayed.
2. Order number– Based on the numbering pattern set in the voucher master, this number will be displayed.
3. Billing party– Enter the name of the billing party.
4. GST party– Enter the name of the GST party (i.e. to whom the GST input credit is to be passed on), if any.
5. Price list name – Fetched from master settings, if any.
6. PO number– Enter the Billing party’s Purchase Order number, if any.
7. Sales ledger– Enter the income ledger.
8. Tax type– This is auto filled.
9. GST type– This is auto fetched based on company’s business place & party’s state.
10. Payment term– If there is a payment term agreed upon, it can be added here.
Note: It should not exceed 250 words.
11. Payment days– Add the credit period.
12. LC number– Add the LC number, if any.
13. Date– Set the voucher date.
14. Business place– Usually, it is auto selected, but in case of multiple business places, this needs to be selected from the dropdown.
15. Broker– Search the broker ledger, if any.
16. Special economic zone – If the billing party belongs to a SEZ location, then only select the tick box.
17. Salesman– Search the Salesman ledger, if any.
18. PO date– Add the Billing party’s Purchase Order date, if any.
19. Delivery date– Add the date on which the delivery has to be made.
20. Freight type– Select the most appropriate freight type from the dropdown list displayed.
21. LC date– Type in the LC date if applicable.
Note: Other than Billing Party, Order No. & Date, all are optional fields and can be skipped.

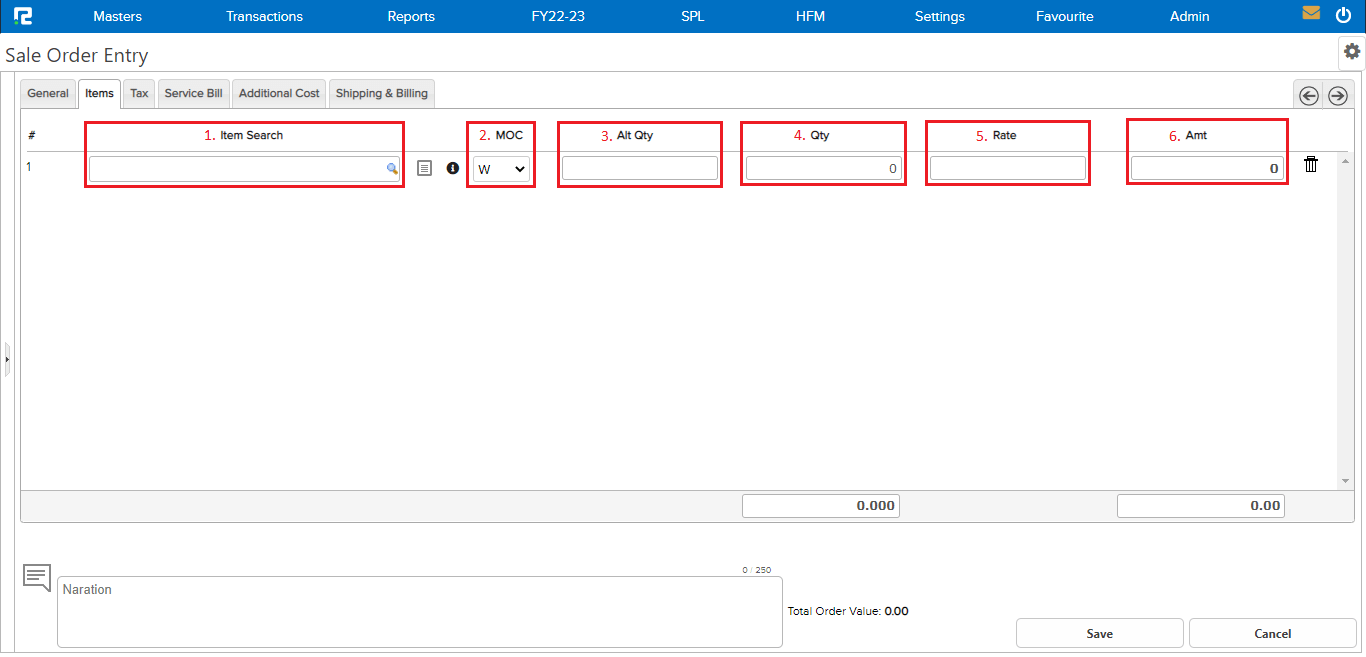
STEP 3: Go to the ITEM tab present next to the general tab and fill in the basic details-
1. Item search– Search the item name.
2. MOC – Method of Calculation or MOC gets activated only where alt qty is active.
There are 3 options for calculating the item amount:
a) W – This multiplies the Qty with Rate
b) P– This multiplies the Alt Qty with Rate
c) F – If F is chosen, then the amount needs to be filled, and rate is calculated by dividing Amount with Qty.

3. Alt quantity – Alternative Quantity or Different units of measurement, needs to be configured in item master, then only it can be used in the sale order screen.
4. Quantity– Enter the base order quantity.
5. Rate– Enter the base rate for the order.
6. Amount– The amount will be calculated accordingly with the qty and rate that you have entered.
Note: If required, amount can be entered manually, by changing the transaction configurations.

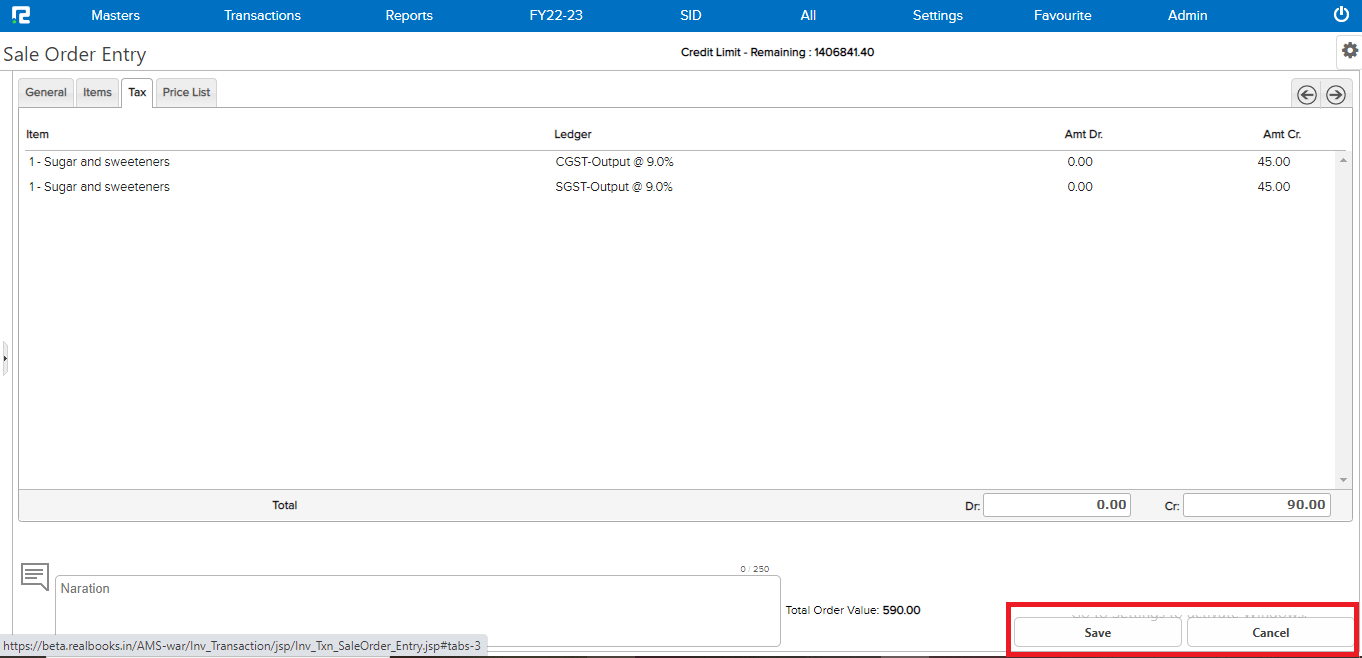
STEP 4: The GST details are displayed on the Tax tab, based on taxes configured in the item master & the amount as per sale order.
Note: Taxes are calculated automatically only in cases, where the GST has been configured as Automatic in voucher master.
STEP 5: Once the details have been updated, click on the SAVE button below to save the sale order.
Note: Enable Print After Save option to activate auto pop-up for print.

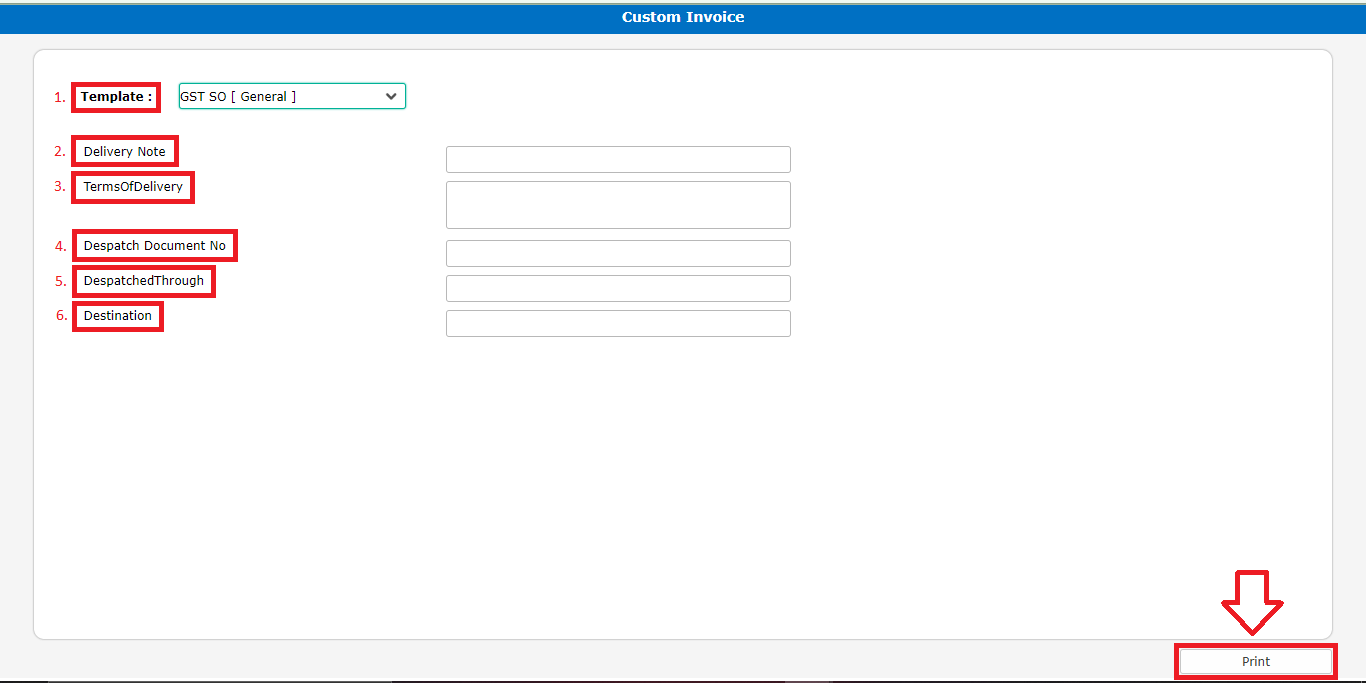
After saving the order, print pop-up opens, select the template, fill in the additional details, and click on Print.
How to Create a Sale Order (With Manual GST)
STEP 1: Go to Transactions⇒ Inventory ⇒ Sale cycle ⇒ Sale Order

A sales order creation page will open-
STEP 2: Under the general tab fill in the basic details-
1. Voucher type– select the appropriate voucher type from the dropdown list displayed.
2. Order number– Based on the numbering pattern set in voucher master, this number will be displayed.
3. Billing party– Enter the name of the billing party.
4. GST party– Enter the name of the GST party (i.e. to whom the GST input credit is to be passed on), if any.
5. Price list name – Fetched from master settings, if any.
6. PO number– Enter the Billing party’s Purchase Order number, if any.
7. Sales ledger– Enter the ledger that is appropriate.
8. Tax type– Select the tax type from the dropdown list displayed.
9. GST type– This is auto fetched based on company’s business place & party’s state.
10. Payment term– If there is a payment term agreed upon, it can be added here.
Note: It should not exceed 250 words.
11. Payment days– Add the credit period.
12. LC number– Add the LC number, if any.
13. Date– Set the voucher date.
14. Business place– Usually, it is auto selected, but in case of multiple business places, this needs to be selected from the dropdown.
15. Broker– Search the broker ledger, if any.
16. Special economic zone– If the billing party belongs to a SEZ location, then only select the tick box.
17. Salesman– Search the Salesman ledger, if any.
18. PO date– Add the Billing party’s Purchase Order date, if any.
19. Delivery date– Add the date on which the delivery has to be made.
20. Freight type– Select the most appropriate freight type from the dropdown list displayed.
21. LC date– Type in the LC date if applicable.
Note: Other than Billing Party, Order No. & Date, all are optional fields and can be skipped.

STEP 3: Go to the item tab present next to the general tab and fill in the basic details-
1. Item search– Search the item name.
2. MOC– Method of Calculation or MOC gets activated only where alt qty is active.
There are 3 options for calculating the item amount:
a) W – This multiplies the Qty with Rate
b) P– This multiplies the Alt Qty with Rate
c) F – If F is chosen, then the amount needs to be filled, and rate is calculated by dividing Amount with Qty.

Alt quantity– Alternative Quantity or Different units of measurement, needs to be configured in item master, then only it can be used in the sale order screen.
Quantity– Enter the base order quantity.
Rate– Enter the base rate for the order.
Amount– The amount is calculated by multiplying the qty and rate.
Note: If required, amount can be entered manually, by changing the transaction configurations.
STEP 4: Go to the tab present next to the item tab which is the tax tab, Fill in the details that they require
1. Item name– Select the name of the item from drop down list to which tax has to be collected.
2. Tax ledger– Select the appropriate tax ledger which is applicable to your item.
3. Rate– Type in the rate at which the tax has to be calculated.
The final amount will be calculated accordingly.
Click on the “+” sign present at the right side of each row to add more items on which tax has to be computed.
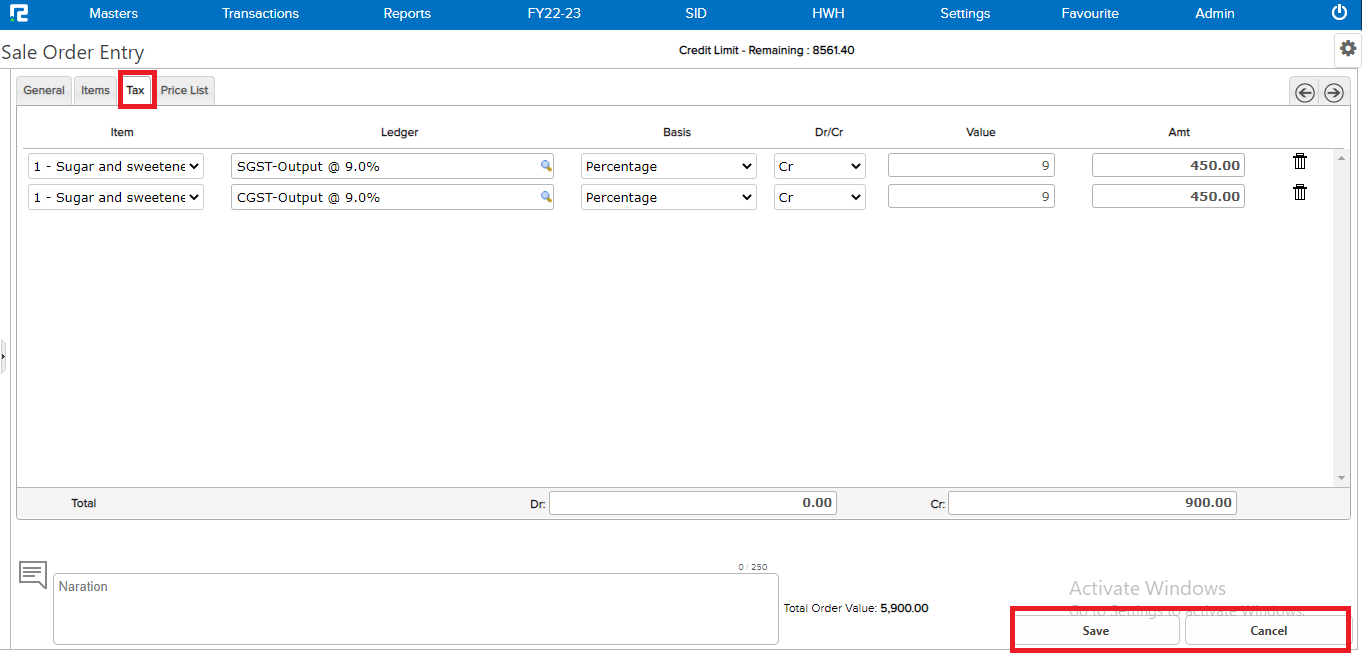
Note: In-case of Intra state tax the item needs to be selected twice once for CGST and Once for SGST.
STEP 5: Once the details have been updated, click on the SAVE button below to save the sale order.
After saving the order, print pop-up opens, select the template, fill in the additional details, and click on Print.

How to Create a Sale Order (Non-GST)
STEP 1: Go to Transactions⇒ Inventory⇒ Sale cycle⇒ Sale Order
 A sales order creation page will open-
STEP 2: Under the general tab fill in the basic details-
1. Voucher type– select the appropriate voucher type from the dropdown list displayed
2. Order number– Based on the numbering pattern set in the voucher master, this number will be displayed.
3. Billing party– Enter the name of the billing party.
4. GST party– Enter the name of the GST party (i.e. to whom the GST input credit is to be passed on), if any.
5. Price list name – Fetched from master settings, if any.
6. PO number– Enter the Billing party’s Purchase Order number, if any.
7. Sales ledger– Enter the income ledger.
8. Tax type– This is auto filled.
9. GST type– This is auto fetched based on company’s business place & party’s state.
10. Payment term– If there is a payment term agreed upon, it can be added here.
Note: It should not exceed 250 words.
11. Payment days– Add the credit period.
12. LC number– Add the LC number, if any.
13. Date– Set the voucher date.
14. Business place– Usually, it is auto selected, but in case of multiple business places, this needs to be selected from the dropdown.
15. Broker– Search the broker ledger, if any.
16. Special economic zone- If the billing party belongs to a SEZ location, then only select the tick box.
17. Salesman– Search the Salesman ledger, if any.
18. PO date– Add the Billing party’s Purchase Order date, if any.
19. Delivery date– Add the date on which the delivery has to be made.
20. Freight type– Select the most appropriate freight type from the dropdown list displayed.
21. LC date– Type in the LC date if applicable.
Note: Other than Billing Party, Order No. & Date, all are optional fields and can be skipped.
 STEP 3: Go to the item tab present next to the general tab and fill in the basic details-
1. Item search– Search the item name.
2. MOC- Method of Calculation or MOC gets activated only where alt qty is active.
There are 3 options for calculating the item amount:
a) W – This multiplies the Qty with Rate.
b) P– This multiplies the Alt Qty with Rate.
c) F – If F is chosen, then the amount needs to be filled, and rate is calculated by dividing Amount with Qty.  3. Alt quantity– Alternative Quantity or Different units of measurement, needs to be configured in item master, then only it can be used in the sale order screen.
4. Quantity– Enter the base order quantity.
5. Rate– Enter the base rate for the order.
6. Amount– The amount will be calculated accordingly with the qty and rate that you have entered.
Note: If required, amount can be entered manually, by changing the transaction configurations. 
STEP 4: Once the details have been updated, click on the SAVE button below to save the sale order.
Note: Enable the Print After Save option to activate auto pop-up for print. 
After saving the order, a print pop-up opens, select the template, fill in the additional details, and click on Print.

How to Edit a Sale Order Entry
Users can view, edit, or delete a sale order entry from only the sale order status report available in the system.
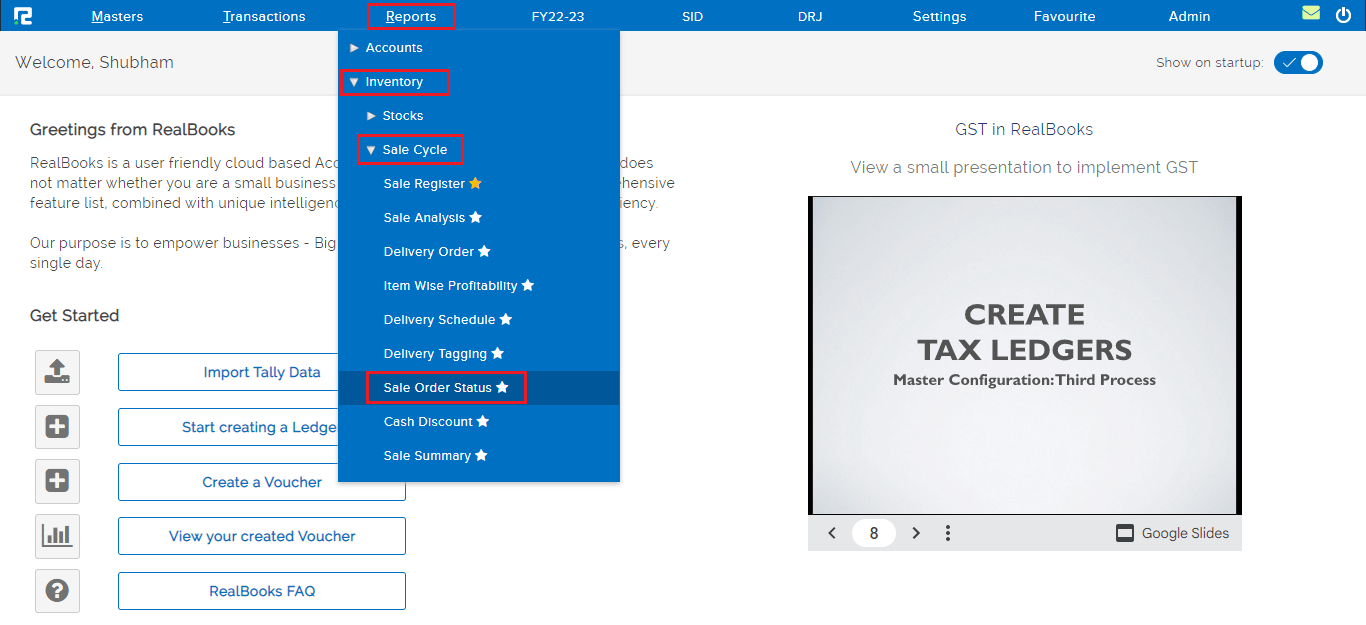
TRANSACTION EDIT VIA SALE ORDER STATUS REPORT
Go to Reports⇒ Inventory⇒ Sale Cycle⇒ Sale Register
To edit an entry, click on the settings icon on the right-hand side of the entry & click on the order edit option, or alternatively, press Enter on the keyboard.
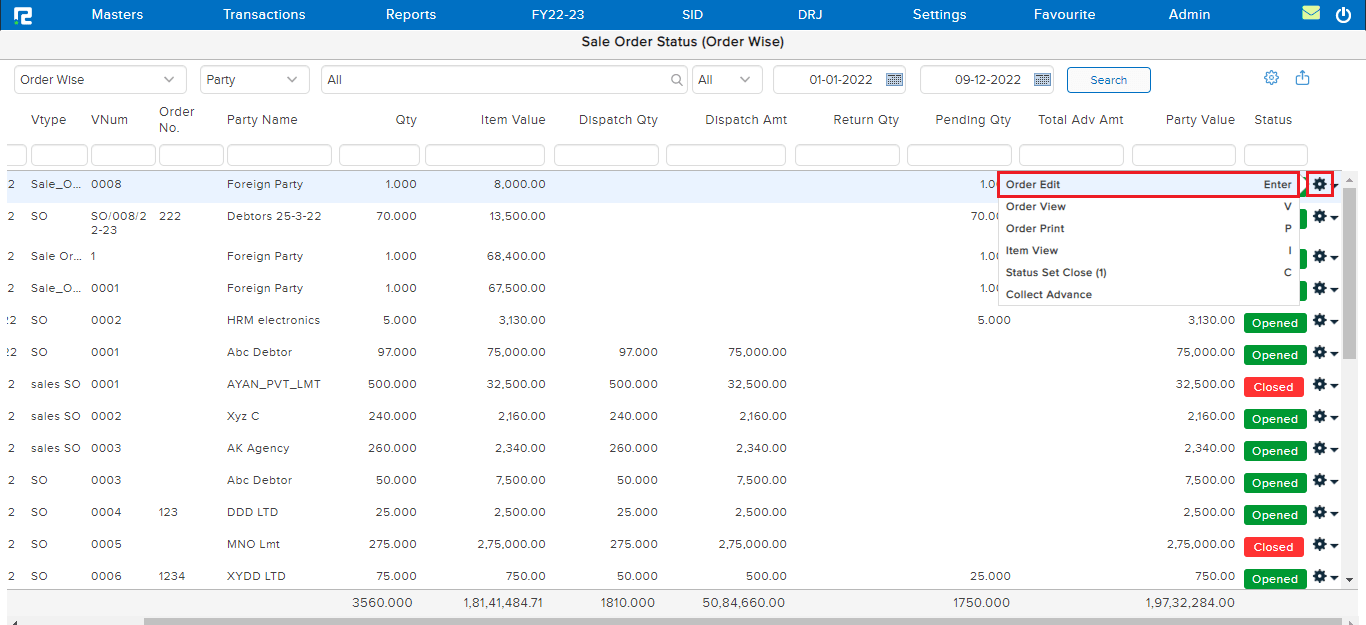
Do the necessary changes as required and click on the submit button.
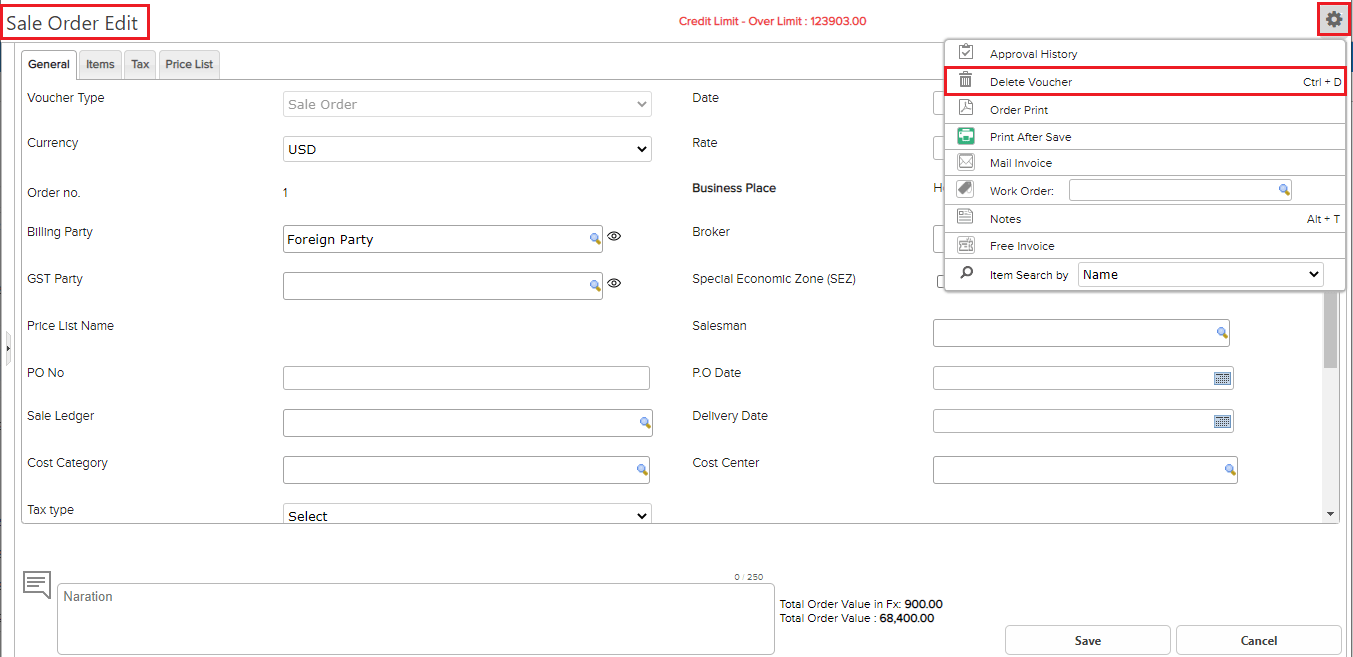
How to Delete an Entry
DELETE– To delete an entry, open the entry in edit mode, then go to the Settings icon on the right-hand side of the page. From the drop-down menu select the delete voucher as required, enter the reason for deletion, and then click on delete.