A voucher is an internal document that is used to classify accounting/inventory documents. By default, the basic voucher types are available on RealBooks. Rest the user can create as per the requirements.
How to Create a Voucher
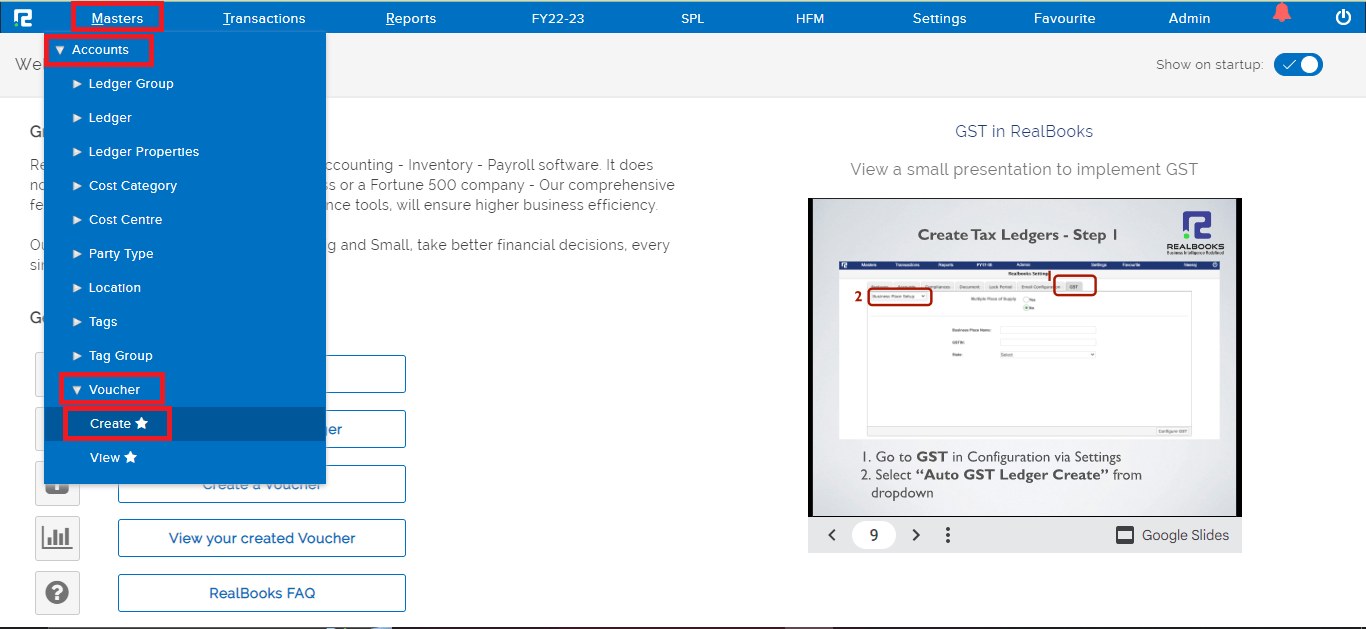
STEP 1: Go to Masters ⇒ Accounts ⇒ Voucher ⇒ Create
STEP 2: Fill in the following information.
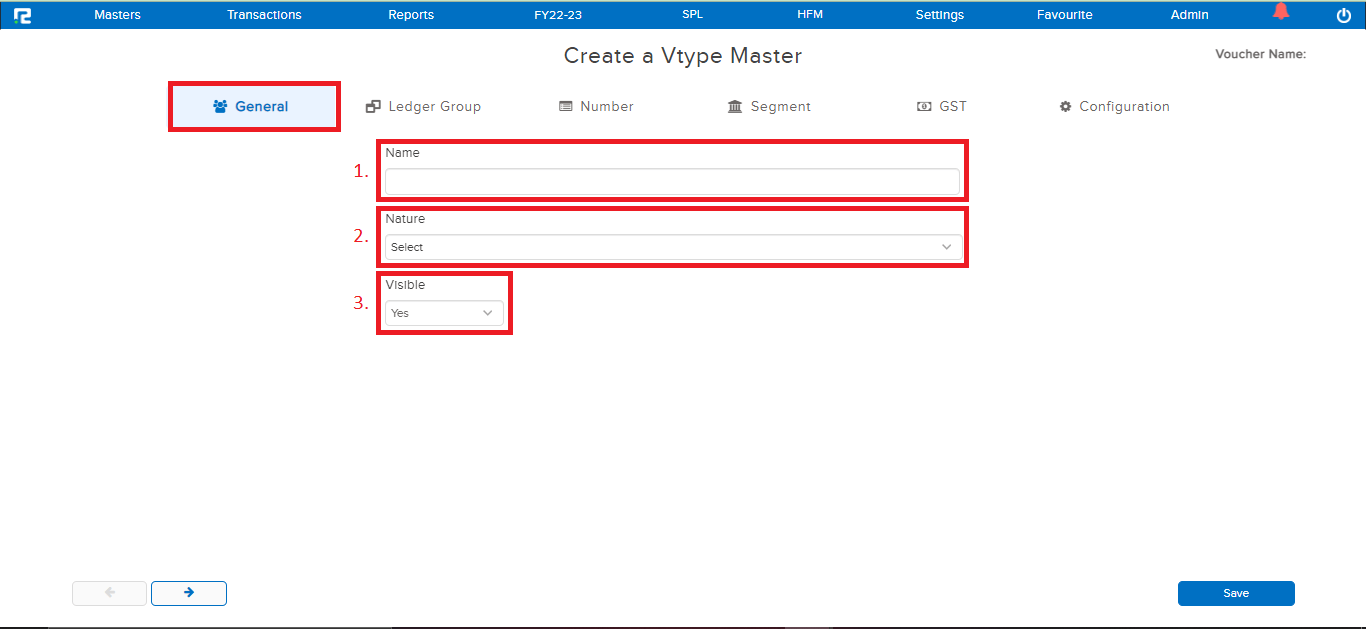
General:
1. Name – Provide a name for the voucher.
2. Nature – Select voucher type nature from the dropdown list.
3. Visible – Select “Yes” to keep the voucher active on the transaction screen.
Permission:
Ledger Group Manage helps the user minimize mistakes while updating a voucher entry. As it sets a limit on the ledgers that can be used in the specific voucher type.
This is done in either of Two ways:
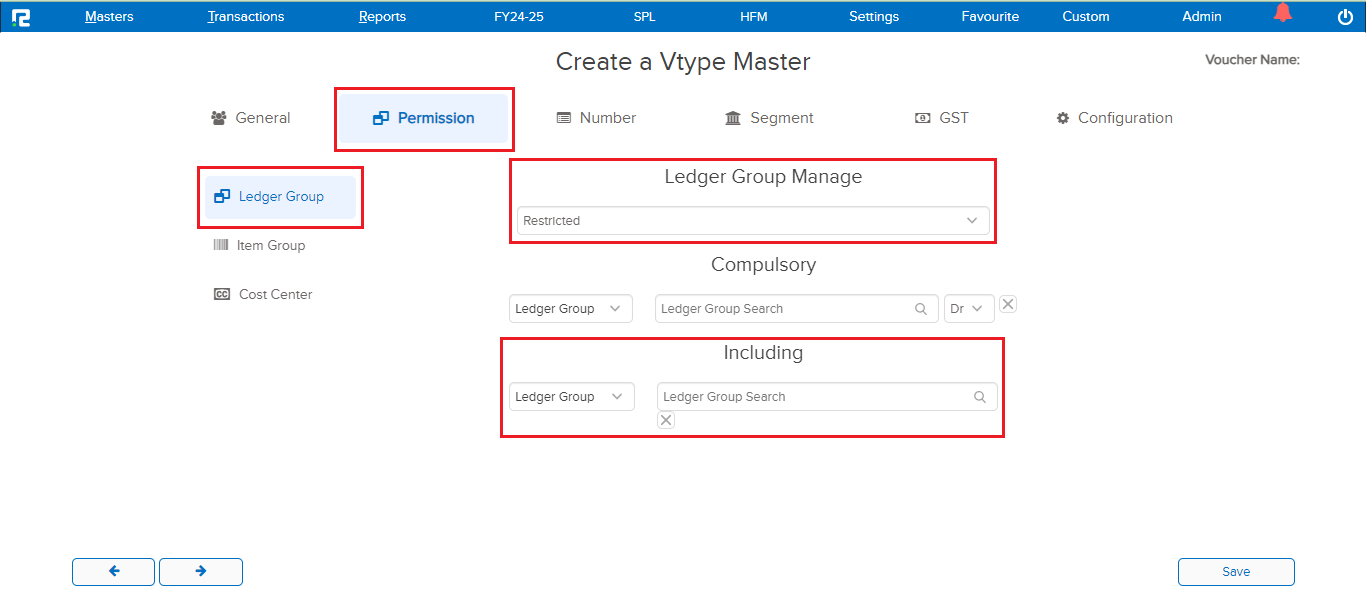
1) Restricted Approach – In this approach, the user can specify the ledgers or ledger groups that can be used in a voucher.
How does it work:
Step 1: Select Ledger Group manage dropdown as Restricted
Step 2: Under the header Including, assign those ledgers/ledger groups that shall remain open for use in this voucher type. The system automatically restricts the use of other ledger/ledger groups in this voucher.
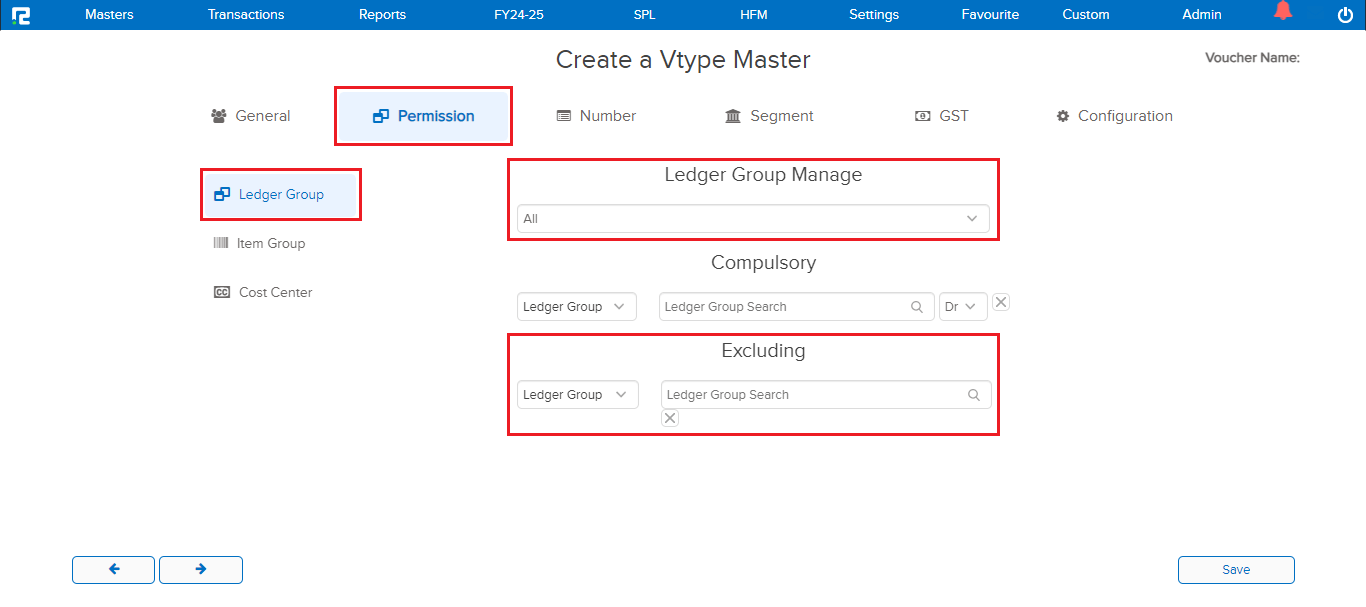
2) Allow All Approach – In this approach, the user can specify the ledgers or ledger groups that are to be excluded from being used in a voucher.
How does it work:
Step 1: Select the Ledger Group Manage dropdown as All
Step 2: Under the header Excluding, assign those ledgers/ledger groups that shall remain restricted from being used in this voucher type. The system automatically restricts the specified ledger/ledger group, allowing others to be used.
Note: The same logic applies to the item group tab as well.
Number:
Under the Number Tab, we have 3 types of numbering patterns, either of which can be selected as per the requirement.

1. Auto Increment Without Reset – It auto-generates the voucher numbers in a sequential manner and doesn’t reset the numbers if any old entry of the same Financial Year is deleted.
2. Auto Increment Manual Update – It enables a numbering pattern that is partially fixed and partially variable. The fixed portion comprises the prefix & suffix, whereas the variable portion is the internal number, which is assigned sequentially, for each entry against the specific voucher.

a. VPeriod Name– Select the Financial year from the dropdown list.
b. Segment- Select the segment for which you want to set the numbering.
c. Prefix- The input in this field, comes before the recurring invoice number. Say, the voucher number is – ASL/0091/22-23, here ASL is the prefix
d. Suffix- The input in this field, comes after the recurring invoice number. So, in the above-mentioned invoice number, 22-23 is the suffix.
e. Length- It denotes the number of digits for the internal number. In the above-mentioned voucher number, the internal number is 0091, which means the no. length is set as 4.
f. First Number- It denotes the start number for the internal number.
3. Manual Entry – It enables a fully manual numbering system, which can be both numerical & alphanumerical.
SEGMENT:
This tab helps to map the voucher to specific segments. If any segment/branch is assigned under this field, the system will then restrict the use of this voucher to the specified segment. Press enter to add a new row for assigning the voucher to multiple segments.

GST:
The fields in this tab need to be configured for GST enablement in the voucher master.
A) Enable GST – To use GST ledgers in the voucher types, this option has to be enabled.
B) Track GST Ledger wise – If this is marked as Yes, then the system will not allow using the GST ledger if the income/expense ledger is not available. As it saves the break-up of tax and assessable/taxable value.
C) GST Computation Method – There are 2 methods of applying GST computation.
1. Manual- Under this method, the user will have to manually search the GST ledger in the transaction.
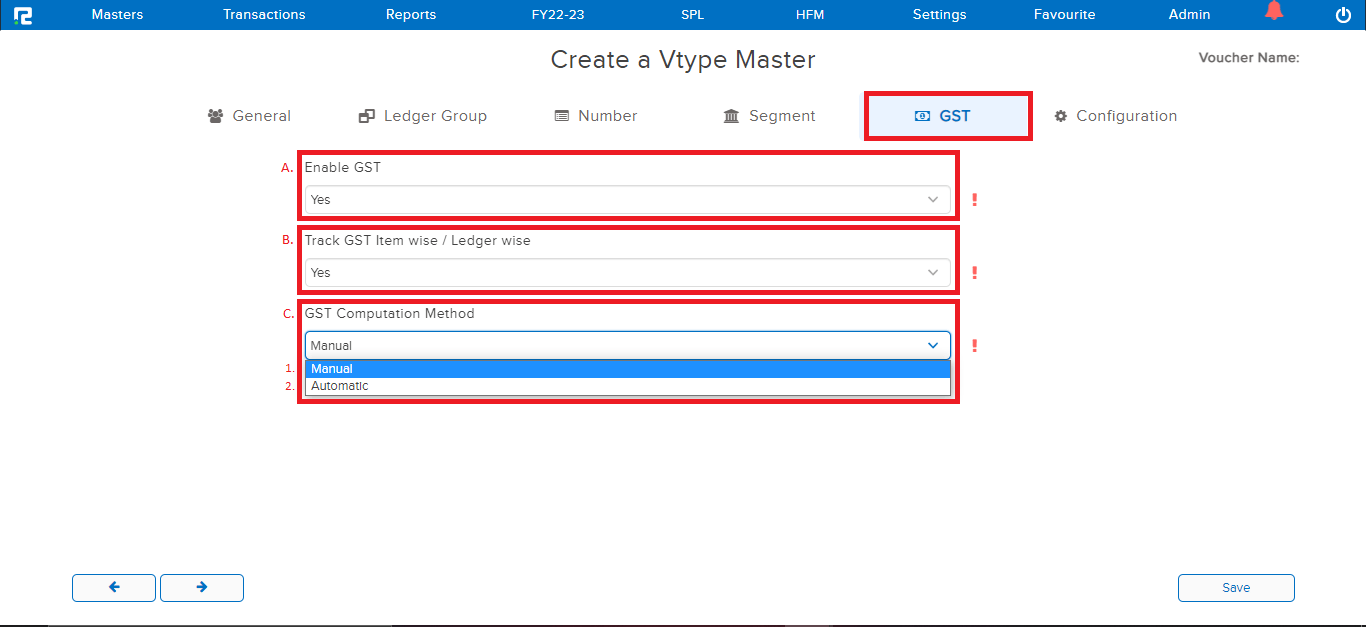
2. Automatic– Under this method, GST is computed automatically. In this case, the user simply needs to click on Compute GST and the system will calculate the tax, based on the tax rate configured in the Item/ledger master.
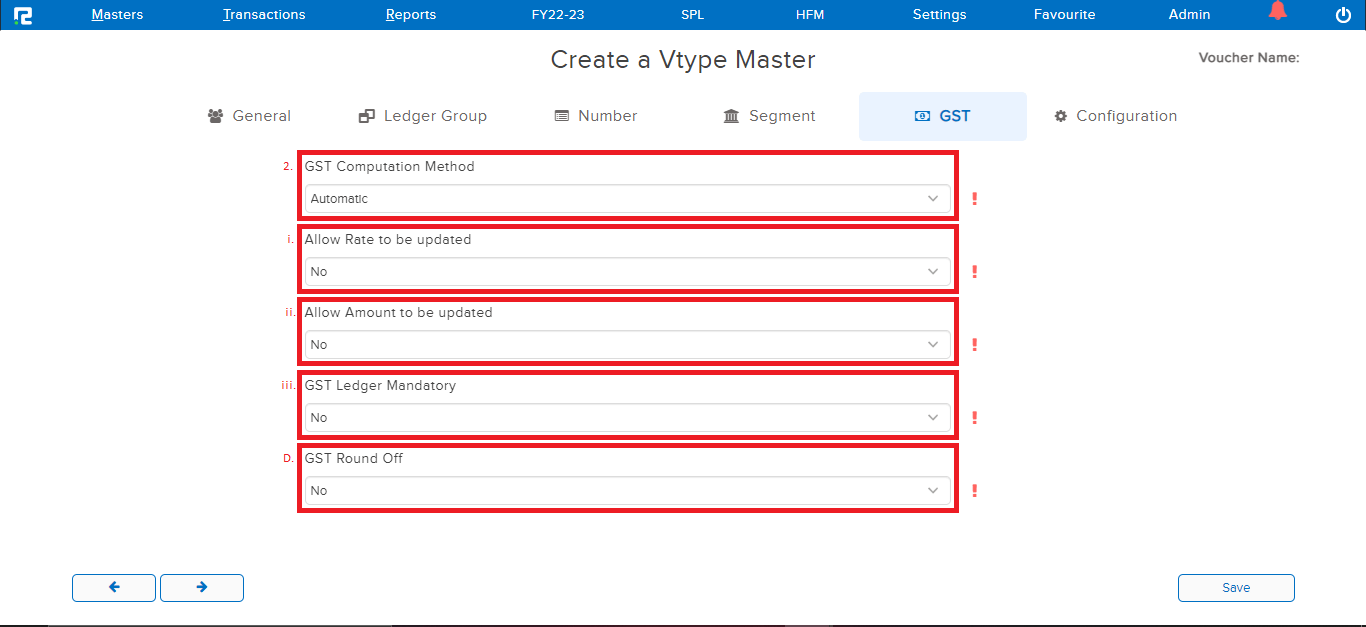
i. Allow Rate to be updated – This allows the user to update the GST rate manually in the transaction.
ii. Allow Amount to be updated – This allows the user to update the GST amount manually in the transaction.
iii. GST Ledger Mandatory – If this is marked as Yes, then system will not allow the user to save the voucher without using the GST ledger.
D) GST Round Off – If this is marked as Yes, then the system will round off the GST amount to the nearest rupee.
Configuration:
Property Template- In case, where user requires additional/custom fields to capture additional information in the transactions, voucher property can be created, and marked as optional or mandatory.
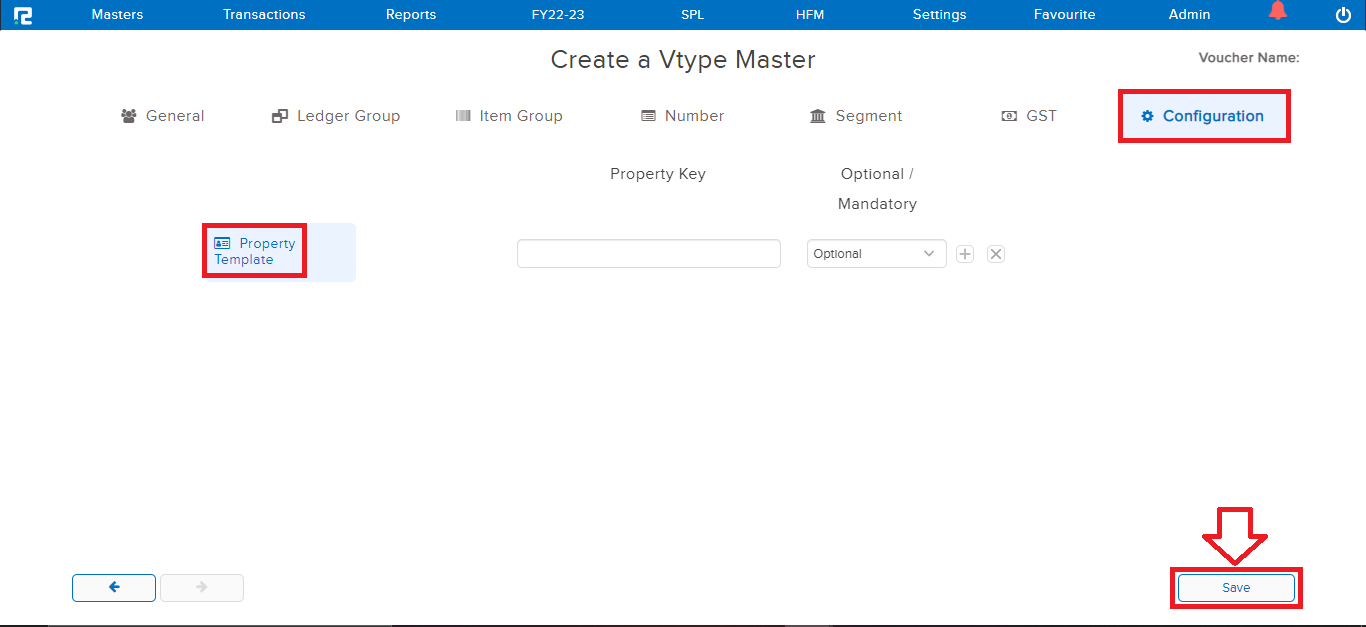
STEP 3: Once the above details have been filled in, CLICK on “SAVE” to create the Voucher Type.
How to View a Voucher
STEP 1: Go to Masters ⇒ Accounts ⇒ Voucher ⇒ View
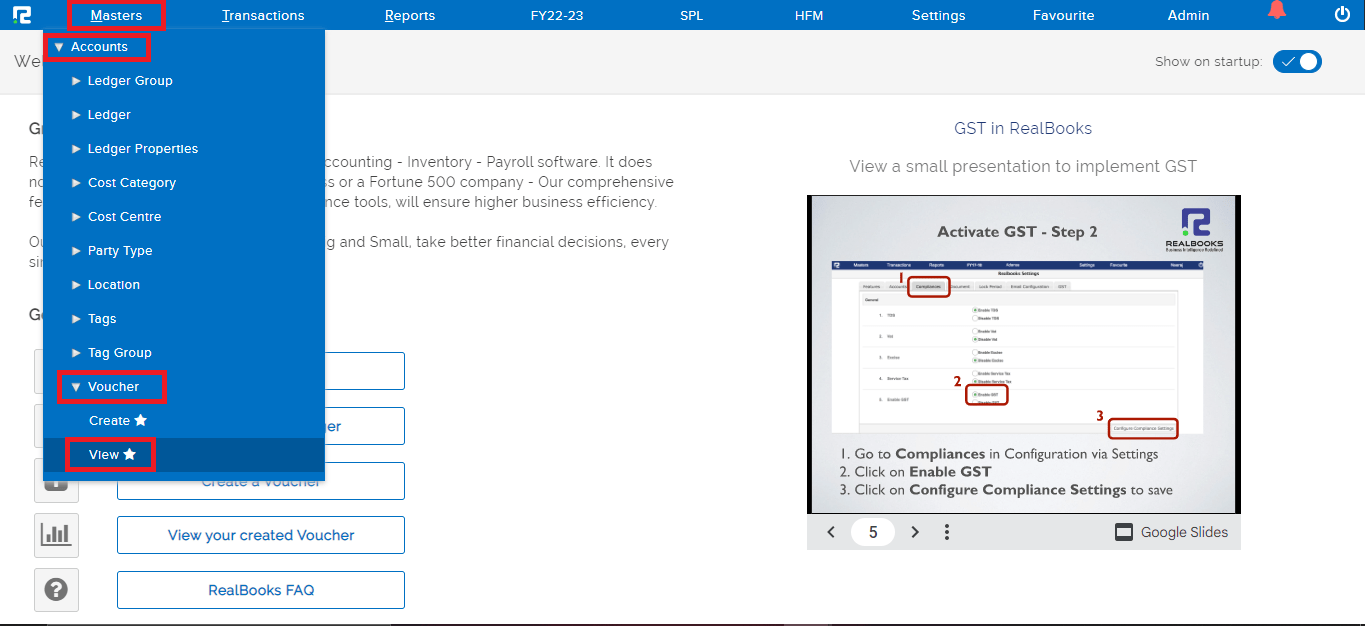
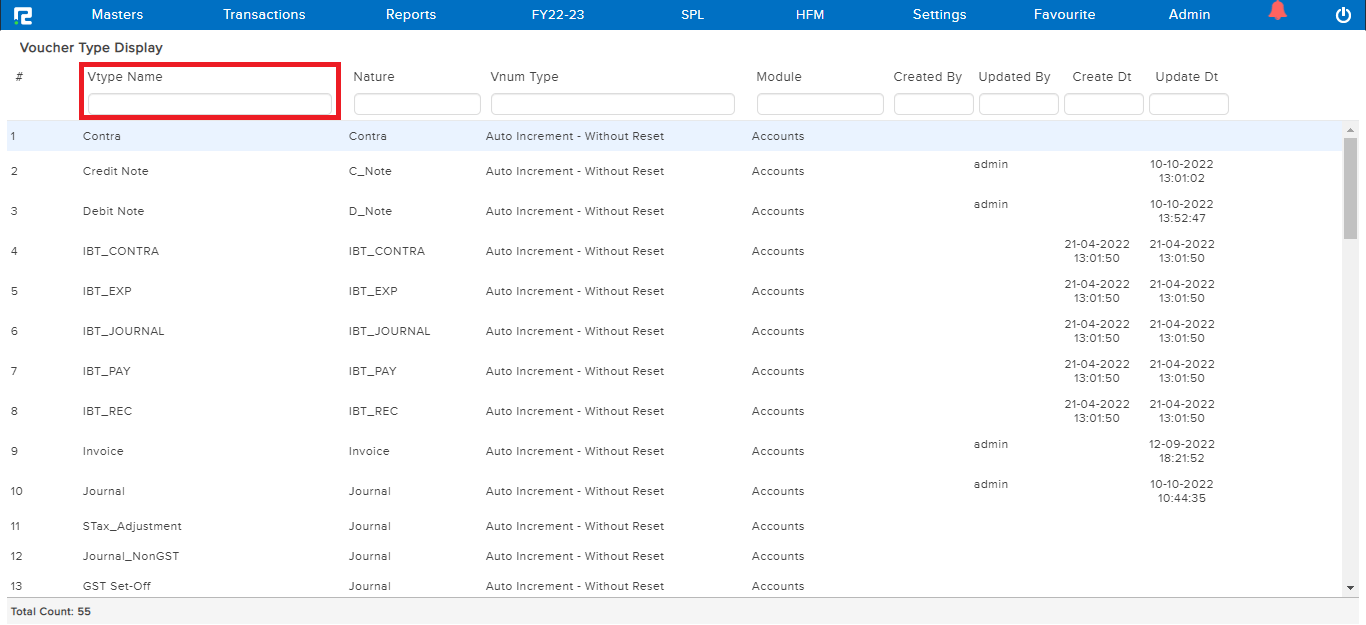
STEP 2: Once you click on View option, The entire list of existing vouchers will be displayed here. In the case of long lists, it is easy to filter the data by searching for the name under the Vtype Name.
How to Edit a Voucher
STEP 1: Go to Masters ⇒ Accounts ⇒ Voucher ⇒ Edit
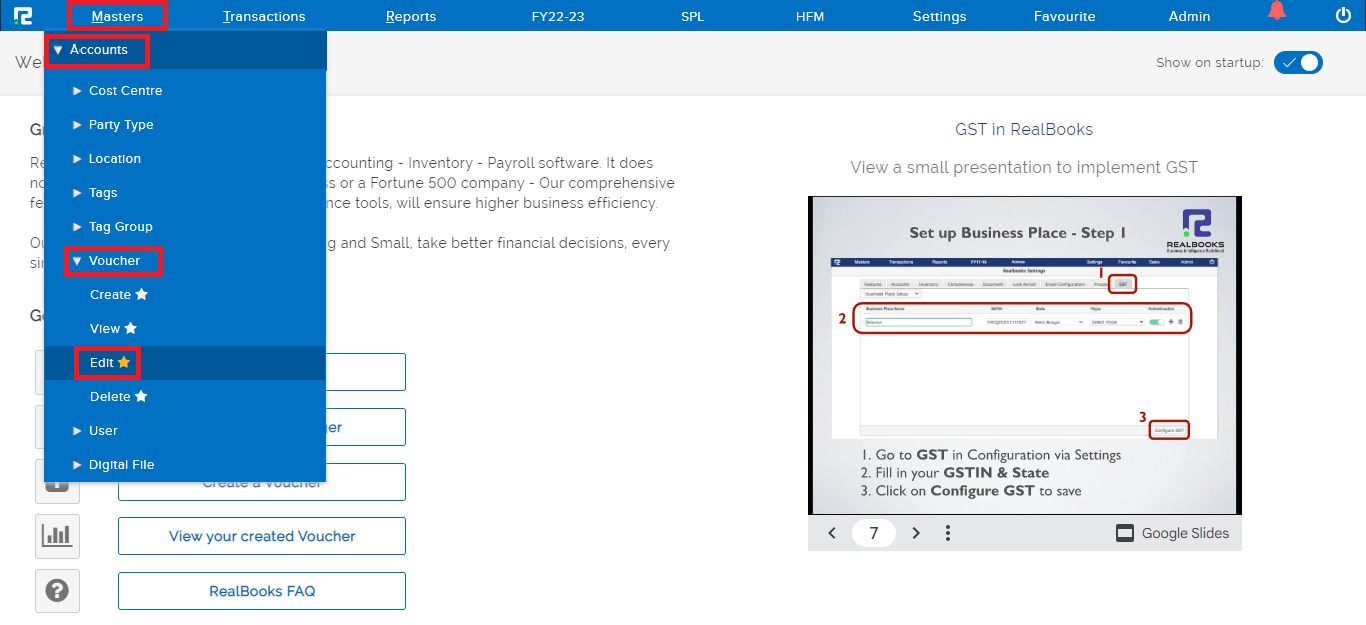
STEP 2: Once you CLICK on EDIT option, Voucher Type List will appear.
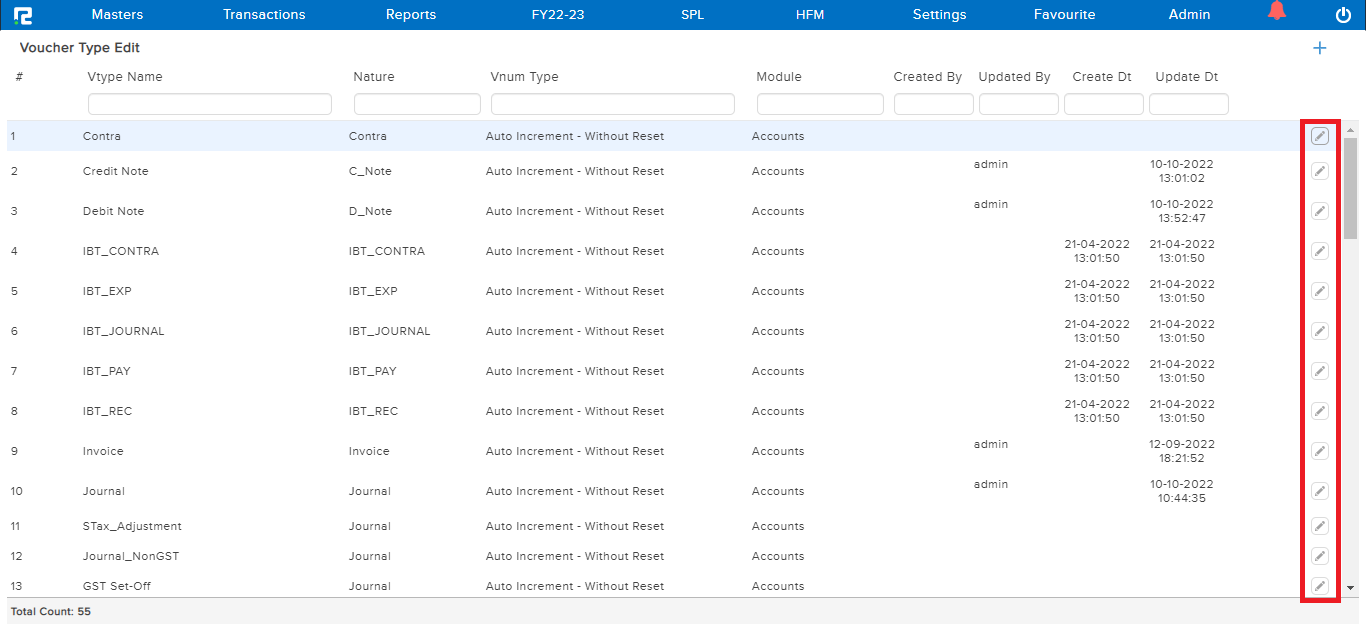
STEP 3: To edit any voucher CLICK on the “PENCIL” icon or select the voucher and press ENTER, VType Master Update page appears, wherein the details can be edited.
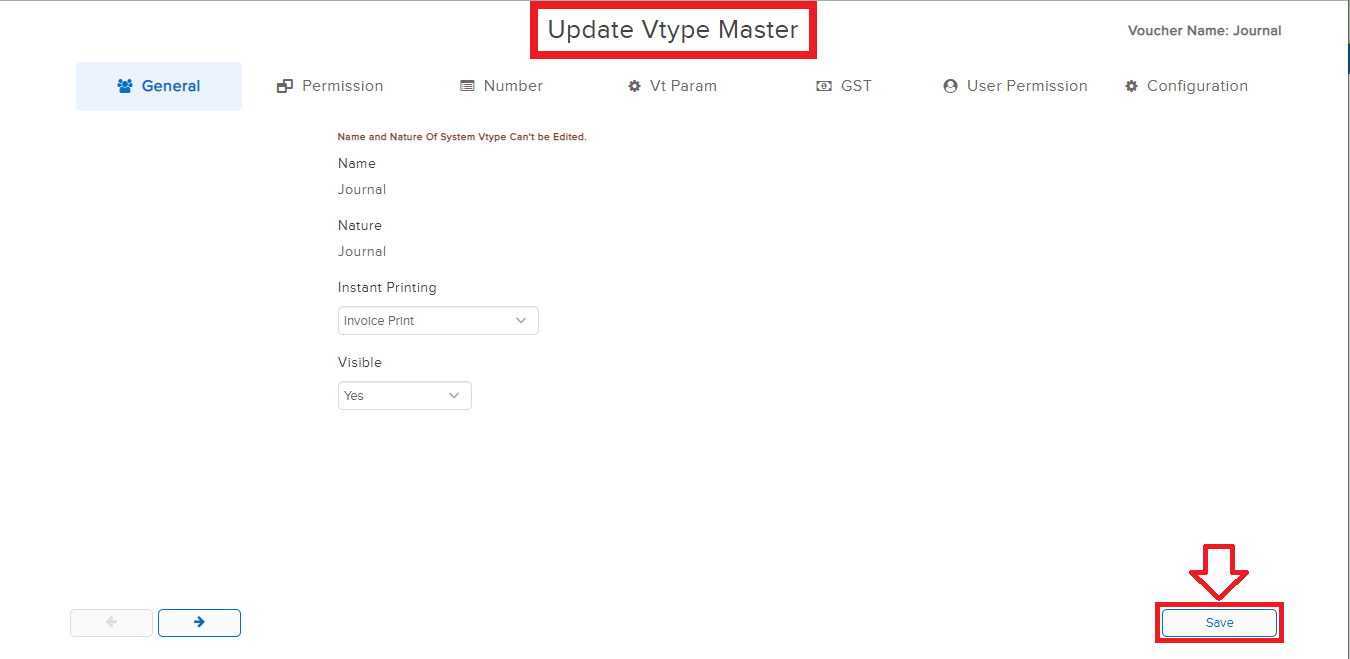
Note: The name & Nature of the voucher once created cannot be edited.
STEP 4: CLICK on “SAVE“ to update the details.
How to Delete a Voucher
STEP 1: Go to Masters ⇒ Accounts ⇒ Voucher ⇒ Delete
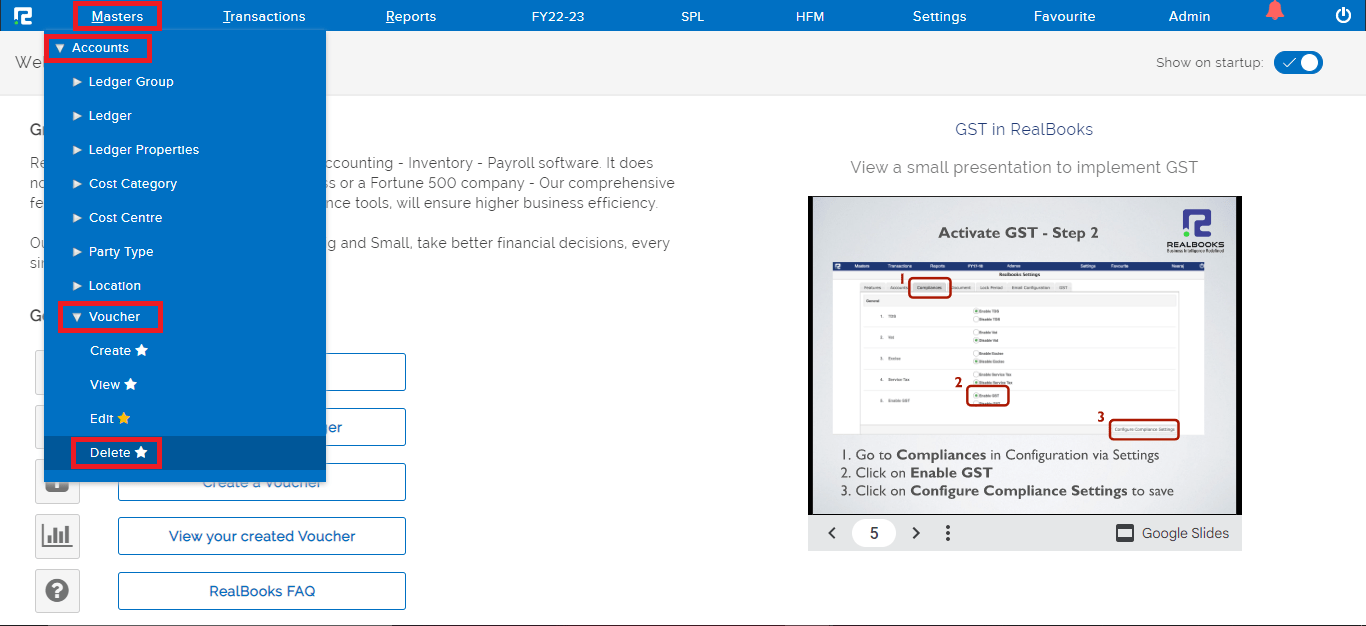
STEP 2: Once you click on delete option, Voucher Type List will appear.
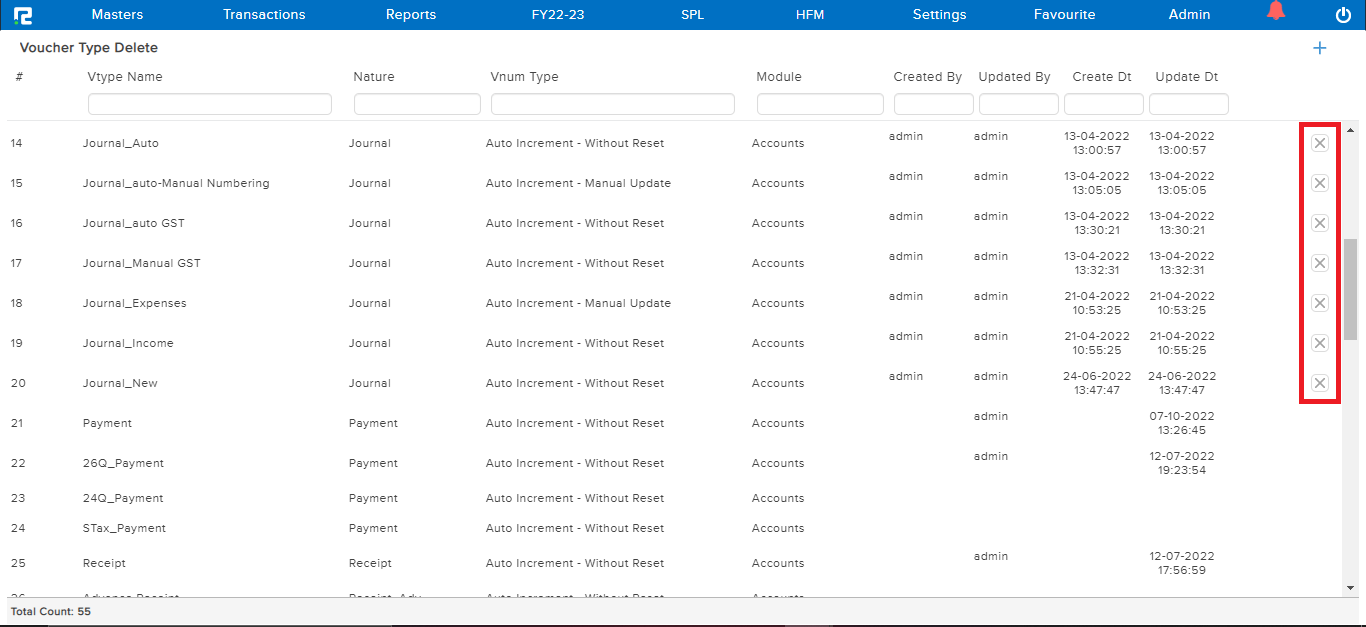
STEP 3: To delete any voucher CLICK on the “x” icon or select the voucher and press the delete key. On clicking the same a warning message pop-up appears on the screen, which confirms the deletion of the voucher.
Note: System-generated vouchers cannot be deleted.
