Main Release — 05-06-2026
📌 Overview
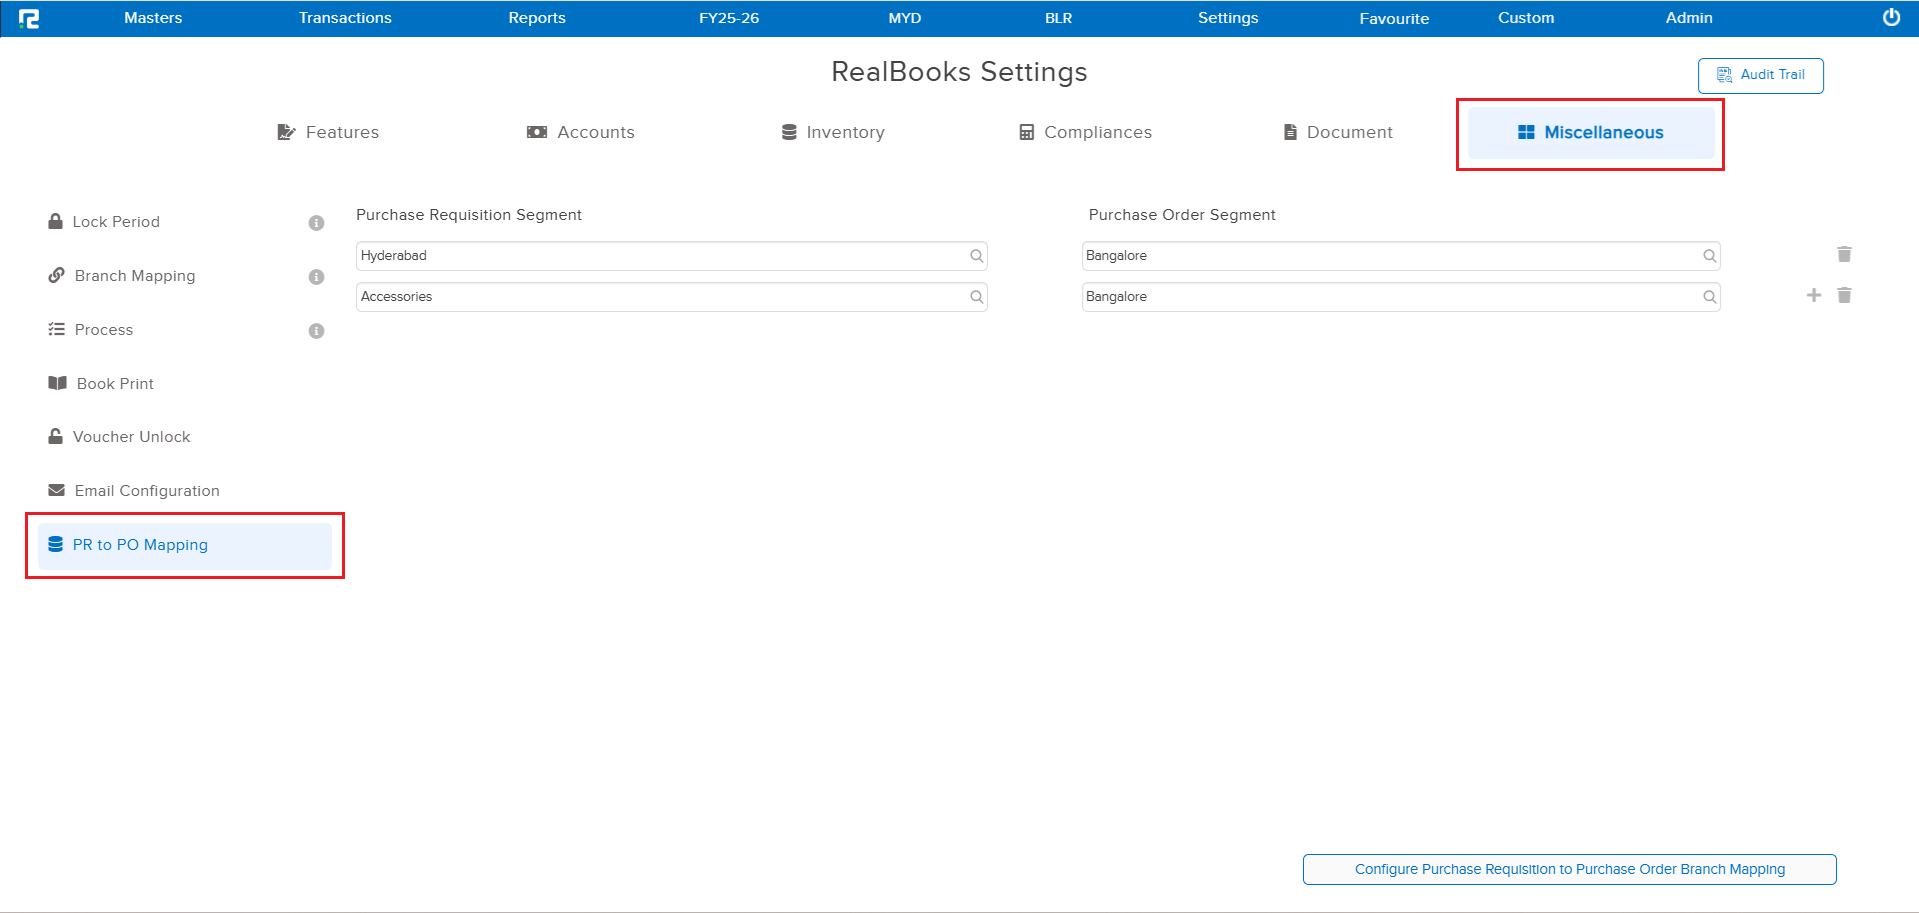
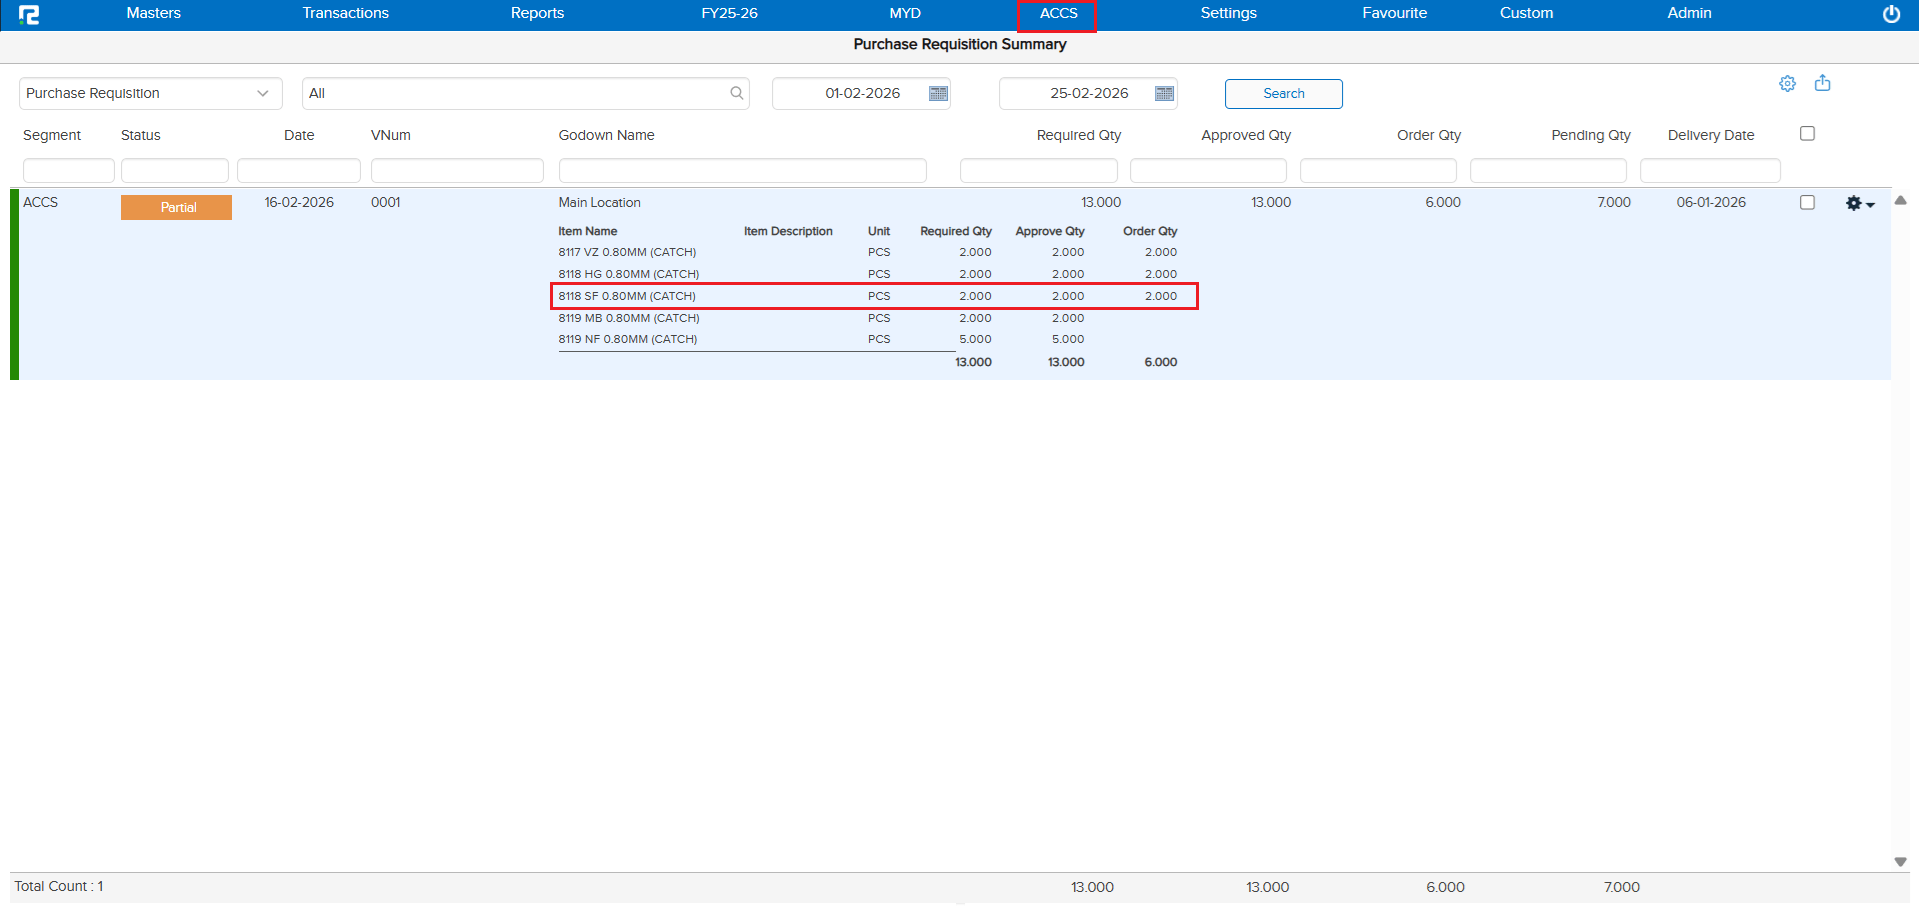
If your organization handles purchasing centrally — say, your Bangalore office creates Purchase Orders for requisitions coming from Hyderabad and Accessories segments — this feature is made for you! You can now map multiple segments to a centralized Purchase Order segment, so all Purchase Requisitions flow into one place.
🌟 What This Means for You
No more creating separate Purchase Orders in each segment. Your central procurement team can now see and tag Purchase Requisitions from across the organization, all from a single segment. This saves time, reduces duplication, and streamlines your procurement process.
🛠 Quick Setup
Simply map which segments should feed into your centralized PO segment, then click save. It’s that easy!
🎬 Example
Let’s say Hyderabad and Accessories segments raise Purchase Requisitions, and Bangalore handles all purchasing:
1. Map Hyderabad → Bangalore and Accessories → Bangalore.
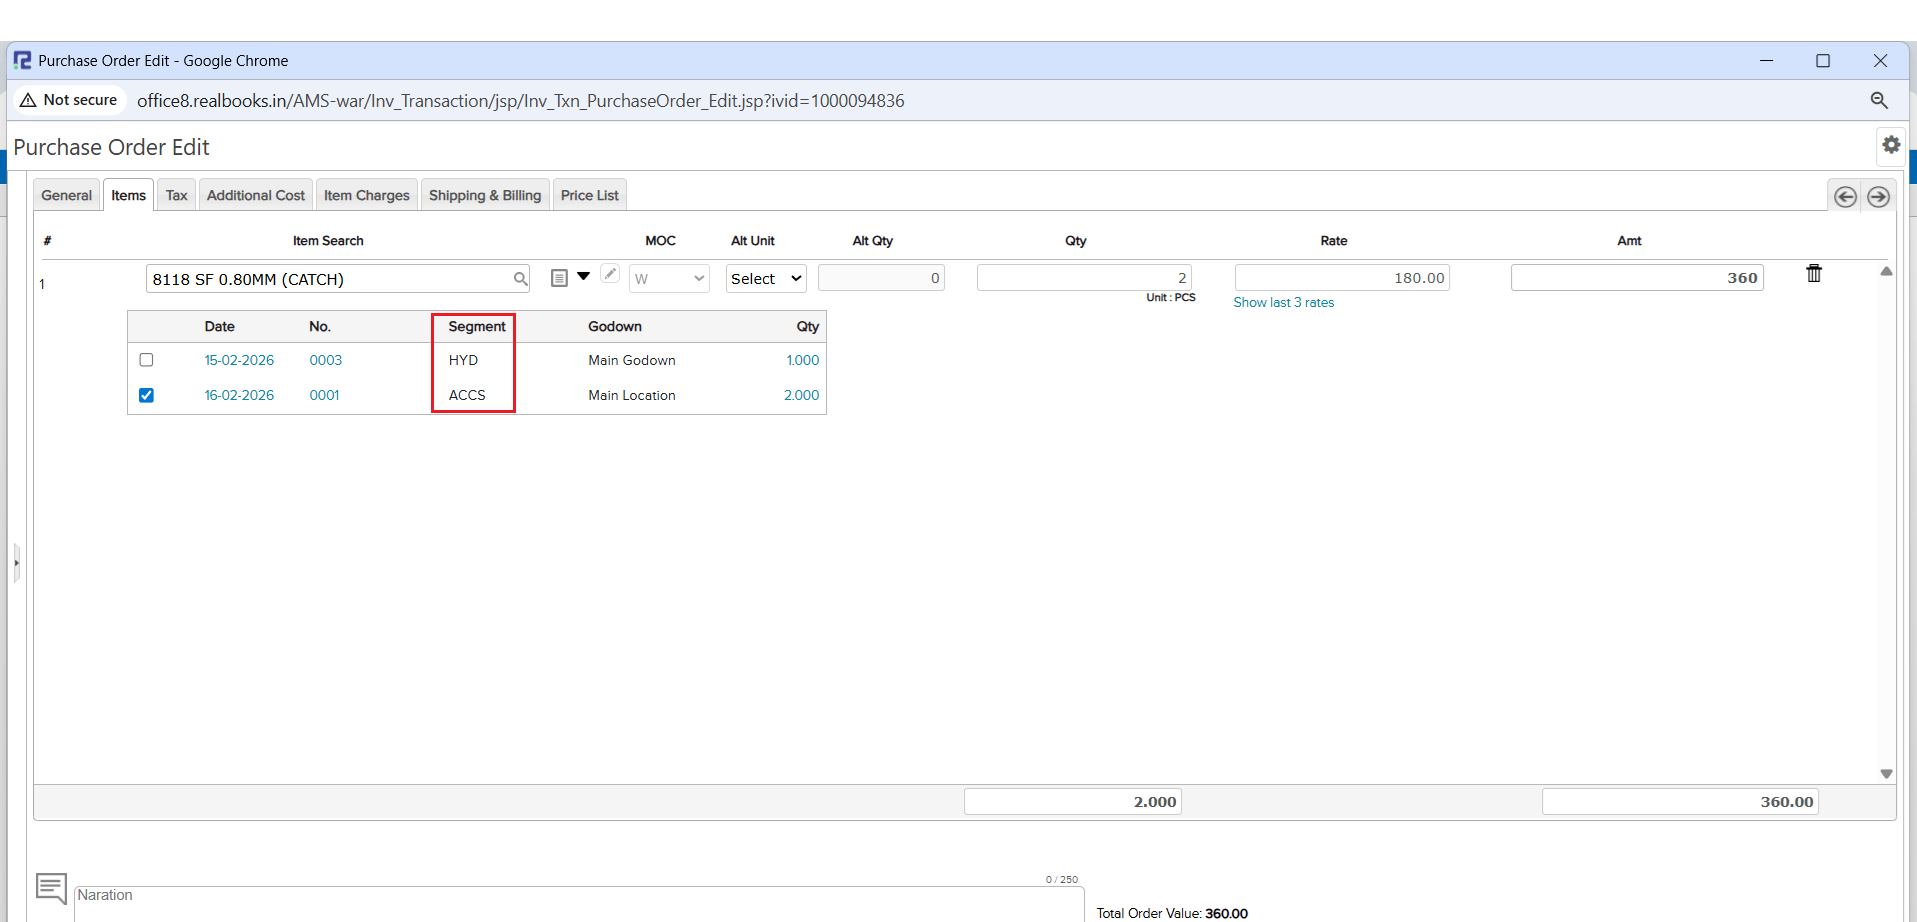
2. When creating a PO in Bangalore, you’ll see PRs from both segments ready to be tagged.
📷 See It in Action
📌 Overview
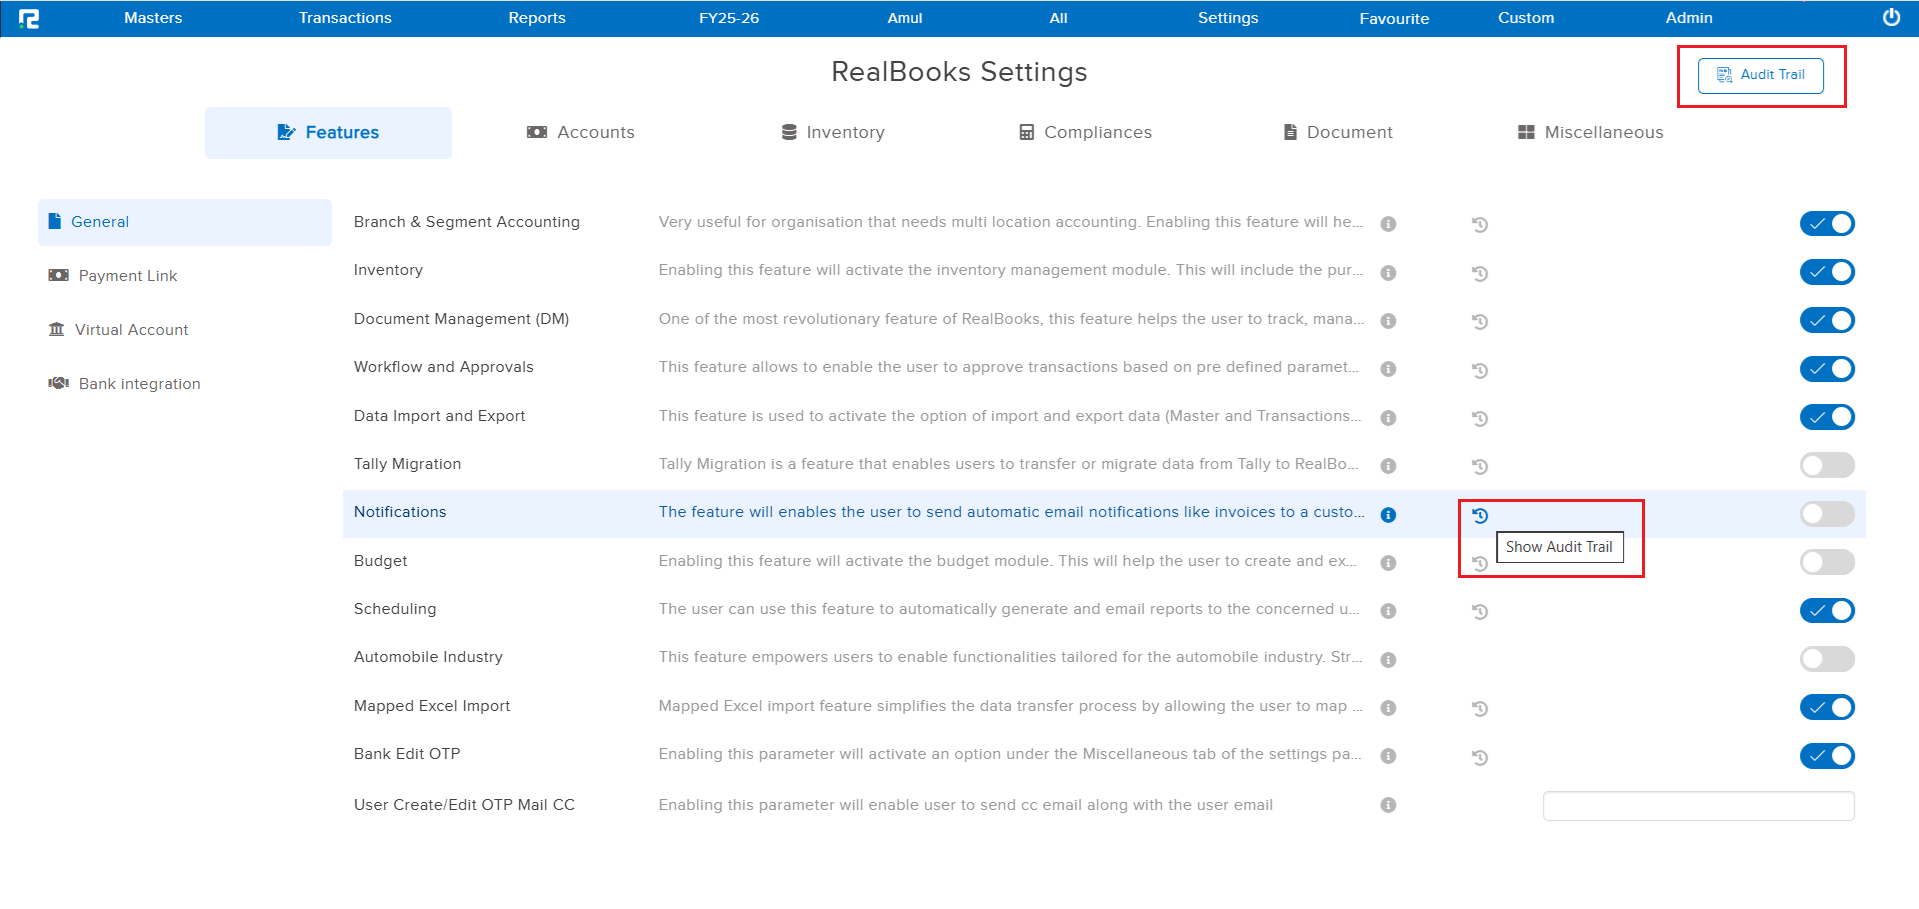
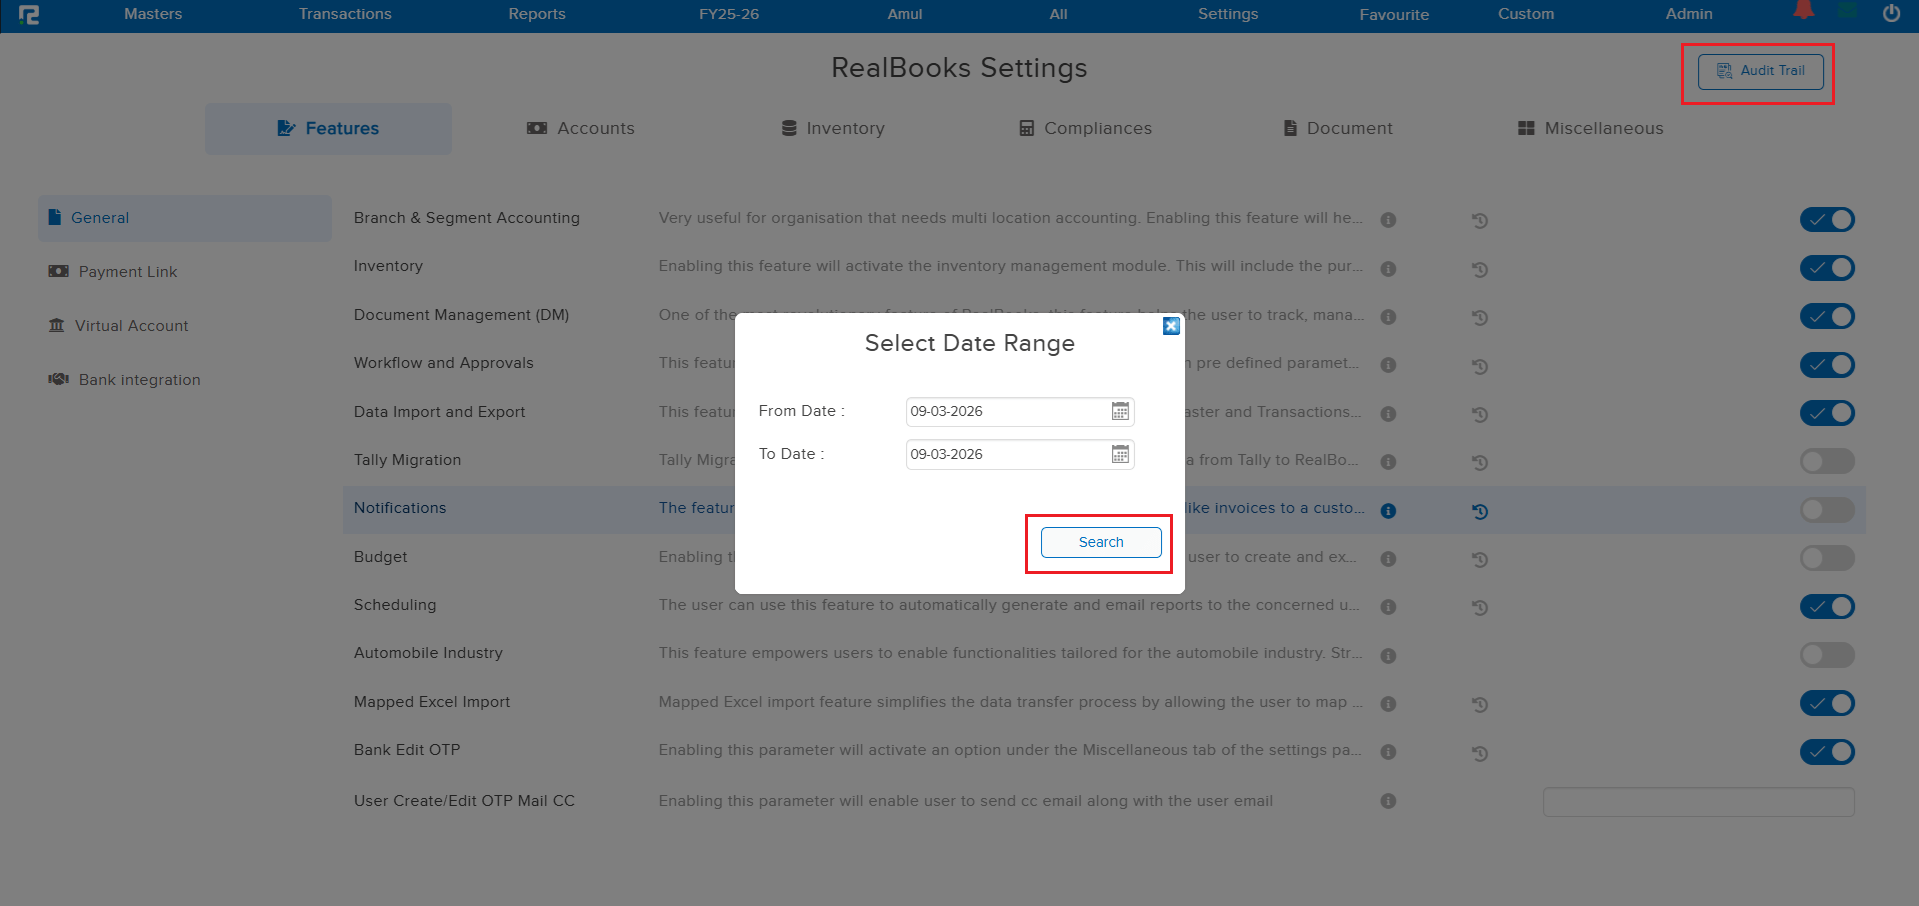
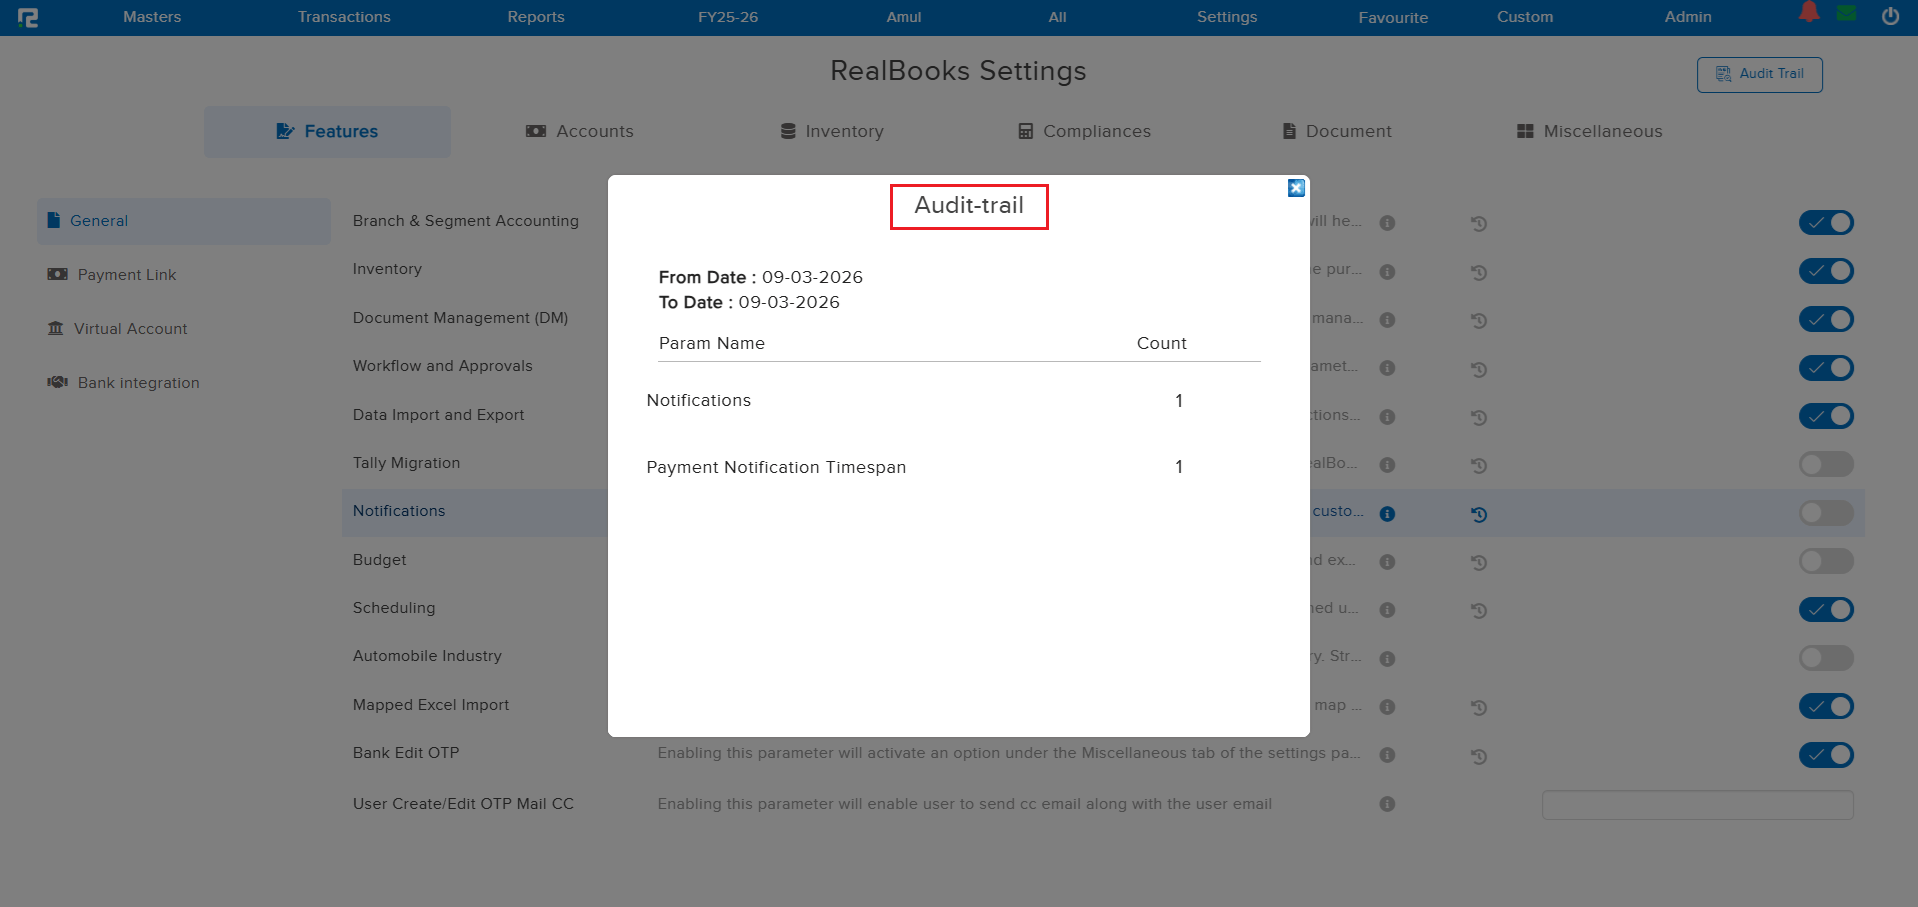
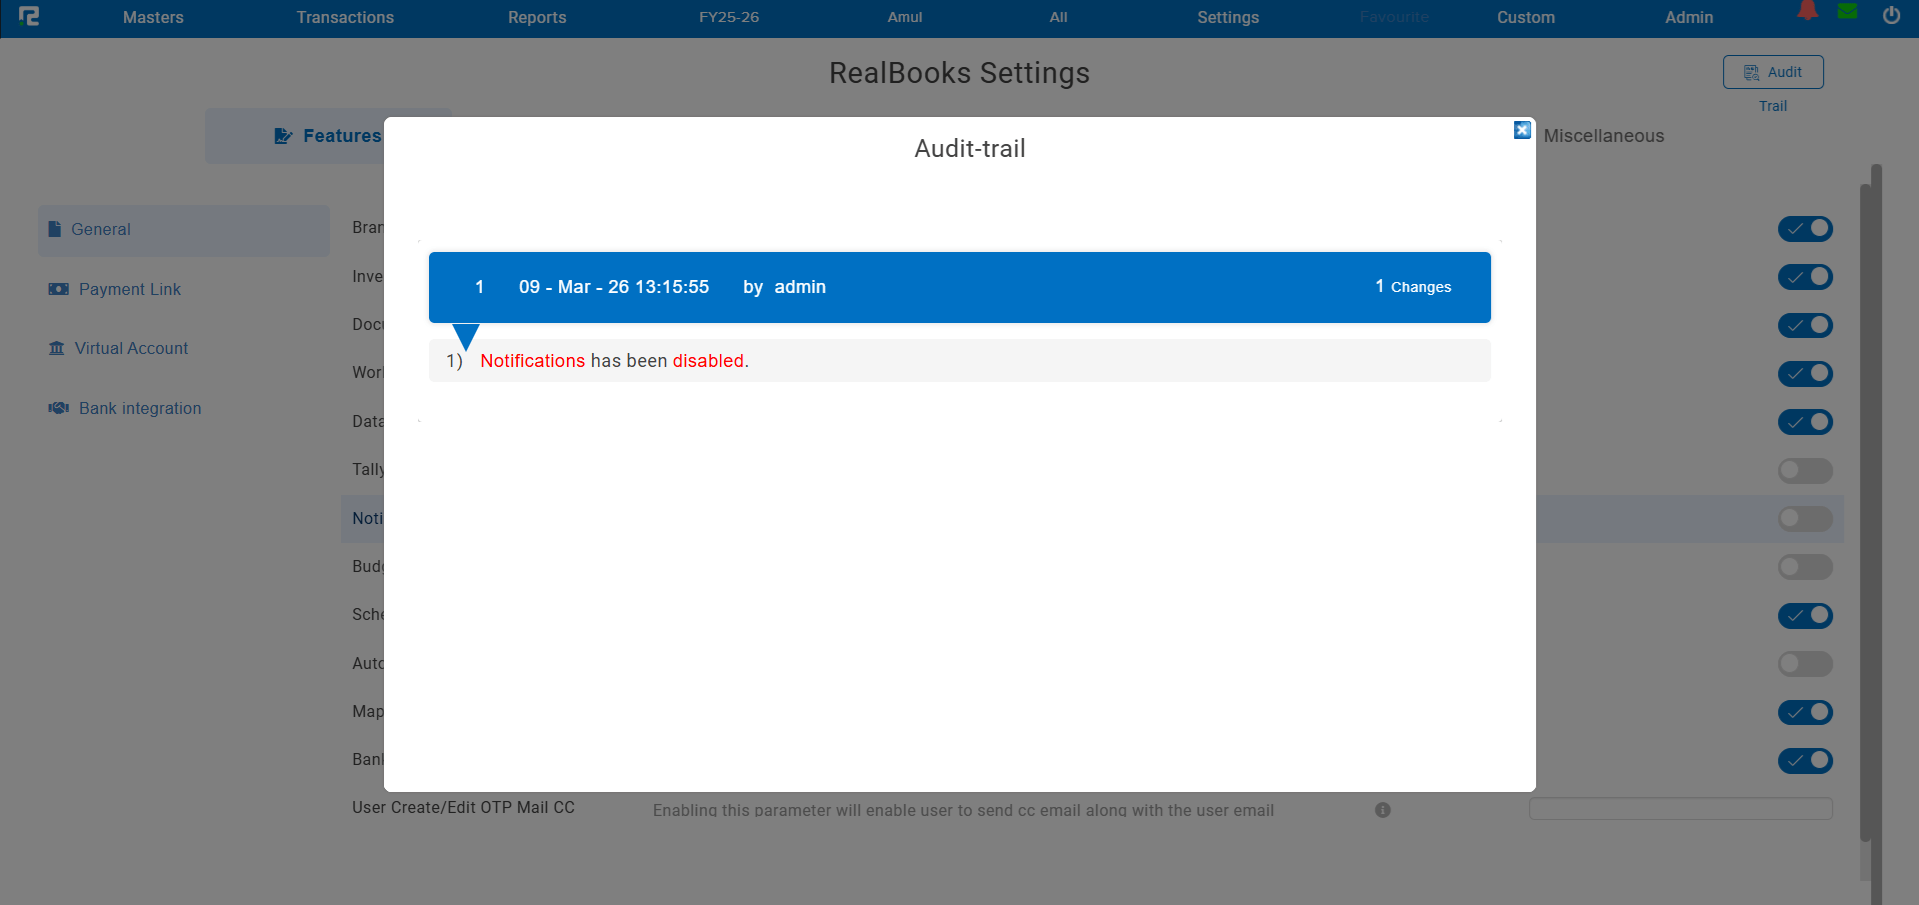
A comprehensive Audit Trail has been introduced on the Settings Configuration page. You can now track every parameter change with full visibility into who made the change, when it was made, and what was enabled or disabled. Two levels of audit trail are available: an Overall Audit Trail showing all configuration changes, and a Parameter-Wise Audit Trail for tracking the history of individual settings.
🌟 What This Means for You
No more guessing who toggled a setting or when a configuration was changed. The audit trail gives administrators complete transparency and accountability over all settings changes, making it easier to troubleshoot issues and maintain compliance.
🎬 How to Use It
1. Go to Settings → Configuration.
2. Use the Overall Audit Trail to view all recent configuration changes across parameters.
3. Click on any individual parameter to view its Parameter-Wise Audit Trail — showing the complete history of that specific setting.
📷 See It in Action
📌 Overview
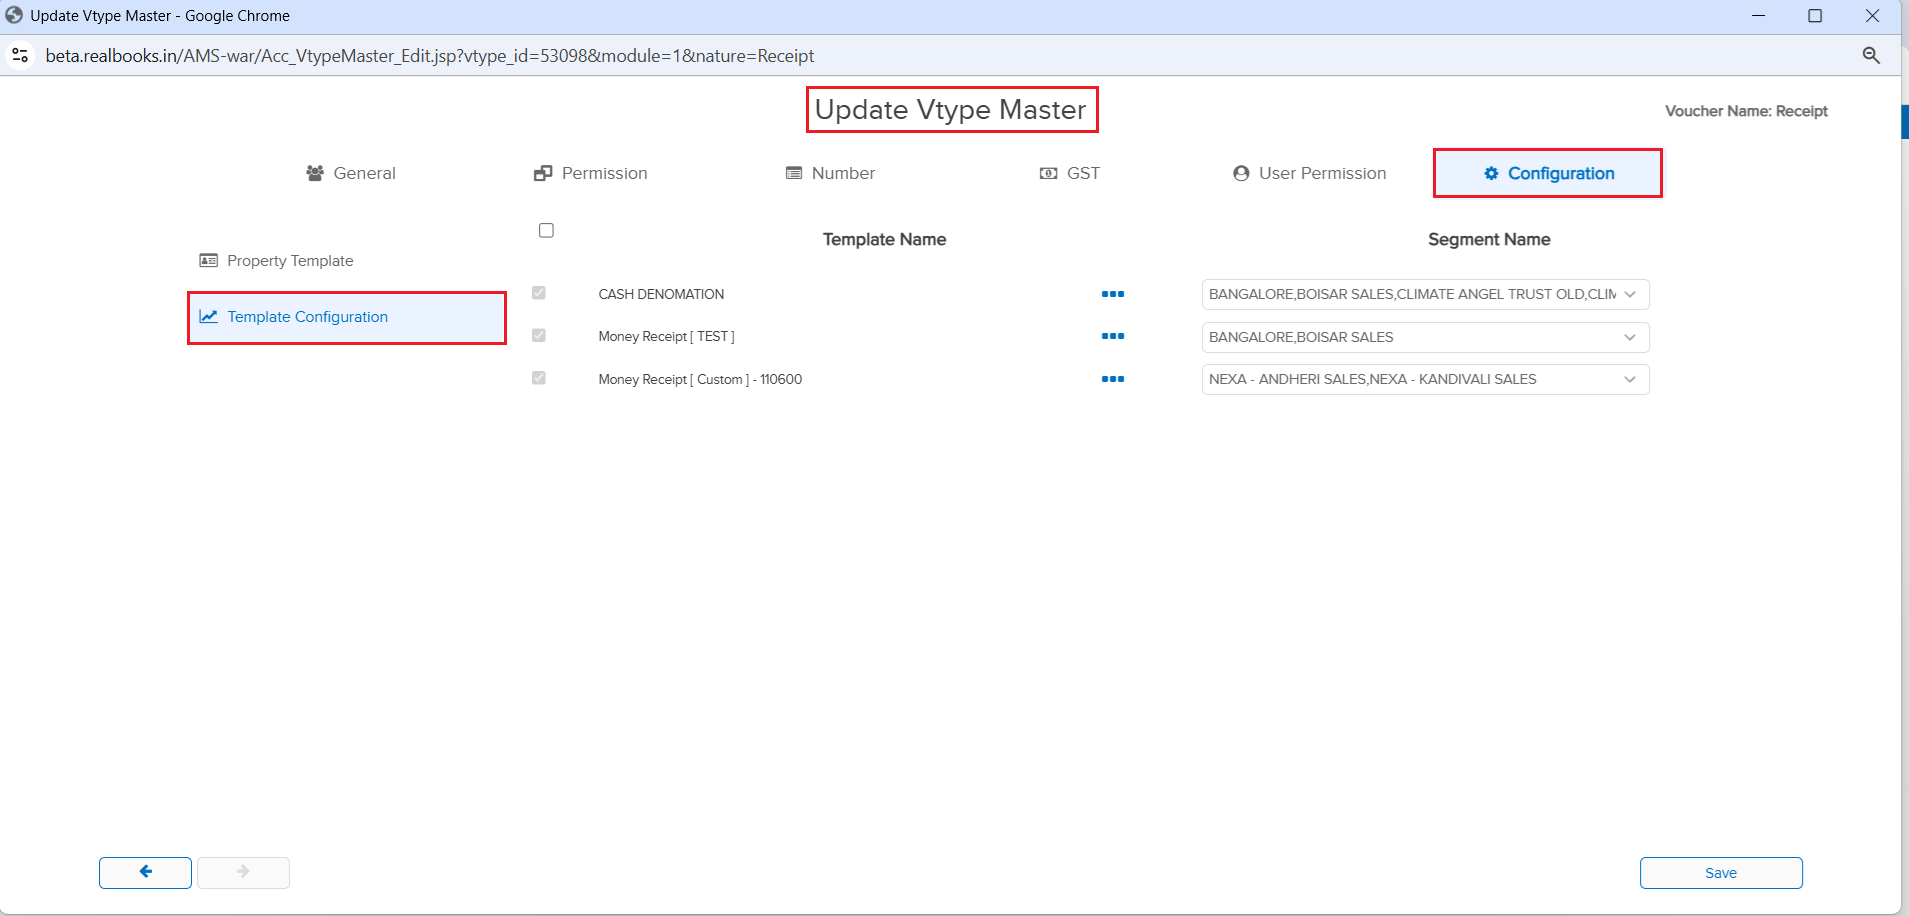
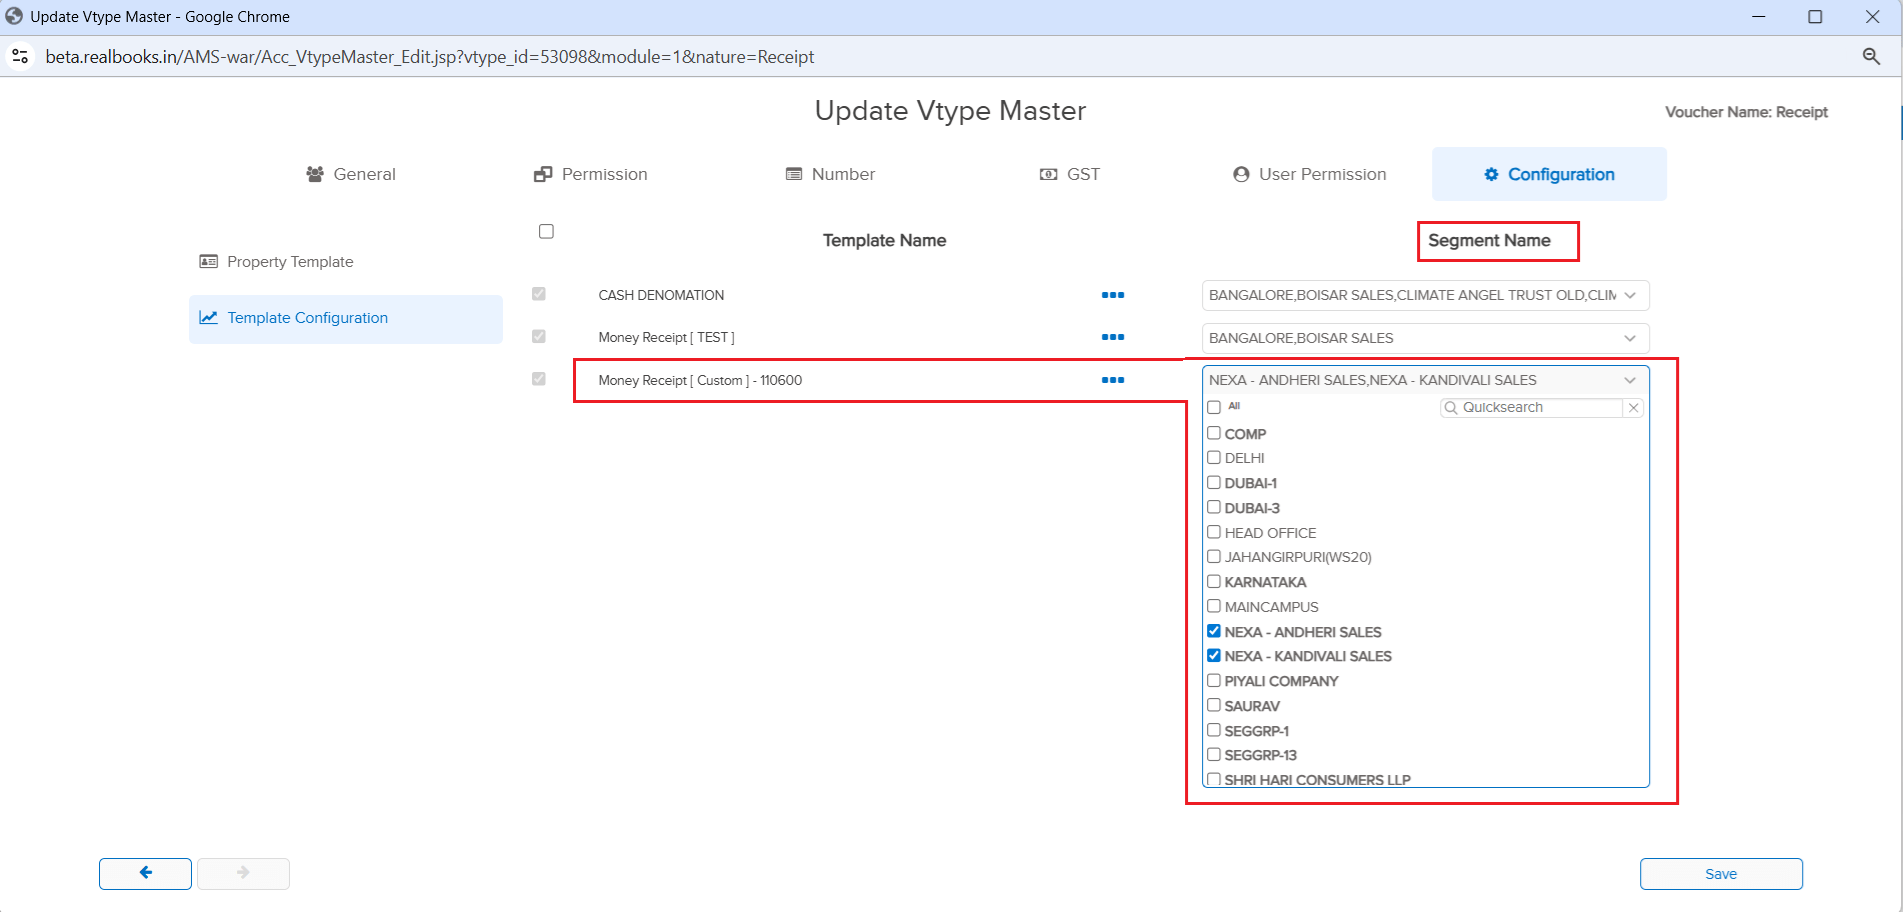
If your company has custom templates deployed, you can now assign them to voucher types directly from the Voucher Type Master — no need to contact the RealBooks team! Previously, when a new segment was created after a custom template was deployed, you had to reach out to get the template assigned to the new segment. Now, you can do it yourself. Additionally, you can see how many templates are assigned to a specific voucher type and which segments each template is assigned to.
🌟 What This Means for You
Complete self-service control over template assignments! When you create a new segment, simply go to the Voucher Type Master and assign the required templates yourself. You also get full visibility into the template-to-segment mapping, making it easy to manage and audit your template configurations across the organization.
🎬 How to Use It
1. Go to Masters → Accounts → Voucher and open a voucher type in Edit mode.
2. You’ll see the available custom templates listed for selection.
3. Assign templates to the desired segments.
4. View the summary to see how many templates are assigned and their segment mappings.
📷 See It in Action
📌 Overview
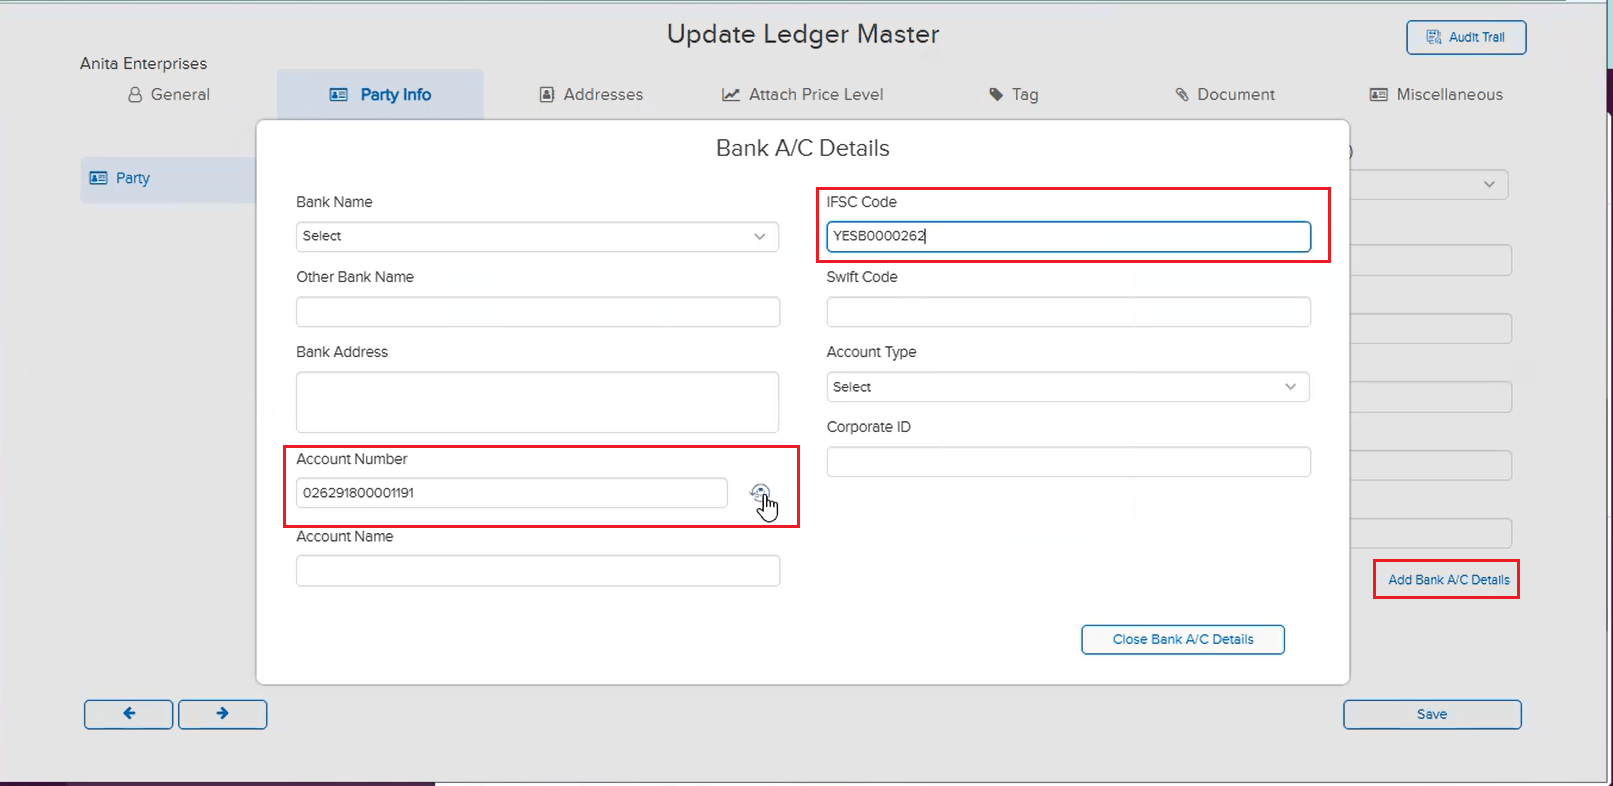
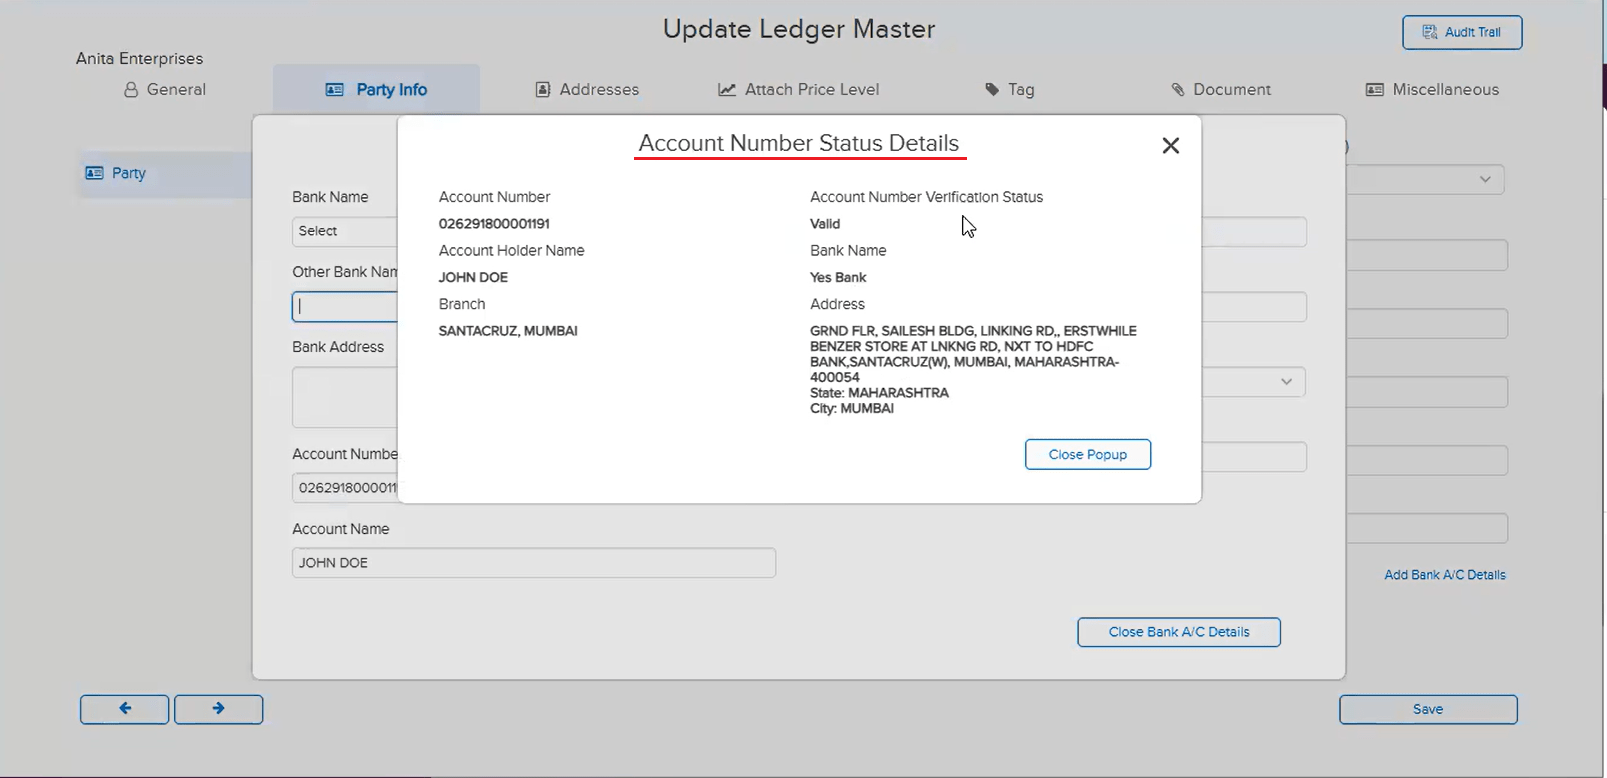
RealBooks now integrates with Cashfree — a trusted third-party vendor — to validate whether a bank account number is valid or invalid. This validation happens at the time of ledger creation and ledger editing, and works for both Bank ledgers and Party ledgers. The verification is based on the account number and the updated IFSC code entered in the ledger master.
🌟 What This Means for You
Before making any bank payment via FTP, you can now be confident that the recipient’s bank details are verified and valid. If the bank details are not verified, bank payments via FTP will not be processed — even if the entry has been approved in RealBooks. This adds a critical layer of security to your payment workflow, preventing payments to incorrect or invalid bank accounts.
🎬 How It Works
1. While creating or editing a Bank or Party ledger, enter the account number and IFSC code.
2. The system will validate the bank details via Cashfree’s bank validation service.
3. If the account is valid, the ledger can be saved and FTP payments will proceed normally.
4. If the account is invalid or unverified, the system will flag it — and bank payments via FTP will be blocked until the details are corrected and verified.
📷 See It in Action
📌 Overview
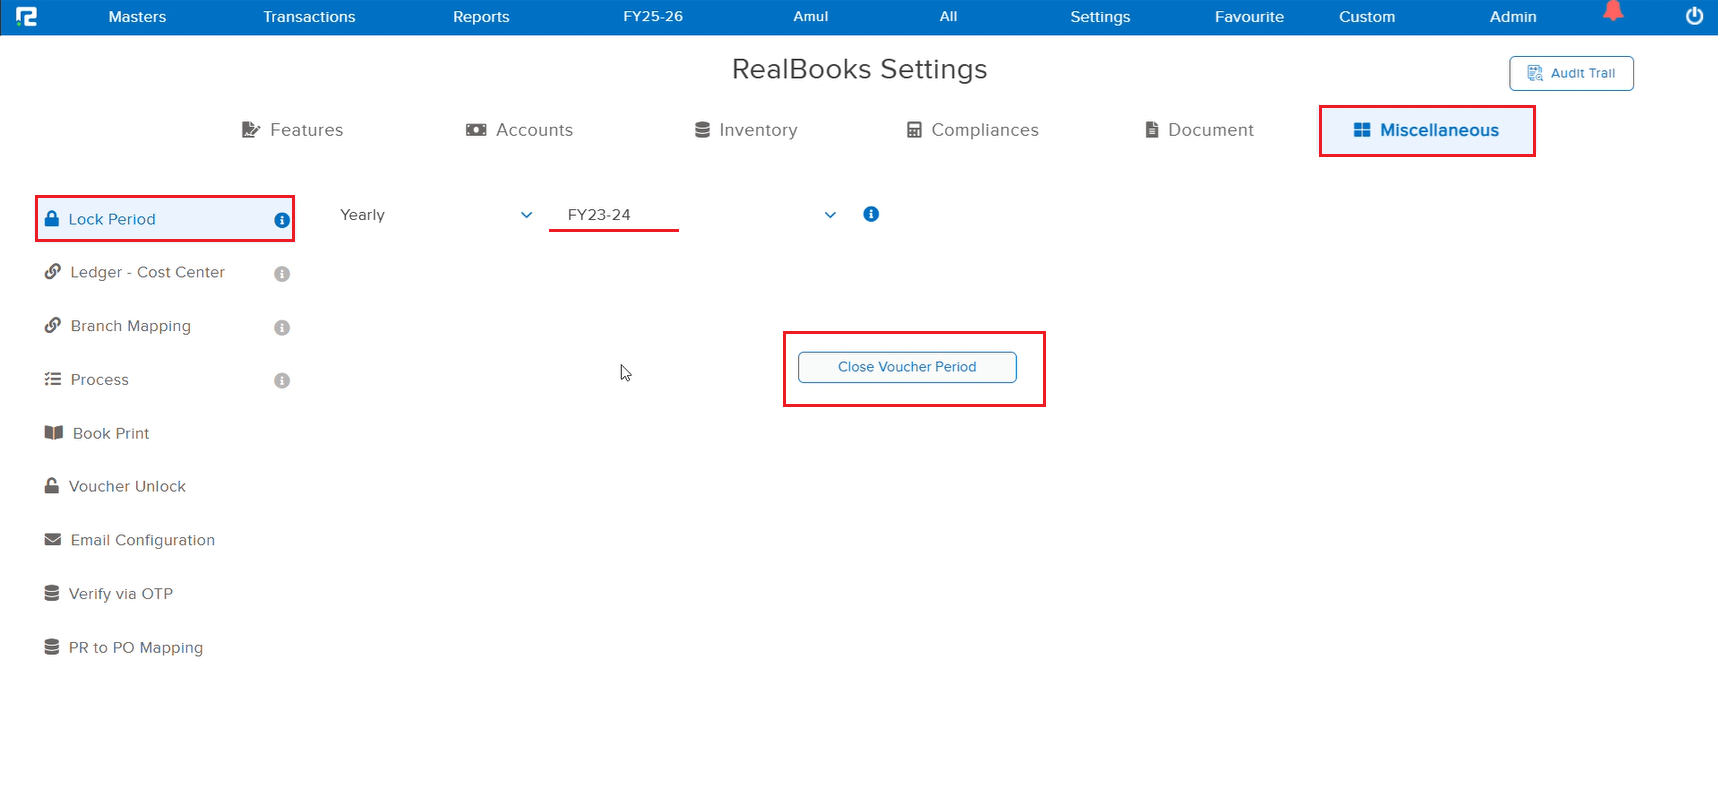
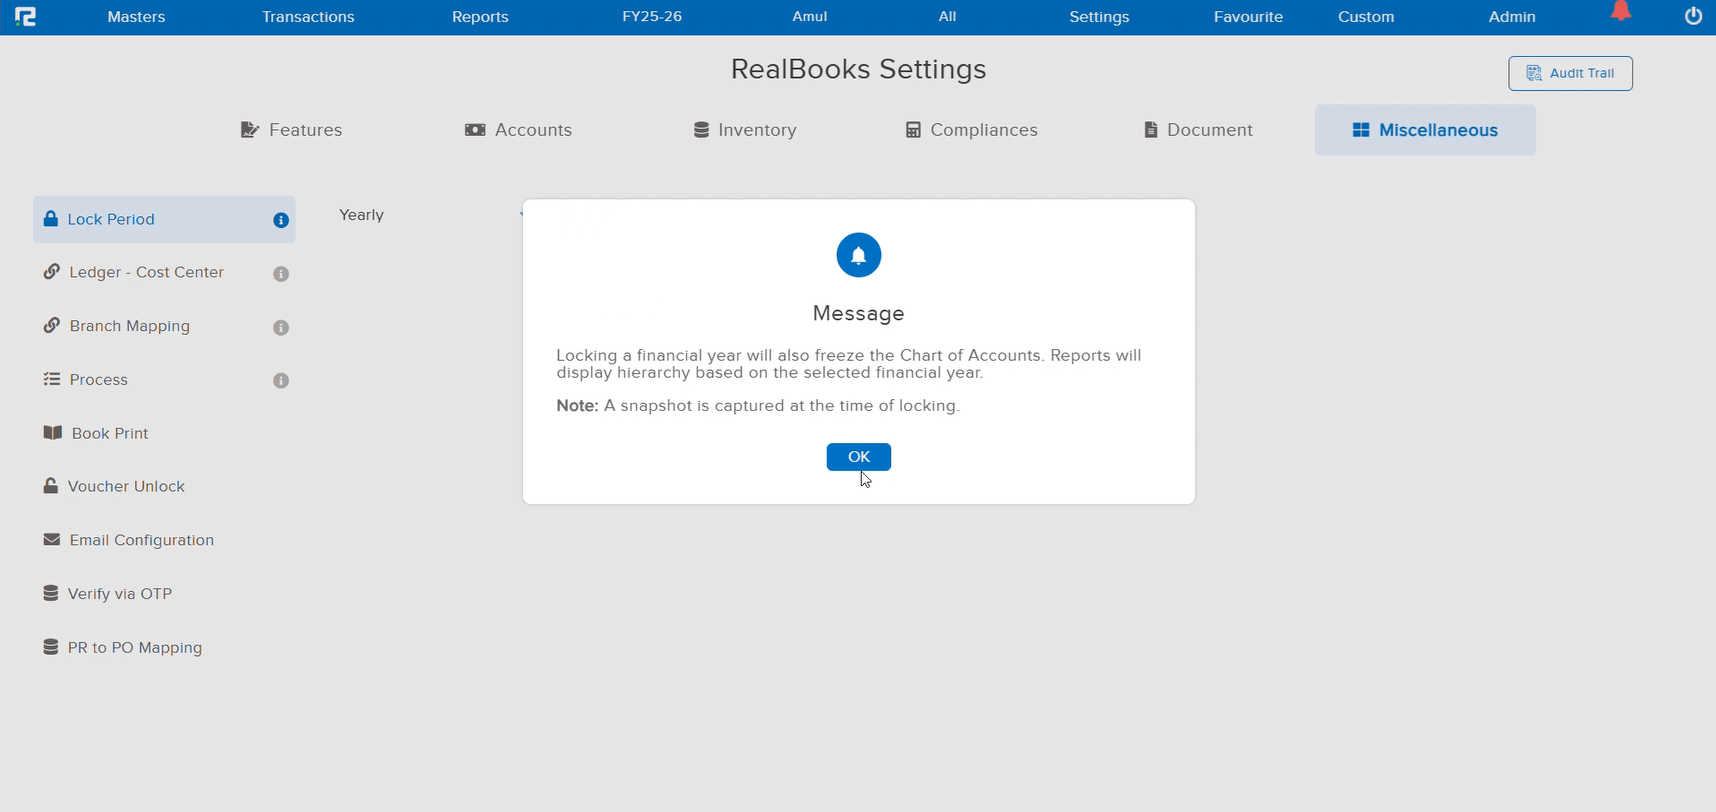
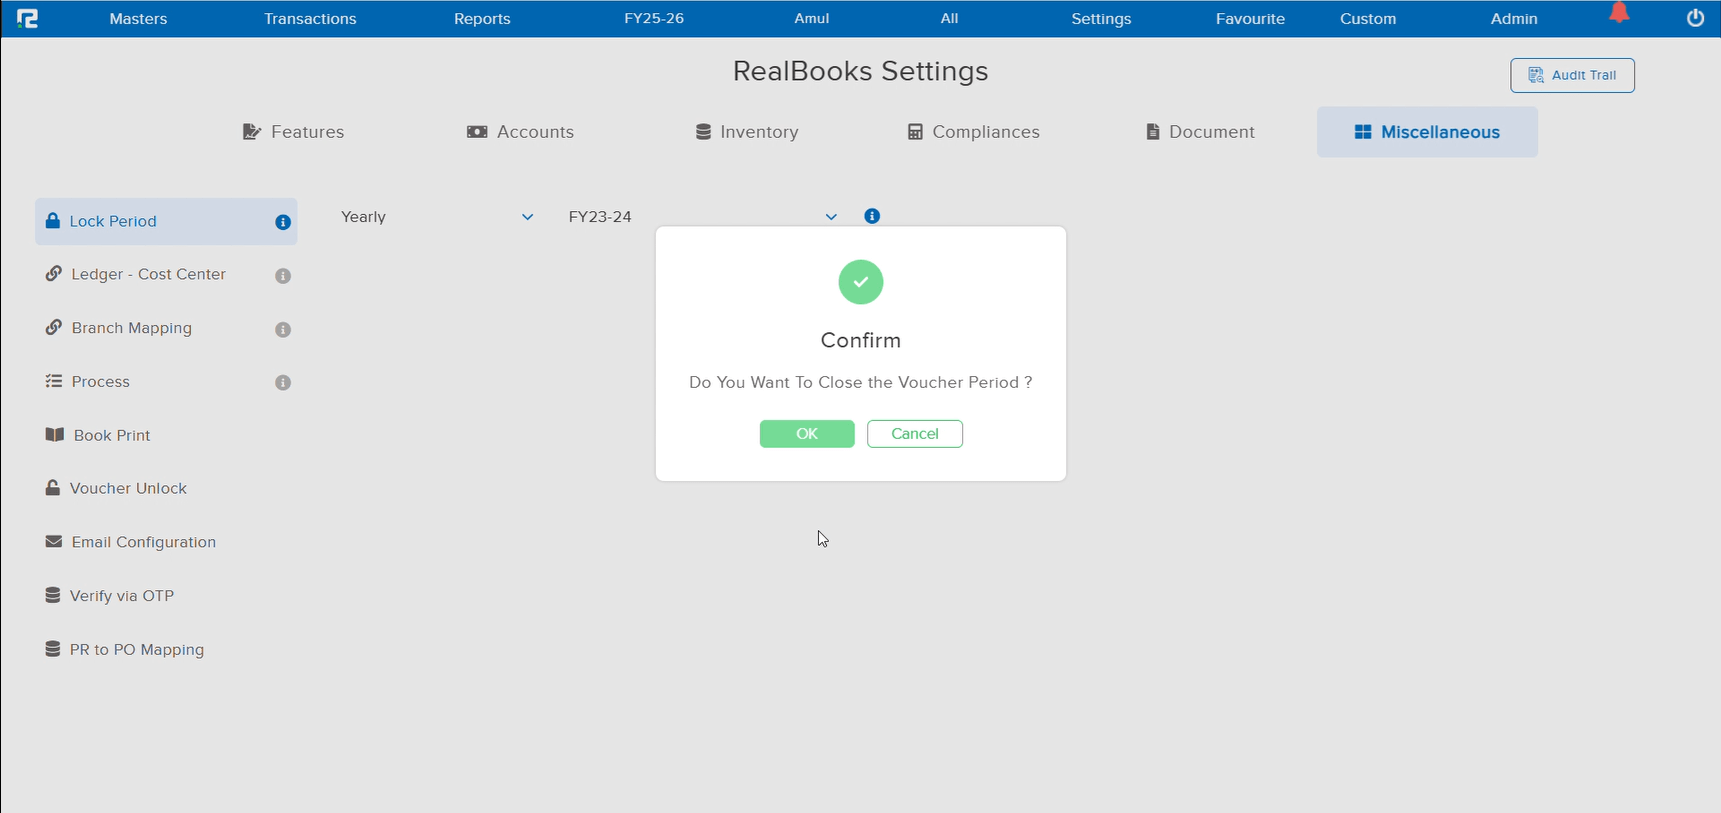
A new Chart of Accounts Locking feature has been introduced that allows you to lock your ledger structure on a financial year (FY) basis. Once a financial year is locked, the ledger grouping as it existed at that time is preserved. If the grouping is changed in a subsequent FY, the locked year will continue to reflect the original grouping.
📌 How It Works
For example, if a user finalized books for FY 2024–25 with ledger “Adansa Solutions Private Limited” under the group Sundry Debtors, and later in FY 2025–26 changed the grouping to a new sub-group RealEdge Debtors (under Sundry Debtors), then:
• For FY 2024–25 — the ledger will continue to show under Sundry Debtors
• For FY 2025–26 — the ledger will show under RealEdge Debtors (under Sundry Debtors)
🌟 What This Means for You
You can now confidently reorganize your Chart of Accounts for new financial years without affecting previously finalized books. The locked FY data remains intact, ensuring audit-ready historical reports while giving you flexibility to restructure ledger groups going forward.
🎬 Where to Find It
📷 See It in Action
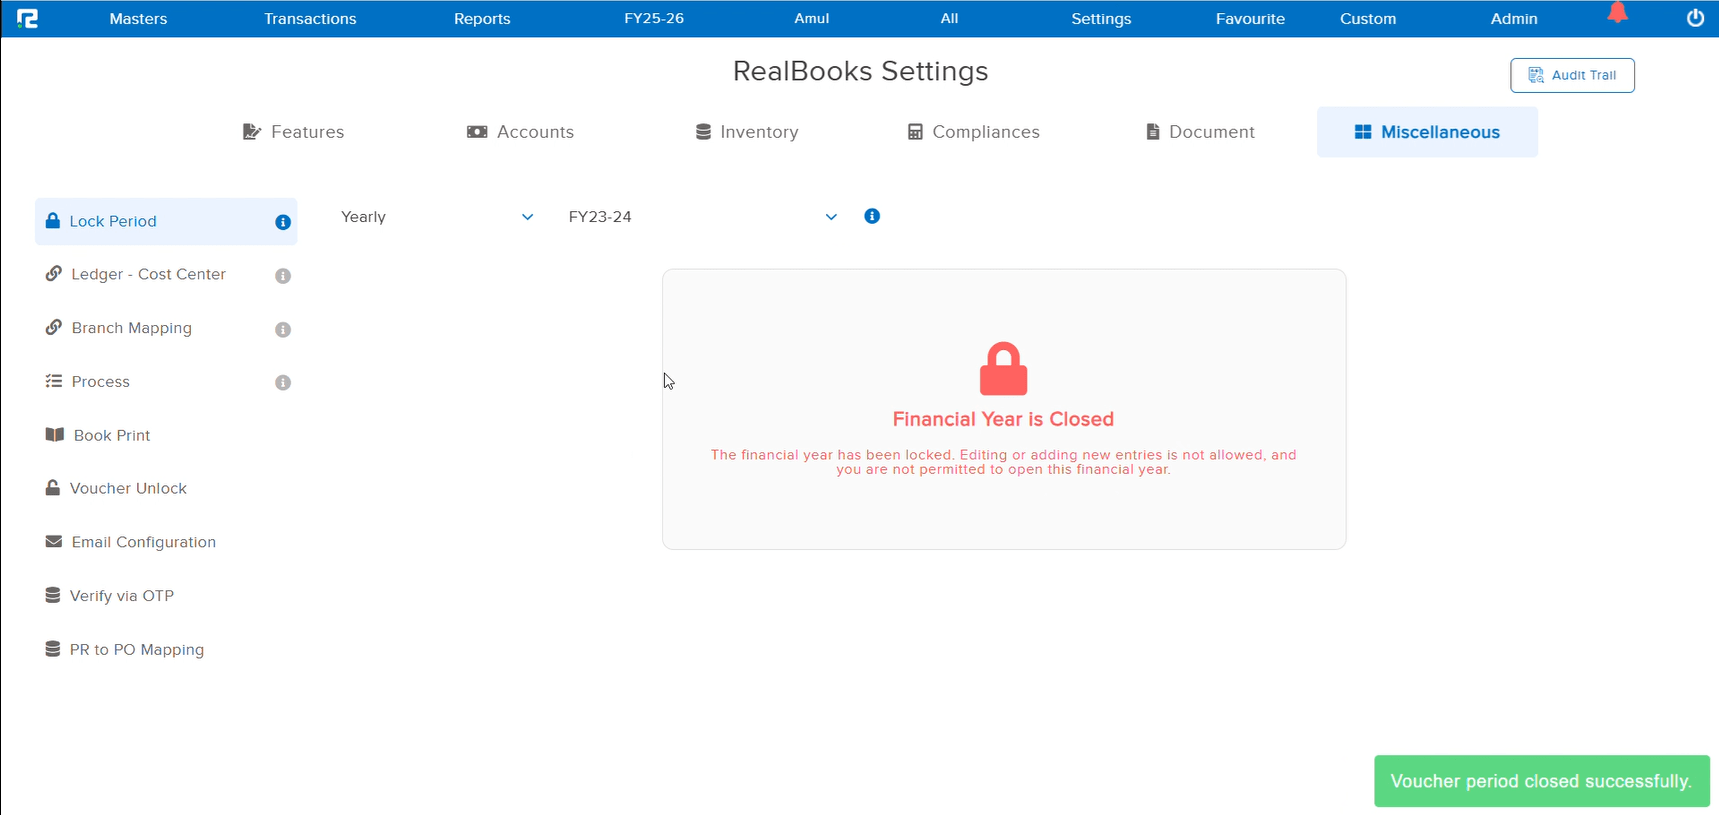
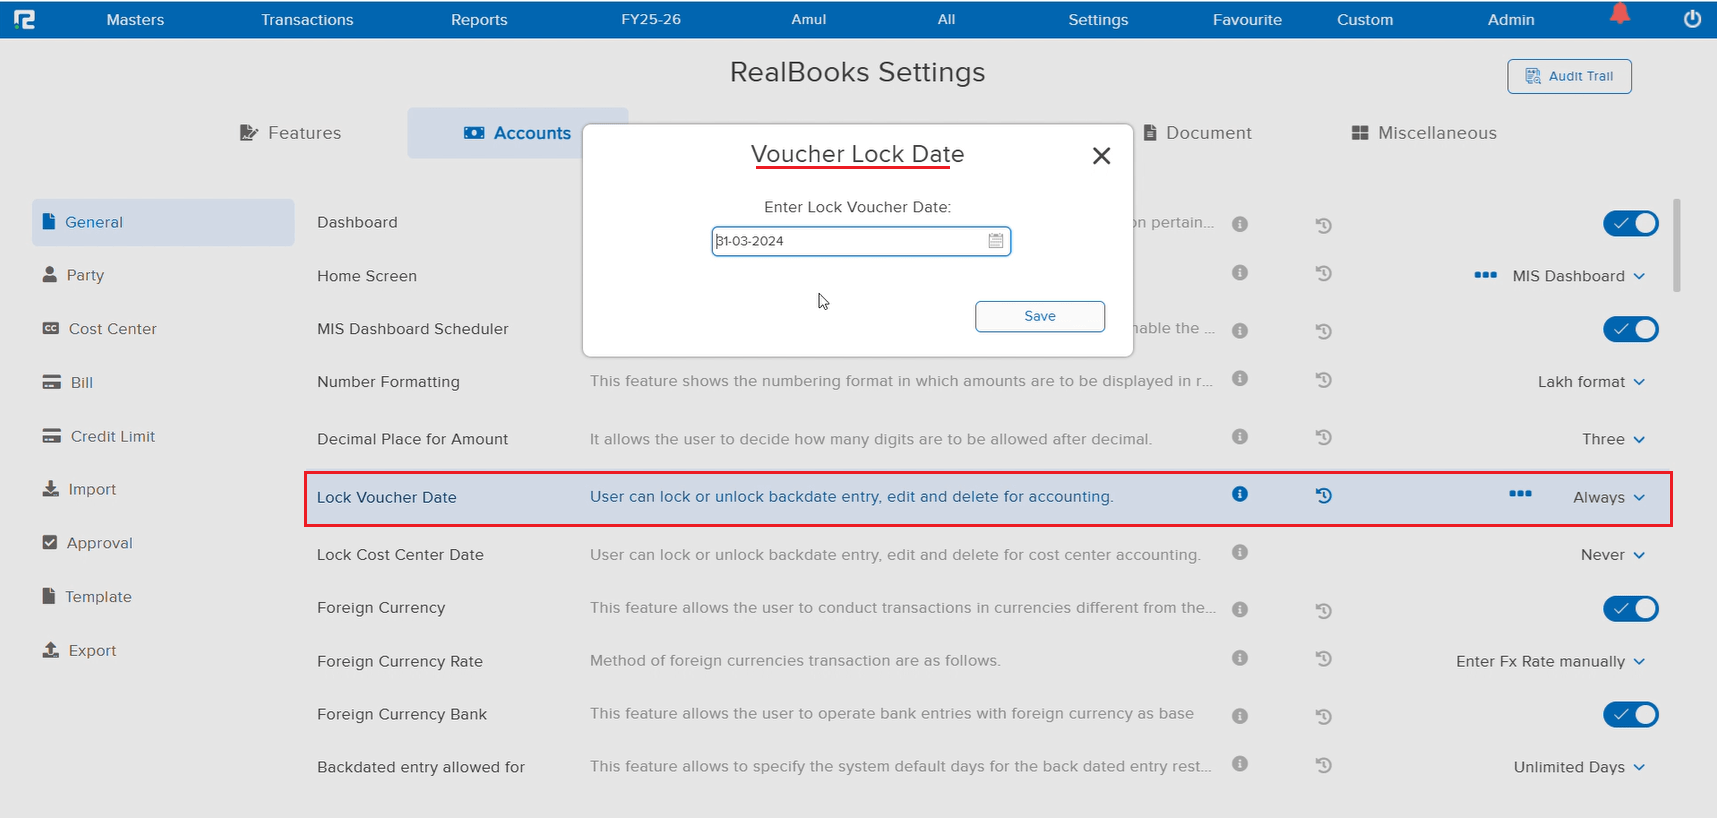
📌 Overview
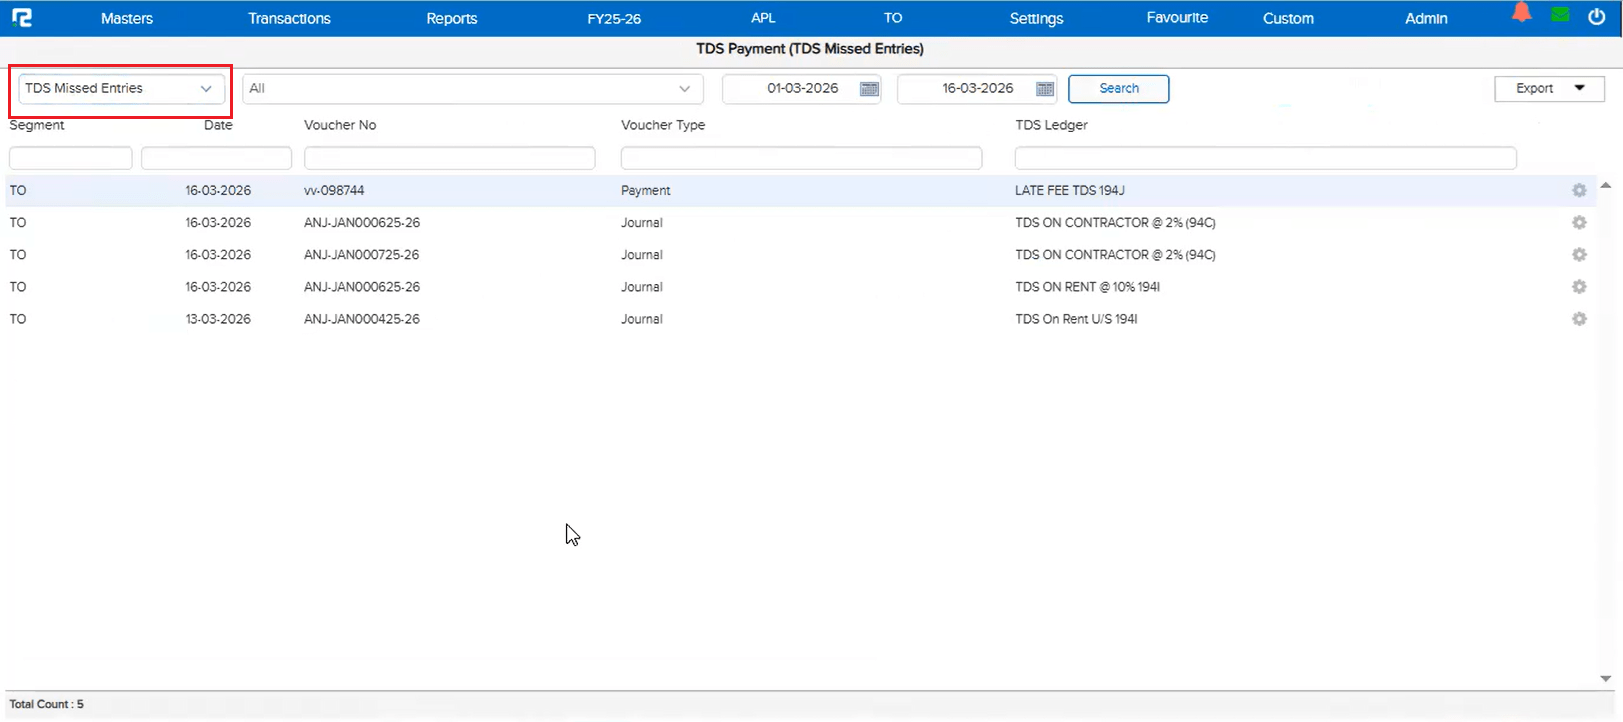
Some entries containing TDS ledgers were not reflecting in the TDS reports, making it difficult for users to fully rely on the TDS data for compliance. To address this, a brand new TDS Missed Entries exception report has been developed. This report displays all entries that contain TDS ledgers but have not been considered in the standard TDS reports — giving you complete visibility into any gaps.
🌟 What This Means for You
You can now confidently verify your TDS data before filing. The TDS Missed Entries report acts as a safety net, ensuring no TDS-related entries slip through the cracks. If any entries are listed here, you know exactly what needs attention — giving you full confidence in your TDS compliance.
🎬 How to Access It
Simply navigate to the report, and it will list all entries that have TDS ledgers but are missing from your TDS reports. Review the entries and take corrective action as needed.
📷 See It in Action
📌 Overview
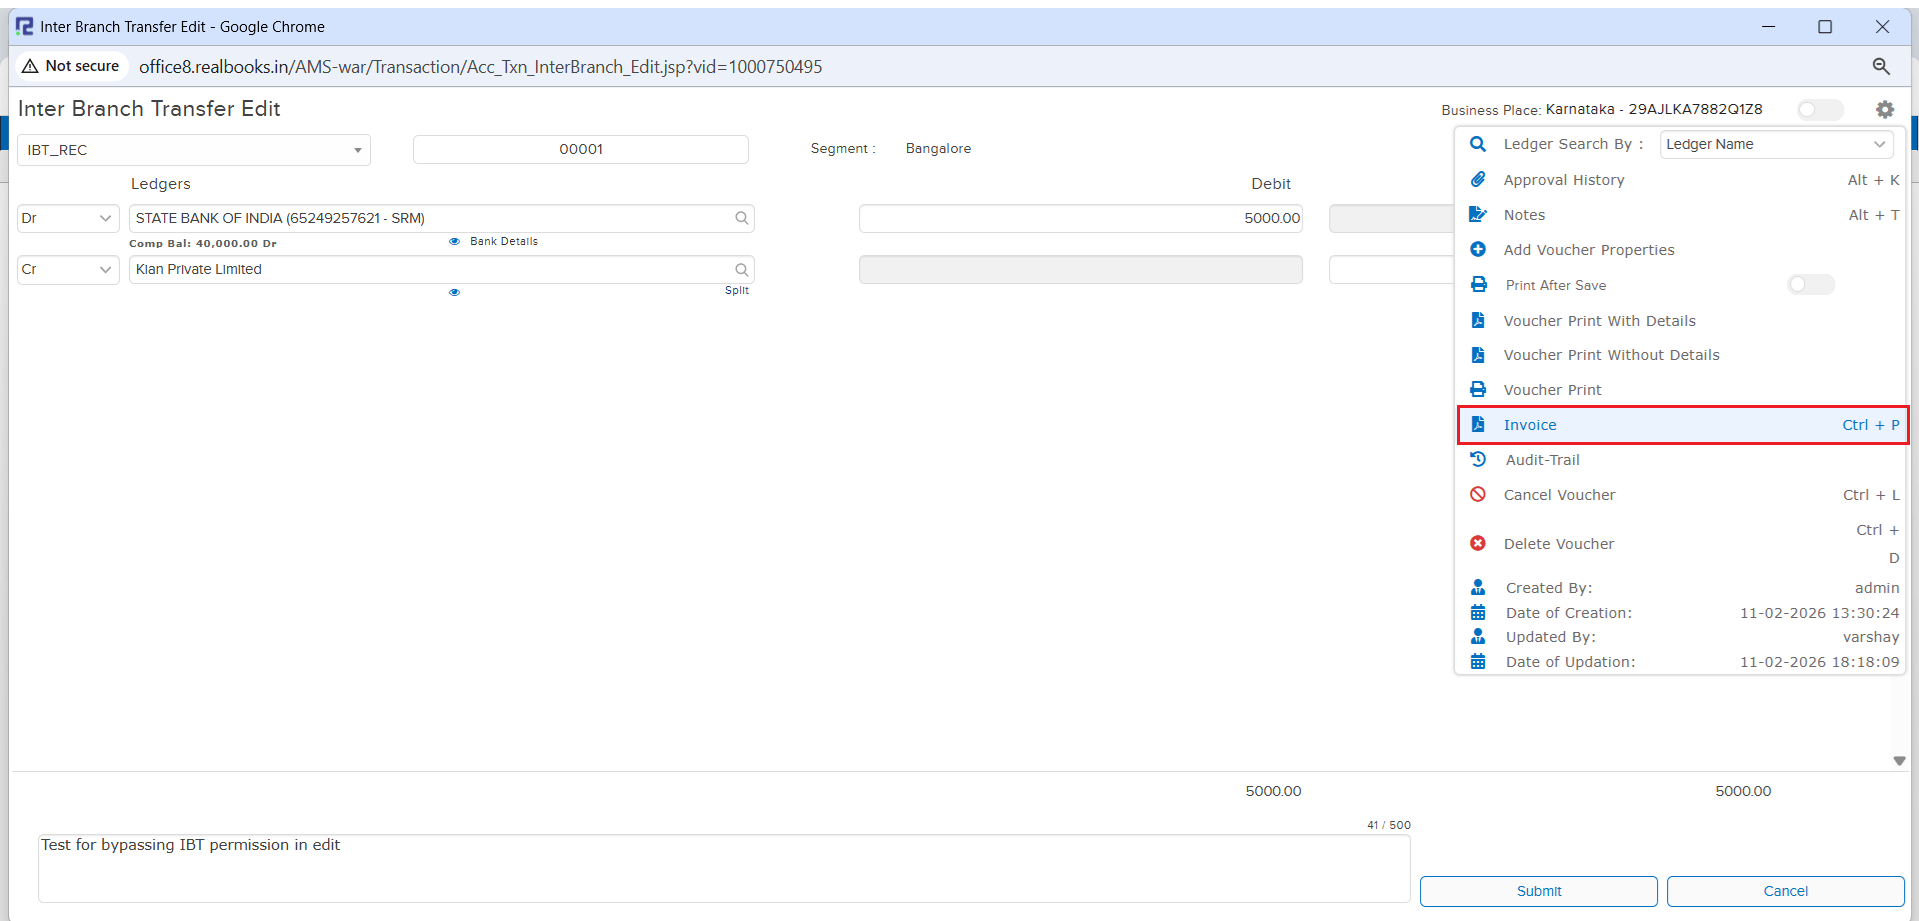
We know Ctrl + P is the universal shortcut for printing — and now you can use it in RealBooks too! Previously, you had to press Ctrl + Y to print voucher templates from the IBT_REC edit screen. With this update, you can enable the familiar Ctrl + P shortcut through a simple configuration.
🌟 What This Means for You
No more remembering a different shortcut! Enable Ctrl + P and print your IBT_REC voucher templates instantly using the shortcut you already know and love.
🛠 How to Enable It
It’s just a one-time setup:
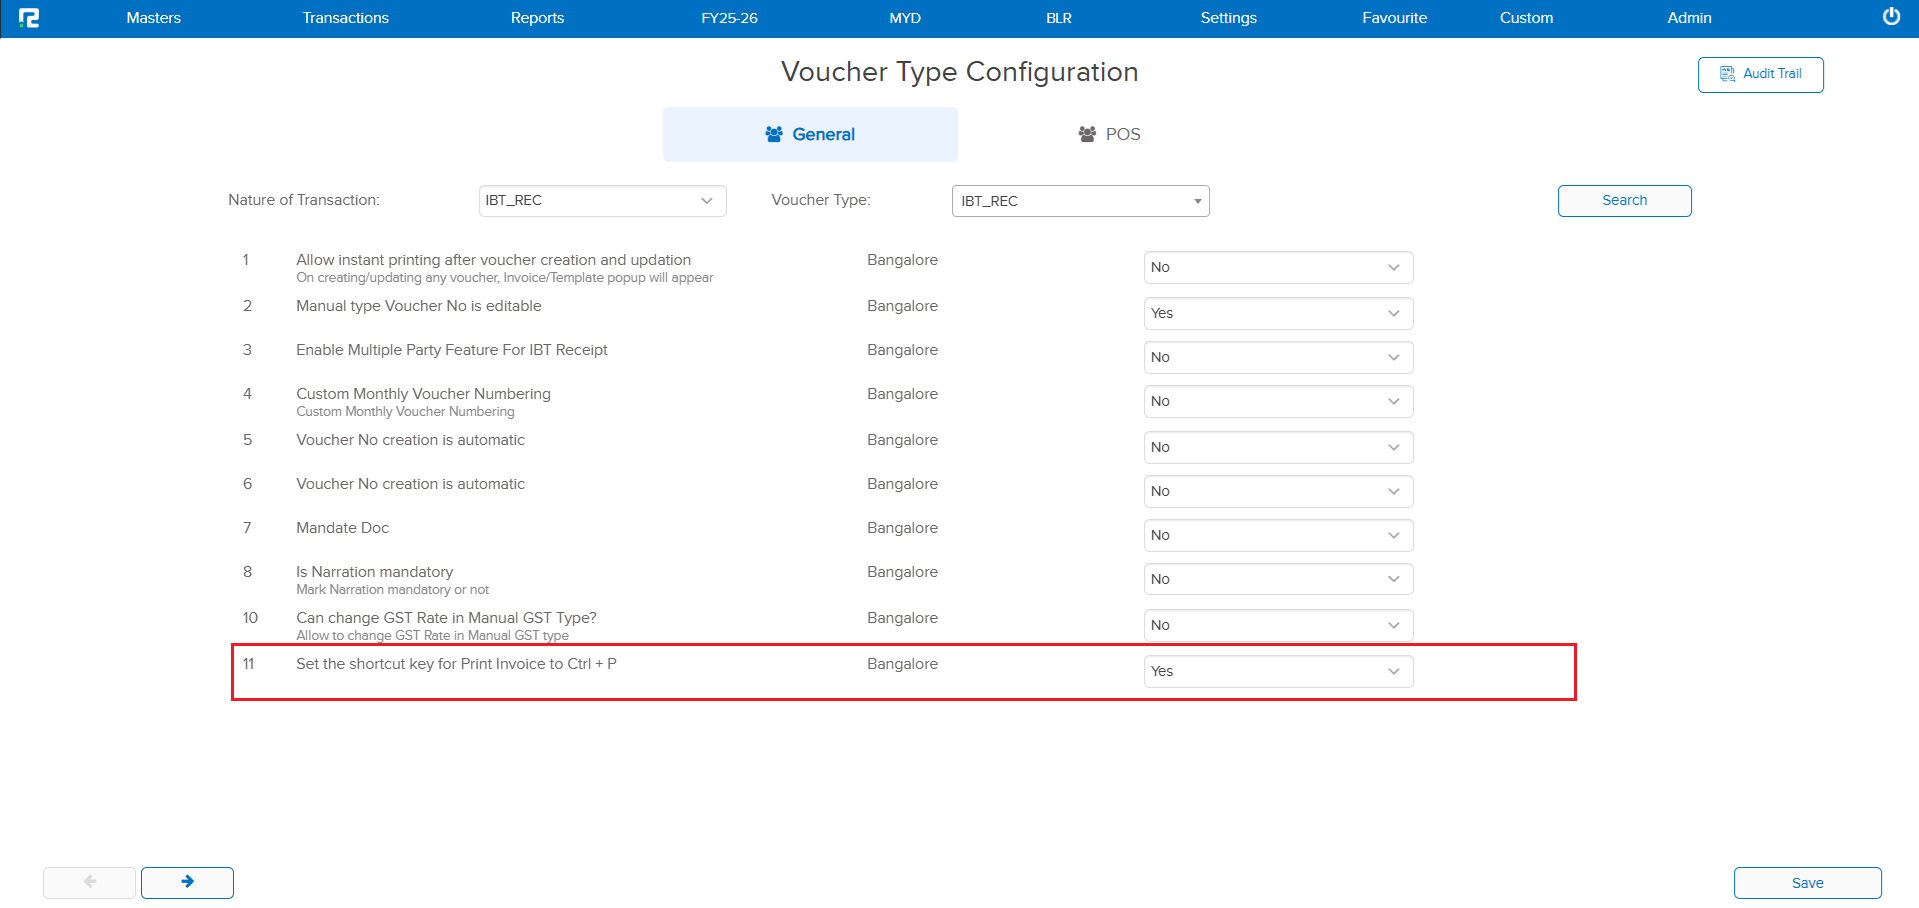
1. Select IBT_REC as the Nature of Transaction.
2. Set the parameter of “Set the shortcut key for Print Invoice to Ctrl + P” to Yes.
3. That’s it! Now open any IBT_REC voucher in edit mode and press Ctrl + P to print.
📷 See It in Action
📌 Overview
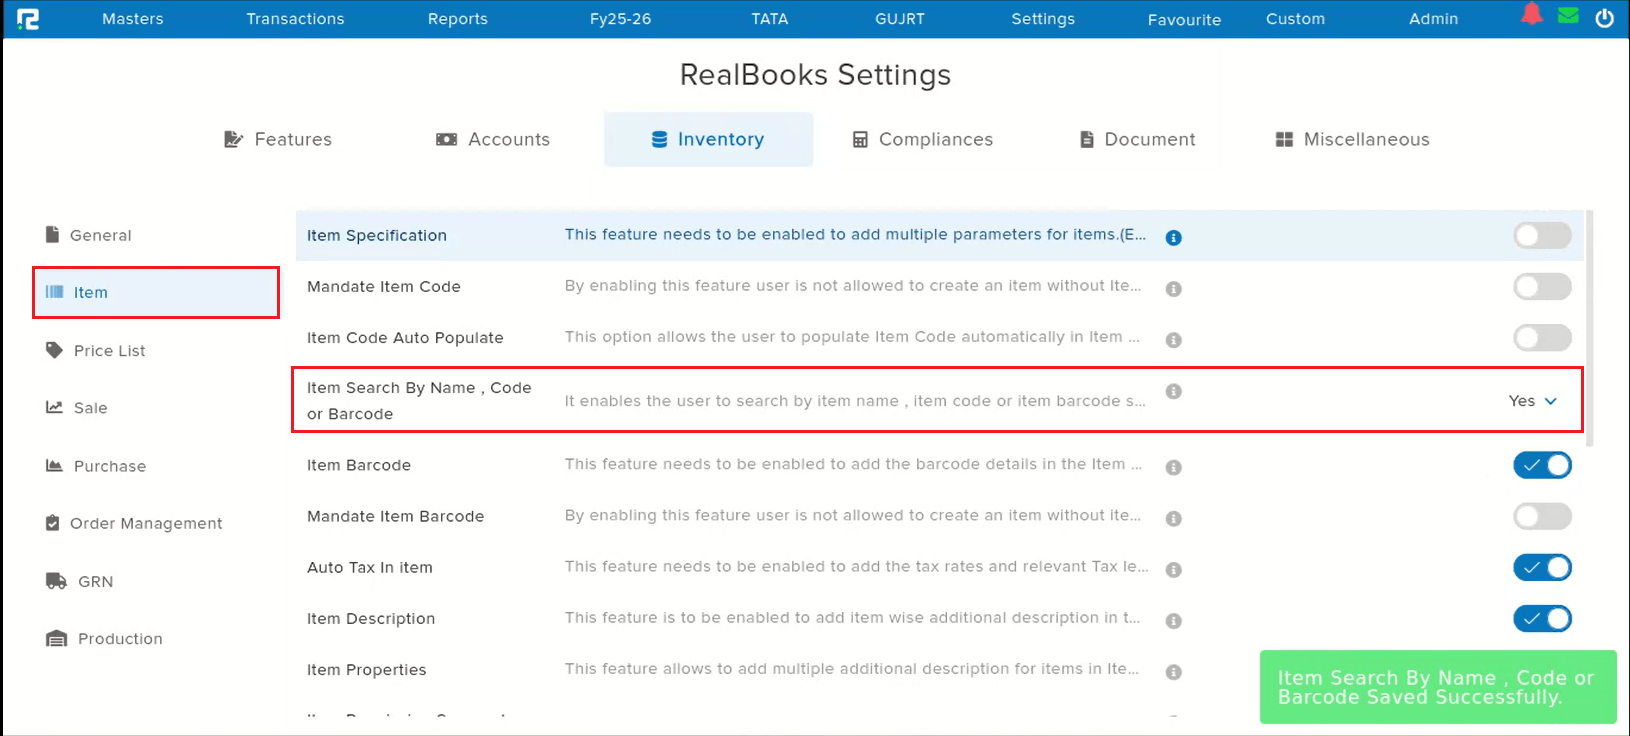
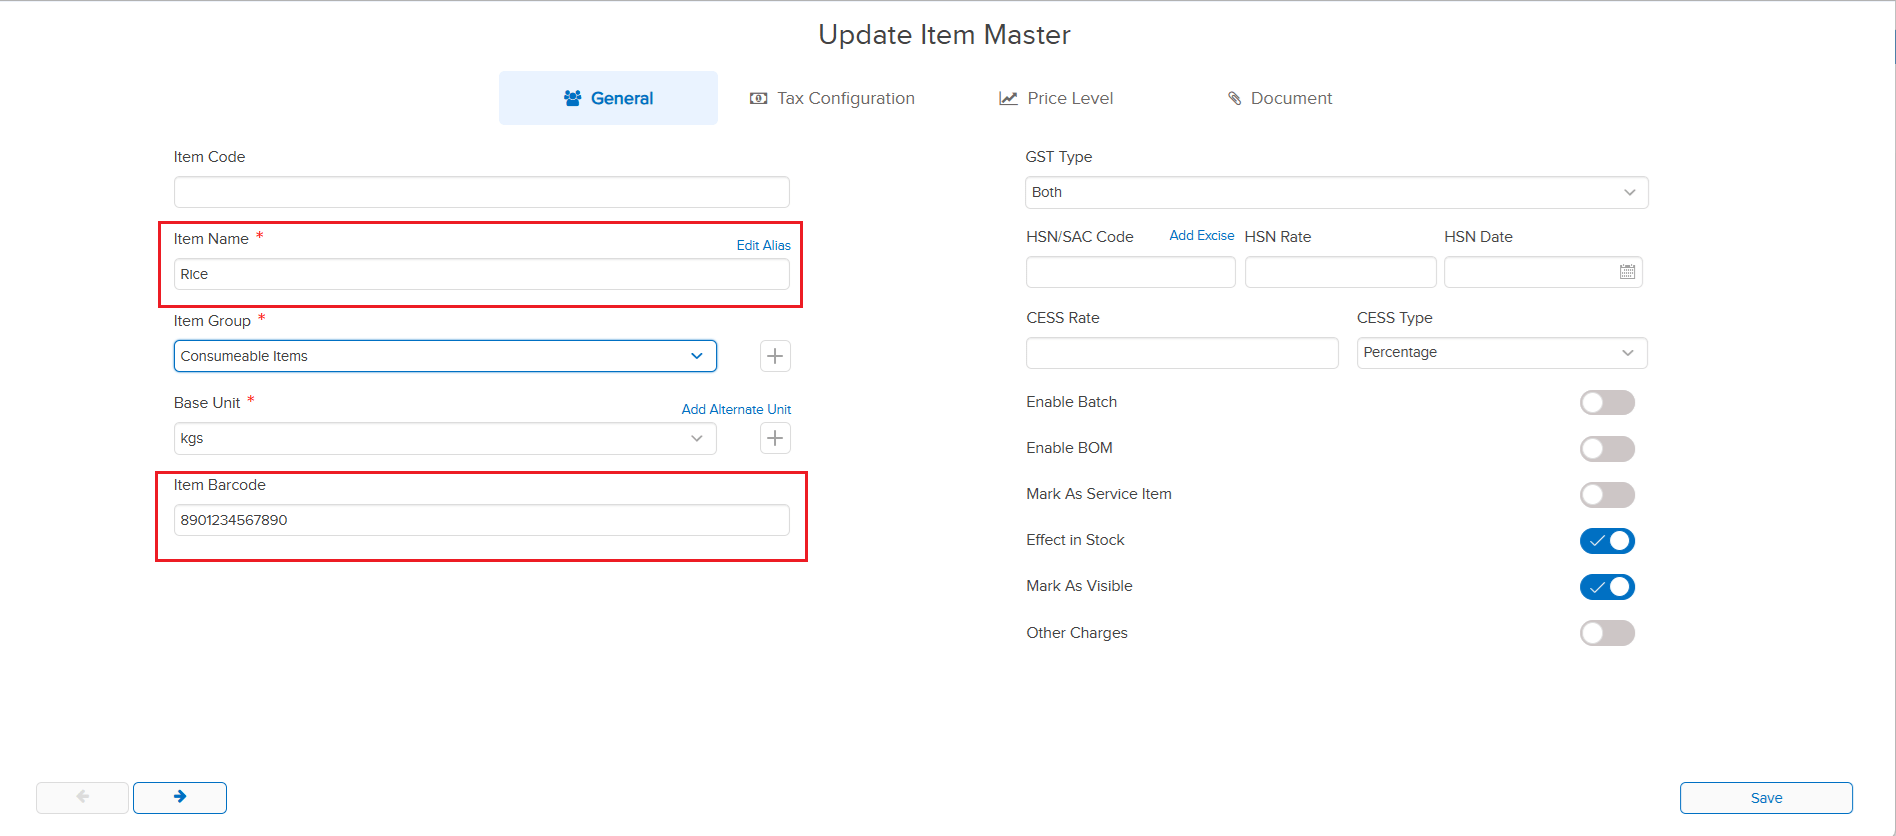
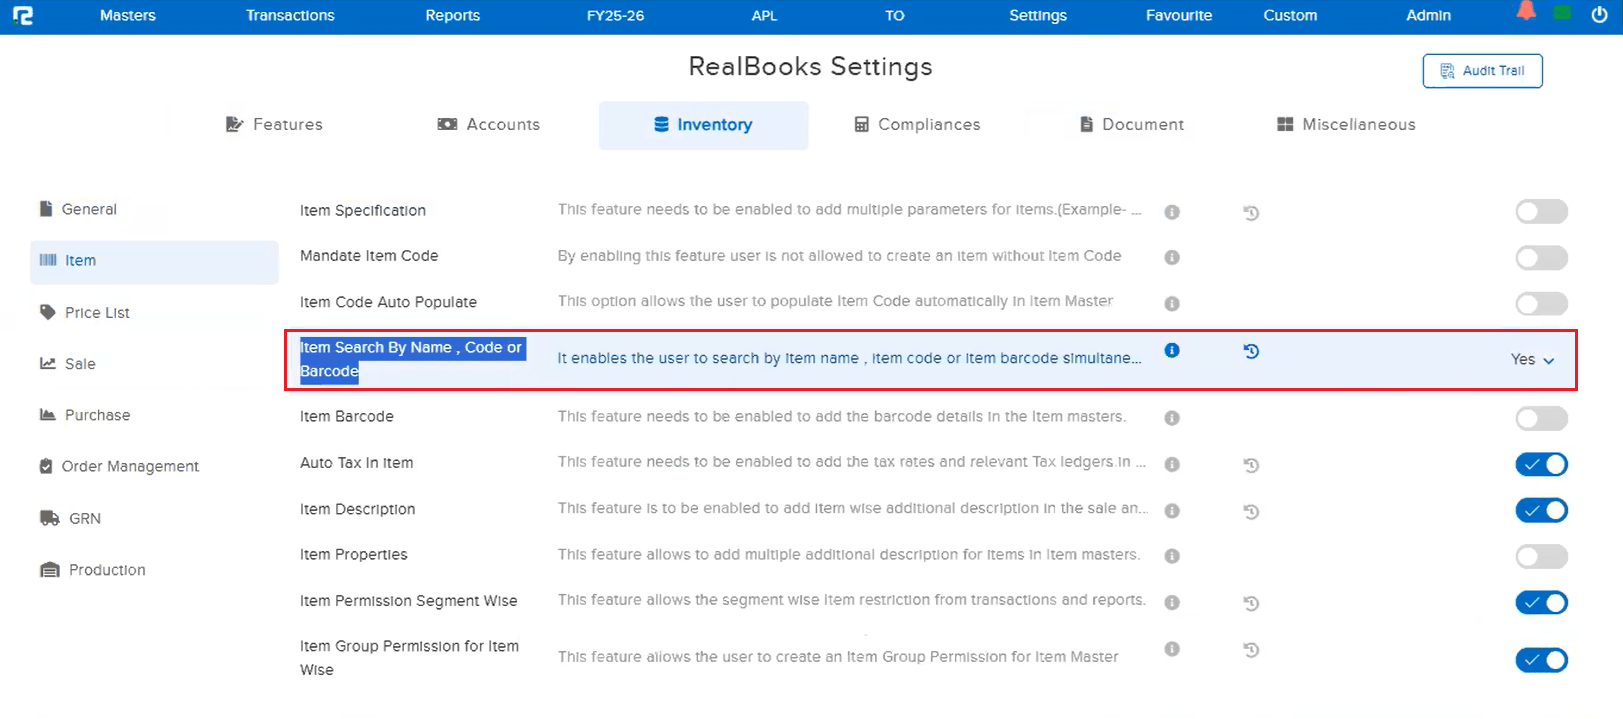
When the Simultaneous Item Search parameter is enabled from the Settings page, the search previously only worked with Item Name and Item Code. With this enhancement, the search now also includes BarCode — so you can find items by scanning or typing a barcode directly in the search field.
🌟 What This Means for You
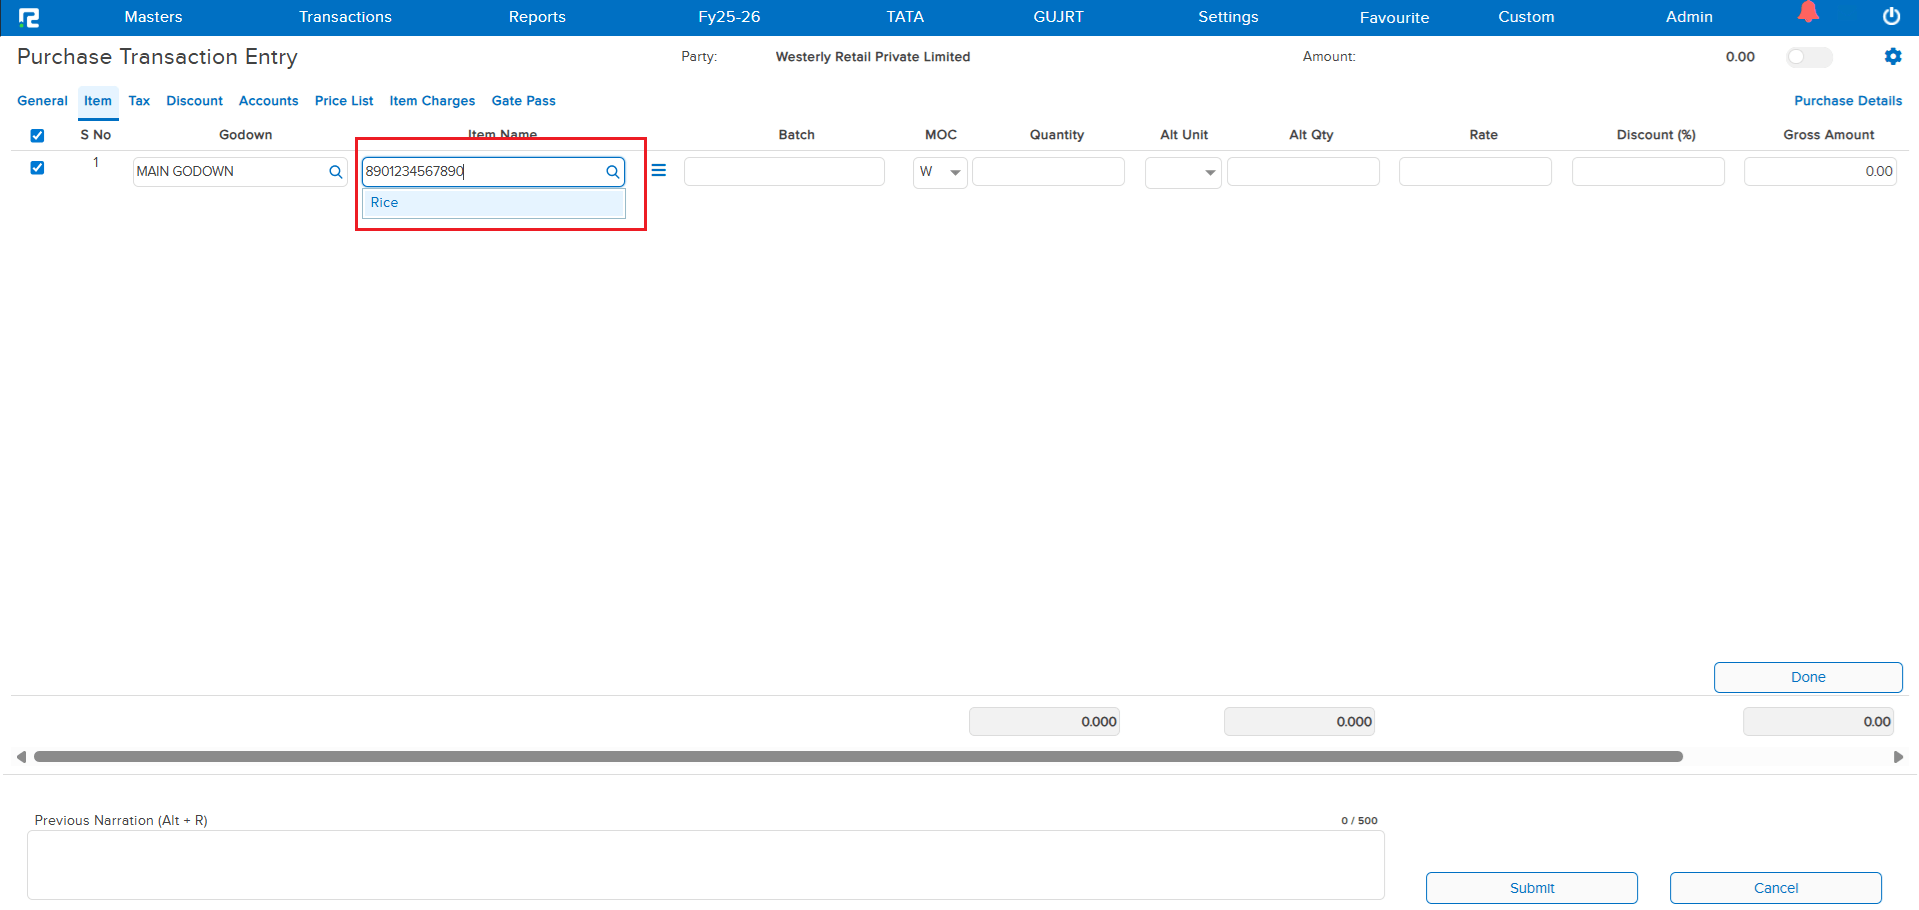
If your workflow relies on barcodes, you no longer need to switch between search modes. Simply type or scan the barcode in the simultaneous search field, and the system will find the matching item instantly — just like it does for Item Name and Item Code. One search field, three ways to find your item!
🎬 How to Use It
1. Ensure the Simultaneous Item Search parameter is enabled in your Settings page.
2. In any item search field, type or scan the BarCode.
3. The system will search across Item Name, Item Code, and BarCode simultaneously and display the matching results.
📷 See It in Action
📌 Overview
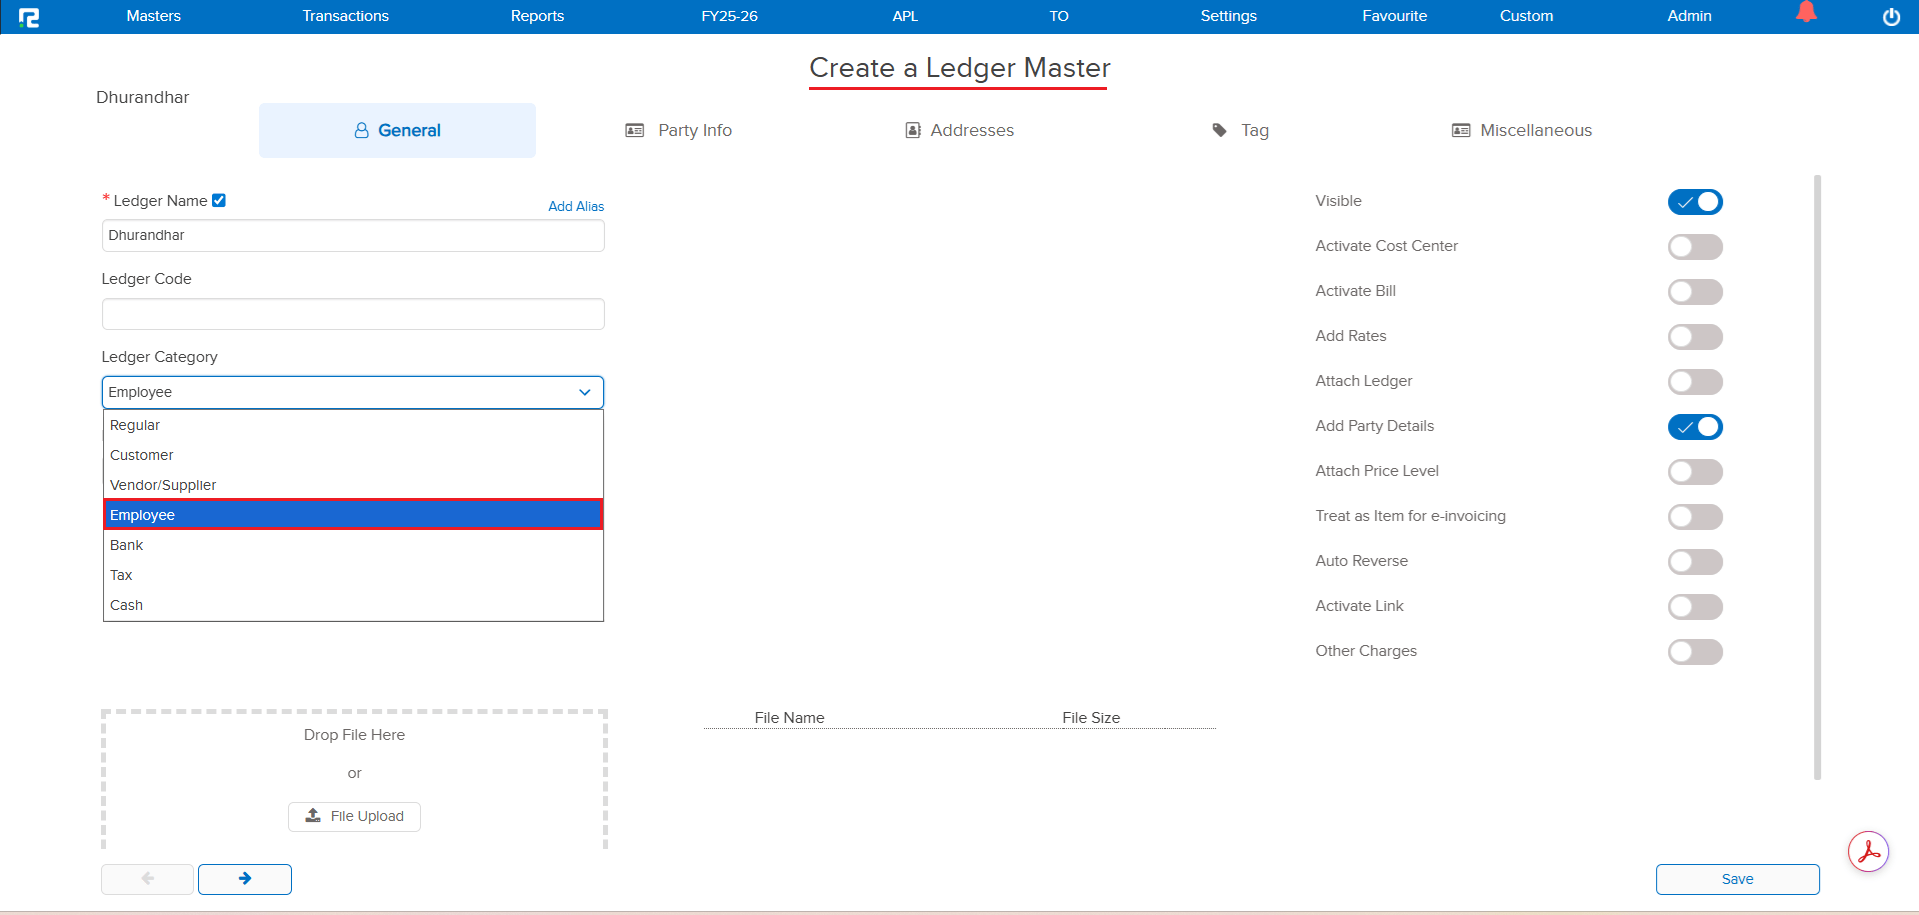
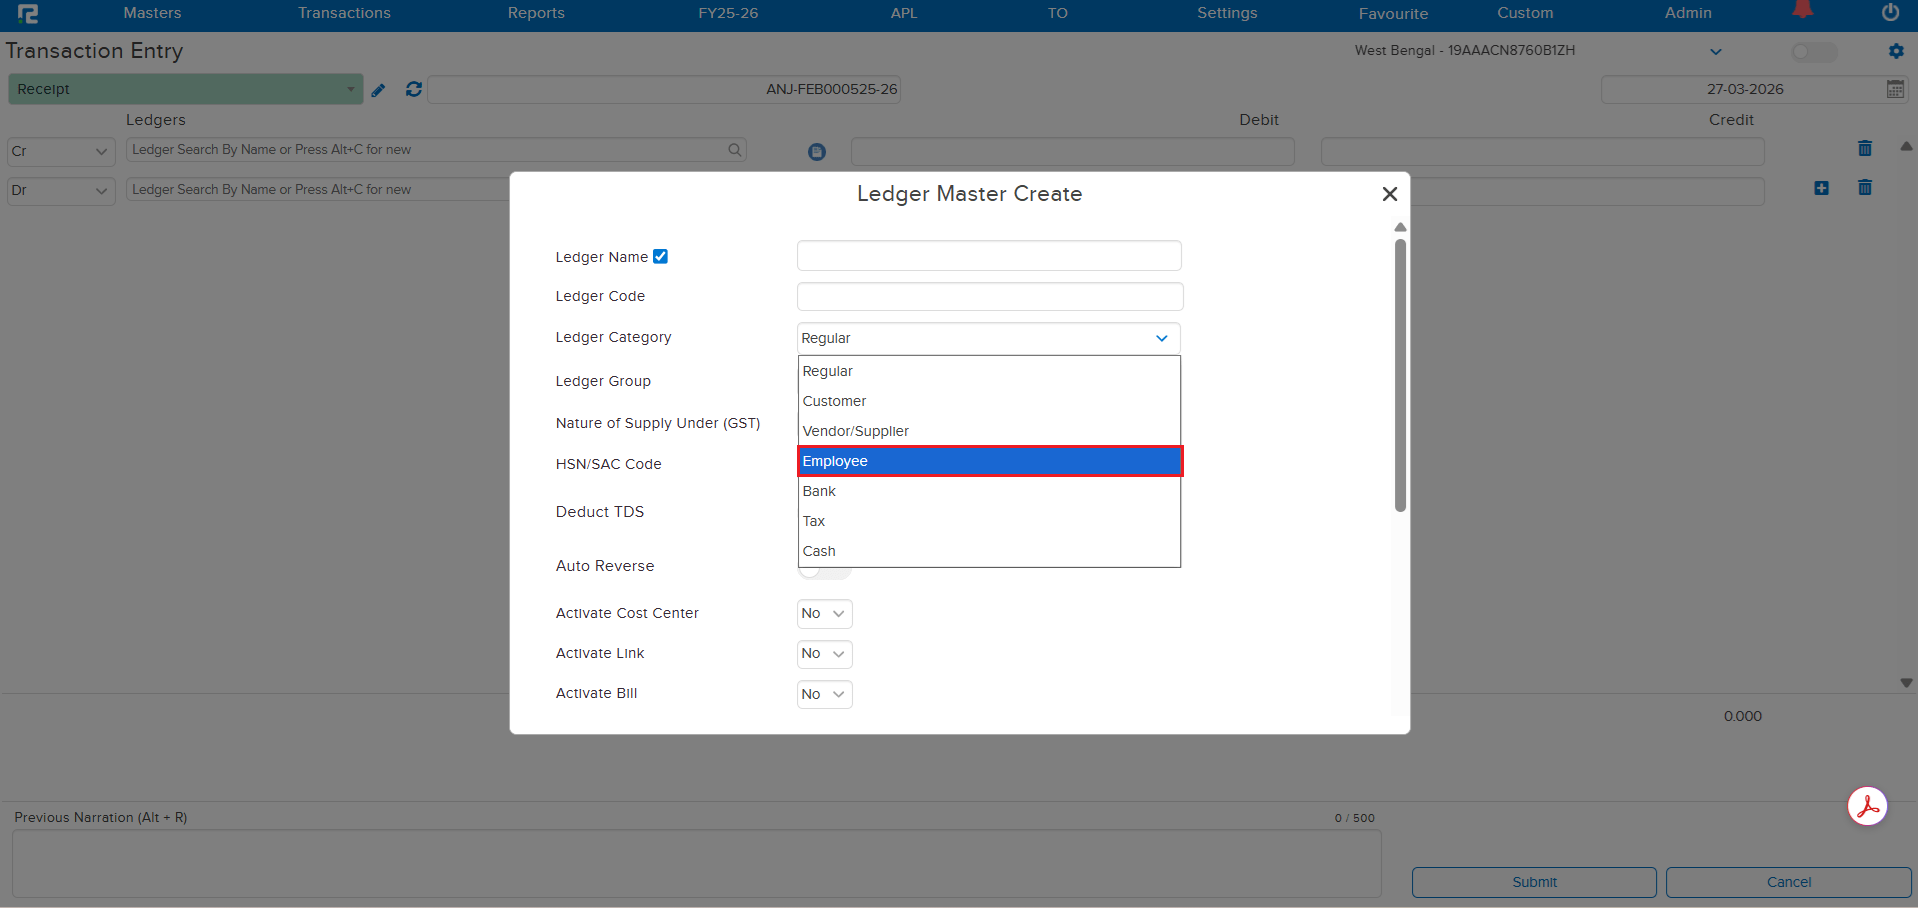
A new Employee category has been added under the Ledger Category dropdown in the Ledger Master. Previously, there was no dedicated category for employee-related ledgers, requiring users to map them under other categories. With this enhancement, you can now directly classify ledgers as Employee type during creation.
🌟 What This Means for You
You can now categorize employee-related ledgers accurately using the dedicated Employee category. This improves ledger organization, makes filtering easier, and ensures cleaner reporting for employee-specific transactions.
🎬 Where to Find It
1. Go to Masters → Accounts → Ledger → Create.
2. In the Ledger Category dropdown, select the new Employee option.
3. Complete the remaining fields and save.
📷 See It in Action
📝 What Changed
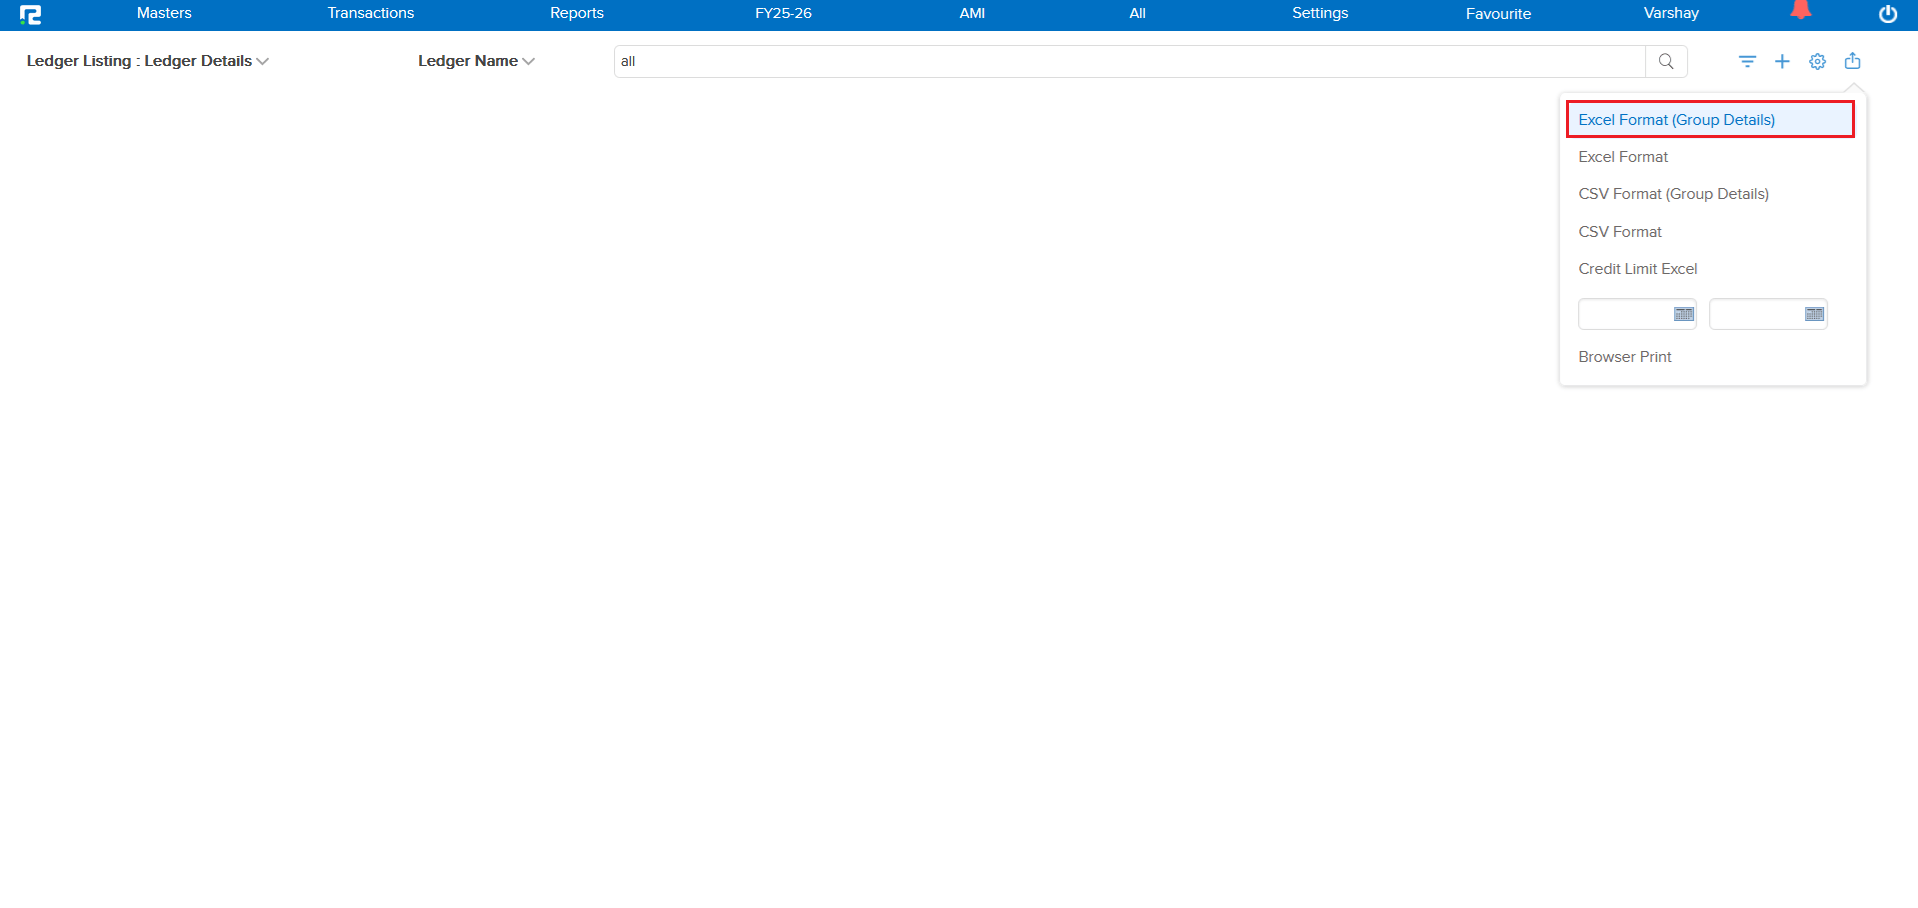
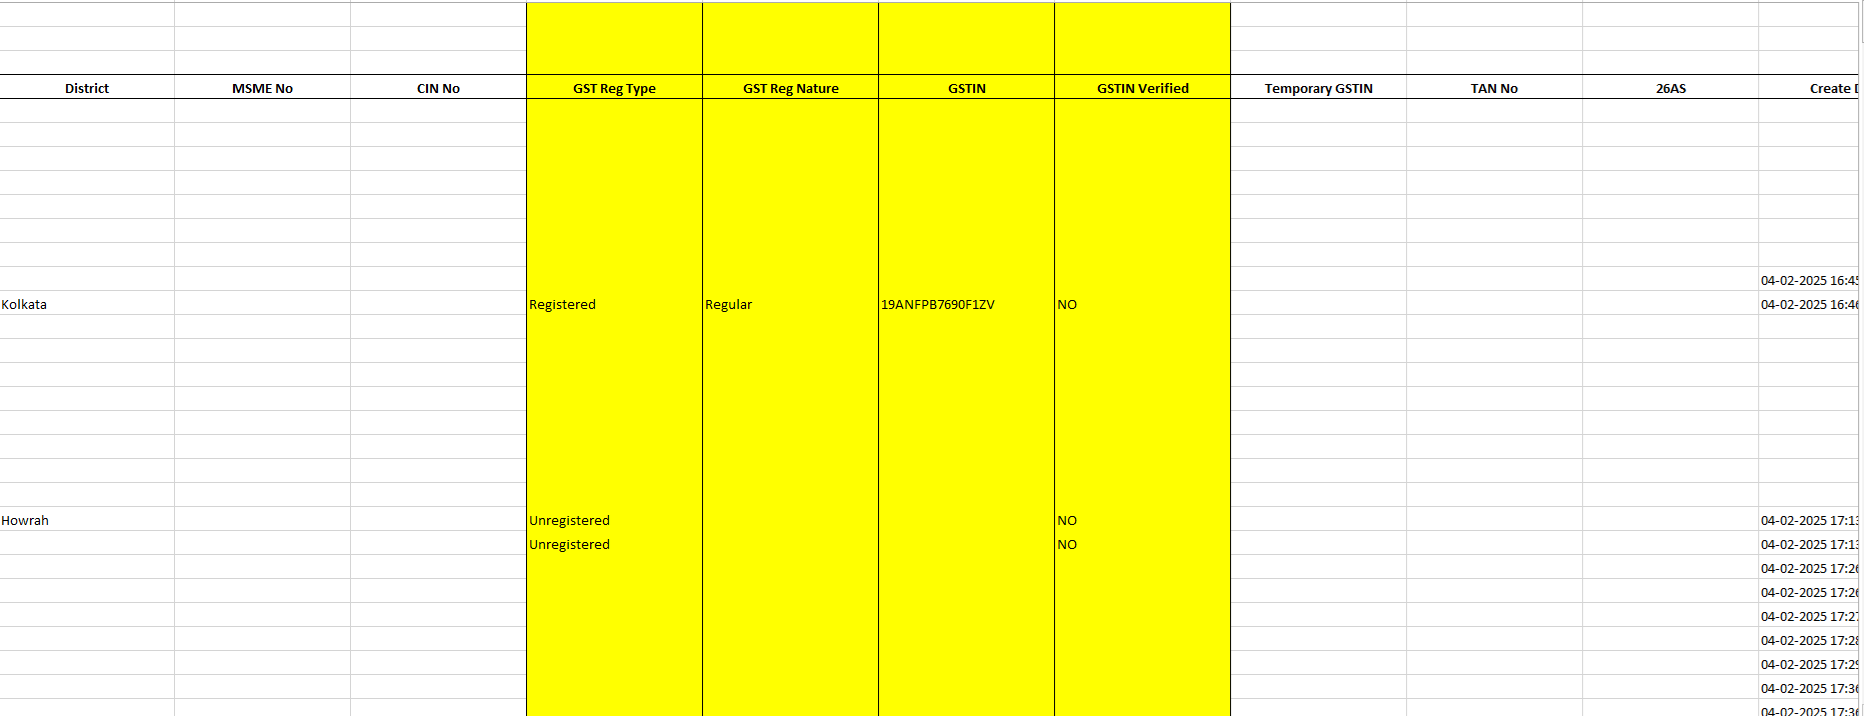
In the Ledger Master export variation “Excel Format (Group Details)”, the following new fields have been introduced:
- GST Reg Type
- GST Reg Nature
- GSTIN
- GSTIN Verified
📷 See It in Action
📌 What Was Happening
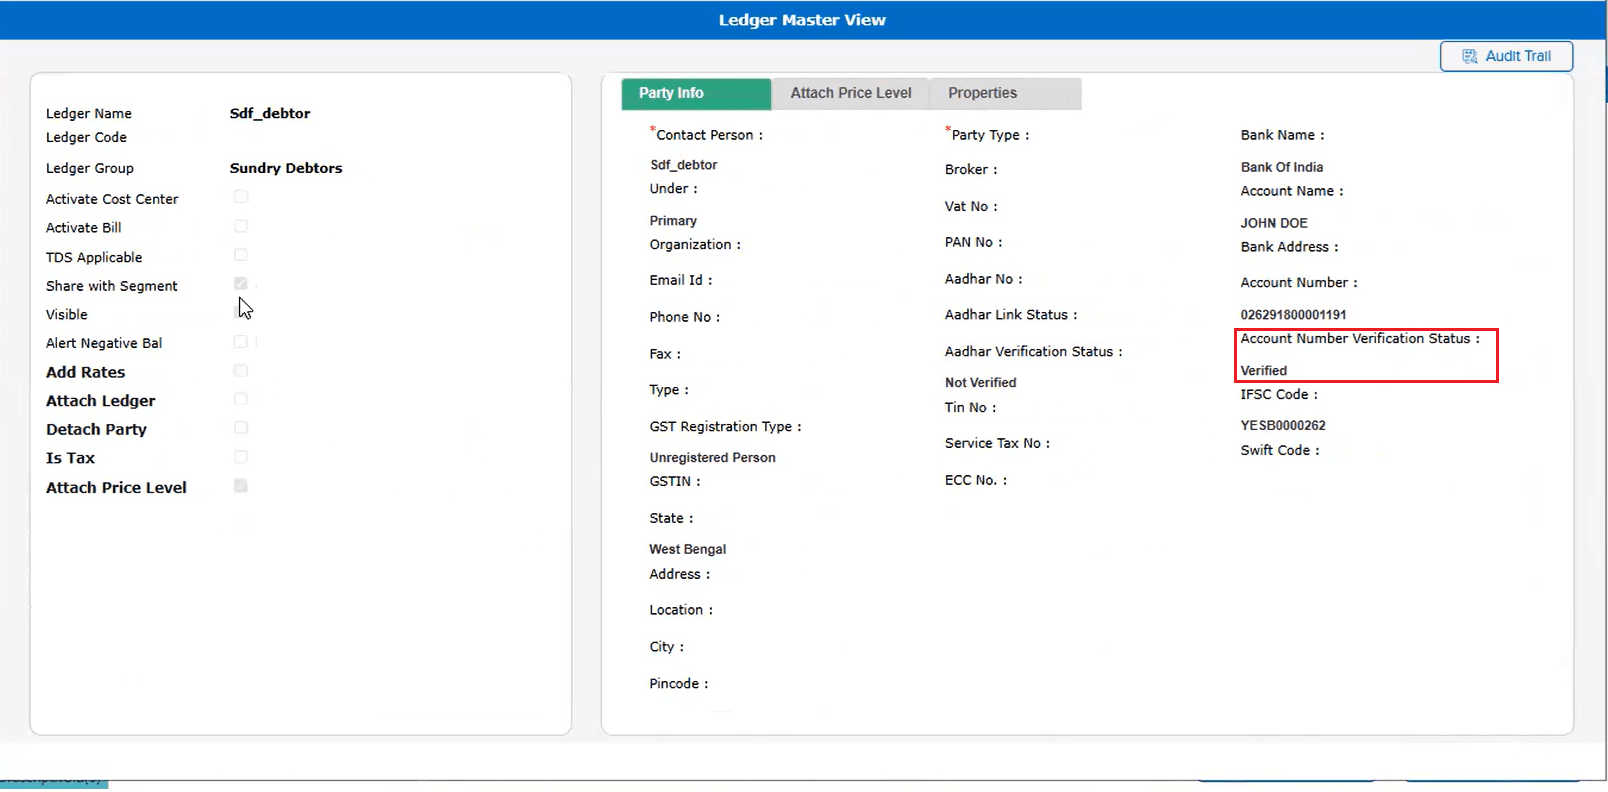
As part of the earlier release (JOB-157918), Cashfree Bank Validation was introduced to verify bank account details during ledger creation and editing. However, the verification status was not visible when viewing the ledger in the Ledger Master View screen. Users had to open the edit mode to check whether a bank account was verified or not.
🌟 What This Means for You
The bank verification status is now displayed directly in the Ledger Master View screen. You can quickly see whether a ledger’s bank account has been verified via Cashfree without needing to enter edit mode — making it faster to review and audit ledger details.
🎬 Where to Find It
📷 See It in Action
📌 What Was Happening
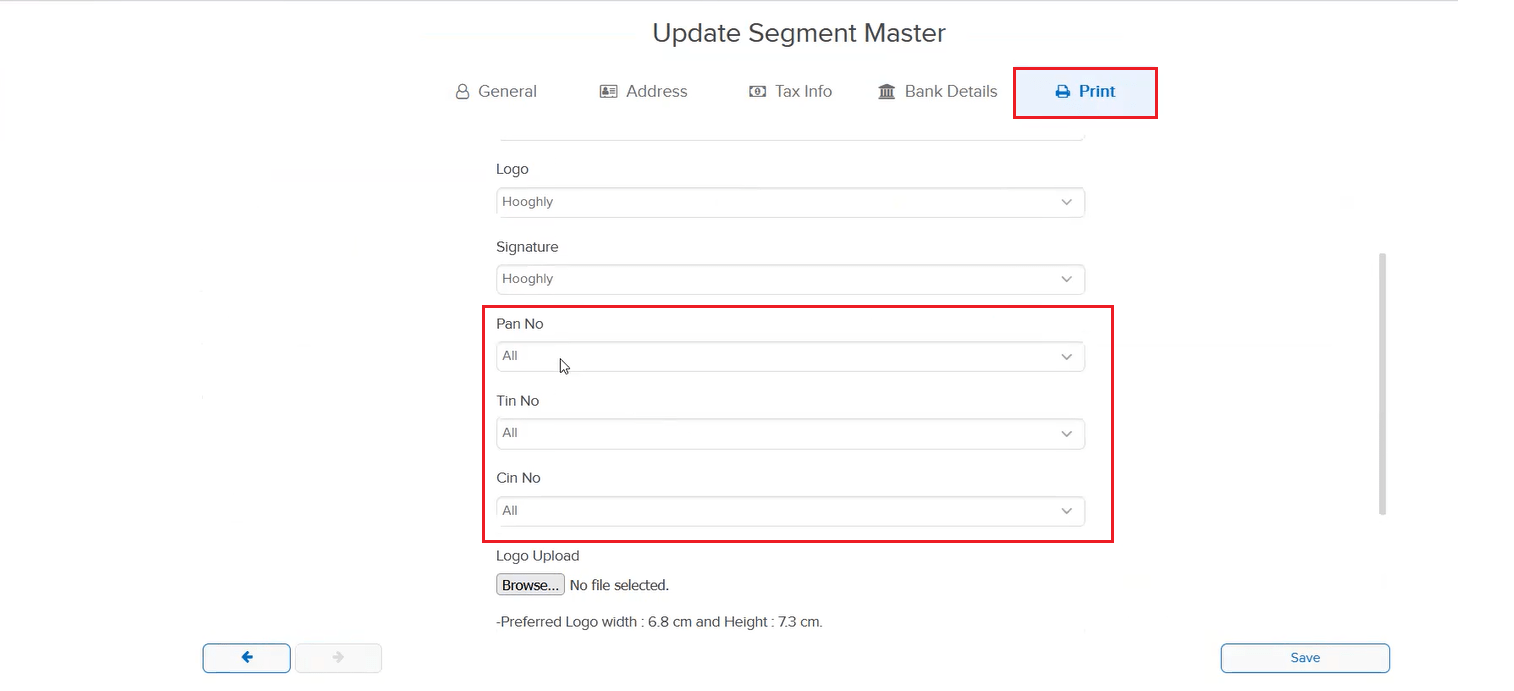
The Segment Master did not have fields for PAN, TIN, and CIN under the print setup section. Users who needed these details to appear on printed templates (invoices, reports, etc.) had no way to configure them at the segment level, resulting in missing or manually added information on print outputs.
🌟 What This Means for You
Print setup fields for PAN, TIN, and CIN are now available in the Segment Master. You can configure these details per segment, and they will be automatically fetched and displayed in your print templates — ensuring accurate and professional document outputs without manual intervention.
📷 See It in Action
📌 What Was Happening
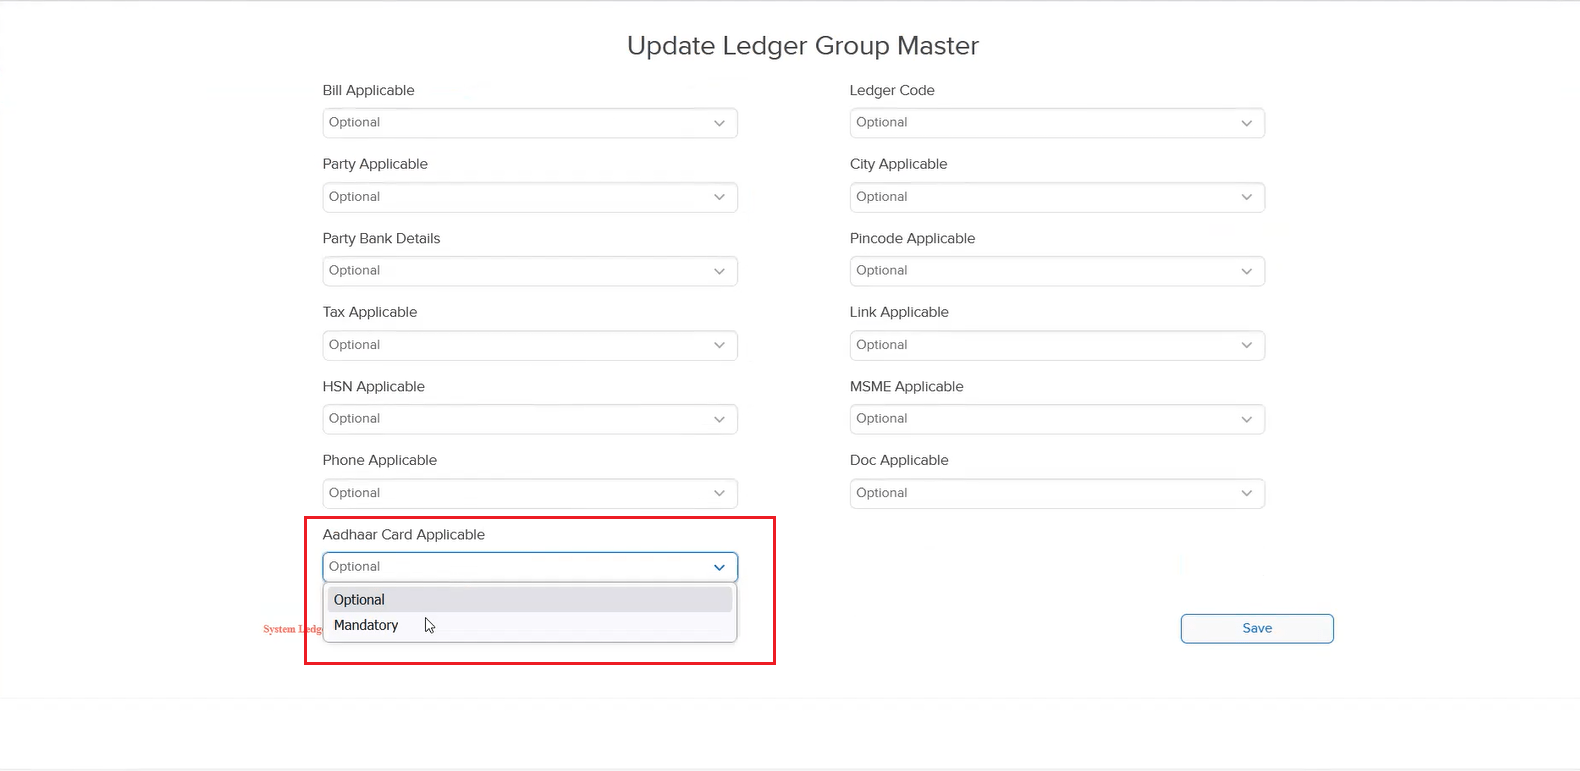
The Ledger Group Master had a PAN Applicability option under Applicability settings, but there was no similar option for Aadhaar Card. Users who needed to enforce Aadhaar collection for specific ledger groups had no way to configure this at the group level.
🌟 What This Means for You
An Aadhaar Card Applicability option is now available in the Ledger Group Master under Applicability, similar to the existing PAN Applicability. You can now configure whether Aadhaar is required for ledgers under a specific group — ensuring compliance and consistent data collection across your organization.
📷 See It in Action
📌 Overview
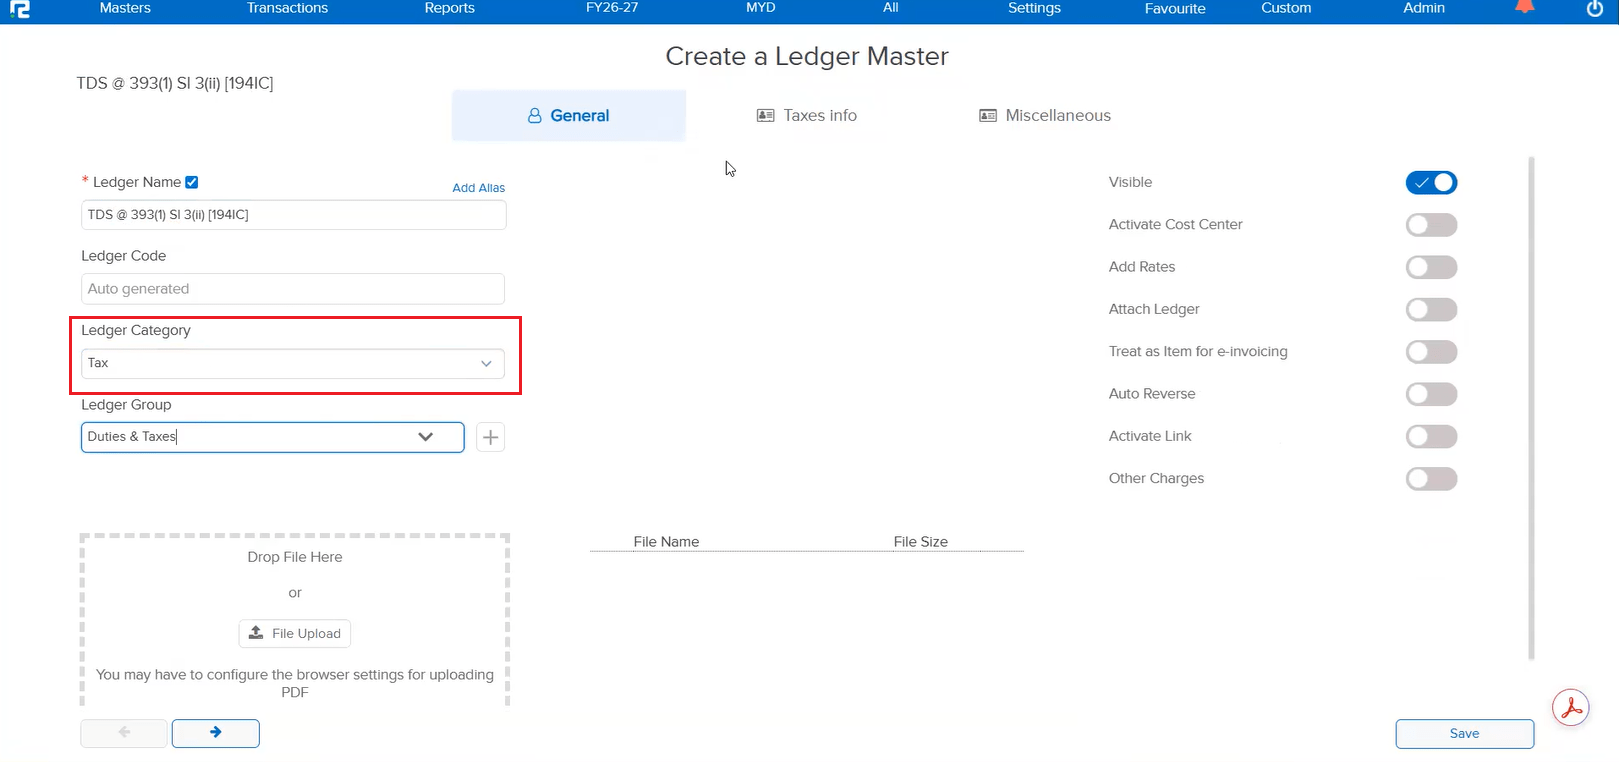
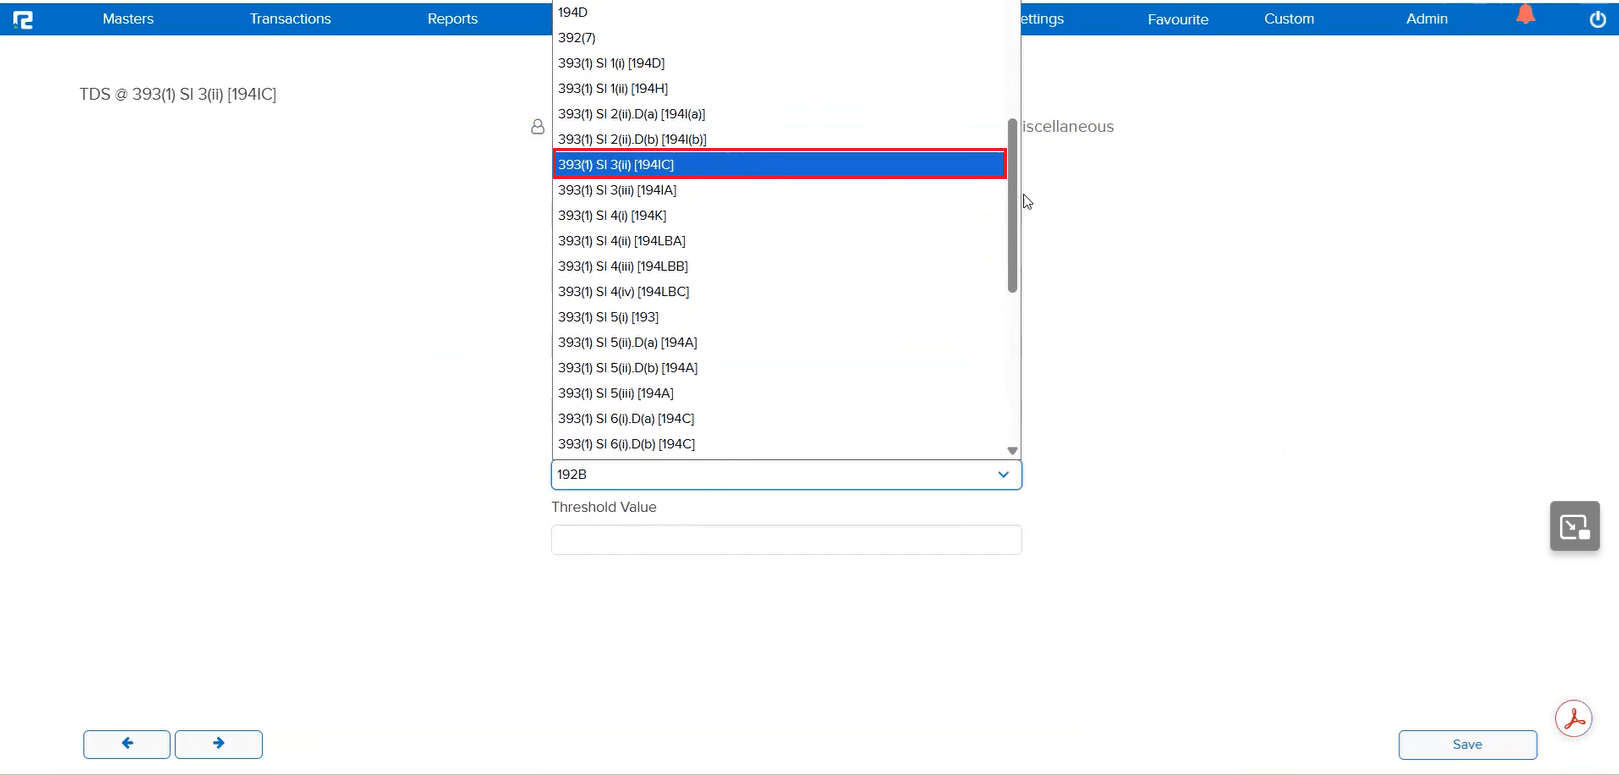
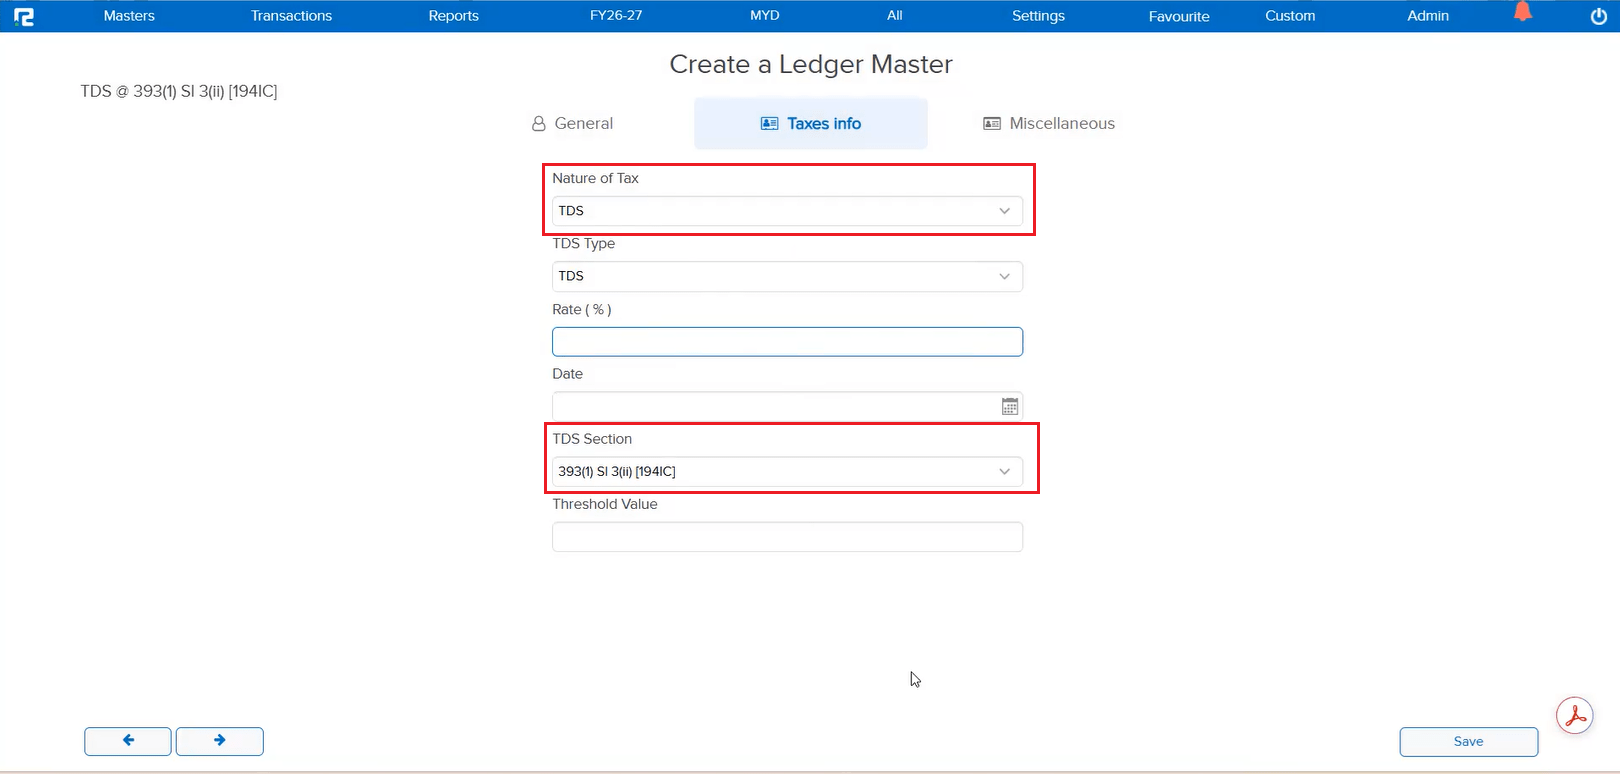
As per the latest compliance rules effective from 01-04-2026, new TDS sections have been introduced. These updated sections are now available in the Ledger Master for selection when configuring TDS-related ledgers, ensuring your setup remains compliant with the current financial year regulations.
🌟 What This Means for You
You can now select the newly introduced TDS sections directly from the Ledger Master. This ensures your TDS configuration is up to date with the FY 2026–27 compliance requirements — avoiding any issues during TDS filing and return processing.
📷 See It in Action
📌 What Was Happening
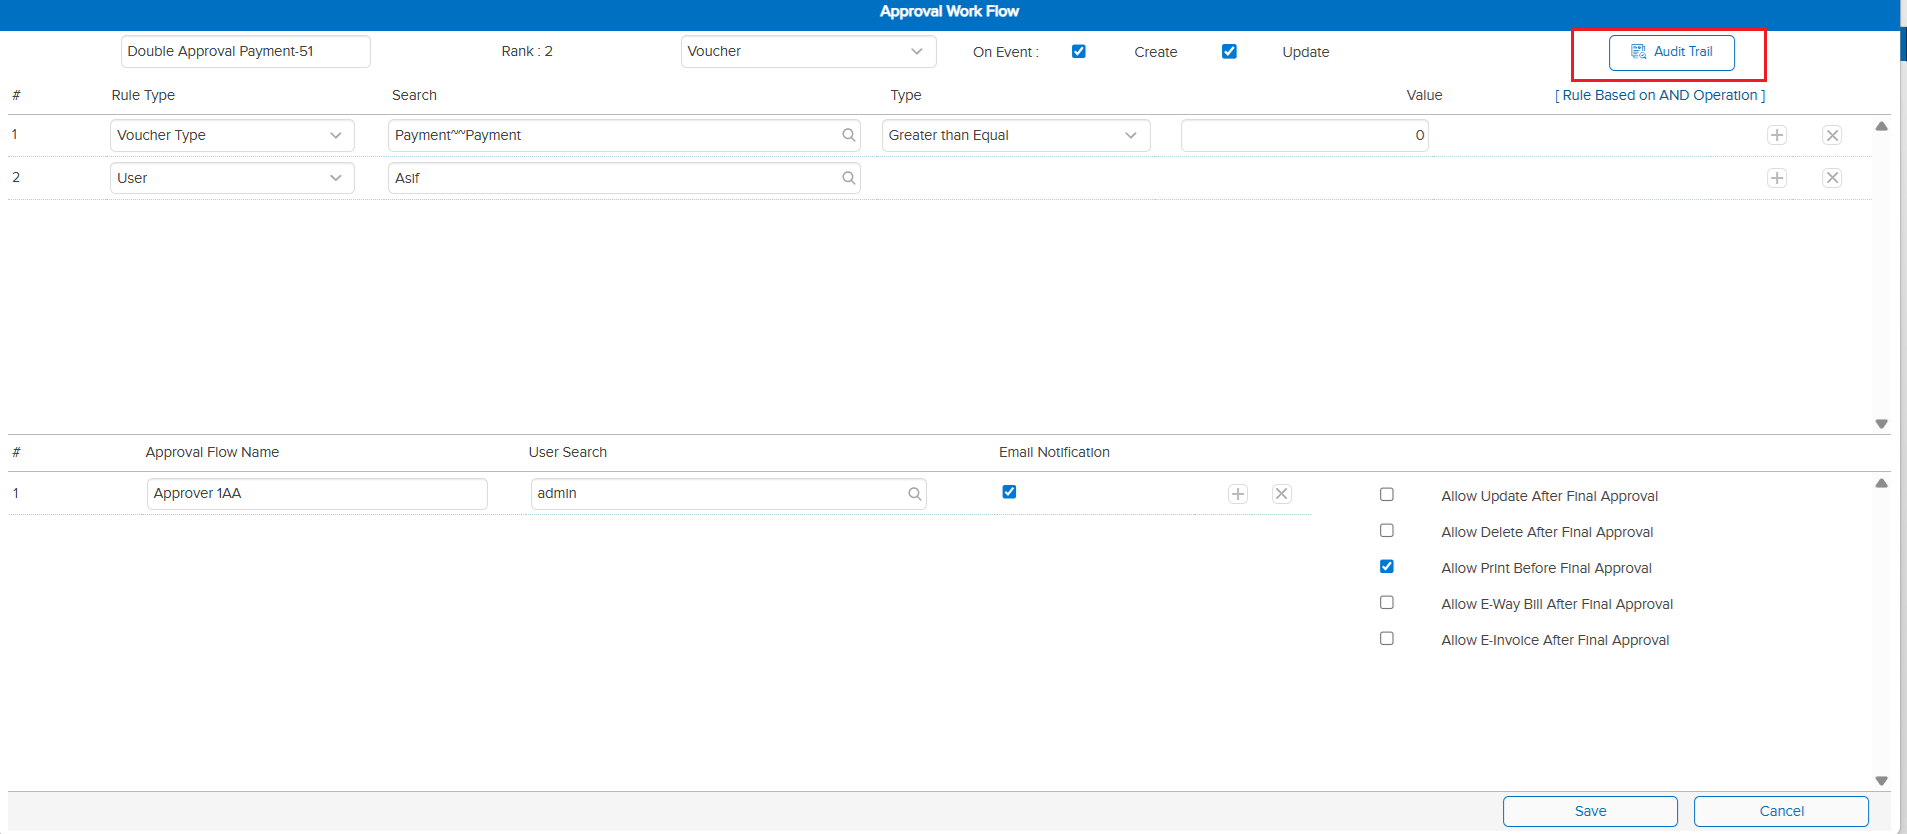
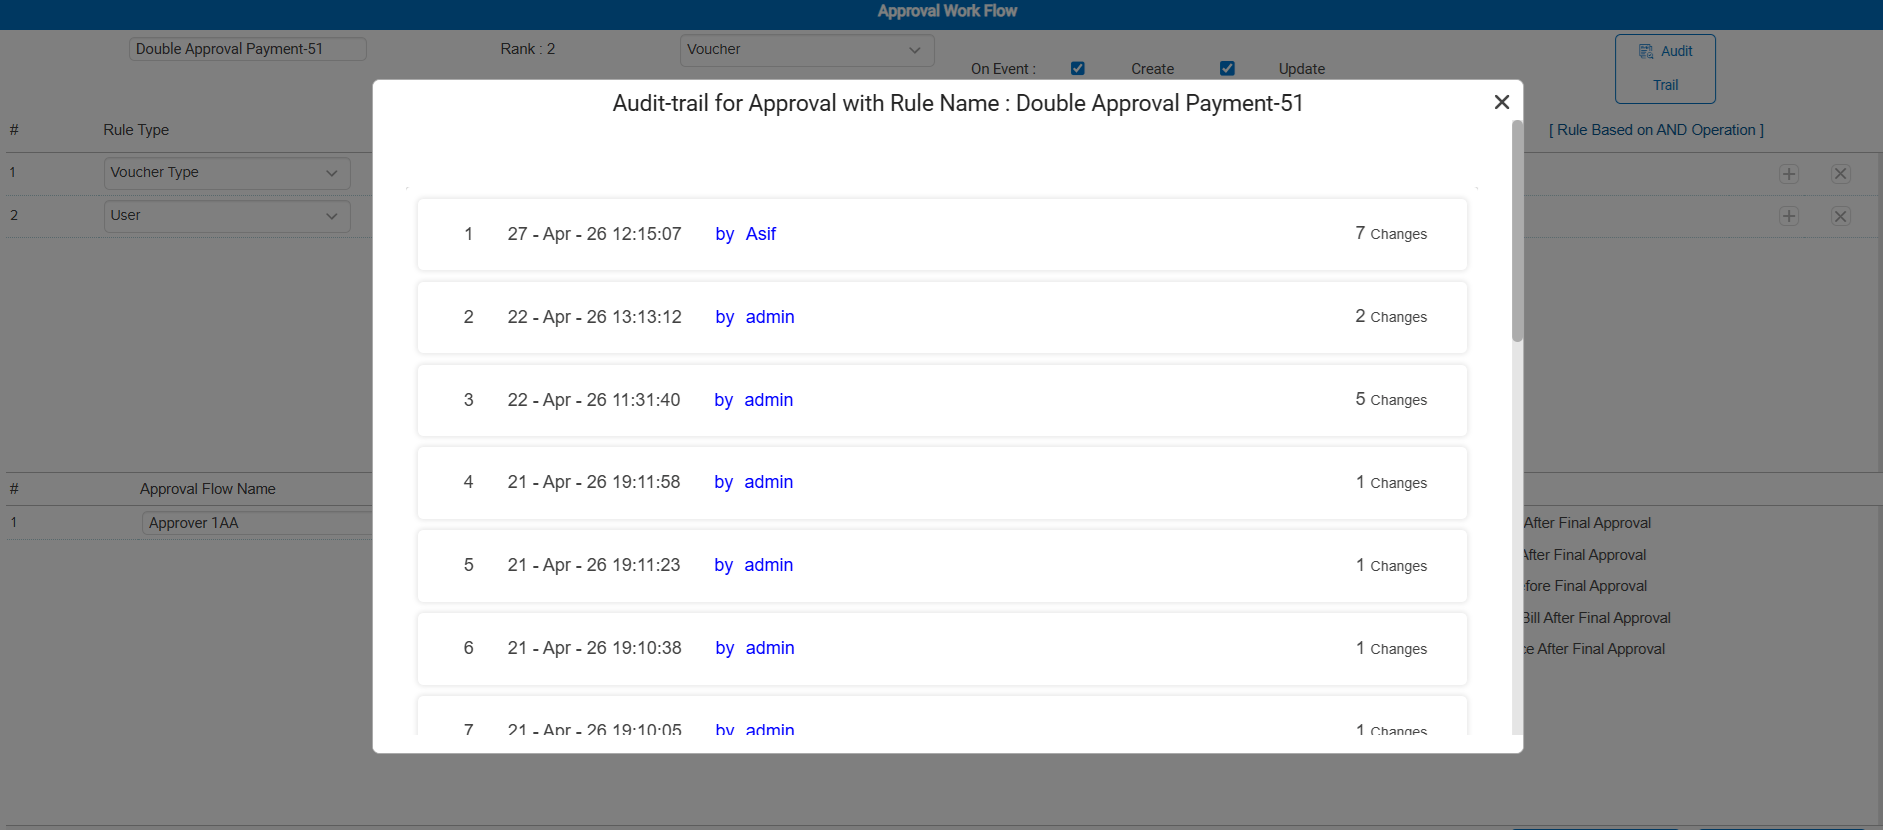
In the Approval Workflow Master, there was no option to check the Audit Trail. Users had no way to track who made changes to the approval workflow configuration, when the changes were made, or what was modified — making it difficult to maintain transparency and accountability over workflow settings.
🌟 What This Means for You
An Audit Trail is now available for the Approval Workflow Master. You can view a complete history of changes made to approval workflow configurations — including who made the change, when it was made, and what was modified. This enables better tracking, transparency, and accountability for your approval processes.
🎬 Where to Find It
📷 See It in Action
📌 What Was Happening
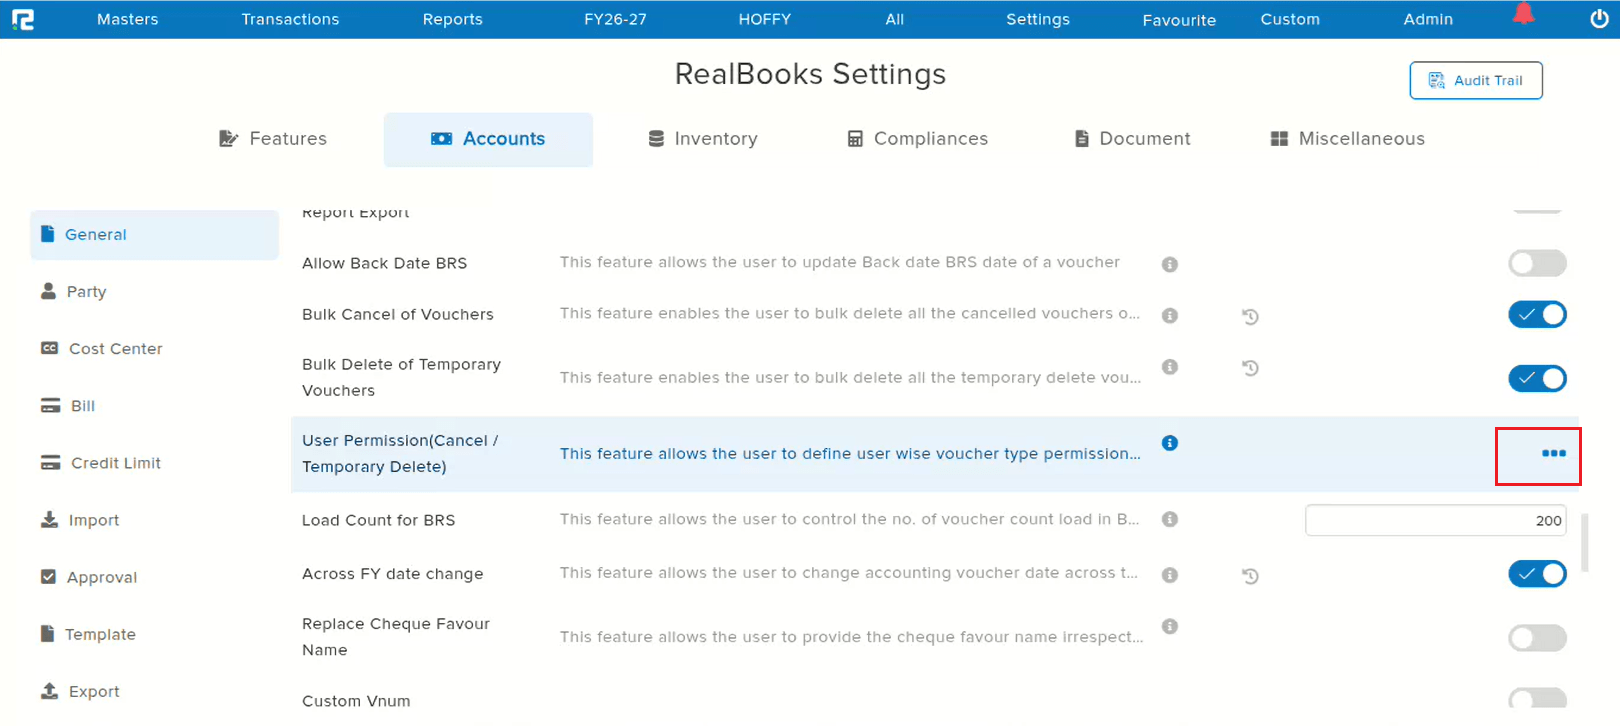
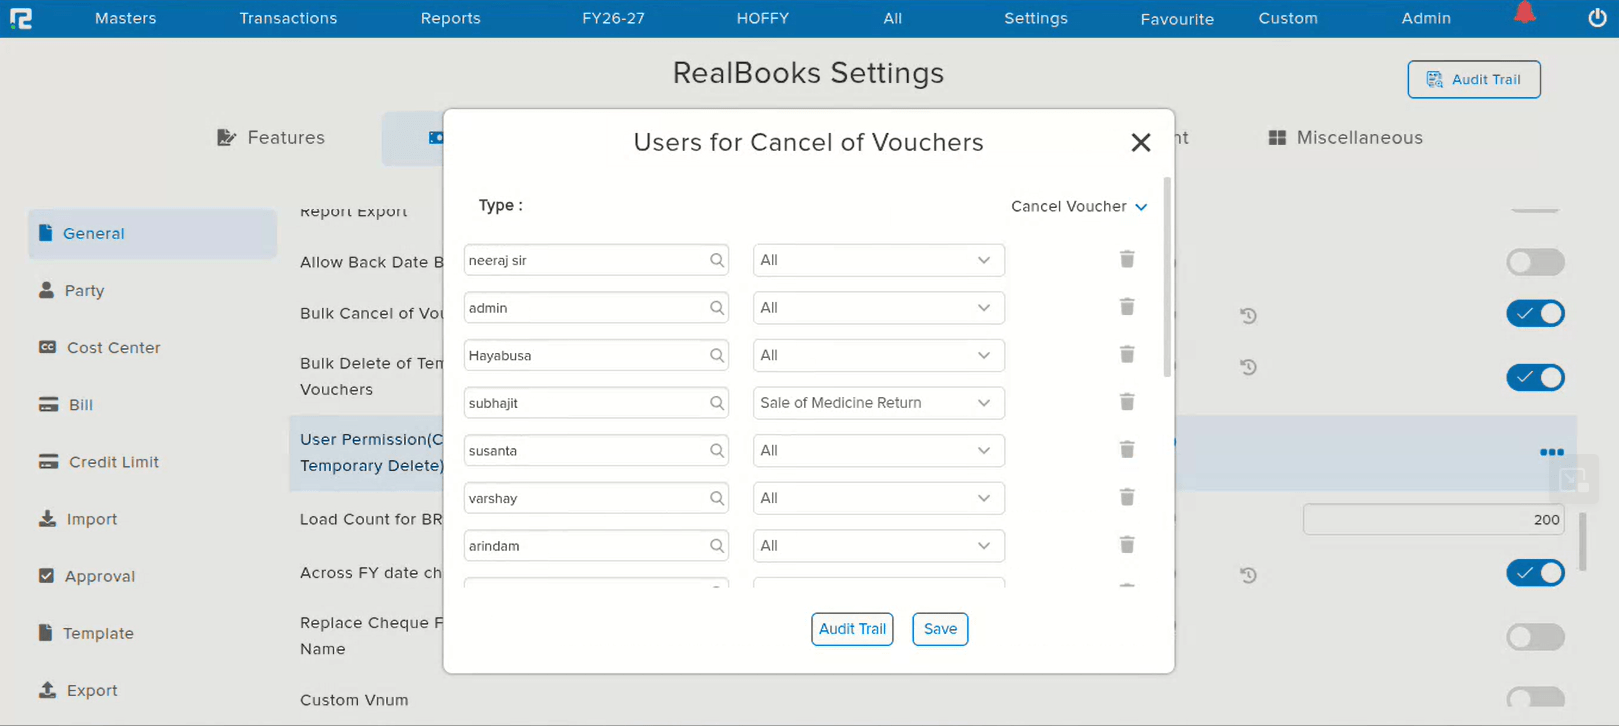
The User Permission pop-up for Cancel / Temporary Delete actions on the Settings page was not accessible. Users were unable to interact with or configure these permission settings, requiring optimization to make the pop-up functional and reachable.
🌟 What This Means for You
The User Permission (Cancel / Temporary Delete) pop-up in the Settings page has been optimized and is now fully accessible. You can configure cancel and temporary delete permissions directly from the settings without any issues.
🎬 Where to Find It
📷 See It in Action
📌 Overview
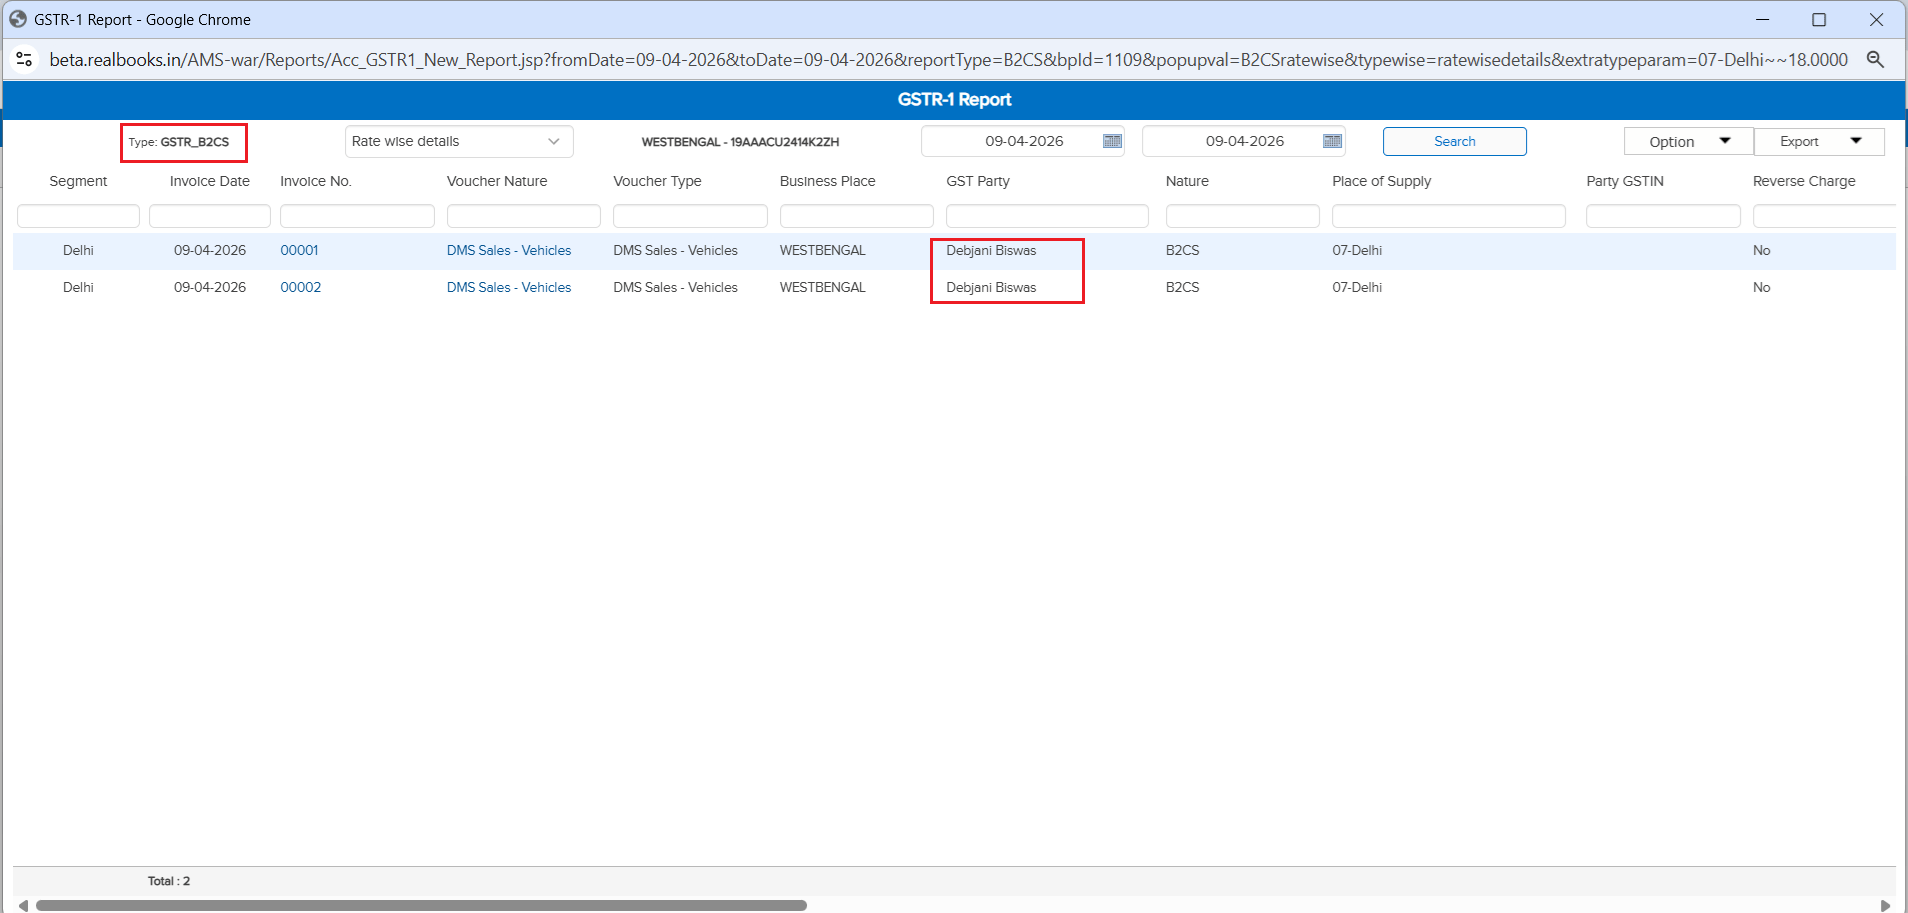
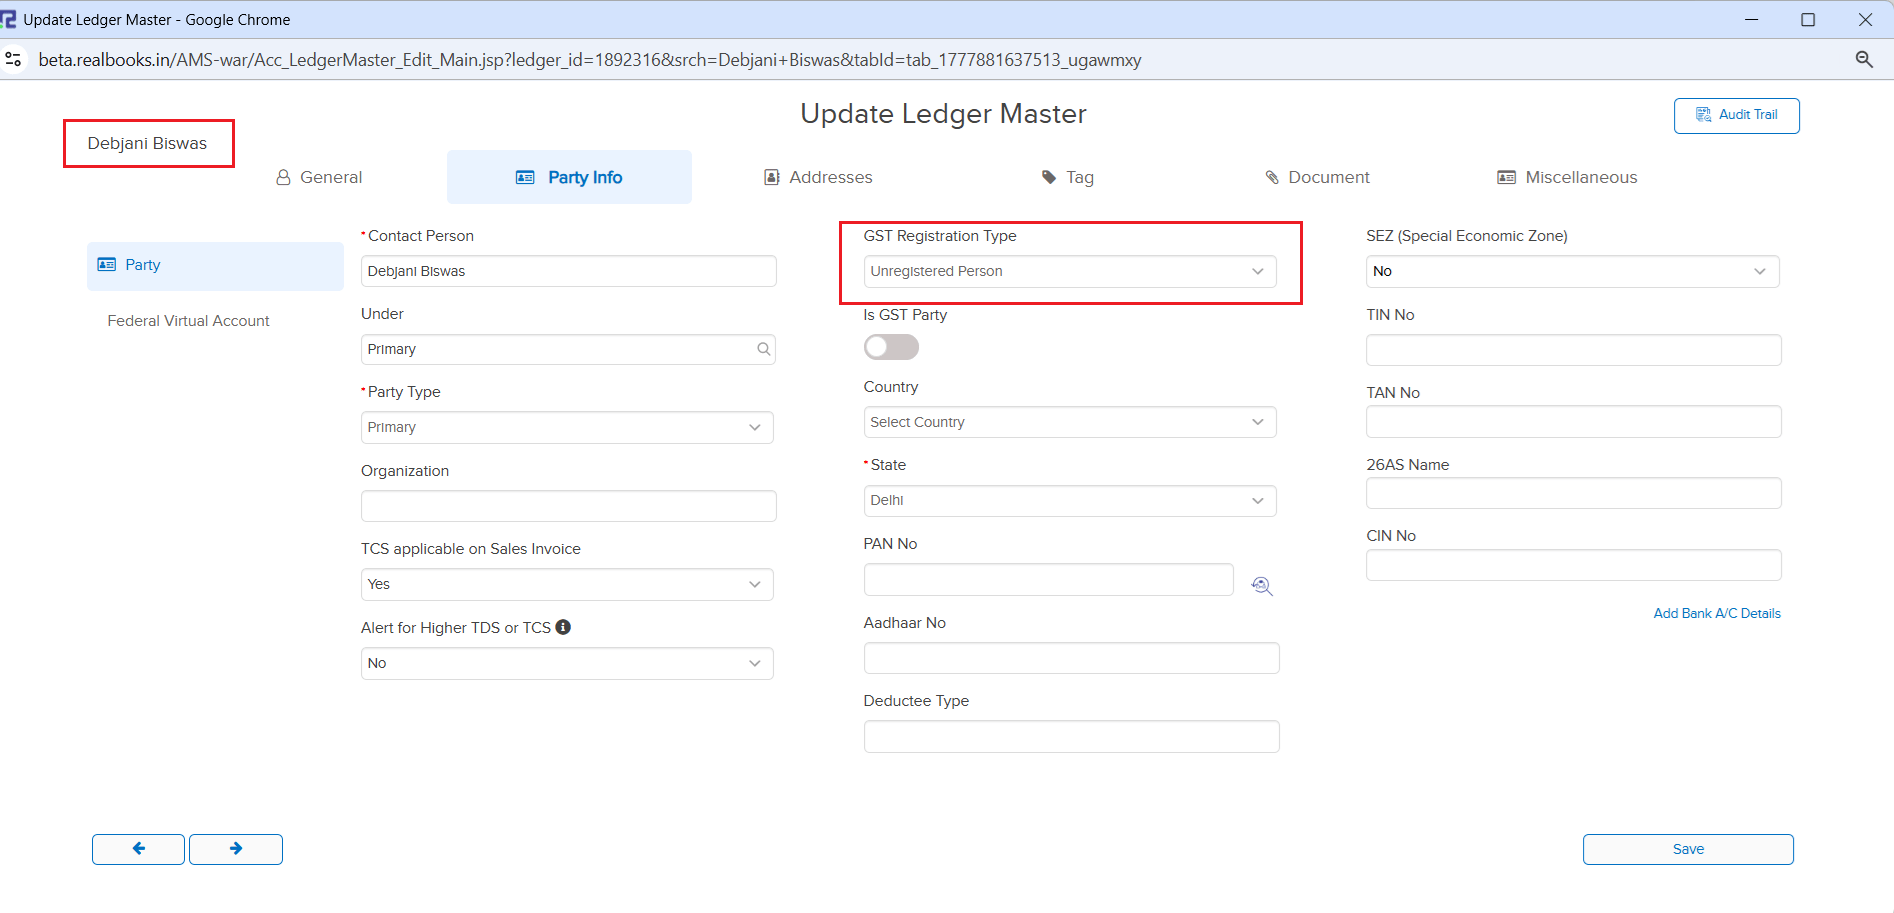
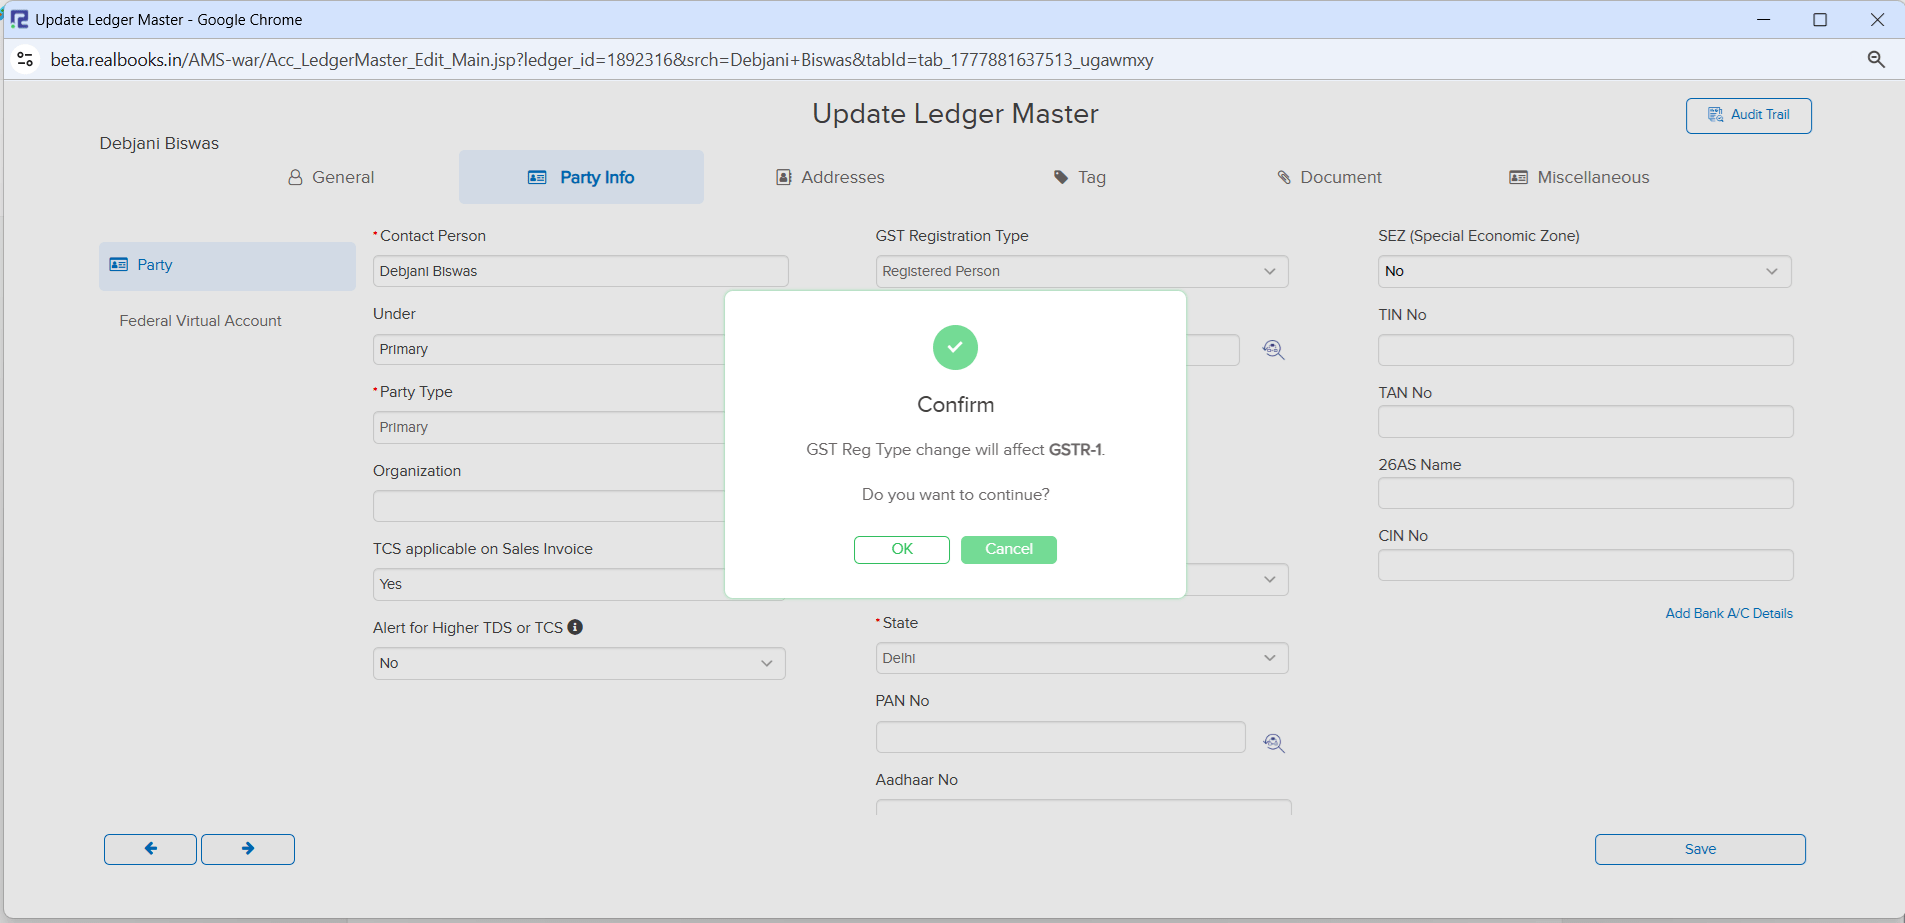
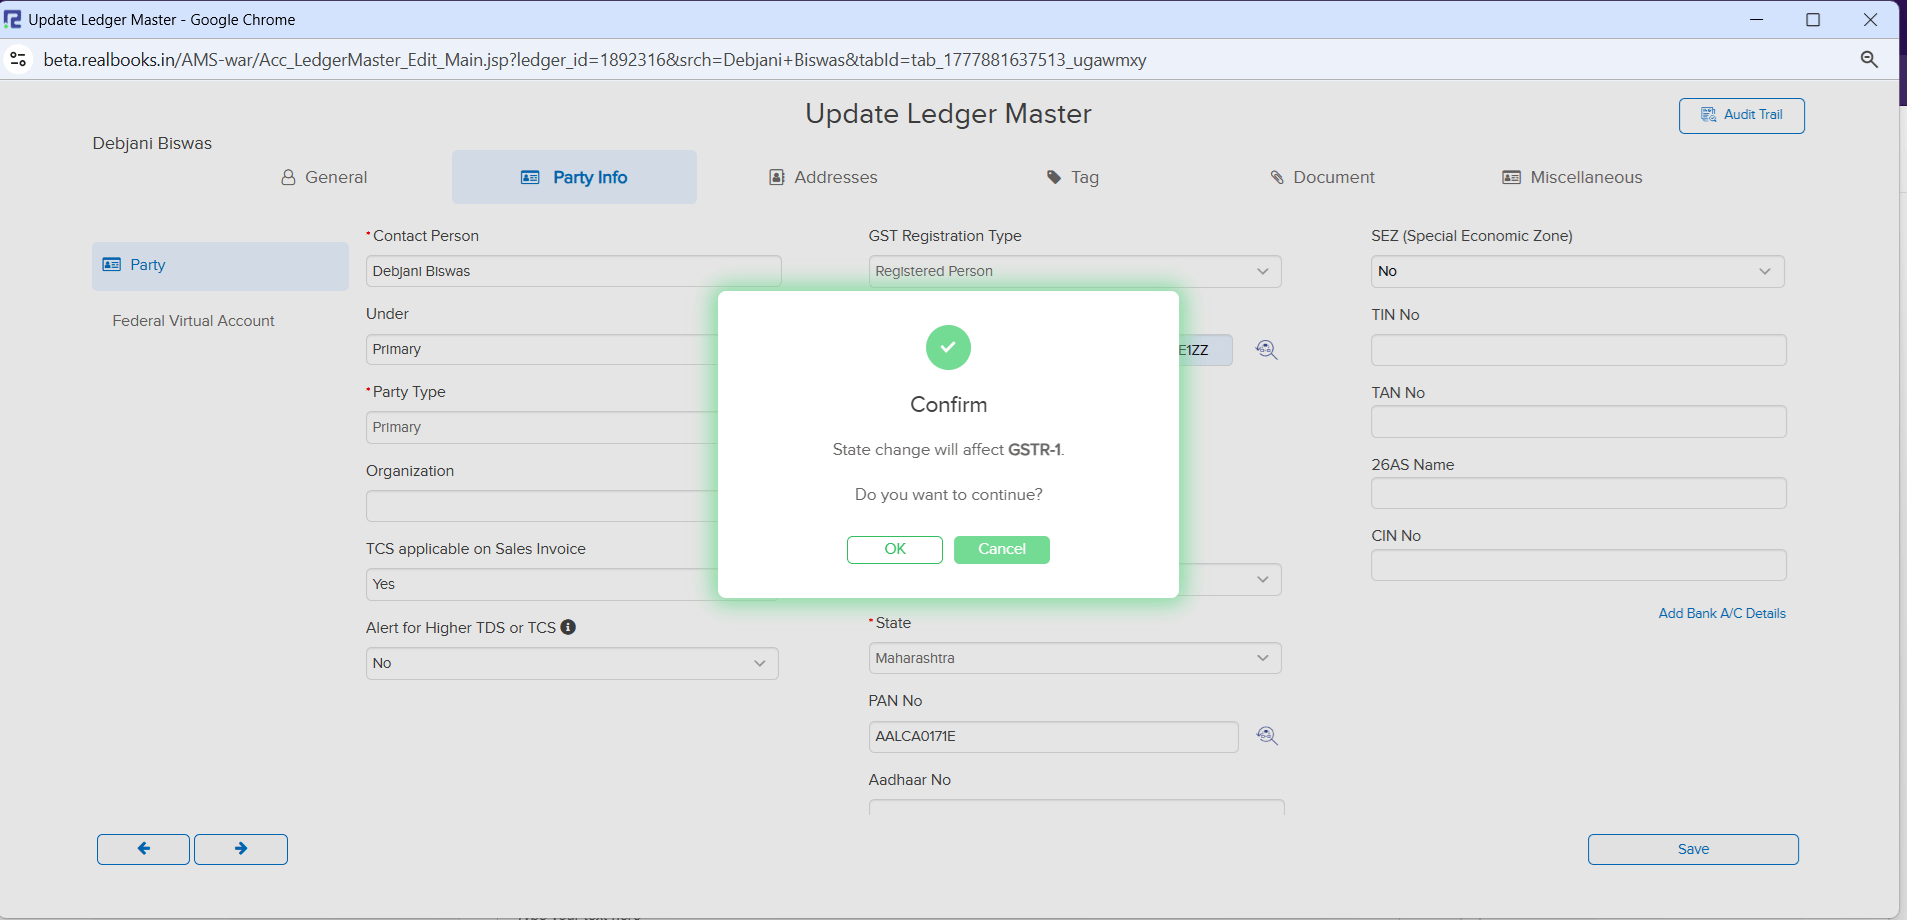
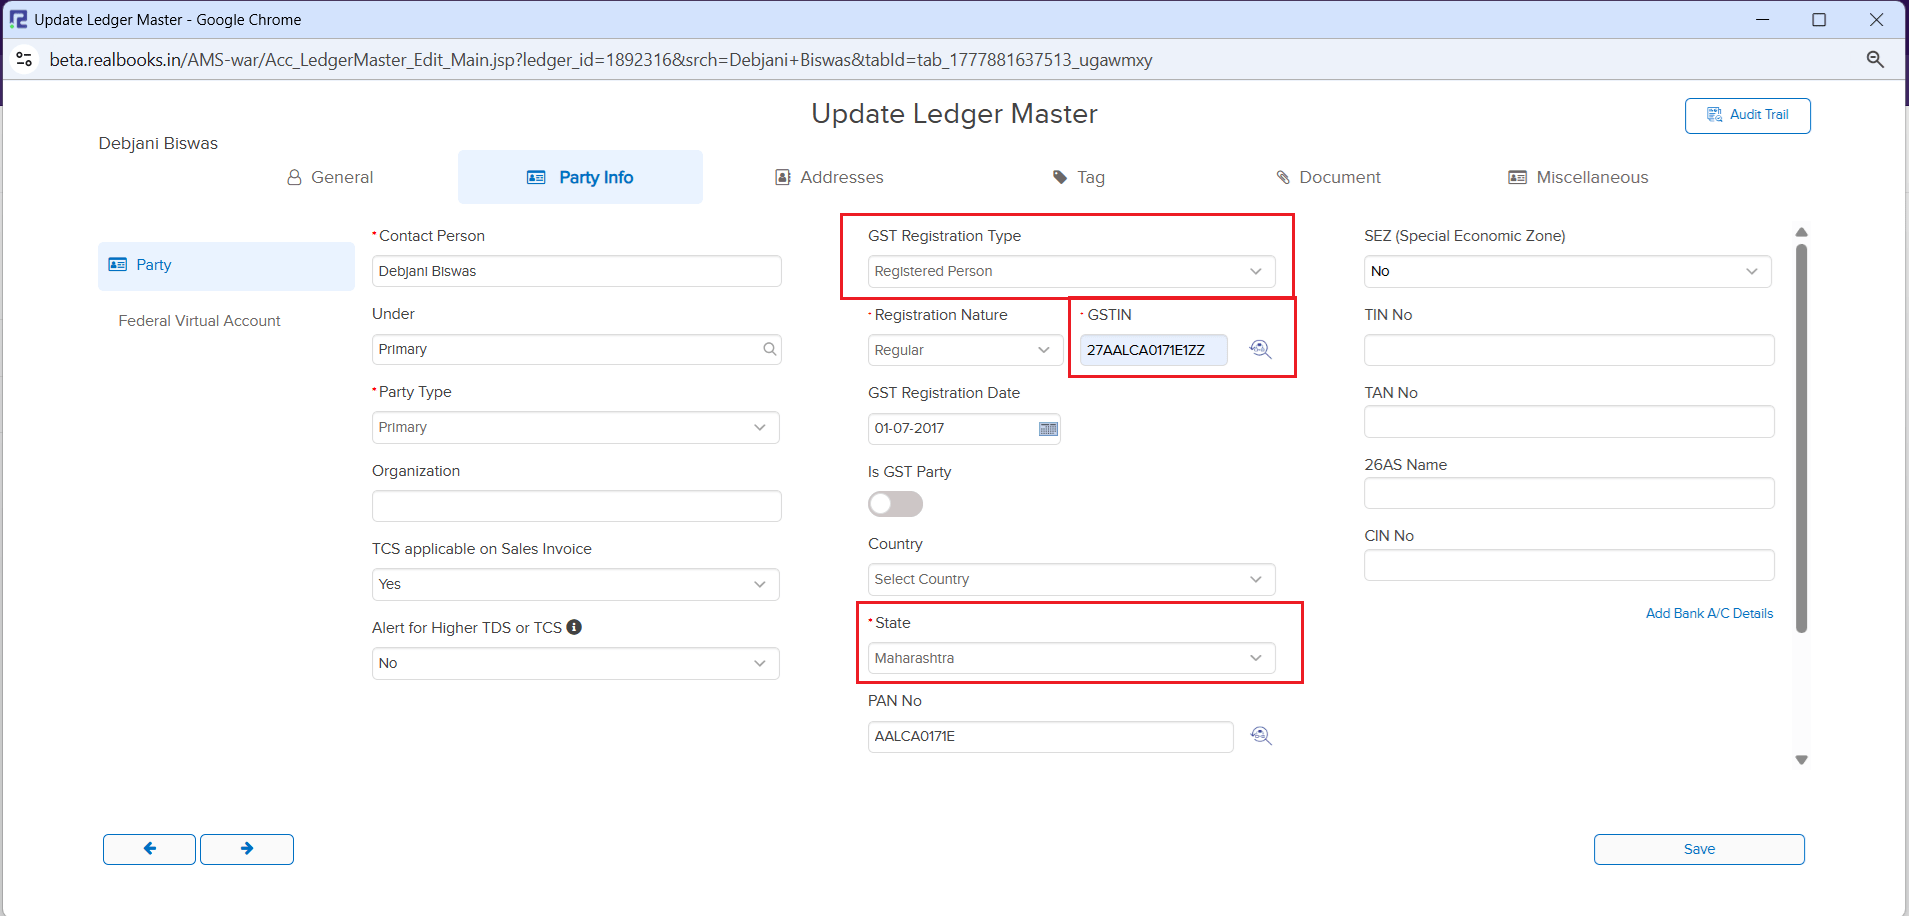
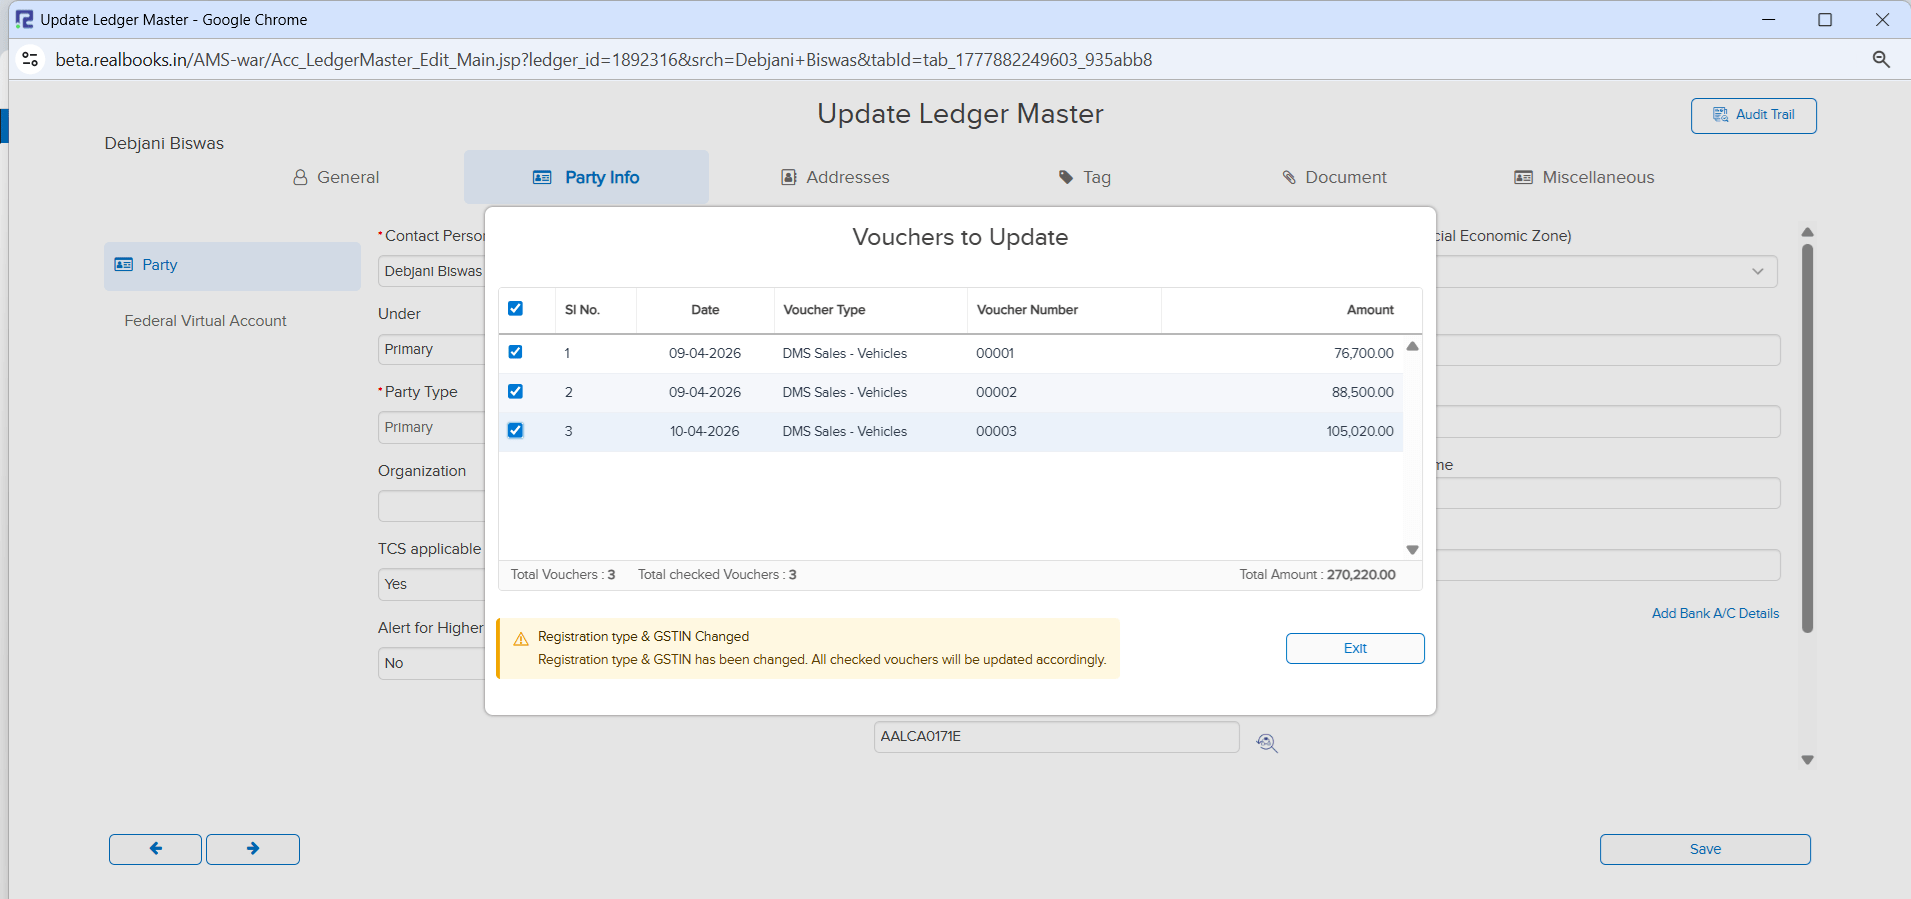
When a party’s State Name or Registration Type (e.g., Unregistered → Registered) was updated in the Ledger Master, the existing voucher entries were not automatically reclassified in GST reports. This could lead to incorrect GSTR-1 reporting — for example, transactions continuing to reflect under B2CS instead of B2B.
📌 How It Works
When you update the State Name or Registration Type under Ledger Master → Party Details:
• A pop-up appears showing a list of impacted voucher entries with Voucher Date and Voucher Number
• On clicking Save on the Ledger Master, selected entries are automatically pushed for re-sync with GSP
• GST classification is updated accordingly in reports
Logic: Only voucher entries dated after the GST Registration Date (available in Ledger Master) are listed for re-sync.
🌟 What This Means for You
You no longer need to manually identify and re-sync voucher entries when a party’s state or registration type changes. The system automatically detects impacted entries and re-syncs them with the GSP — ensuring accurate GSTR-1 classification and compliance without manual intervention.
🎬 Where to Find It
📷 See It in Action
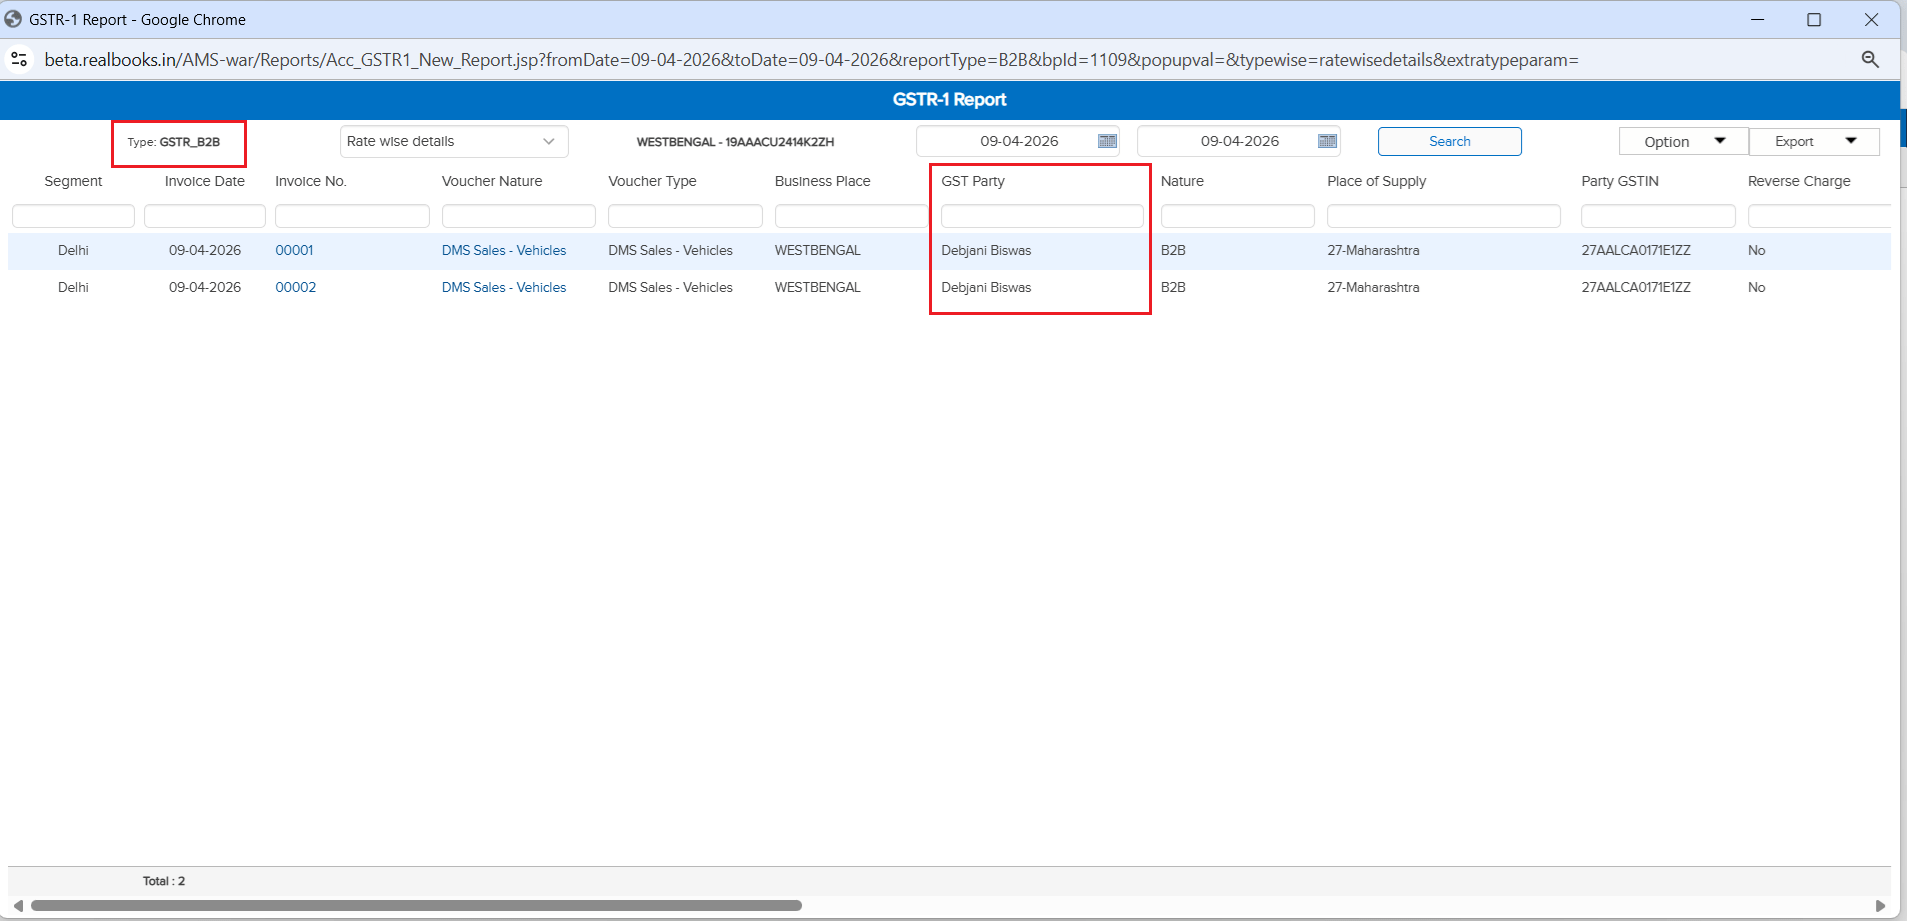
📌 What Was Happening
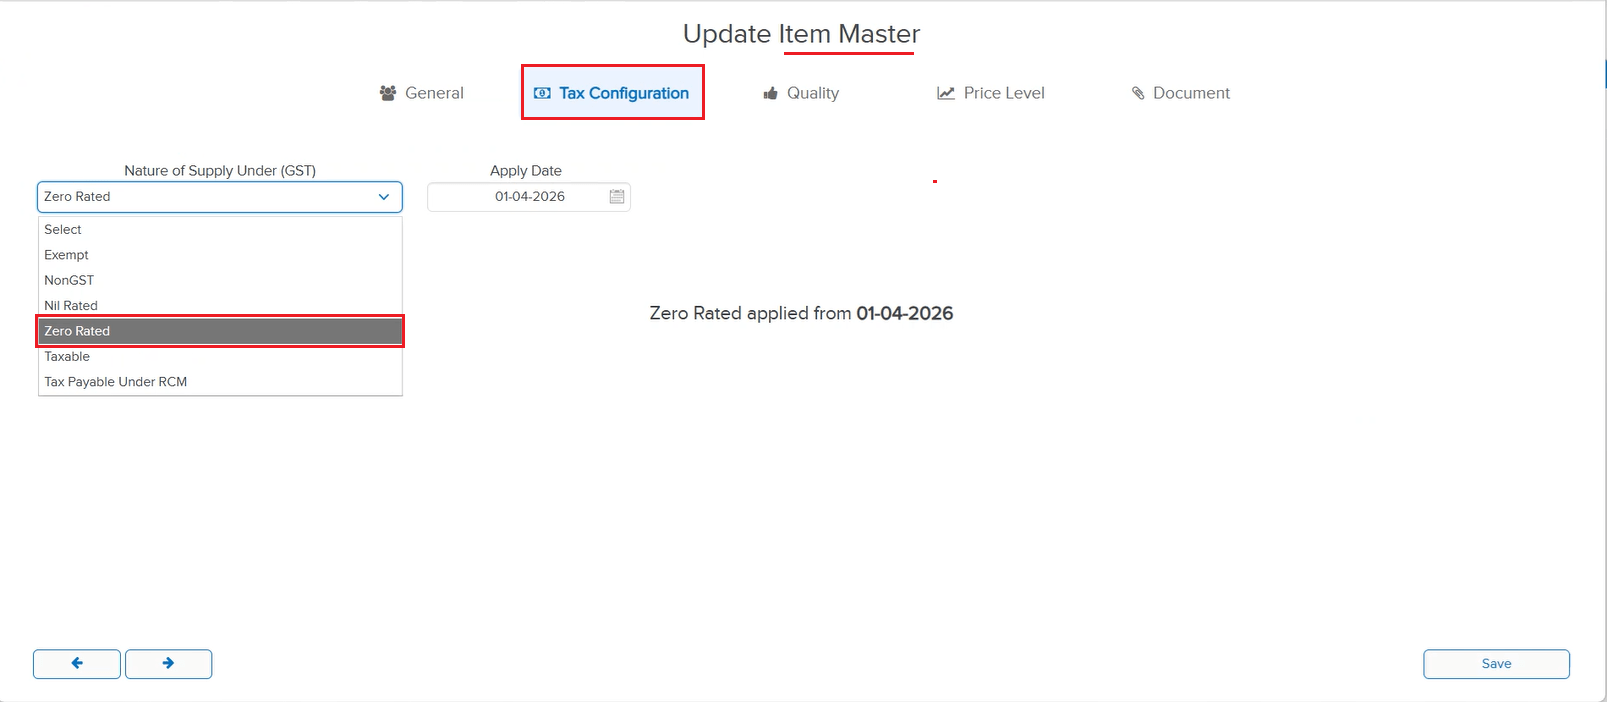
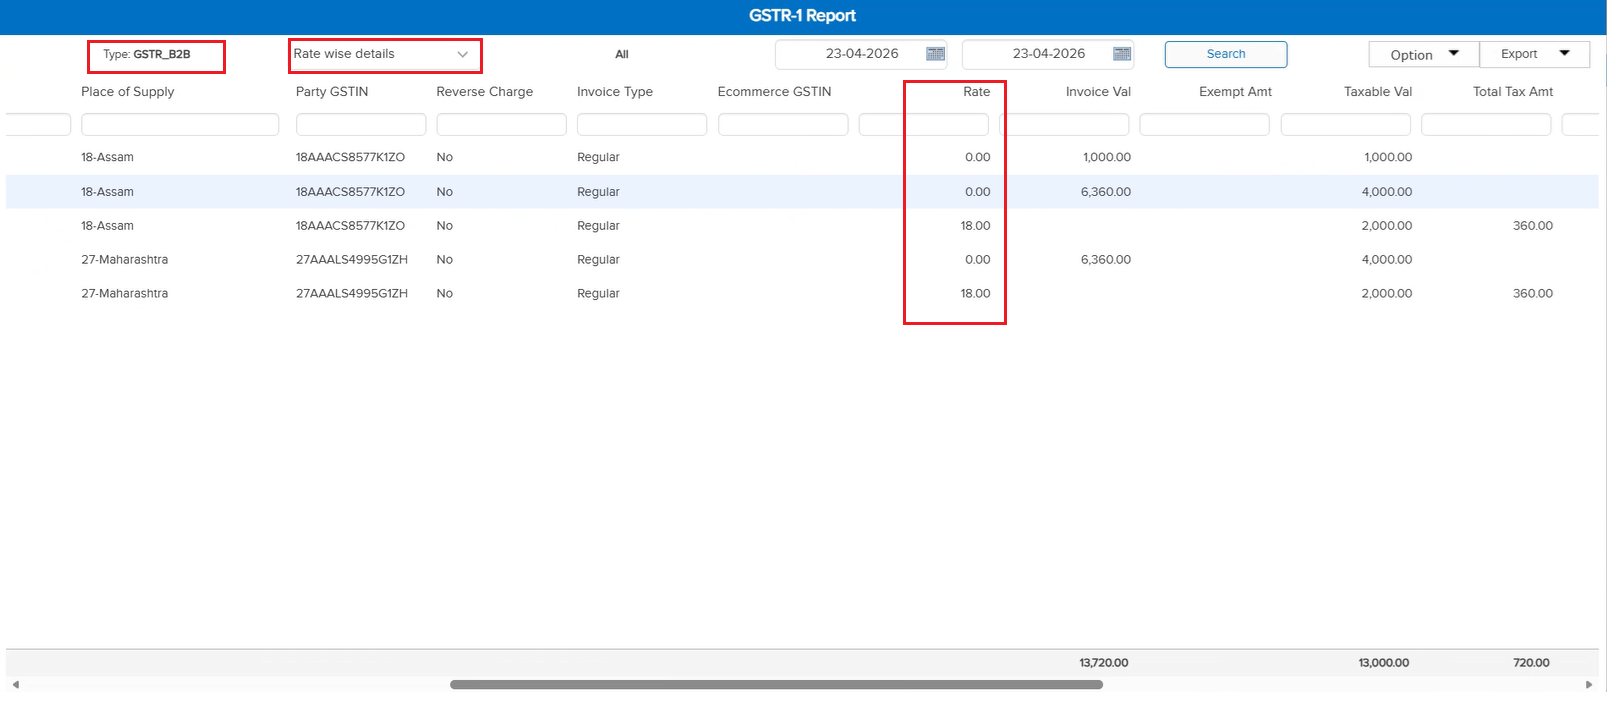
There was no option to assign a 0% GST rate in the Item Master. Items that are taxable at 0% were being treated as Exempt in GST return Excel exports, causing incorrect classification. The 0% rate was also not visible in GST rate-wise reports, leading to discrepancies in compliance reporting.
🌟 What This Means for You
A 0% GST rate option has been introduced and is now configurable under the Item Master. Key improvements include:
• Inter & Intra Sales — Items with 0% GST now correctly appear under Taxable Value (not Exempt) in GST return Excel
• GST Rate-wise Reports — 0% rate is now visible across all GST rate-wise reports for accurate reporting
• Item Master Configuration — 0% rate can be selected and saved directly from the Item Master setup
📷 See It in Action
📌 Overview
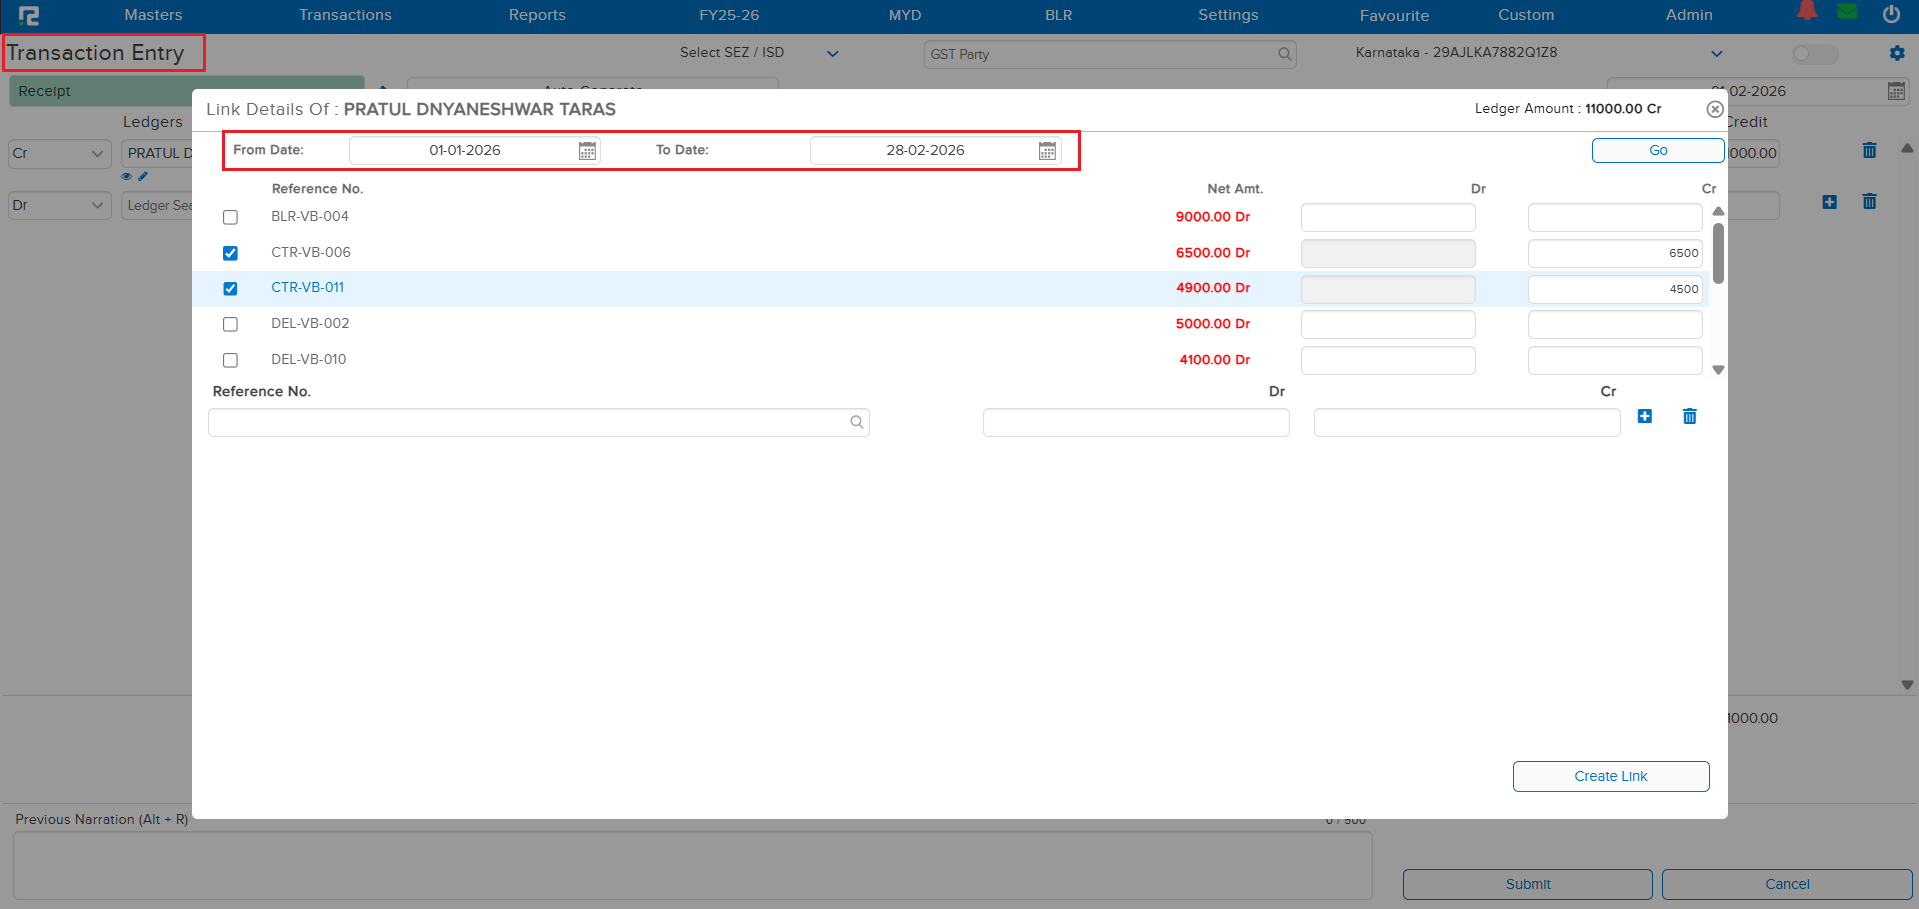
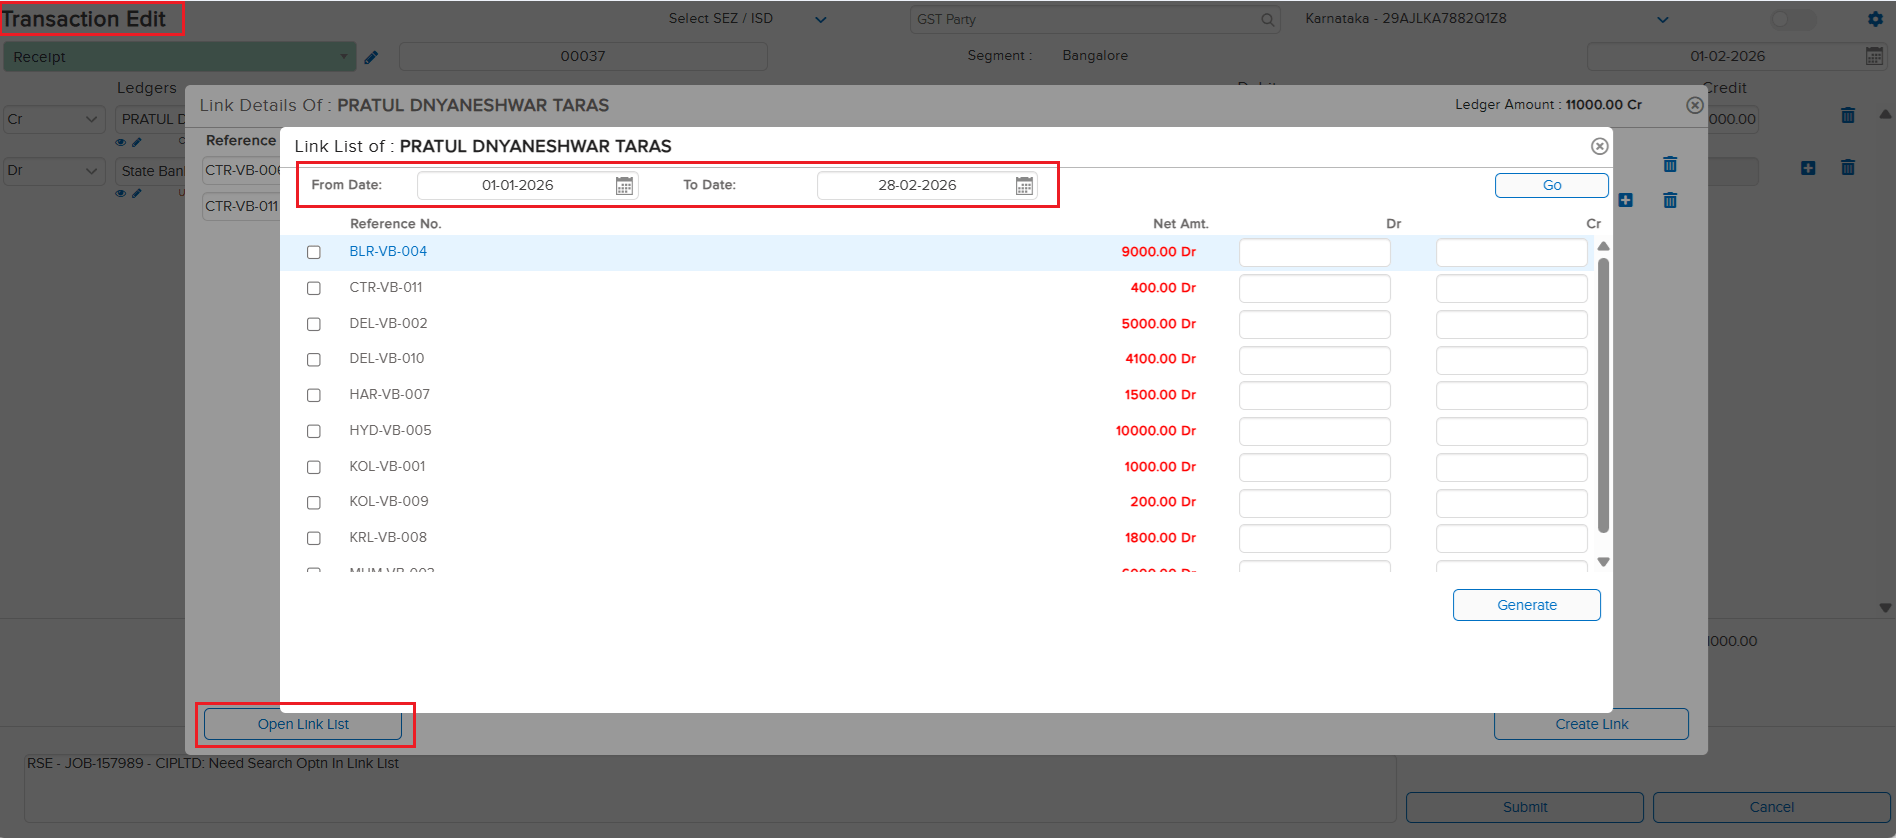
The Link Search option in transactions now includes a date range filter. Whether you’re creating a new transaction or editing an existing one, you can now search for linked entries by specifying a “From” and “To” date — making it much easier to find the exact transaction you need.
🌟 What This Means for You
No more scrolling through long lists of linked transactions! Simply set a date range and the system filters results instantly. This is especially helpful when you have a high volume of transactions and need to quickly locate a specific one during entry or editing.
🎬 How to Use It
1. Open any transaction in entry or edit mode.
2. Click the Link Search option.
3. Use the new From Date and To Date fields to filter results by date range.
4. Select the linked transaction you need.
📷 See It in Action
📌 What Was Happening
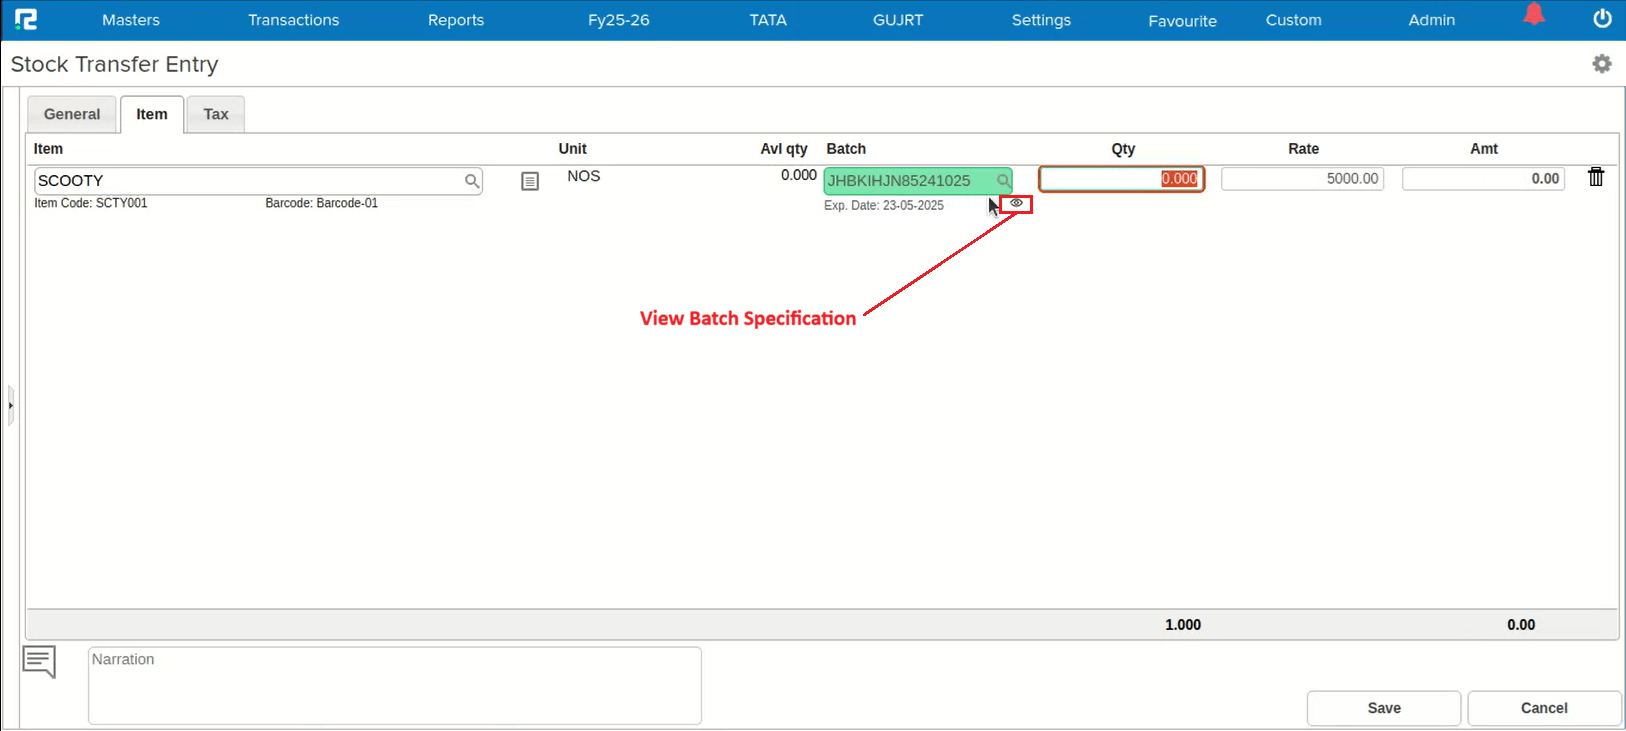
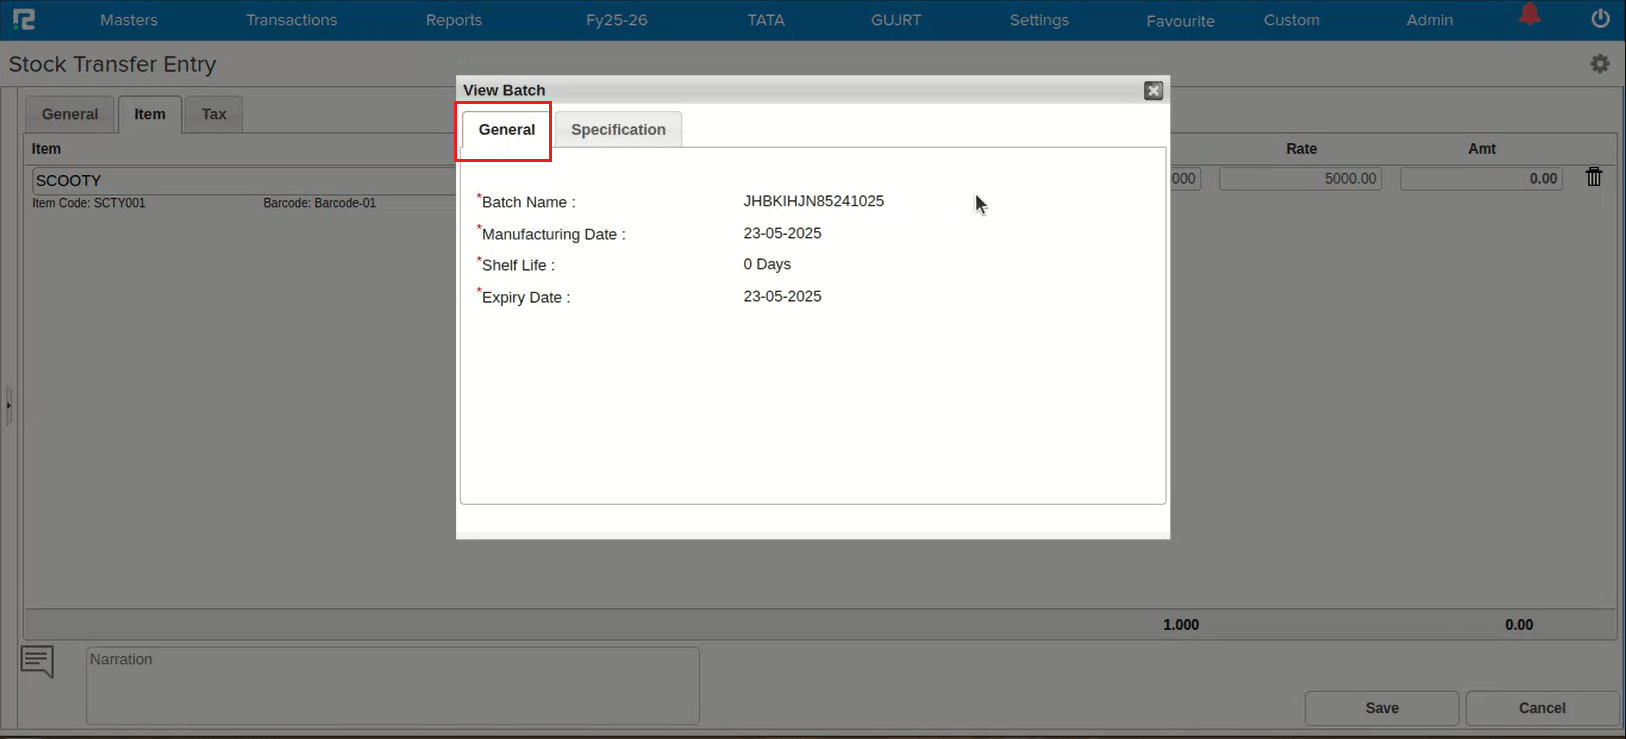
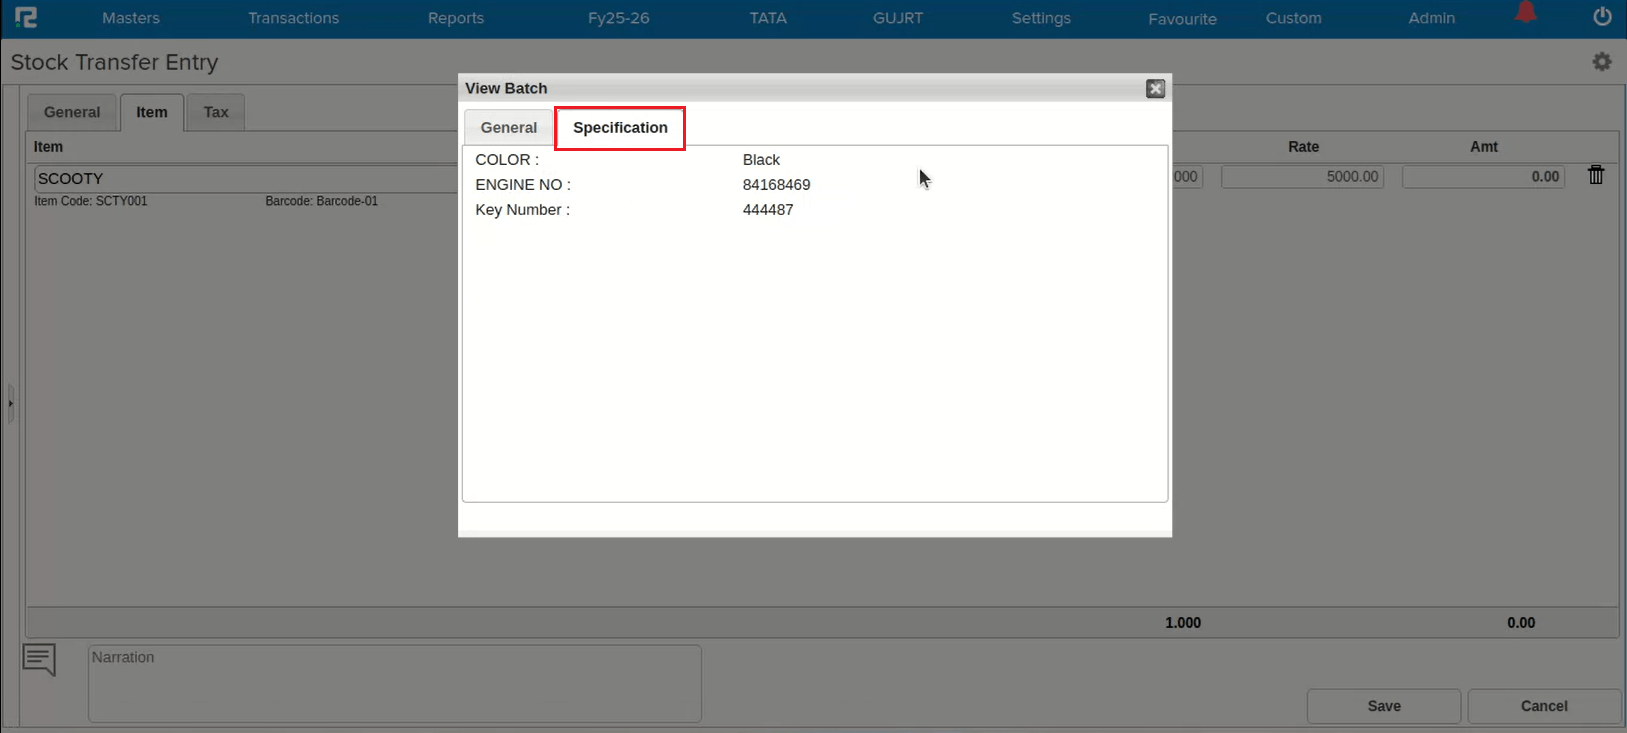
While performing a Stock Transfer (Godown Transfer), the Batch Specification was not visible under the batch selection. Users could see the batch but had no visibility into the specification details, making it difficult to identify and select the correct batch during transfers.
🌟 How This Helps You
Batch Specification now correctly reflects under the batch selection during Stock Transfer. You can easily identify batches by their specifications, ensuring accurate godown transfers without needing to look up batch details separately.
📷 See It in Action
📌 Overview
The backend saving structure for Stock Journal and Stock Transfer entries has been optimized. Previously, when editing entries with a large number of line items (e.g. 191 items), the save process would take an excessively long time — sometimes over 90 minutes — during which the system kept buffering. This blocked the user from performing any other work in the company, even in other segments.
📌 What Was Happening
When rates were updated for some line items in a Stock Journal with 191 items, the system continued buffering for an extended period after saving. During this prolonged save, if the user clicked the close button, got logged out, or switched segments, the entry would get partially saved and the remaining line items would be deleted — causing significant stock discrepancies.
🌟 What This Means for You
The saving process for Stock Journal and Stock Transfer entries is now significantly faster and more reliable. Large entries no longer block you from working in other segments, and the risk of partial saves causing data loss or stock discrepancies has been addressed.
🎬 Where to Find It
📌 What Was Happening
When a segment was assigned a Business Place, the business place was only being saved in transactions that involved a party ledger or tax ledger. For other transactions under the same segment — such as journal entries or transfers without party/tax ledgers — the business place was not getting saved, leading to incomplete data for compliance and reporting.
🌟 What This Means for You
If a segment has a Business Place assigned, all transactions created under that segment will now automatically carry the business place — regardless of whether a party or tax ledger is used in the entry. This ensures consistent and complete business place data across all your transactions for accurate GST compliance and reporting.
📷 See It in Action
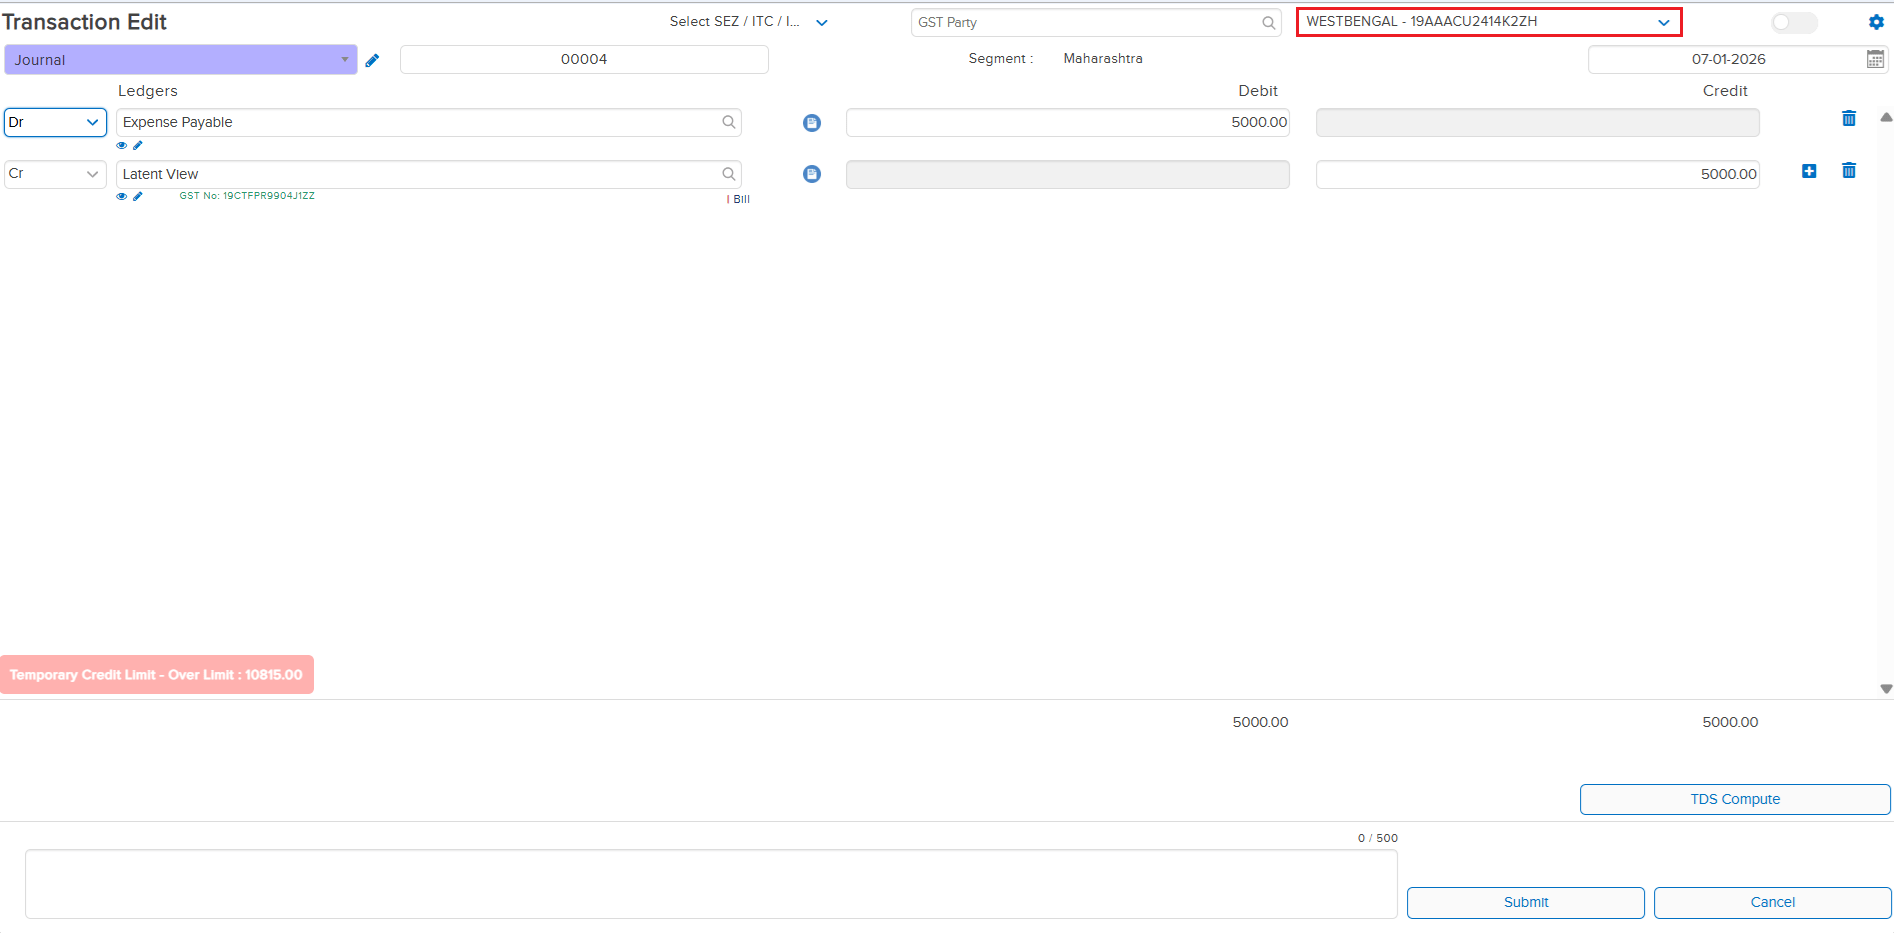
📌 What Was Happening
When creating a new ledger using the Alt + C shortcut key during entry passing, the District field was not appearing under Customer Information. Users had to save the ledger first and then go back to the Ledger Master to add the district separately — adding unnecessary steps to the workflow.
🌟 What This Means for You
The District field is now available in the Alt + C shortcut Ledger Master creation form. You can enter the district directly while creating a ledger during entry passing — no need to navigate to the Ledger Master separately.
📷 See It in Action
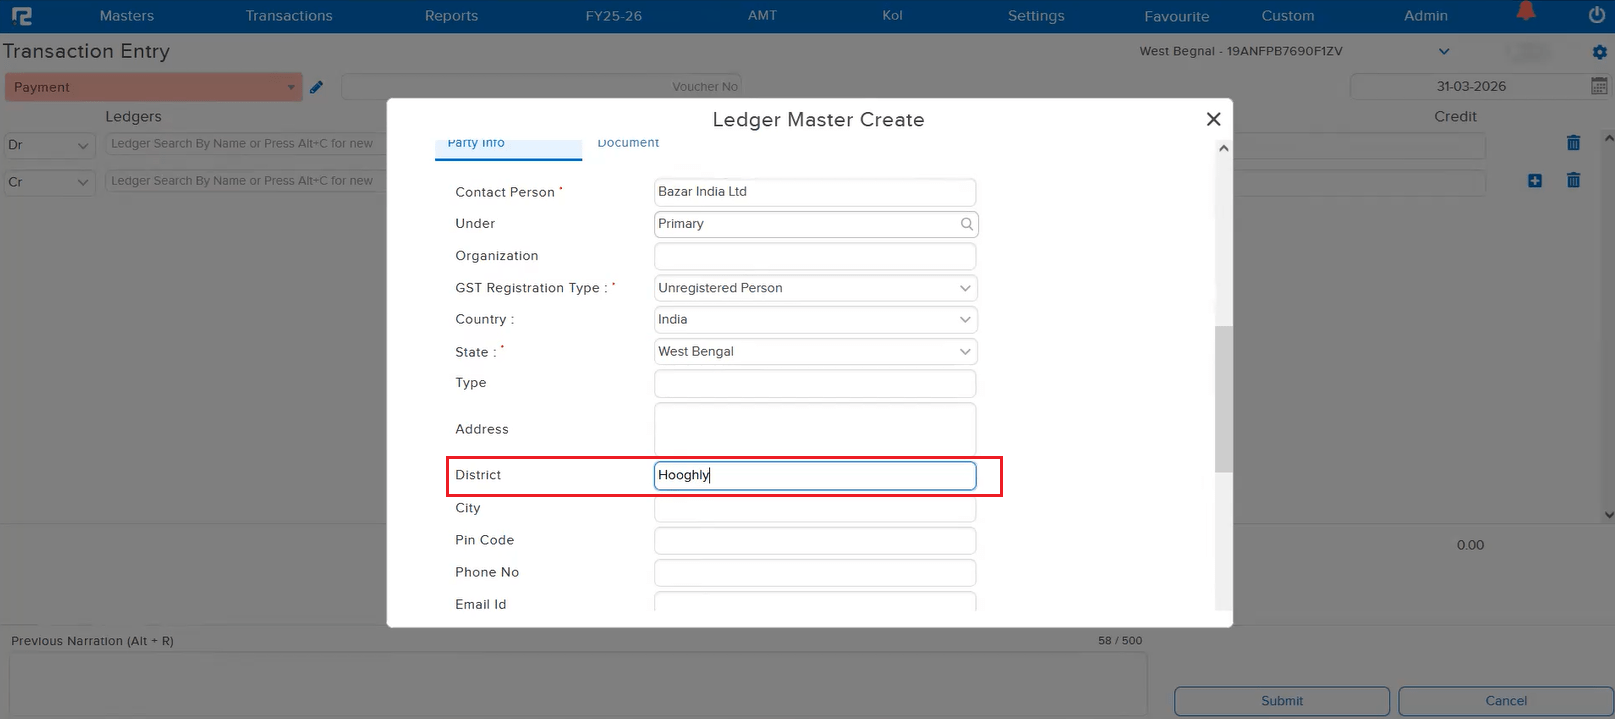
📌 What Was Happening
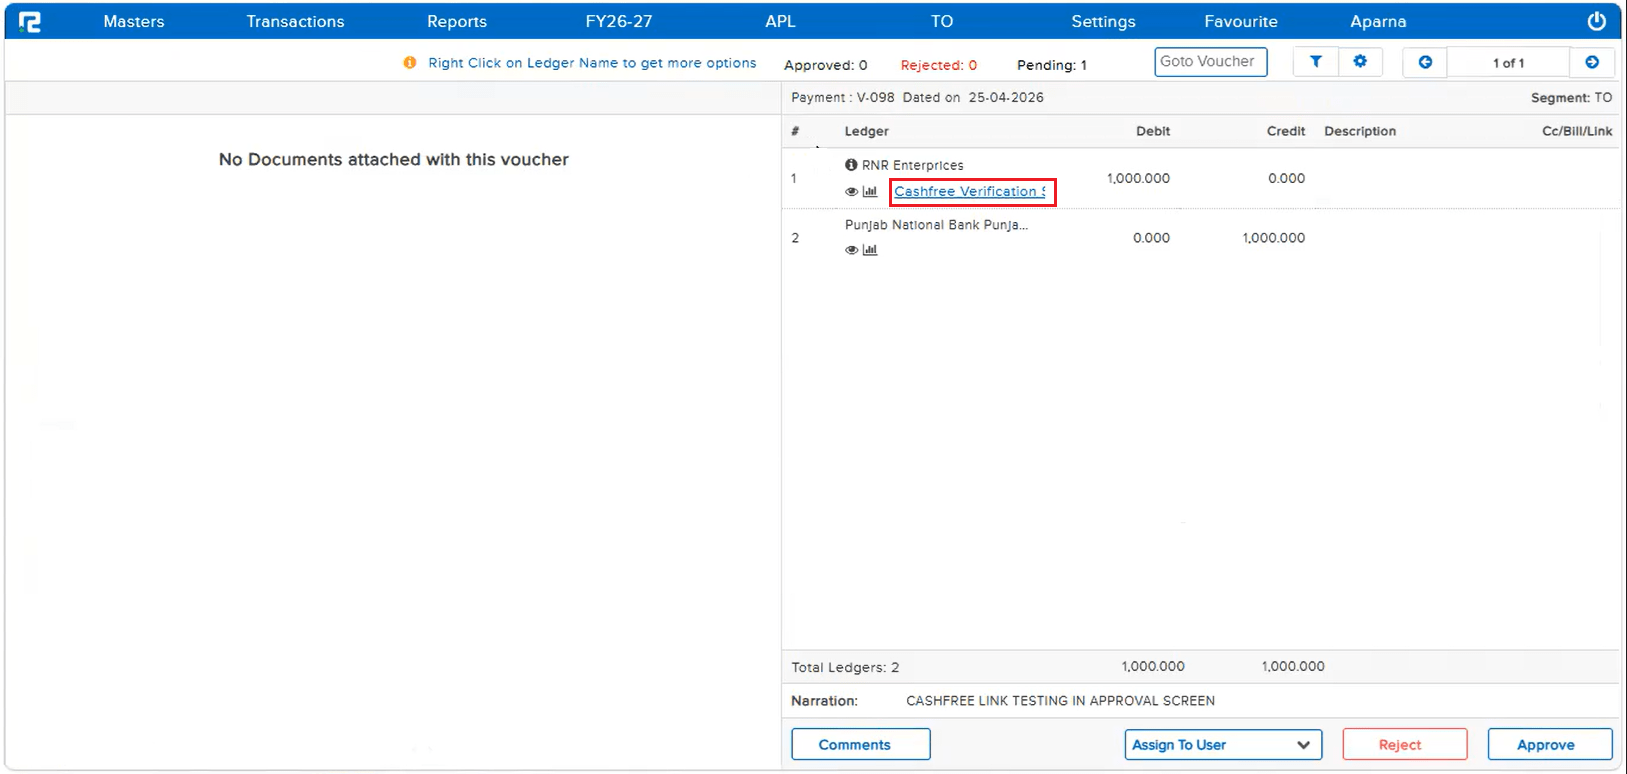
In the Approval Screen, there was no way to quickly verify the Cashfree bank validation status of a party ledger. Approvers had to navigate away from the approval screen and open the Ledger Master separately to check whether the bank details were verified via Cashfree — slowing down the approval process.
🌟 What This Means for You
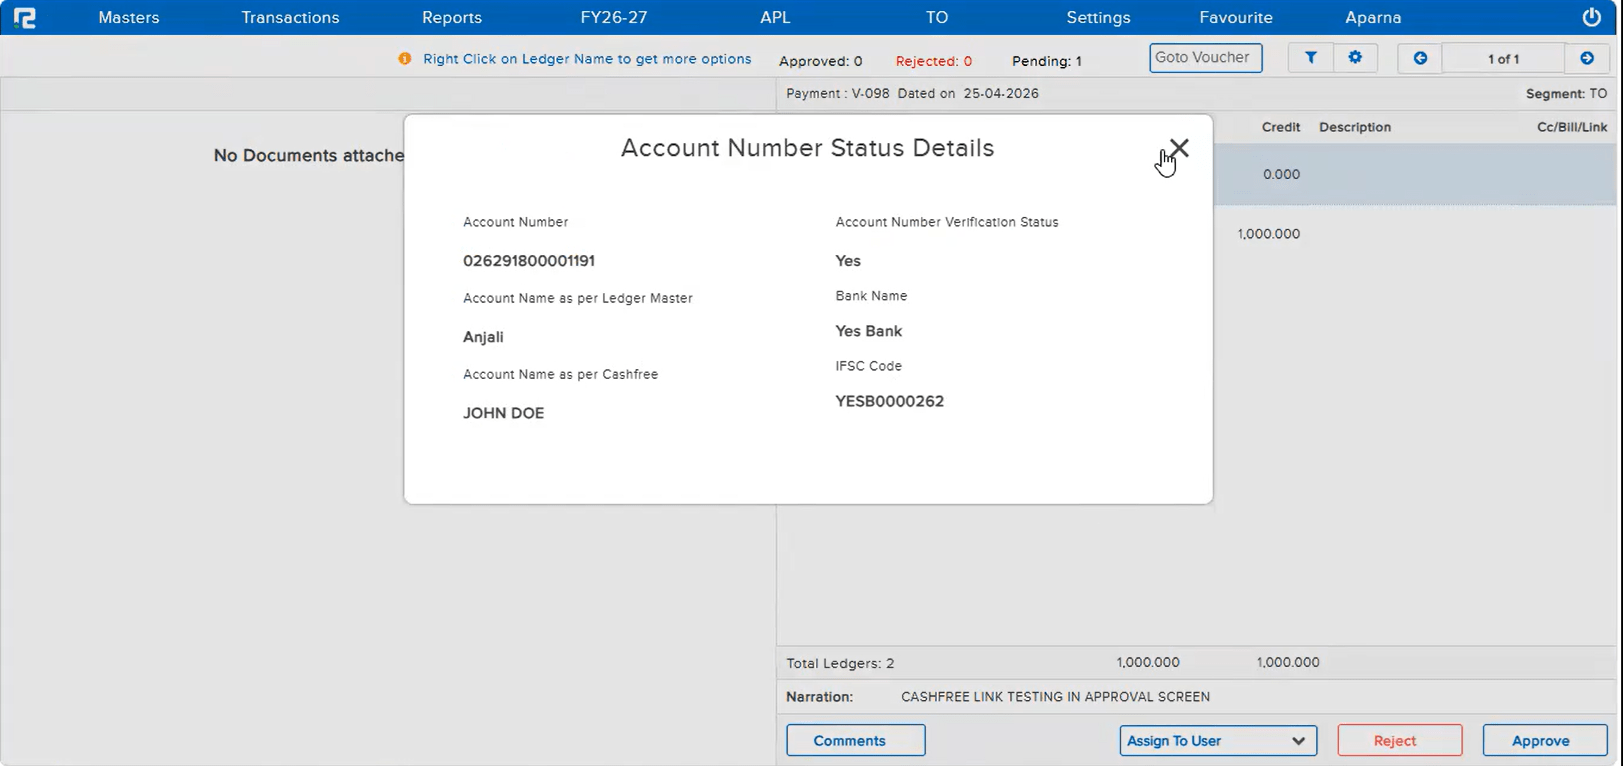
A clickable link has been added in the Approval Screen beside the party ledger name. Clicking it displays the Cashfree verification details directly:
• CashFree Verification — Yes / No
• Account Name as per Ledger Master
• Account Name as per Cashfree
• Bank Name
• Account Number
• IFSC Code
This allows approvers to verify bank details without leaving the approval screen — making the process faster and more reliable.
📷 See It in Action
📌 Overview
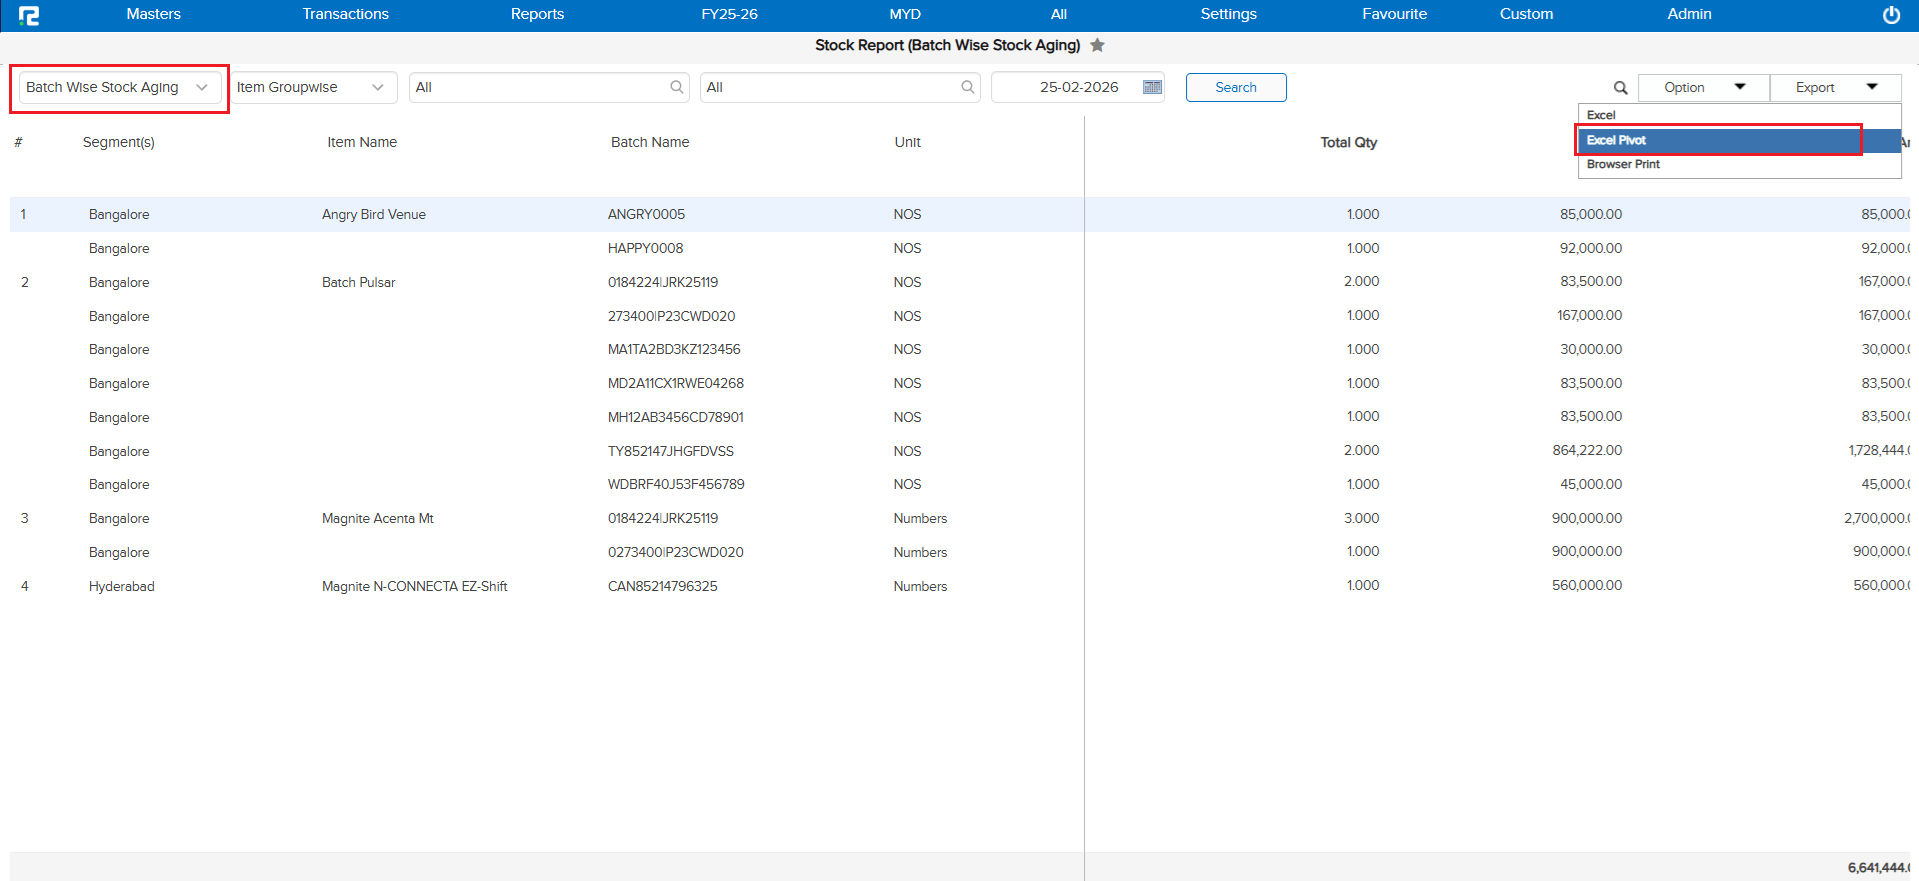
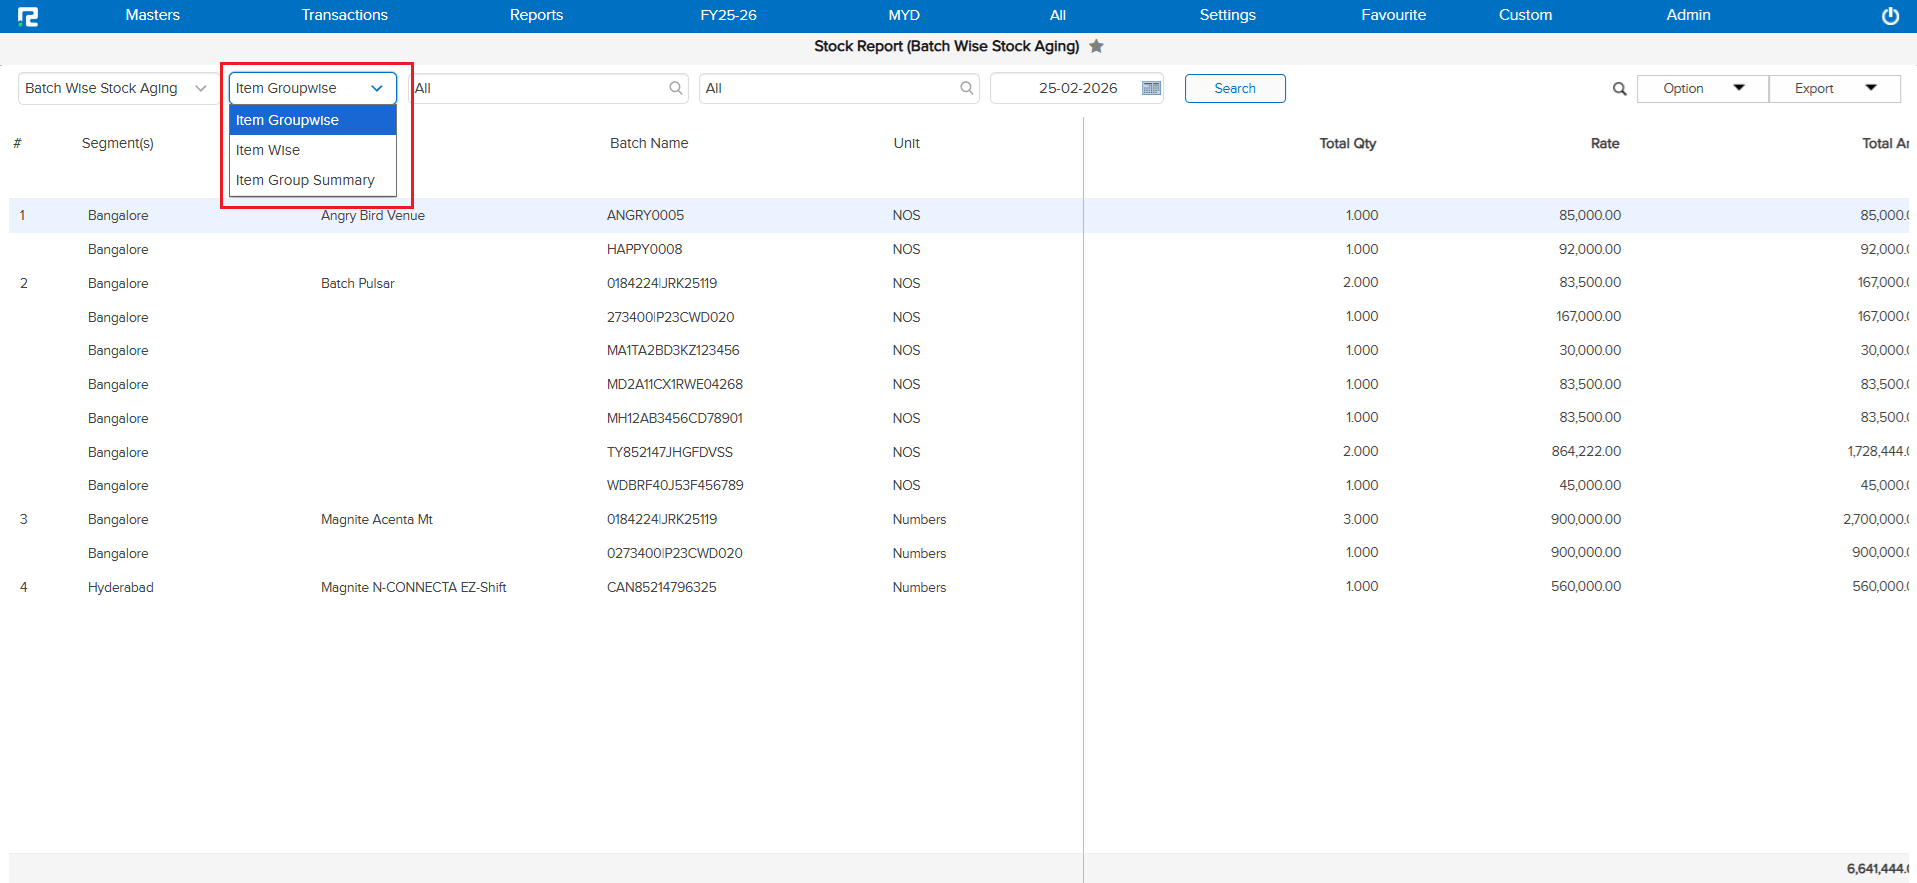
Love working with Pivot Tables in Excel? Now you can export your Batch Wise Stock Aging report directly in pivot-ready format! This works across all three report variations: Item Groupwise, Item Wise, and Item Group Summary.
🌟 What This Means for You
No more manually reformatting data in Excel. The pivot export gives you a ready-to-analyze structure, saving you time and effort when reviewing your inventory aging.
🎬 How to Use It
1. Select your preferred variation.
2. Click Export.
3. Choose Excel Pivot — done!
📷 See It in Action
📌 Overview
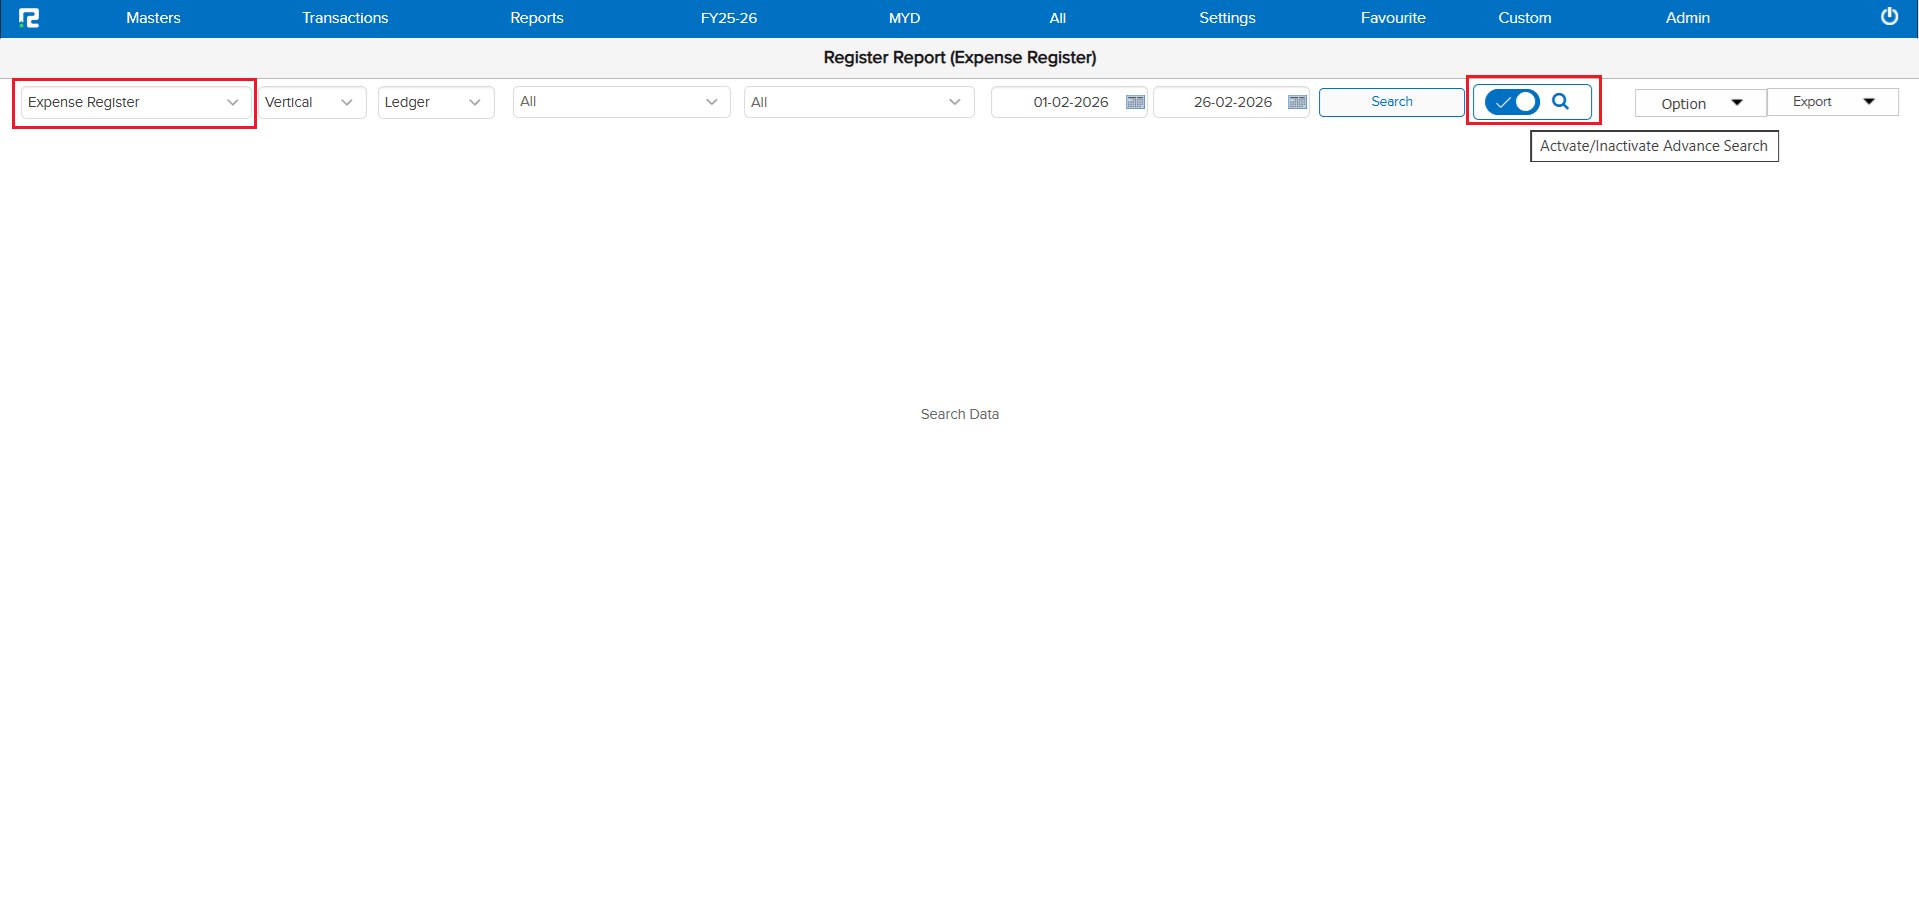
Tired of waiting for the Expense Register to load when you have thousands of entries? We’ve added a smart new option! You can now download your filtered data directly to Excel without the page needing to display all that data first.
🌟 What This Means for You
Faster exports, no more browser freezes, and you get exactly the data you need in Excel. Use the toggle to switch between viewing on screen or downloading directly — the choice is yours!
🎬 How to Use It
1. Turn on the Advance Search toggle.
2. Set your filters.
3. Click Export to download directly, or Search to view on screen.
📷 See It in Action
📌 Overview
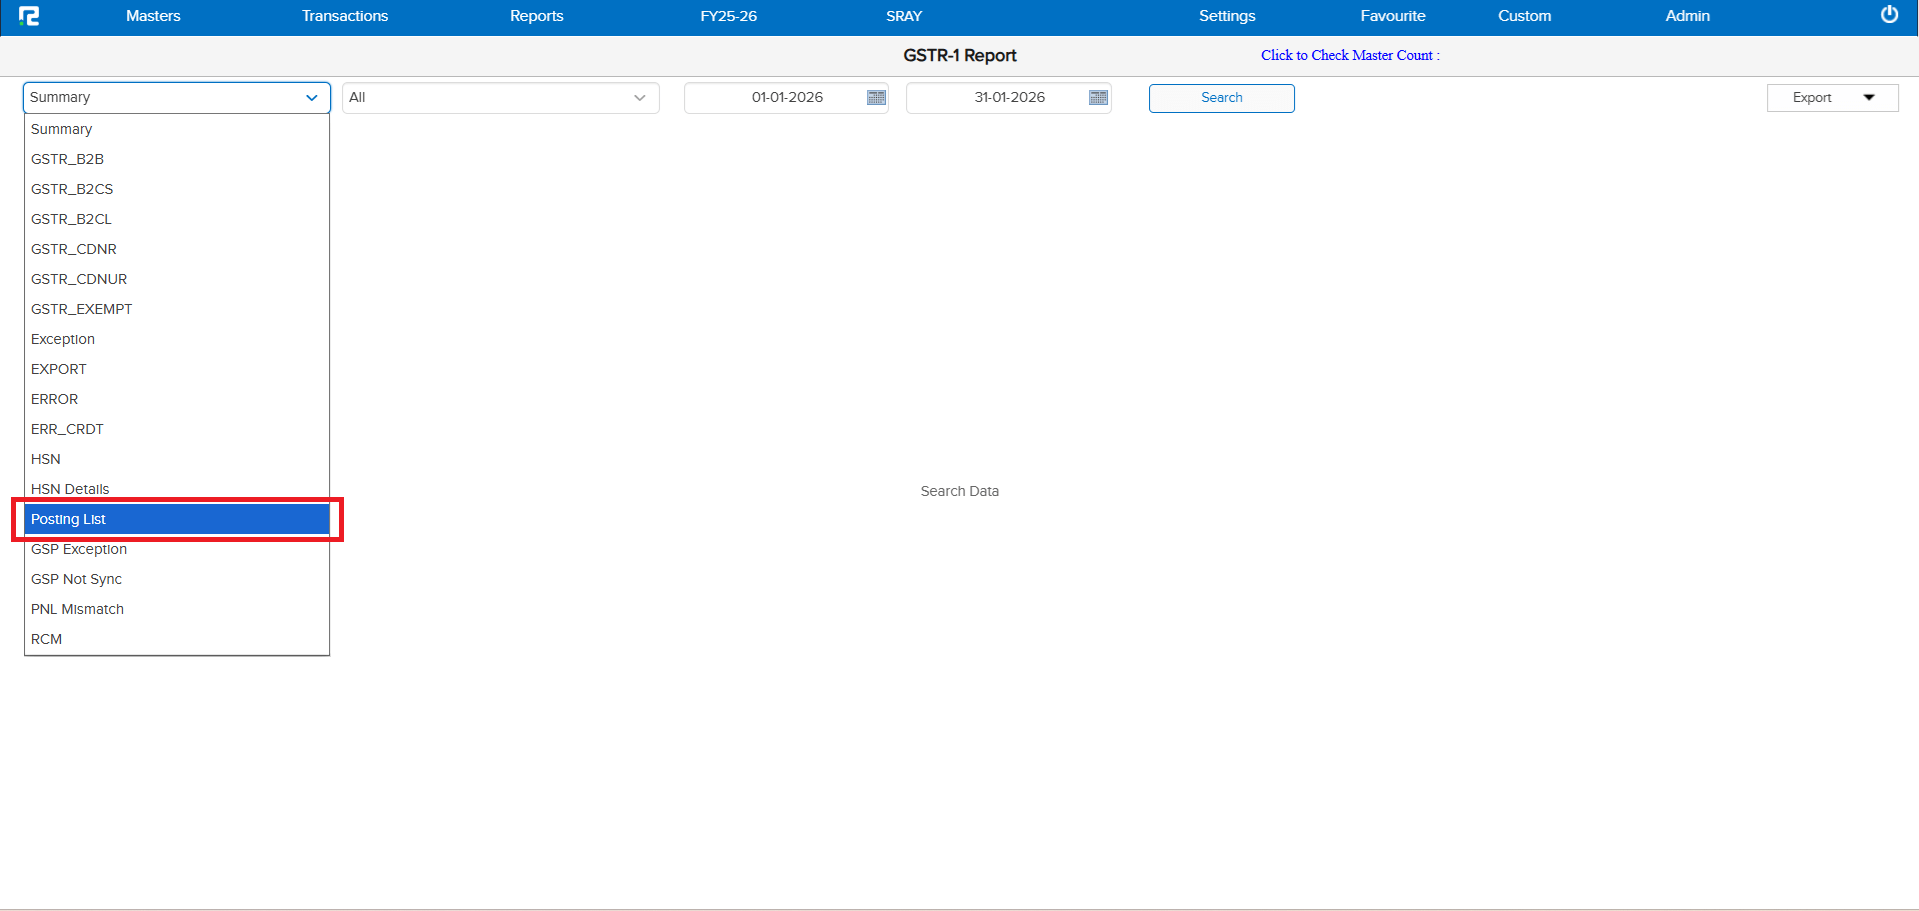
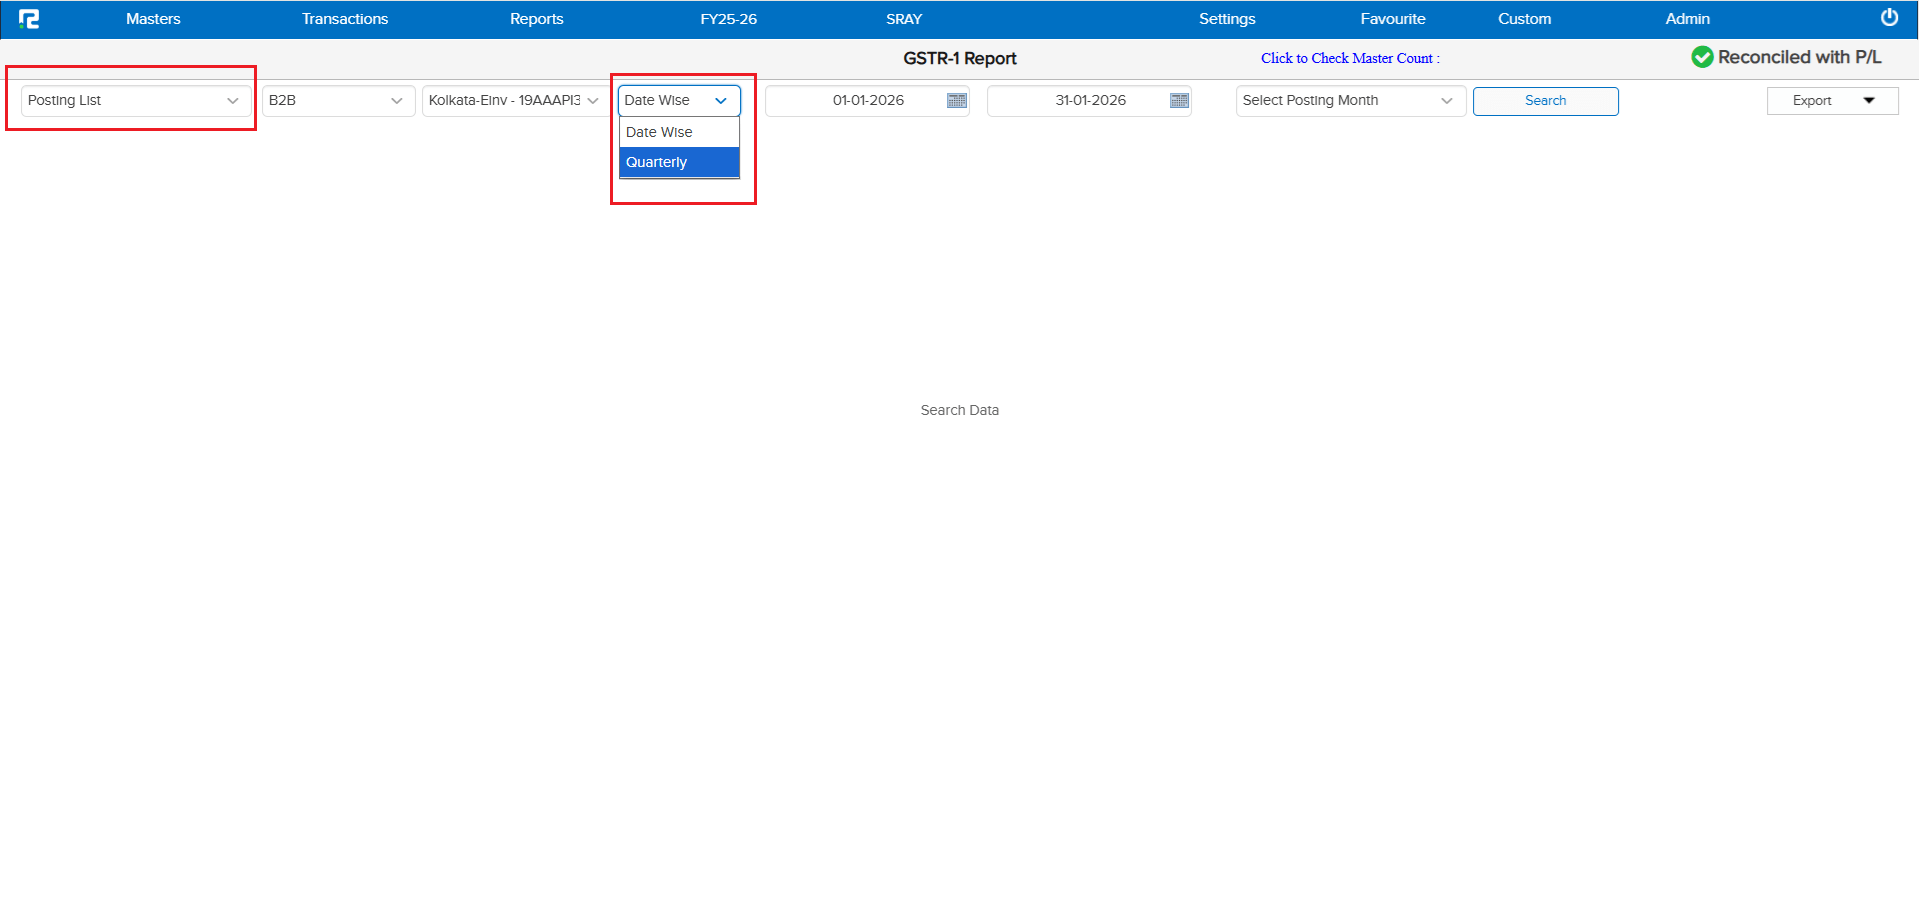
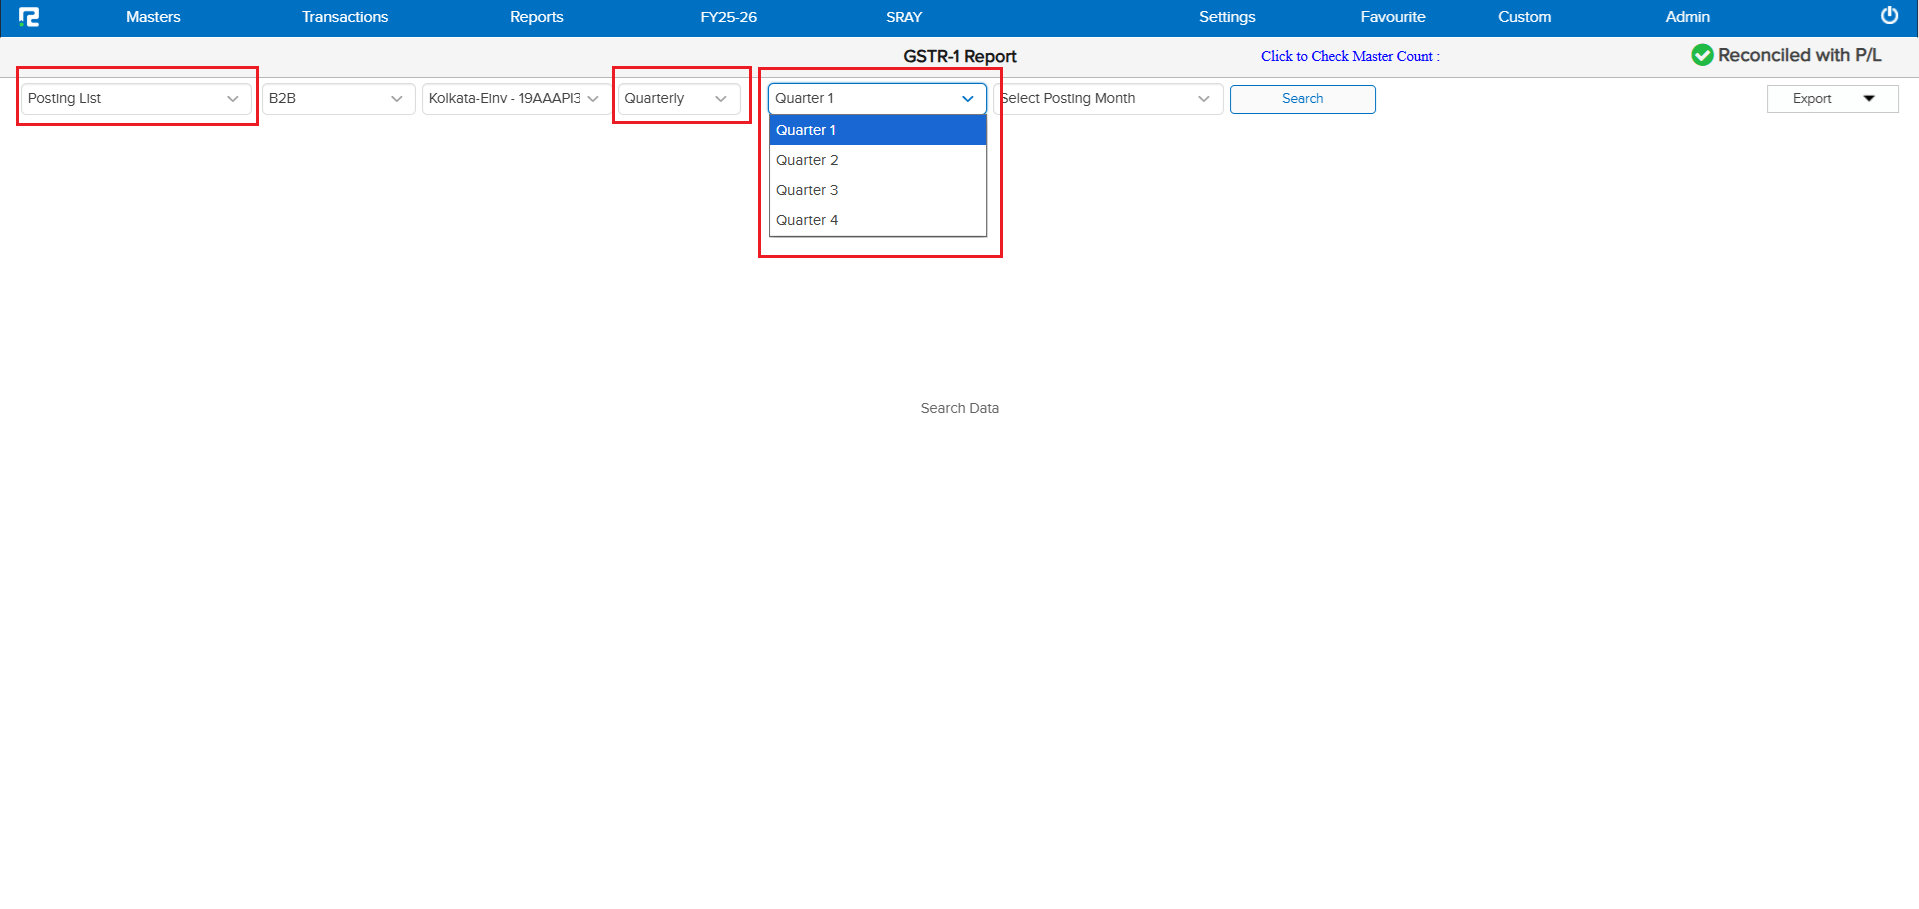
Great news for businesses that file GSTR-1 on a quarterly basis! Until now, RealBooks only supported monthly filing. We’ve added a brand new Quarterly option that lets you select and post GSTR-1 data by quarter — Quarter 1 through Quarter 4.
🌟 What This Means for You
If your business files quarterly, you no longer need to manually combine monthly data. Simply select your quarter, and RealBooks handles the rest. Faster filing, fewer errors, and full compliance support.
🎬 How to Use It
1. Go to the GSTR-1 Report.
2. Select Posting List.
3. Choose Quarterly from the dropdown.
4. Pick your quarter (Q1, Q2, Q3, or Q4).
5. Click Search and you’re all set!
📷 See It in Action
📌 Overview
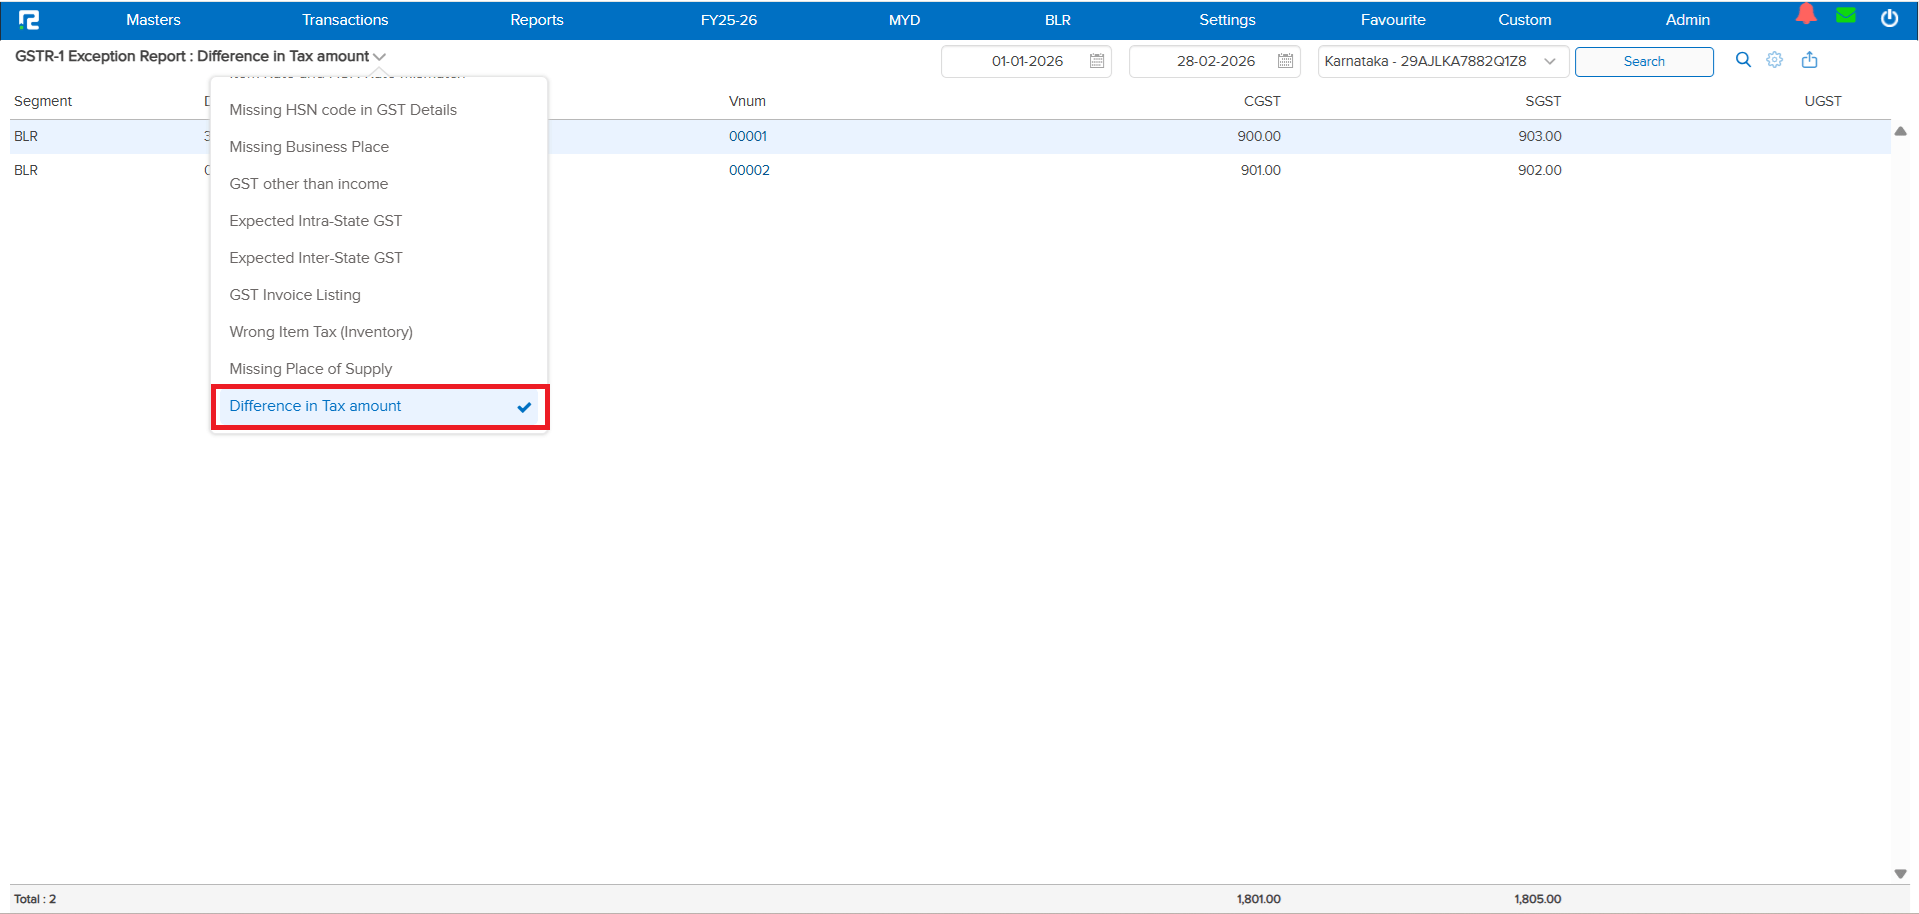
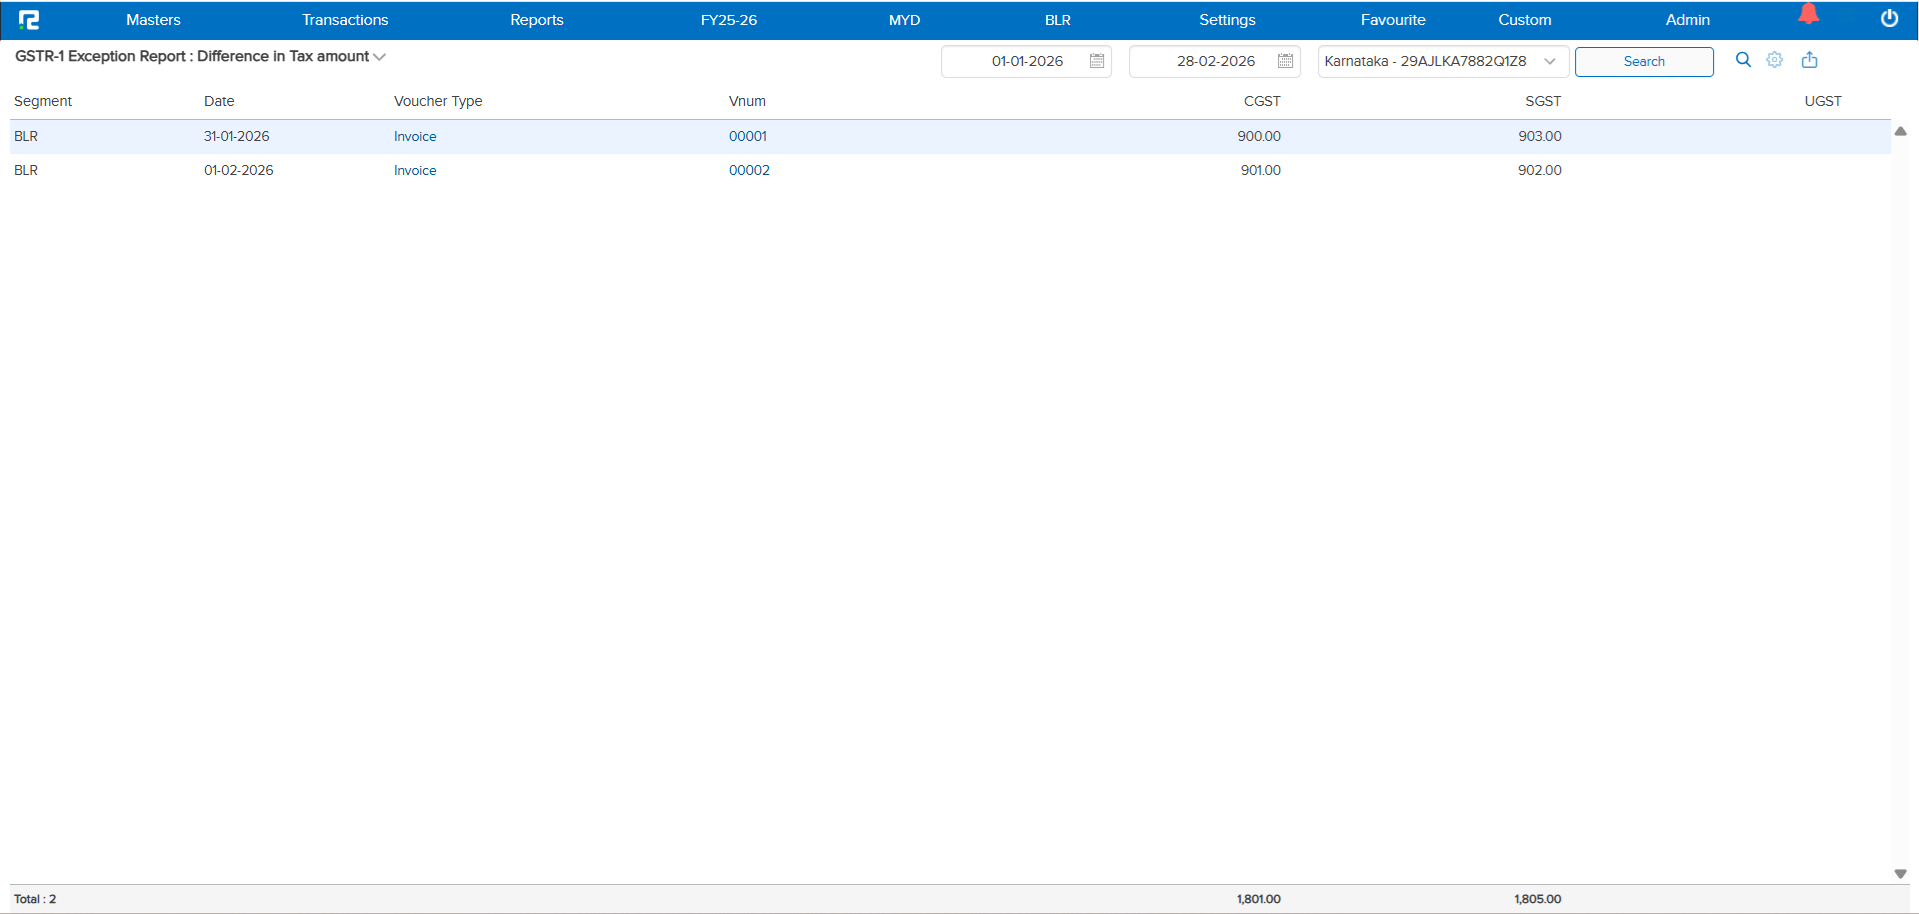
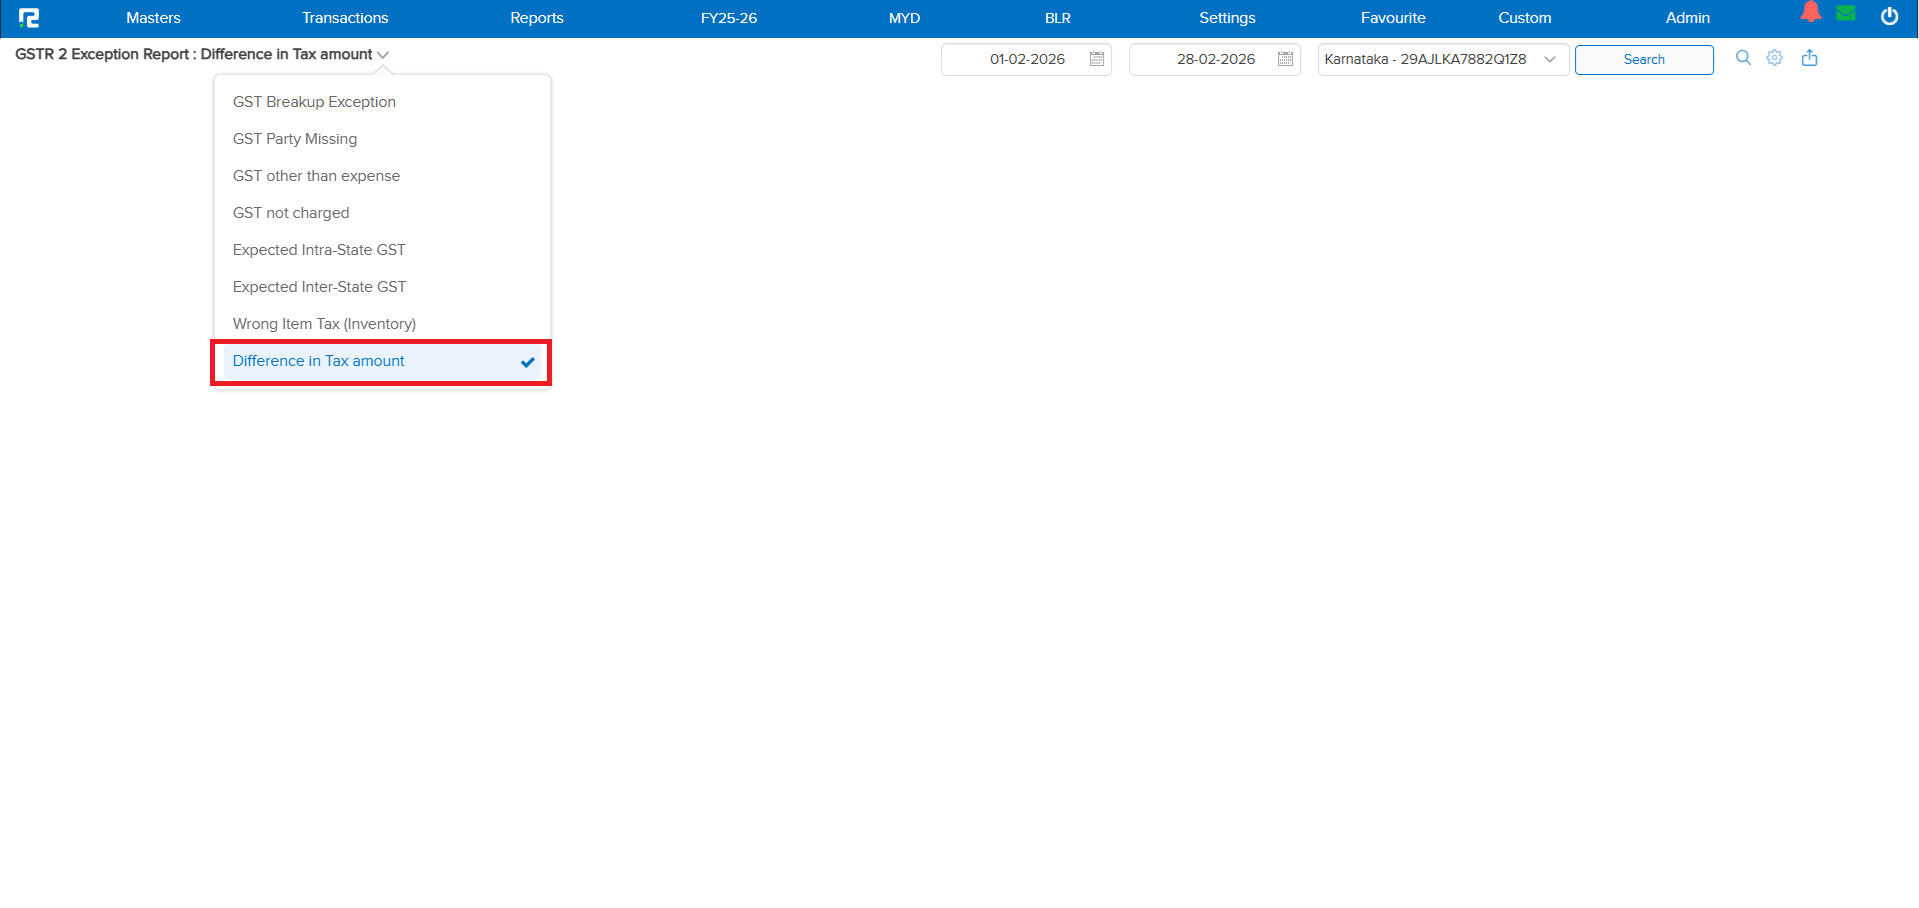
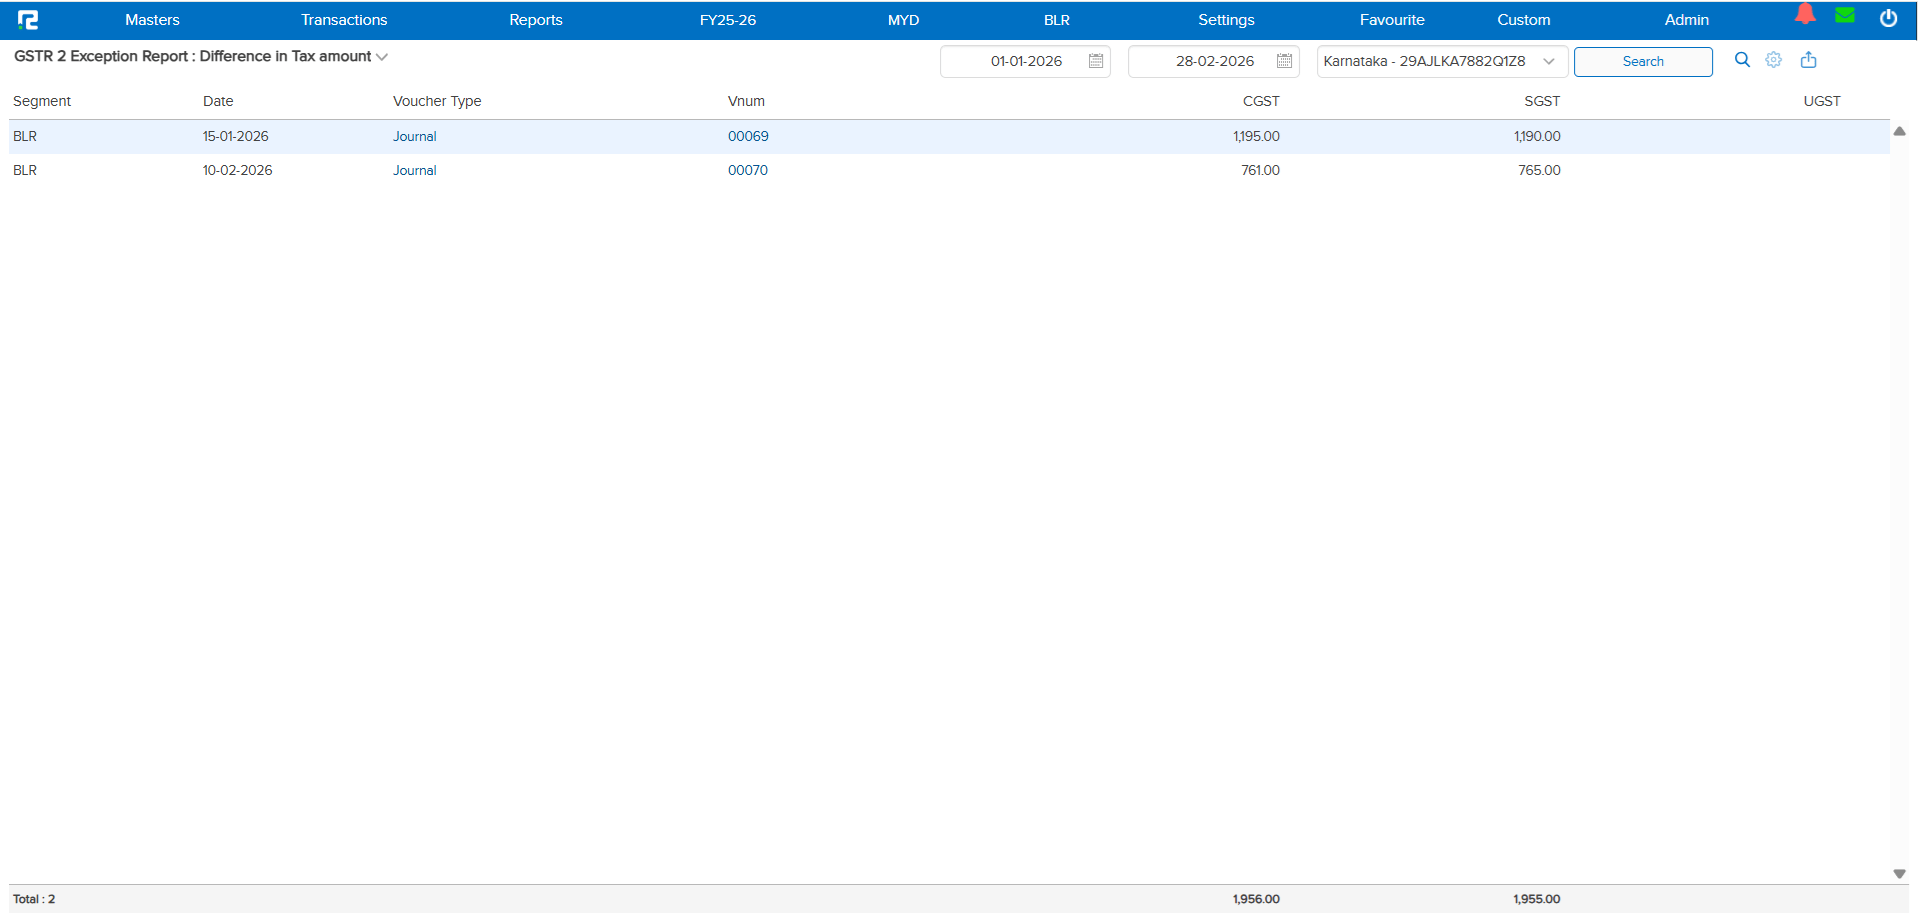
A brand new variation — Difference in Tax Amount — has been added to both the GSTR-1 Exception and GSTR-2 Exception reports. This report highlights transactions where the total CGST value and total SGST value do not match, helping you catch tax calculation discrepancies before filing.
🌟 What This Means for You
Tax mismatches between CGST and SGST can lead to filing errors and compliance issues. With this new variation, you can quickly identify and correct these discrepancies right from the exception report — no manual cross-checking needed!
🎬 How to Use It
The new variation is available in both GSTR-1 and GSTR-2 exception reports:
1. Open either exception report.
2. Select the new Difference in Tax Amount variation.
3. Run the report to see all transactions where CGST and SGST values don’t match.
📷 See It in Action
📌 Overview
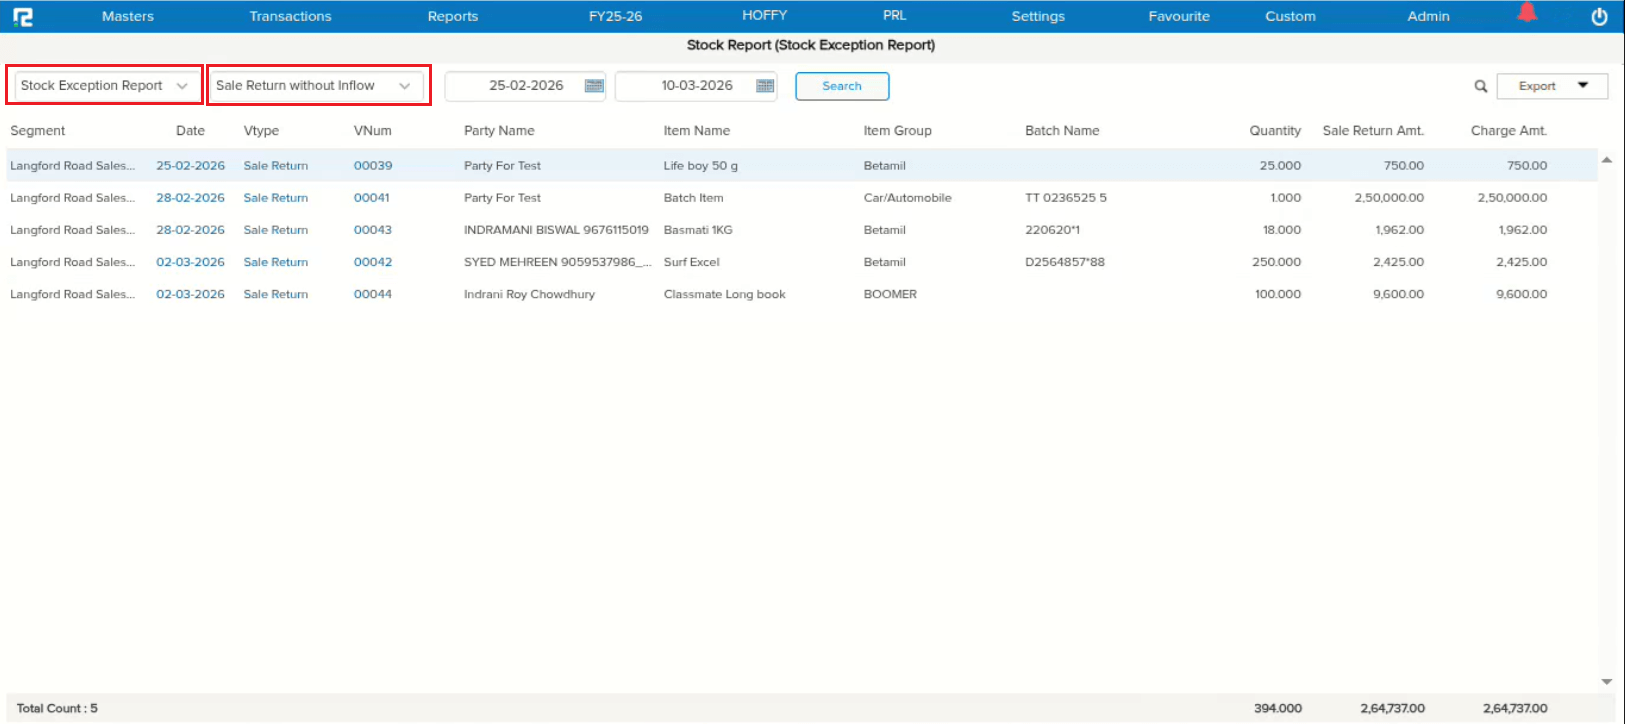
A new parametric feature has been introduced to handle COGS (Cost of Goods Sold) updates in case of Sale Returns. This applies to both batch and non-batch items. If an item was never purchased or had no inflow via Stock Journal, the system now automatically updates the COGS based on the Sales Return Rate. A dedicated Stock Exception Report lists all entries where COGS has been updated using the Sales Return Rate.
🌟 What This Means for You
Previously, if a returned item had no purchase or inflow history, the COGS couldn’t be determined. Now, the system intelligently uses the Sales Return Rate to update COGS automatically via the Overnight Scheduler, ensuring your cost records stay accurate without manual intervention.
🎬 How It Works
1. This is a parametric feature — enabled on demand only.
2. Applies to both batch and non-batch items.
3. If the item has no purchase or Stock Journal inflow, COGS is updated based on the Sales Return Rate.
4. COGS updates are processed via the Overnight Scheduler.
5. An exception report is available to review all affected entries.
🛠 Where to Find the Exception Report
📷 See It in Action
📌 Overview
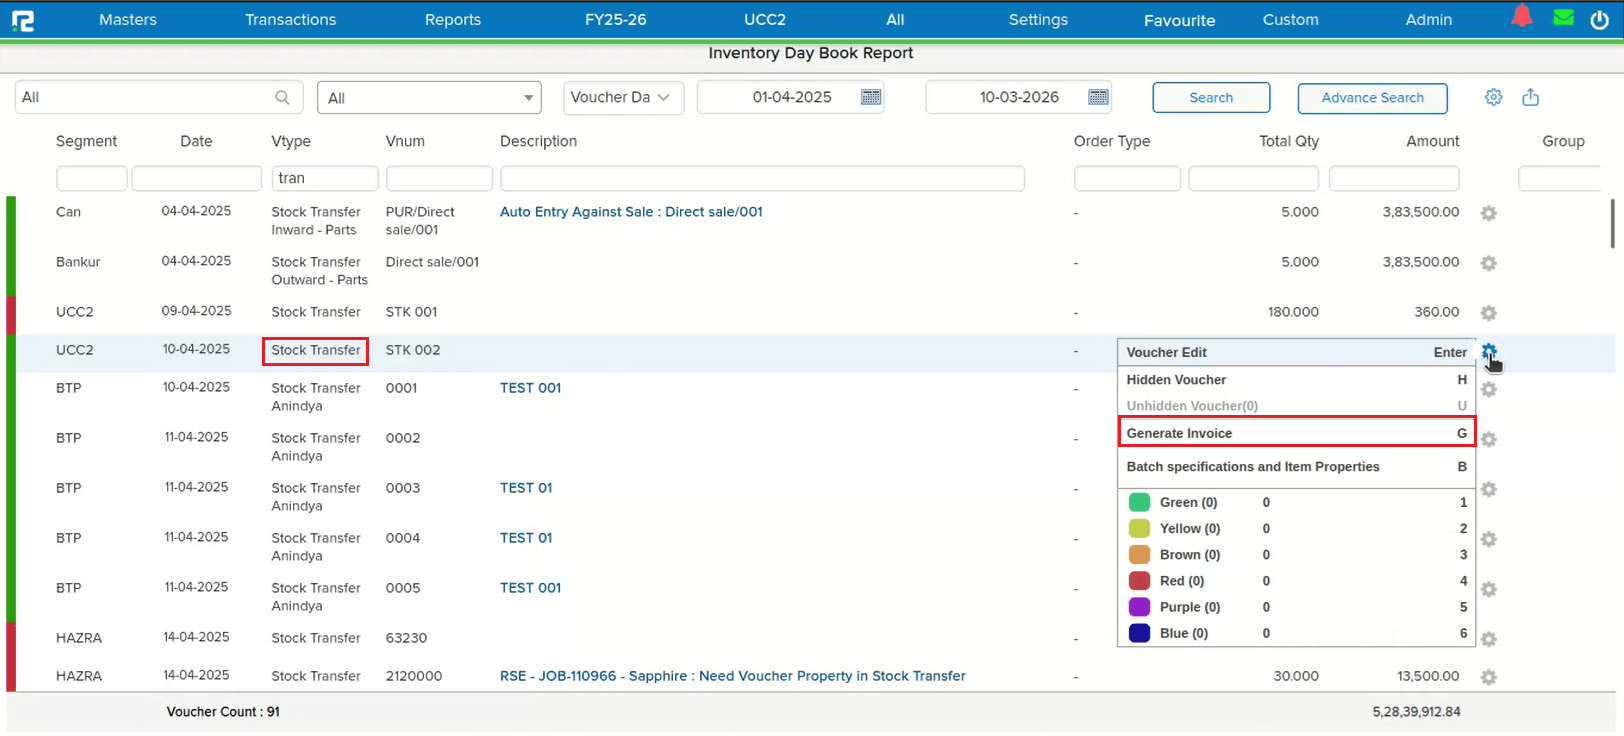
A new Generate Invoice option has been added for Stock Transfer entries in the Voucher Listing Report. You can now generate invoices directly from the report without needing to open each entry individually. Additionally, a convenient keyboard shortcut G is available — simply select a Stock Transfer entry and press G to instantly trigger the invoice generation pop-up.
🌟 What This Means for You
No more navigating away from the Voucher Listing Report to generate invoices for stock transfers. Whether you prefer clicking the option or using the keyboard shortcut, invoice generation is now just one step away — saving you time and keeping your workflow seamless.
🎬 How to Use It
1. Go to Reports → Inventory → Stock → Voucher Listing.
2. Locate and select the Stock Transfer entry you want to generate an invoice for.
3. Use the Generate Invoice option, or simply press the G key on your keyboard.
4. The invoice generation pop-up will appear — select the appropriate template and proceed.
📷 See It in Action
📌 Overview
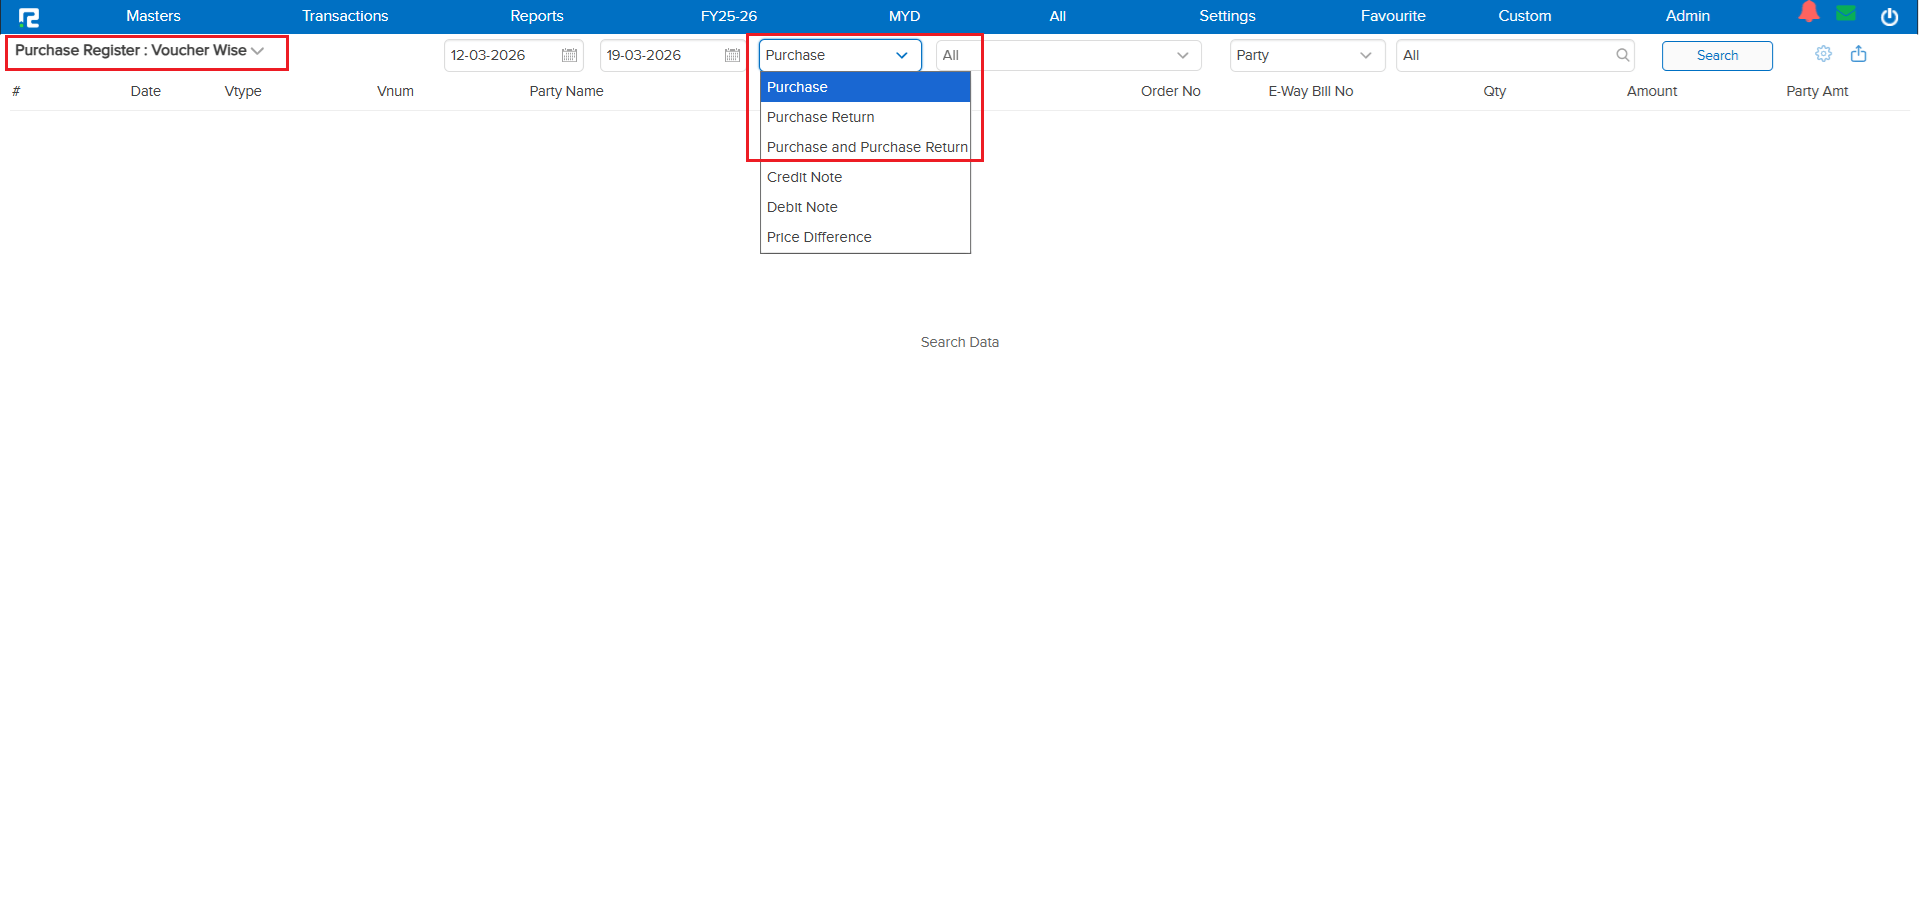
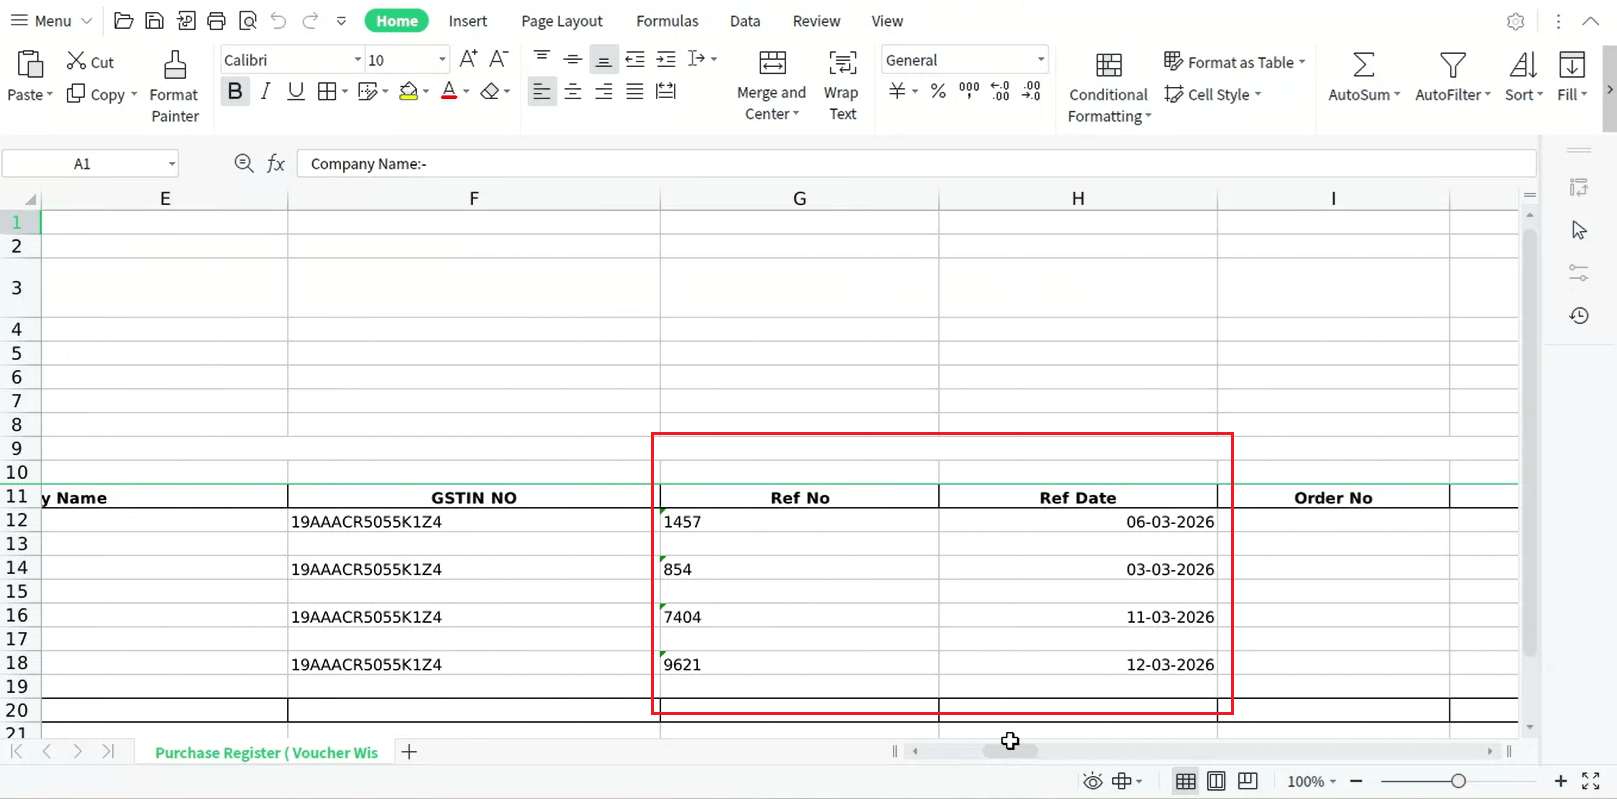
Previously, the Ref No. column in the Purchase Register (Voucher Wise) Excel export contained both the Bill Number and Bill Date combined in a single column, separated by a comma. This made it difficult to sort, filter, or work with bill dates independently in Excel.
With this enhancement, the Ref No. column now contains only the Bill Number, and a brand new Ref Date column has been added right next to it containing the Bill Date.
🌟 What This Means for You
Your Excel exports are now cleaner and easier to work with. You can independently sort, filter, and analyze by Bill Number or Bill Date without needing to manually split the data. This applies to both Excel and Custom Excel export types.
🎬 Where It Applies
This change applies to the following sub-types:
• Purchase
• Purchase Return
• Purchase & Purchase Return
And both export types:
• Excel
• Custom Excel
📷 See It in Action
📌 Overview
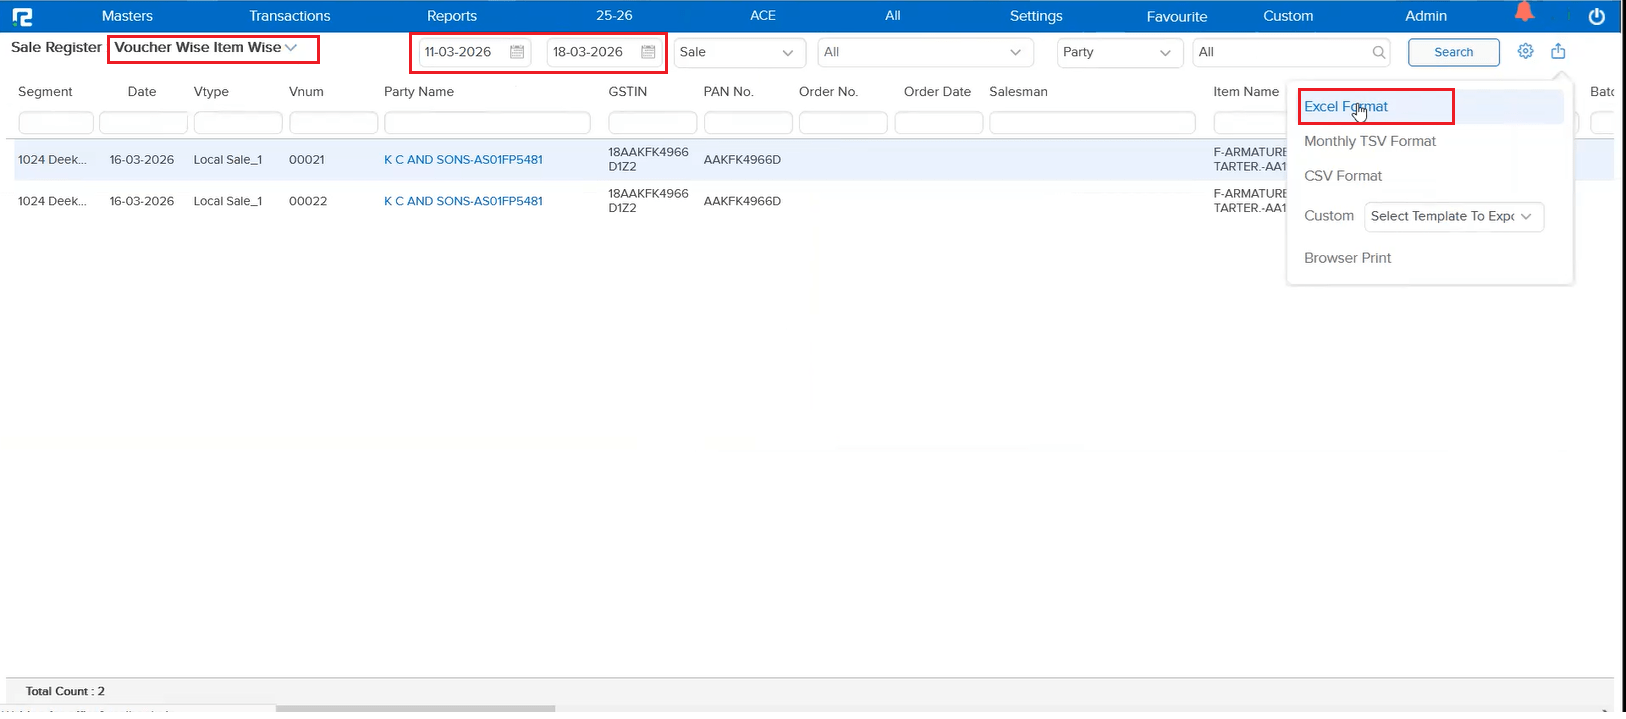
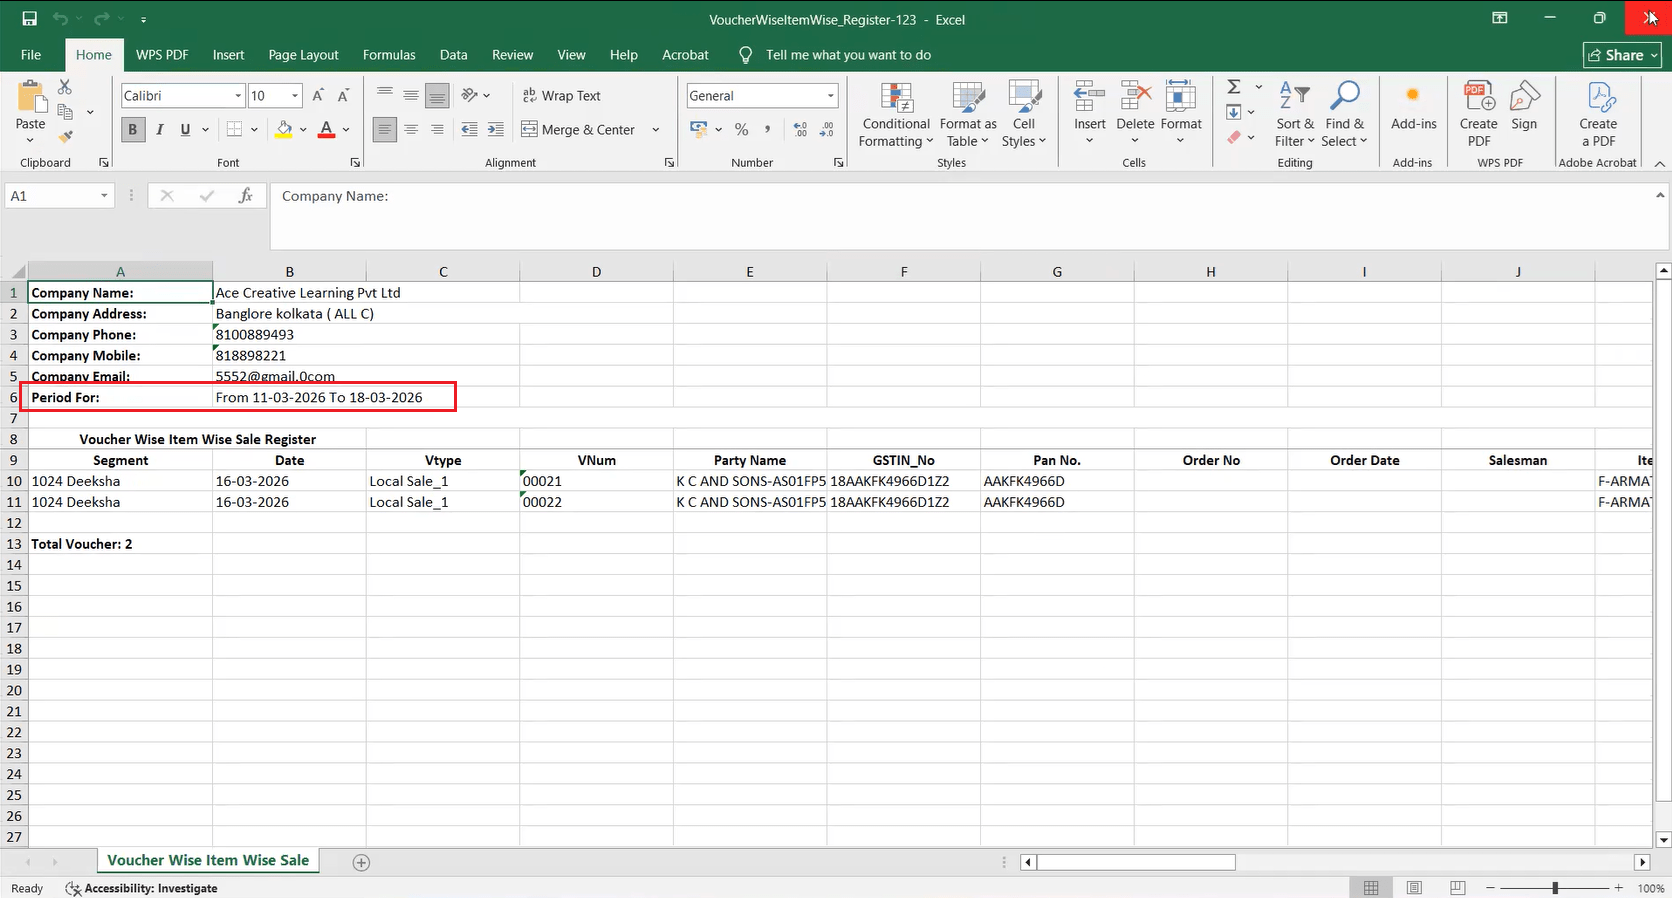
When exporting Purchase Register or Sale Register data in the Voucher Wise Item Wise Excel format, the date range selected in the report was previously not included in the exported file. This made it difficult to identify which period the exported data belonged to. The selected date is now available in the Excel export.
🌟 What This Means for You
Your exported Excel files now clearly show the date range, making it easier to identify, organize, and share period-specific data without confusion. No more guessing which date range a particular export covers!
🎬 Where It Applies
Purchase Register (Voucher Wise Item Wise):
• Purchase
• Purchase Return
• Purchase & Purchase Return
Sale Register (Voucher Wise Item Wise):
• Sale
• Sale Return
• Sale & Sale Return
📷 See It in Action
📌 Overview
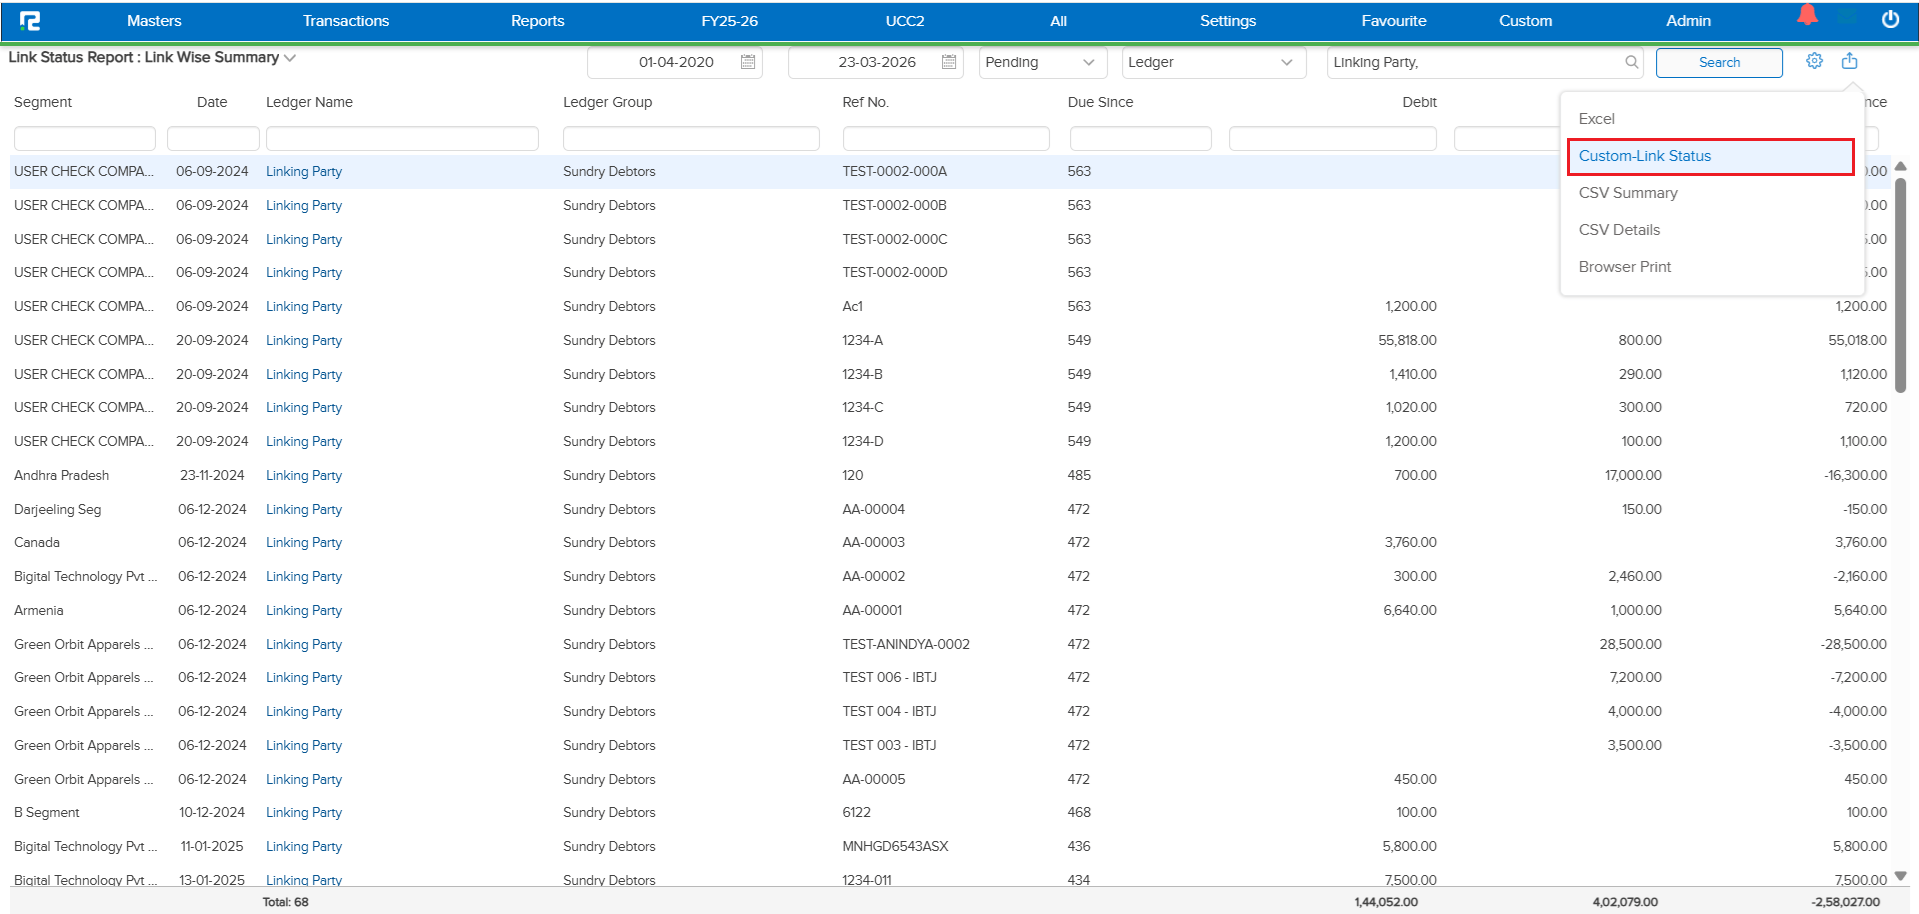
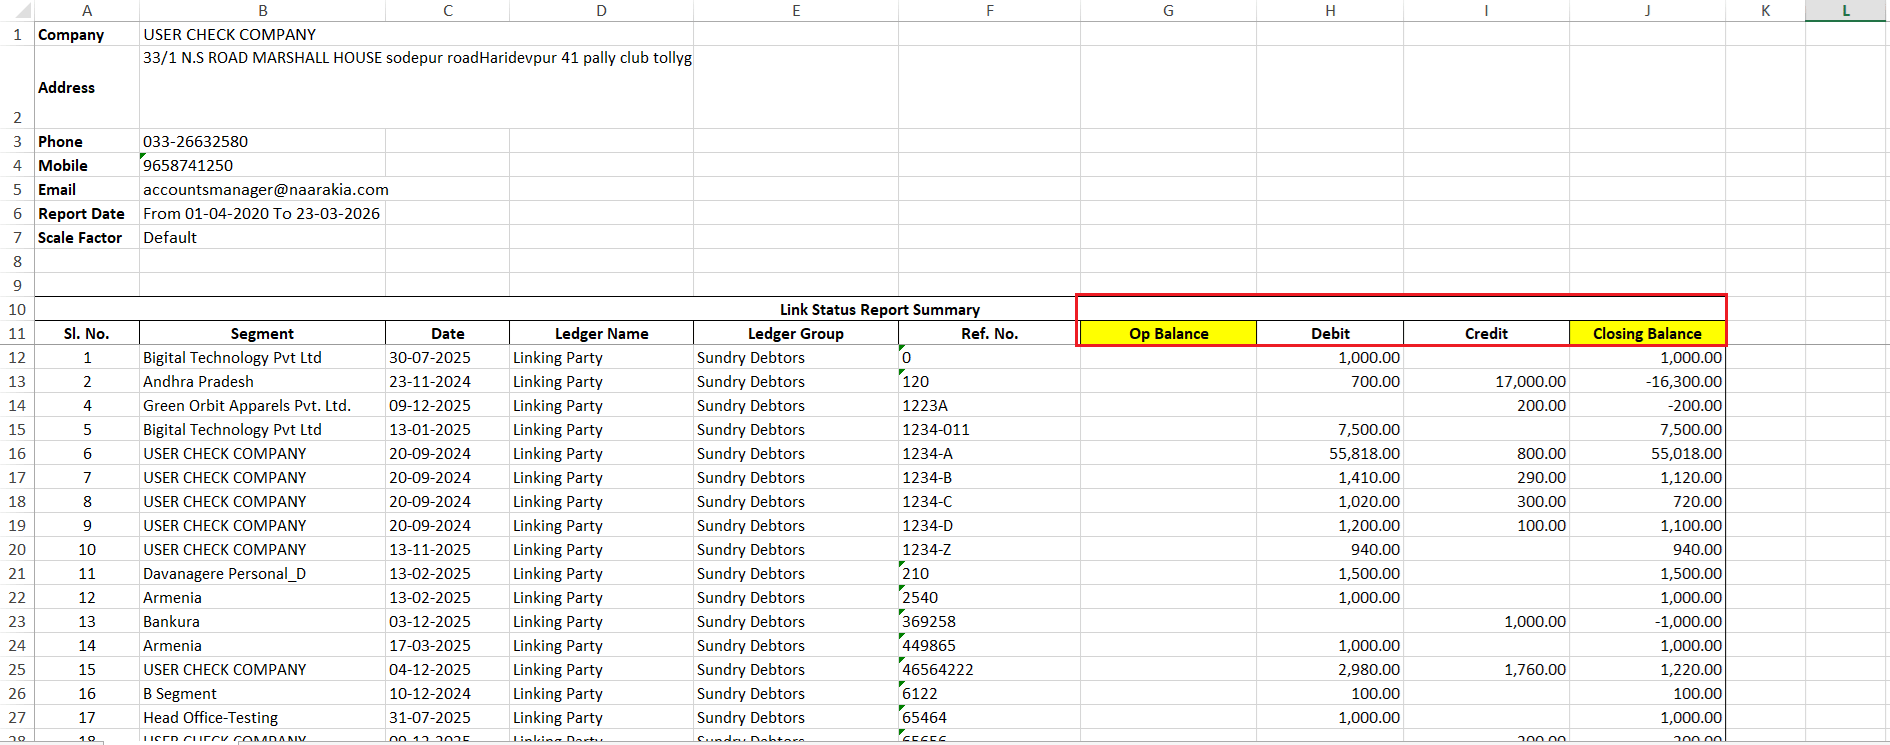
Previously, to get accurate data in the Link Wise Summary report, users had to run the report from the start of the company so that all entries for a reference number were considered. If a specific month was selected, older transactions for that reference were not included — leading to incomplete data.
With this enhancement, the report now shows the opening balance for each reference as on the selected date range, so you no longer need to run the report from the very beginning.
🌟 What This Means for You
You can now run the Link Wise Summary report for any specific month or date range and still get the complete picture. The opening balance ensures you see the correct closing balance without having to process data from the start of the company every time.
🎬 How It Works
The following logic is now applied:
• If any transaction has happened for a reference in the selected date range, the report will show the opening balance of that reference — even if the first transaction date falls outside the current period.
• If no transaction has happened for a reference in the selected date range, the report will still include the reference with its opening balance.
• The reference data appears in both the Summary and Detail sheets, with transactions for the selected period and the opening balance as on the start of the date range.
• The Difference & Subtotal calculations now factor in the opening balance to display the correct closing balance.
📷 See It in Action
📌 What Was Happening
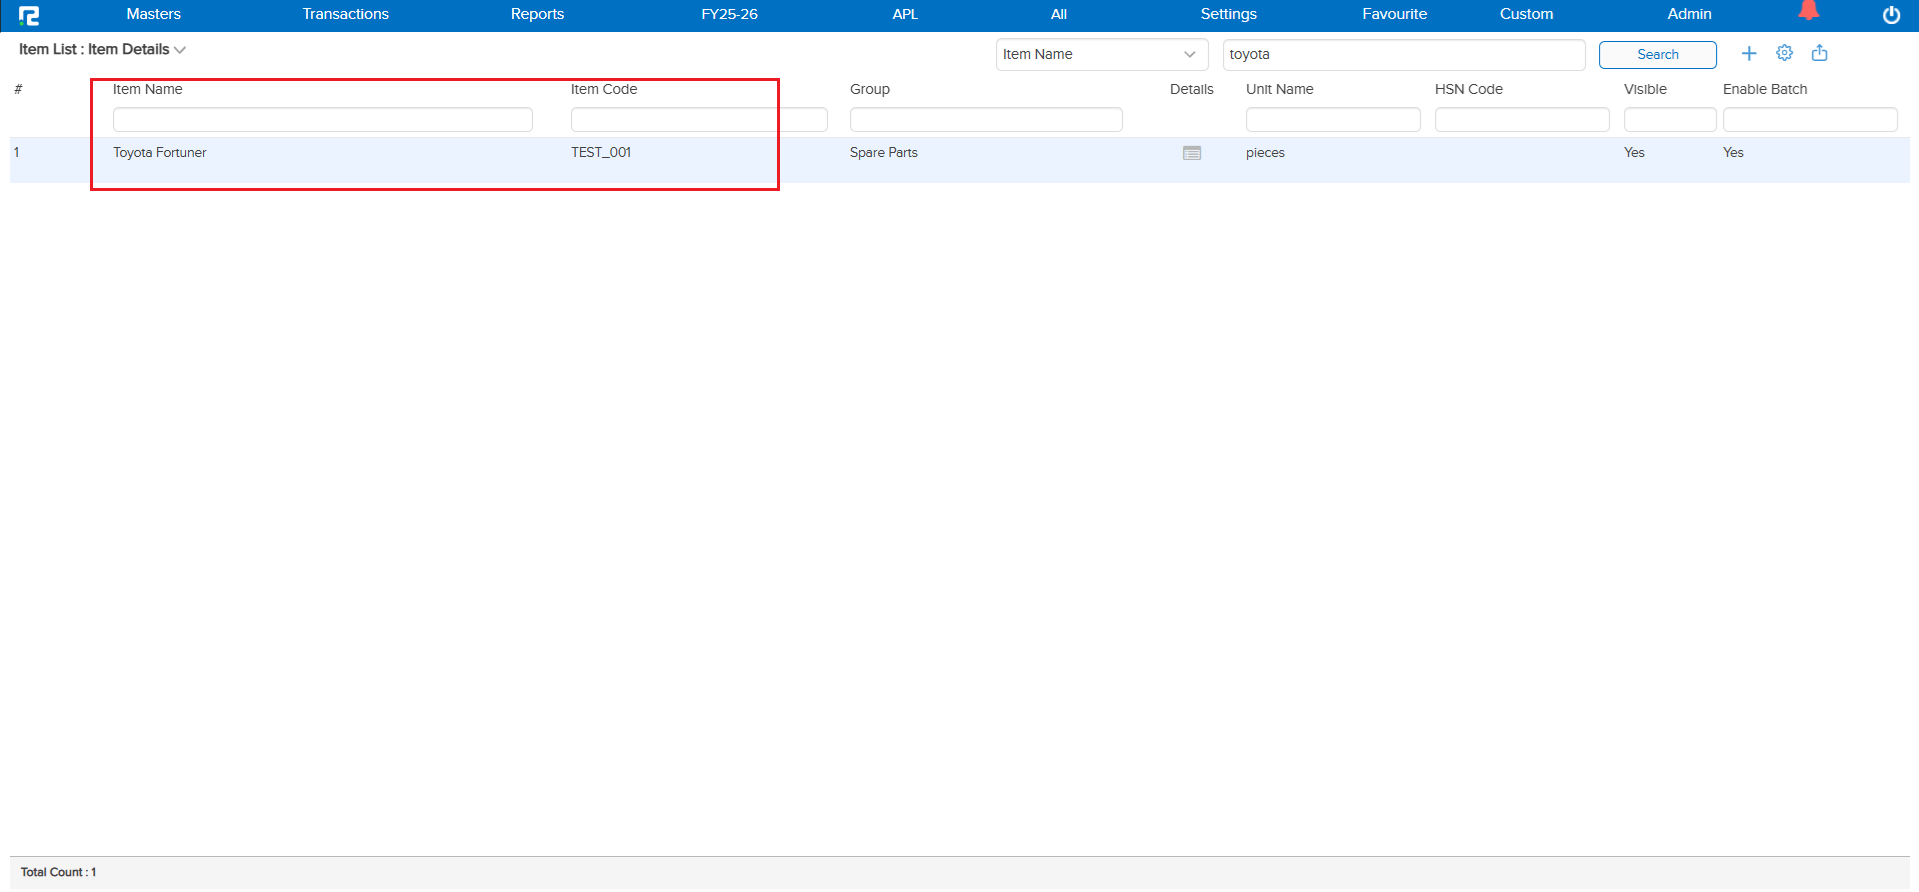
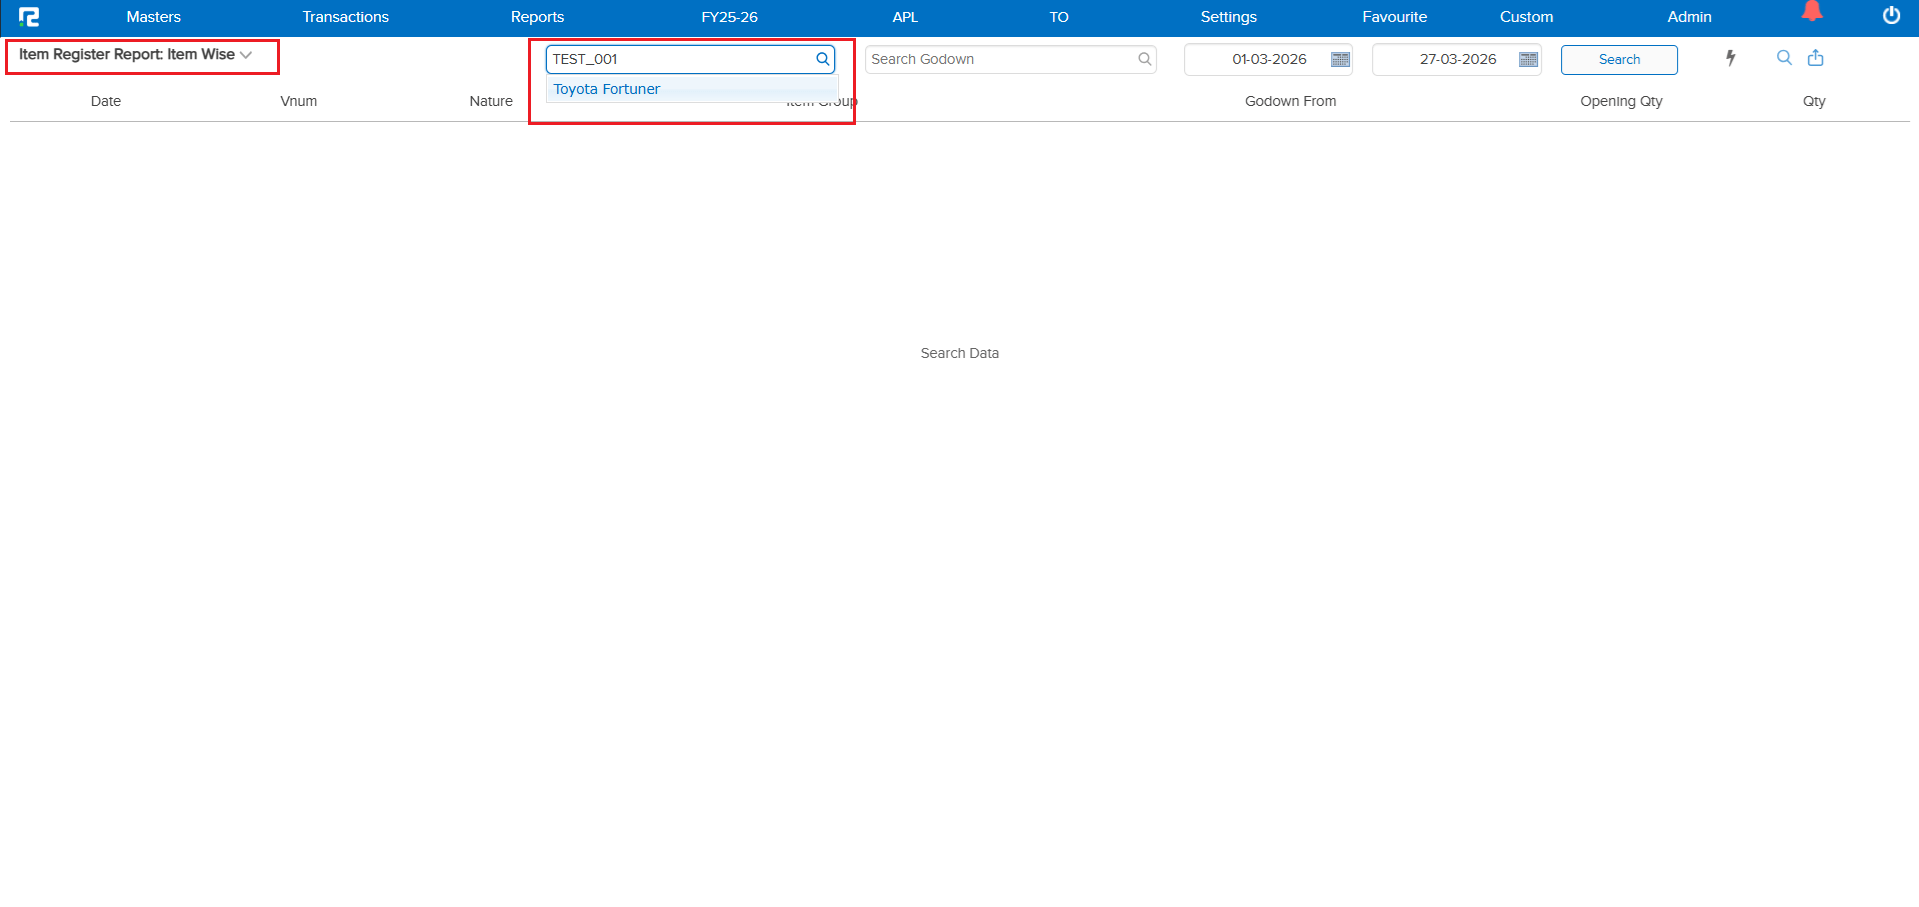
The Simultaneous Search setting for item name or code was already available and enabled in the Settings menu. However, this functionality was not working in the Item Register report — primarily because it had not been developed for that module. Users could only search by one field at a time, making it harder to locate items quickly.
🌟 What This Means for You
The simultaneous search option now works in the Item Register as intended. You can search by either Item Name or Item Code in a single search field, making it much faster and more convenient to find the item you need without switching between filters.
🎬 Where to Find It
1. Open the Item Register report.
2. Use the search field to search by Item Name or Item Code — both work simultaneously.
3. The setting can be managed from Settings menu.
📷 See It in Action
📌 Overview
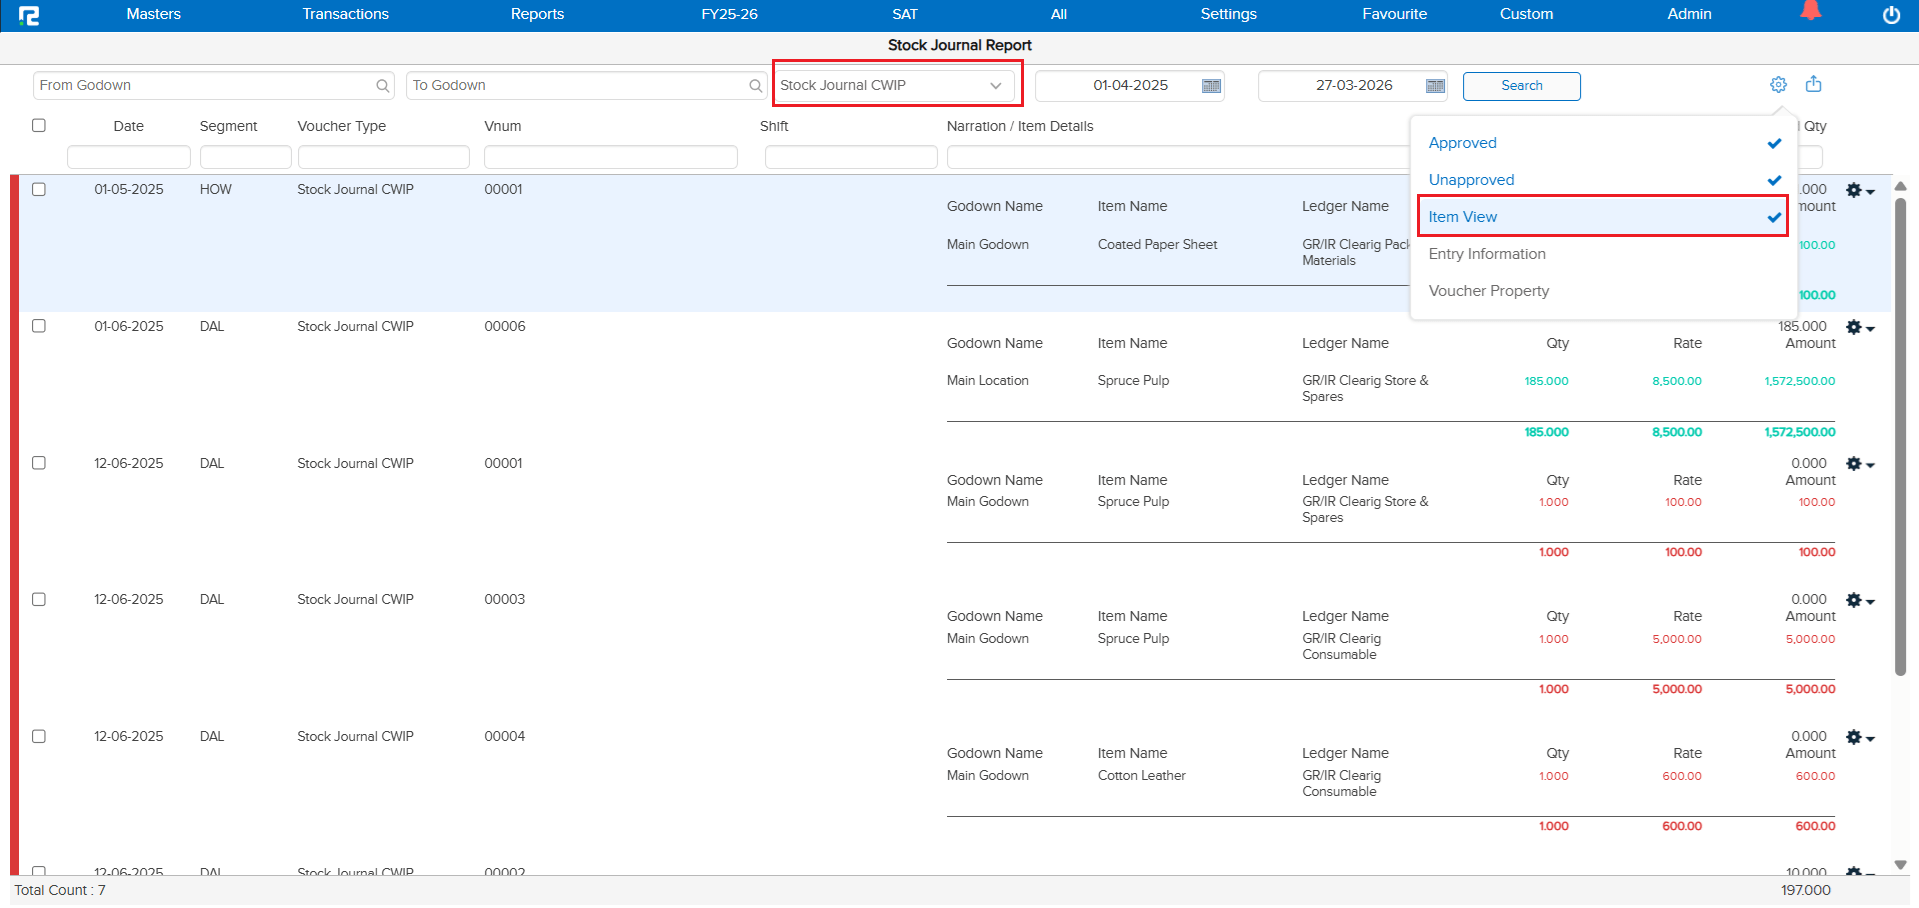
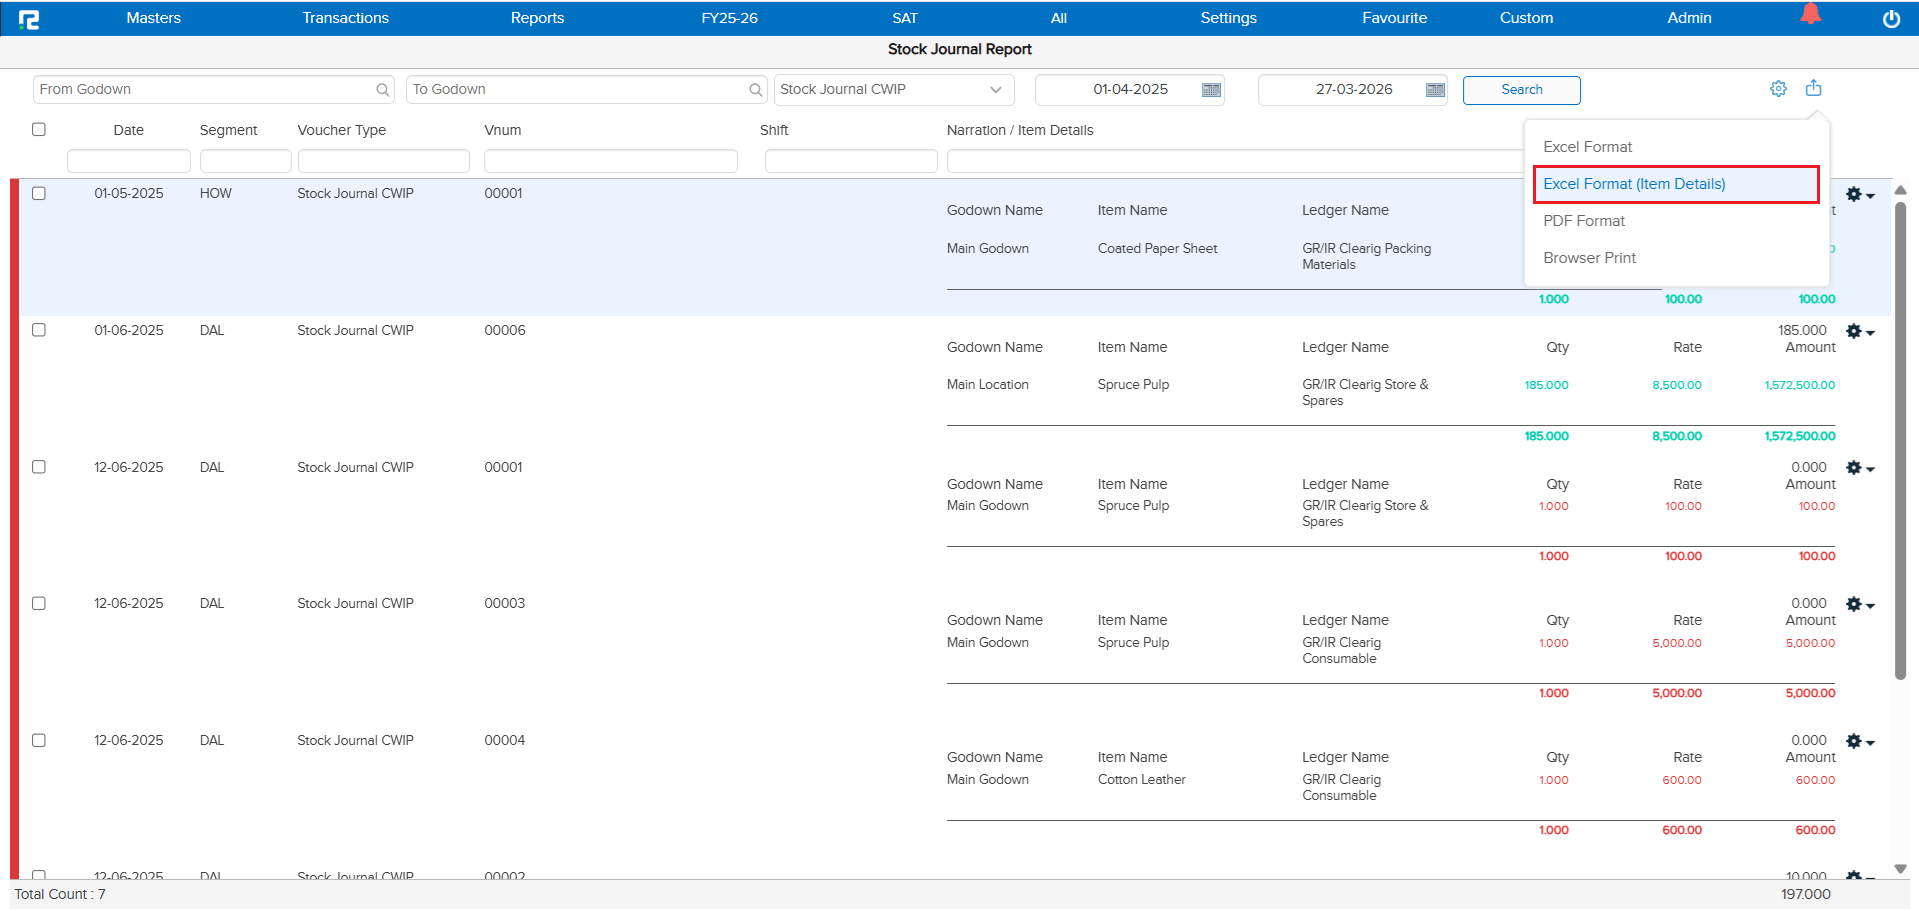
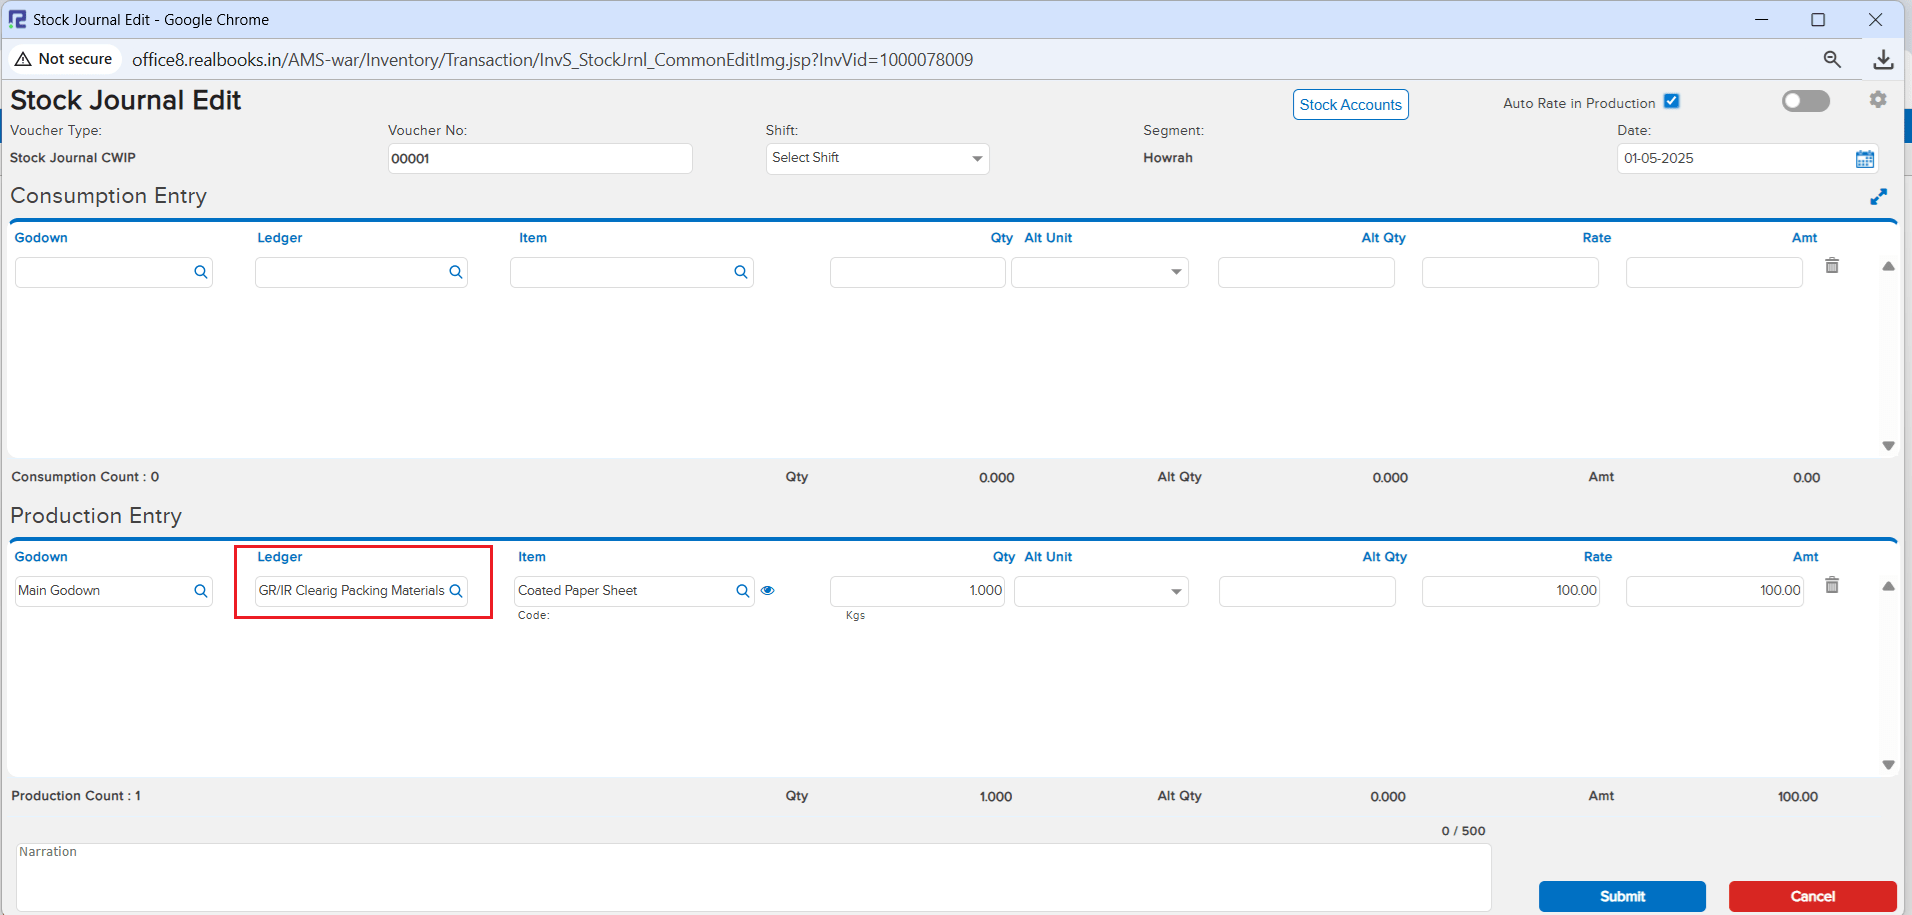
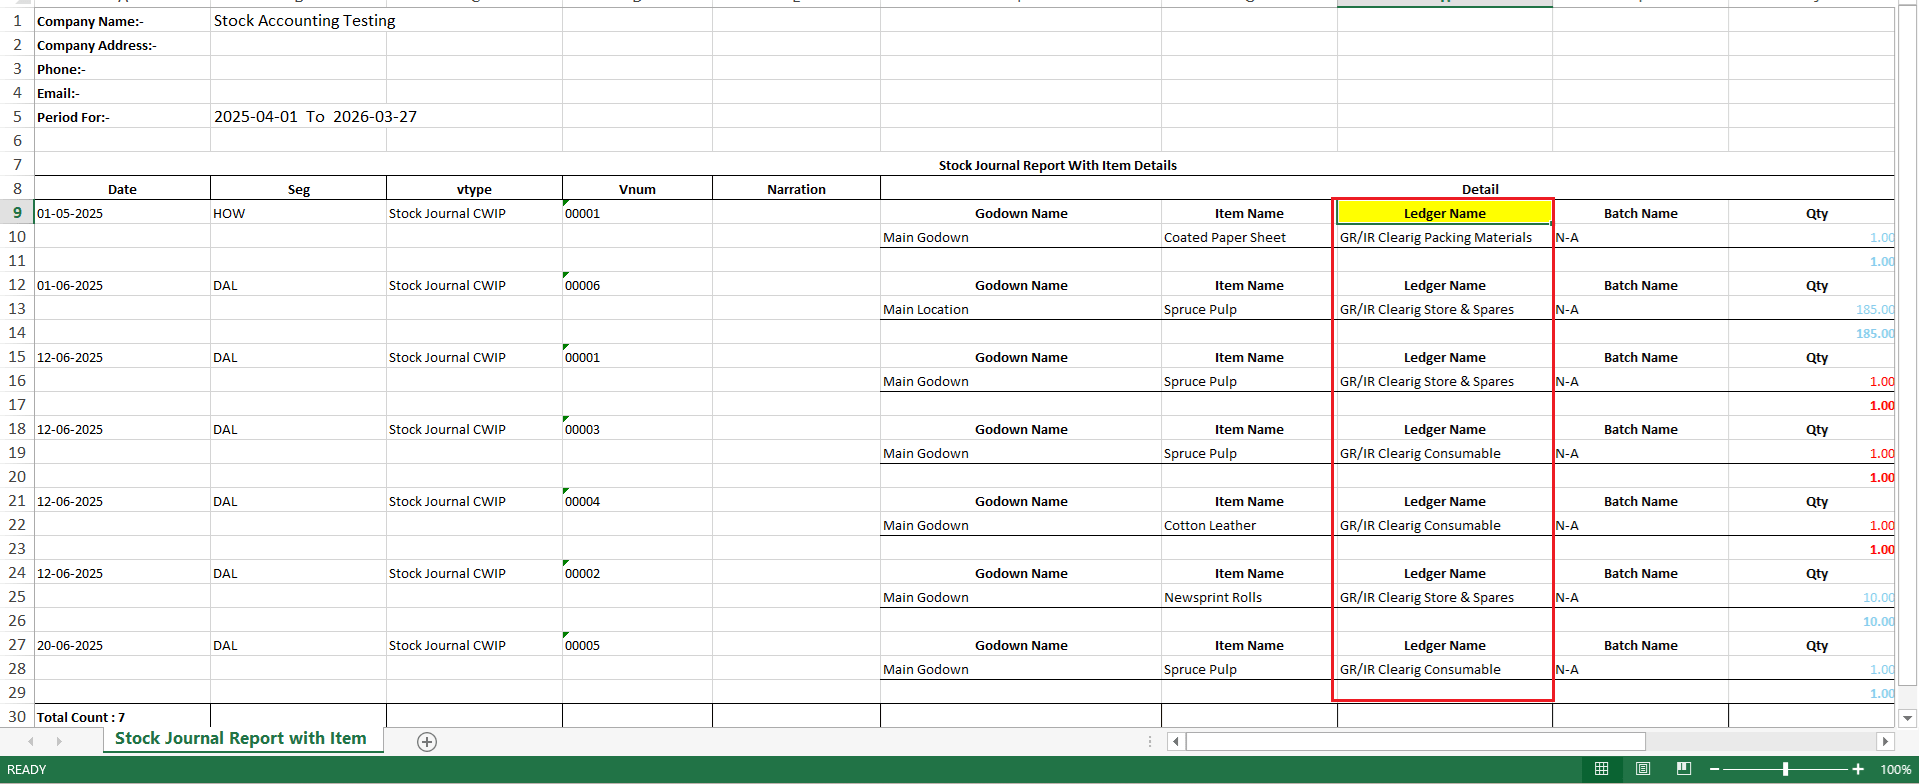
For Stock Journal entries where a stock accounting ledger is used, the option to view the ledger is now included when exporting to Excel. After clicking Item View, the ledger details are reflected in the export under Excel Format (Item Details) for the voucher type Stock Journal CWIP. Previously, this ledger information was not part of the exported data.
🌟 What This Means for You
You can now get complete ledger details in your Excel exports for Stock Journal CWIP entries. This eliminates the need to manually cross-reference ledger data and ensures your exported reports contain all the information visible on screen.
🎬 Where to Find It
📷 See It in Action
📌 What Was Happening
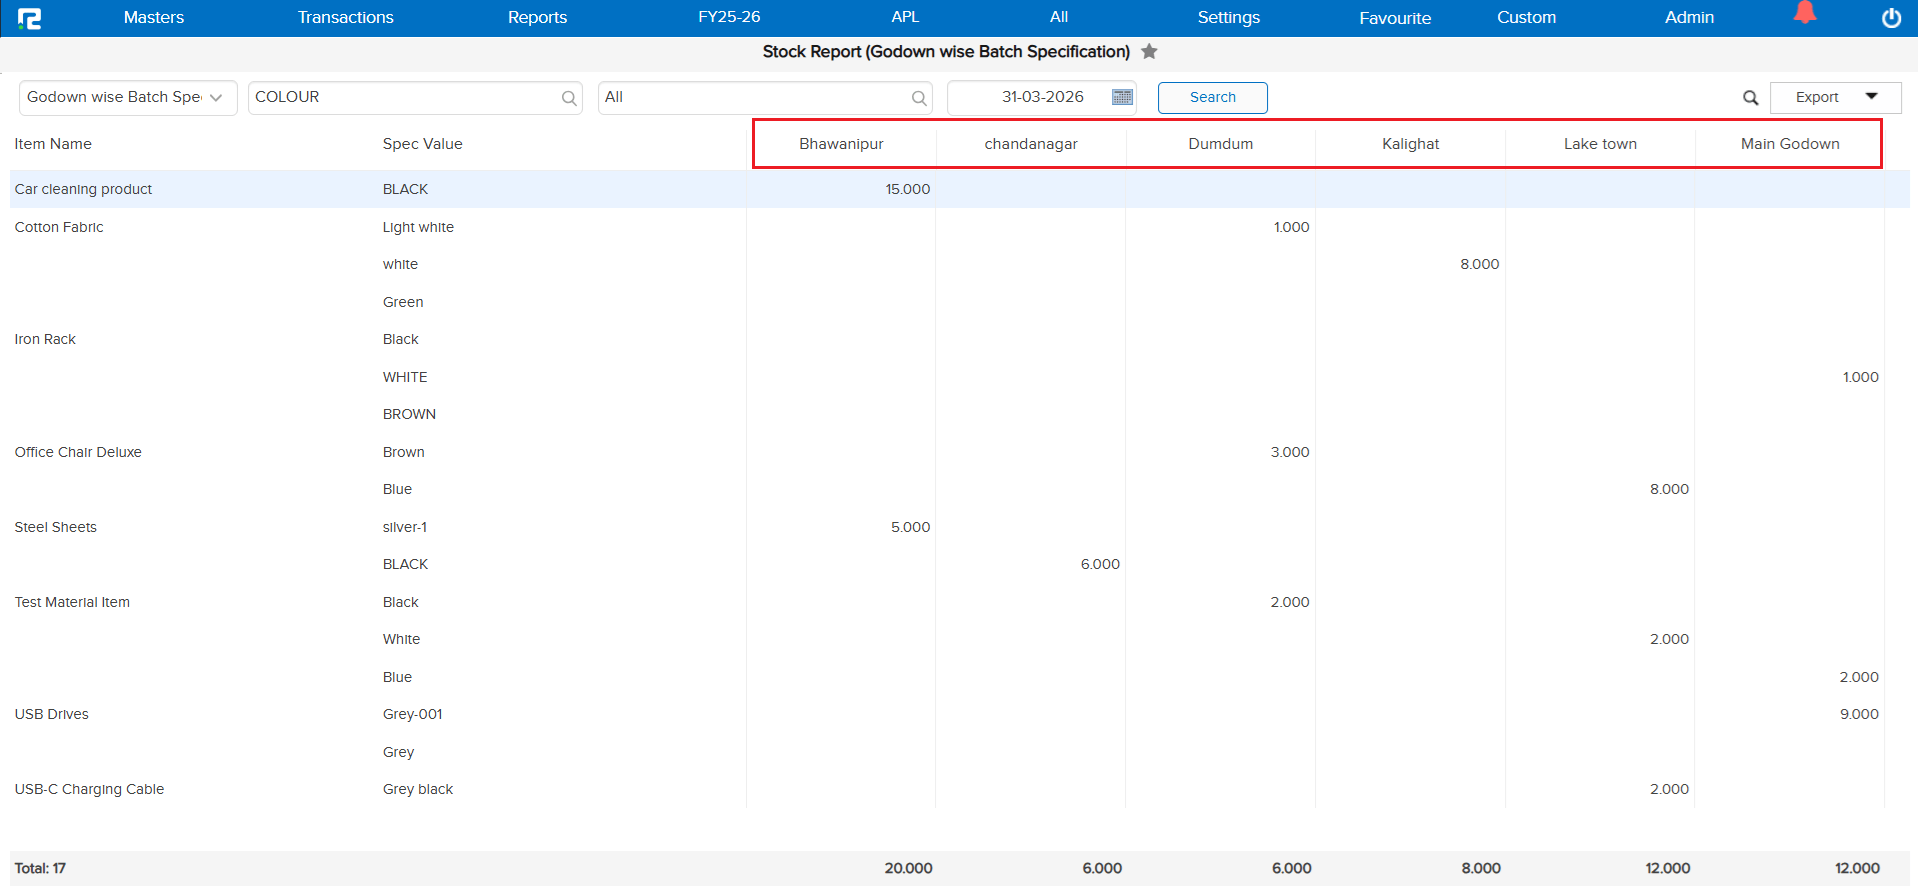
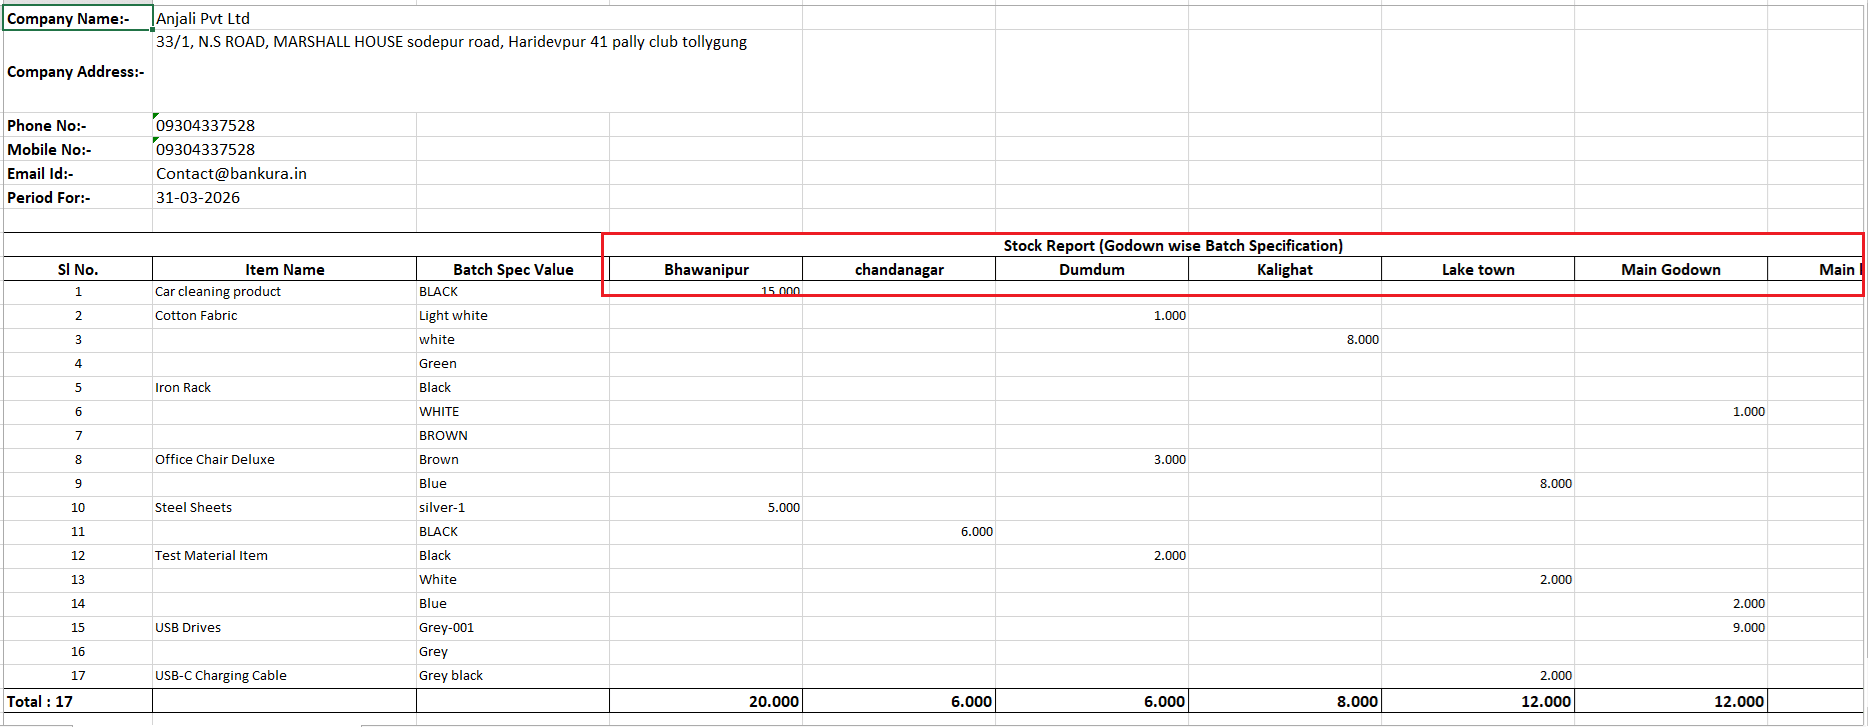
In the Godown Wise Batch Specification report, the godown names were not displayed in any particular order. This made it difficult for users to locate a specific godown quickly, especially when dealing with a large number of godowns.
🌟 What This Means for You
Godown names now reflect in alphabetical order in the Godown Wise Batch Specification report. This makes it much easier and faster to find the godown you are looking for, improving overall readability and navigation within the report.
🎬 Where to Find It
📷 See It in Action
📌 What Was Happening
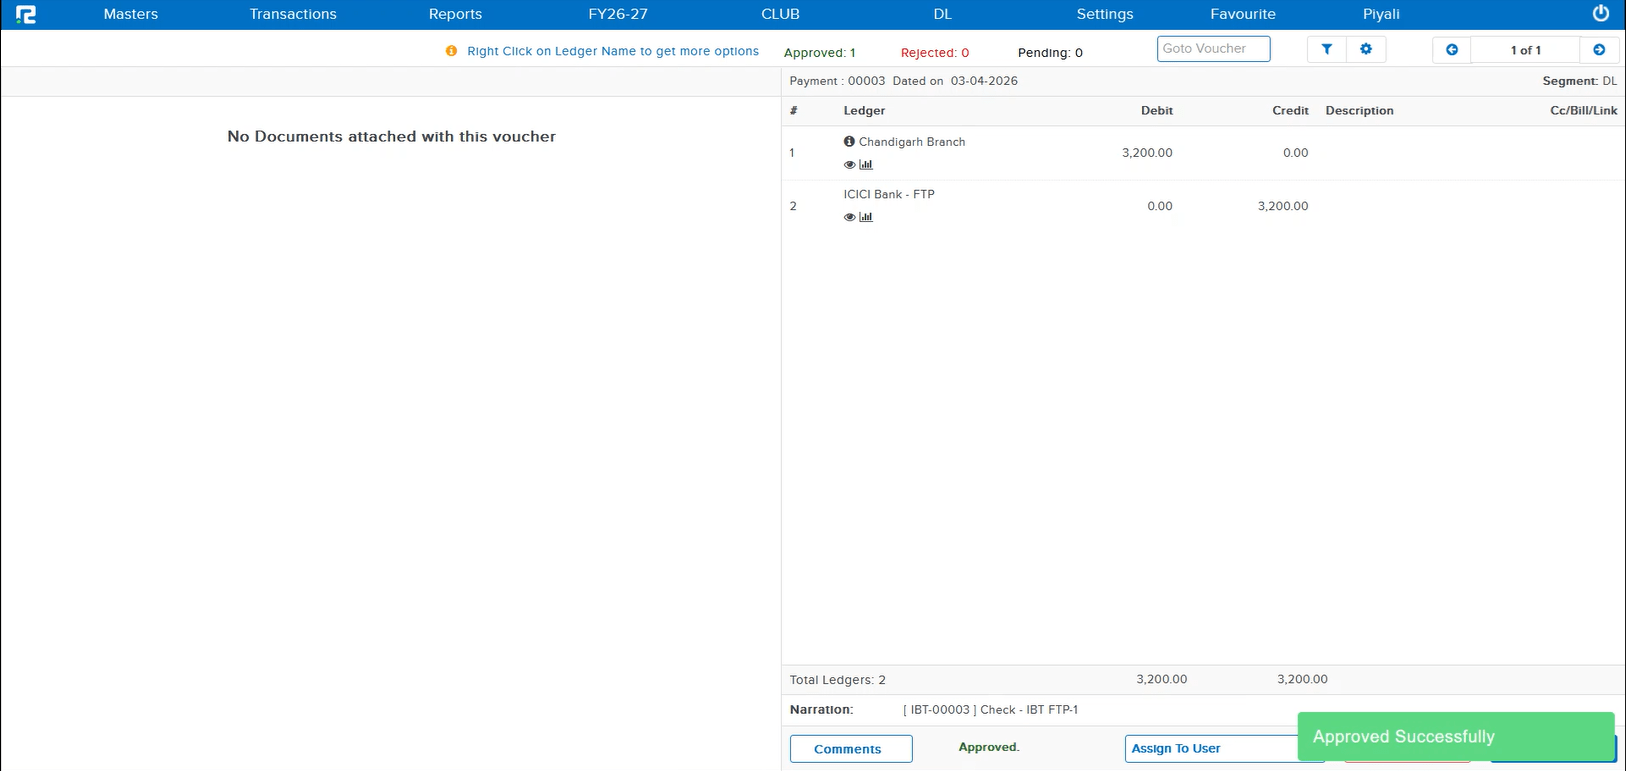
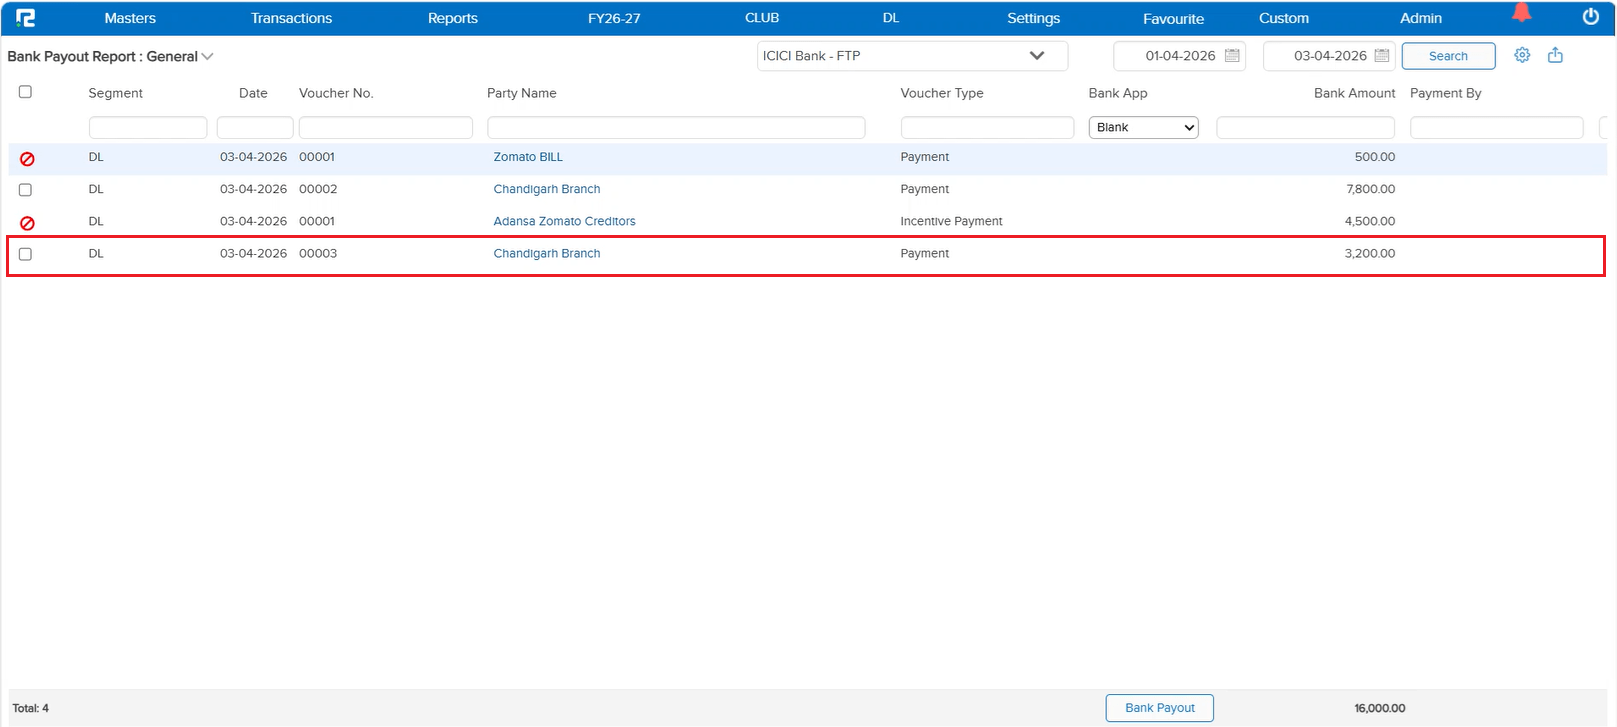
When a payment was created through an Interbranch Transaction (IBT), the auto-posted child payment entry — even after being approved — was not appearing in the FTP (Fund Transfer Processing) list. Only direct payment entries were being listed in FTP. This meant IBT-originated payments could not be processed via FTP, requiring manual workarounds.
🌟 What This Means for You
Approved IBT child payment entries now correctly appear in the FTP list alongside direct payment entries. You can process all approved payments — whether created directly or via IBT — through FTP in a single, unified workflow without any manual intervention.
📷 See It in Action
📌 What Was Happening
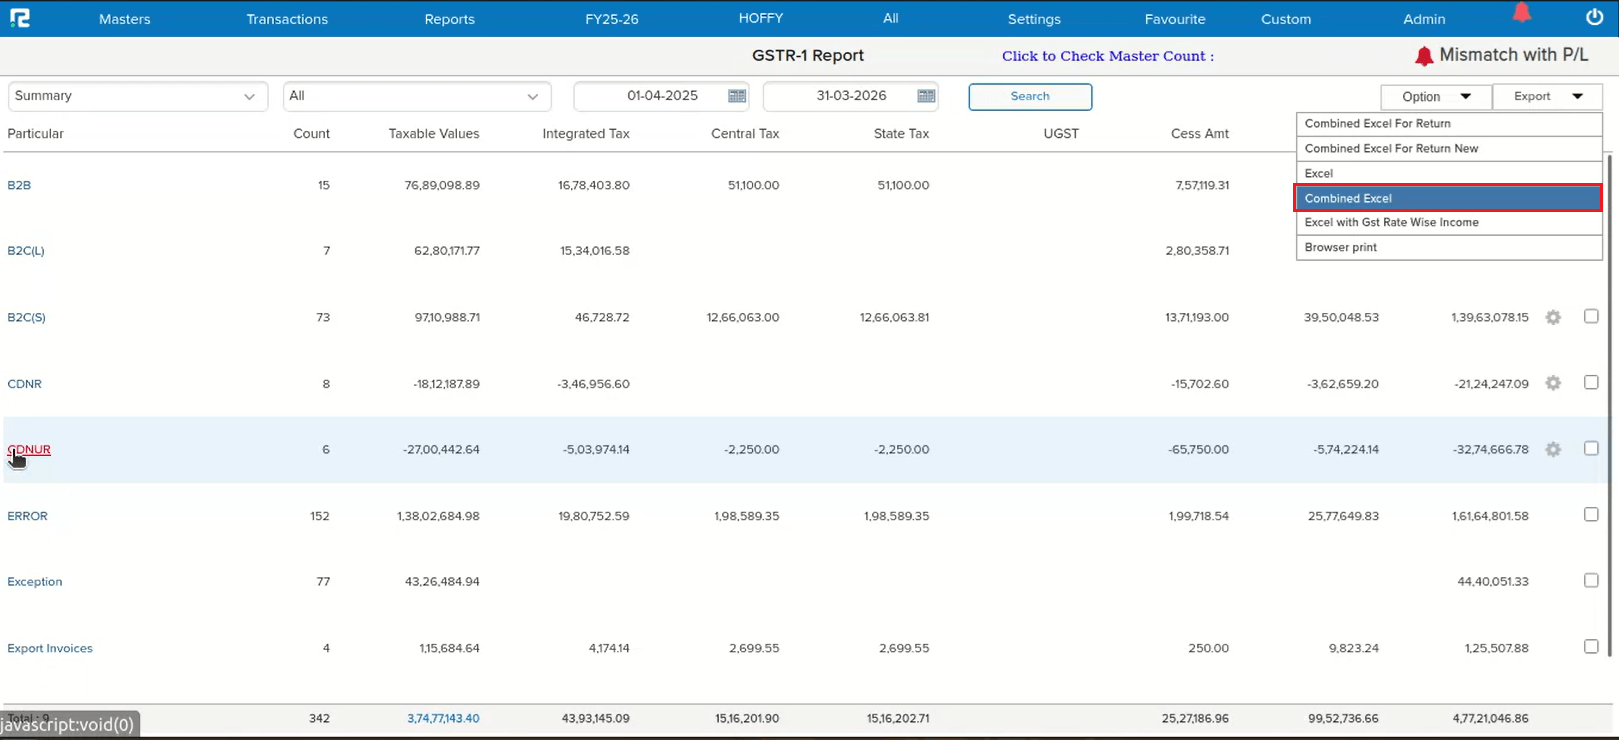
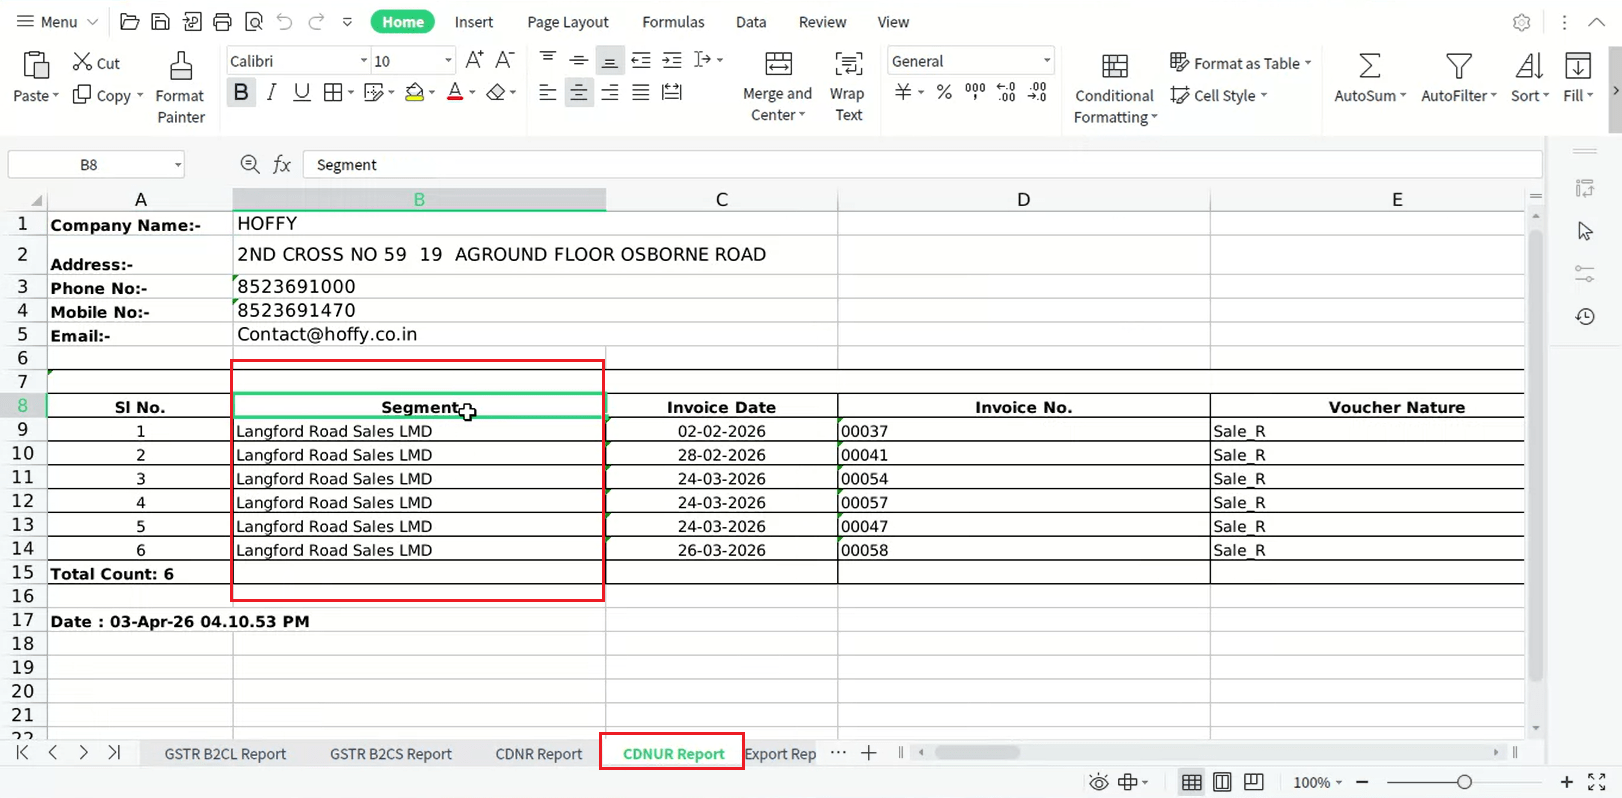
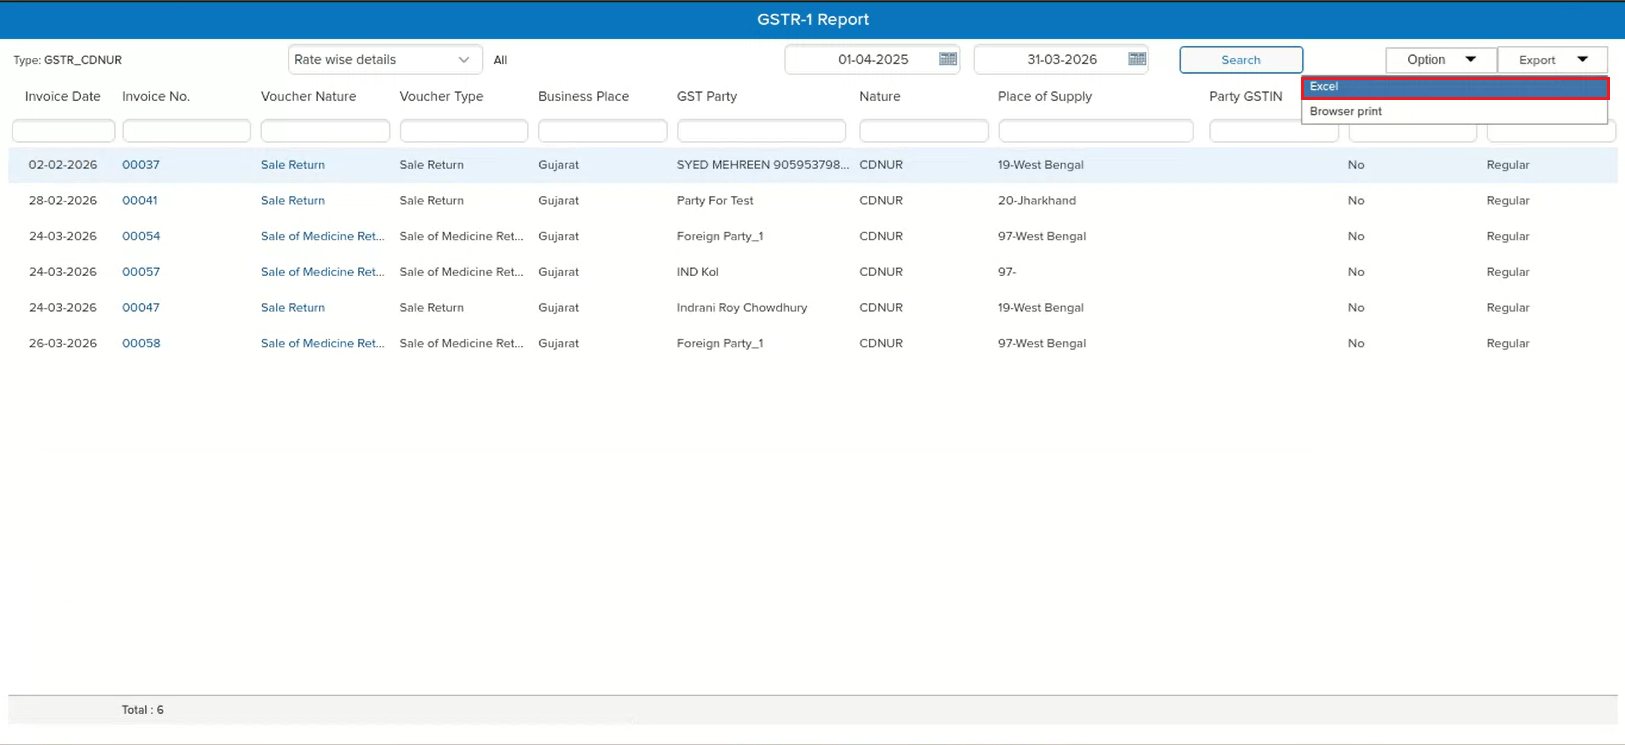
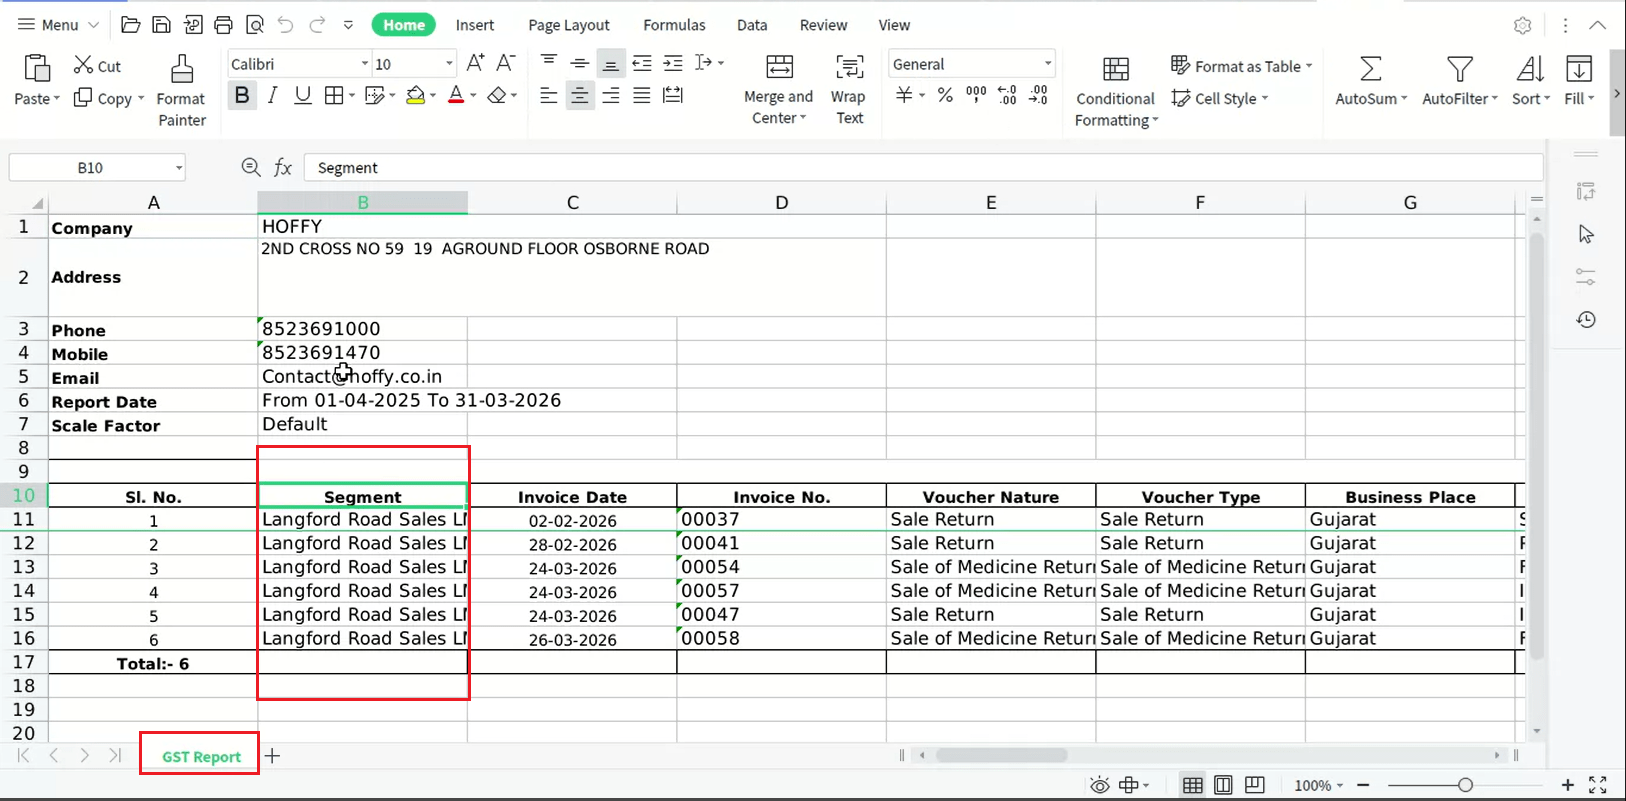
In the GSTR-1 report, the CDNUR section did not include the Segment column when exporting data using the Combined Excel option. Users who work with multiple segments needed this column for reconciliation and audit purposes but had to manually add it, leading to extra effort and potential errors.
🌟 What This Means for You
The Segment column is now included in the Combined Excel export for the CDNUR section of the GSTR-1 report. You can directly identify which segment each entry belongs to without any manual effort — making reconciliation and compliance review faster and more accurate.
🎬 Where to Find It
📷 See It in Action
📌 What Was Happening
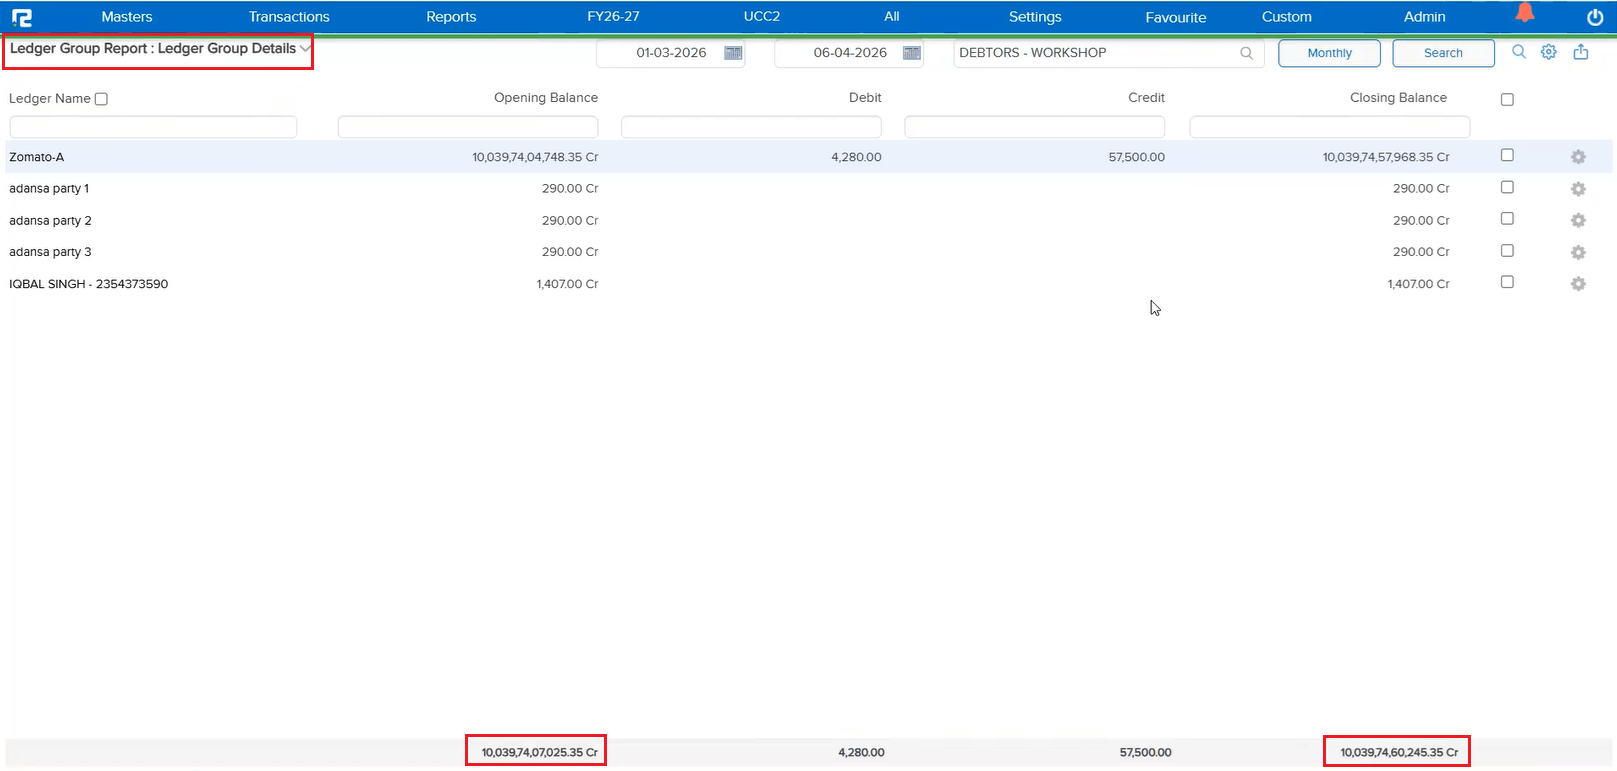
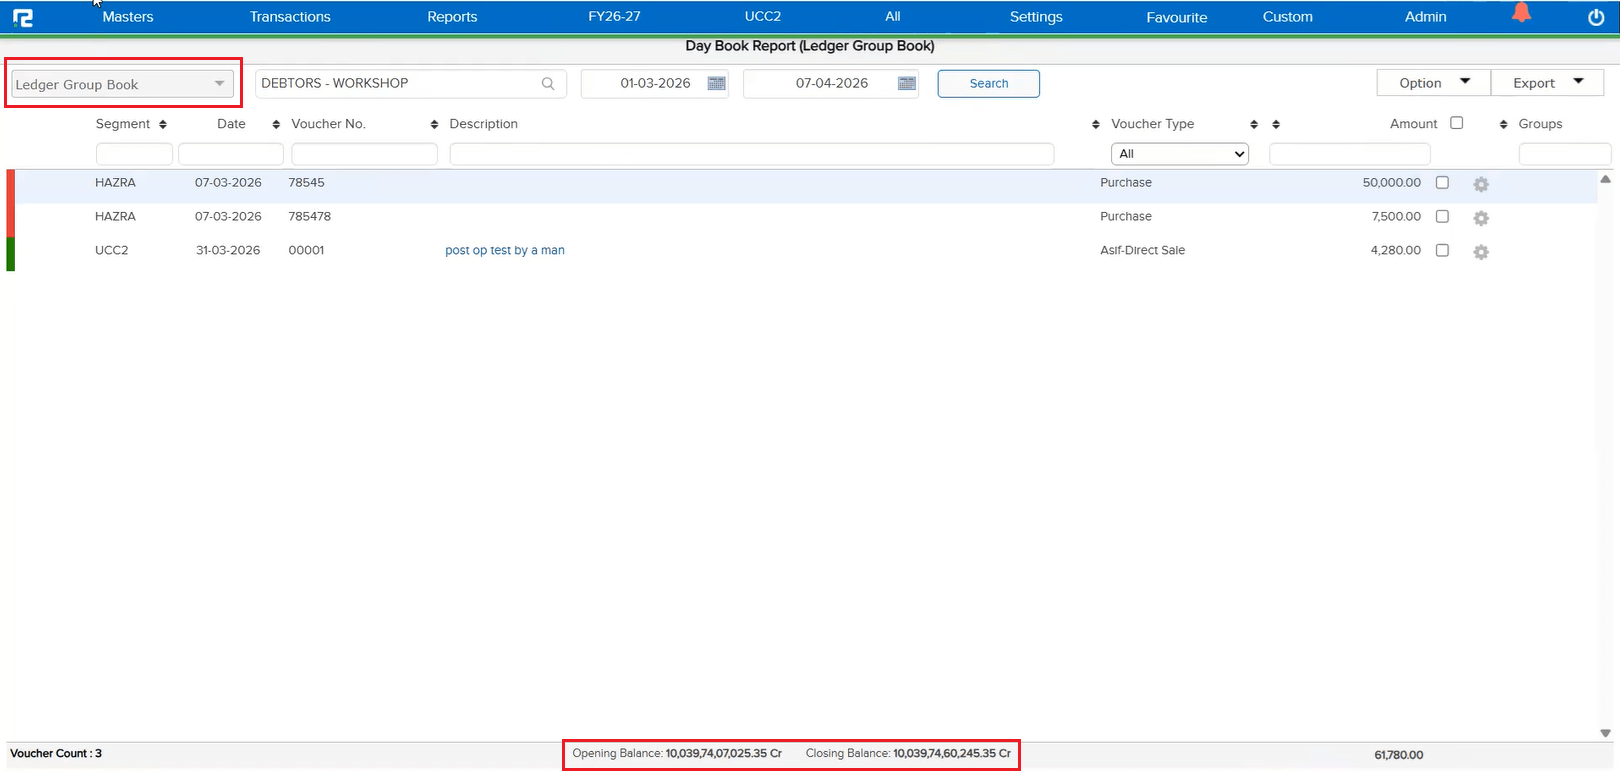
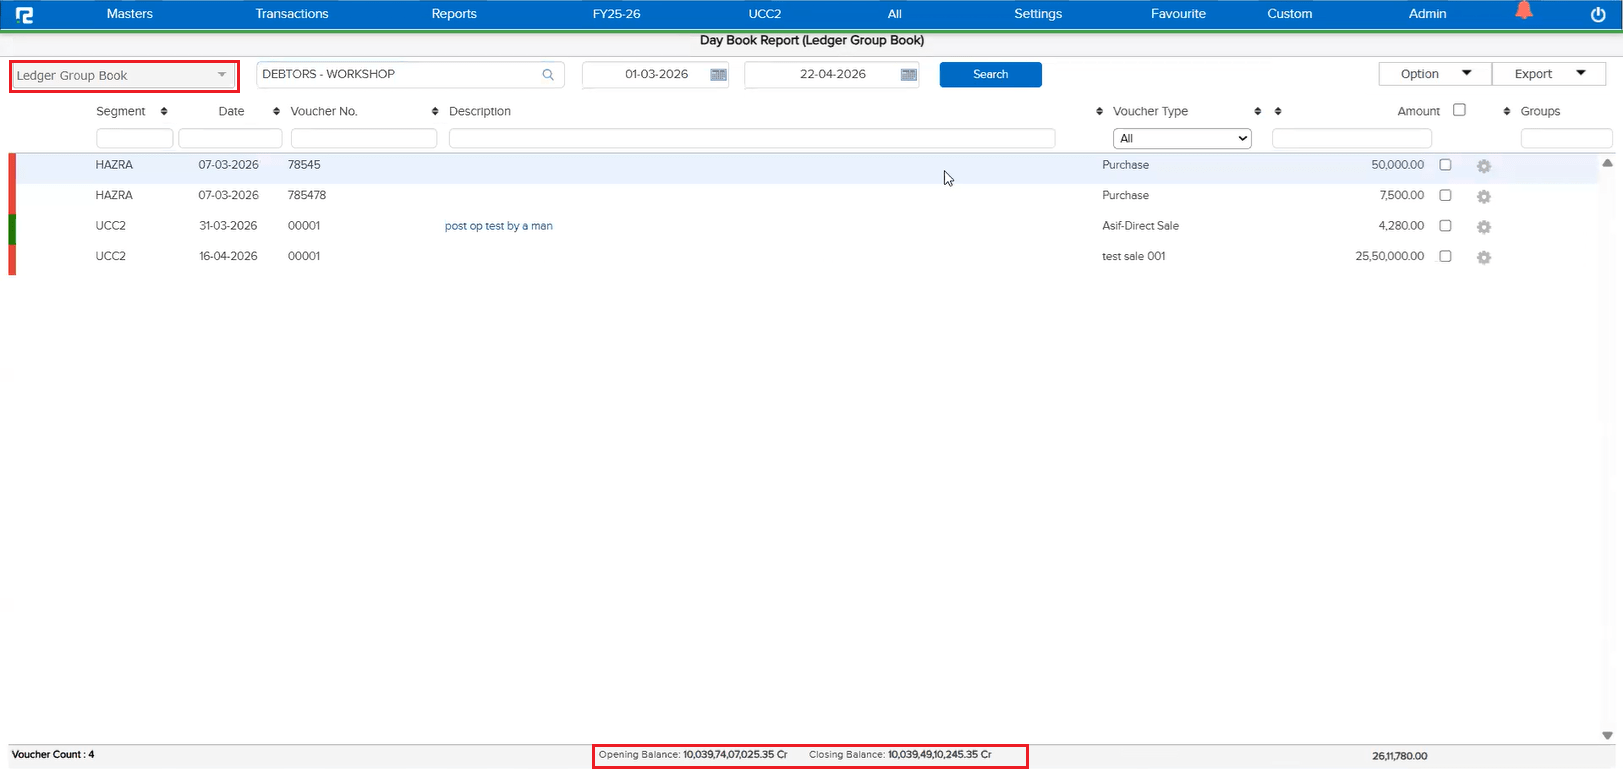
In the Ledger Group Book under Day Book, the Opening Balance and Closing Balance were not displayed. Users had to refer to other reports to get these balance figures, making it inconvenient to get a complete financial picture directly from the Ledger Group Book.
🌟 What This Means for You
The Opening Balance and Closing Balance are now displayed in the Ledger Group Book. You can view the complete balance summary directly within the report without needing to cross-reference other reports.
🎬 Where to Find It
📷 See It in Action
📌 What Was Happening
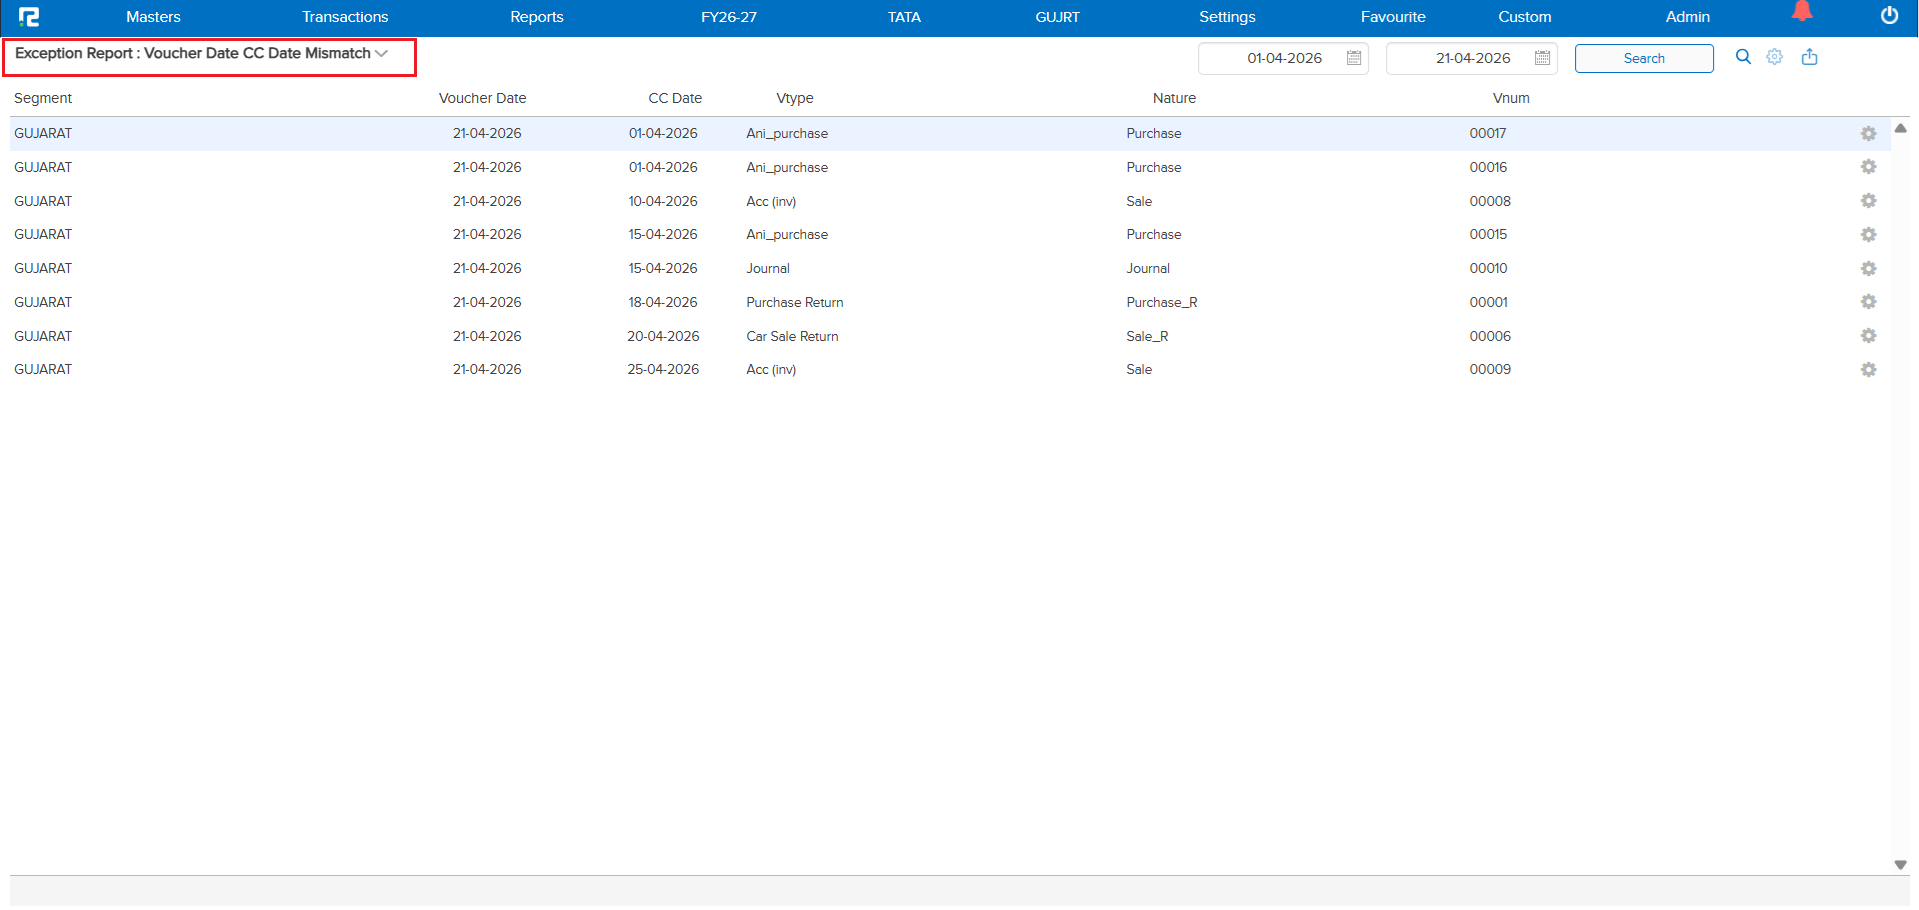
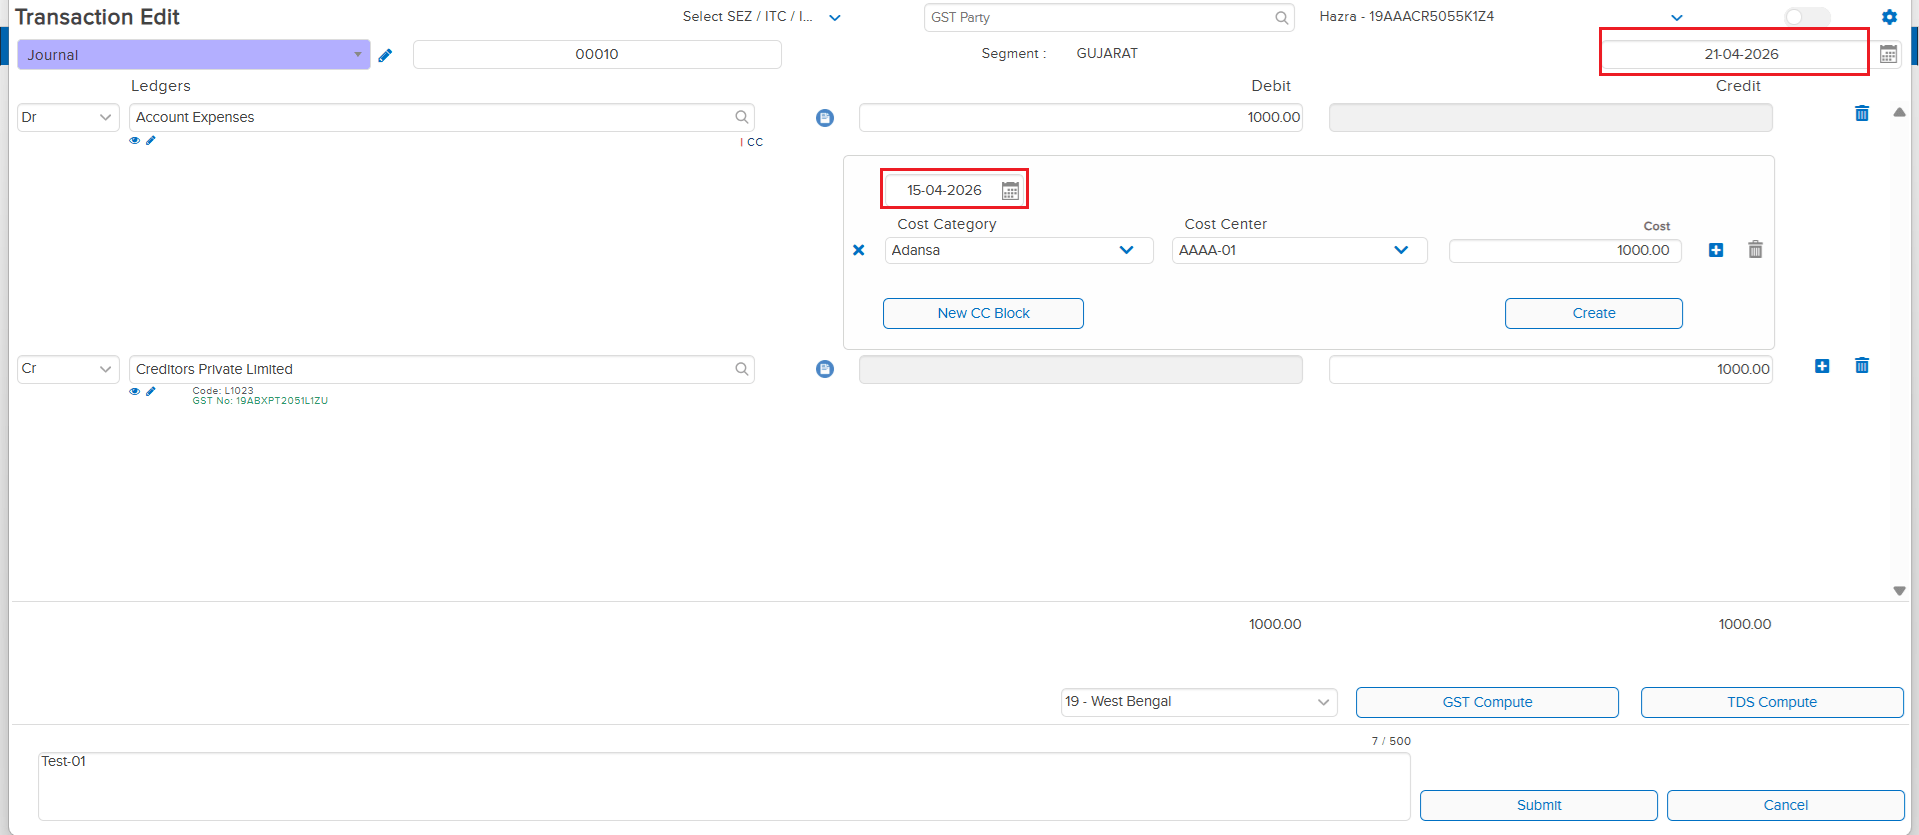
Under the Exception Report, there was no option available to identify or understand the difference between Cost Center Date entries and Voucher Date entries. Users had no way to spot mismatches between these two dates, making it difficult to track discrepancies and ensure data accuracy across vouchers.
🌟 What This Means for You
A new Voucher Date CC Date MisMatch option has been added under the Exception Report. You can now easily identify vouchers where the Cost Center Date differs from the Voucher Date — enabling better clarity, tracking, and quicker resolution of date-related discrepancies.
🎬 Where to Find It
📷 See It in Action
📌 What Was Happening
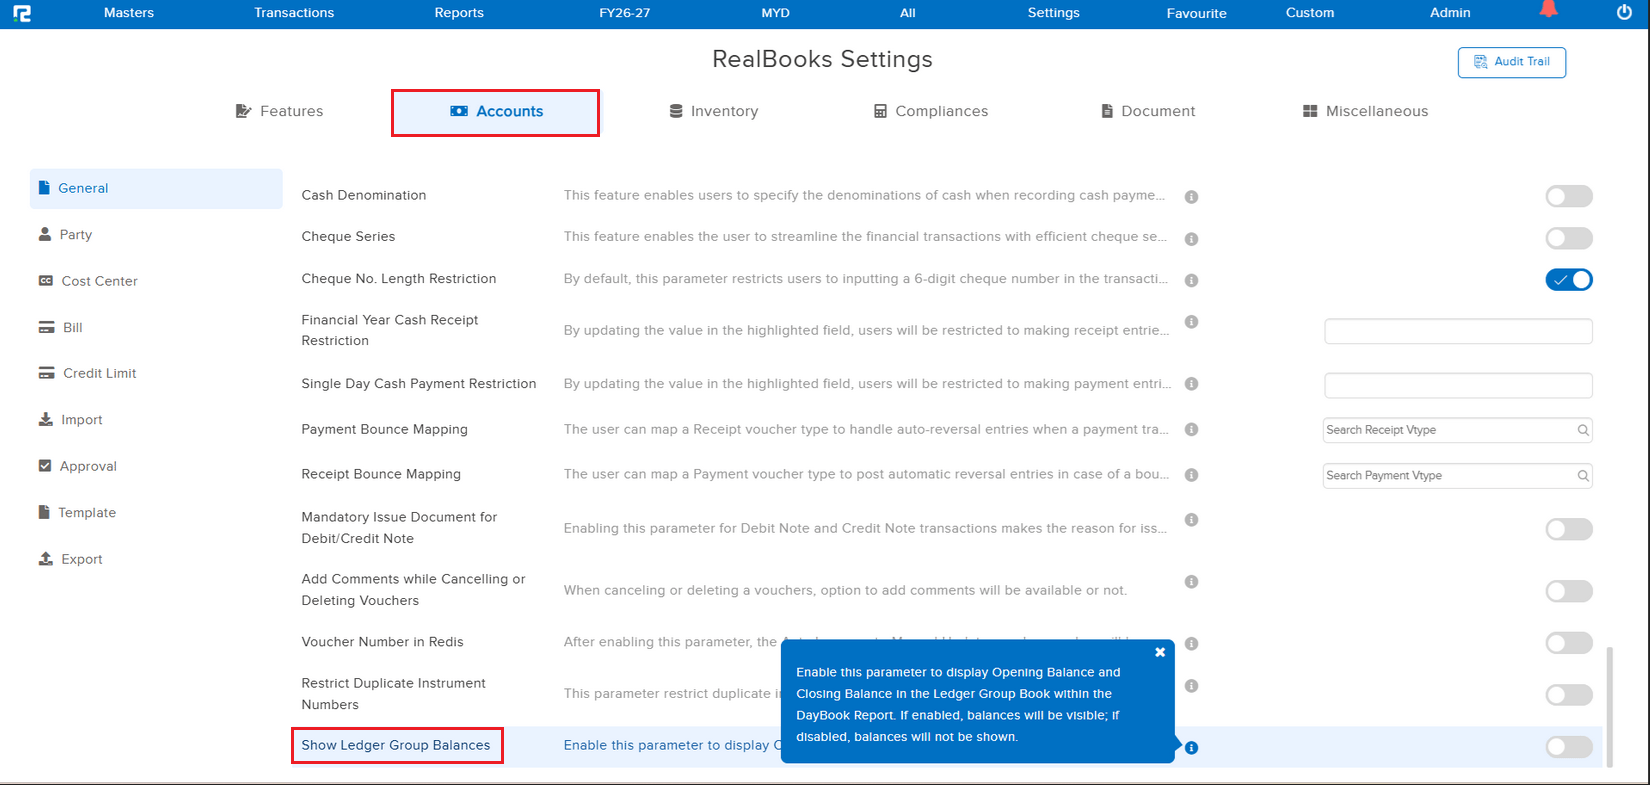
In the Ledger Group Book under the DayBook report, the Opening Balance and Closing Balance were not displayed in the UI or in the exported data. Users had to refer to other reports to get these balance figures, making it inconvenient to get a complete financial picture directly from the Ledger Group Book.
🌟 What This Means for You
A new parameter Show Ledger Group Balances has been introduced under configuration. When enabled, the Opening Balance and Closing Balance will be displayed in the Ledger Group Book within the DayBook Report — both in the UI and in the exported data. If disabled, balances will not be shown.
🎬 Where to Find It
📷 See It in Action
📌 What Was Happening
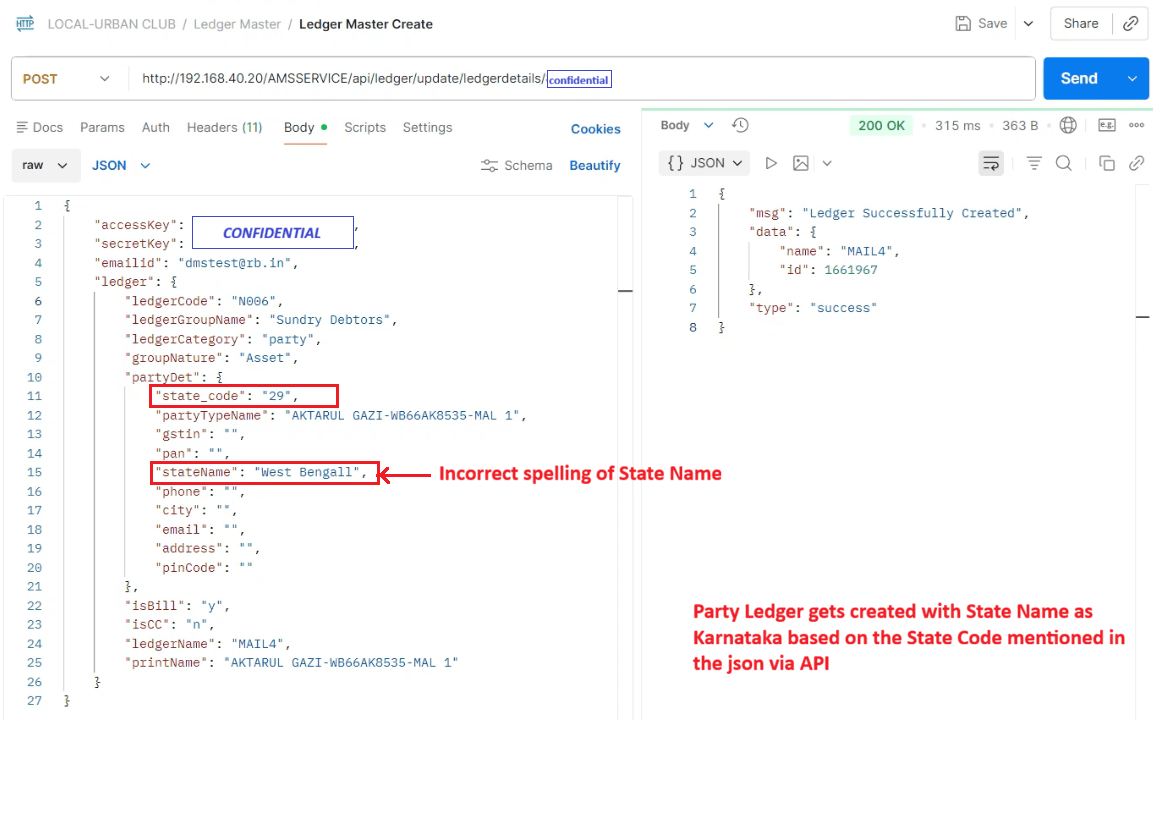
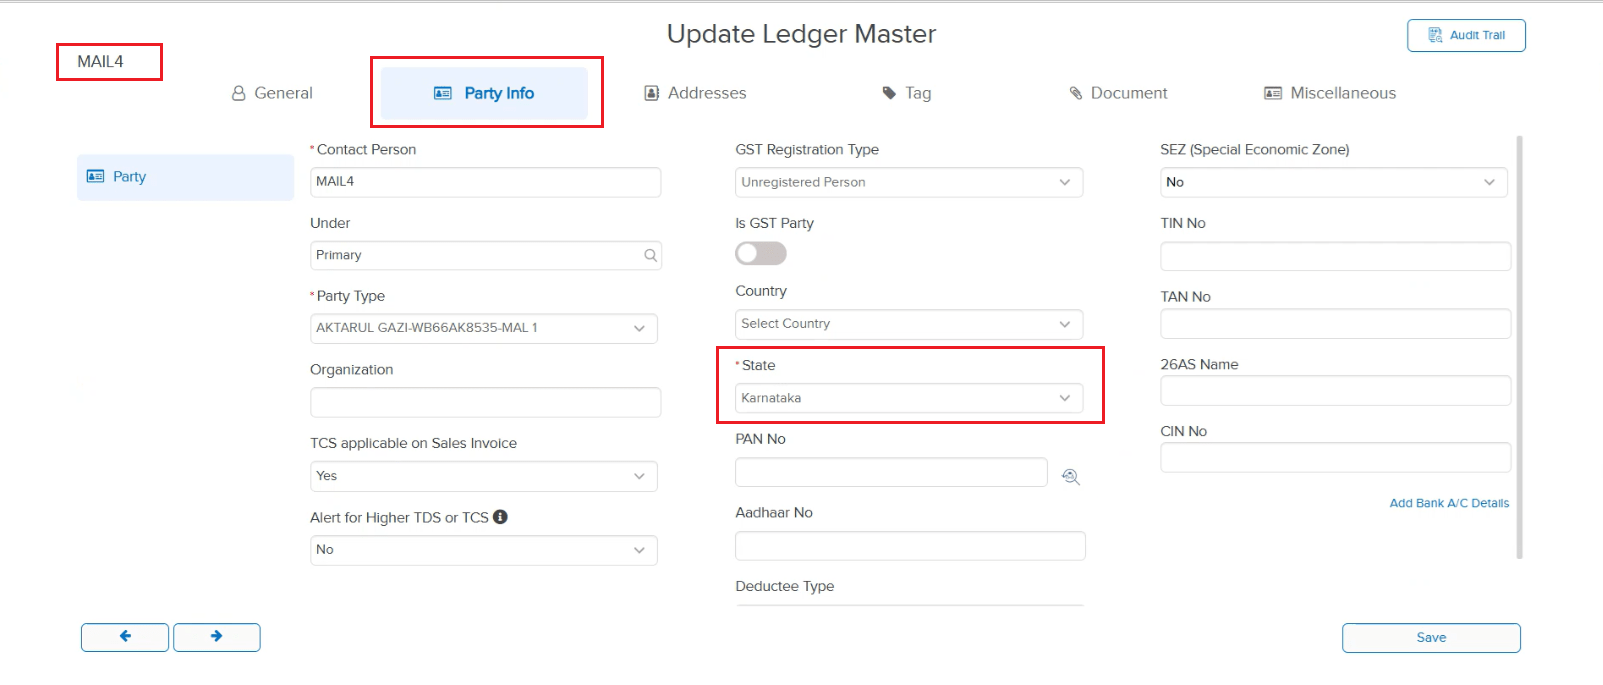
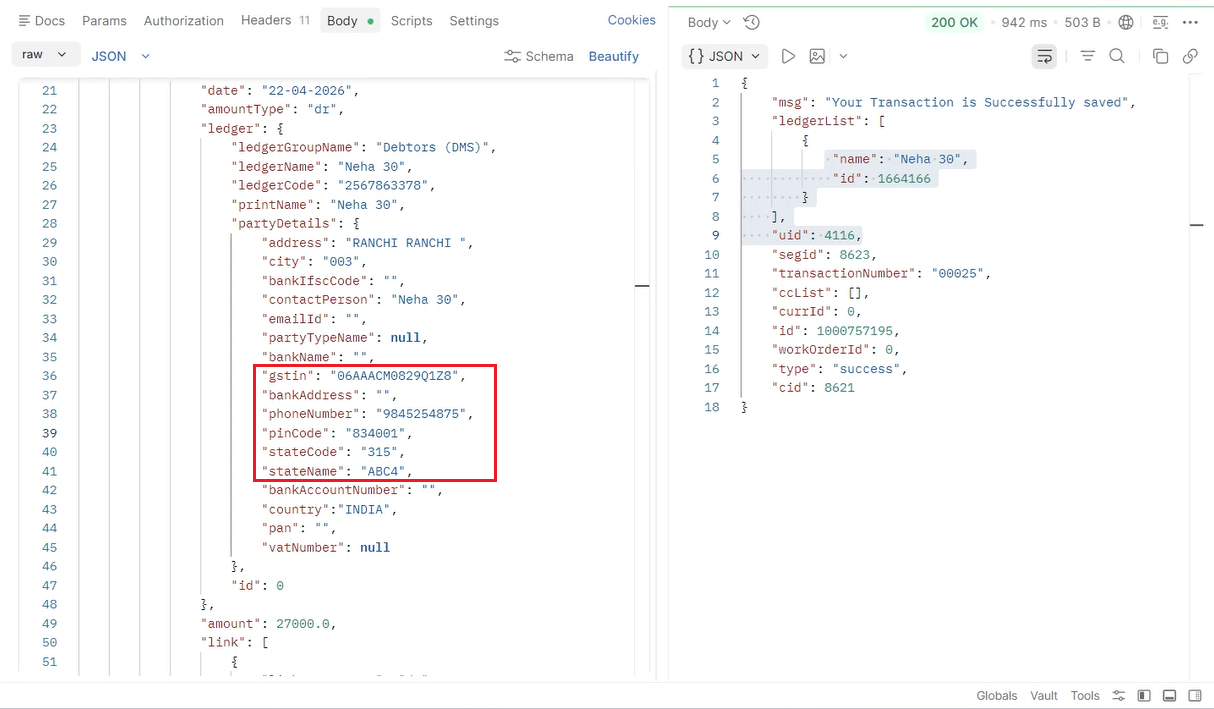
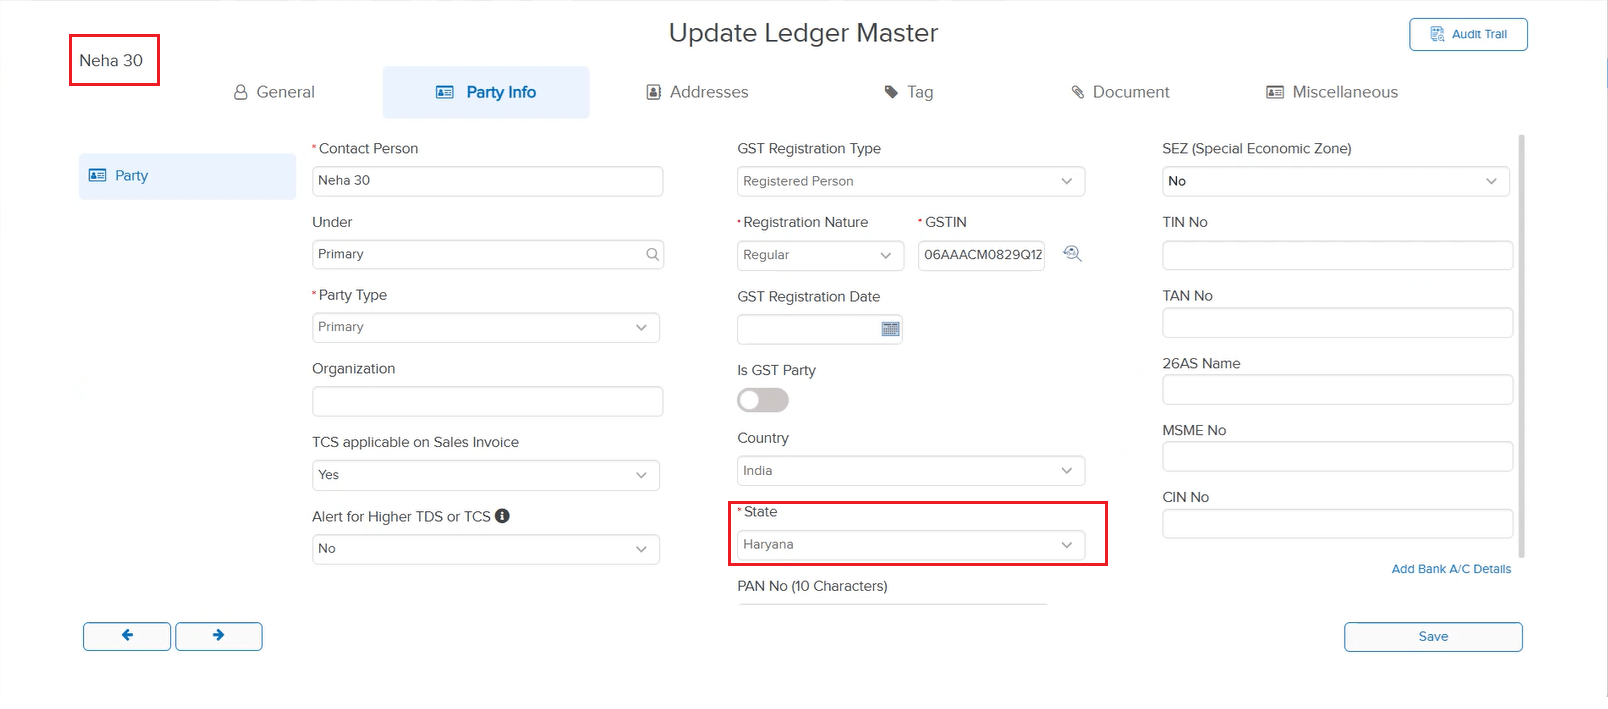
If a party ledger was created through the API and the state name didn’t quite match the state code (for example, code “29” is Karnataka, but the name was sent as “West Bengall” with a typo), the ledger was created — but the crucial Party Info tab was completely missing. This meant you couldn’t see or edit party details.
🌟 How This Helps You
The system is now smarter about handling state data. It trusts the State Code as the source of truth, so even if the state name has a typo, everything works correctly. The Party Info tab will always appear with the right state information.
📷 See It in Action
📌 What Was Happening
If you were working with two tabs open and both had the same segment selected (e.g. “All”), the system was still forcing you to refresh. Here’s the scenario: You’re on Tab 1 with segment “All”, you switch to Tab 2 and change the segment to “Bangalore”, work there for a while, then switch the segment back to “All”. When you returned to Tab 1 — even though both tabs now had the same segment “All” selected — the system forcefully asked you to refresh Tab 1.
🌟 How This Helps You
The system now correctly checks whether the segment has actually changed before prompting a refresh. If both tabs are on the same segment, you can switch between them freely without losing your work or being interrupted by unnecessary refresh prompts.
📷 See It in Action
📌 What Was Happening
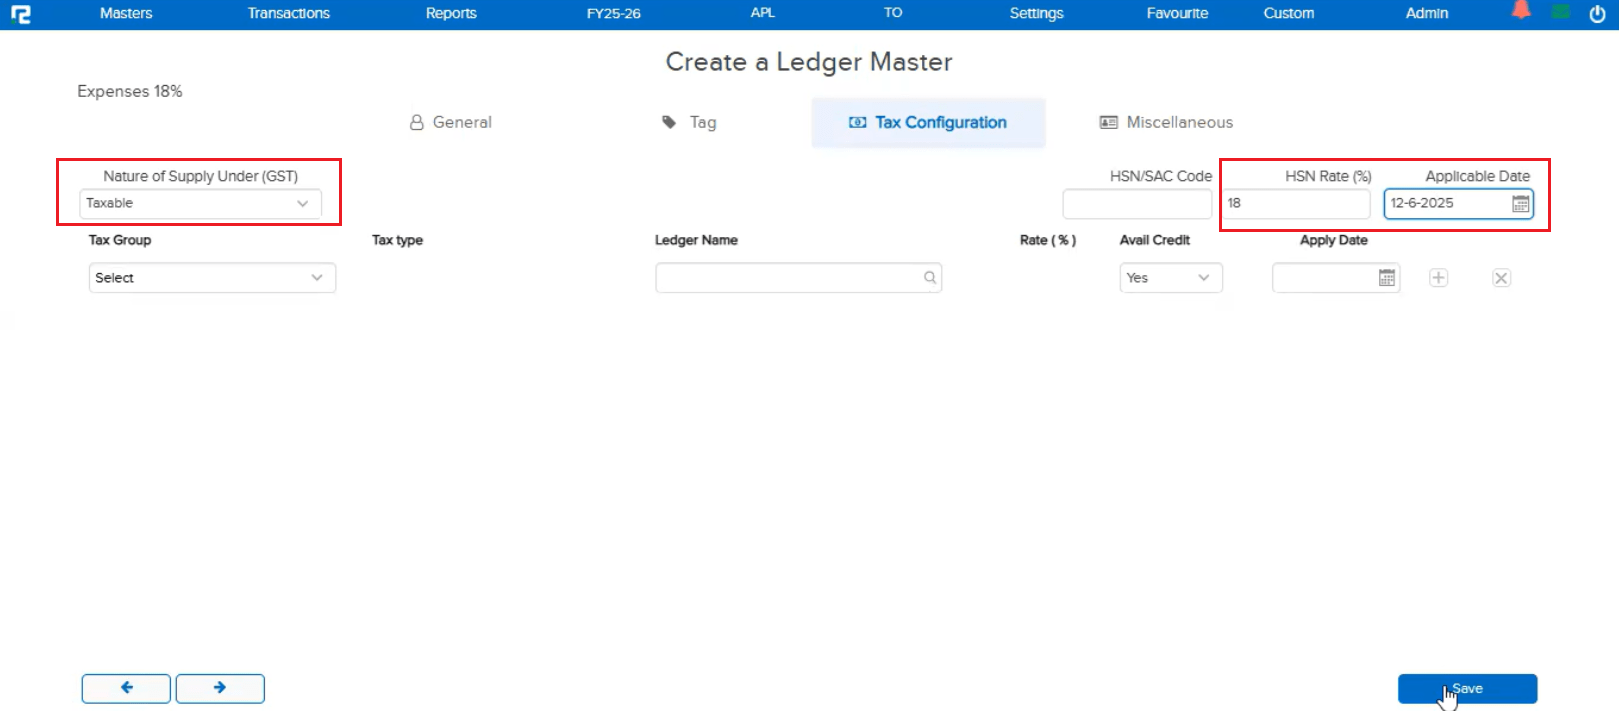
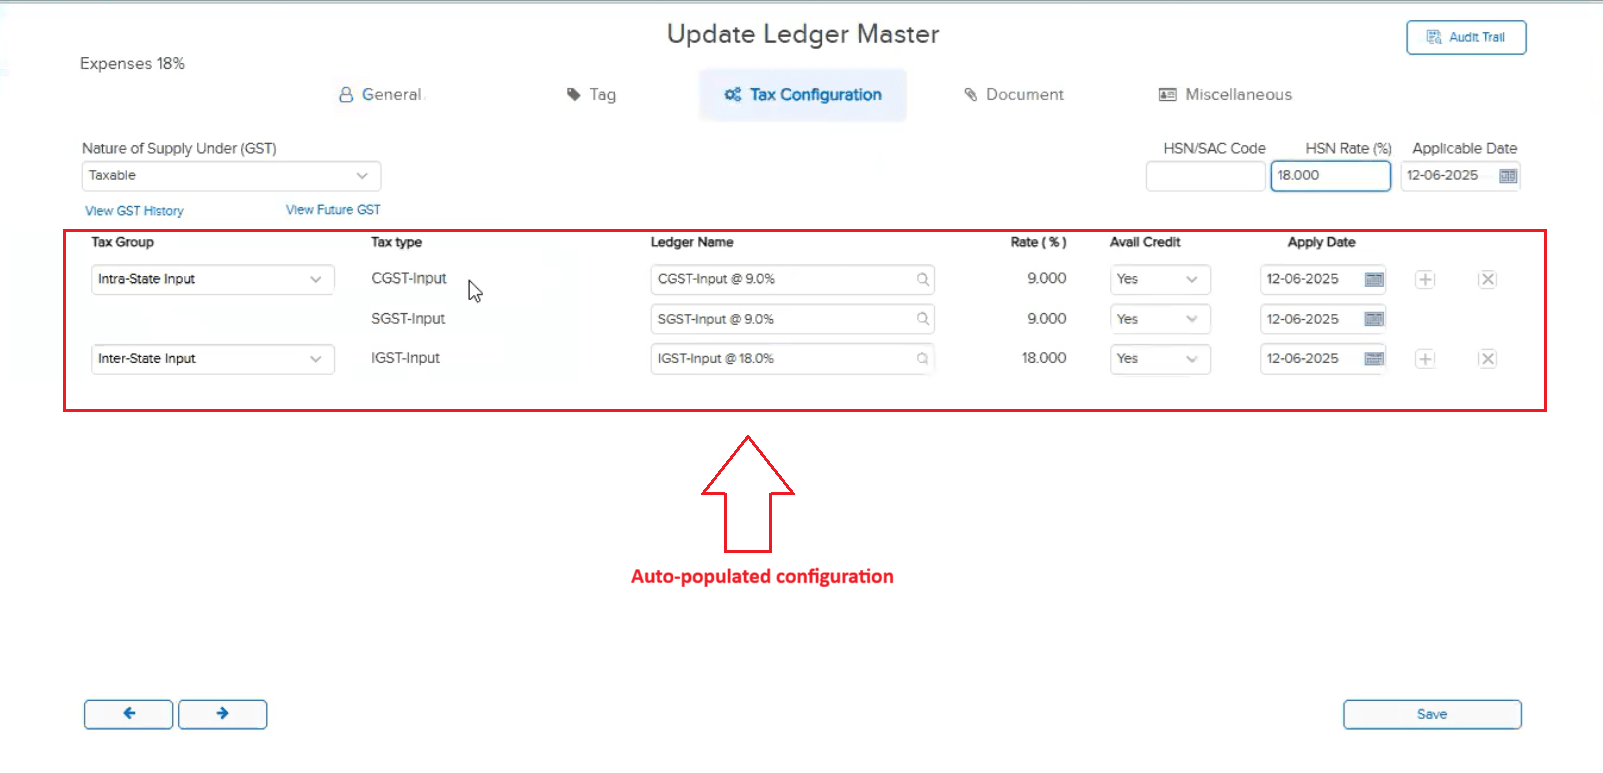
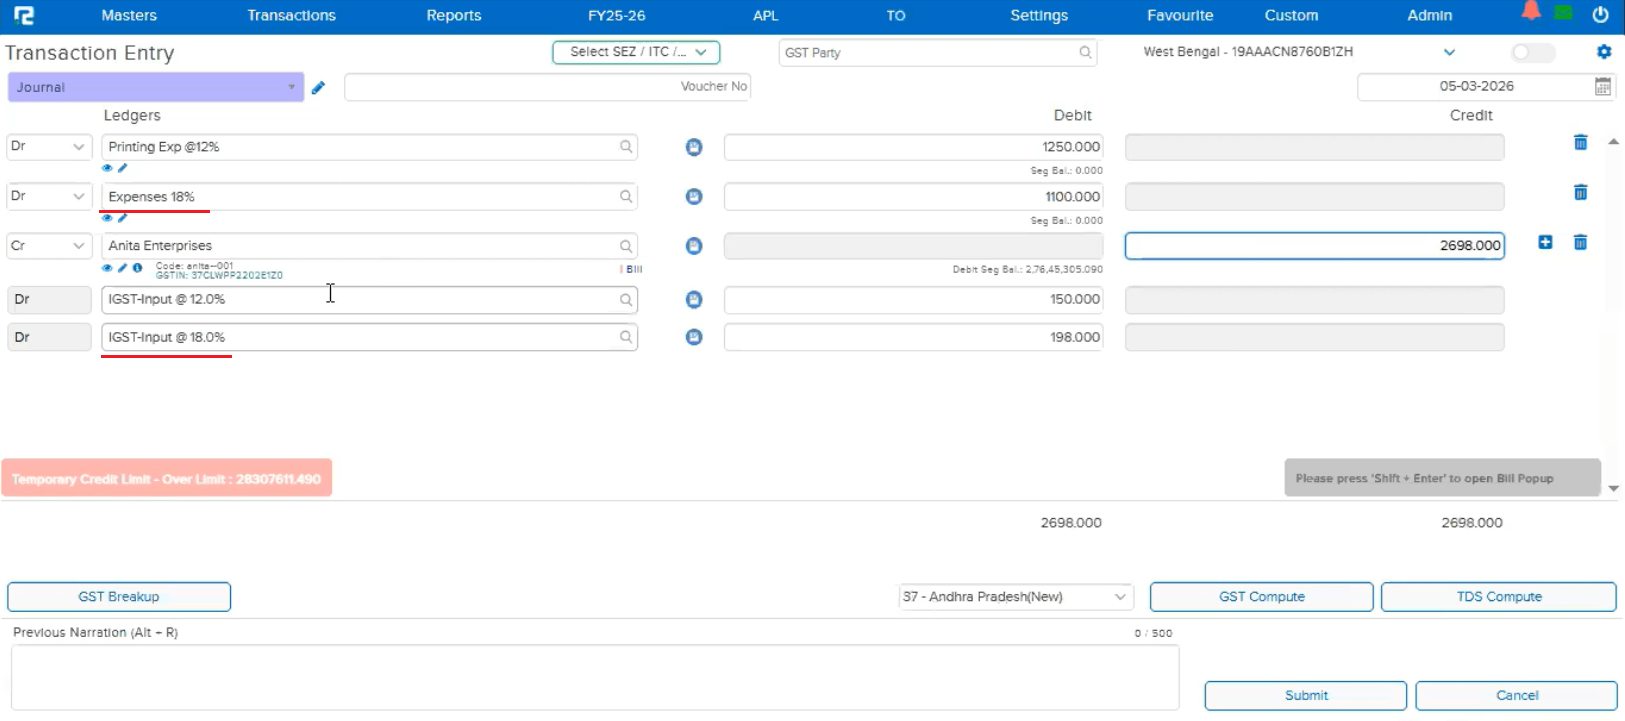
When a transaction used two expense ledgers — one with tax configured via HSN Rate/Code and the other with tax configured manually — the GST was not computing correctly. The issue was that the applicable date for HSN-based tax configuration was not being saved internally (even though it appeared correctly on the UI). As a result, when Auto GST was enabled, the ledger with HSN-based tax was incorrectly picking up the tax configuration from the other manually-configured expense ledger.
🌟 How This Helps You
The applicable date for HSN Rate/Code based tax configurations now saves correctly. Each expense ledger computes its own GST independently, so you get accurate tax calculations even when mixing HSN-based and manually-configured tax ledgers in the same transaction.
📷 See It in Action
📌 What Was Happening
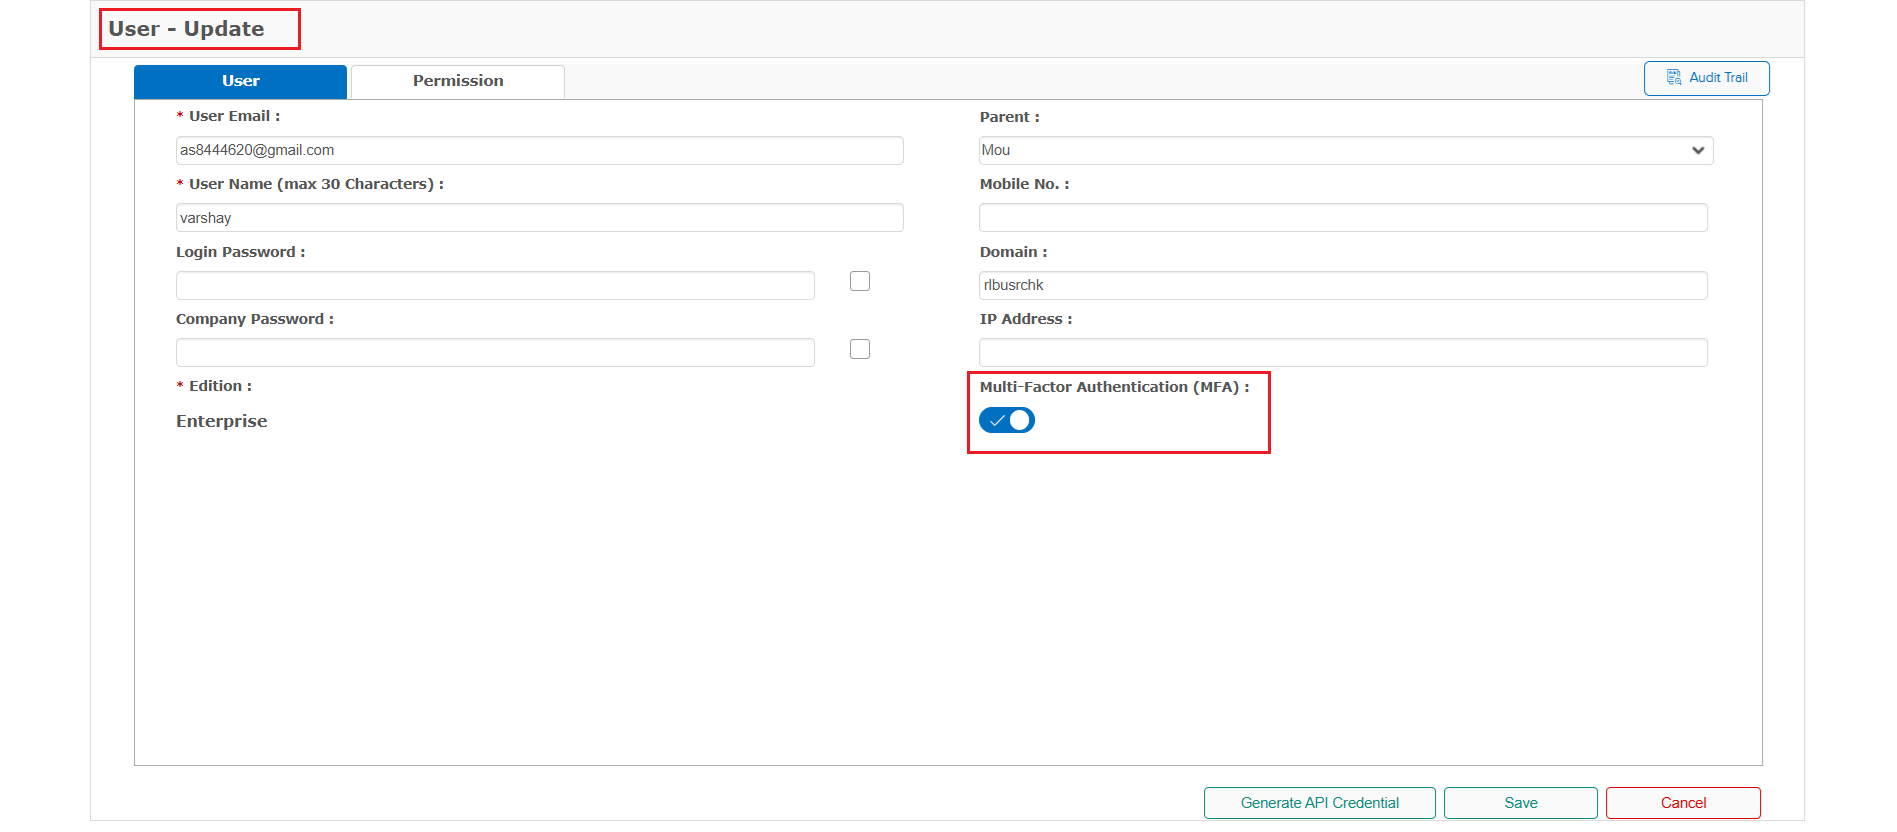
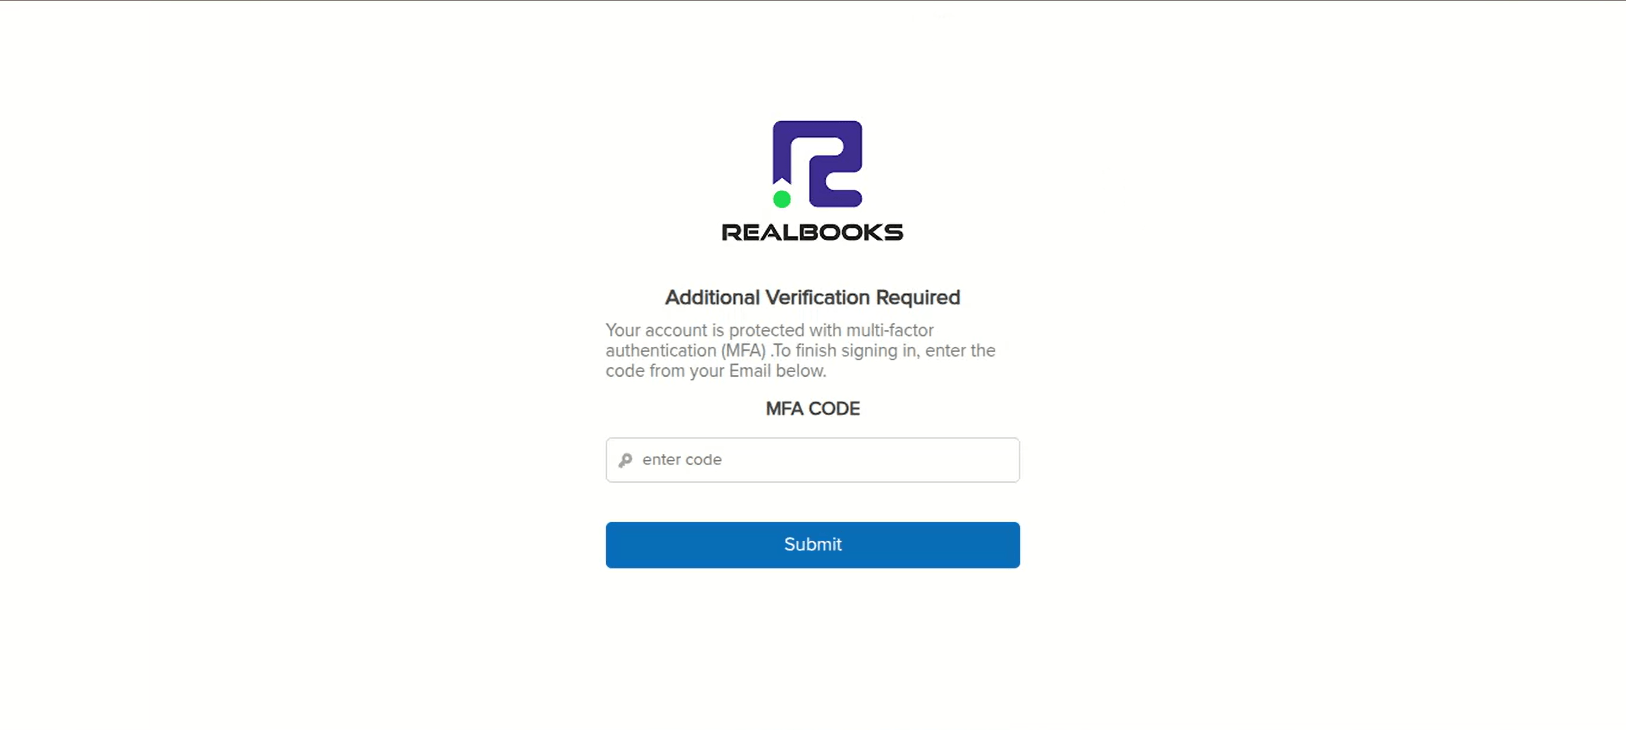
Users with Multi-Factor Authentication (MFA) enabled were experiencing login failures. The MFA code was received via email after approximately 1 minute, but by the time the user entered the code, the system had already timed out and automatically logged out of the login page. The MFA code was being triggered immediately from the RealBooks side, but email delivery delays caused the timeout to expire before users could enter it.
🌟 How This Helps You
The MFA timeout has been increased so that even if the email containing the code is delayed, the system will still accept the MFA code. You no longer have to worry about being logged out before you can enter the code.
🎬 Where to Enable MFA
📷 See It in Action
📌 What Was Happening
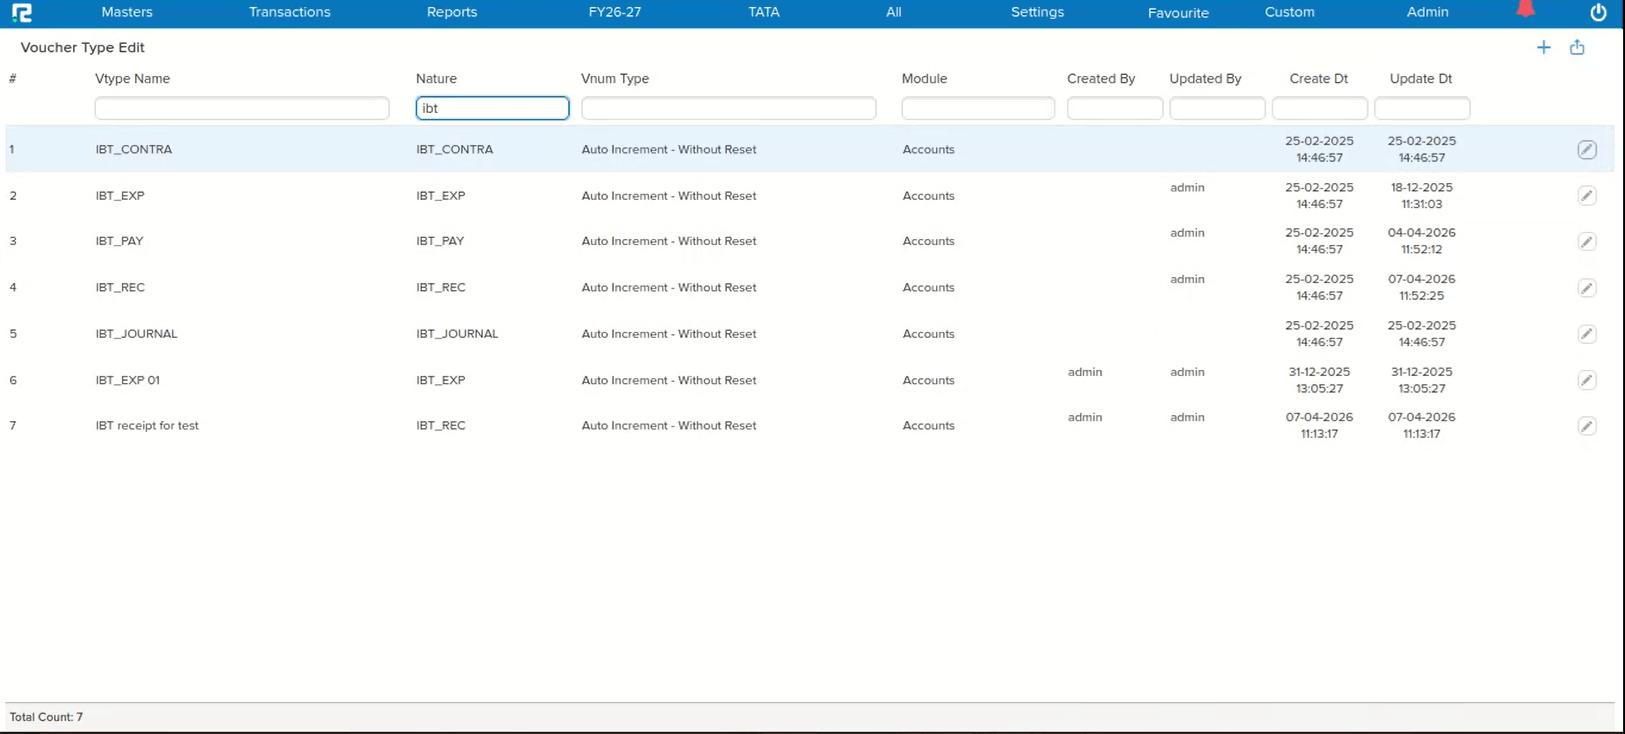
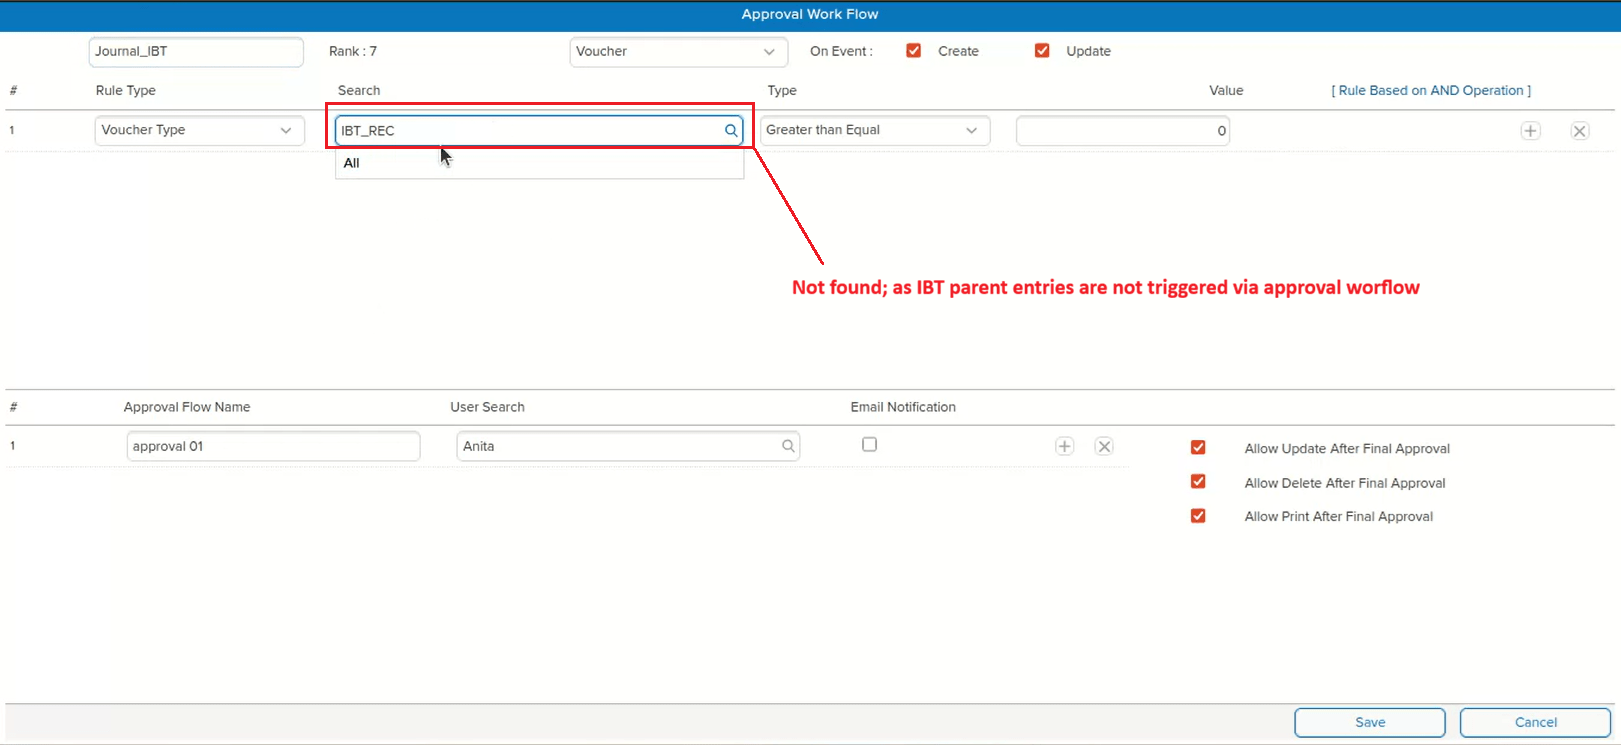
IBT Parent voucher types were visible for selection in the Approval Master, which created confusion. IBT parent entries do not trigger the approval workflow — only IBT child entries go through the approval process. Having parent voucher types listed in the selection gave users the false impression that approvals could be configured for them.
🌟 How This Helps You
IBT Parent voucher types have been removed from the Approval Master selection list. Only IBT child voucher types — which actually trigger for approval — are now available for selection. This eliminates confusion and ensures you configure approvals only for voucher types that support them.
📷 See It in Action
📌 What Was Happening
When downloading the Ledger Master Listing with the option Party Listing For GST in Excel format, the file was being downloaded as 0 Bytes (empty file). This was caused by a few party ledgers having their State Code saved as N/A in the database via the API, which broke the export process.
🌟 How This Helps You
The API logic has been corrected to handle invalid state data gracefully:
• If both State Code and State Name are invalid → Ledger Category defaults to Regular
• If State Code is valid but State Name is invalid → State Name is derived from the State Code
• If State Code is invalid but State Name is valid → State Code is derived from the State Name
The Party Listing for GST Excel export now downloads correctly with complete data.
🛠 Where to Find It
📷 See It in Action
📌 What Was Happening
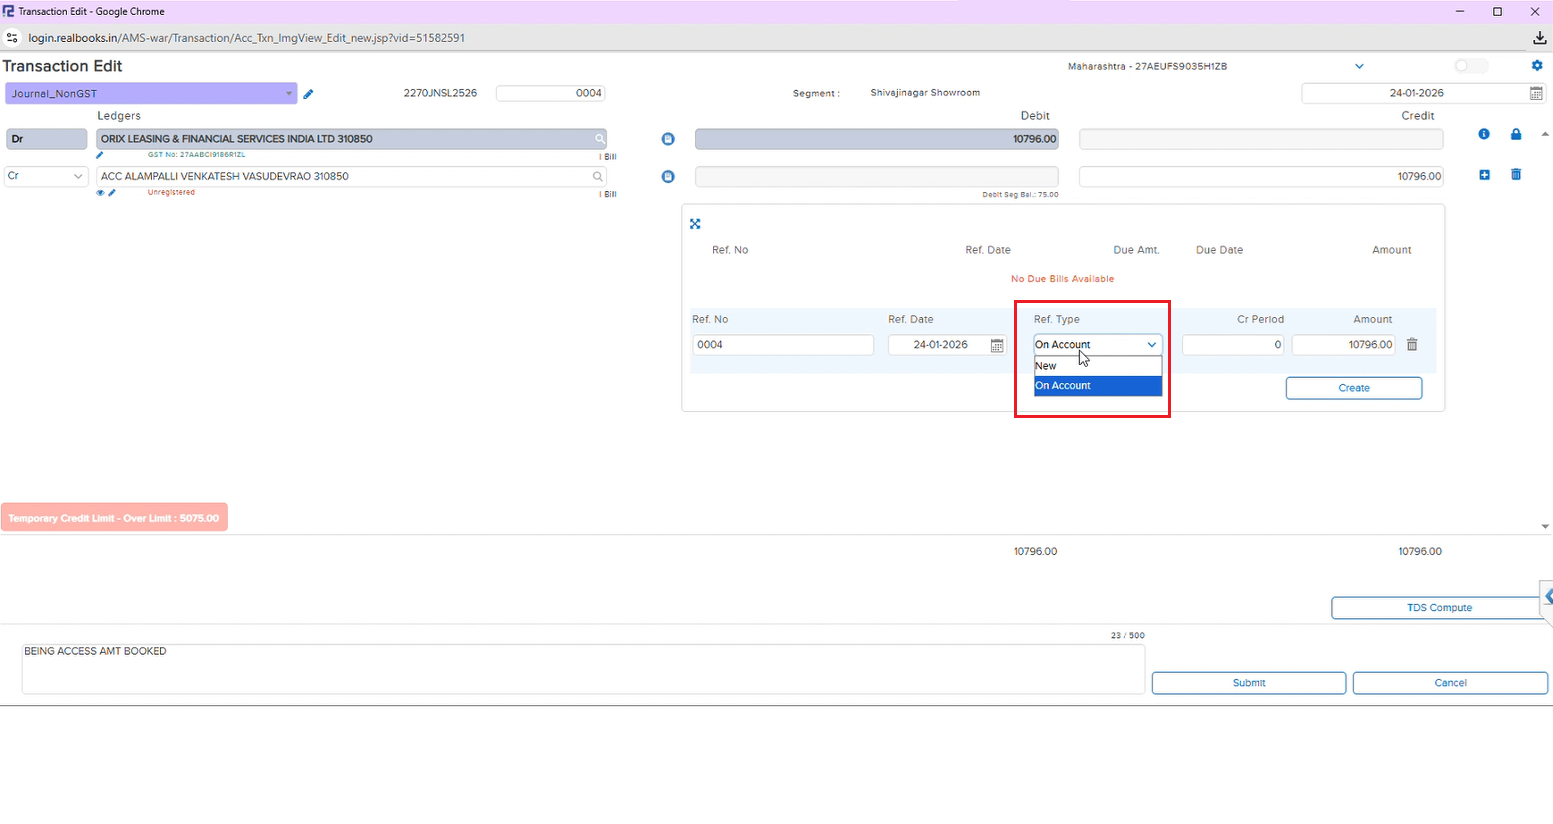
If you were working with a Journal entry that had two parties with the same bill number and one party’s bill was tagged — the other party’s reference type got stuck. You couldn’t switch it from “New” to “On Account”, which meant extra workarounds.
🌟 What This Means for You
This is now fixed! You can freely change reference types for any party, regardless of what’s happening with the other entries. Your workflow stays smooth and uninterrupted.
📷 See It in Action
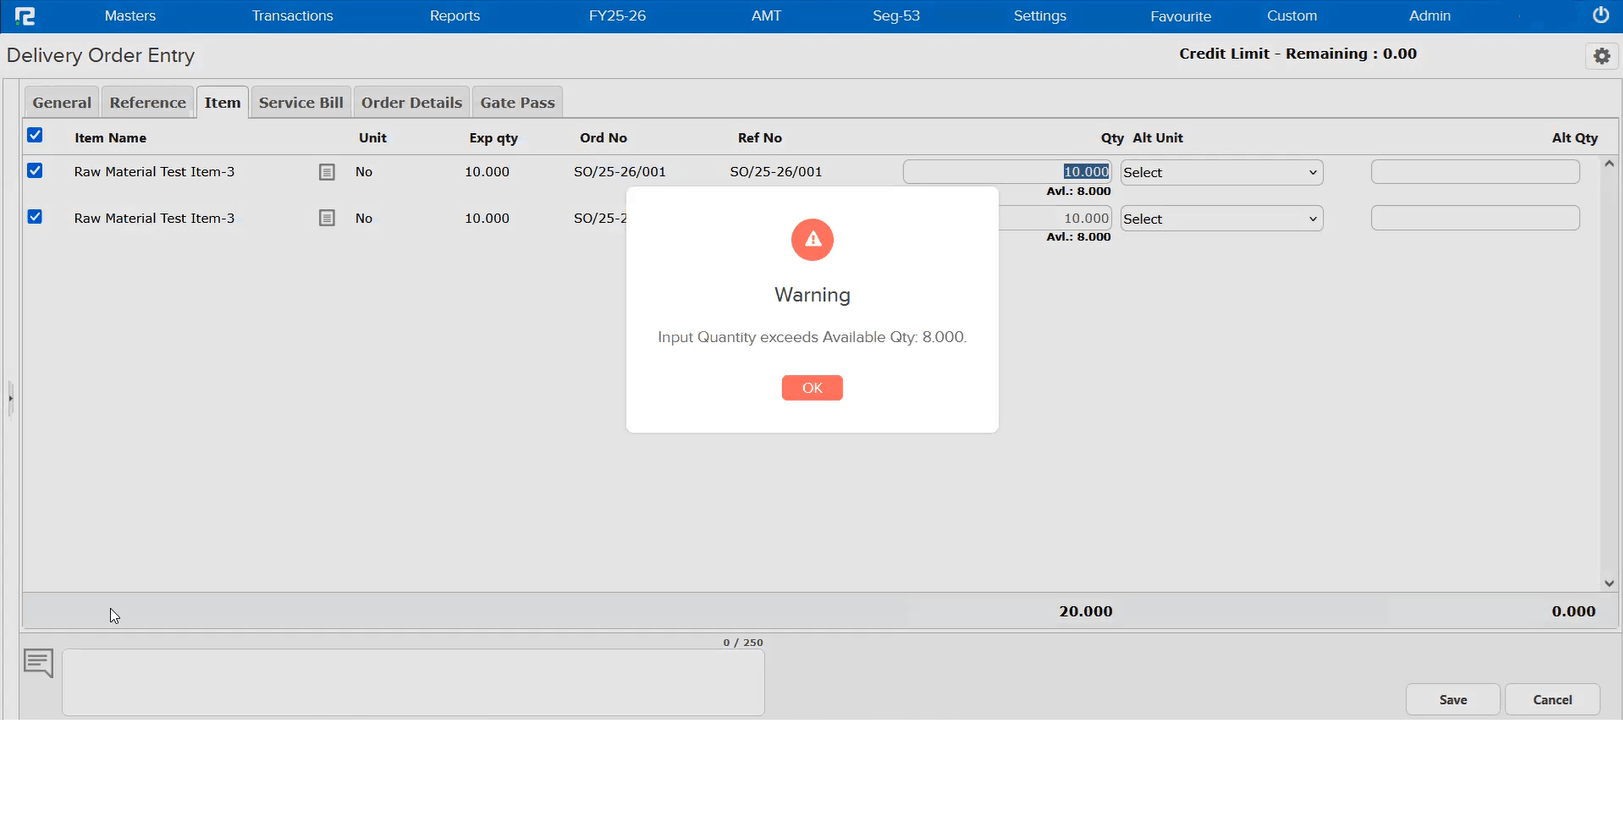
📌 What Was Happening
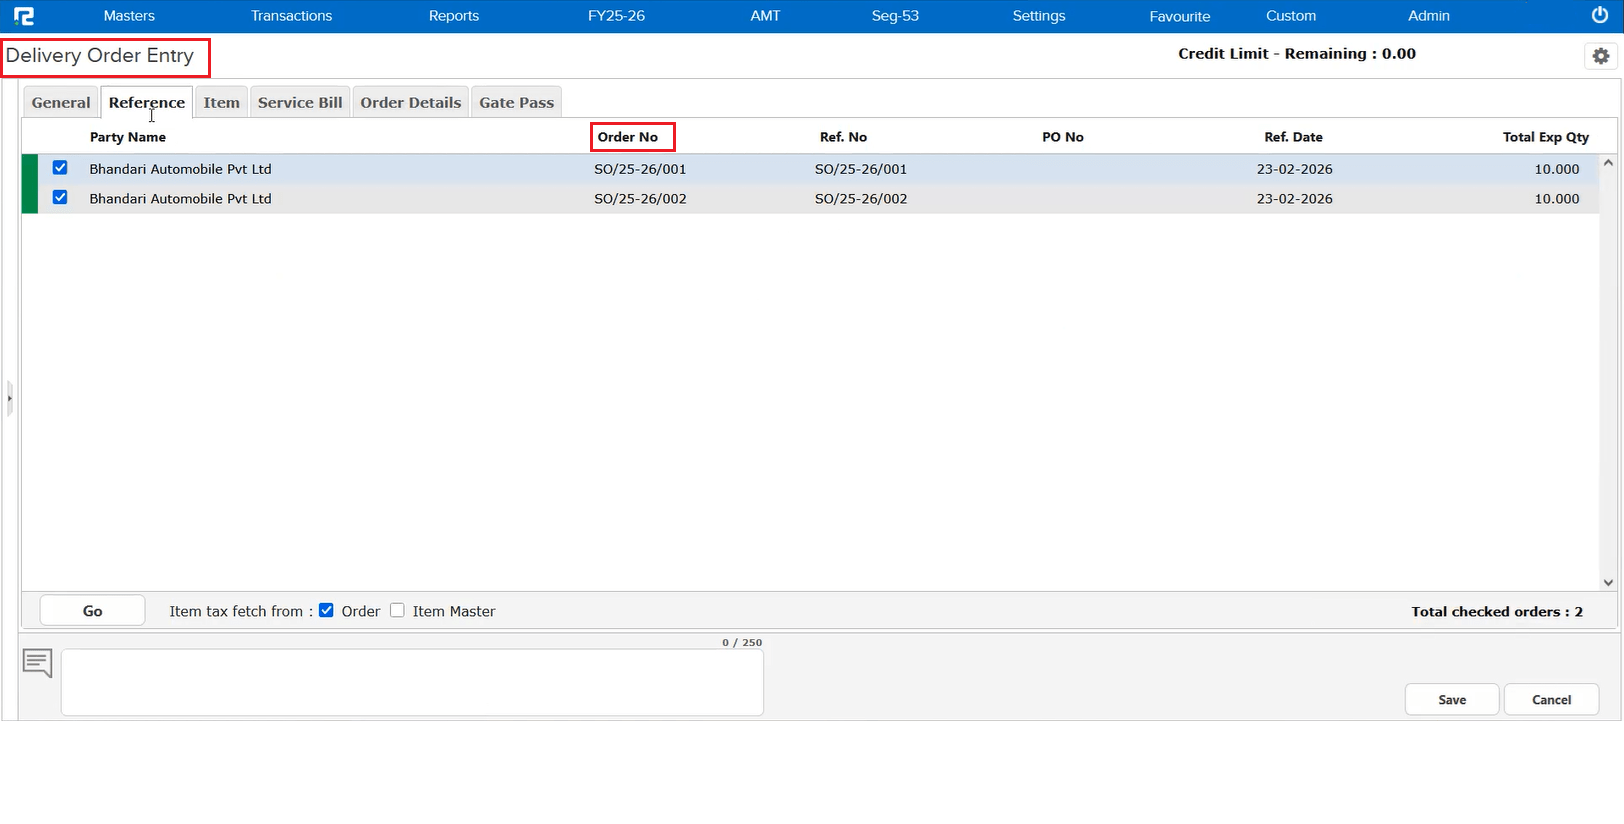
When creating a Delivery Order with multiple Sales Orders for the same item, the system wasn’t checking the combined quantity properly. For example, if you had 8 items available and two Sales Orders for 10 each, the system let you enter 10 + 10 = 20 — well beyond what’s in stock.
🌟 How This Helps You
You’ll now see a clear warning — “Input Quantity exceeds Available Qty” — before any overselling happens. This protects your inventory accuracy and prevents fulfillment issues down the line.
📷 See It in Action
📌 What Was Happening
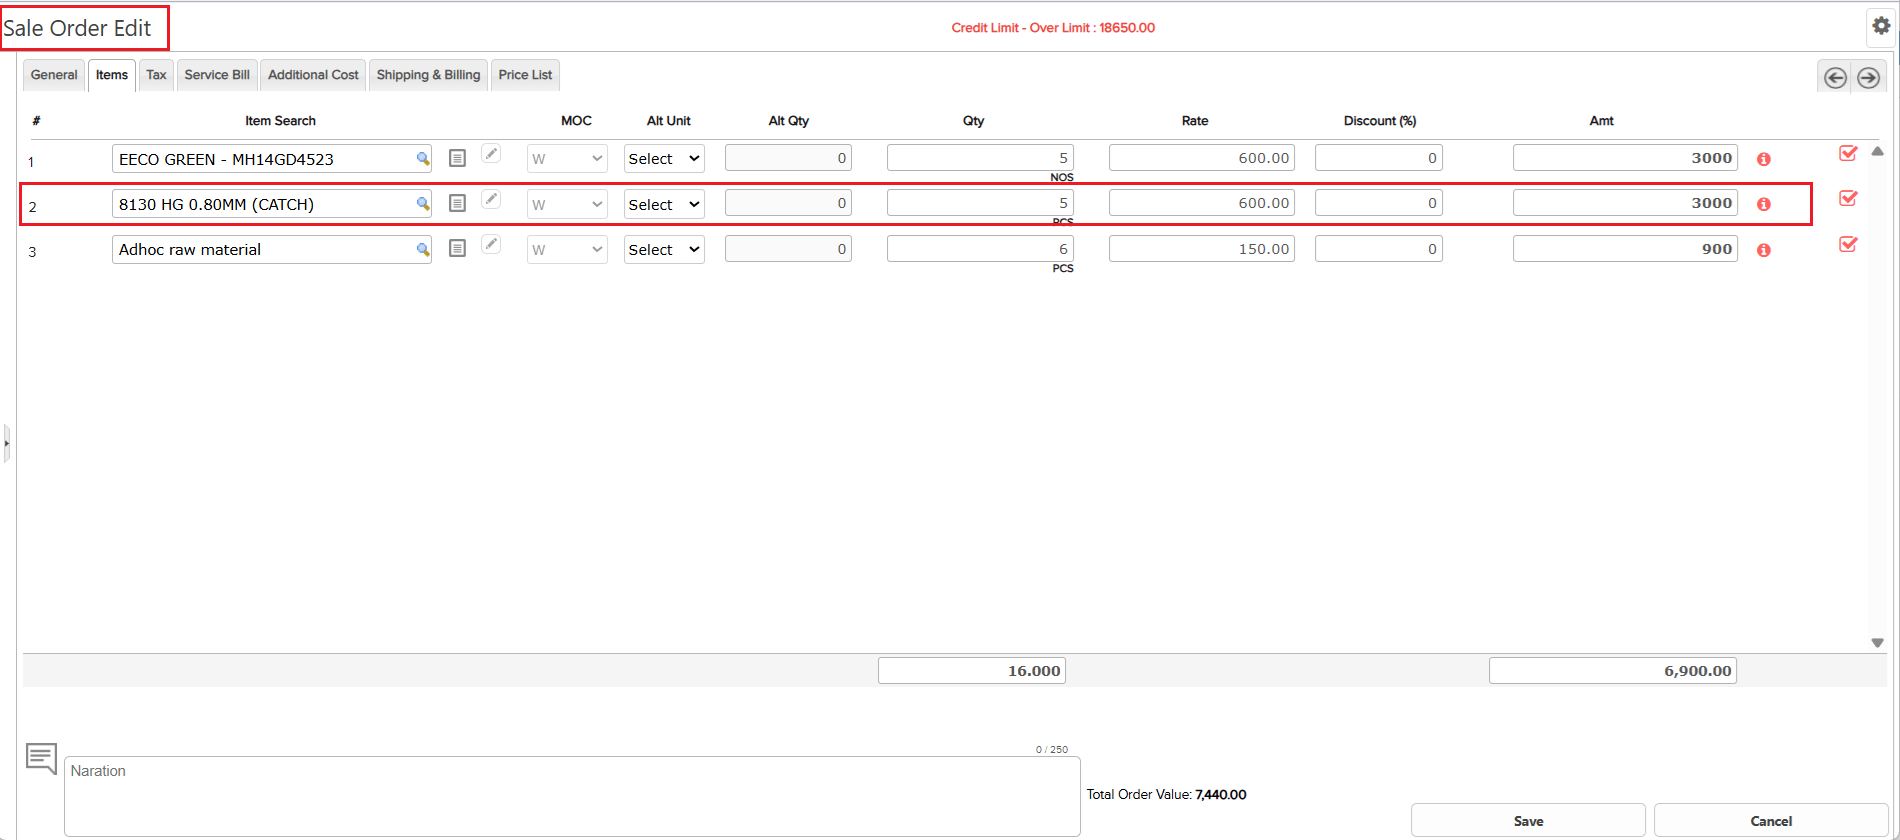
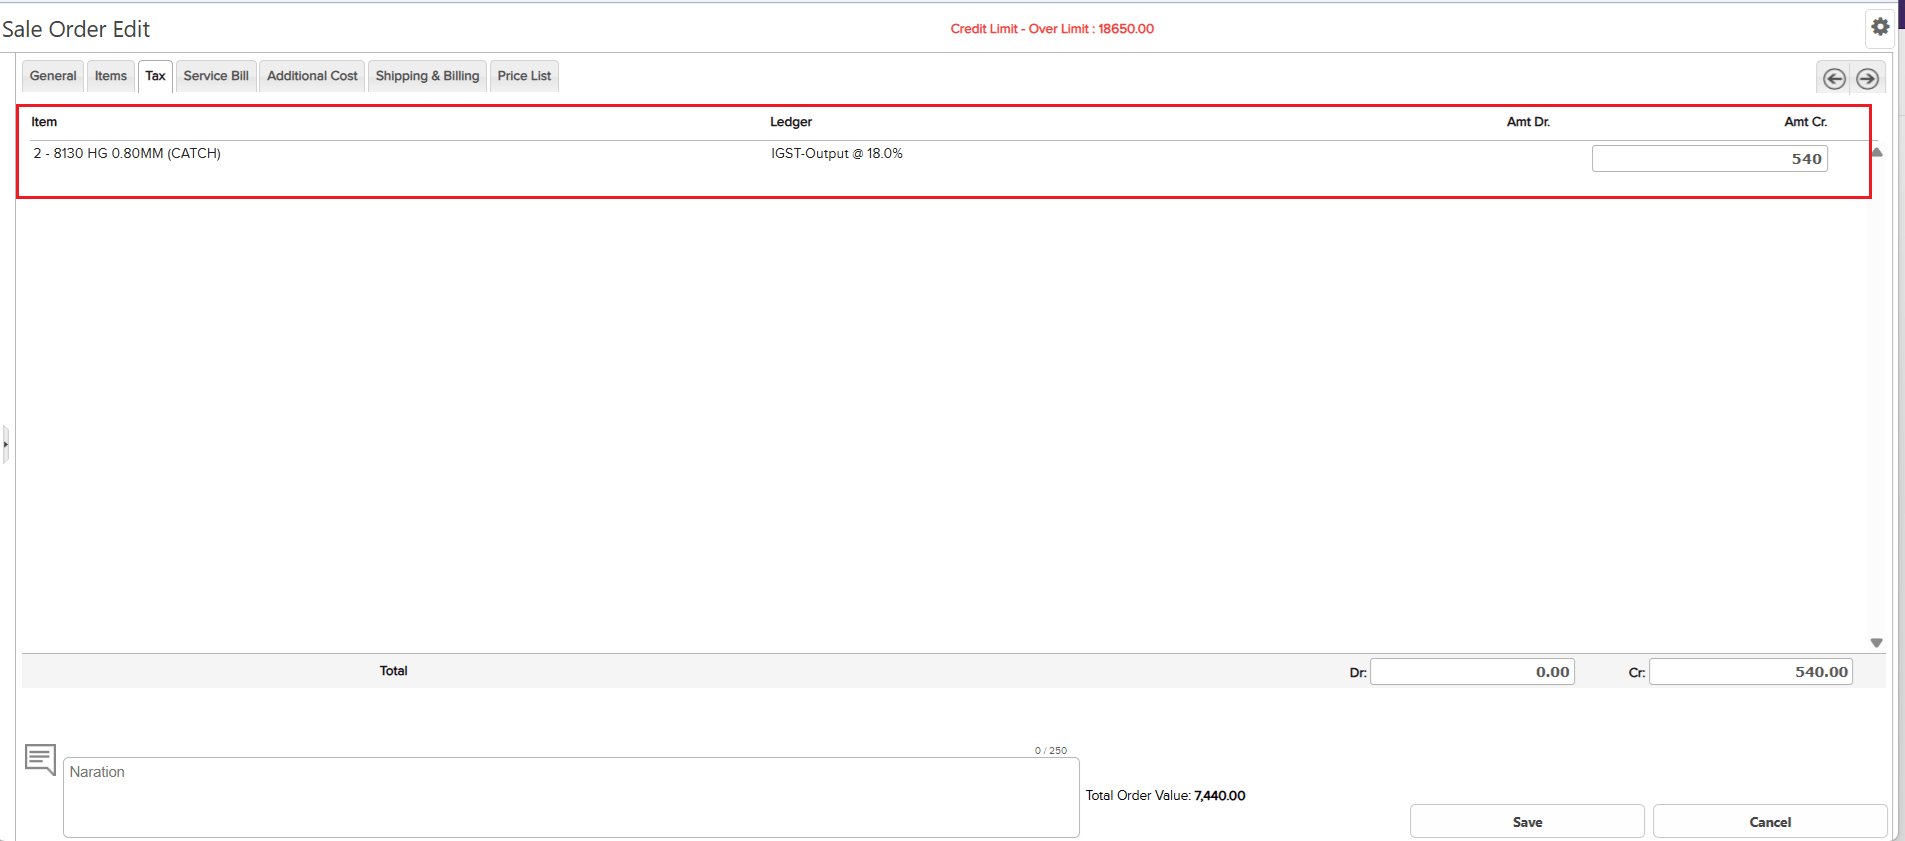
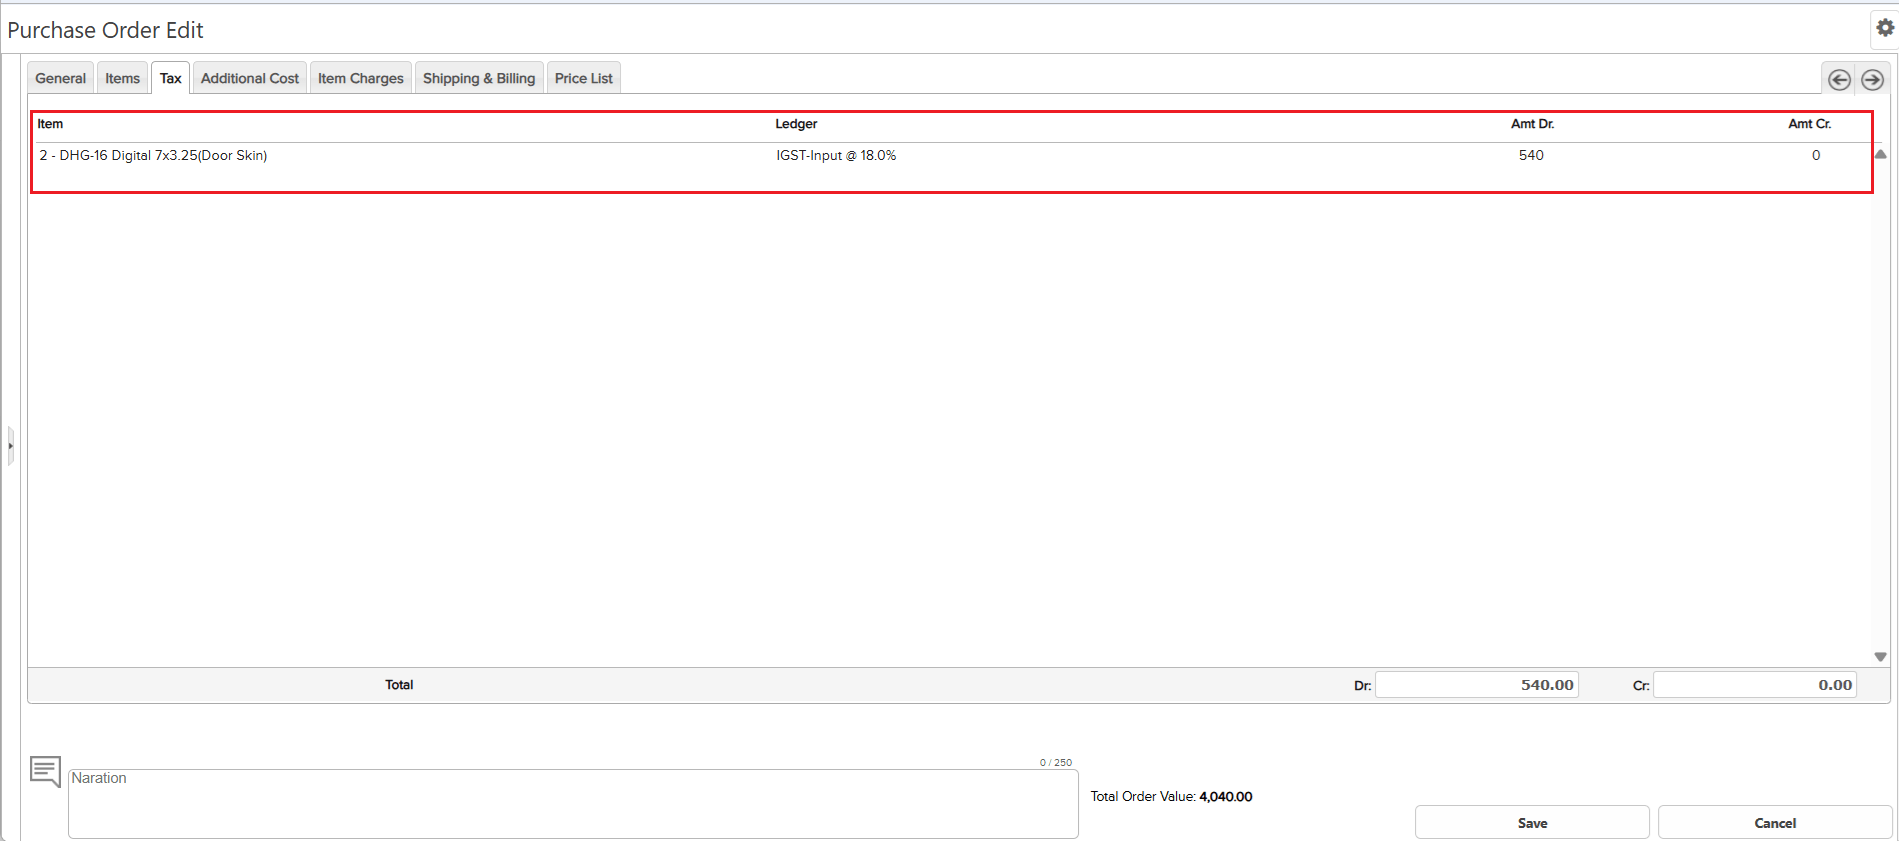
When you had multiple items in a Sale Order or Purchase Order and only some had tax, the Tax tab was showing the wrong serial numbers. For example, if Item #2 had tax but Item #1 didn’t, the Tax tab confusingly showed it as serial no. 1.
🌟 How This Helps You
The Tax tab now correctly matches the item serial numbers from the Items tab. If tax applies to Item #2, you’ll clearly see “2” in the Tax tab. No more guesswork!
📷 See It in Action
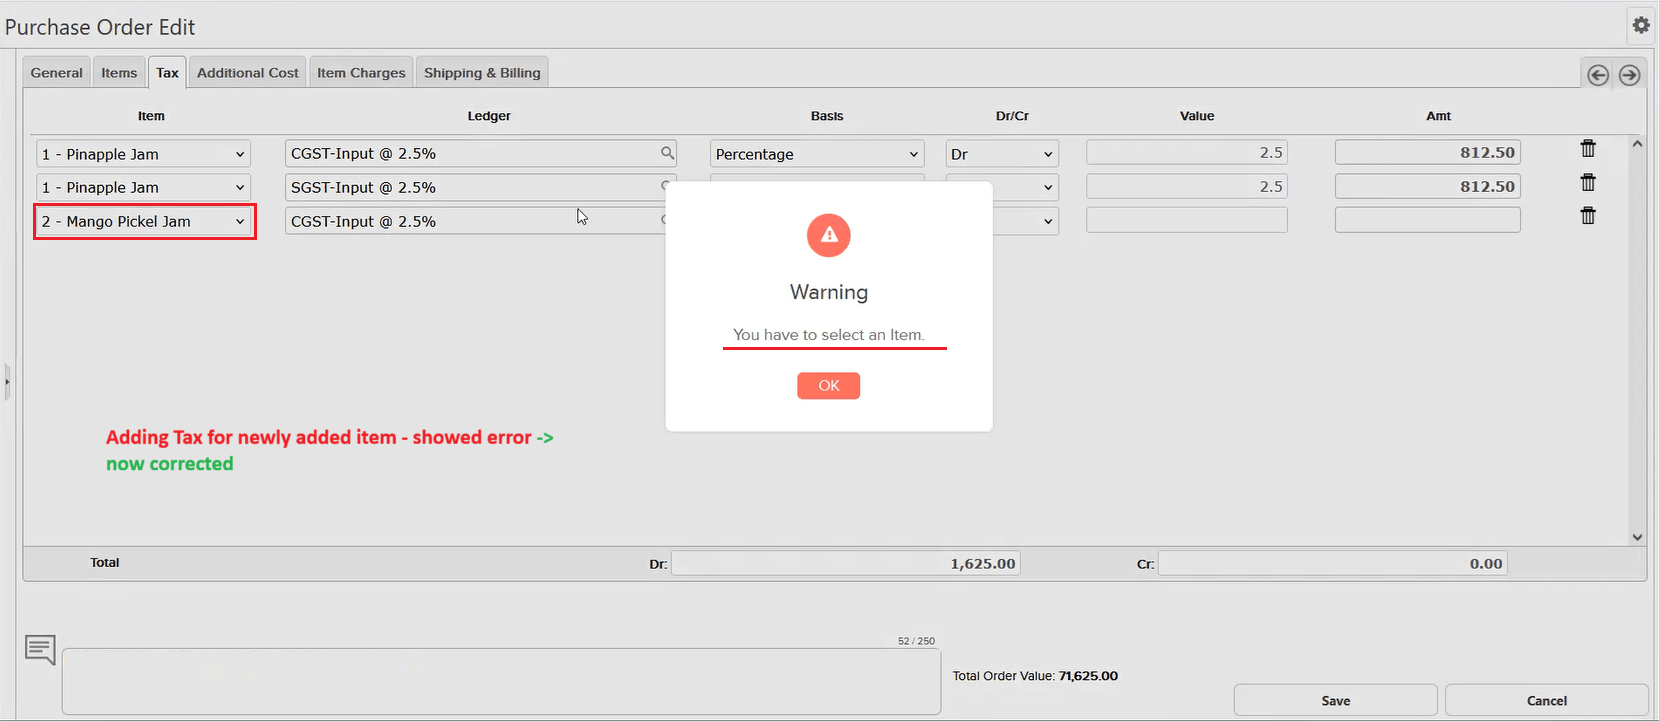
📌 What Was Happening
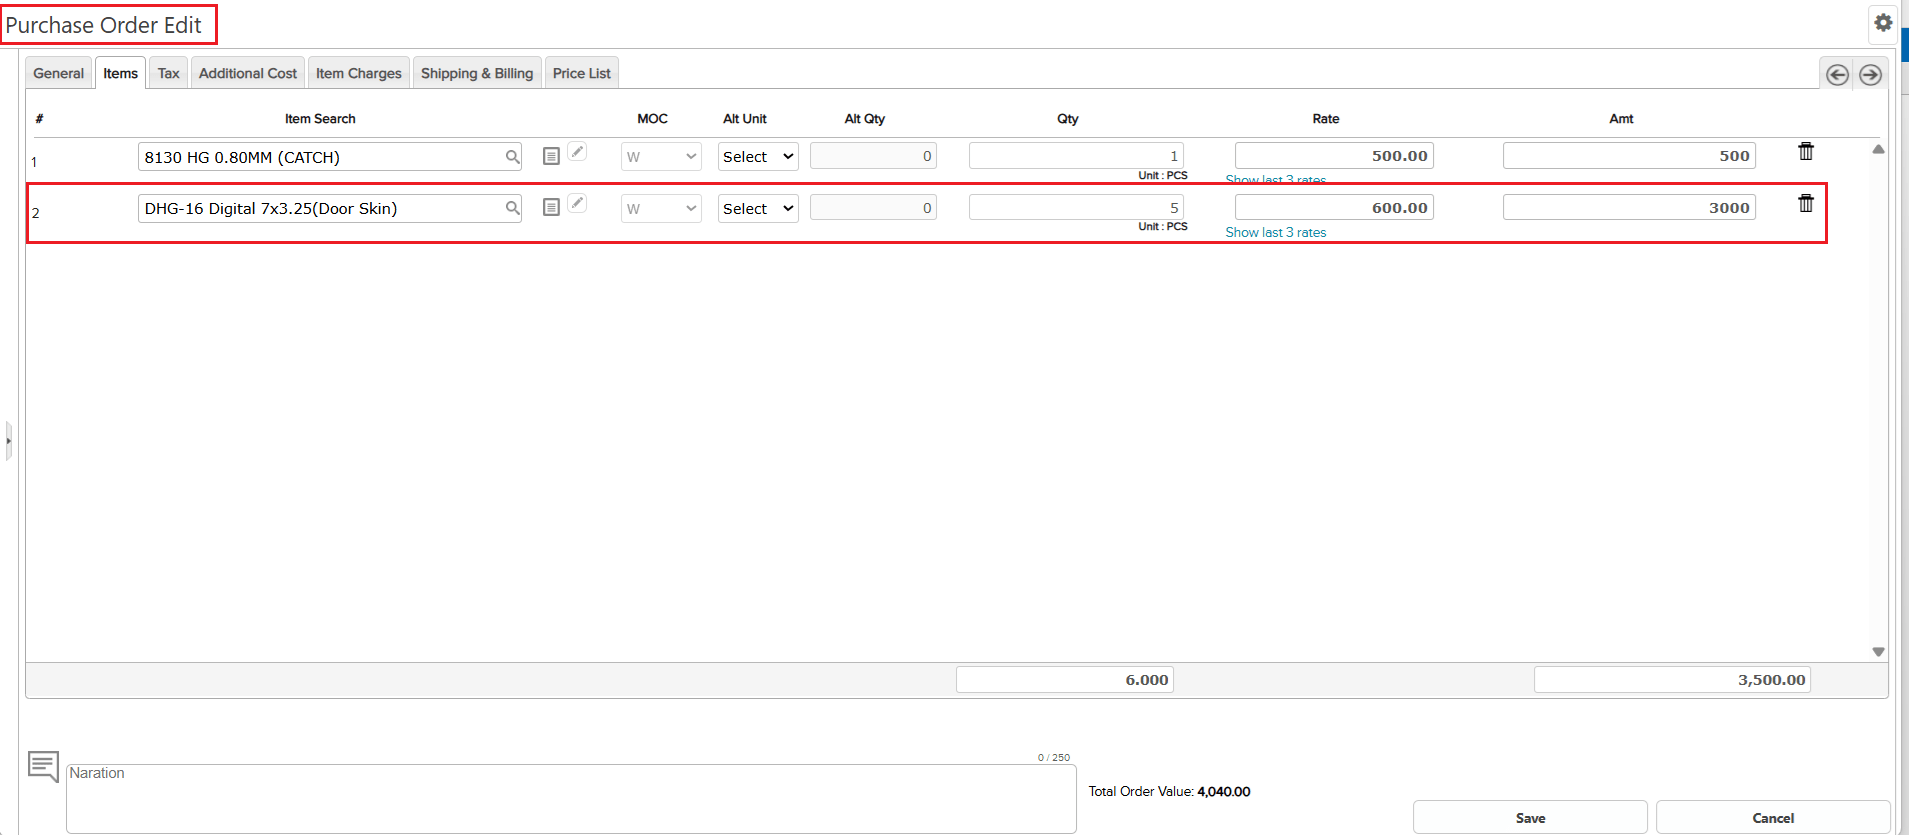
When editing a Purchase Order or Sale Order, if you changed the item and then selected the same GST ledger that was already used for the original item, pressing Tab or Enter triggered an incorrect error message: “You have to select an item”. This blocked the user from proceeding, even though the item was already selected and valid.
🌟 How This Helps You
You can now freely change items in edit mode and reselect the same GST ledger without any errors. The system correctly recognizes the selected item, so your order editing workflow remains smooth and uninterrupted.
📷 See It in Action
📌 What Was Happening
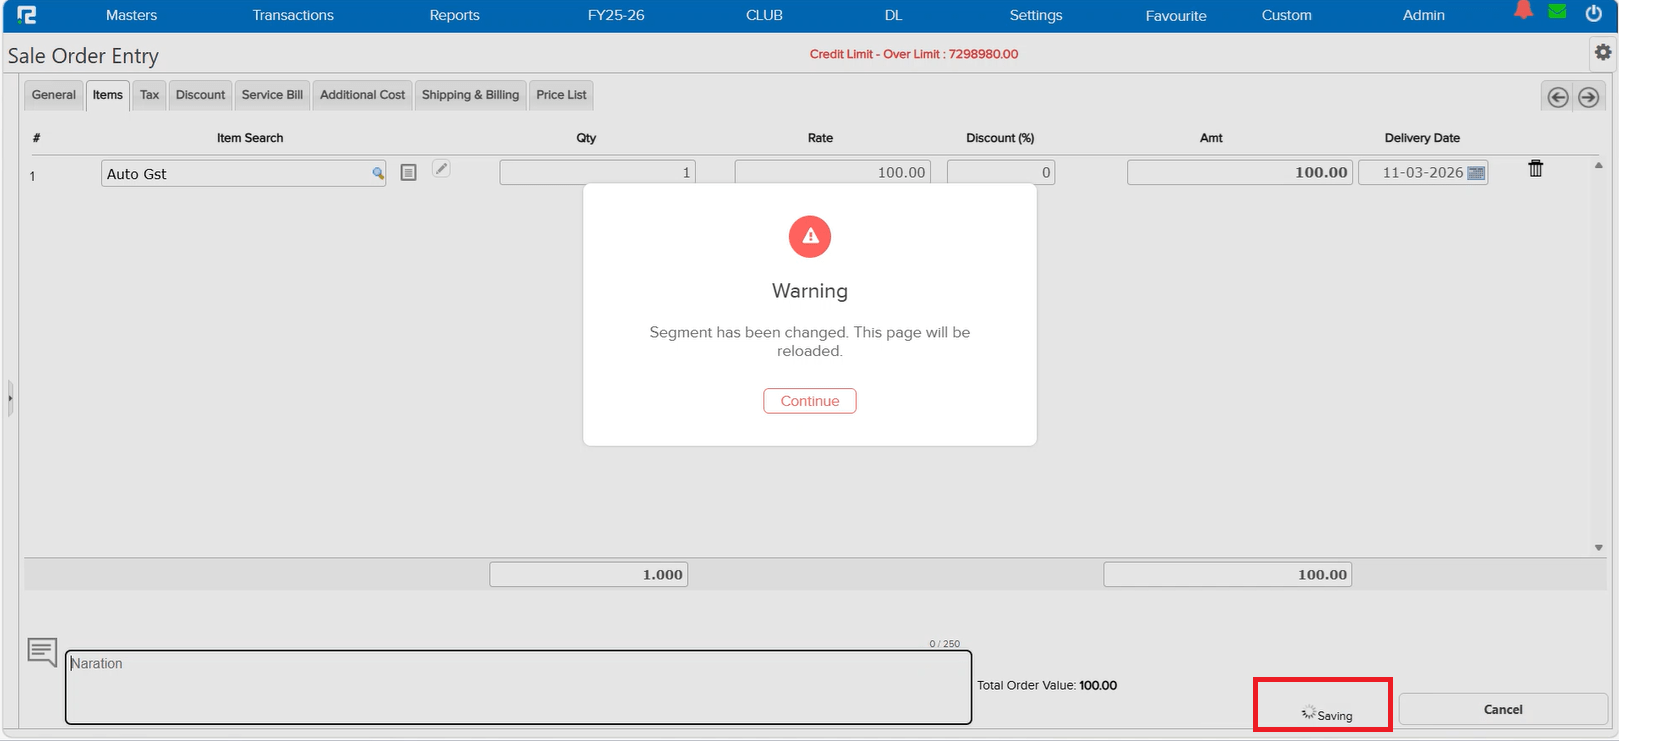
A critical data integrity issue was reported: a user created an entry in the Haridwar segment, but it got saved in the Kolkata segment instead. The Business Place in the entry was also reflecting as Uttarakhand inside the Kolkata segment, even though no changes were made to the entry itself.
After investigation, the root cause was identified — the user had switched the segment in another tab. While the current tab showed a “segment switched” warning on screen, the user was still able to save the entry using the Ctrl + S shortcut, bypassing the warning. This caused a mismatch where one database table recorded Haridwar as the segment while the remaining tables saved Kolkata.
🌟 How This Helps You
The Ctrl + S shortcut now correctly respects the segment-switch warning. If the segment has been changed in another tab, the system will block the save action and prompt you to refresh — preventing any cross-segment data mismatches. Your entries will always be saved in the correct segment.
📷 See It in Action
📌 What Was Happening
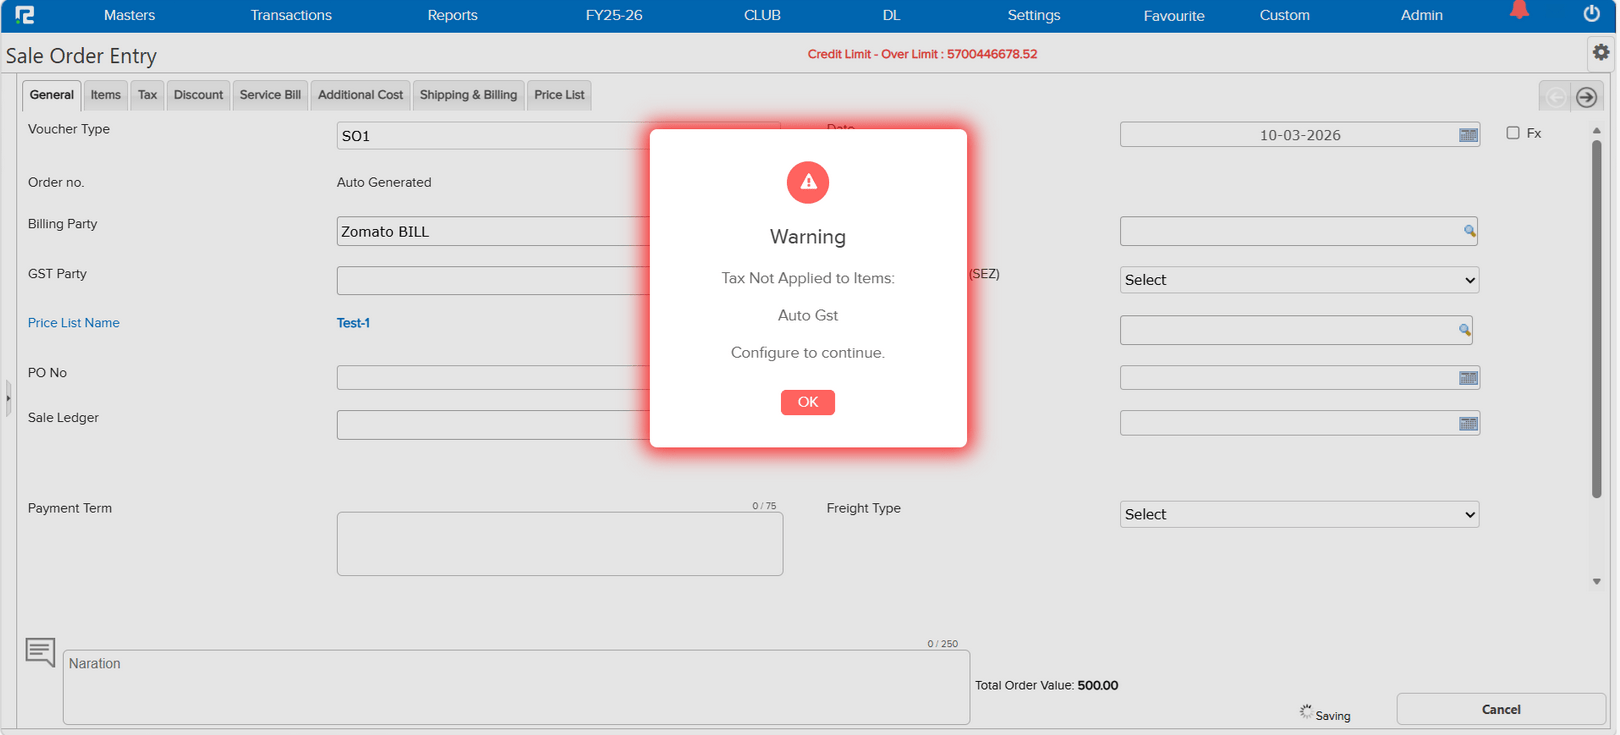
In certain cases, a Purchase Order was being saved without GST tax calculated on the items — even though all necessary configurations were in place (GST-registered Company/Segment, GST-registered Party, Input Tax configured in Item Master, and GST enabled in the Voucher Type). This caused a ripple effect: the auto-posted Sale Order (via Interbranch auto-posting) and its related Sales entry were also impacted with missing tax details.
🌟 How This Helps You
A new validation has been added to safeguard your data. The system will now prevent saving a Purchase Order without GST tax details when all the following conditions are met:
• The Company/Segment is marked as GST Registered
• The Party is GST Registered
• The Item Master has Input Tax configured
• GST is enabled in the Voucher Type
This ensures your Purchase Orders always carry the correct tax information, and any downstream auto-posted Sale Orders and entries remain accurate.
📷 See It in Action
📌 What Was Happening
Previously, the Business Place was sometimes getting skipped in Sale Orders even when the configuration was done correctly. This was suspected to occur due to frequent switching of segments across different browser tabs. A validation was already added for Sale Orders to block saving if the Company is GST registered, the GSTIN is assigned to the segment, and the appropriate Business Place is missing.
However, the same issue was also occurring in Sales transactions, where the Business Place could be saved as blank under similar conditions.
🌟 How This Helps You
The Business Place validation has now been extended to Sales transactions as well. If your Company is GST registered and the GSTIN is assigned to the segment, the system will block the save if the Business Place is missing — ensuring your GST compliance data is always complete and accurate across both Sale Orders and Sales entries.
📷 See It in Action
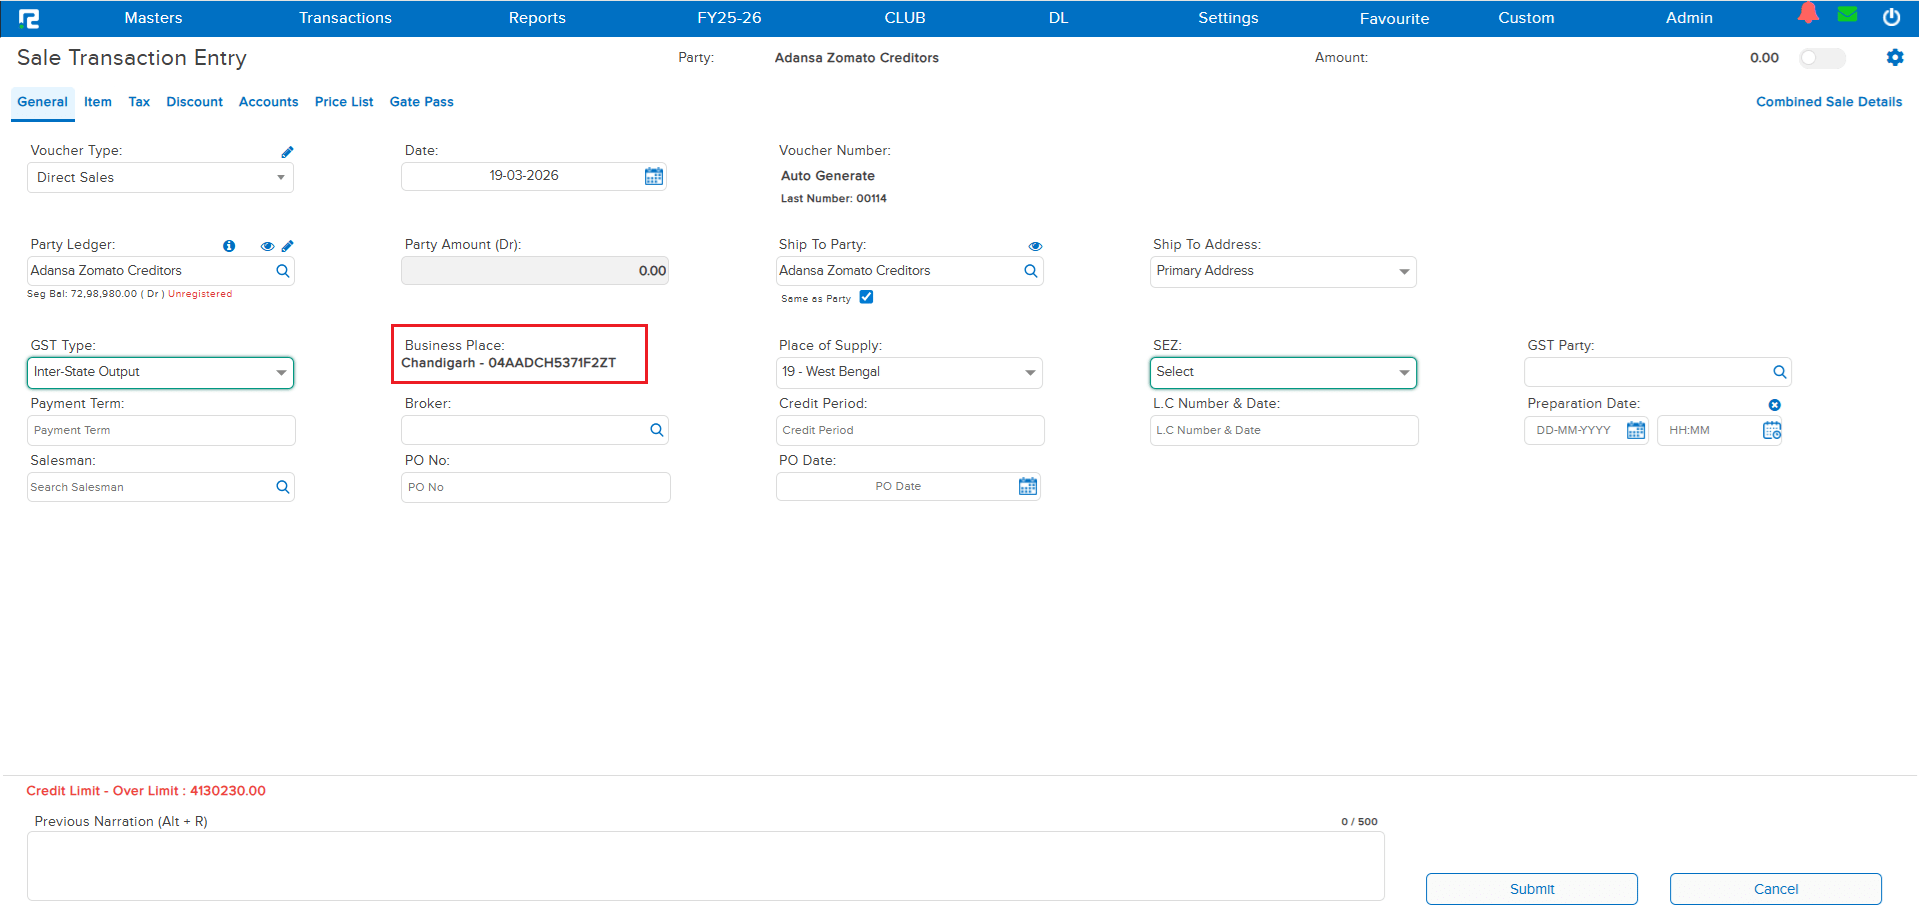
📌 What Was Happening
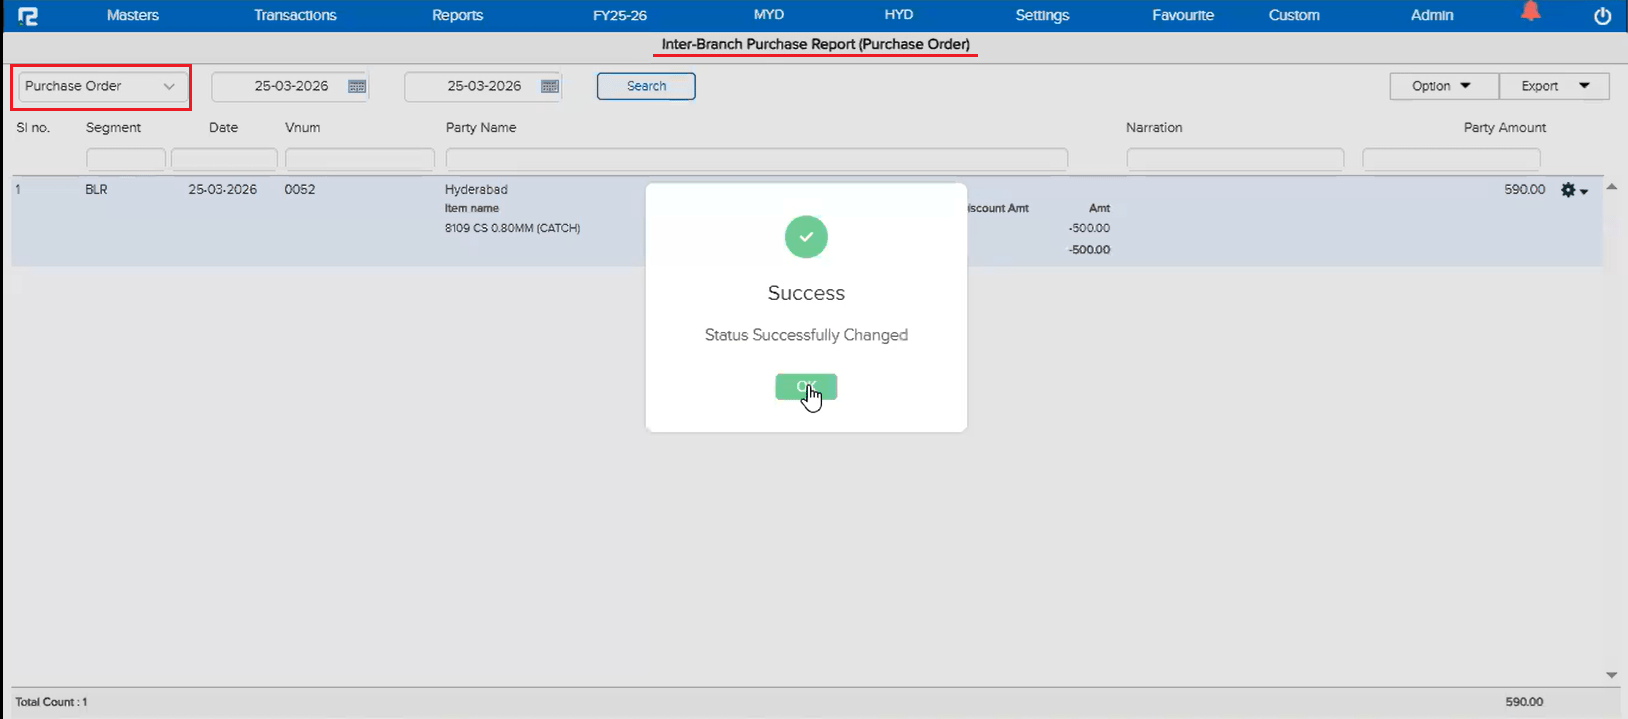
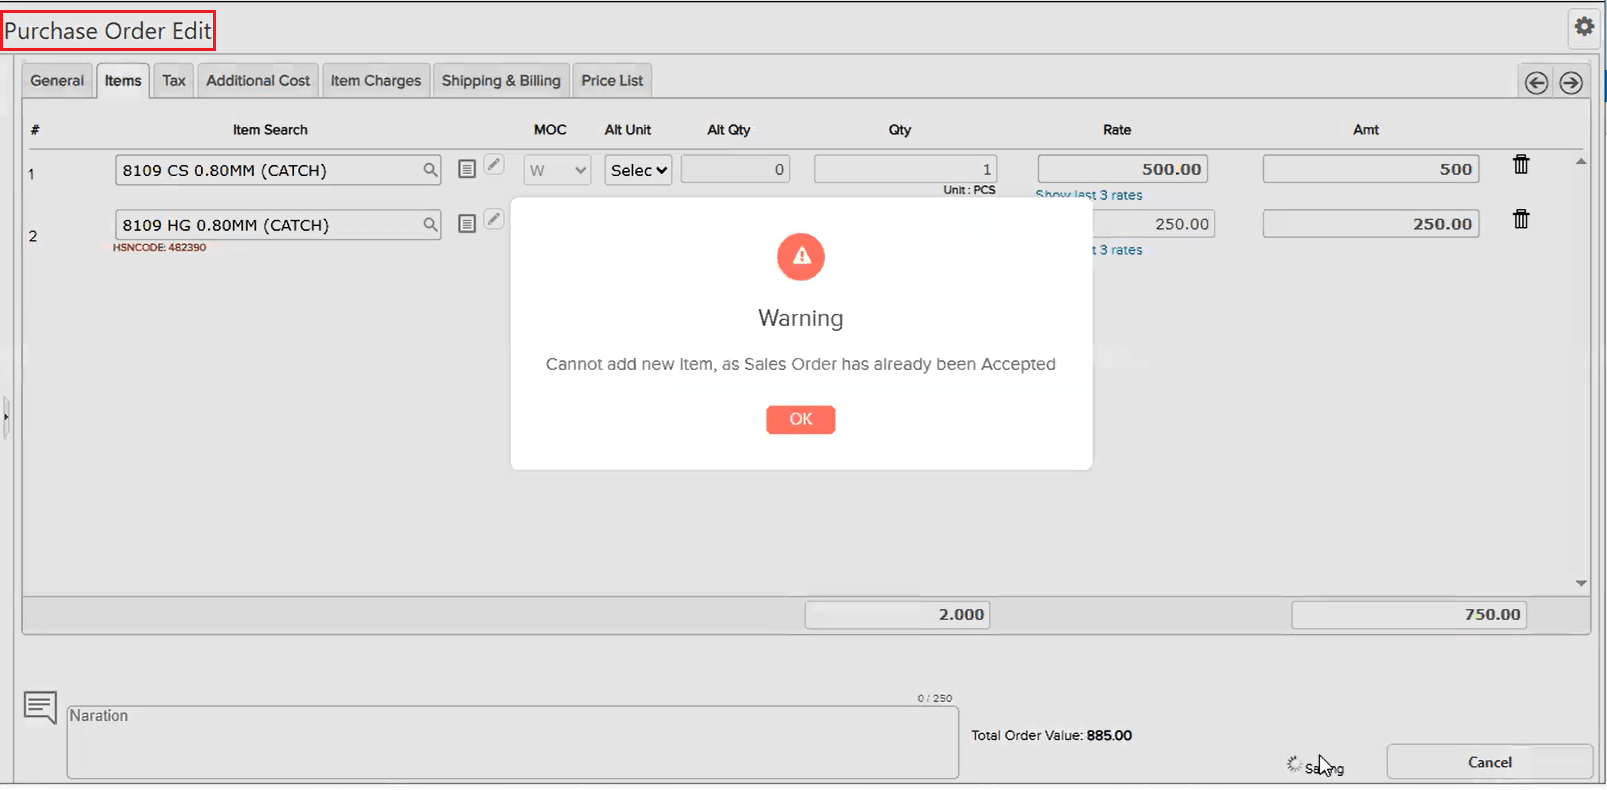
In the case of Interbranch Purchase Order to Sale Order posting, a timing issue was identified. When a Purchase Order (PO) was created with one item and later modified to add another item, the auto-posted Sale Order (SO) was already generated seconds before the PO modification — even with a difference as small as 10 seconds. This meant the SO did not reflect the latest PO changes, causing data inconsistency.
🌟 What This Means for You
A validation has been added so that once an SO is auto-posted from a PO, the PO entry gets locked. If a user attempts to modify the PO after the SO has already been posted, the system will now show an error at the time of saving — informing the user that the respective SO is already posted. This prevents data mismatches even when changes happen within seconds of each other.
📷 See It in Action
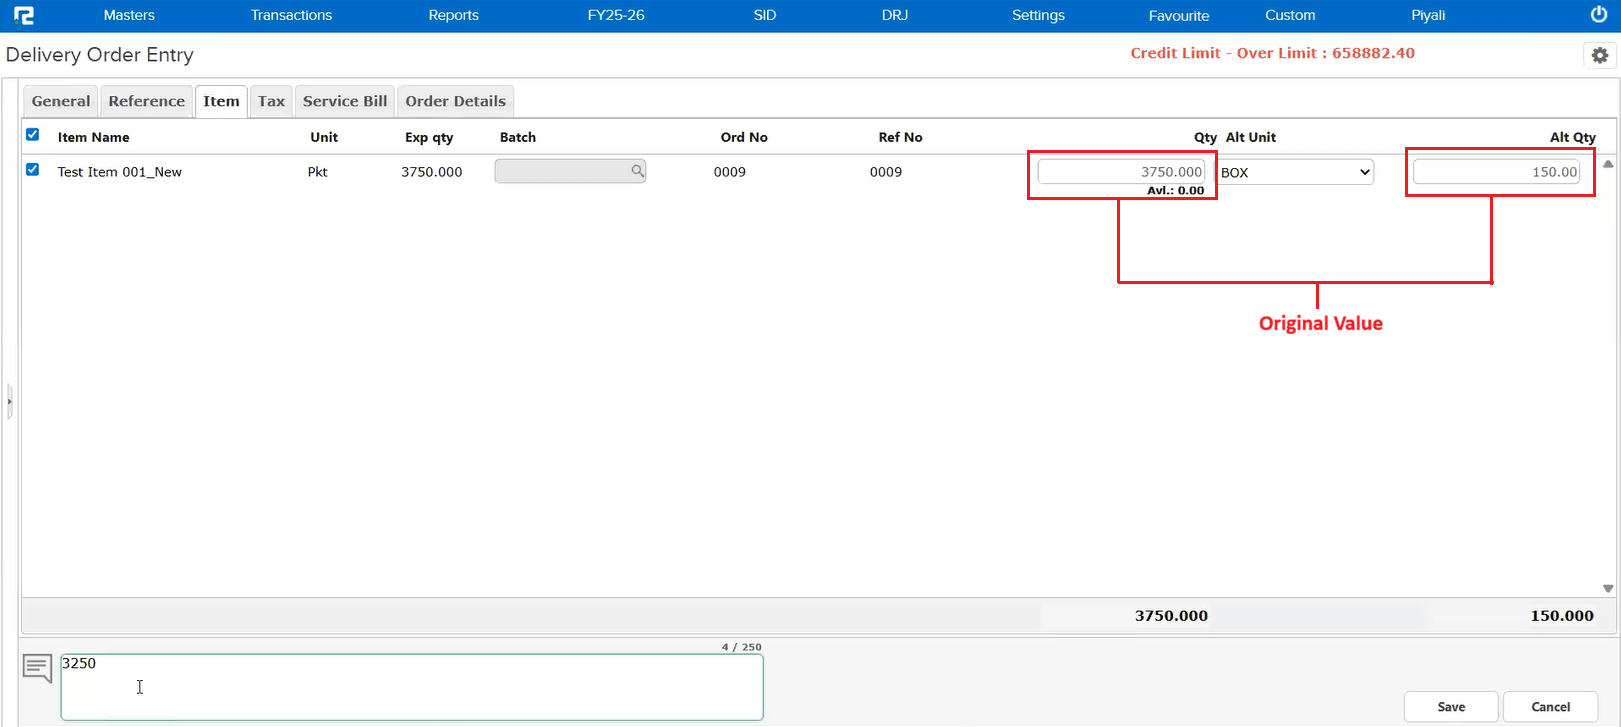
📌 What Was Happening
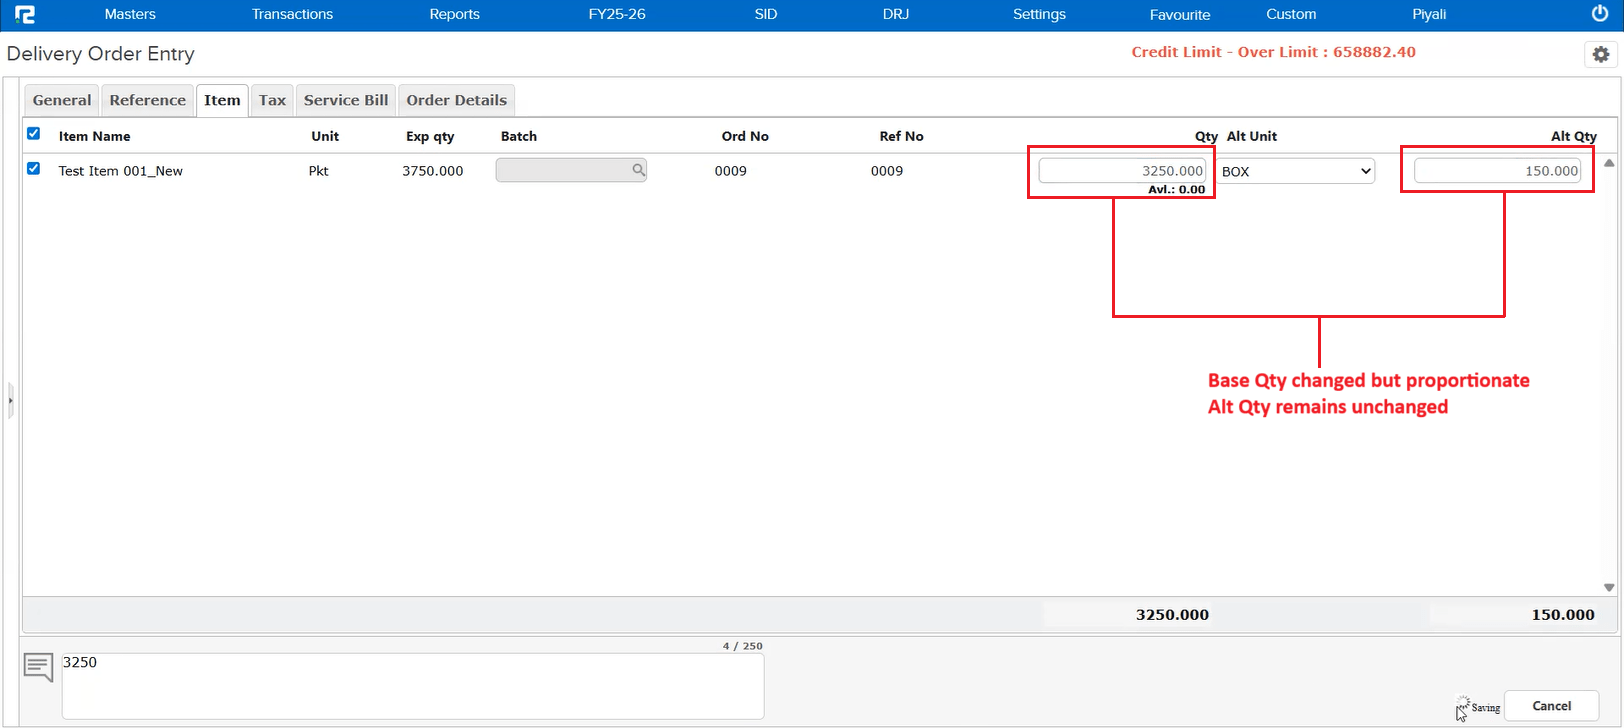
The Alternative Quantity (Alt Qty) of an item was being captured incorrectly in the Delivery Order (DO) and Sales when fetched from a Sale Order. Instead of capturing the correct Alt Qty (e.g. 130 with Base Qty 3250), the system was wrongly picking up the Alt Qty as 150 (Base Qty 3750) from the SO. This issue occurred specifically when the user copy-pasted the quantity in the Delivery Order instead of typing it manually.
🌟 How This Helps You
The Alt Qty now calculates correctly regardless of whether the quantity is typed manually or copy-pasted. You can confidently use copy-paste in Delivery Orders and Sales without worrying about incorrect alternative quantity calculations.
📷 See It in Action
📌 What Was Happening
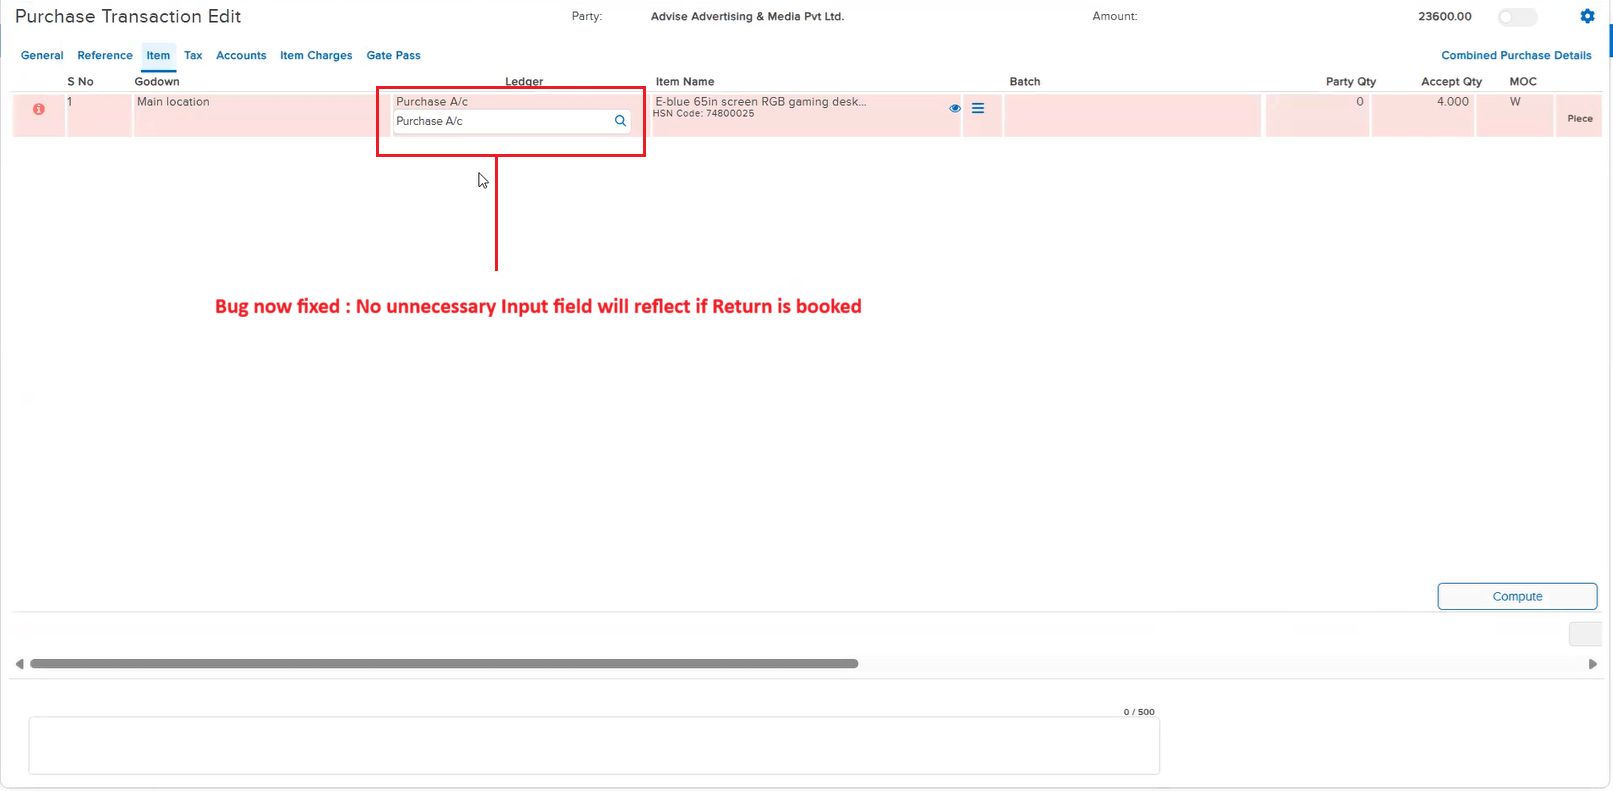
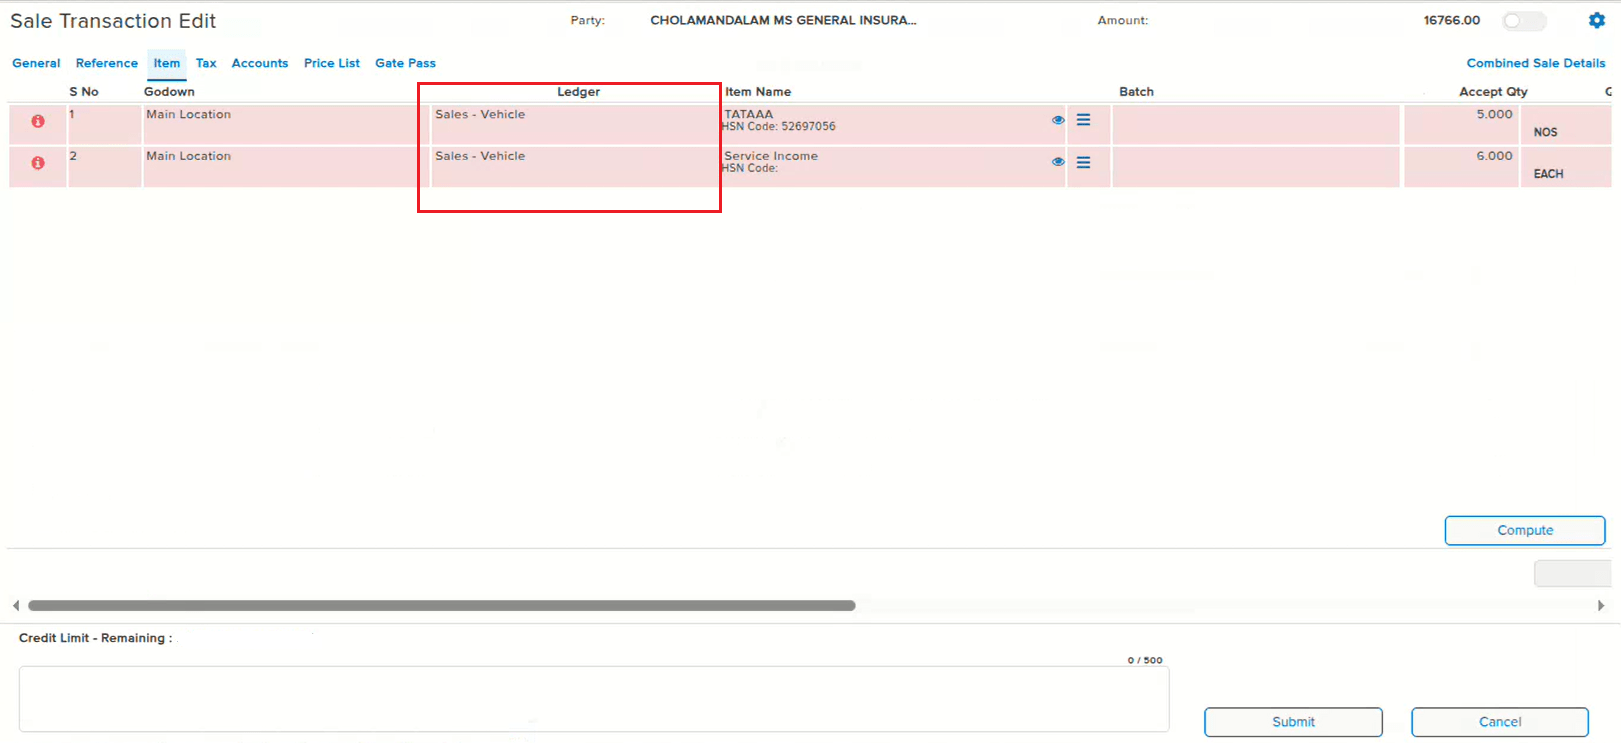
When a Sale Return or Purchase Return was done against a locked Sale or Purchase entry in a multi sale/purchase scenario, an unnecessary input field was reflecting on the screen. This extra field was confusing and not required for the return process.
🌟 How This Helps You
The unnecessary input field has been removed. Locked Sale and Purchase returns in multi-entry scenarios now display a clean interface without any extra or confusing fields.
📷 See It in Action
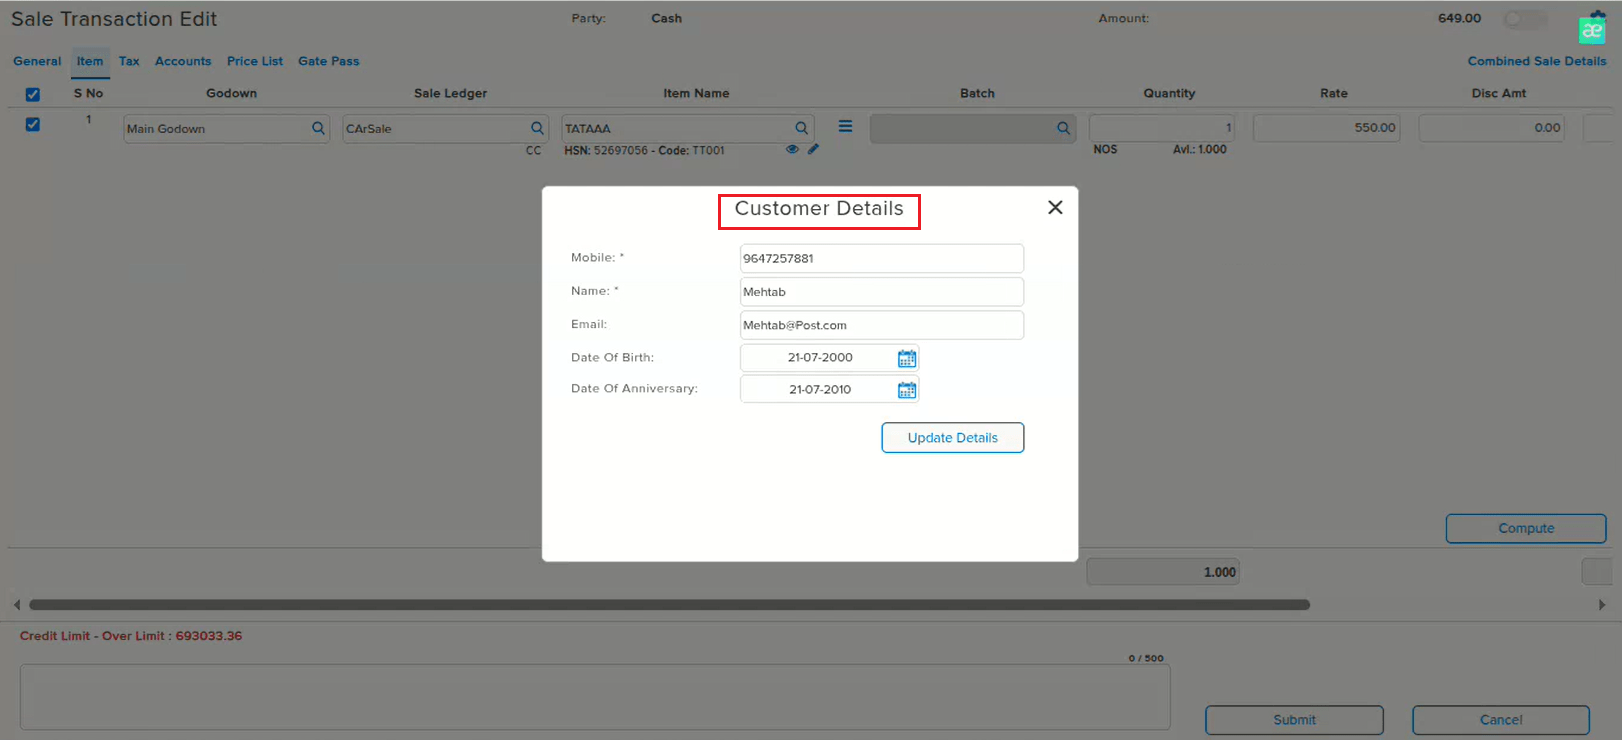
📌 What Was Happening
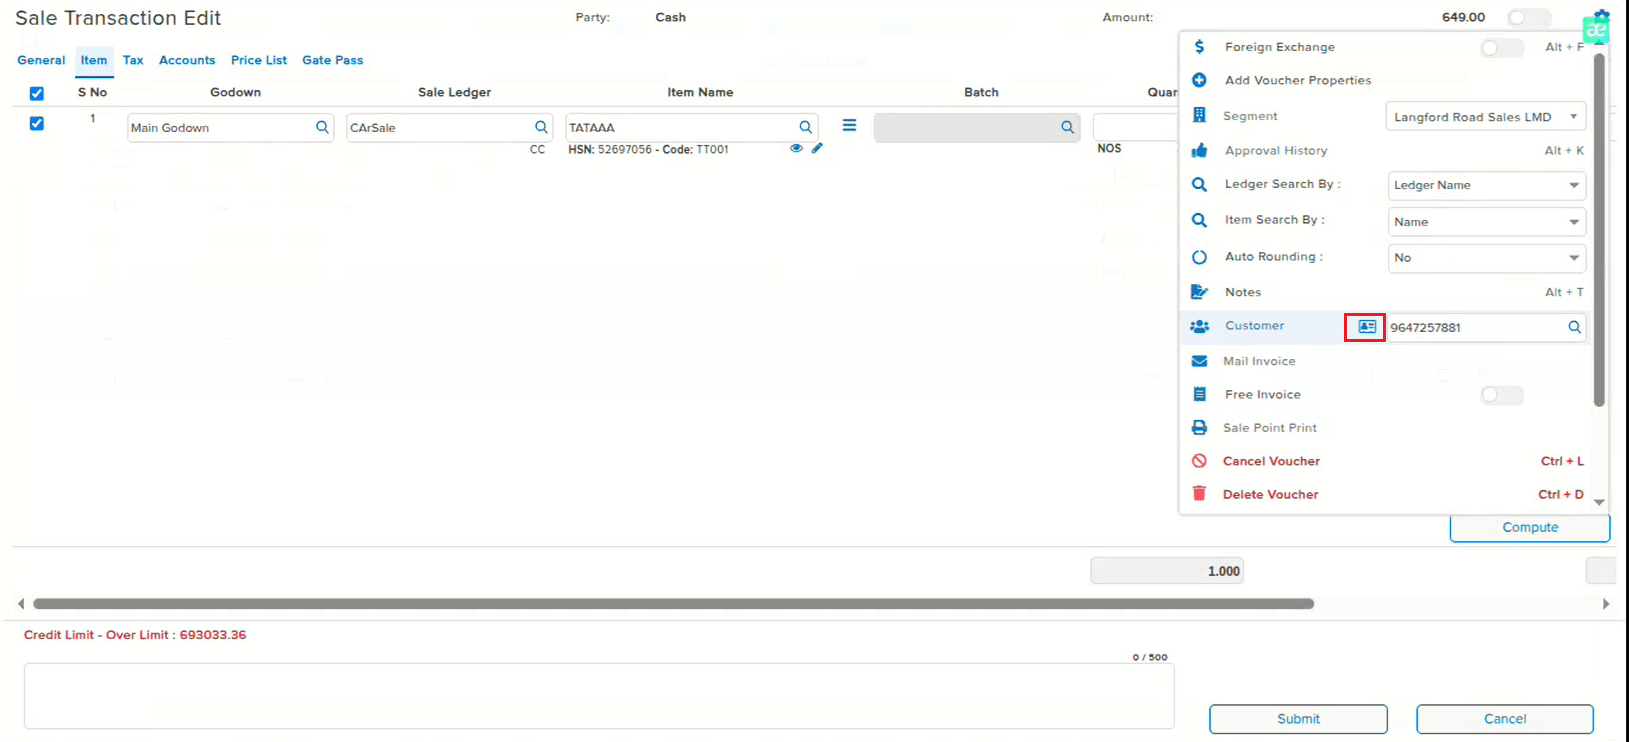
When a sale was created via POS (Point of Sale) with customer details entered, those details were not reflecting when the same sale entry was opened in the Sale edit screen. Users had to re-enter customer information manually, leading to extra effort and potential data inconsistency.
🌟 How This Helps You
Customer details entered via POS now correctly reflect in the Sale edit screen. You can view and verify all customer information without needing to re-enter it, ensuring consistency between POS and the edit view.
📷 See It in Action
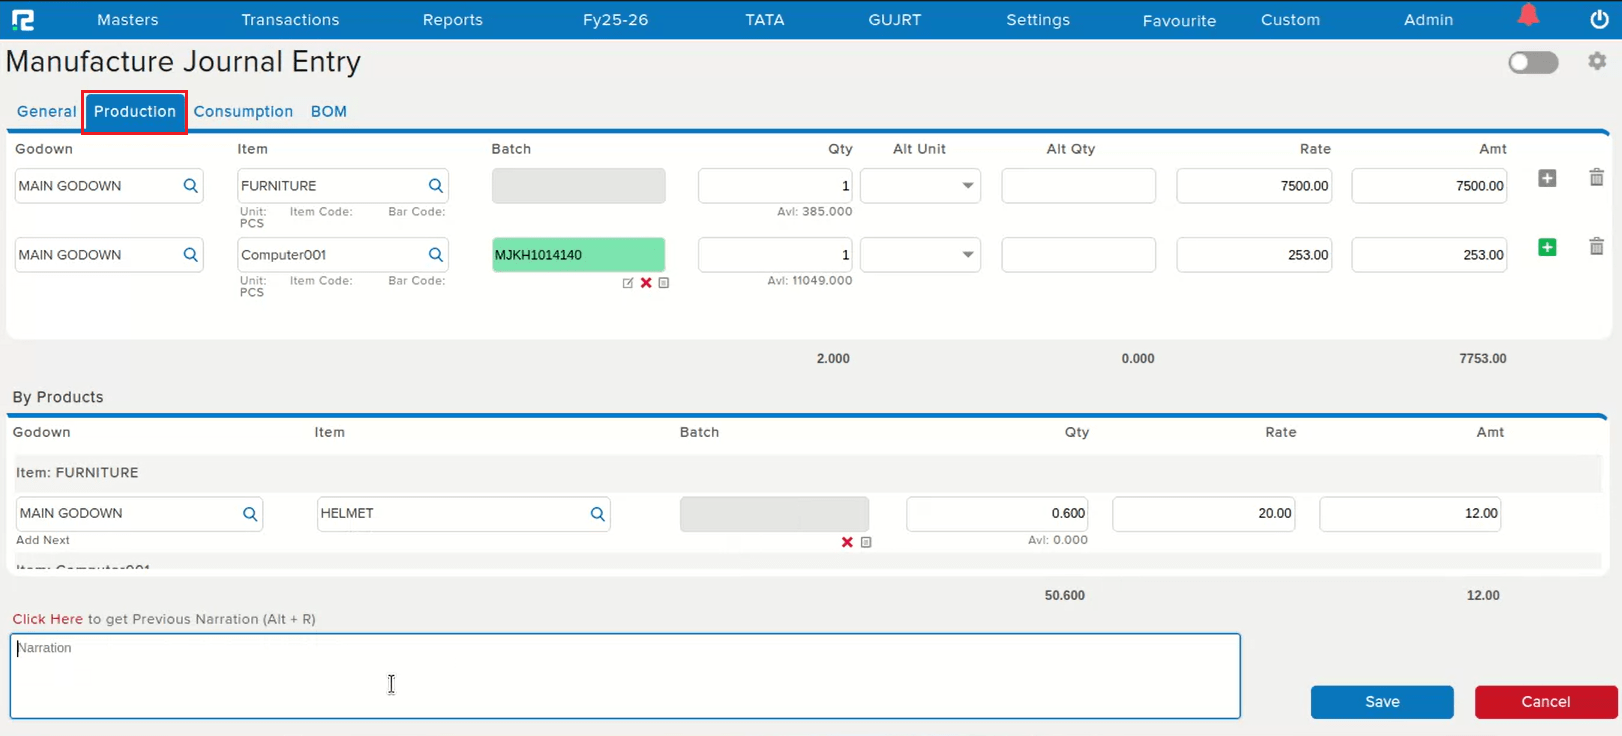
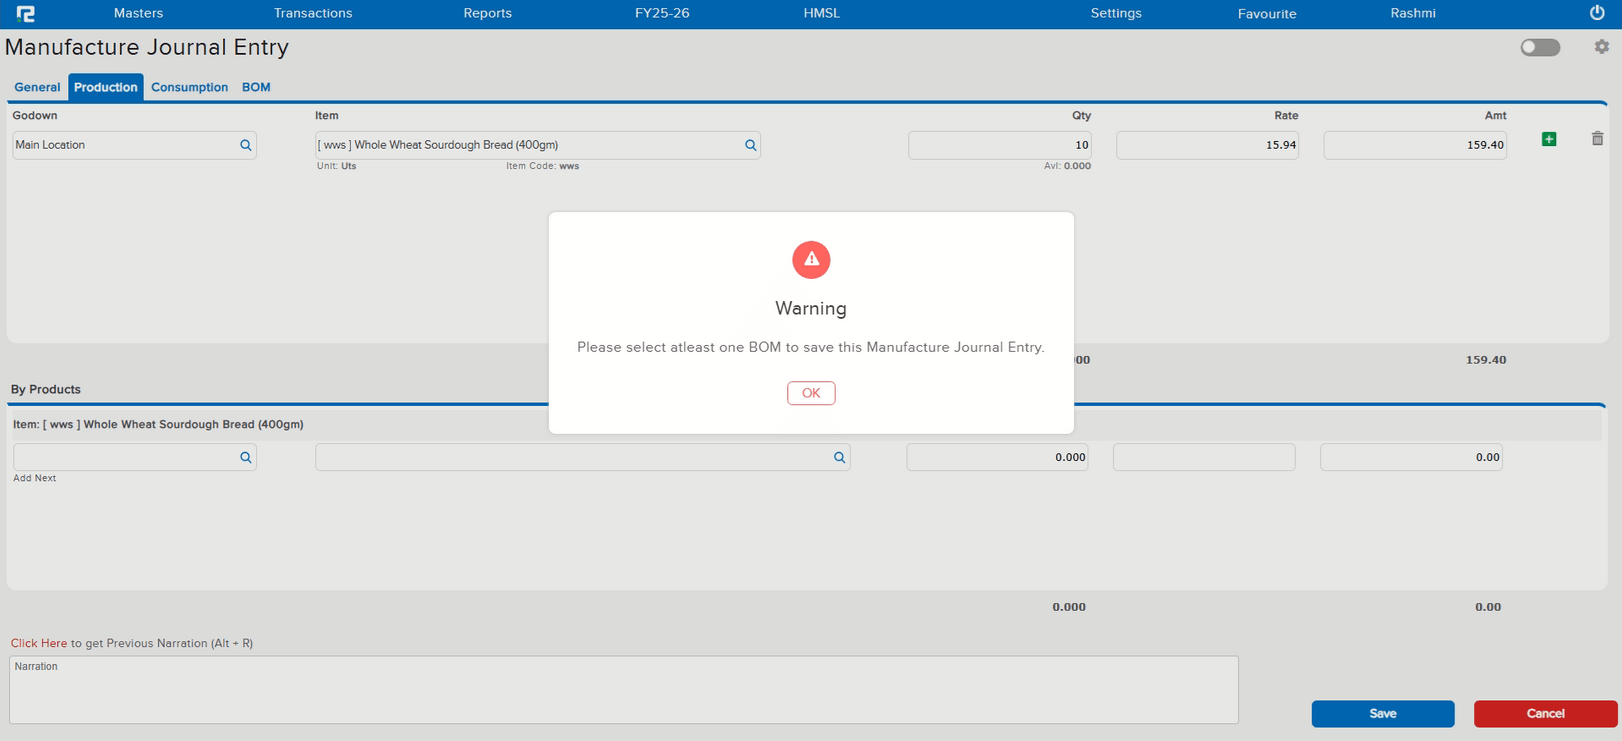
📌 What Was Happening
Users were unable to save a Manufacturing Journal entry when multiple lines were added in the Production tab. The system was throwing an error during save. This was caused by a bug in the Multi Line Addition parameter, which controls the ability to add multiple lines in the production section.
🌟 How This Helps You
The multi-line addition parameter has been fixed and now works as expected. You can add multiple lines in the Production tab of Manufacturing Journal entries and save them without any errors.
🎬 Where to Find It
📷 See It in Action
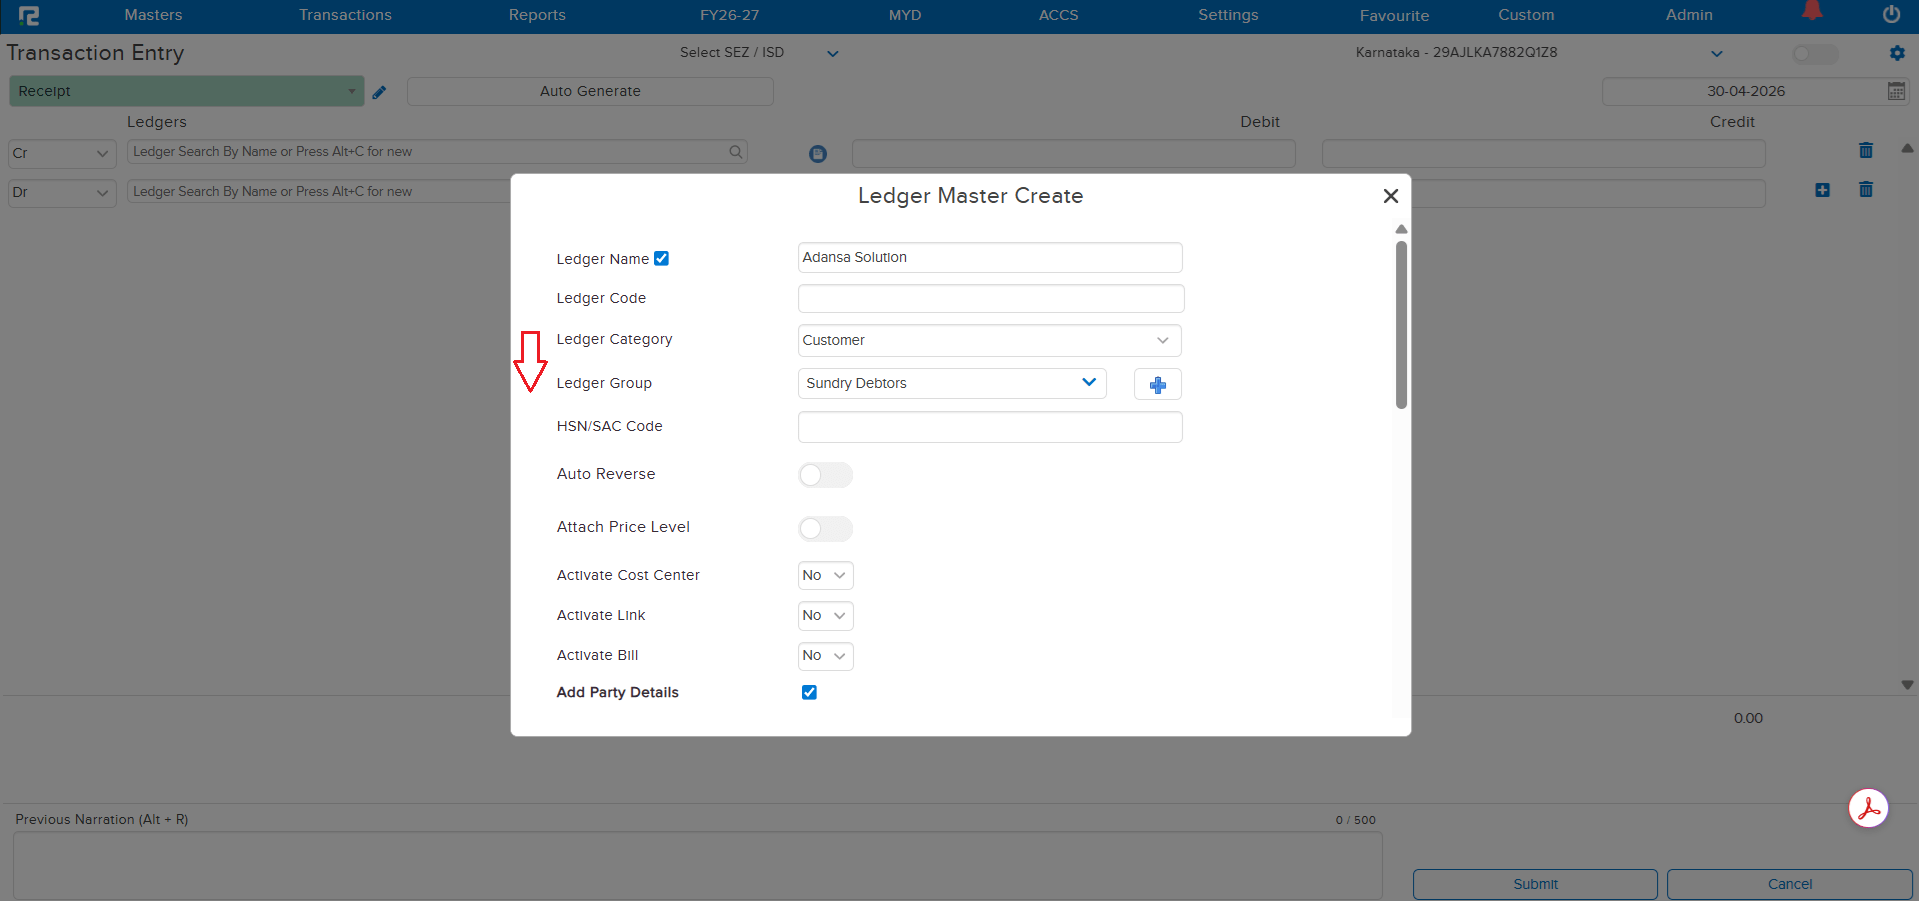
📌 What Was Happening
When creating a Ledger through the Alt + C shortcut key, the cursor disappeared after selecting the Ledger Category. Users had to use the mouse to navigate to the next field, breaking the keyboard-driven workflow and slowing down the ledger creation process during entry passing.
🌟 How This Helps You
The cursor behavior has been fixed. After selecting the Ledger Category, pressing the Tab key now correctly moves the cursor to the next field (Ledger Group) — restoring the seamless keyboard navigation during Alt + C ledger creation.
📷 See It in Action
📌 What Was Happening
When Duplicate Ledger Code was allowed as per company configuration, multiple ledgers with the same code existed in the books. During entry posting, the system was randomly posting entries against any of these duplicate ledgers — instead of considering ledger visibility. This caused entries to be booked against incorrect or disabled ledgers.
🌟 How This Helps You
The system now correctly considers ledger visibility when posting entries with duplicate ledger codes. Entries are booked only against the ledger where visibility is enabled — ledgers with disabled visibility are no longer considered for entry posting. This ensures accurate and predictable transaction recording.
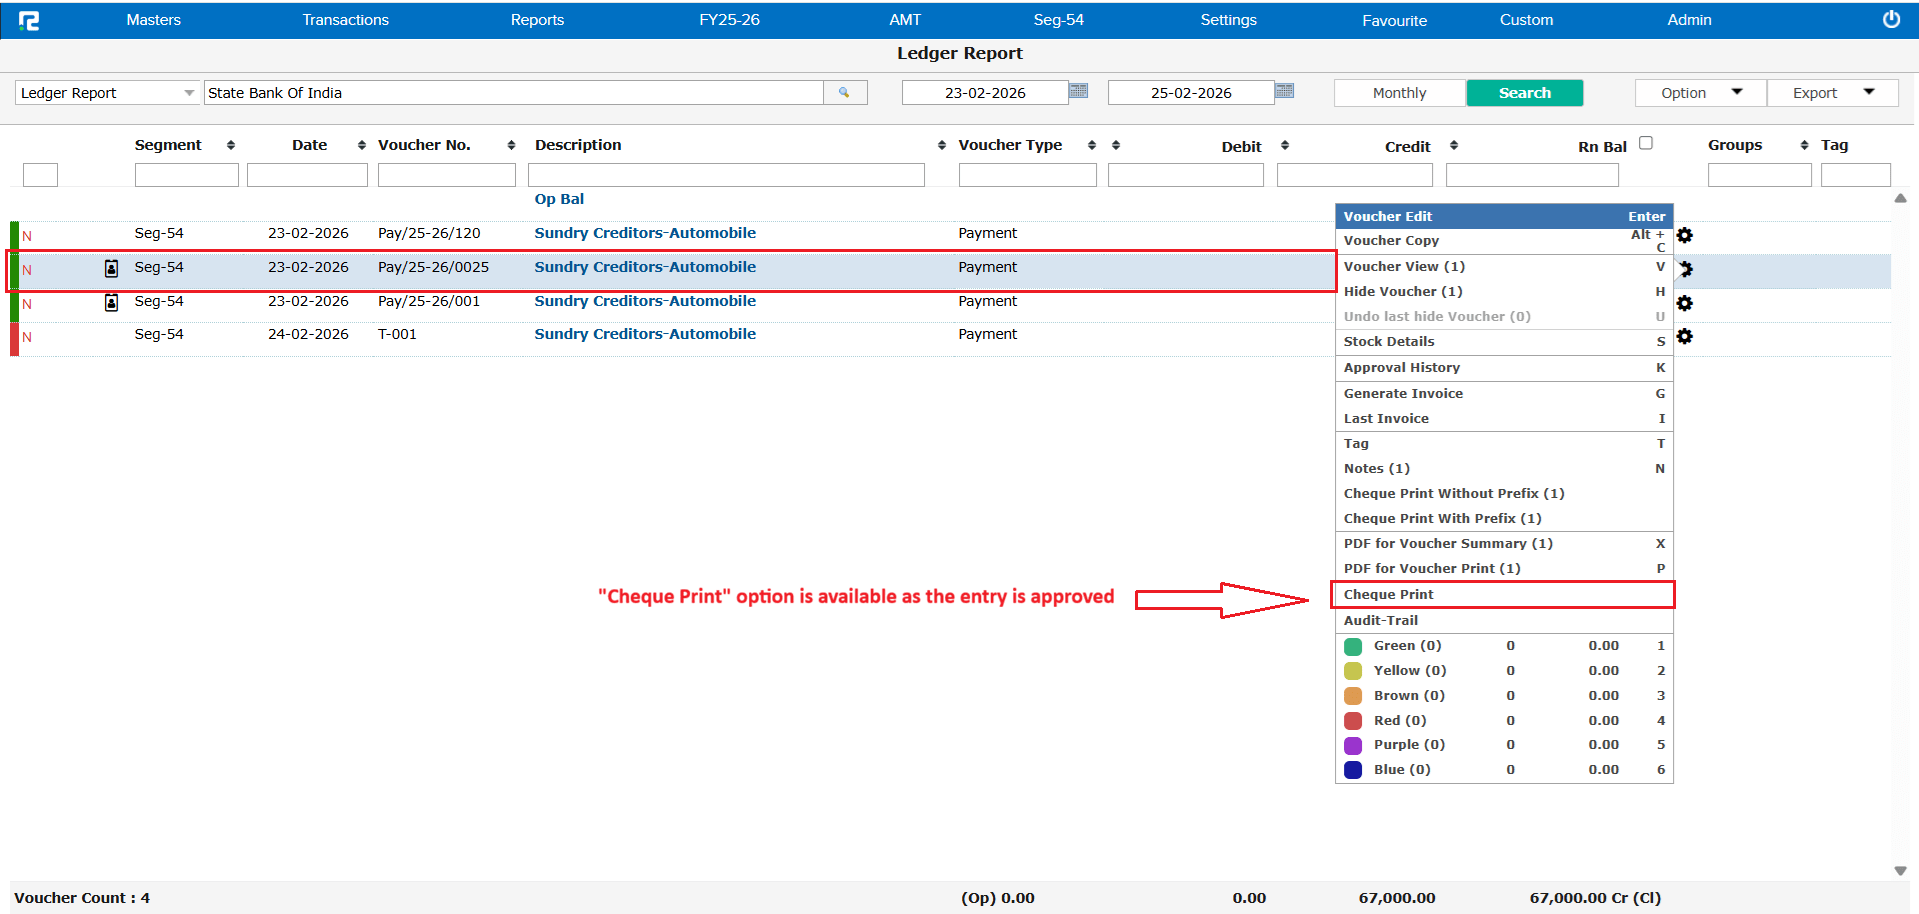
📌 What Was Happening
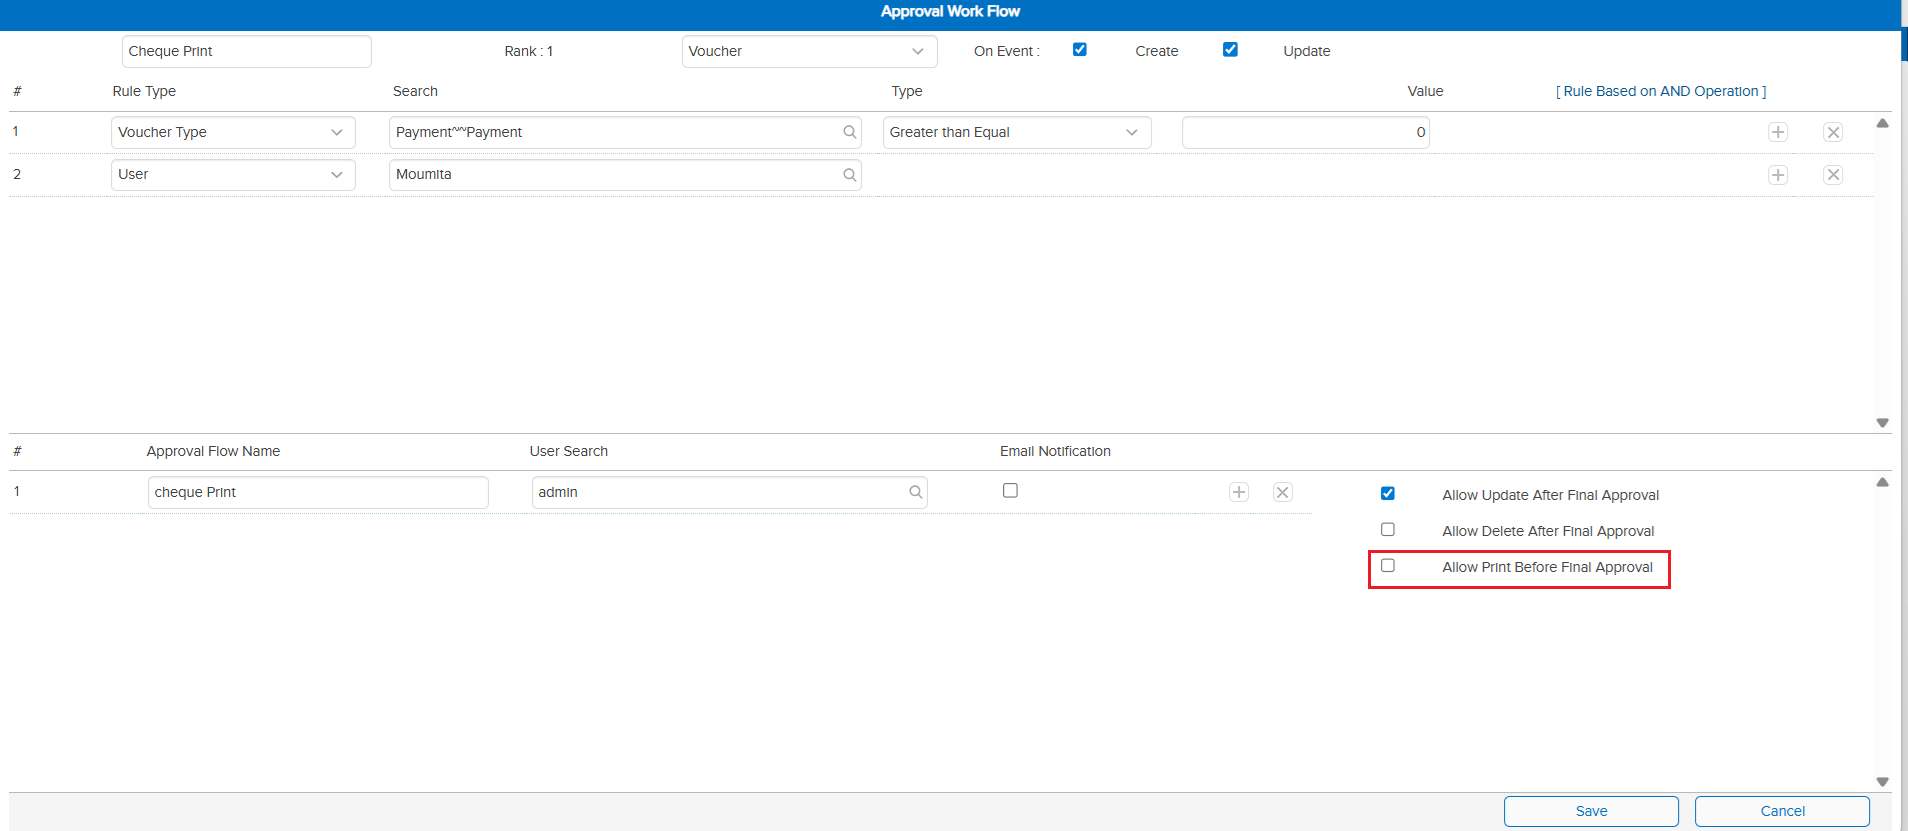
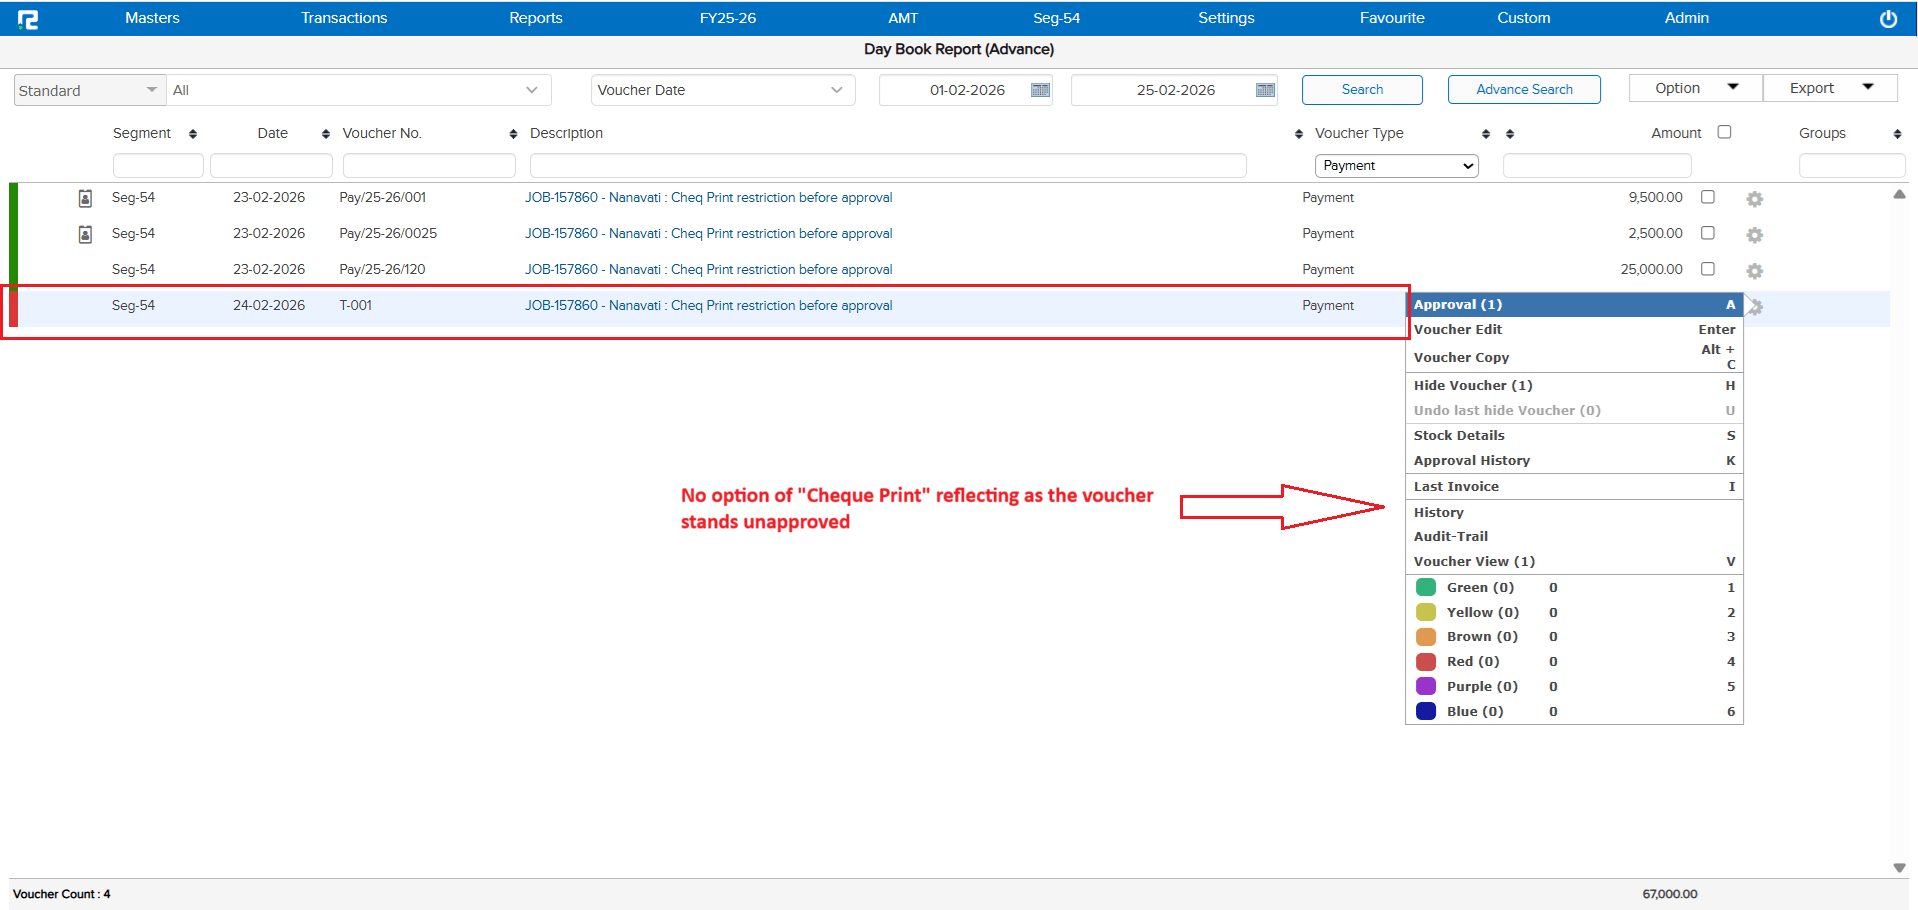
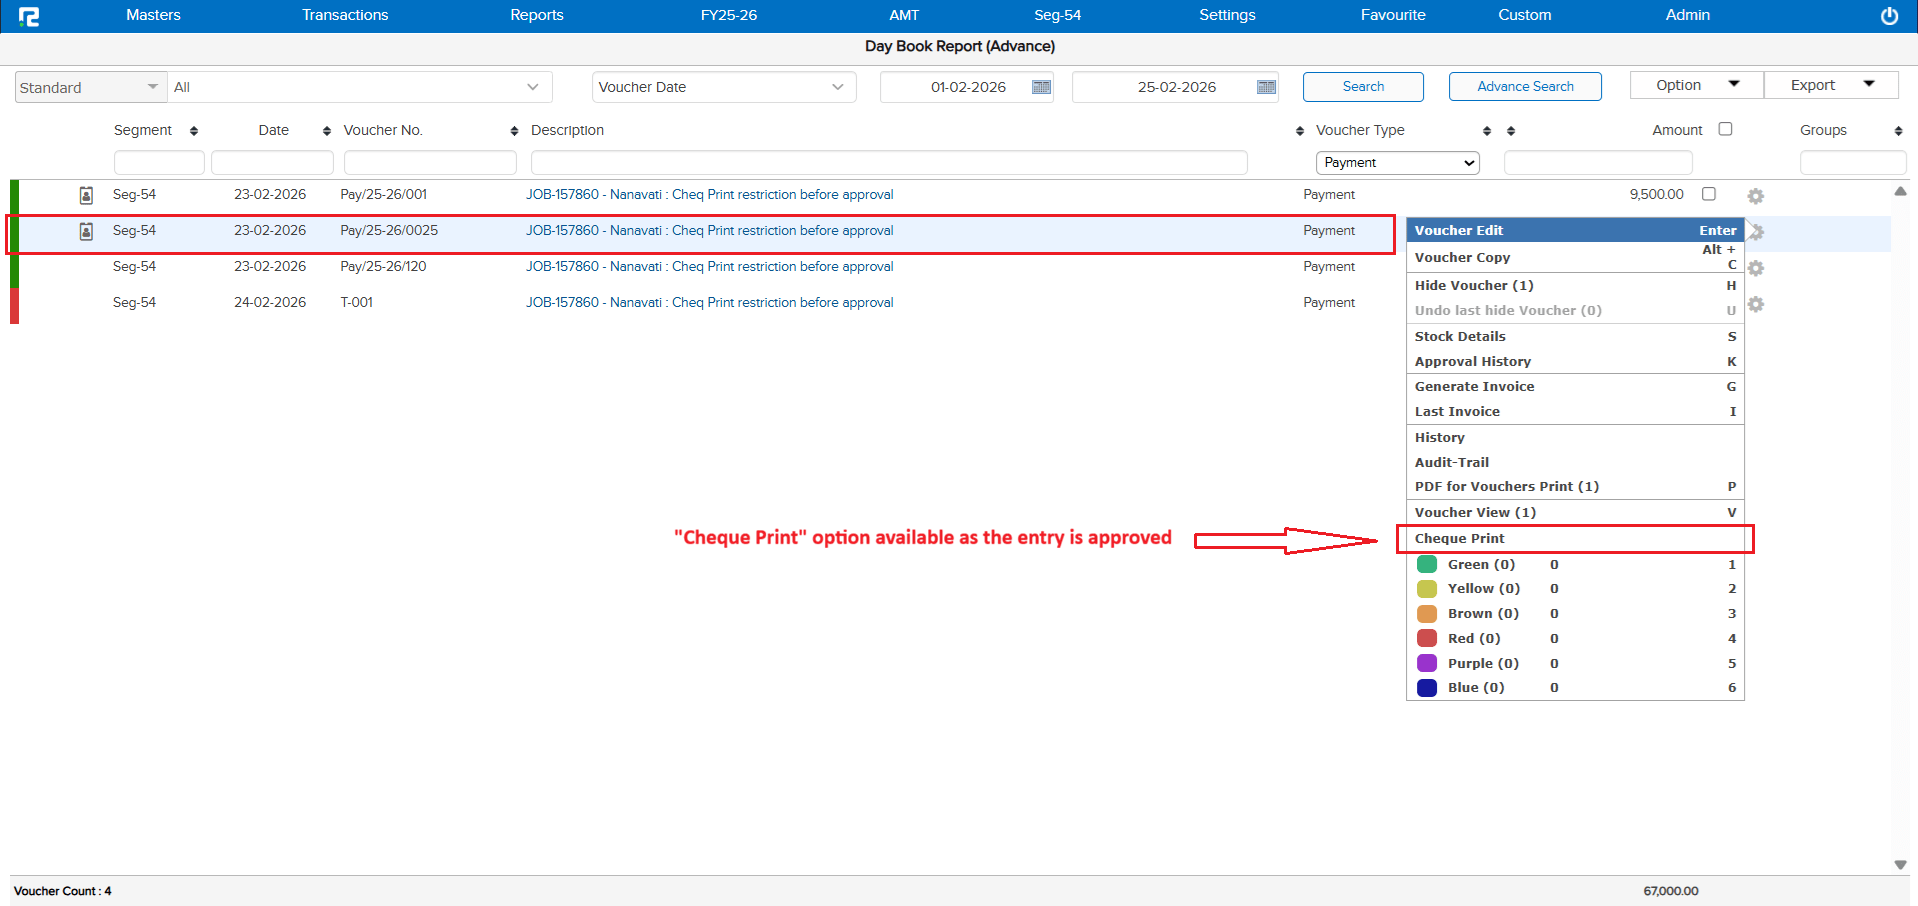
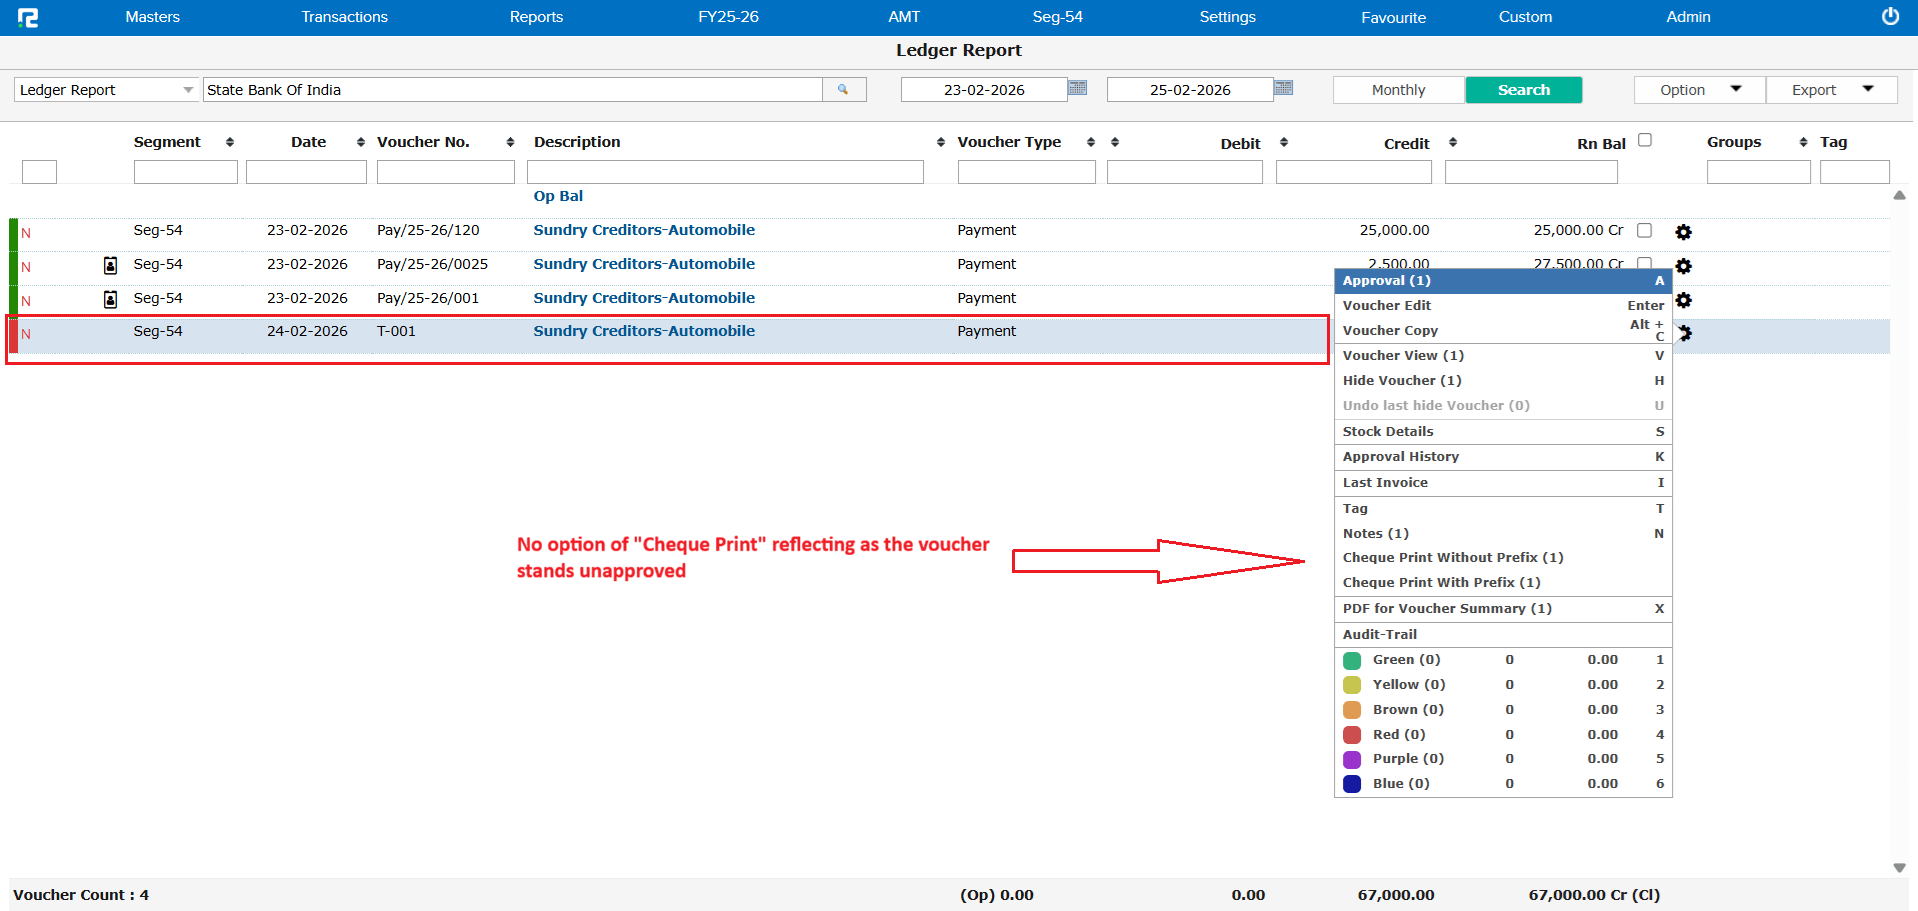
Even though you had set “Allow Print Before Final Approval” to No in your Approval Workflow, the Cheque Print option was still showing up in DayBook and Ledger Reports for unapproved vouchers. Template printing was correctly blocked, but cheque printing slipped through.
🌟 How This Helps You
Your approval controls are now fully enforced. Cheque Print is hidden until the voucher is approved, giving you complete confidence that no unapproved payments are being printed.
📷 See It in Action
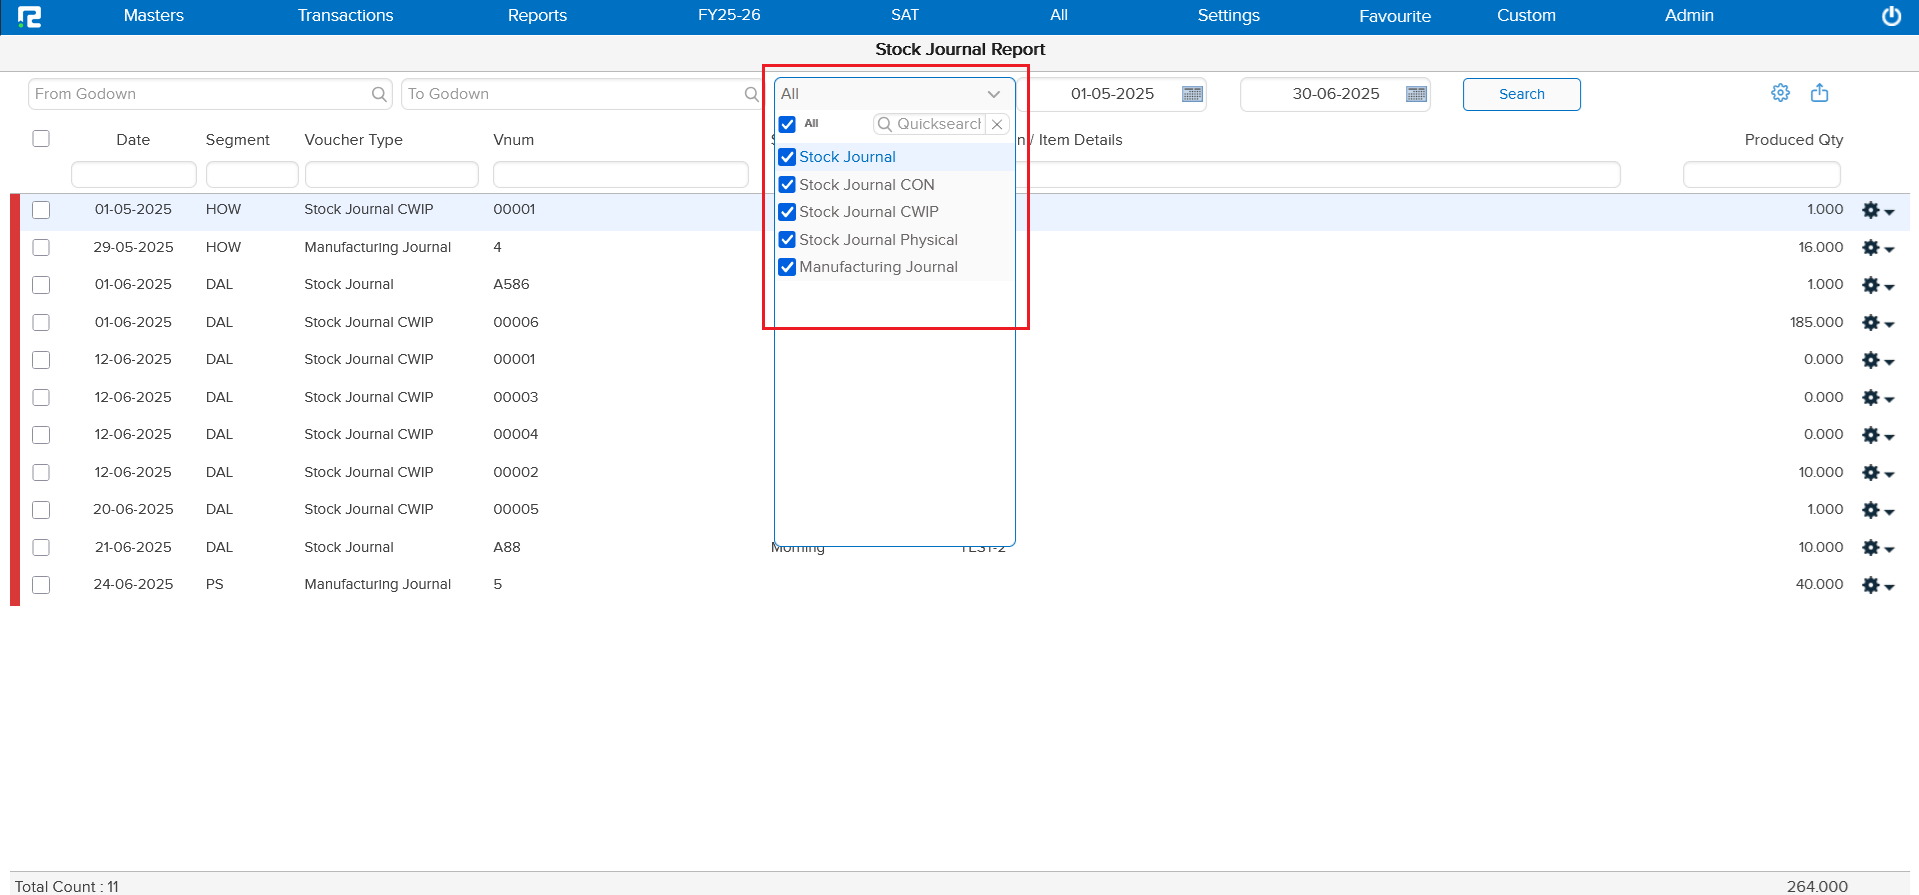
📌 What Was Happening
If your company uses Direct Stock Accounting, you may have noticed that Stock Journal CWIP, CON, and Physical entries wouldn’t open in edit mode from the Stock Journal Report. You had to go through the Ledger Report instead — an unnecessary extra step.
🌟 How This Helps You
All Stock Journal variations now open directly from the Stock Journal Report, just as you’d expect. No more workarounds needed!
🛠 Where to Find It
📷 See It in Action
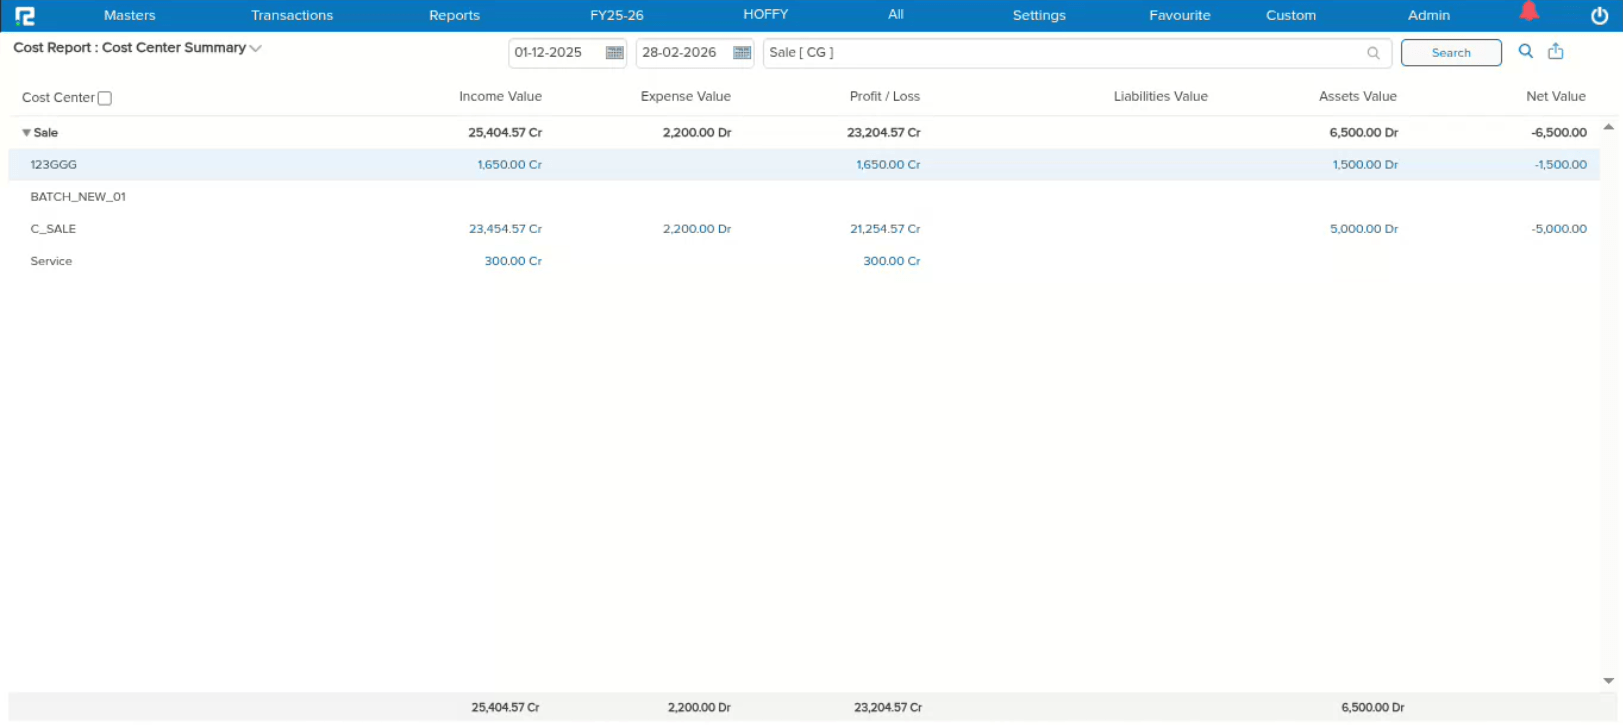
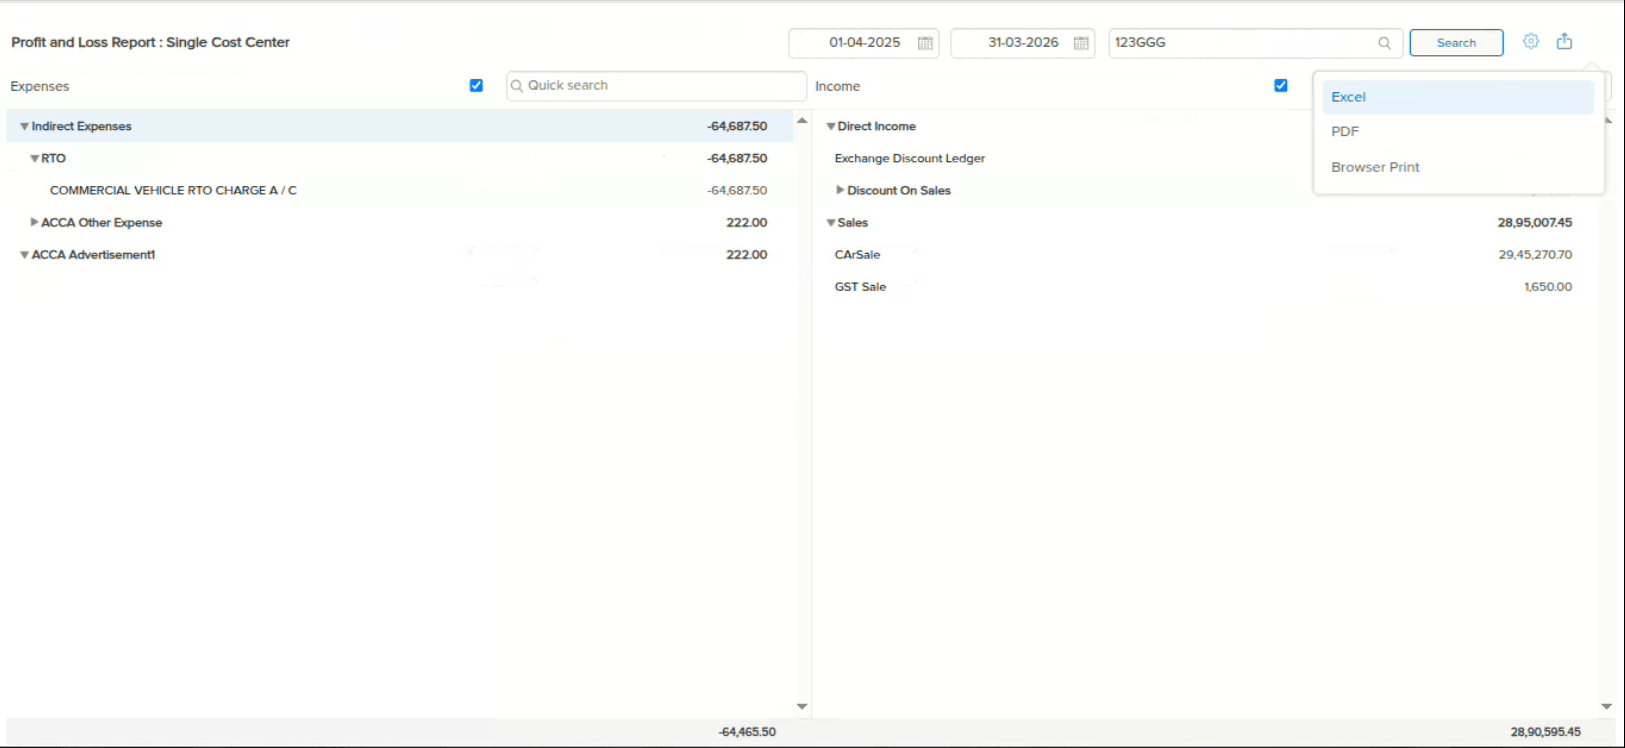
📌 What Was Happening
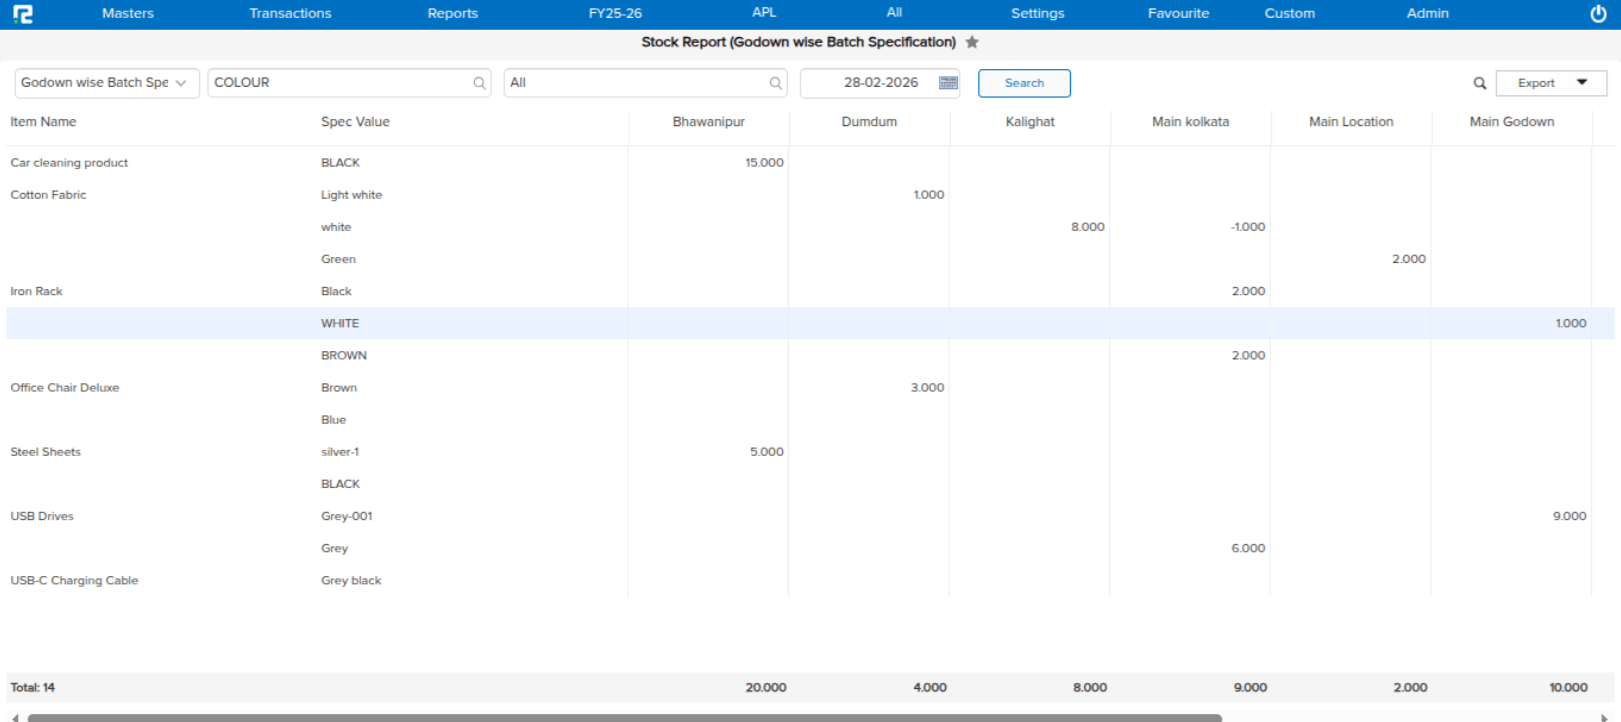
When you drilled down from the Cost Centre Summary report, the resulting Profit & Loss – Single Cost Centre report was not getting exported. Clicking the export option had no effect, leaving you unable to download the detailed cost centre data you needed.
🌟 How This Helps You
The export functionality now works seamlessly on the drill-down page. You can drill down into any cost centre and export the Profit & Loss – Single Cost Centre report without any issues.
🛠 Where to Find It
📷 See It in Action
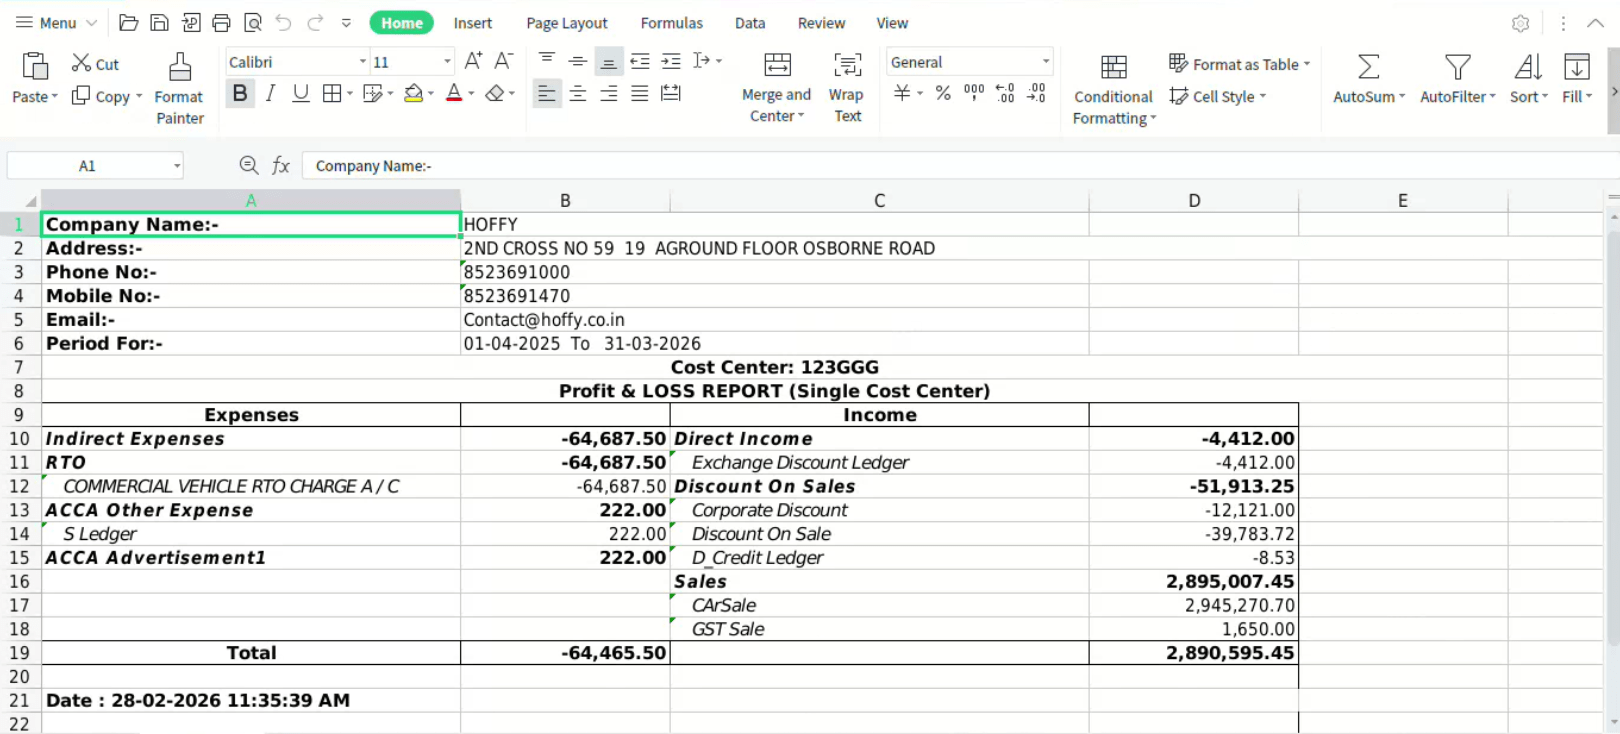
📌 What Was Happening
If you purchased three batches of the same item with different specifications and then transferred the stock of the last batch from Godown A to Godown B, the quantity for that batch appeared blank in the UI for Godown B. This issue occurred specifically when multiple godowns were displayed on the screen at the same time.
🌟 How This Helps You
The report now correctly displays the transferred batch quantity in the destination godown, regardless of how many godowns are visible on screen. Your inventory data is accurate and reliable across all godown views.
🛠 Where to Find It
📷 See It in Action
📌 What Was Happening
When running the Sale Register report (Voucher Wise Item Wise — Sale & Sale Return) for the first time, the Gross Item Rate displayed correctly. However, if you filtered by an Item Name and then removed that filter, the Gross Item Amount changed automatically — showing incorrect values without any data actually changing.
🌟 How This Helps You
The Gross Item Amount now remains consistent regardless of whether you apply or remove item filters. You can freely filter and clear searches without worrying about the report data shifting unexpectedly.
🛠 Where to Find It
📷 See It in Action
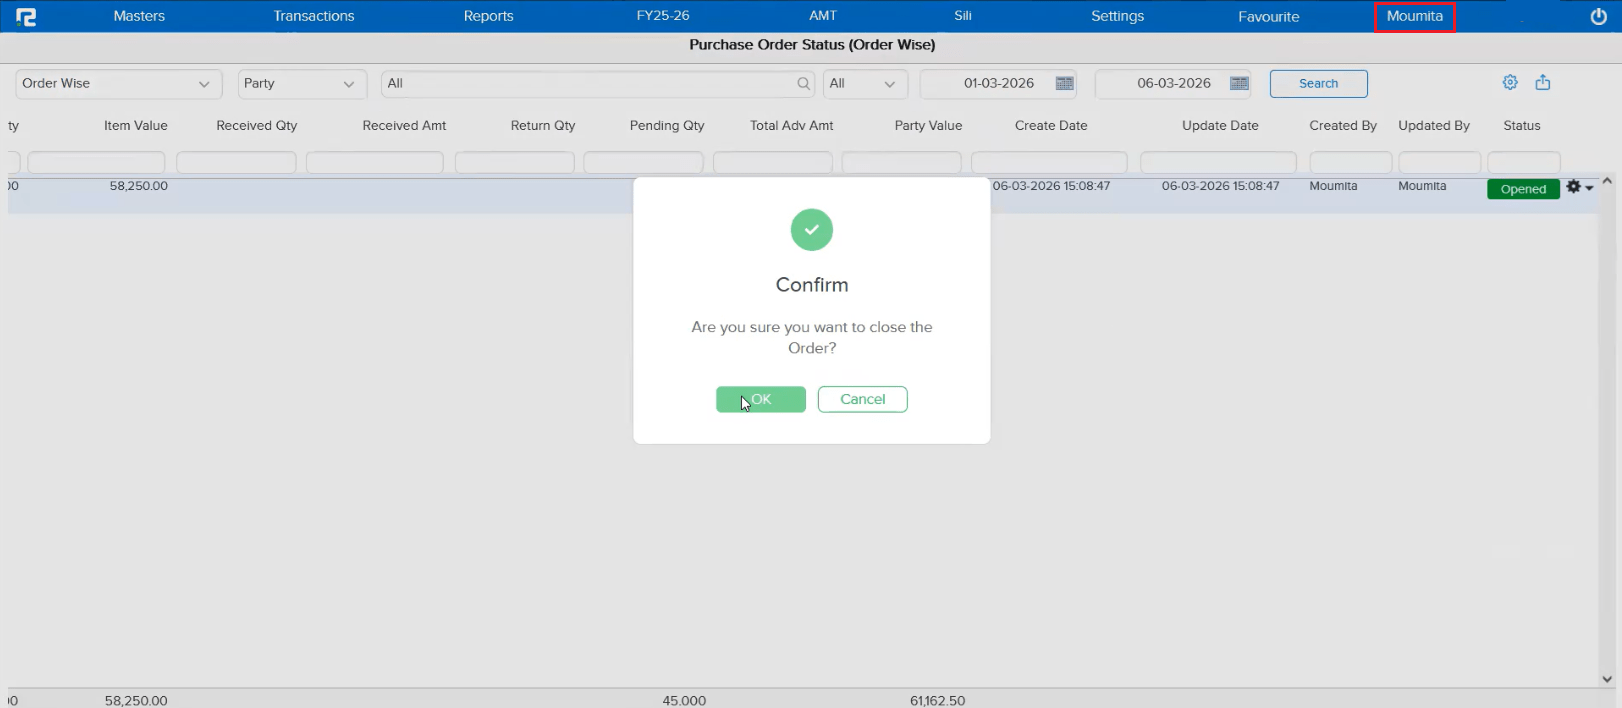
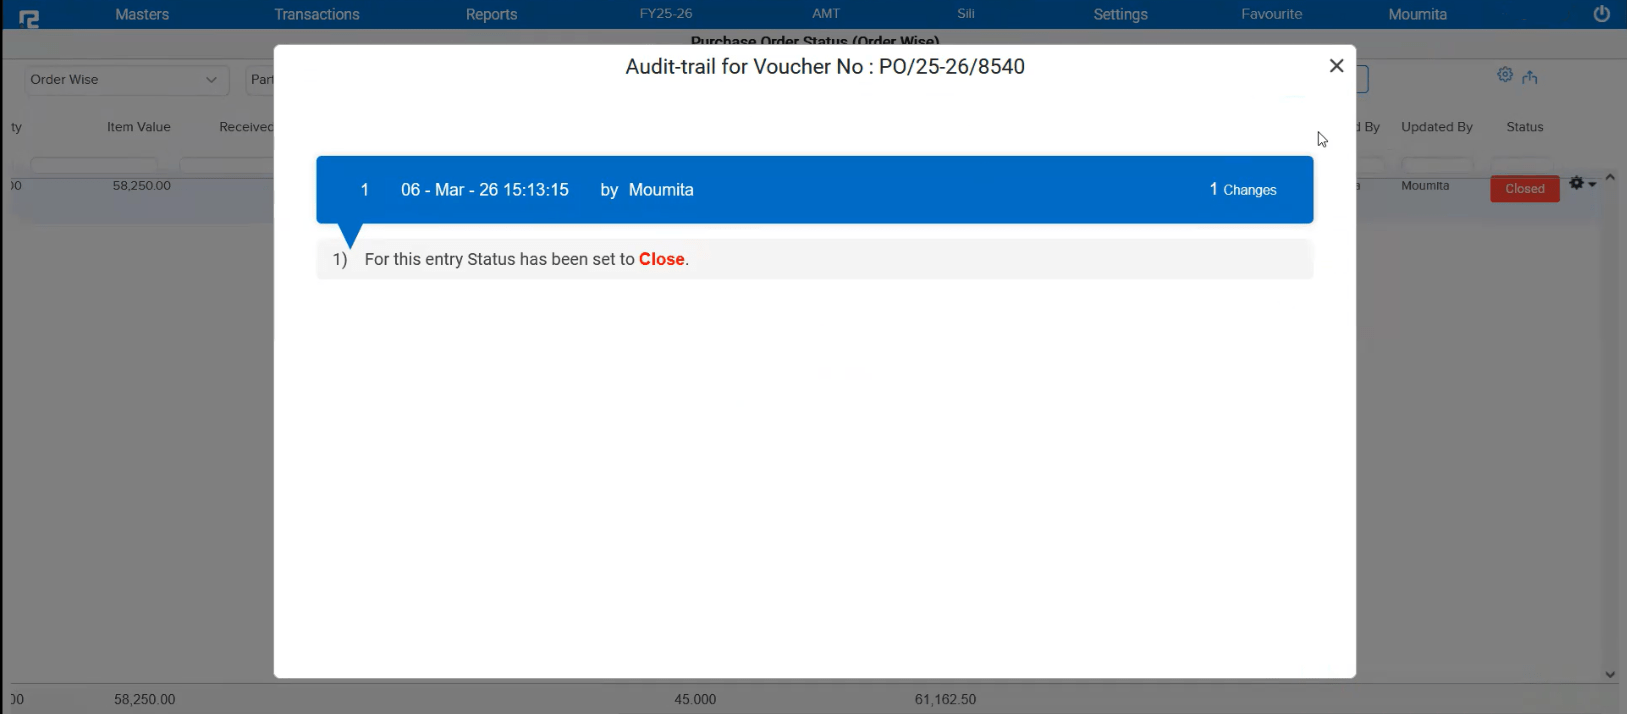
📌 What Was Happening
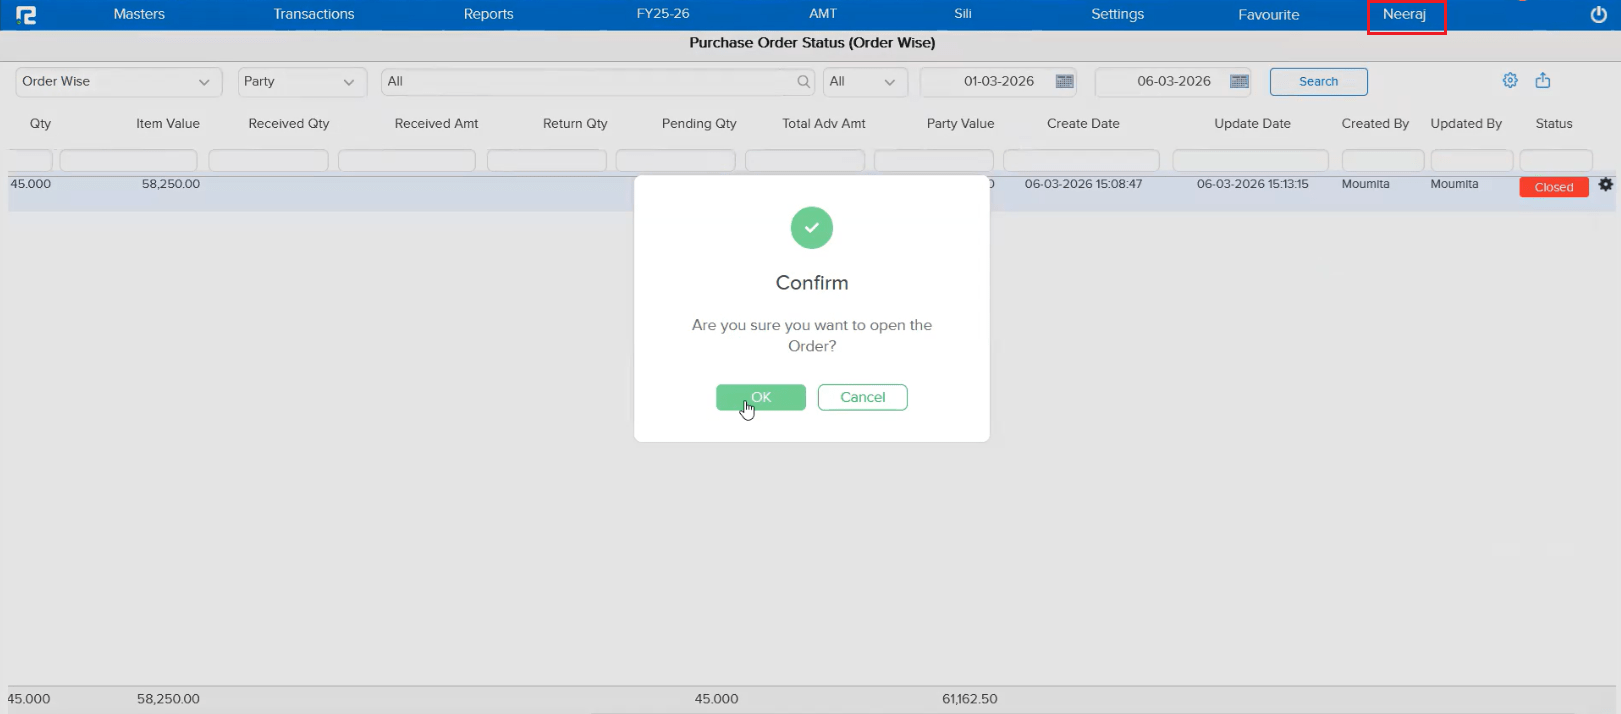
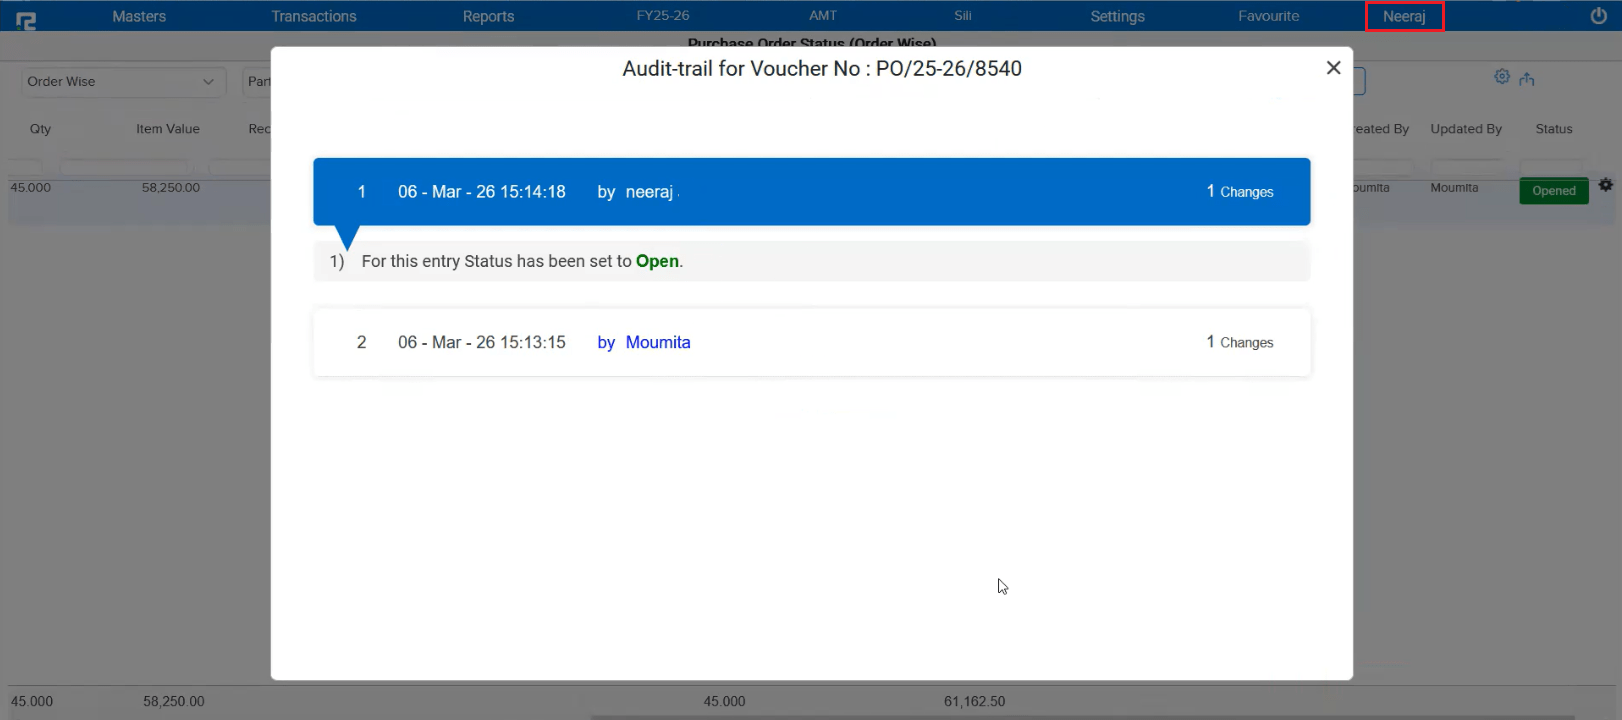
When User A edited a Purchase Order or Sale Order and later User B closed that order from the listing screen (since there is no open/close option in edit mode), the audit trail was incorrectly showing User A as the person who performed the close action. The system was defaulting to the last editor instead of tracking the actual user who closed the order.
🌟 How This Helps You
The audit trail now correctly reflects the actual user who performed the close or open action from the listing screen. This ensures complete accountability and accurate tracking of who did what on each order.
📷 See It in Action
📌 What Was Happening
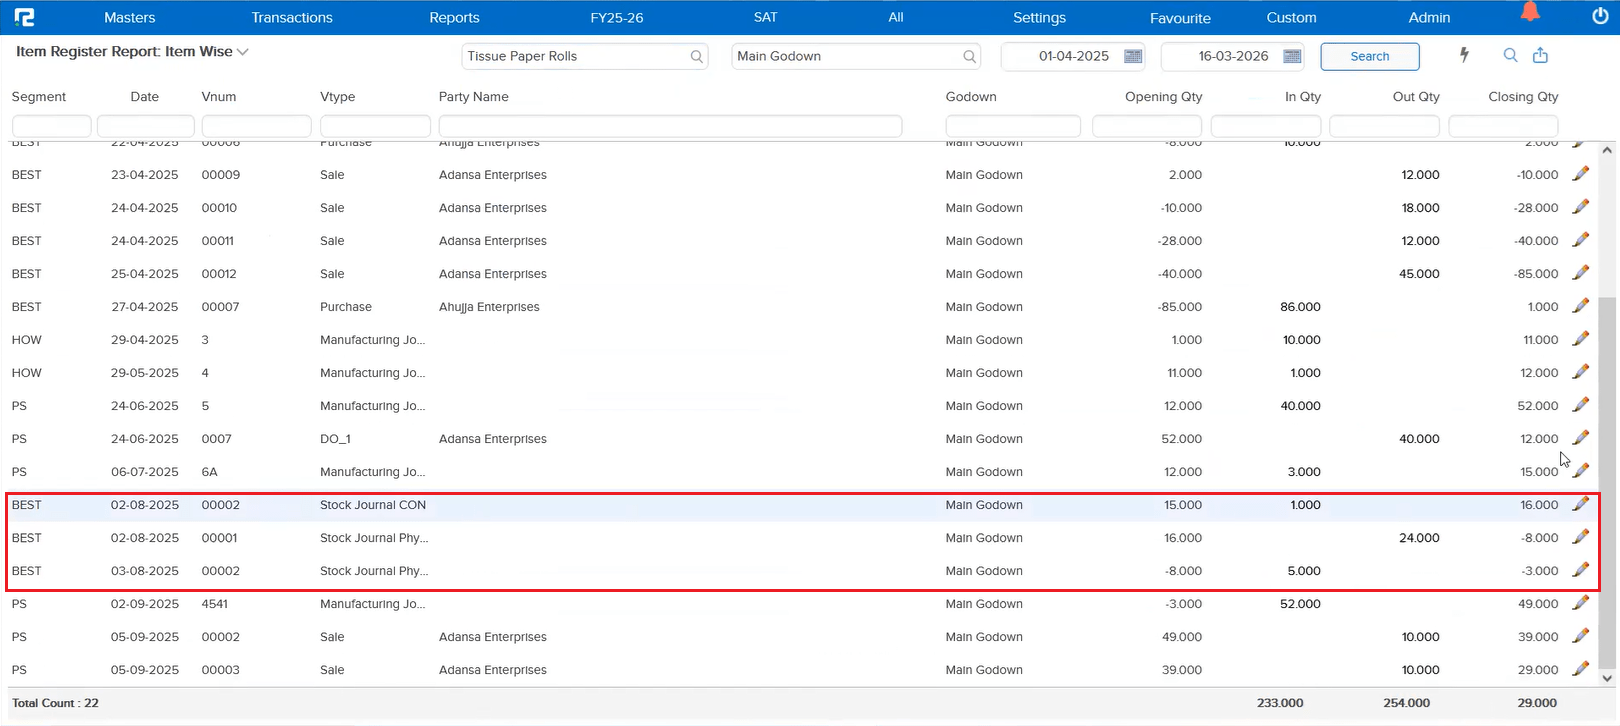
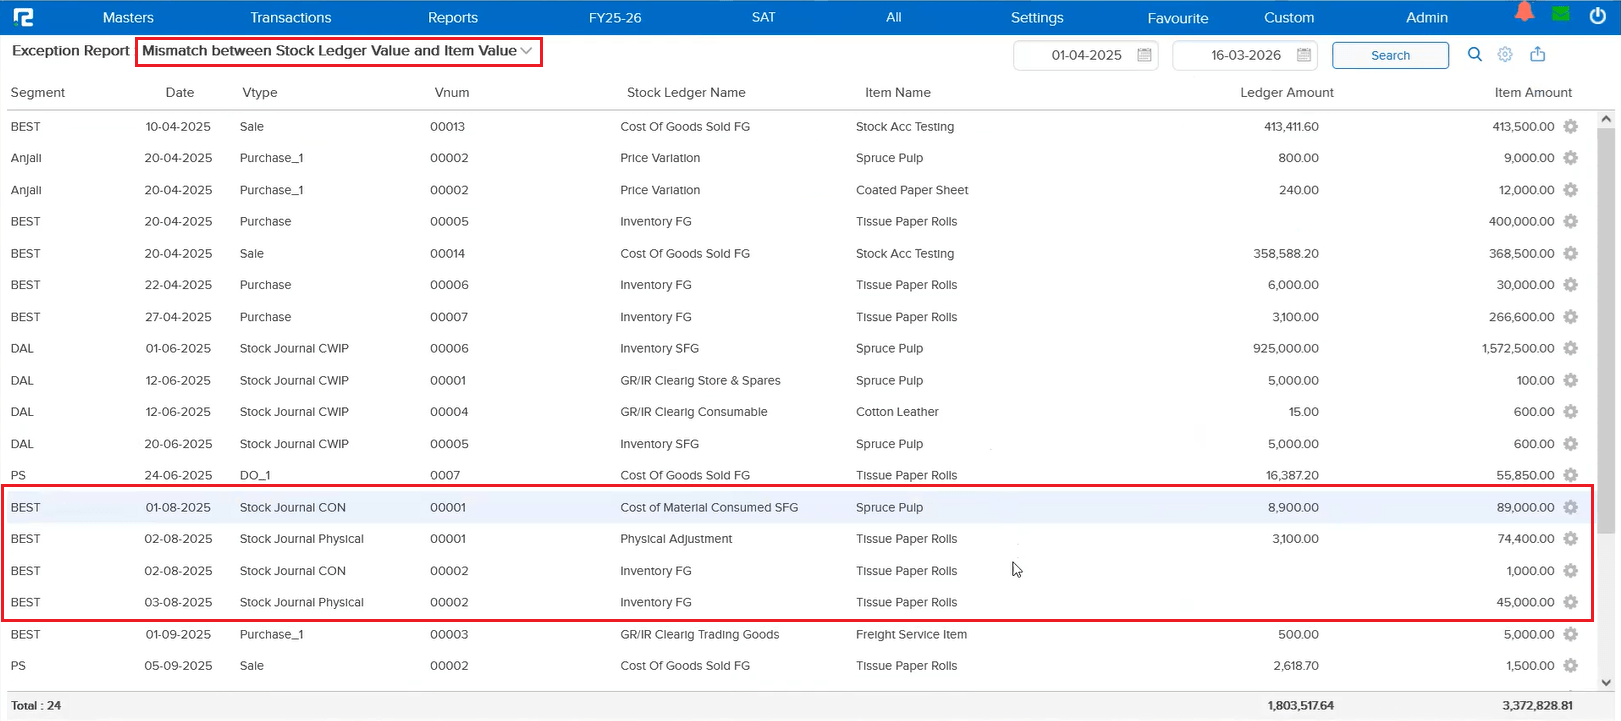
Similar to the issue previously fixed in the Stock Journal Report (JOB-158260), the same problem existed in other reports as well. Stock Journal CWIP, Stock Journal CON, and Stock Journal Physical entries wouldn’t open in edit mode when accessed from the Item Register, Exception Report, and the drill-down of the Stock Movement Report.
🌟 How This Helps You
All Stock Journal variations — CWIP, CON, and Physical — now open correctly in edit mode from these reports as well. No workarounds needed, regardless of which report you’re navigating from.
🛠 Where to Find It
Also applies to the drill-down view of the Stock Movement Report.
📷 See It in Action
📌 What Was Happening
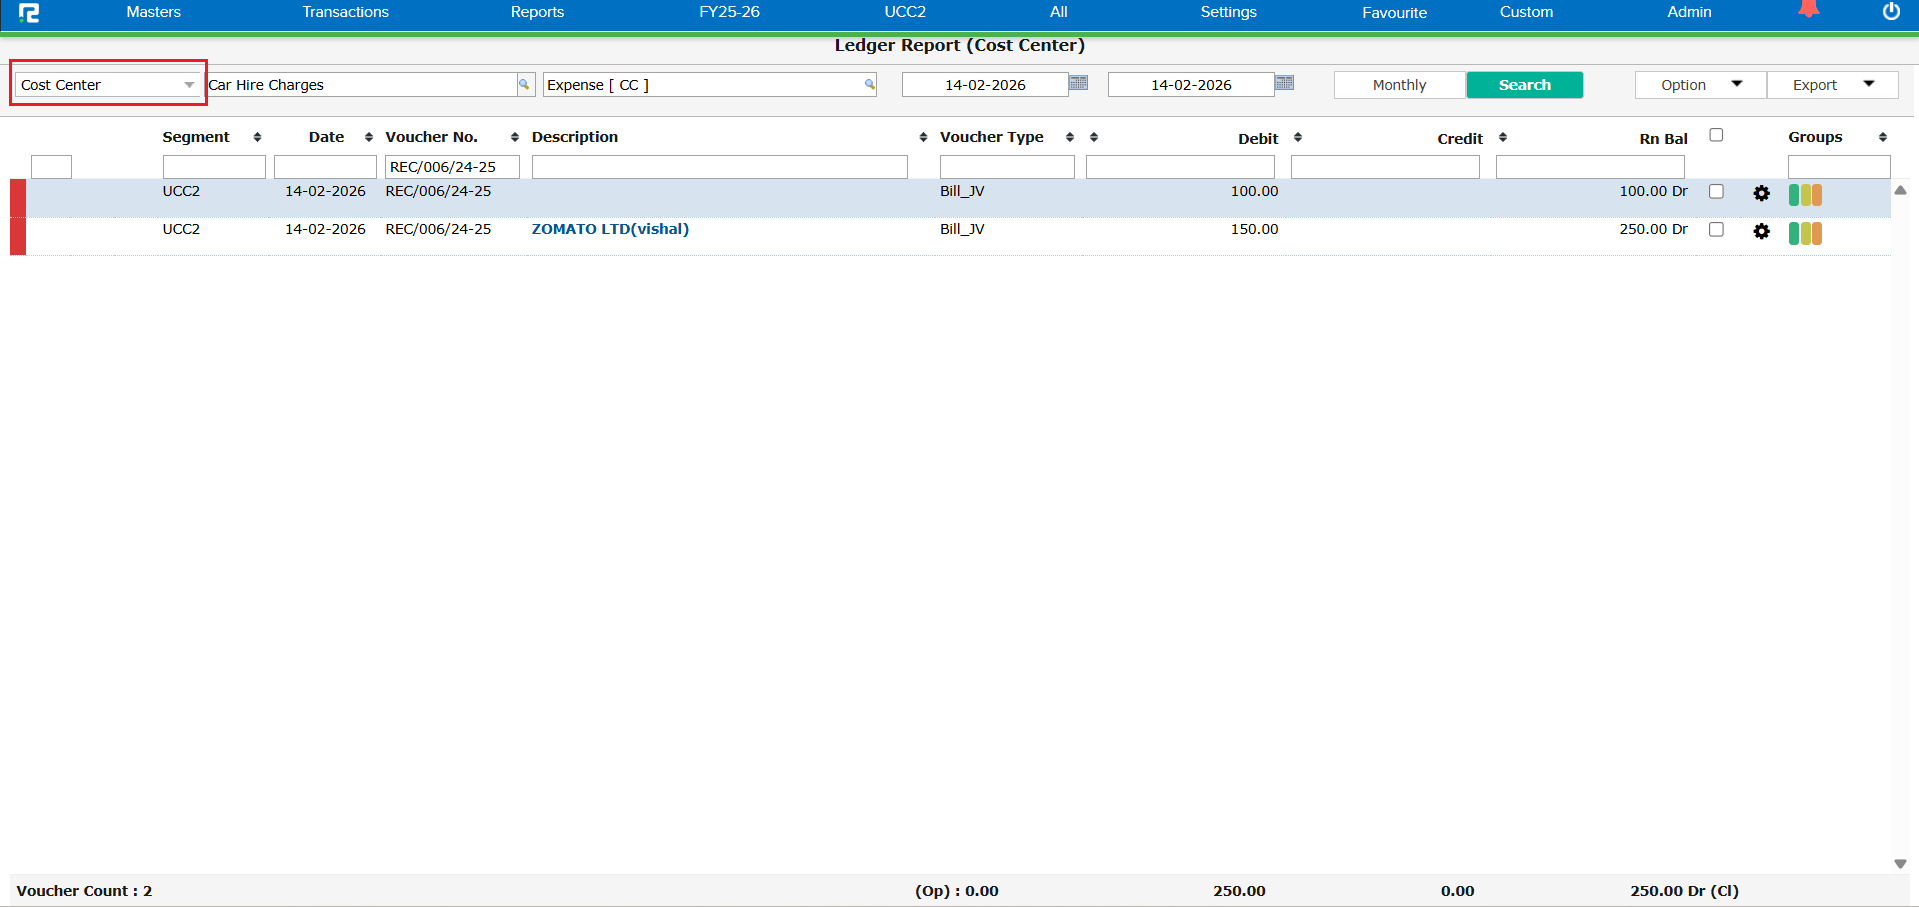
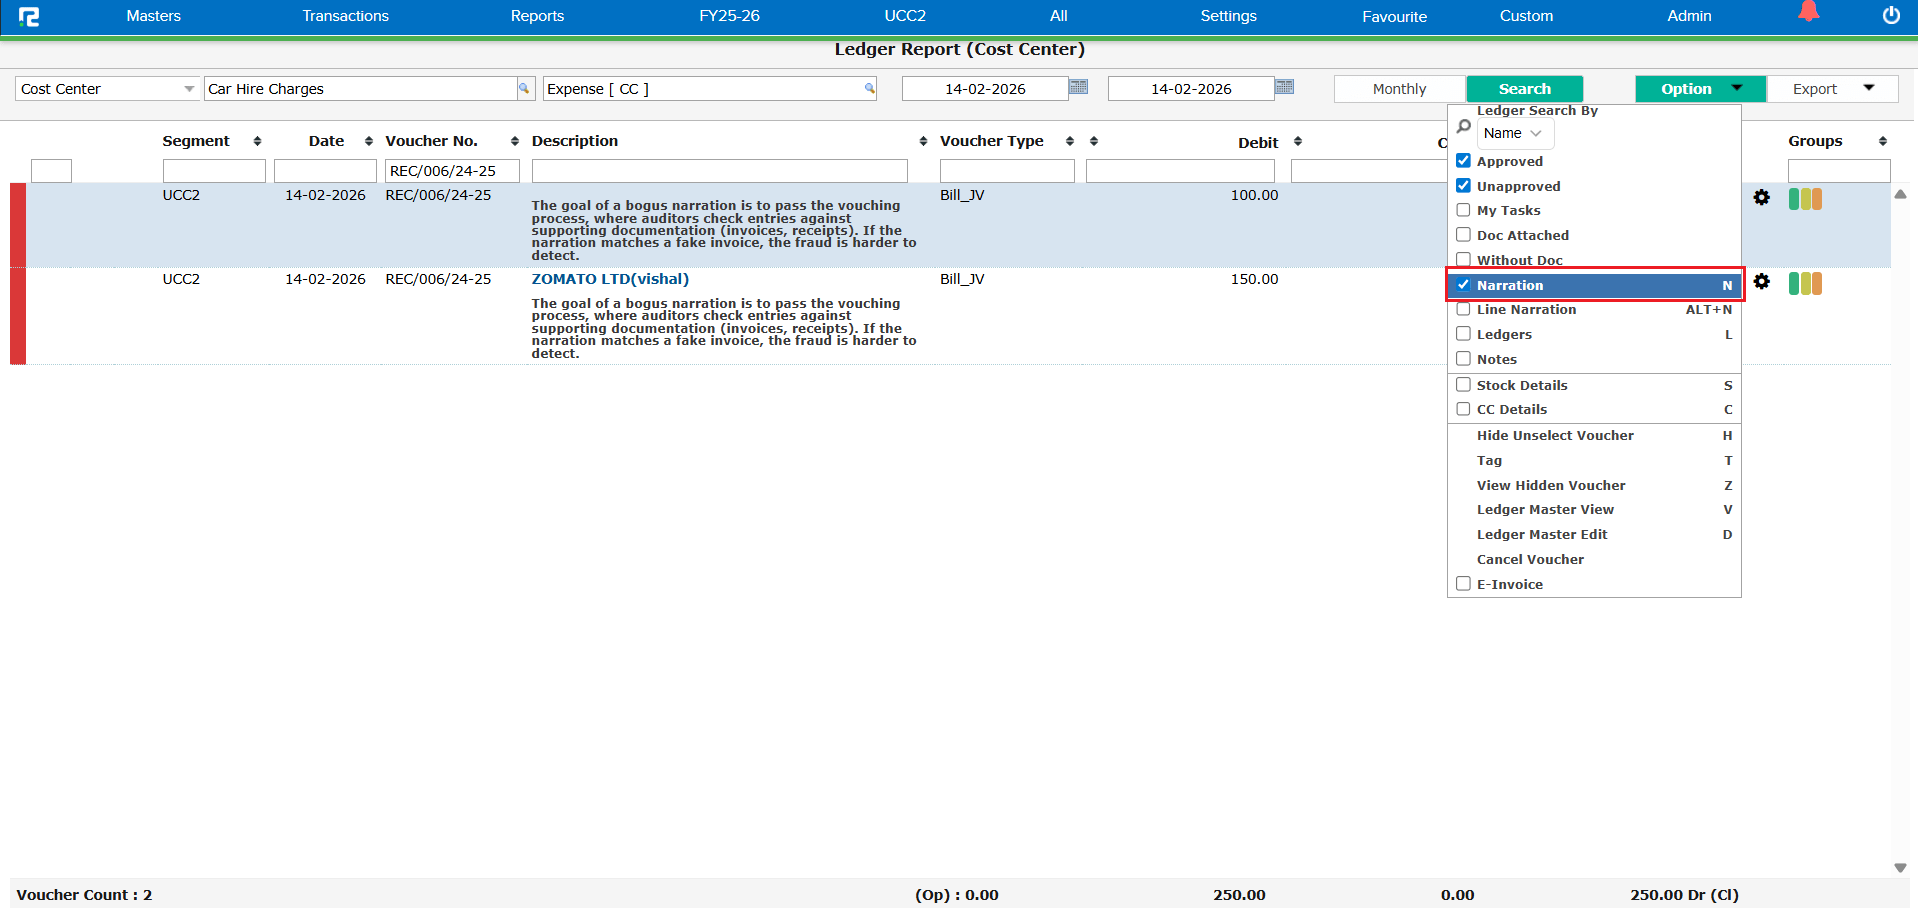
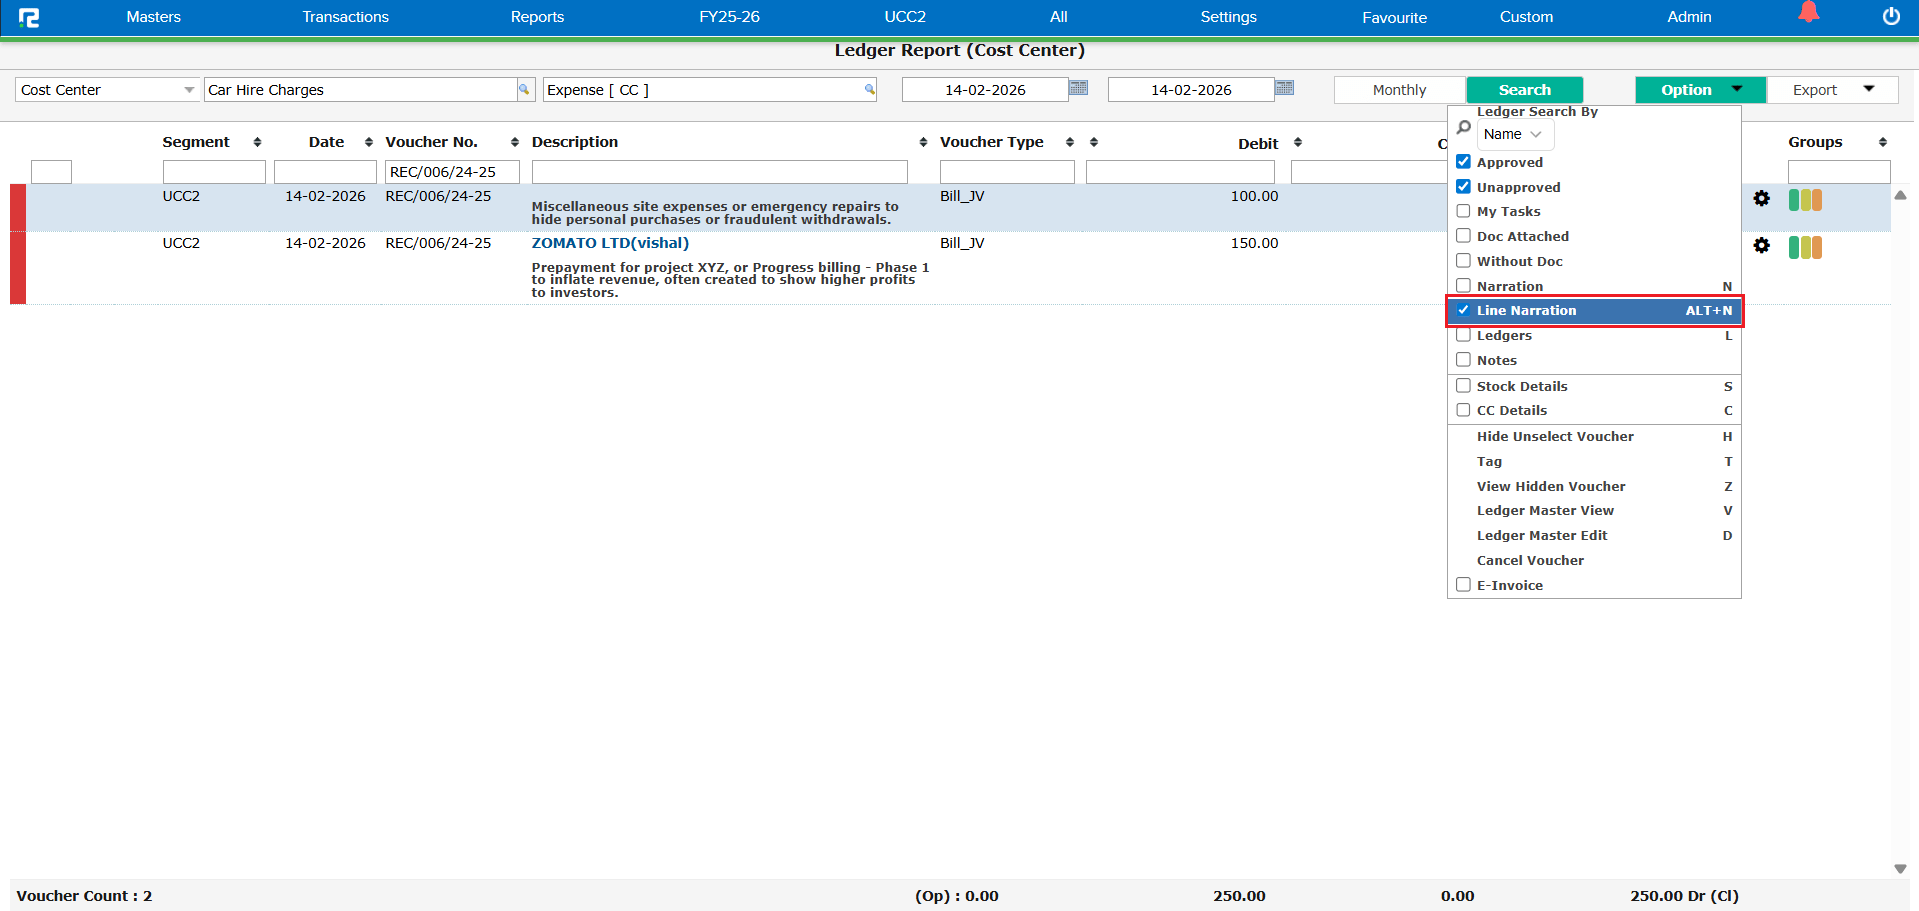
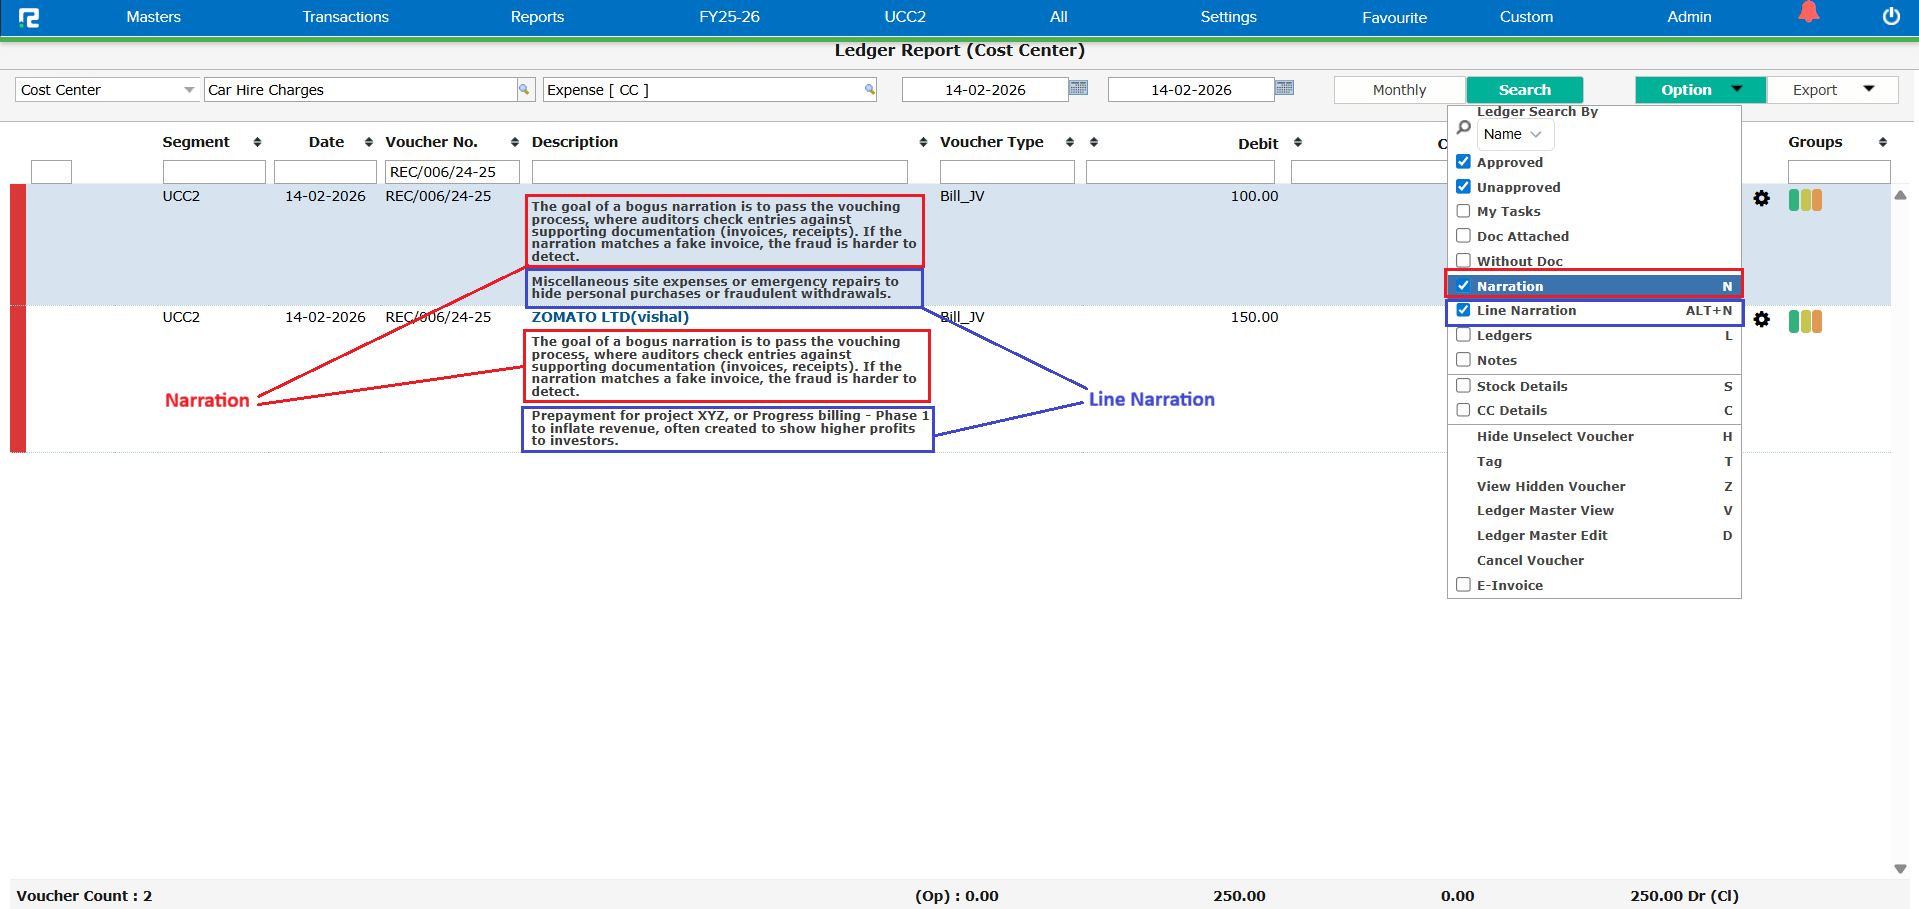
When running the Ledger Report with the Report Type set to Cost Centre, the Line Narration and Narration fields were not fetching correctly. The narrations displayed in the report did not match the actual narrations entered in the voucher entries, leading to confusion and unreliable report data.
🌟 How This Helps You
Both Line Narration and Narration now display accurately in the Cost Centre variation of the Ledger Report. You can rely on the report data for review, audit, and reconciliation without needing to cross-check each entry manually.
🛠 Where to Find It
📷 See It in Action
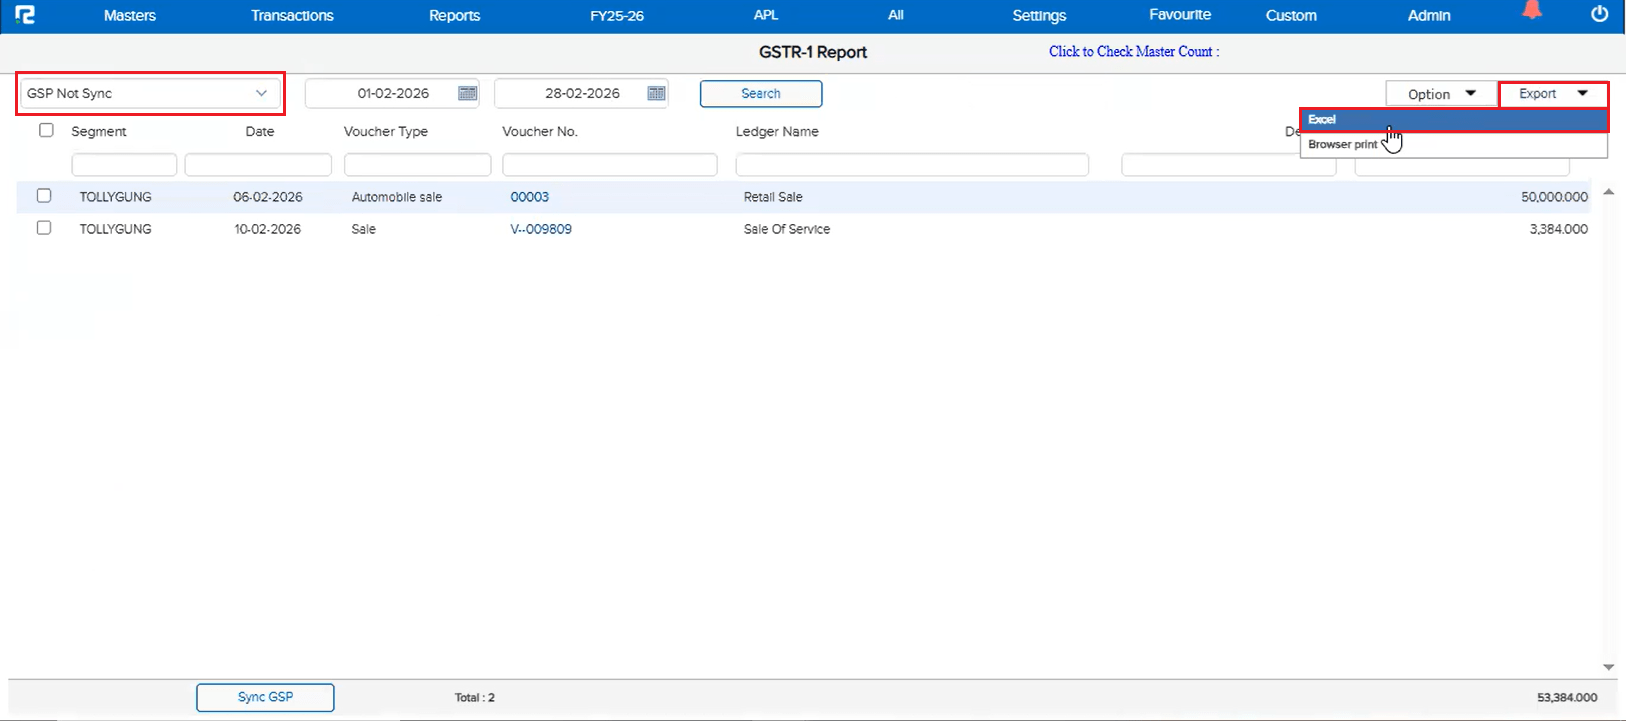
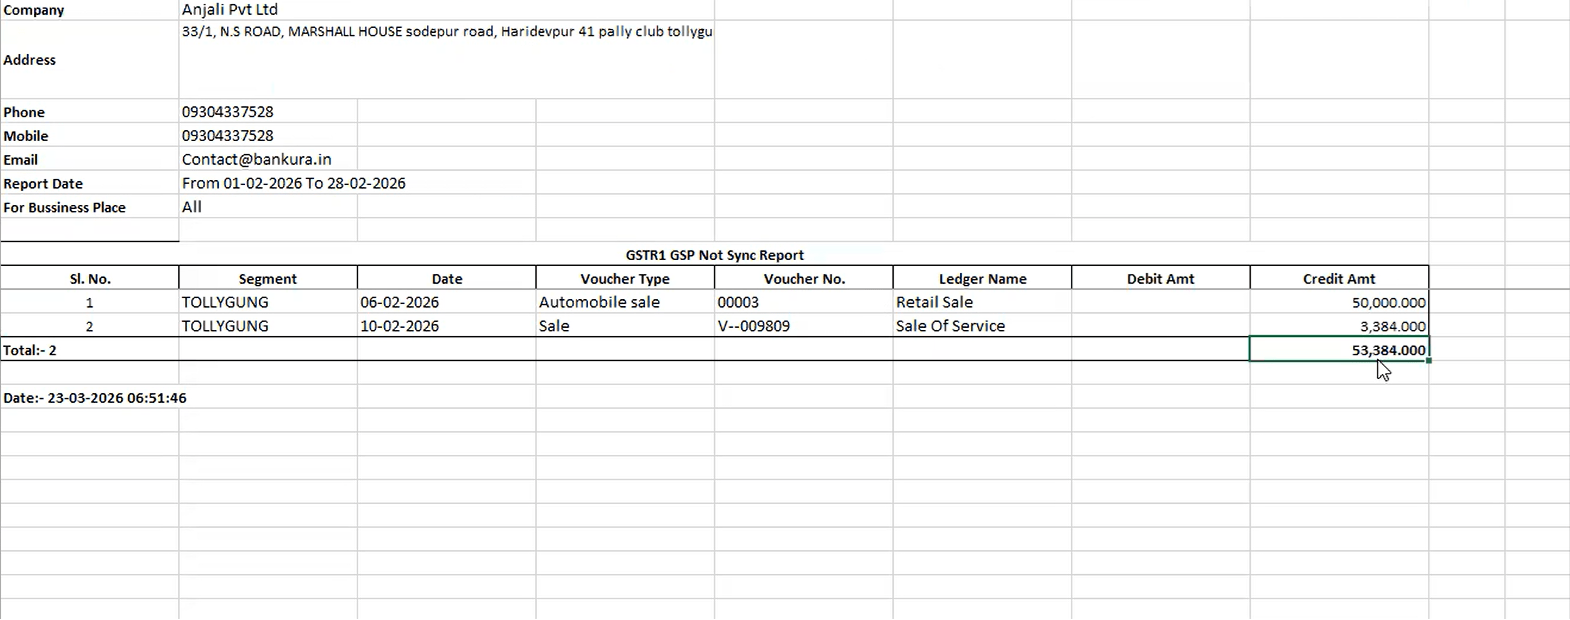
📝 What Changed
When the Excel export option is available but GSP is not synced, the exported Excel file was coming blank. This has been fixed — data now exports correctly regardless of GSP sync status.
📷 See It in Action
📝 What Changed
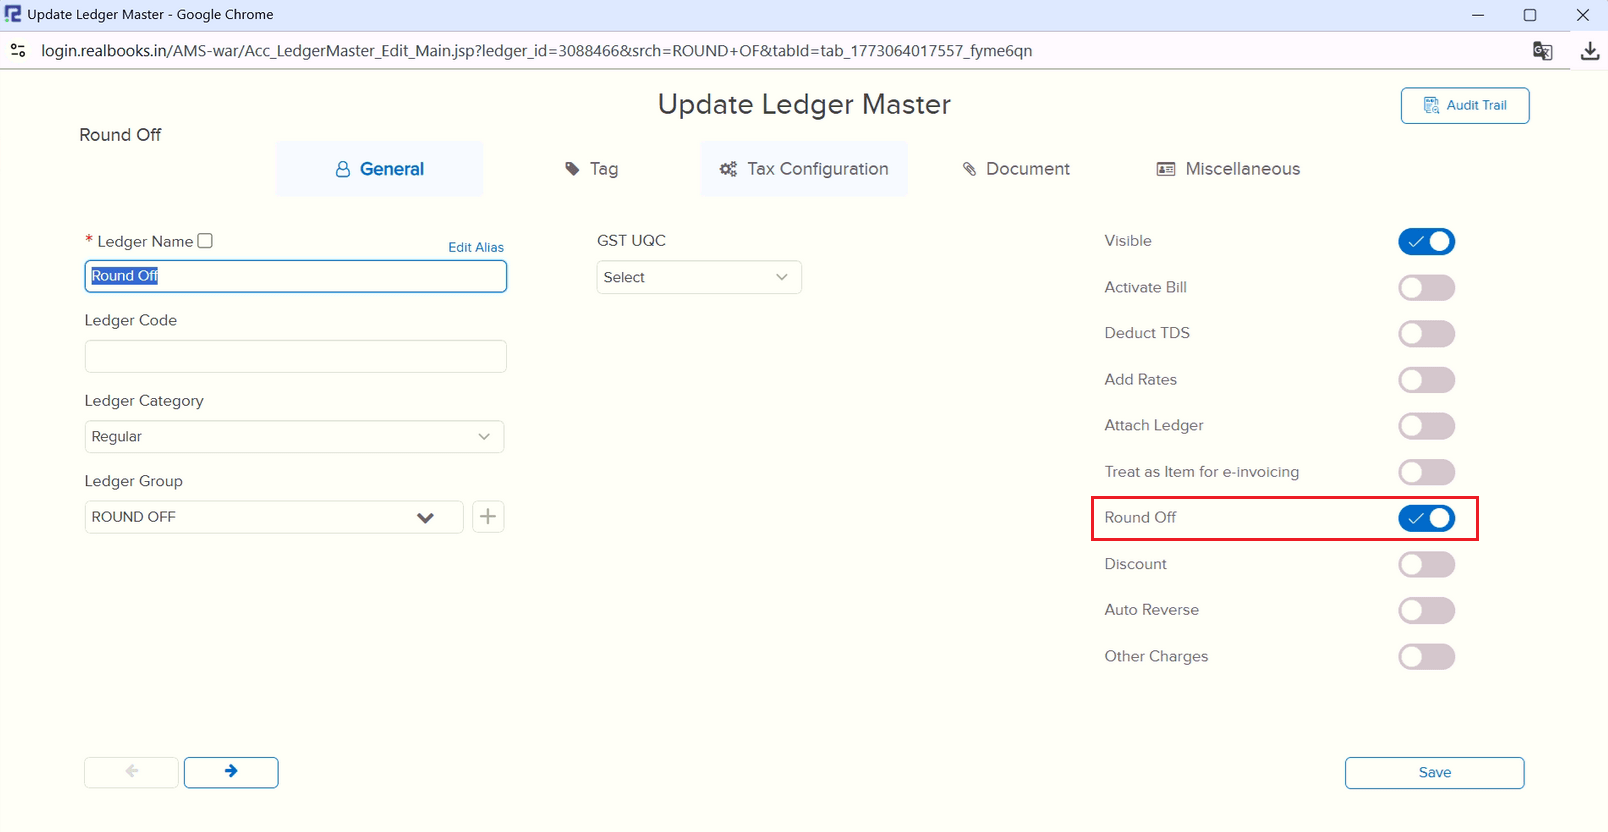
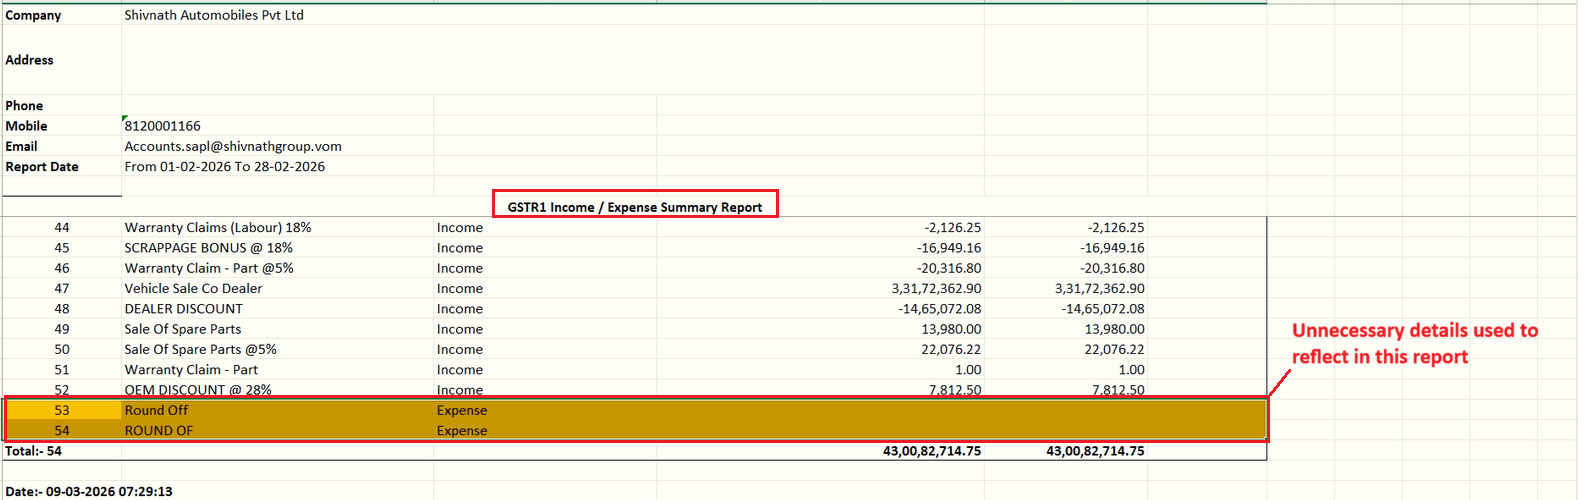
In the GSTR-1 Income / Expense Summary Report (used for reconciliation of GSTR-1 data with P/L Report), unnecessary data was reflecting. Earlier, the UI data was fetched through an API while the Excel data came from a procedure, causing data mismatches in certain cases. Now, both UI and Excel data are fetched through the API for consistency.
📷 See It in Action
📝 What Changed
Entries were not reflecting in chronological order in the Combined Excel for Return New when exported from GSTR-1 Summary, though they reflected properly in Day Book. This has been fixed — the exported Excel now maintains correct chronological order.
🎬 Where to Find It
📷 See It in Action
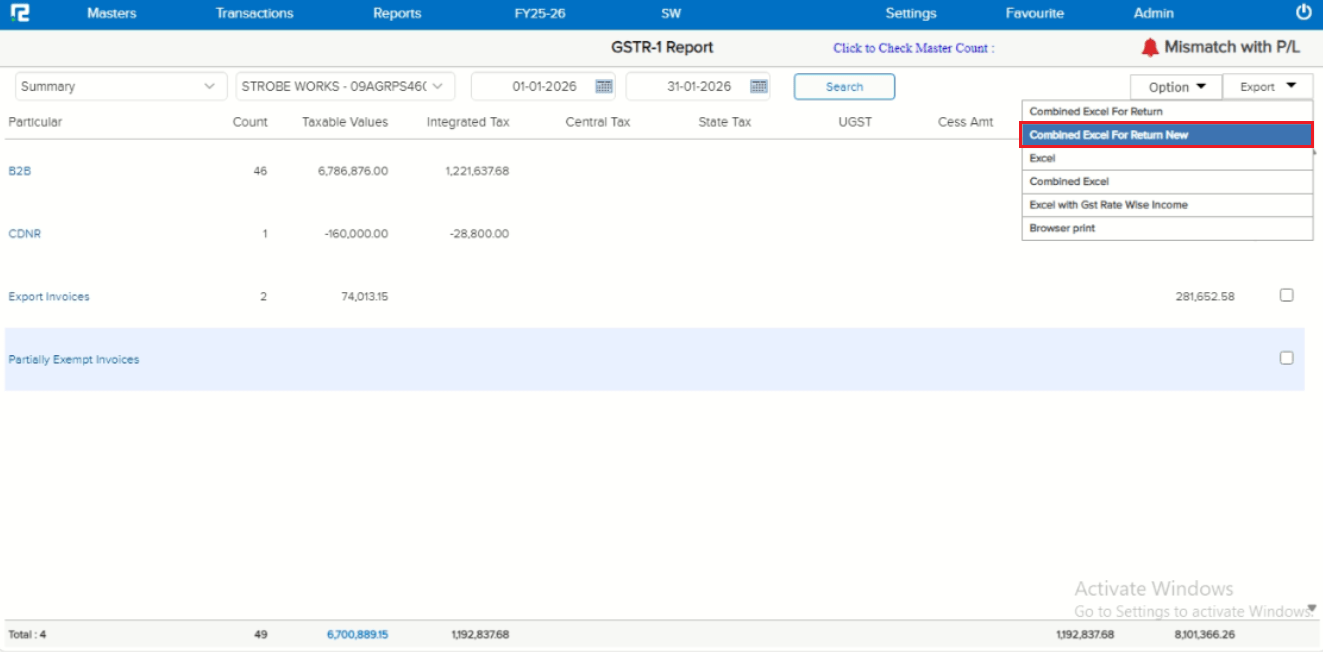
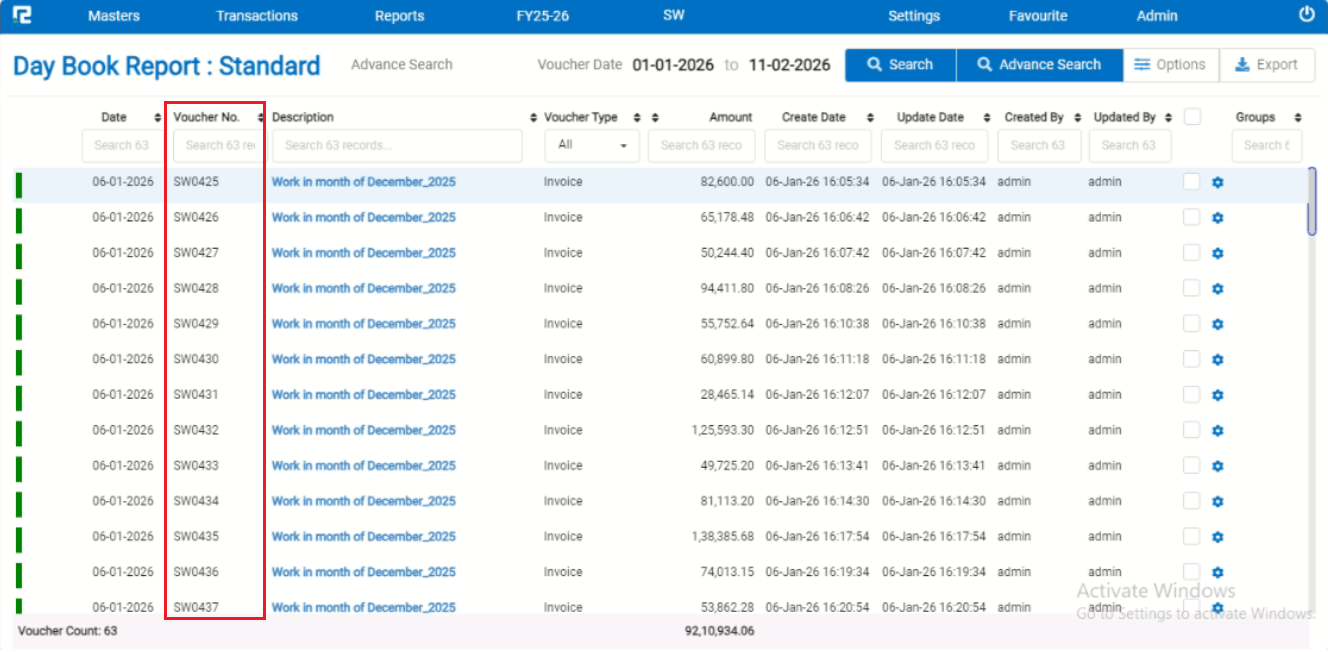
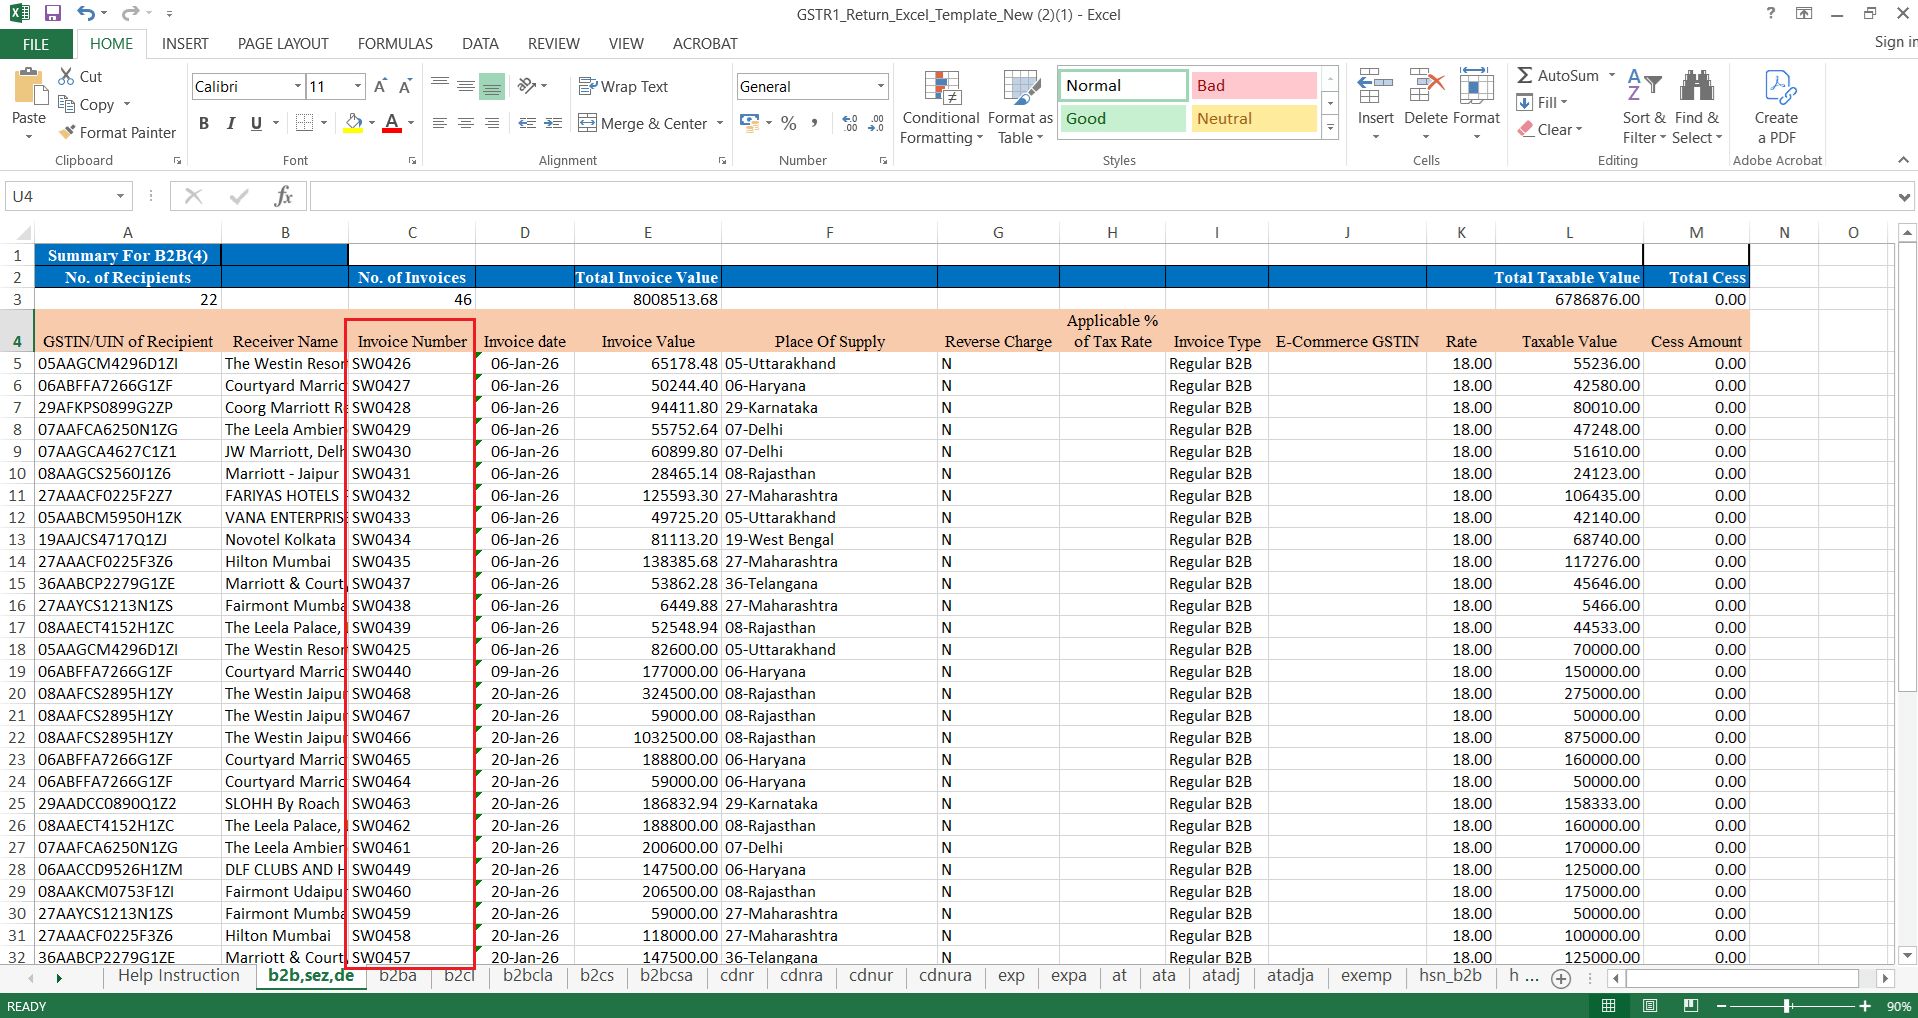
📌 What Was Happening
In the Stock Summary report, searching for a specific Item Group was not working as expected. Instead of filtering and displaying the selected item group, the system was loading all item groups in the search results — making it impossible to quickly locate and view stock data for a particular group.
🌟 How This Helps You
The Item Group search now works correctly in the Stock Summary report. You can search for and select a specific item group, and only that group’s data will be displayed — saving time and giving you accurate, focused results.
🛠 Where to Find It
📷 See It in Action
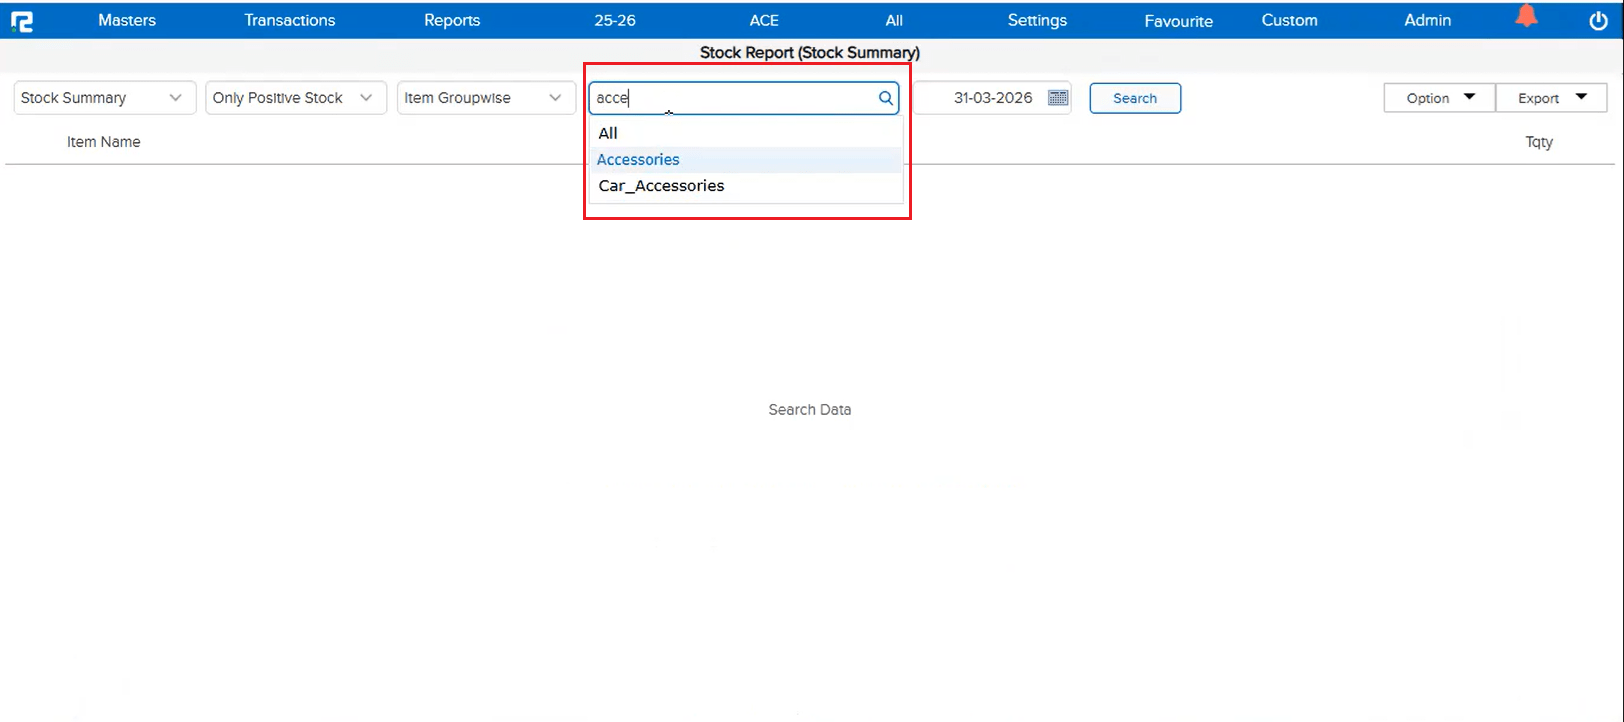
📌 What Was Happening
In the Ledger Report, when searching for a ledger, non-visible ledgers were appearing at the top of the search results. This made it difficult to find and select the active, visible ledgers quickly — as users had to scroll past irrelevant non-visible entries first.
🌟 How This Helps You
The search results now prioritize visible ledgers at the top, followed by non-visible ledgers. This applies to both the old and new Ledger Report formats — making it faster and more intuitive to find the ledger you need.
📷 See It in Action
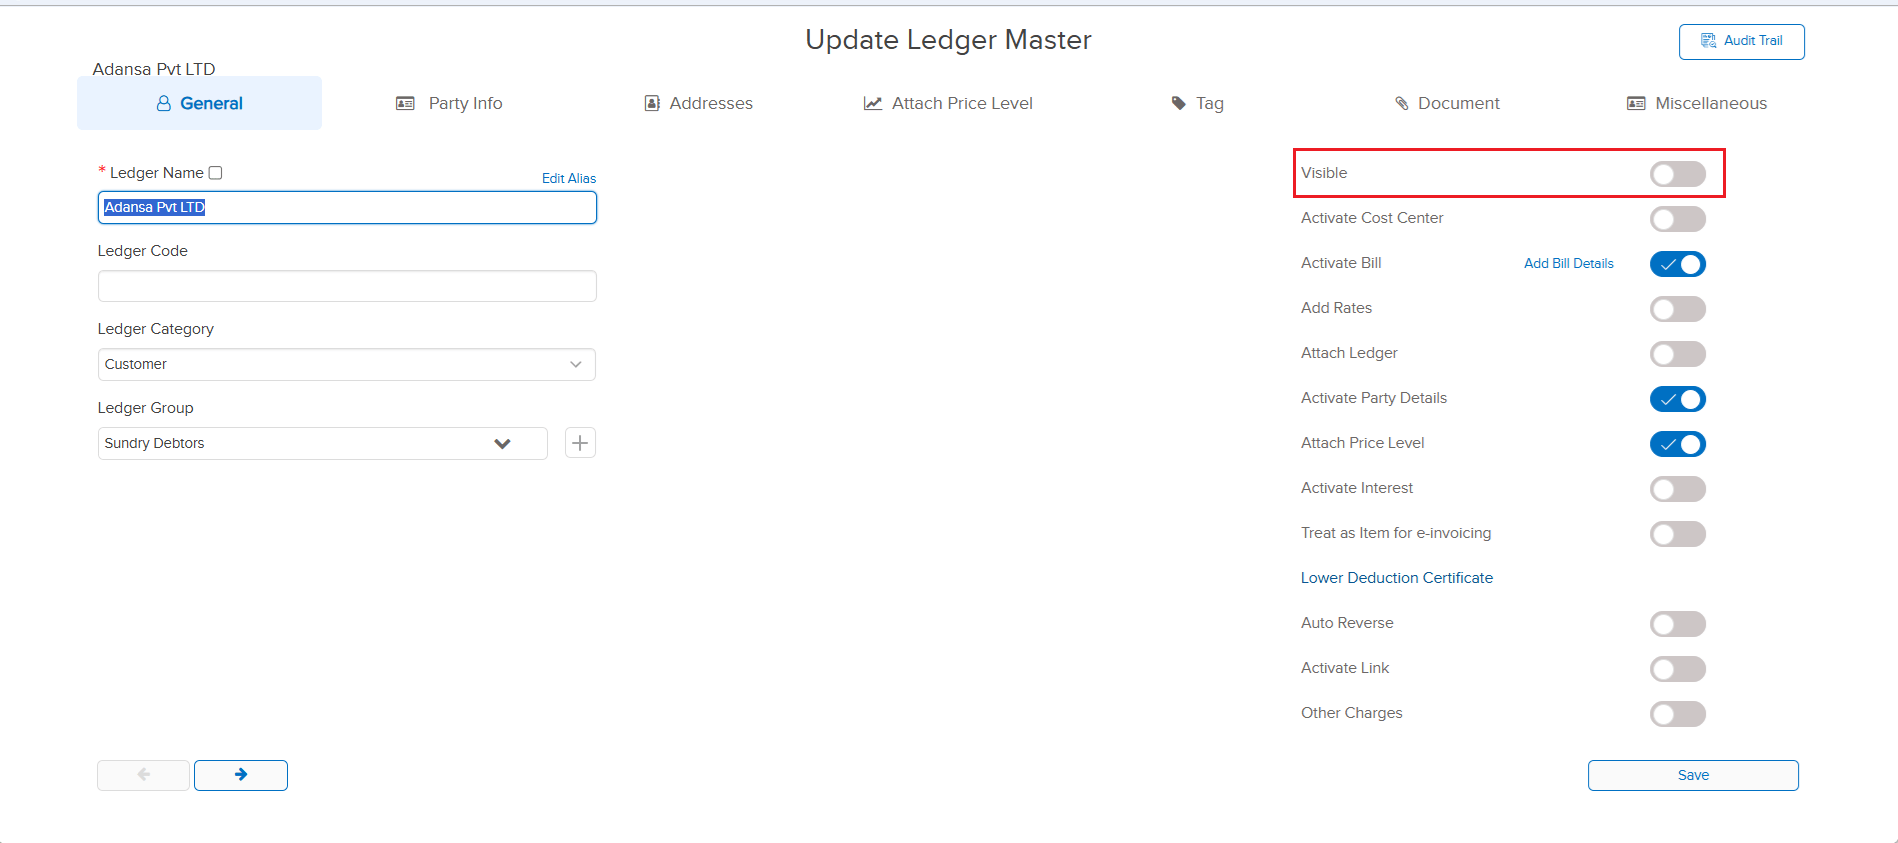
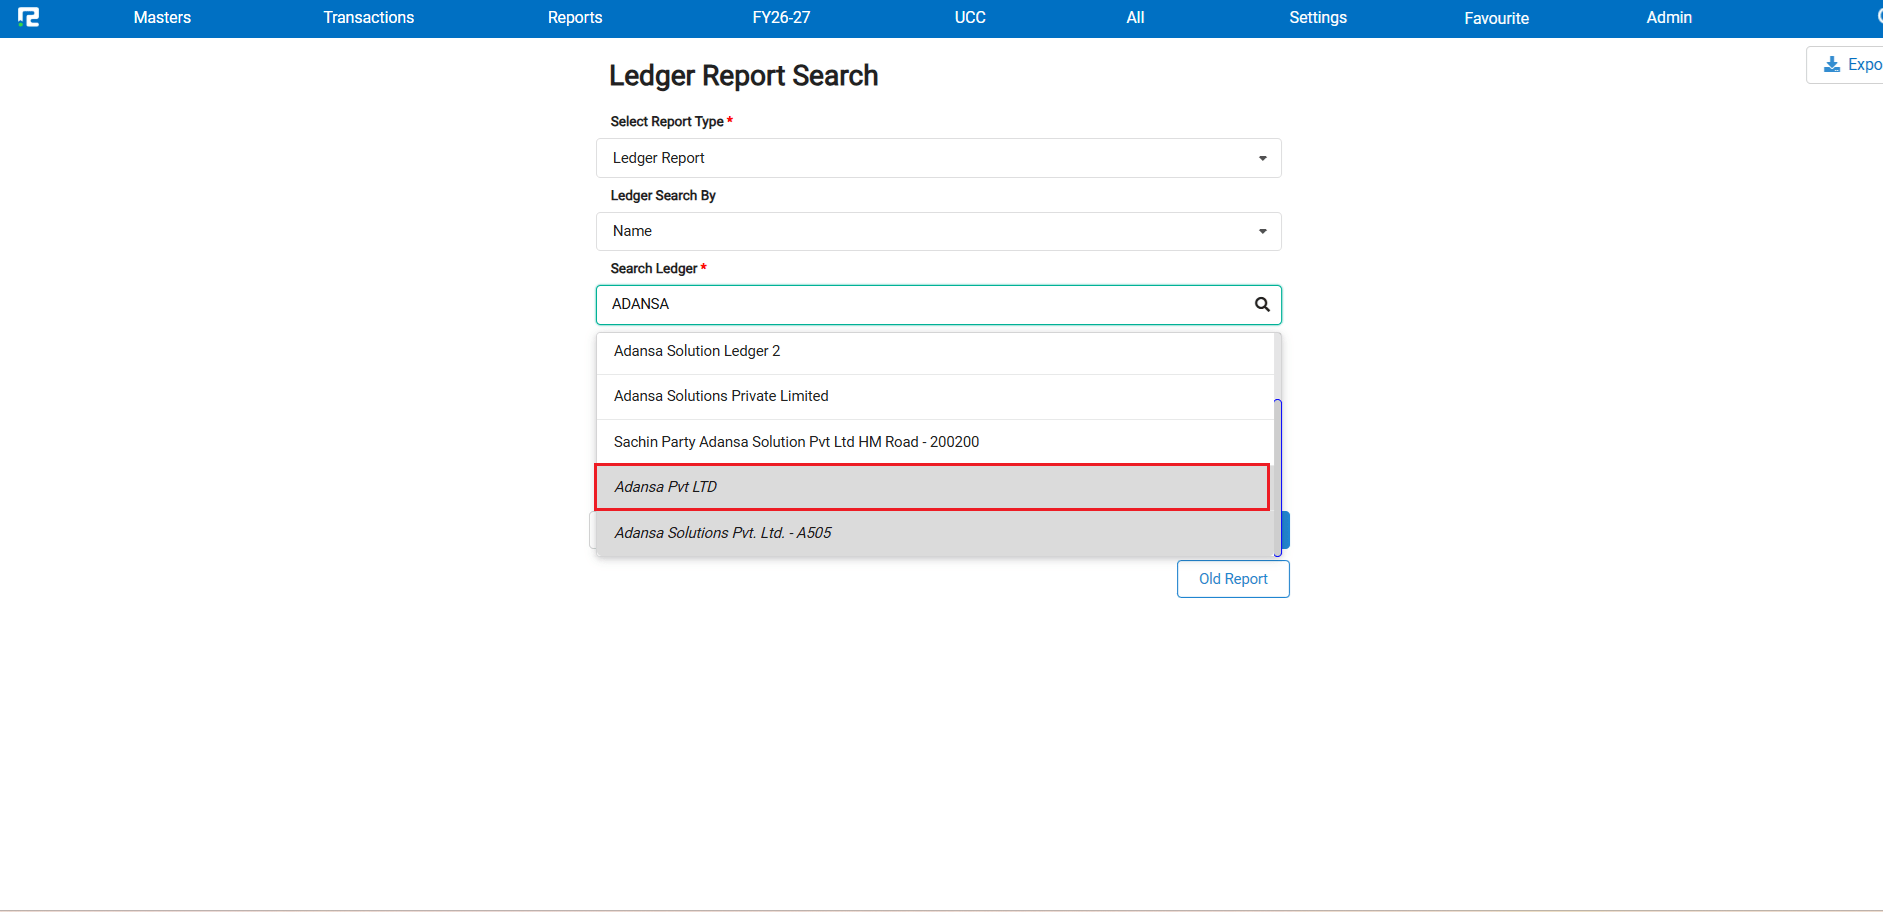
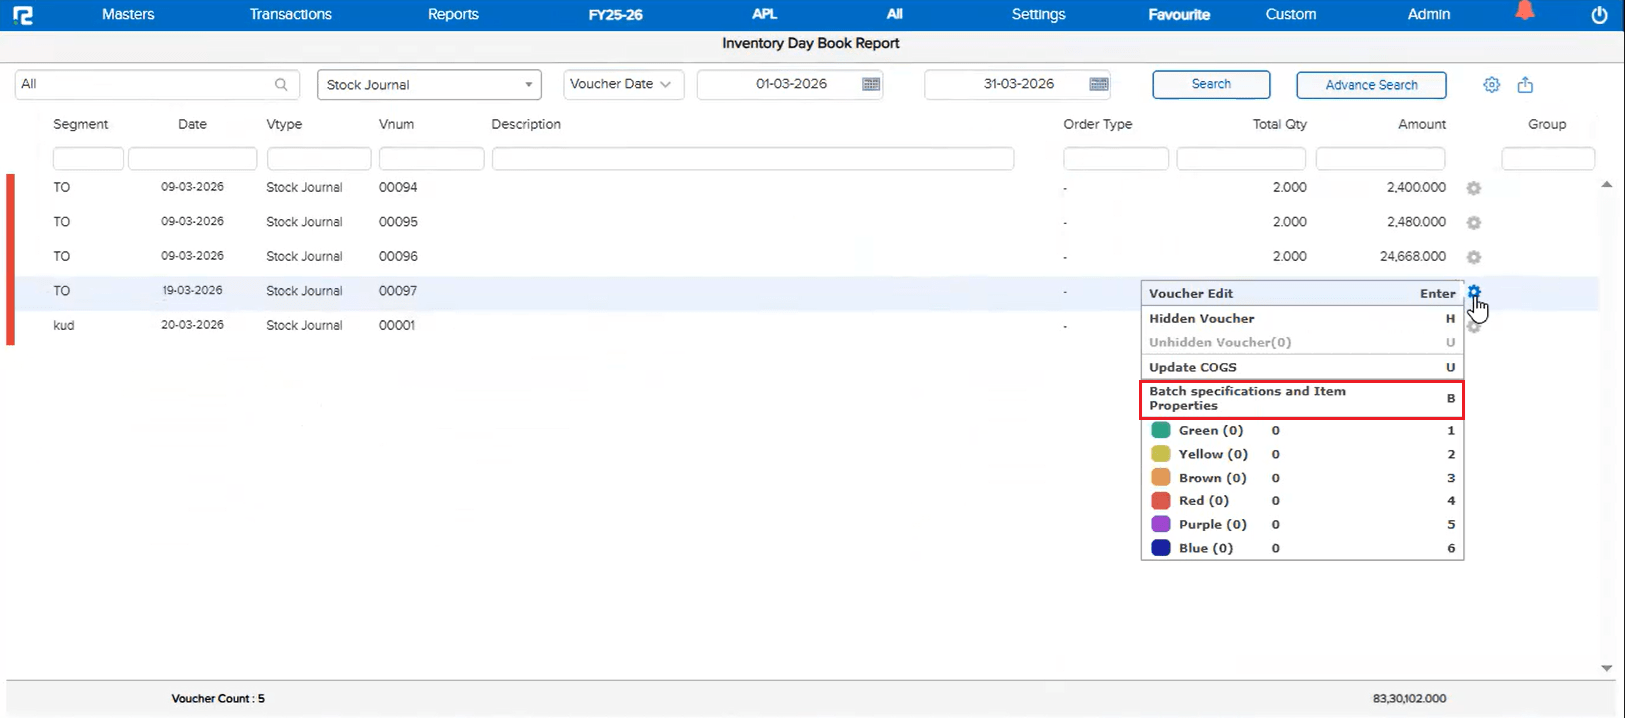
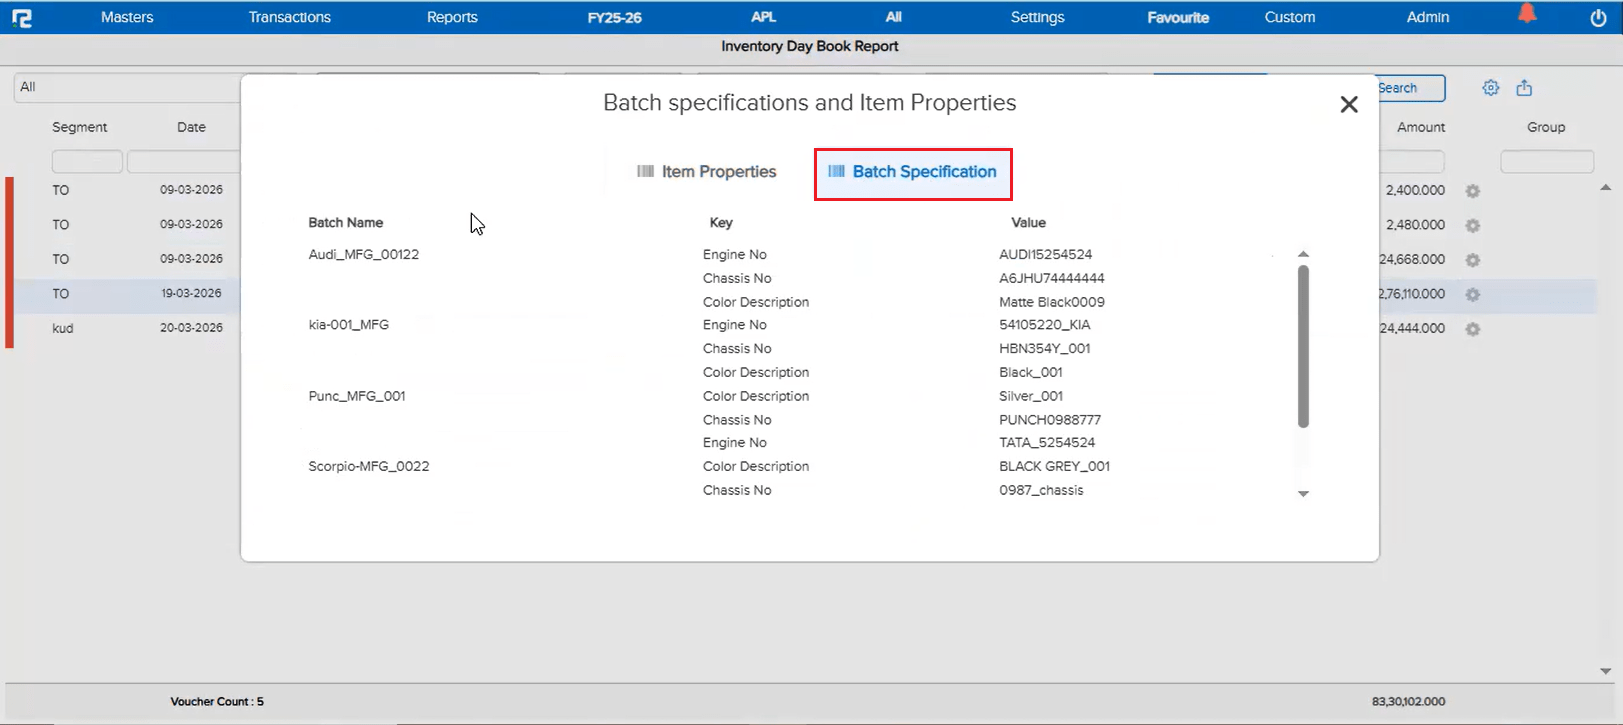
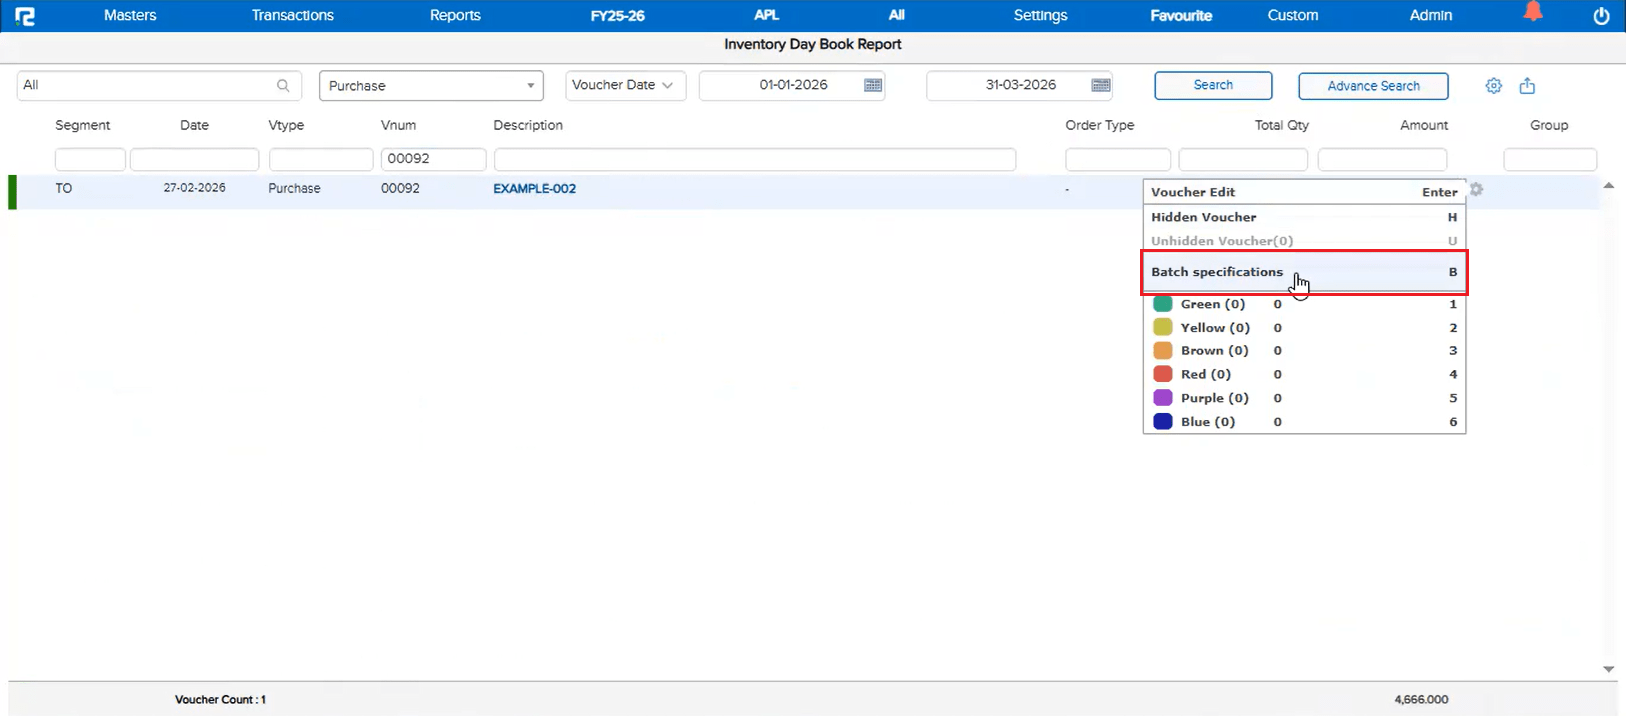
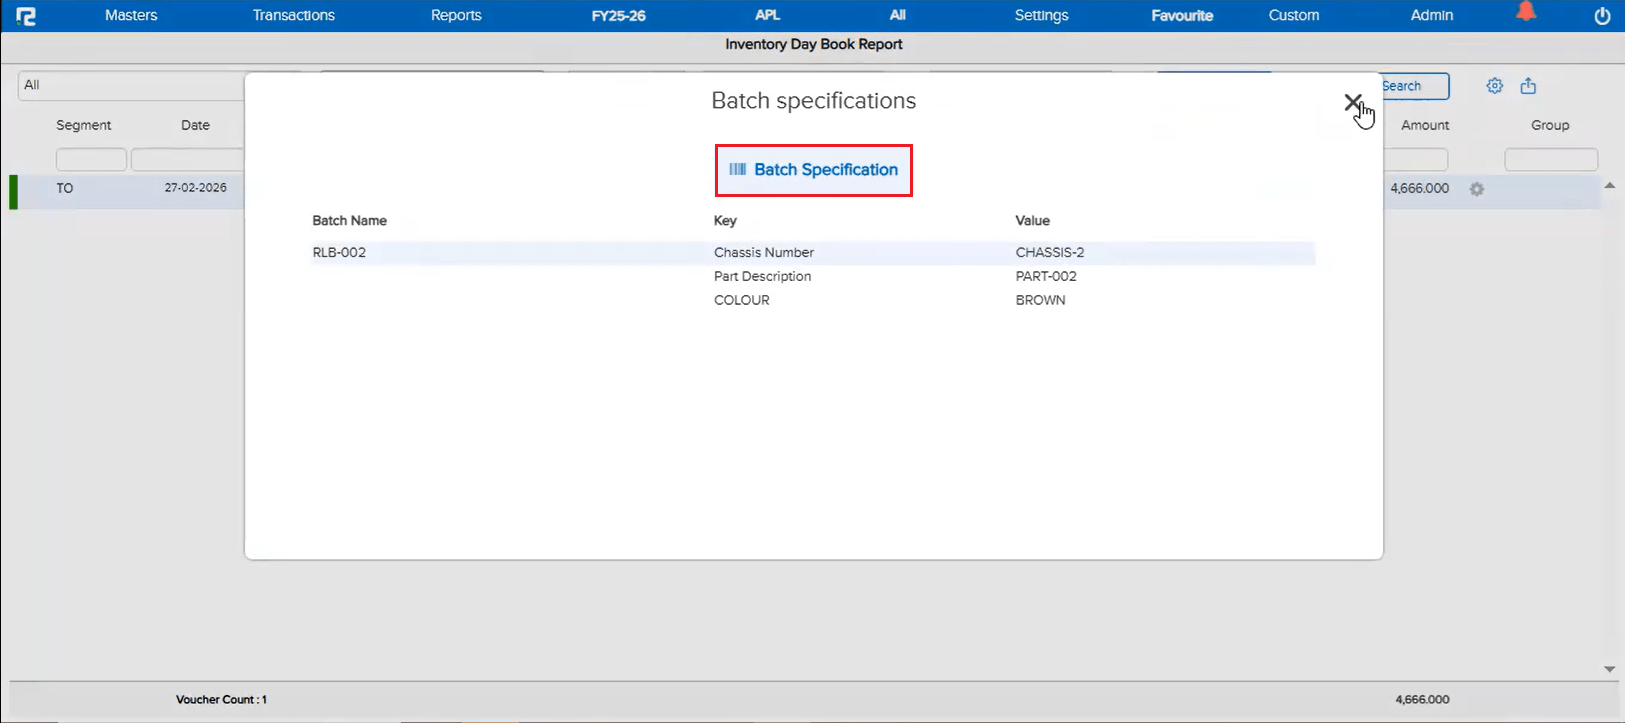
📌 What Was Happening
In the Voucher Listing report, the option to check Batch Specification was available, but the data was coming up blank. This issue occurred specifically when the Item Properties parameter was disabled in the company settings. The batch specification details were not being fetched in this scenario, even though valid batch data existed.
🌟 How This Helps You
Batch Specification data now displays correctly in the Voucher Listing report regardless of whether the Item Properties parameter is enabled or disabled. You can reliably view batch details without needing to change any company-level settings.
📷 See It in Action
📌 What Was Happening
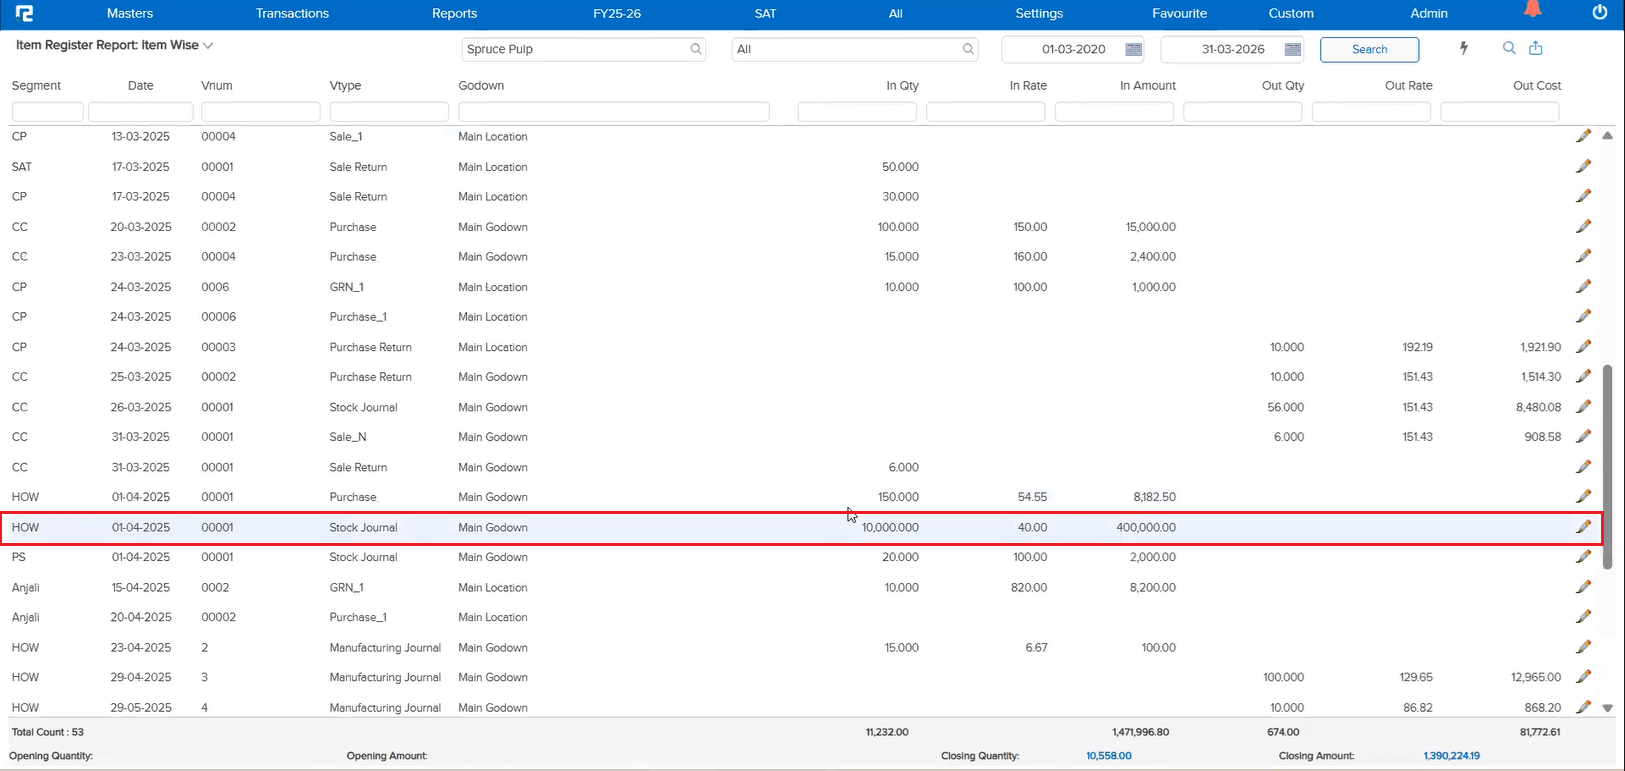
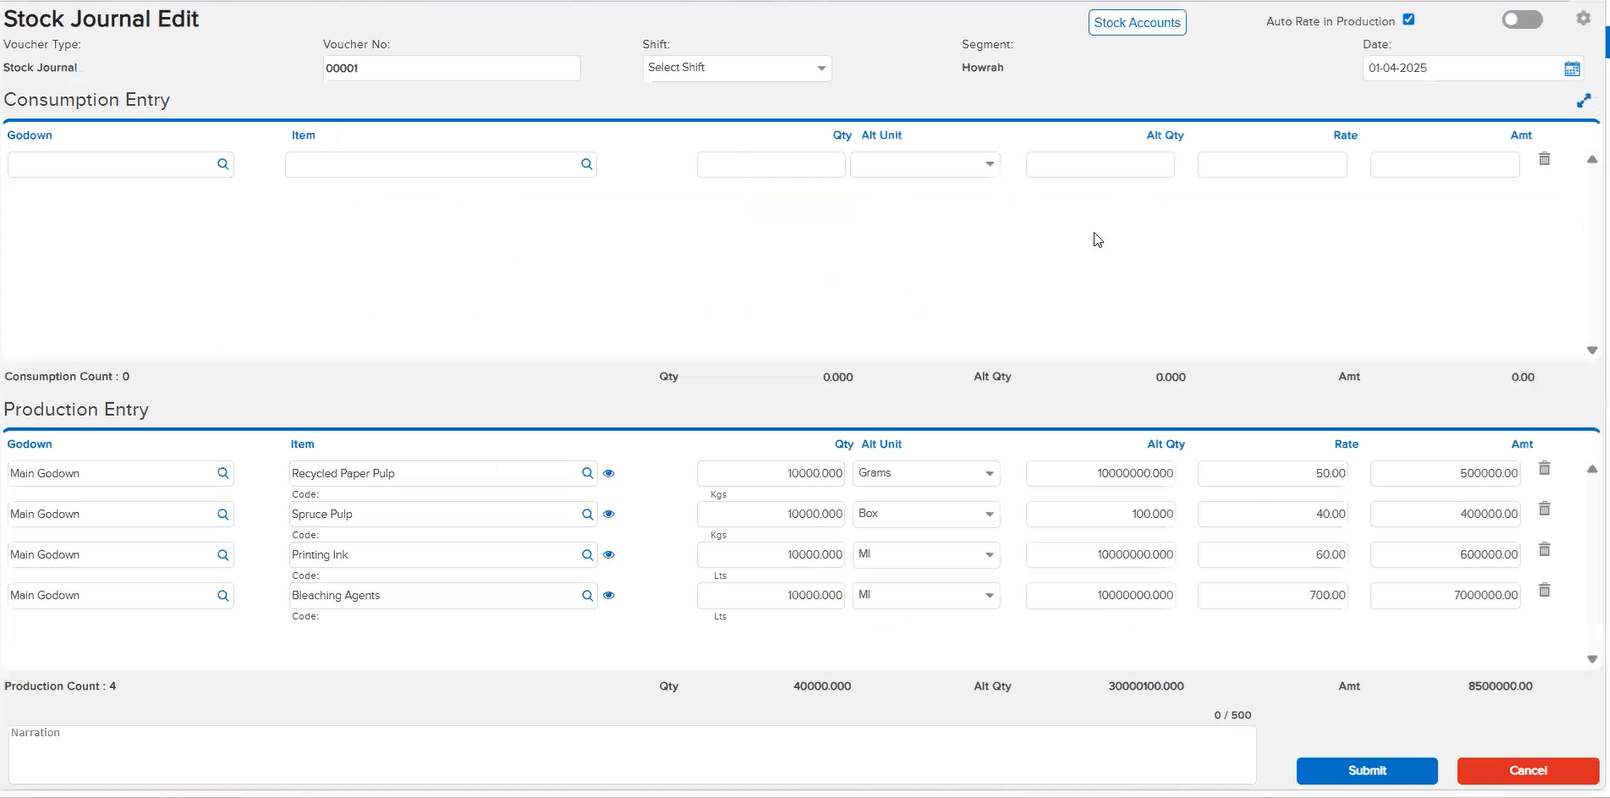
In the Item Register report, when editing any Stock Journal entry, a Purchase entry from the row above was incorrectly opening instead of the selected Stock Journal transaction. This caused confusion and made it impossible to edit Stock Journal entries directly from the Item Register.
🌟 How This Helps You
The issue has been corrected. Editing a Stock Journal entry from the Item Register now correctly opens the selected Stock Journal transaction — no longer loading an unrelated Purchase entry. You can reliably edit Stock Journal entries directly from the report without any workaround.
🛠 Where to Find It
📷 See It in Action
📌 What Was Happening
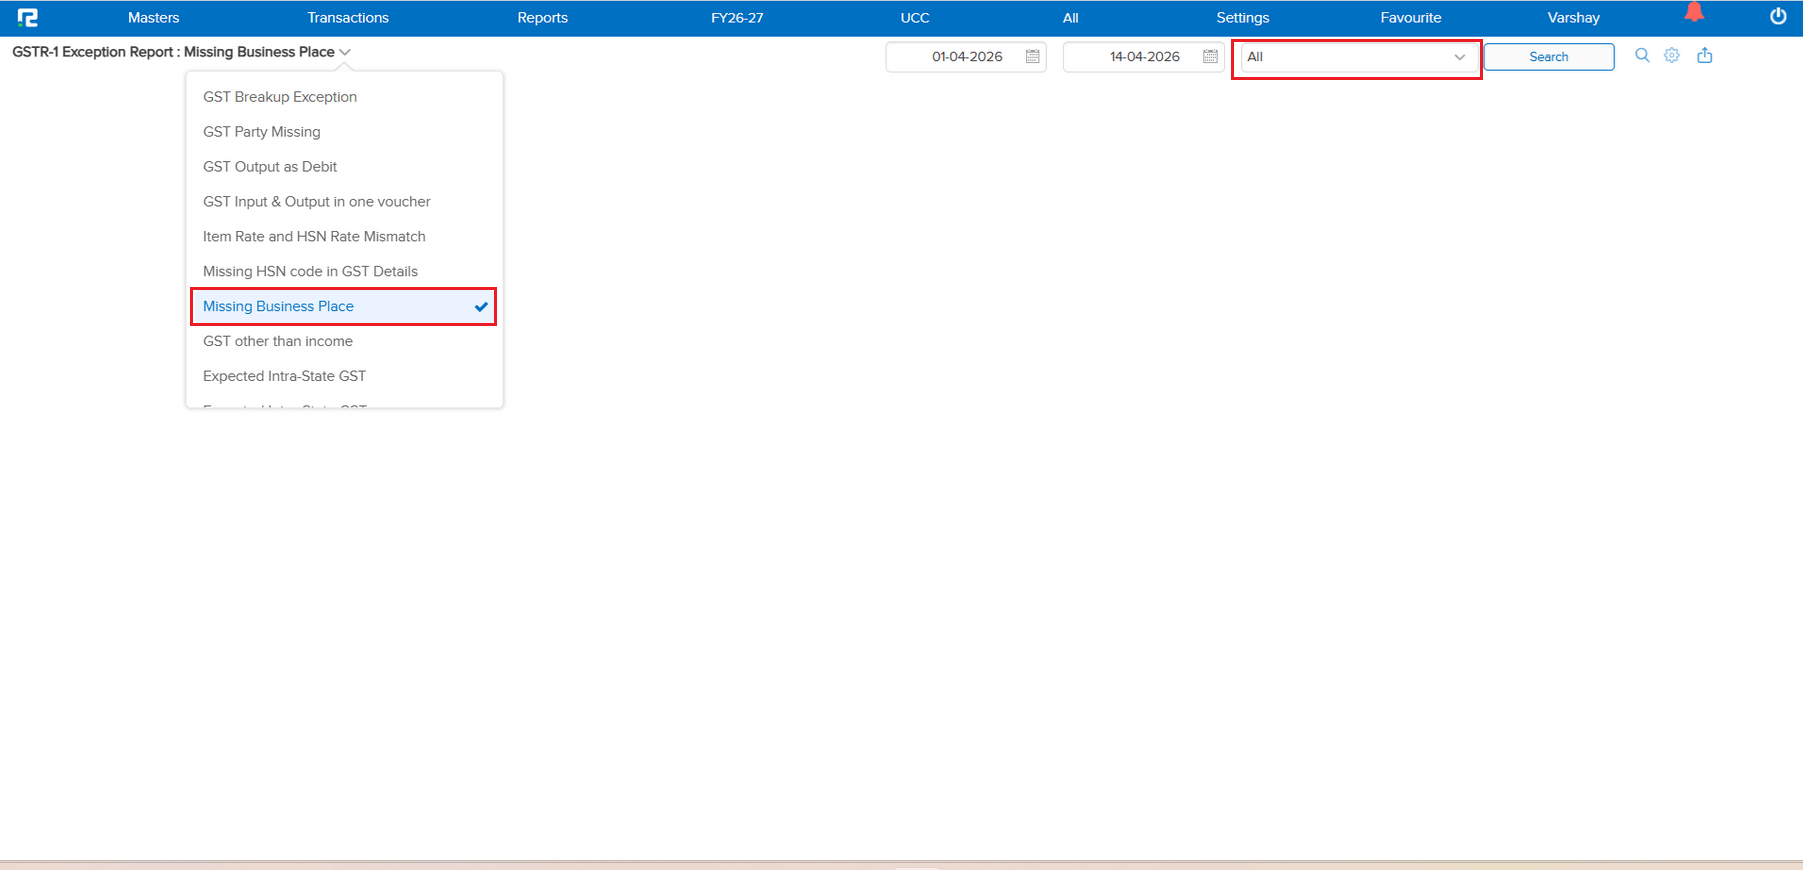
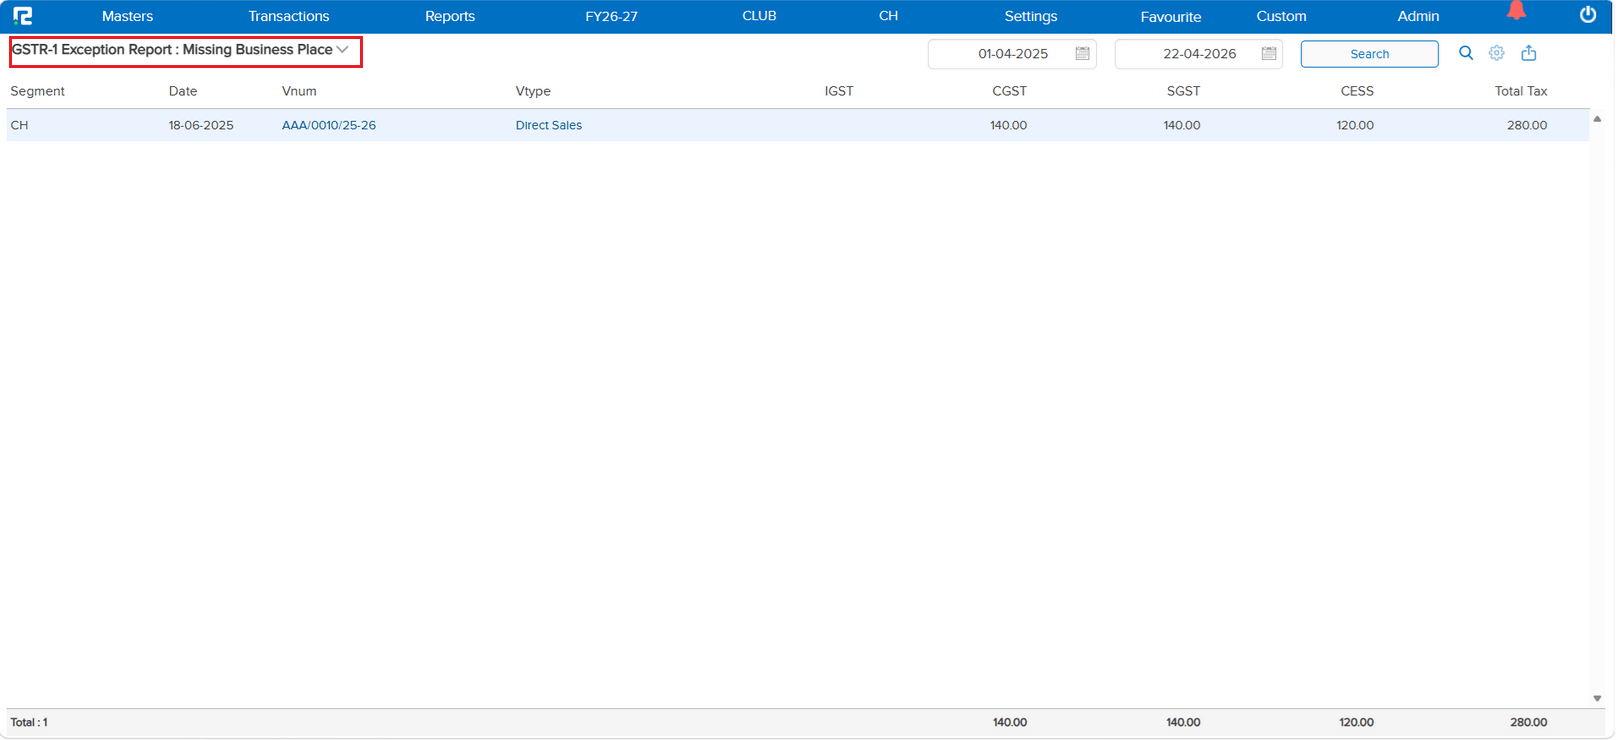
In the GSTR-1 Exception Report for missing Business Place, the Business Place selection option was available, which was unnecessary and caused confusion. Since this exception specifically lists vouchers with missing BP data, having a BP filter in this context was redundant and misleading.
🌟 How This Helps You
The Business Place selection has been removed from the GSTR-1 Exception report for missing Business Place. This simplifies the exception view and removes the unnecessary filter — allowing you to directly see all vouchers with missing BP data without confusion.
🛠 Where to Find It
📷 See It in Action
📌 What Was Happening
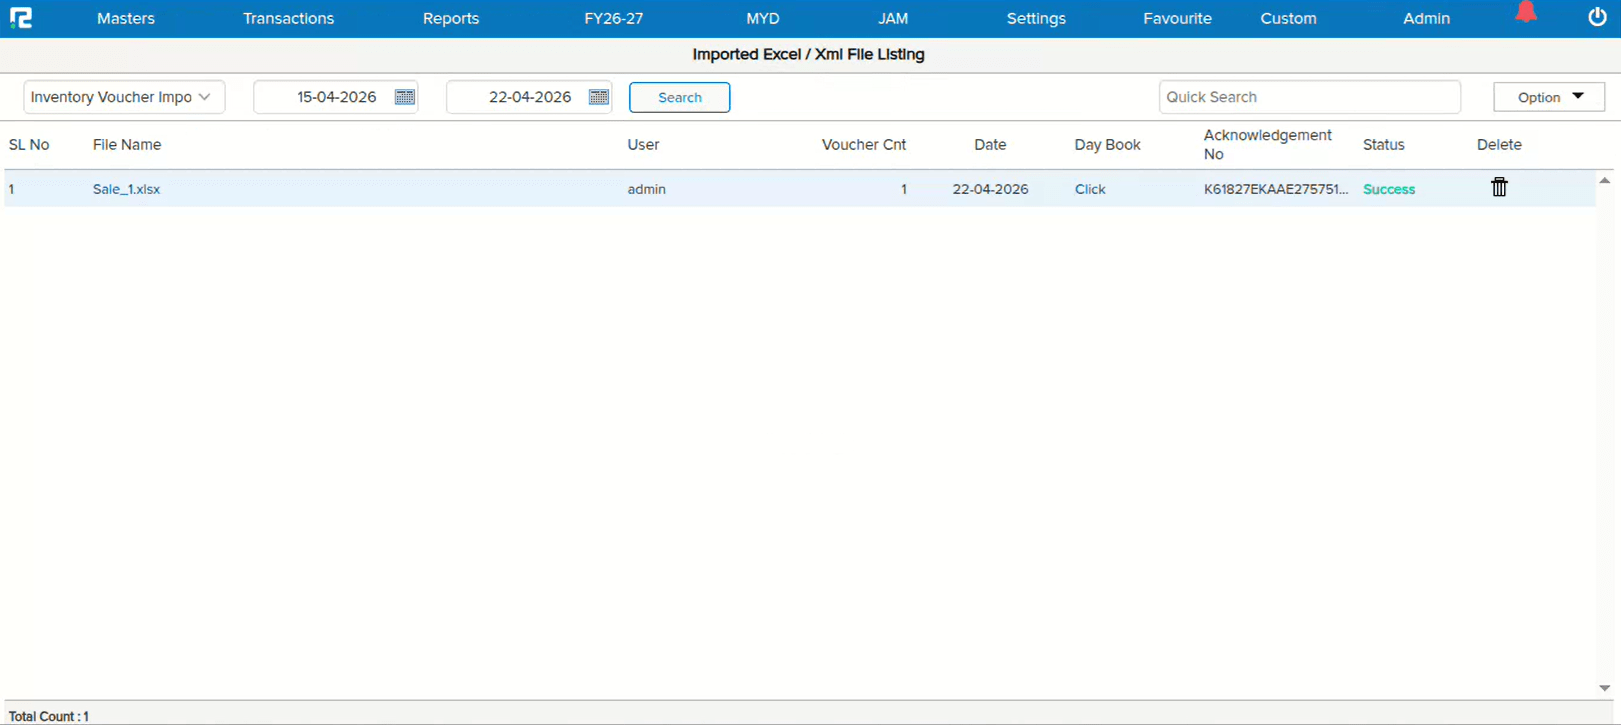
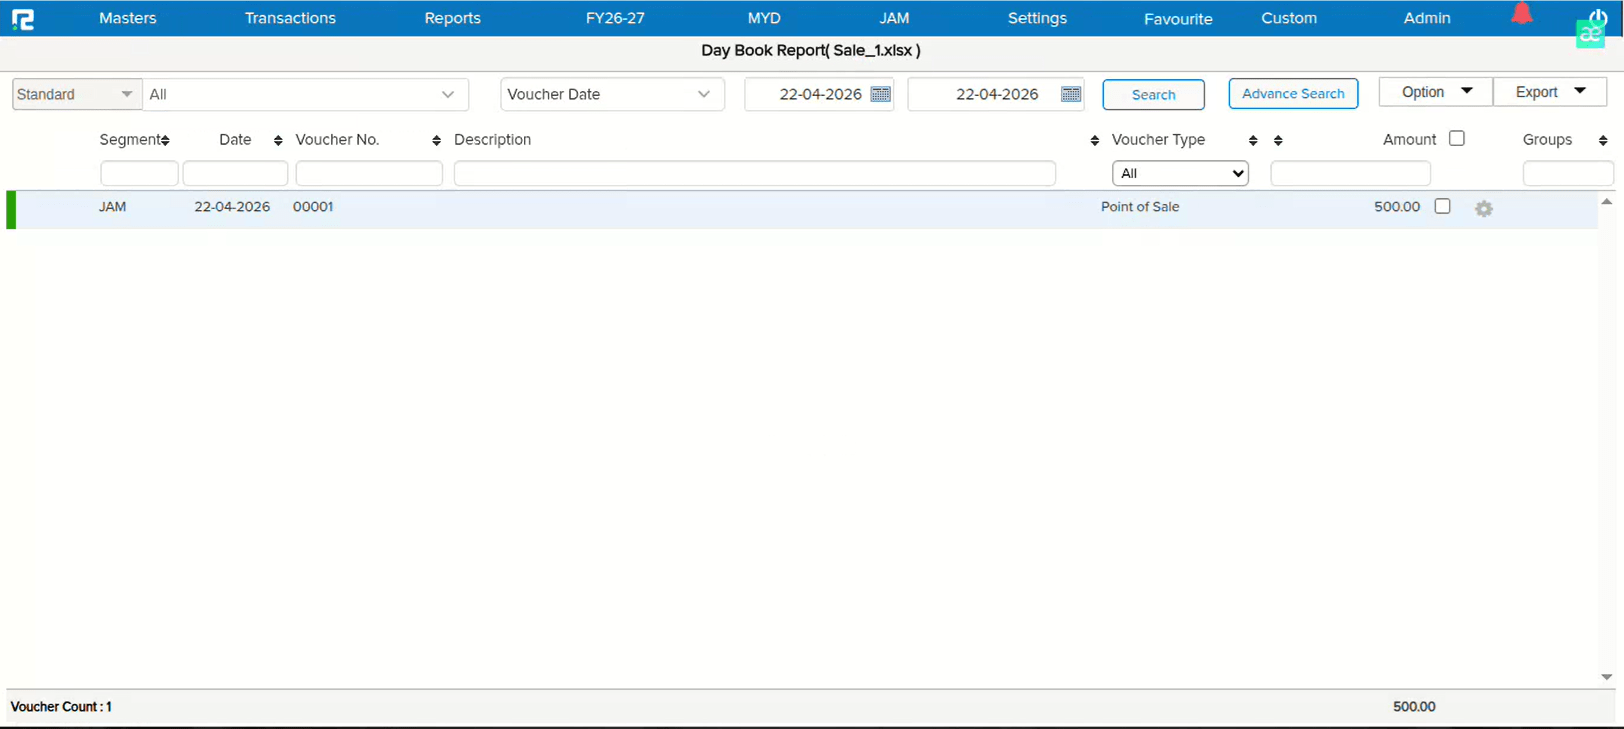
The Voucher Count was reflecting incorrectly in the Import List, and the Click option under DayBook was not working for successfully uploaded files. This issue occurred in companies where no one had run the Old Report and the voucher types remained unchecked in the menu. In this scenario, clicking the “Click” icon from the Import List would open the Day Book but display the message: “Please select any voucher type” instead of opening the specific entry.
🌟 How This Helps You
The voucher count now reflects correctly in the Import List, and the Click option properly opens the specific entry in DayBook for successfully uploaded files — regardless of whether the Old Report has been run or voucher types are checked in the menu. This ensures consistent behavior across all companies under the same domain.
📷 See It in Action