Point of sale is a setup that fast-tracks the invoicing process, allowing faster checkout from the billing sections. This setup is very popular in the retail sector.
How to Enable POS
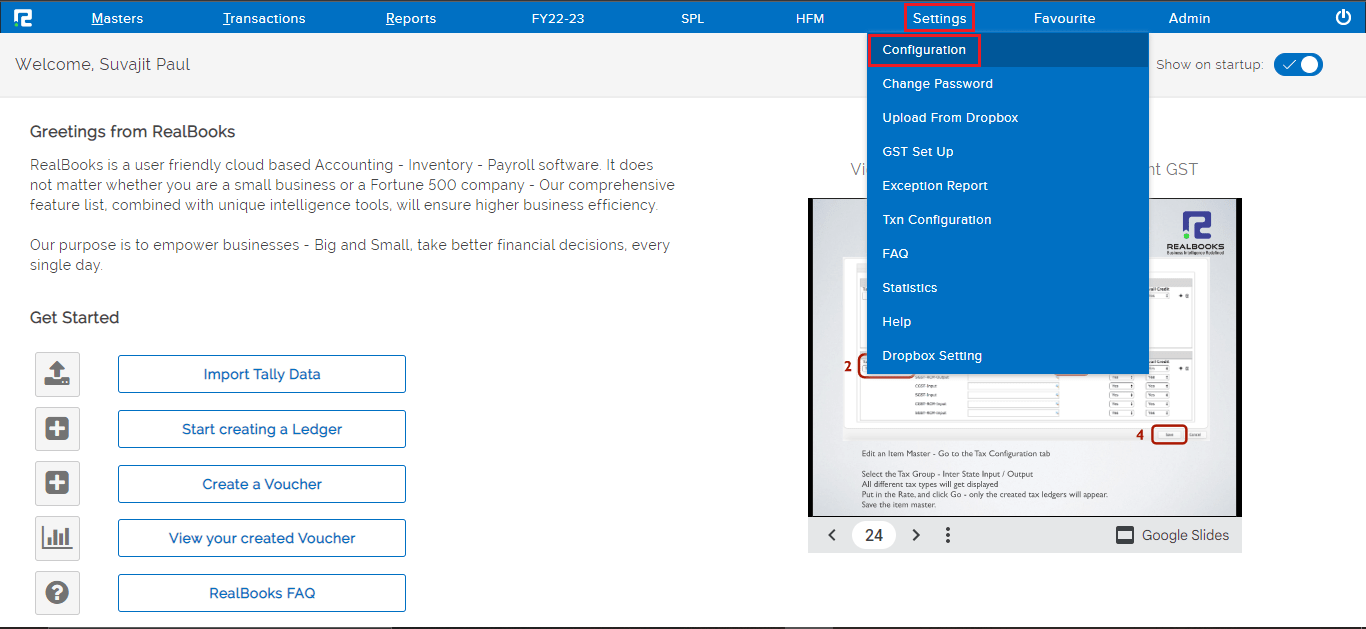
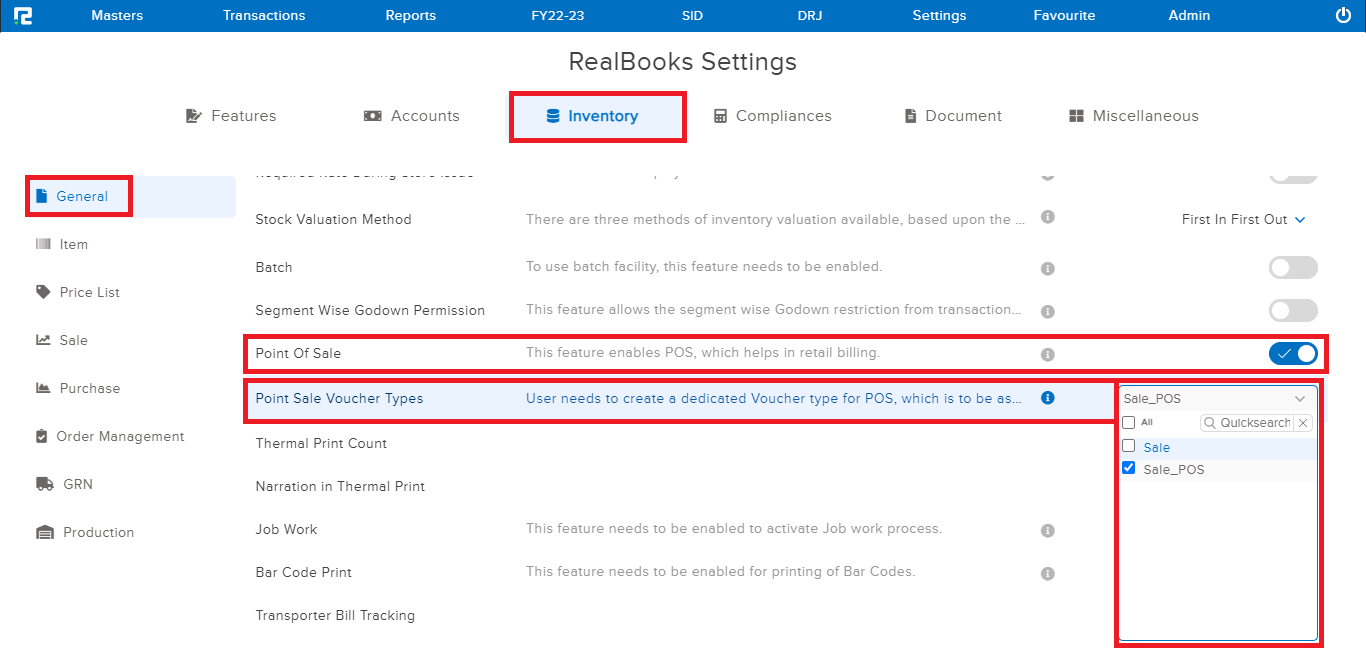
STEP 1: Go to Settings⇒ Configuration⇒ Inventory⇒ Enable Point Of Sale
STEP 2: After enabling the feature, select the Point Sale voucher type from the drop-down list.
How to Configure POS Voucher Parameters
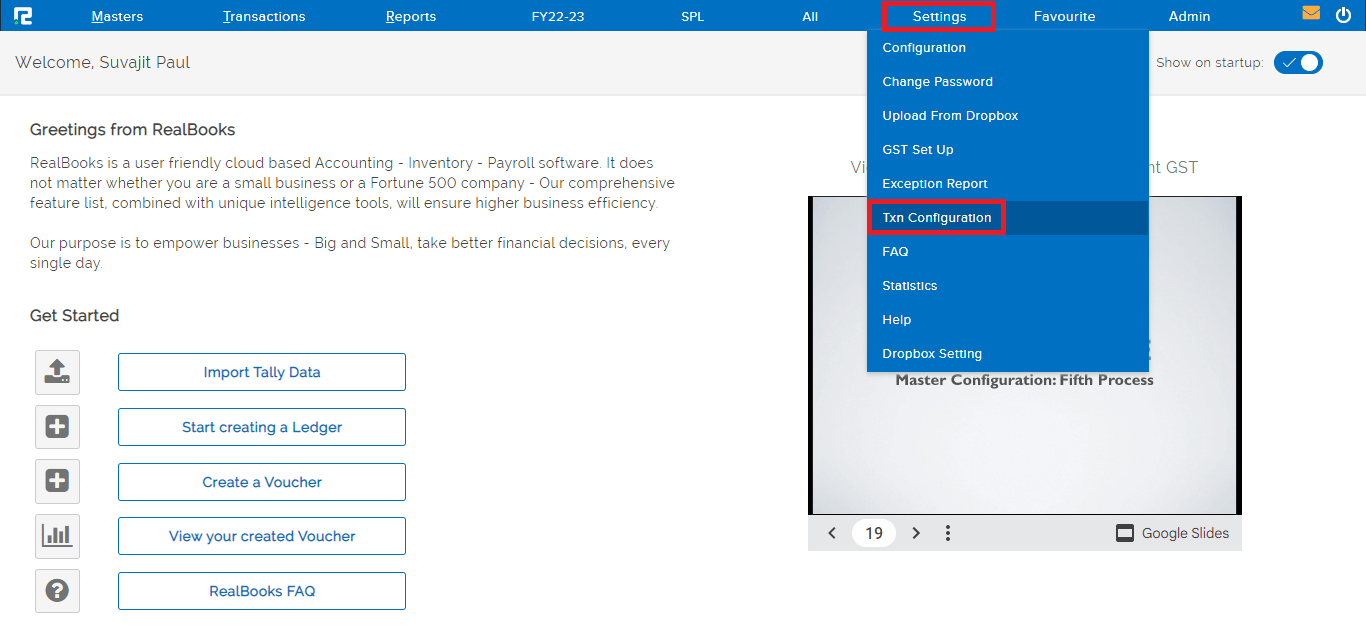
STEP 1: Go to Settings⇒ Txn Configuration
STEP 2: Go to POS⇒ select voucher type from the dropdown list⇒ search
STEP 3: Do the necessary mappings as per the given instructions to post POS post transactions.
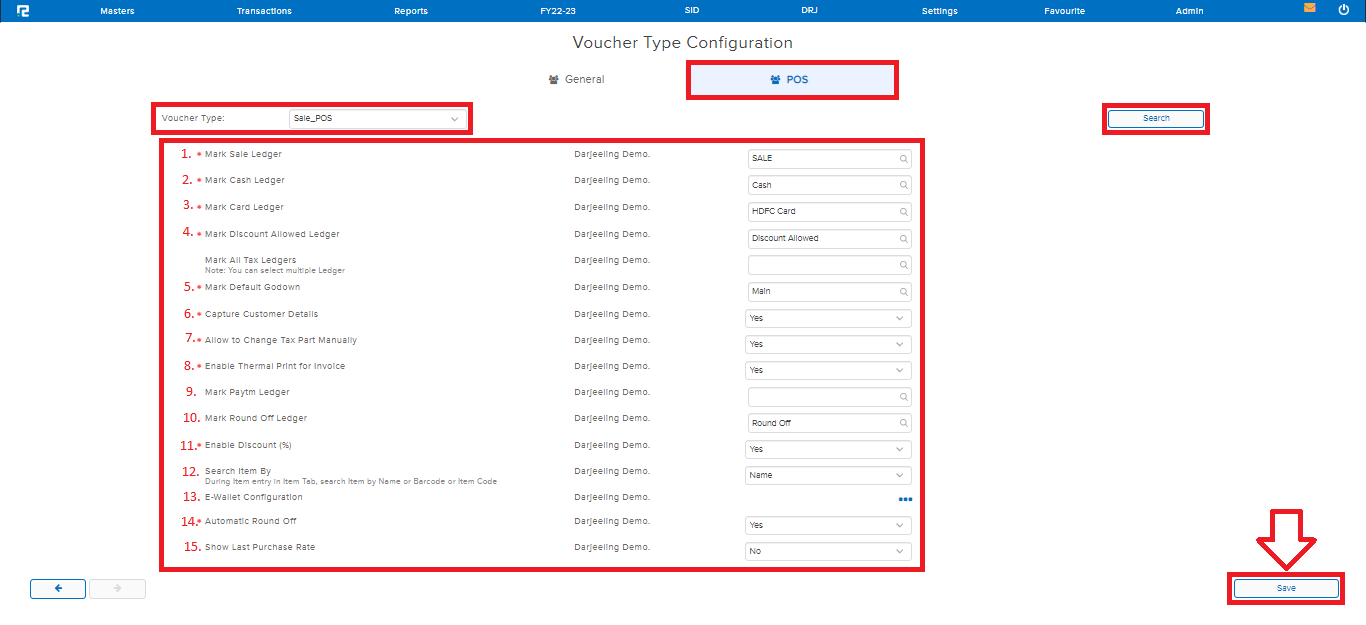
1. Mark sale ledger– Map the sale ledger
2. Mark cash ledger– Map the cash ledger
3. Mark card ledger– Map the card ledger
4. Mark discount ledger– Map the discount allowed ledger
5. Mark Default Godown– Map the godown for stock outflow.
6. Capture Customer Details– To capture customer details, mark it as Yes
7. Allow to Change Tax Part Manually– To modify the tax amount in POS screen, mark it as Yes.
8. Enable Thermal Print for Invoice– By default it is set as Yes, to disable thermal print select the option as No
Note: To increase the number of print count go to Settings⇒ Configuration⇒ Inventory⇒ Thermal Print Count
9. Mark Paytm Ledger– Map the Paytm ledger, if any.
10. Mark Round Off Ledger– Map the round off ledger
11. Enable Discount (%)– By default, the discount calculation is set in Percentage, to change it to amount, mark it as No.
Note: To enable item wise discount Go to Settings⇒ Configurations⇒ Inventory⇒ Sale⇒ Enable Discount Entry During Sale
12. Search Item By– Select between the 3 available options for searching the item.
13. E-Wallet Configuration– Map the E-wallet ledger, if any.
14. Automatic Round Off– This option helps in the auto-adjustment of Round Off value. By default, it is set as Yes, to disable the same, mark it as No.
15. Show Last Purchase Rate– To view the last purchase rate for the item, mark it as Yes.
How to Raise a POS Invoice
STEP 1: Go to Transactions⇒ Inventory ⇒ Sale Cycle ⇒Sale POS
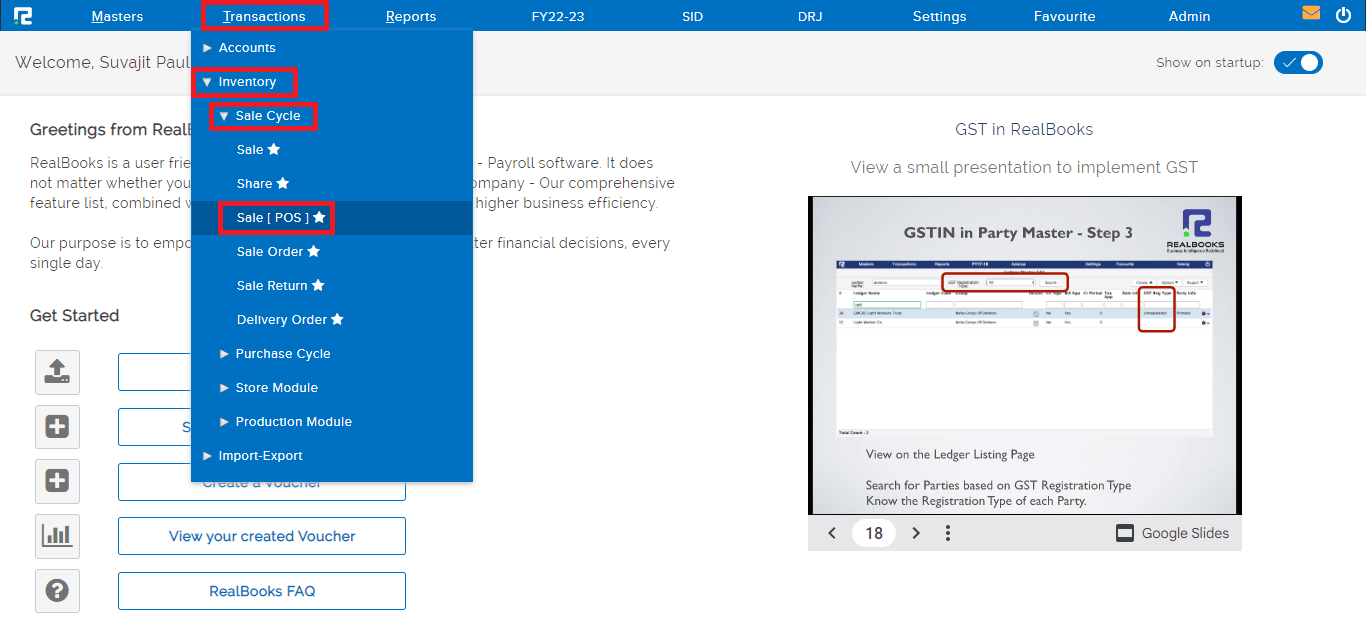
A sales POS transaction page will open-
STEP 2: Fill in the following details:

1. Voucher type- Select the appropriate voucher type from the dropdown list displayed.
2. Voucher number- Based on the numbering pattern set in voucher master, this number will be displayed.
3. GST type- This is auto fetched based on company’s business place & party’s state.
4. Search type- User can choose any between the 3 available option for searching the item. 
a. By Name- This option can be used to search by item name.
b. By Barcode- This option can be used to scan & search by item barcode.
c. By Code- This option can be used to search by item code.
5. Date- Set the voucher date.
6. Debit account- Select the mode via which the sale is taking place.
Note: Selected option is treated as the ledger for Debit Side of the transaction.

a. Cash- When it is a cash sale.
b. Card- When payment is done via the card.
c. Party name- When the sale is made on credit, select this option, and search the customer ledger in the party name field.
7. Item search– Search the item name/code/barcode based on the search type set in the previous field.
8. Quantity– Enter the sale quantity.
9. Rate– Enter the per unit rate of the item.
10. Amount– The amount is the value derived by multiplying Qty with Rate.
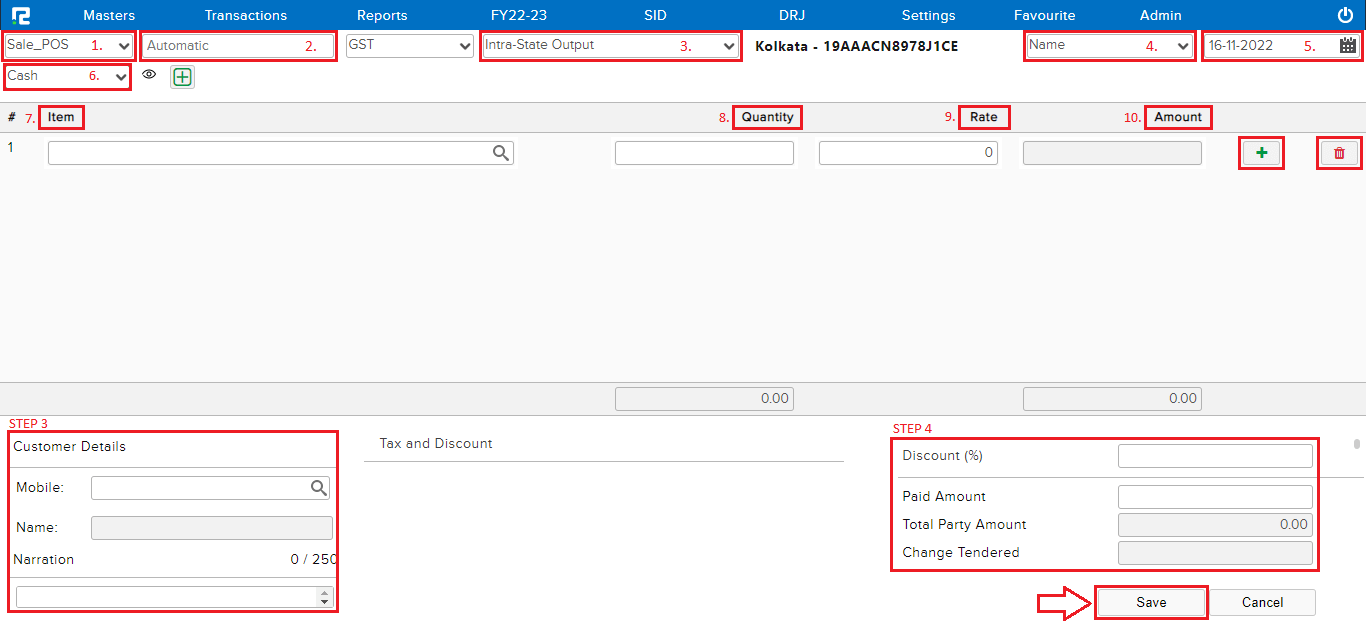
To insert multiple items, click on the “+” icon available at the end of each item row, and to delete, click on the “Trash bin” icon.
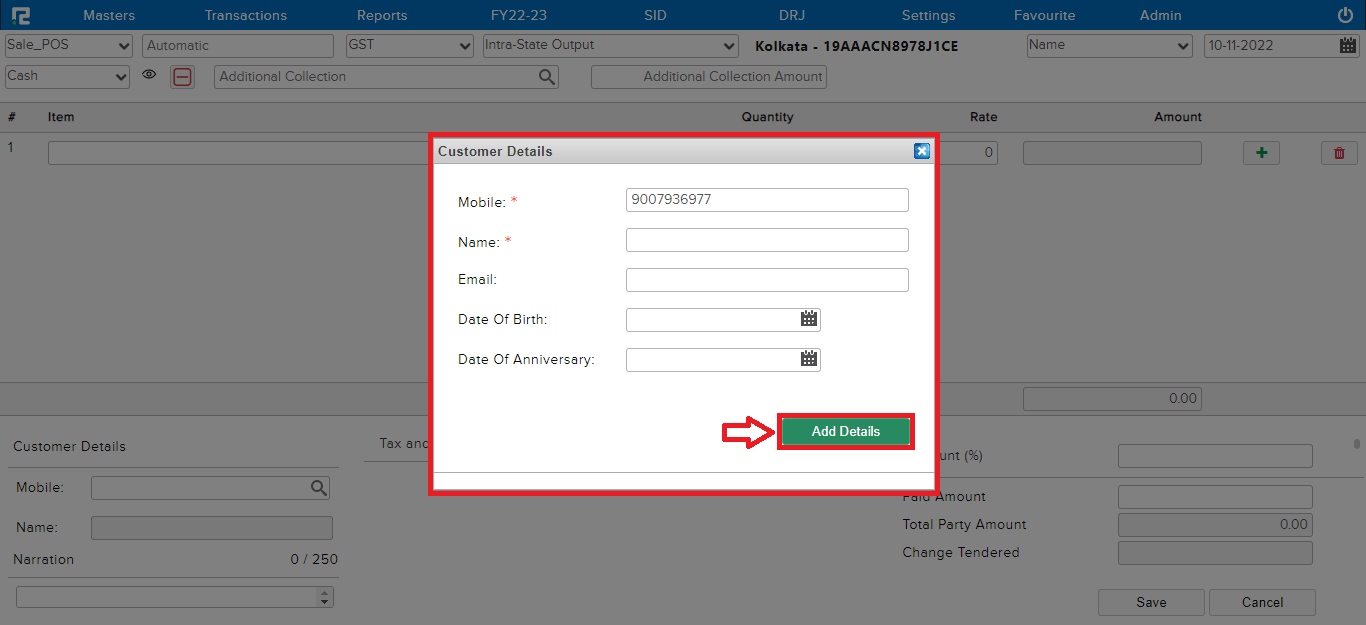
STEP 3: Fill in the customer details-
Enter the customer’s Contact number and click on Add New Customer. Enter the customer’s name, email, date of birth, and anniversary date, if any. Click on Add Details and it will be stored in the system.
Note: For any returning customer the details are not required to be entered again. Simply enter their contact number and select the contact shown in the dropdown.
Customer Details section is optional and can be skipped entirely if not required.
Under the tax and discount column, it will show all the taxes calculated on the goods.
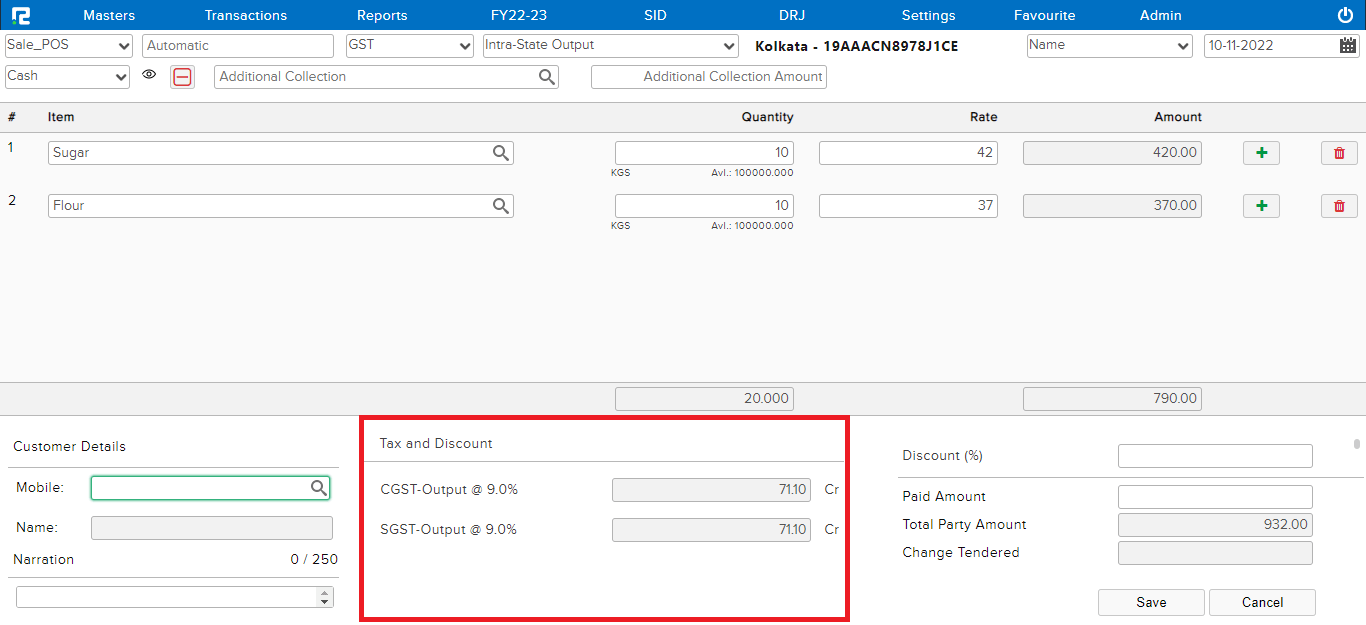
STEP 4: There is a paid amount field at the bottom right, enter the amount paid and click on the Save button.
STEP 5: A thermal invoice will be displayed with all the information.
Note: This needs to be configured under Settings⇒ Txn Configuration⇒ POS⇒ Search POS Voucher⇒ Enable Thermal Print for Invoice
How to View POS Report
STEP 1: Go to Reports⇒ Inventory⇒ Sale Cycle⇒ Sale Register
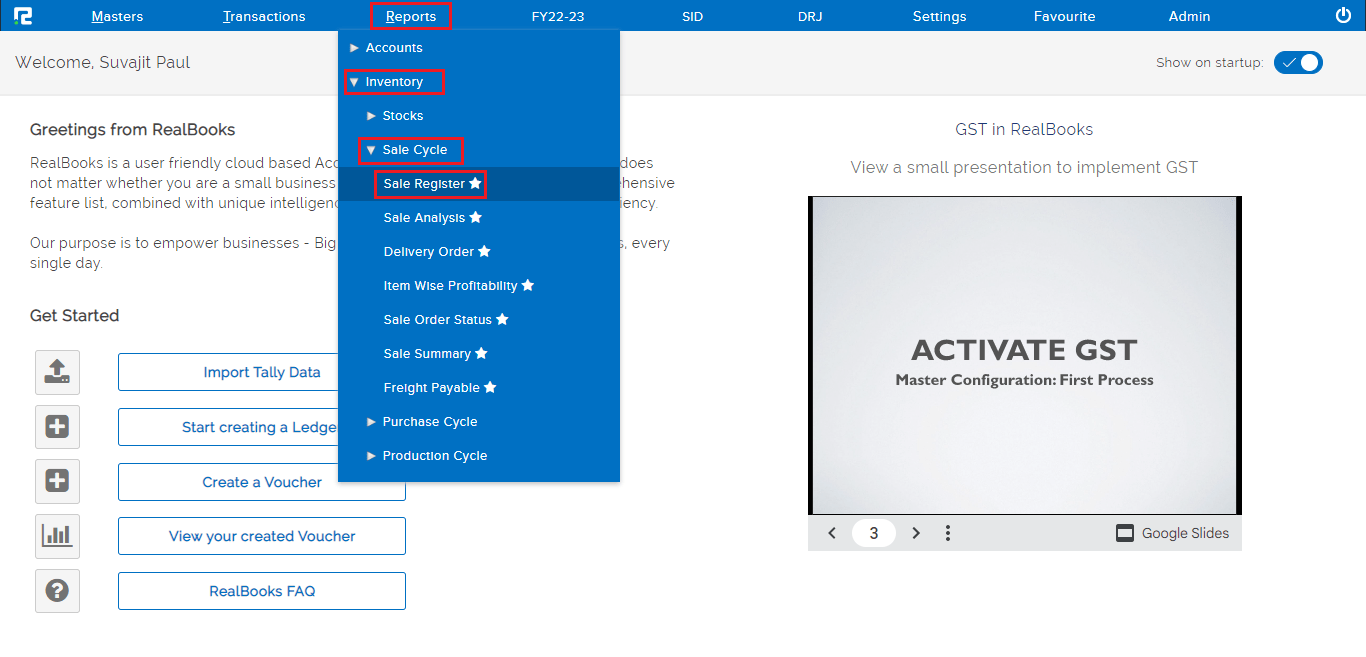
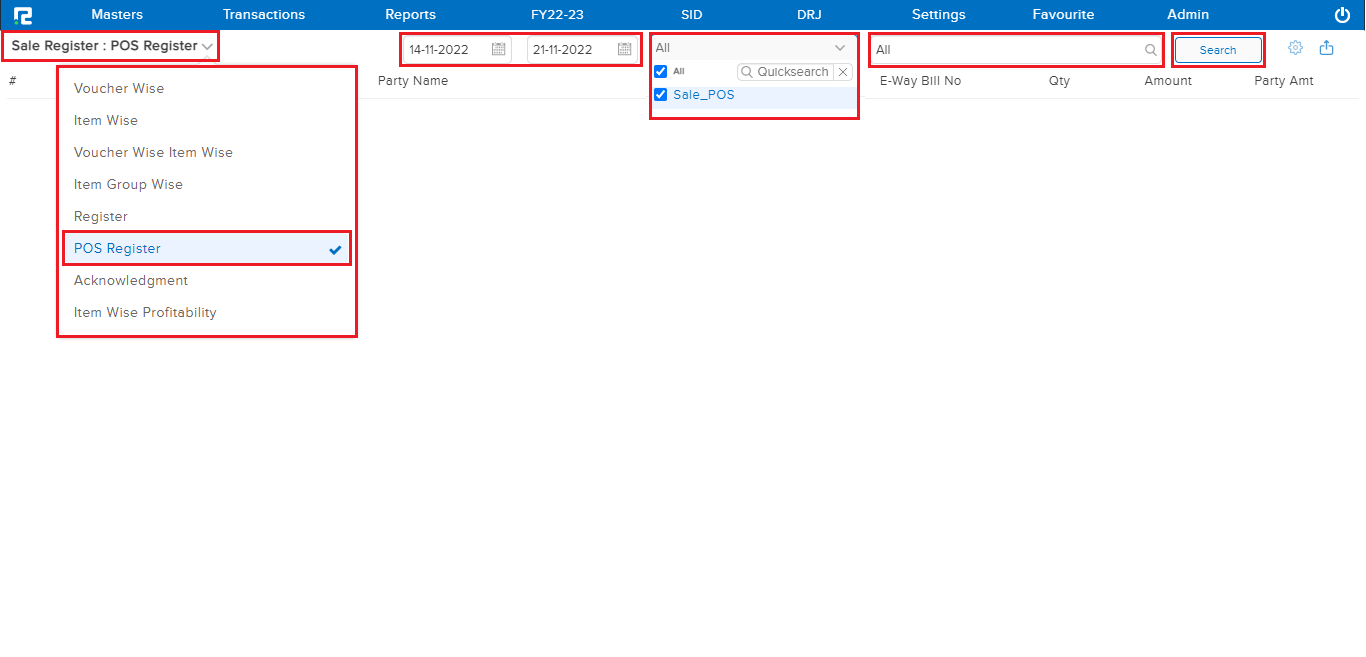
STEP 2: Select POS Register from Sale Register Variation⇒ Set date range⇒ Select Voucher Type⇒ Select Party Ledger⇒ Search
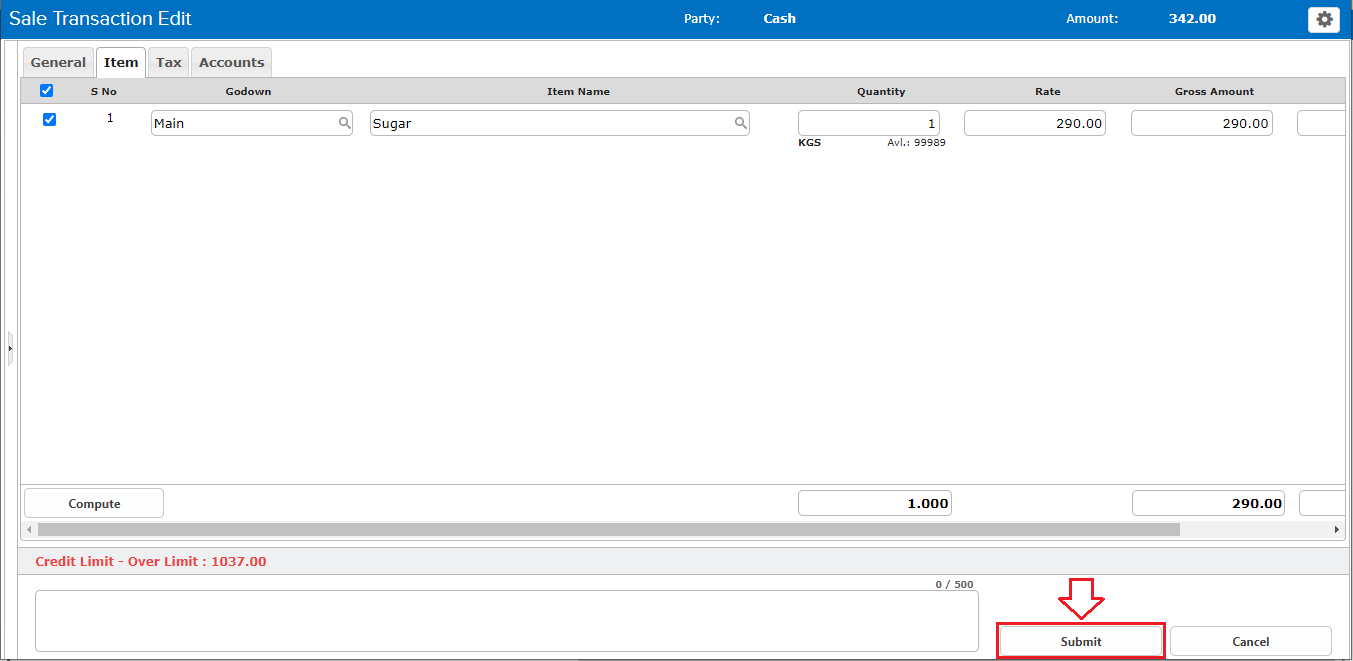
How to Edit a POS Entry
STEP 1: Click on the GEAR icon available on the right side of the entry and click on EDIT or press ENTER.
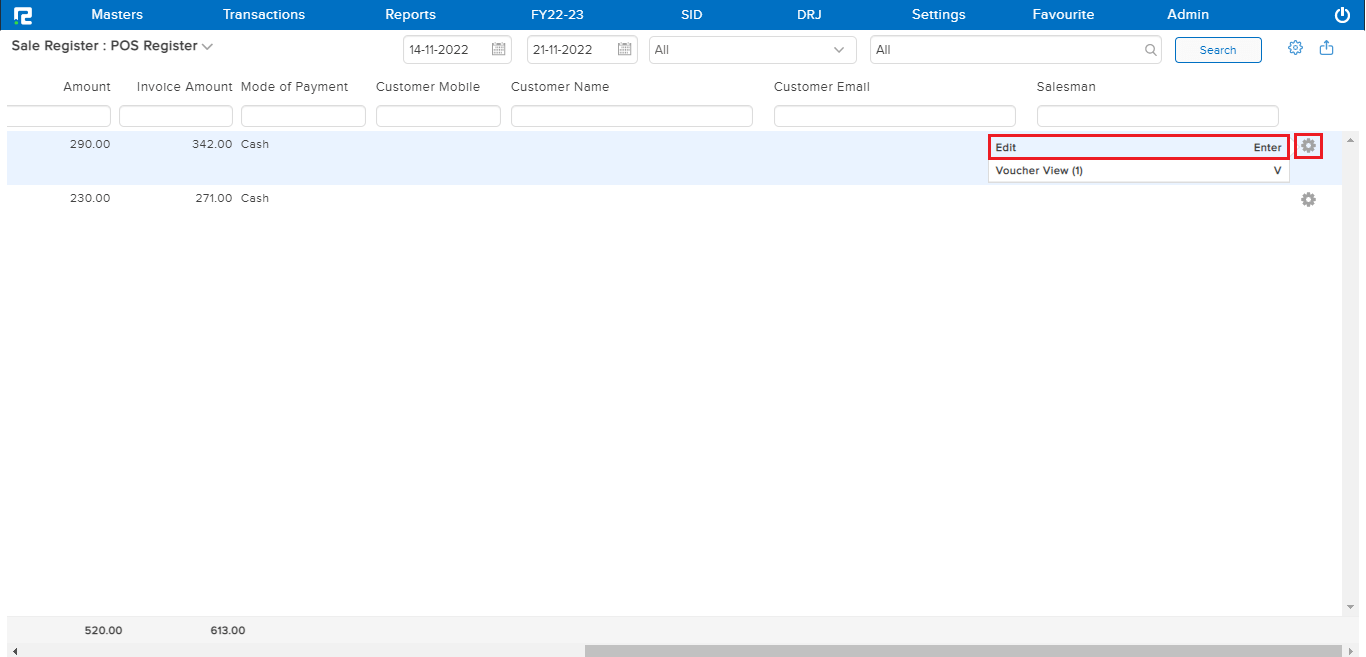
STEP 2: Once the POS Entry is modified, CLICK on SUBMIT to save the entry.
How to View Voucher Details
Click on the GEAR icon available on the right side of the entry and click on VOUCHER VIEW or press V.
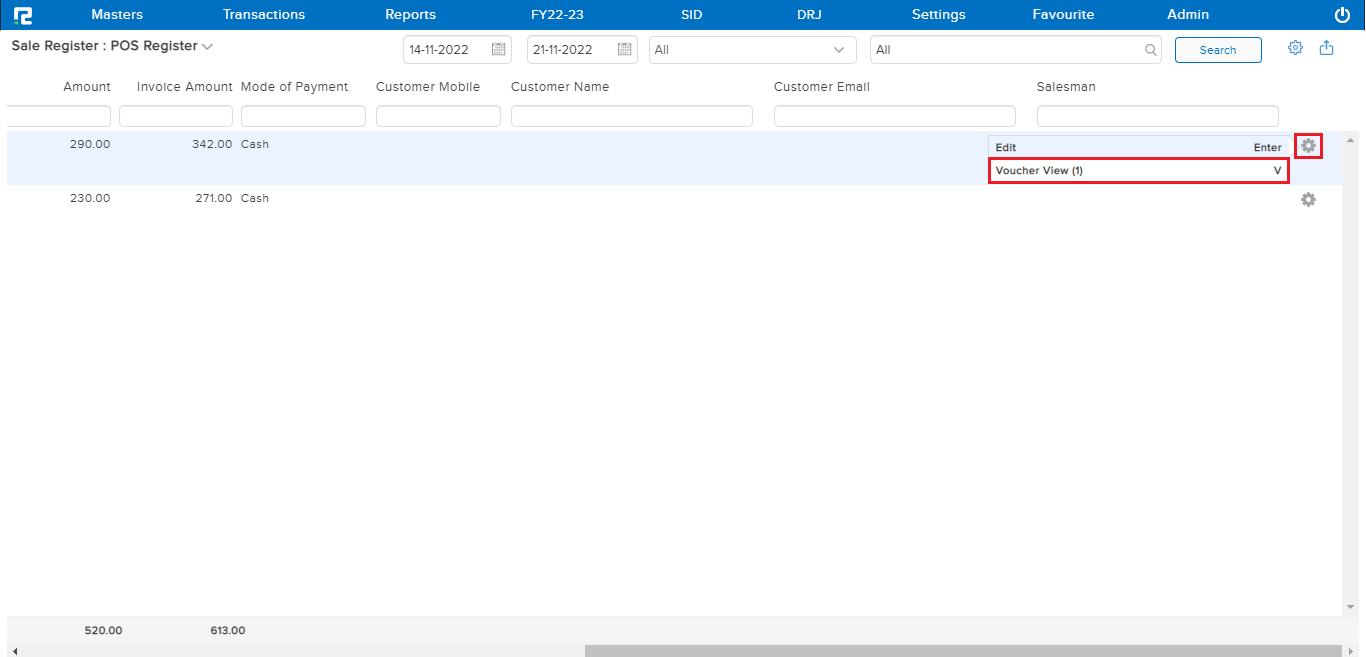
For more filters, click on the GEAR icon available on the top right side of the page.
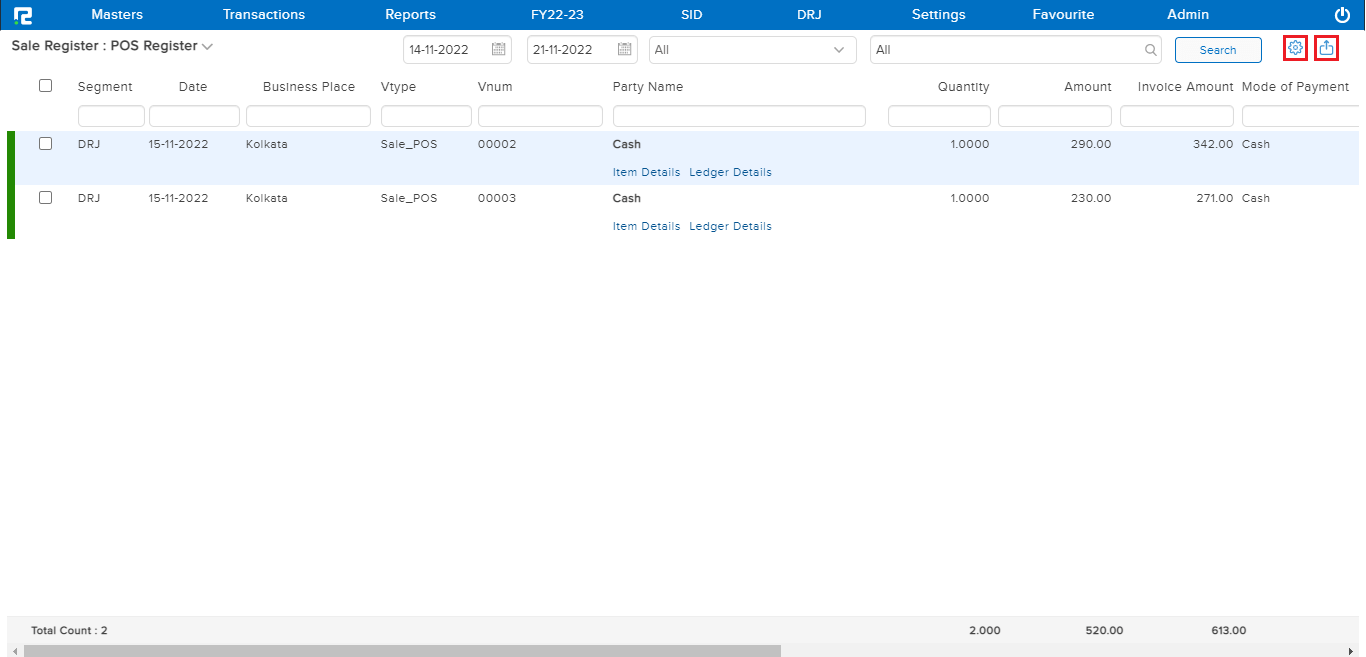
To export reports, click on the EXPORT Icon available on the top right side of the entry and select the desired format.
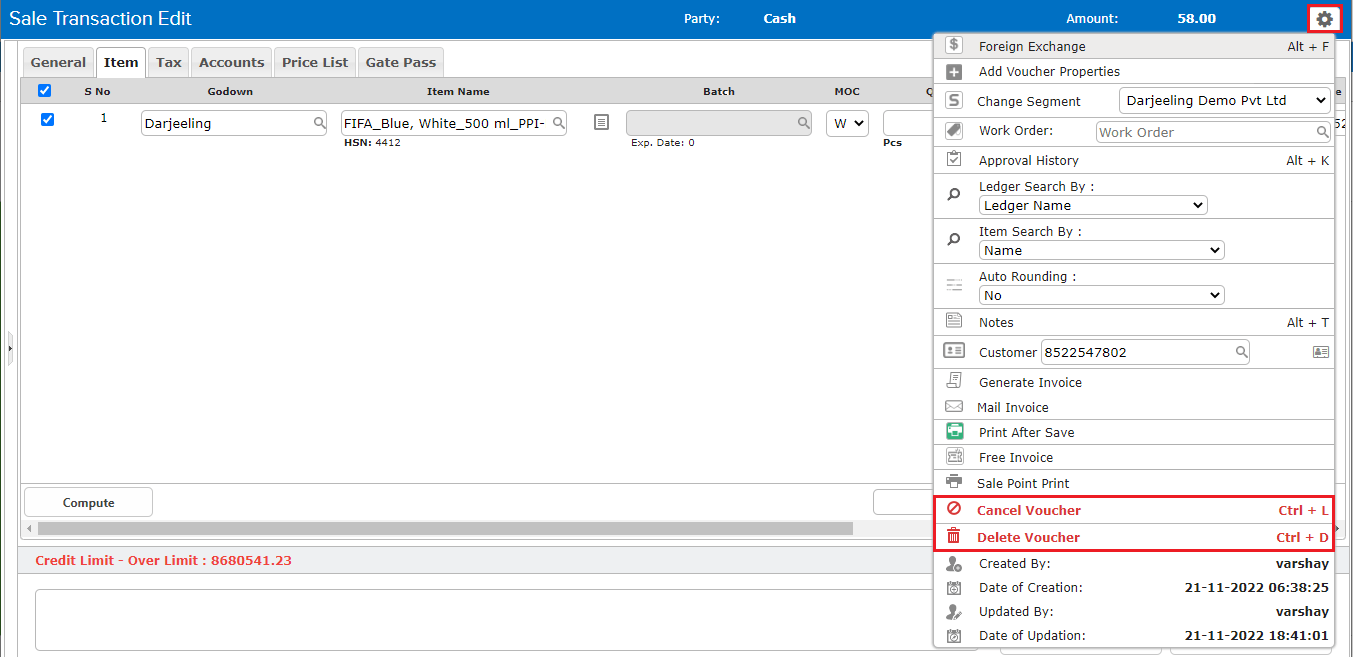
How to Delete or Cancel an Entry
DELETE/CANCEL– To delete/cancel an entry, open the entry in edit mode, then go to the Settings icon on the right-hand side of the page. From the dropdown menu select the cancel/delete voucher as required, enter the reason for cancellation/deletion, and then click on cancel/delete.